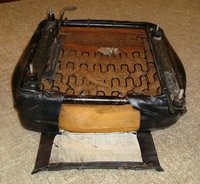
In response to questions and requests on how to recover Z car seats I thought I would put together a post outlining my experience when recovering the driver seat in my ’72 240z. The job took me around 8 hours from start to finish but I worked in 1 or 2 hour increments. Stretching and fitting the covers is the hardest part and will give your hands, arms, and shoulders a workout. This is a job that anyone can do and is a worthwhile job to tackle yourself as many shops can charge $300 - $500 in labor to recover a single seat. The key is to take your time and walk away if you get frustrated or tired and constantly check your work to see how everything is fitting. If you are not happy with how things are looking, stop where you at and see what you need to do to correct the issue. *Please note, I am not an expert or professional of any kind and this is the first seat I have ever recovered. This is written as a guide and your situation may be different. I am not responsible for any damage or injuries caused by someone taking on this project. If you doubt your skills or capabilities in doing this job please contact a professional.
Materials
Synthetic Leather Seat Covers from Ebay - $200 shipped to my door
New Seat Foam Sets from Classic Datsun - $310 shipped to my door
100pk of hog rings from Amazon - $7 shipped to my door
Semi-gloss black Krylon spray paint - $6 at parts store
15ft roll 1/4 inch thick foam - $15 at local fabric store
3M Heavy Duty Spray Adhesive - $8 from Home Depot
Tools
KD-Tools Hog Ring Pliers 2pk, straight and 45 degree from Amazon - $36.81 (These are totally worth the money and very well made)
Needle Nose Pliers
Traditional Pliers
Channel Lock Pliers
Heavy duty wire cutters
Assortment of flat head screw drivers
Assortment of Phillips head screw drivers
Small hammer
Socket Set
Assortment of medium sized clamps
Utility knife with new razor blade
Pneumatic rotary tool with fine wire brush attachment
Super Clean degreaser
Paper towels
Vacuum cleaner/Shop Vac
Remove the seats from your car and move to a location that gives you plenty of space to work and offers some protection to the surface you will be working on since the seats have studs on the bottom. My living room with its plush carpet, TV, and air conditioning was the best spot for me. Assess the seat and if anything broken. If it is make appropriate plans to repair the broken parts. As you can see my seats were in a pretty sad state but were complete and functional. The foam had collapsed in the bottom cushion causing you to instantly sink about 6” or more once you sat in the seat. I could tell by the cover the seat had been recovered before due to the lack of vent holes and it did not match the passenger seat.


Disassemble the seat by tilting the top cushion all the way forward. This will take some of the pressure off the bolts as you remove them since the right hinge is spring loaded.

Take some time to inspect everything as you go along. It is also a good idea to take notes or pictures just in case you do not remember how everything goes back together. My seat was shedding its potato sack material in between the springs but for the most part all the hardware looked good.


I started by disassembling the bottom cushion first. First you will need to slowly pry up the pointed tangs at the back of the cushion with a flat screw driver. This will reveal some more tangs that it covers up. Then gently pry up all the tangs around the perimeter of the cushion, pull the material up from around the tangs, and lift the seat and spring assembly out of the cushion. Inside the edge of the cover is a thick wire. Remove this wire if you can, you will need it later on.


Recommended Comments
There are no comments to display.
Create an account or sign in to comment
You need to be a member in order to leave a comment
Create an account
Sign up for a new account in our community. It's easy!
Register a new accountSign in
Already have an account? Sign in here.
Sign In Now