


Leaderboard
 Subscriber

Popular Content
Showing content with the highest reputation on 10/14/2017 in all areas
-
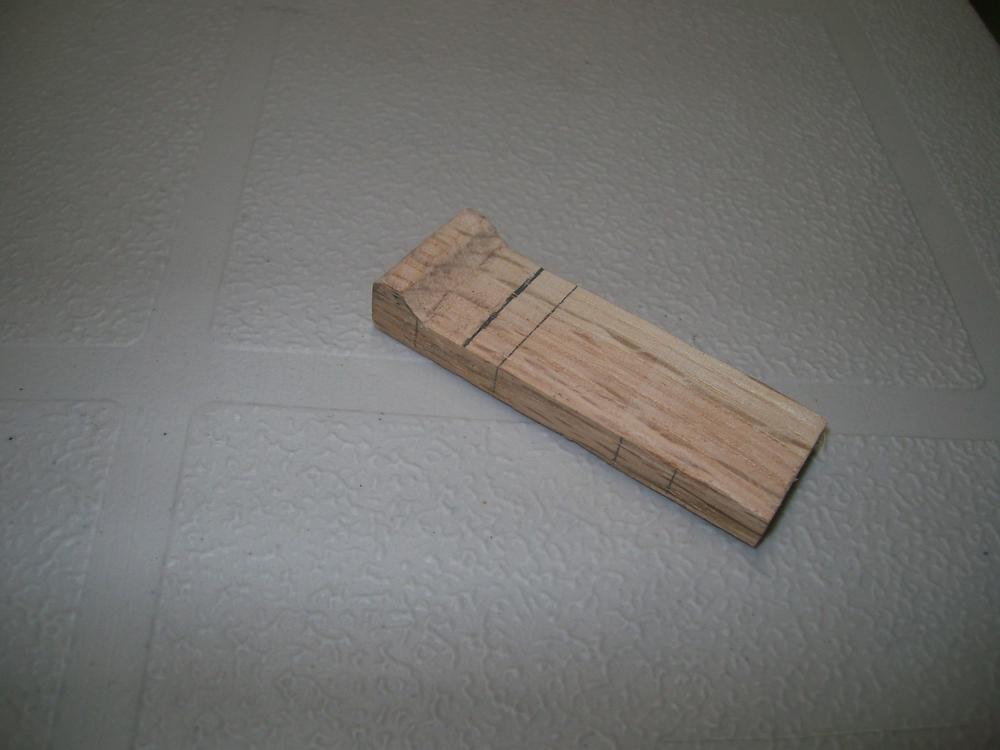
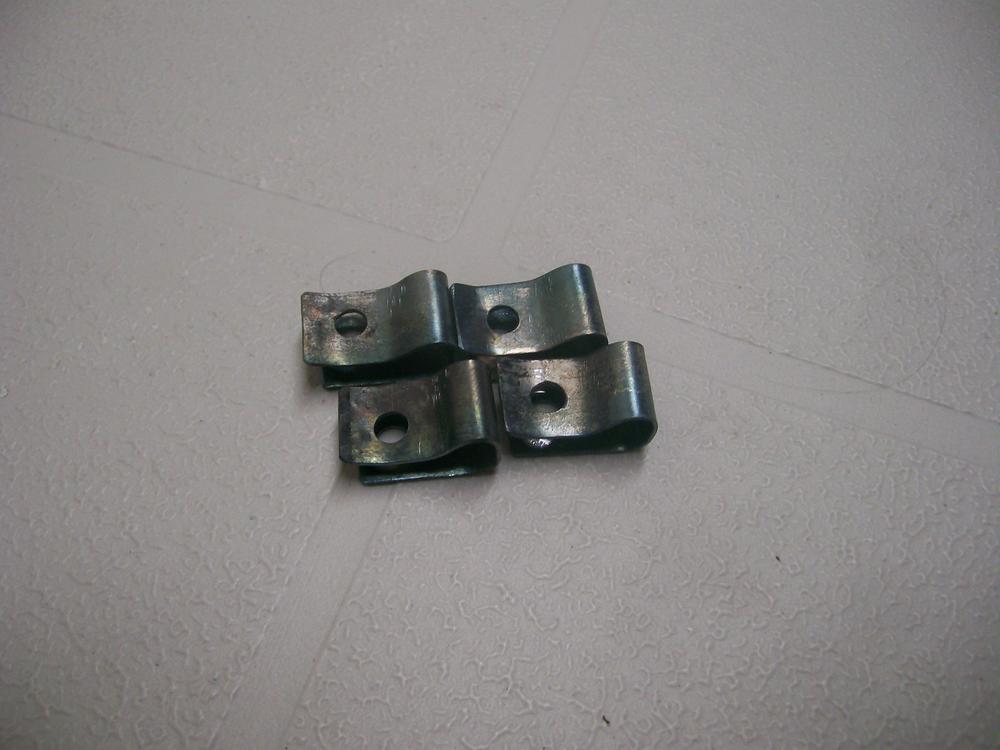
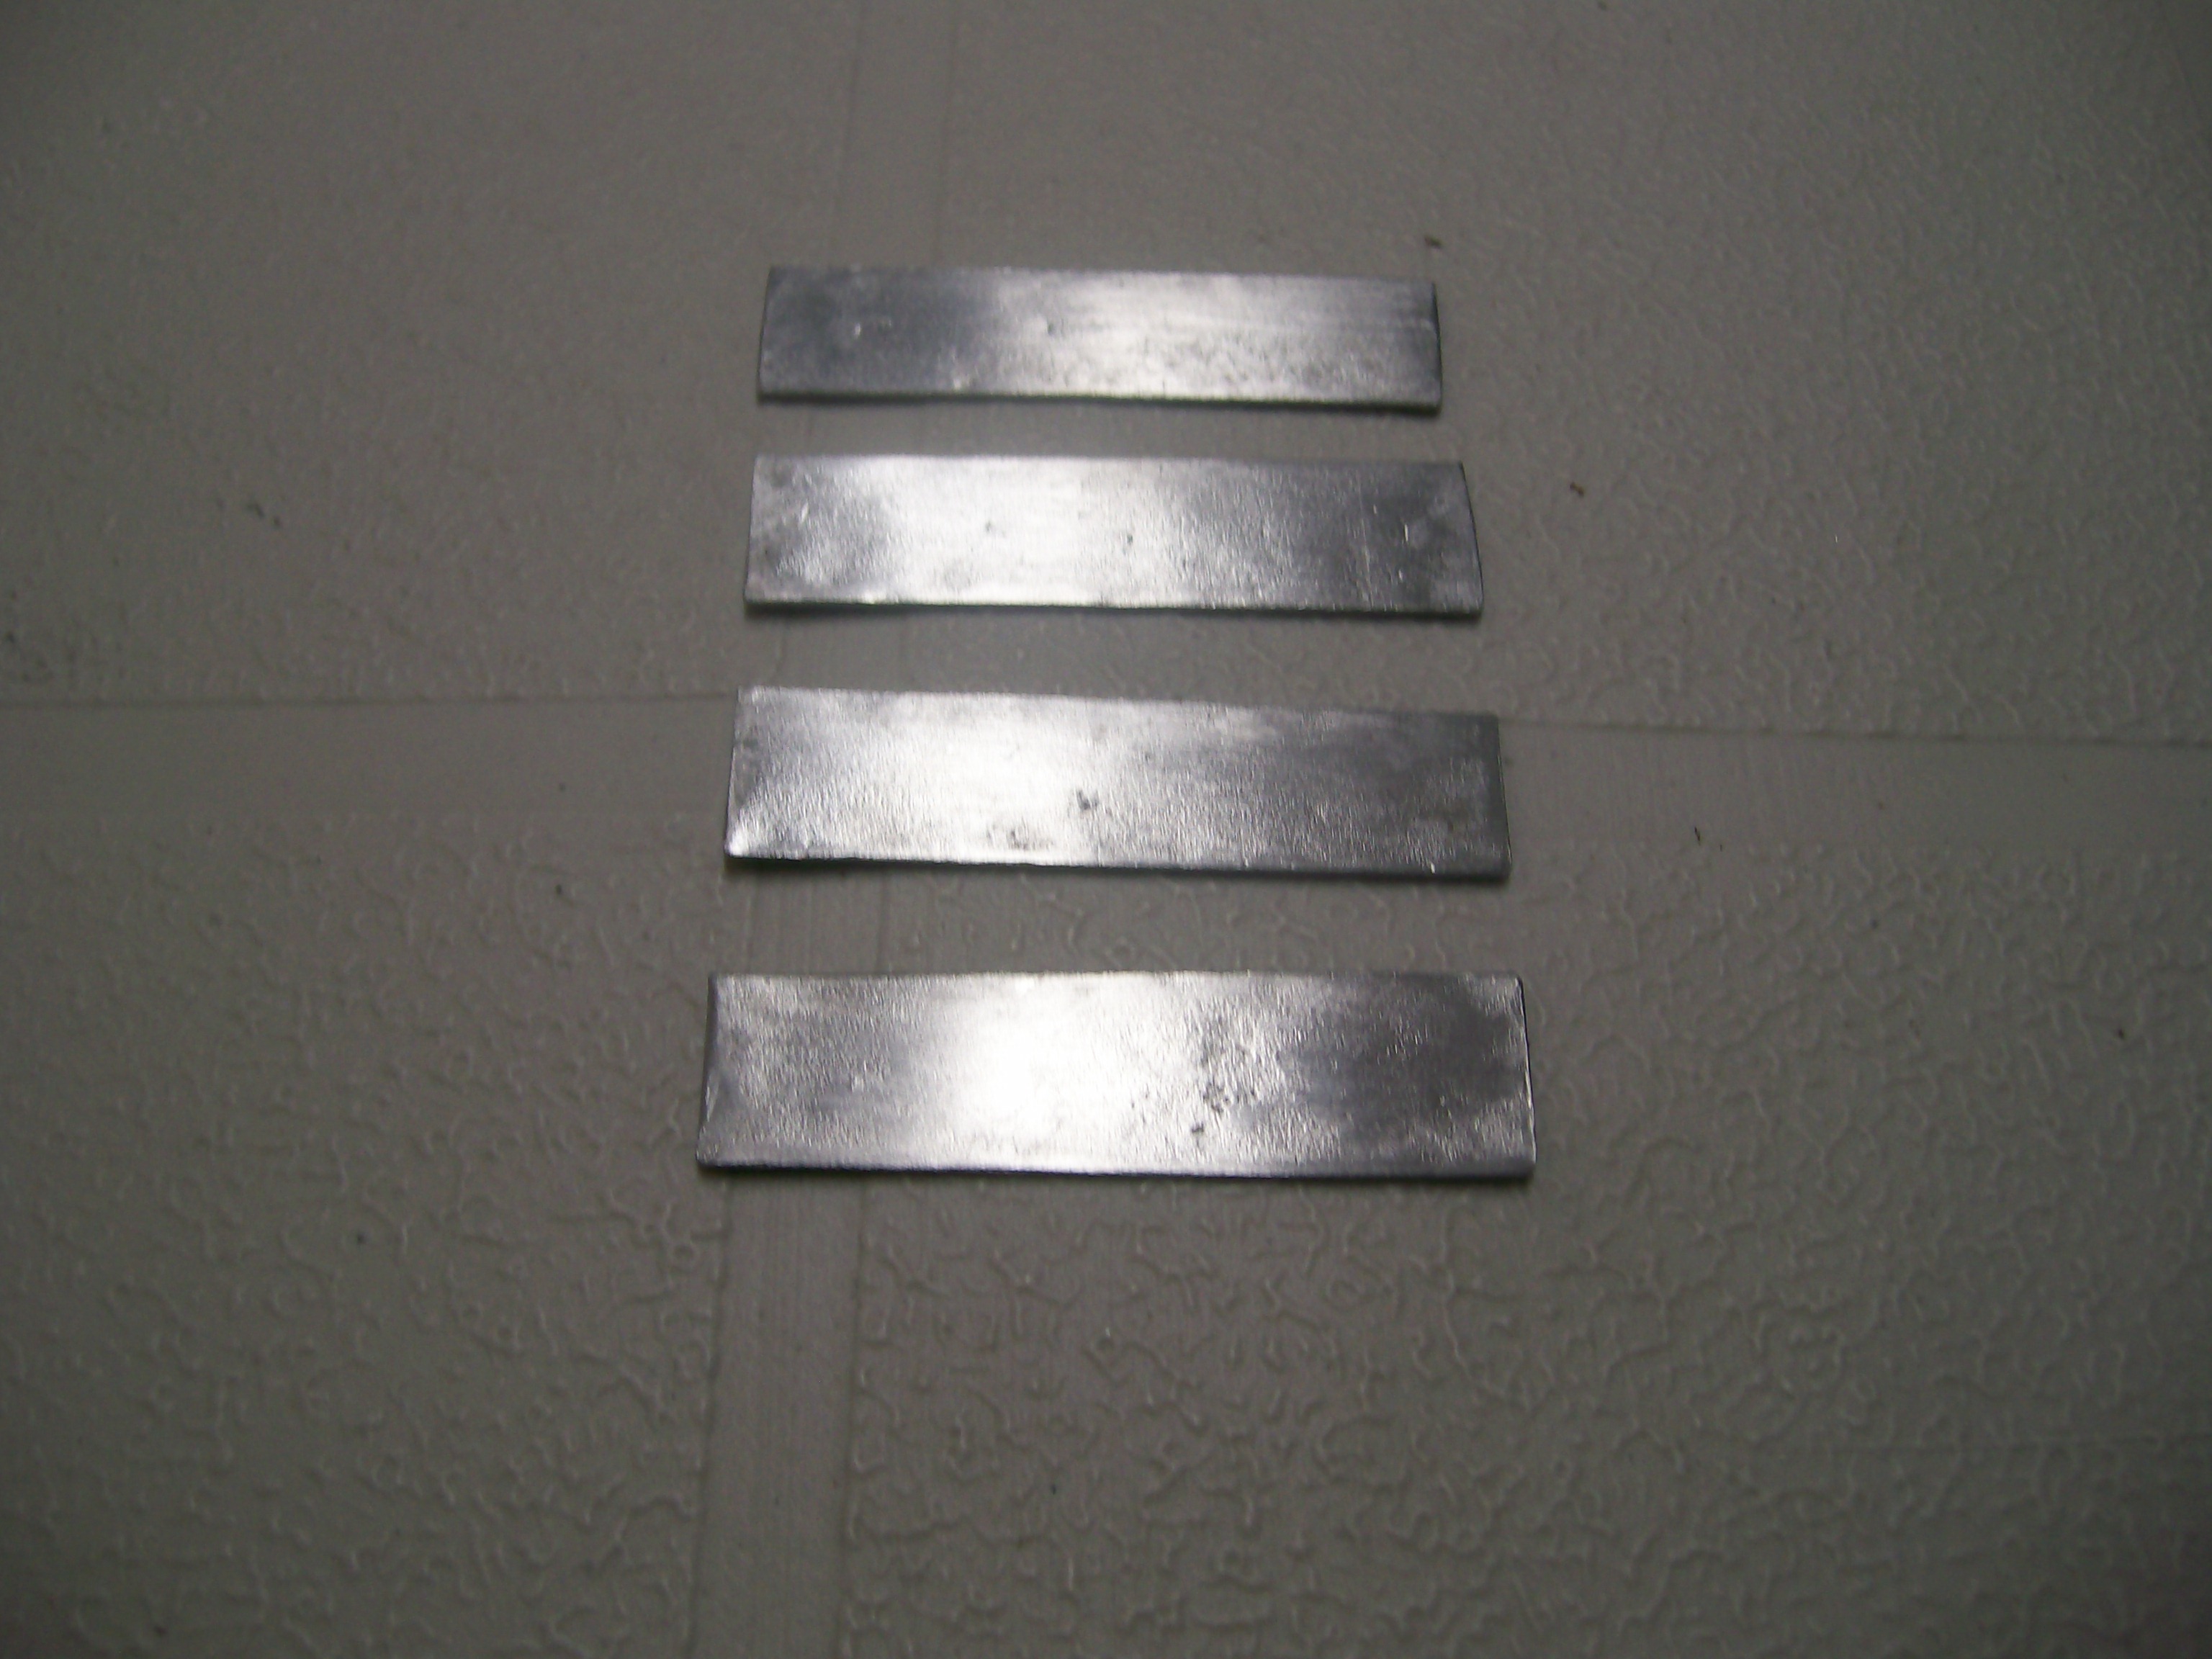
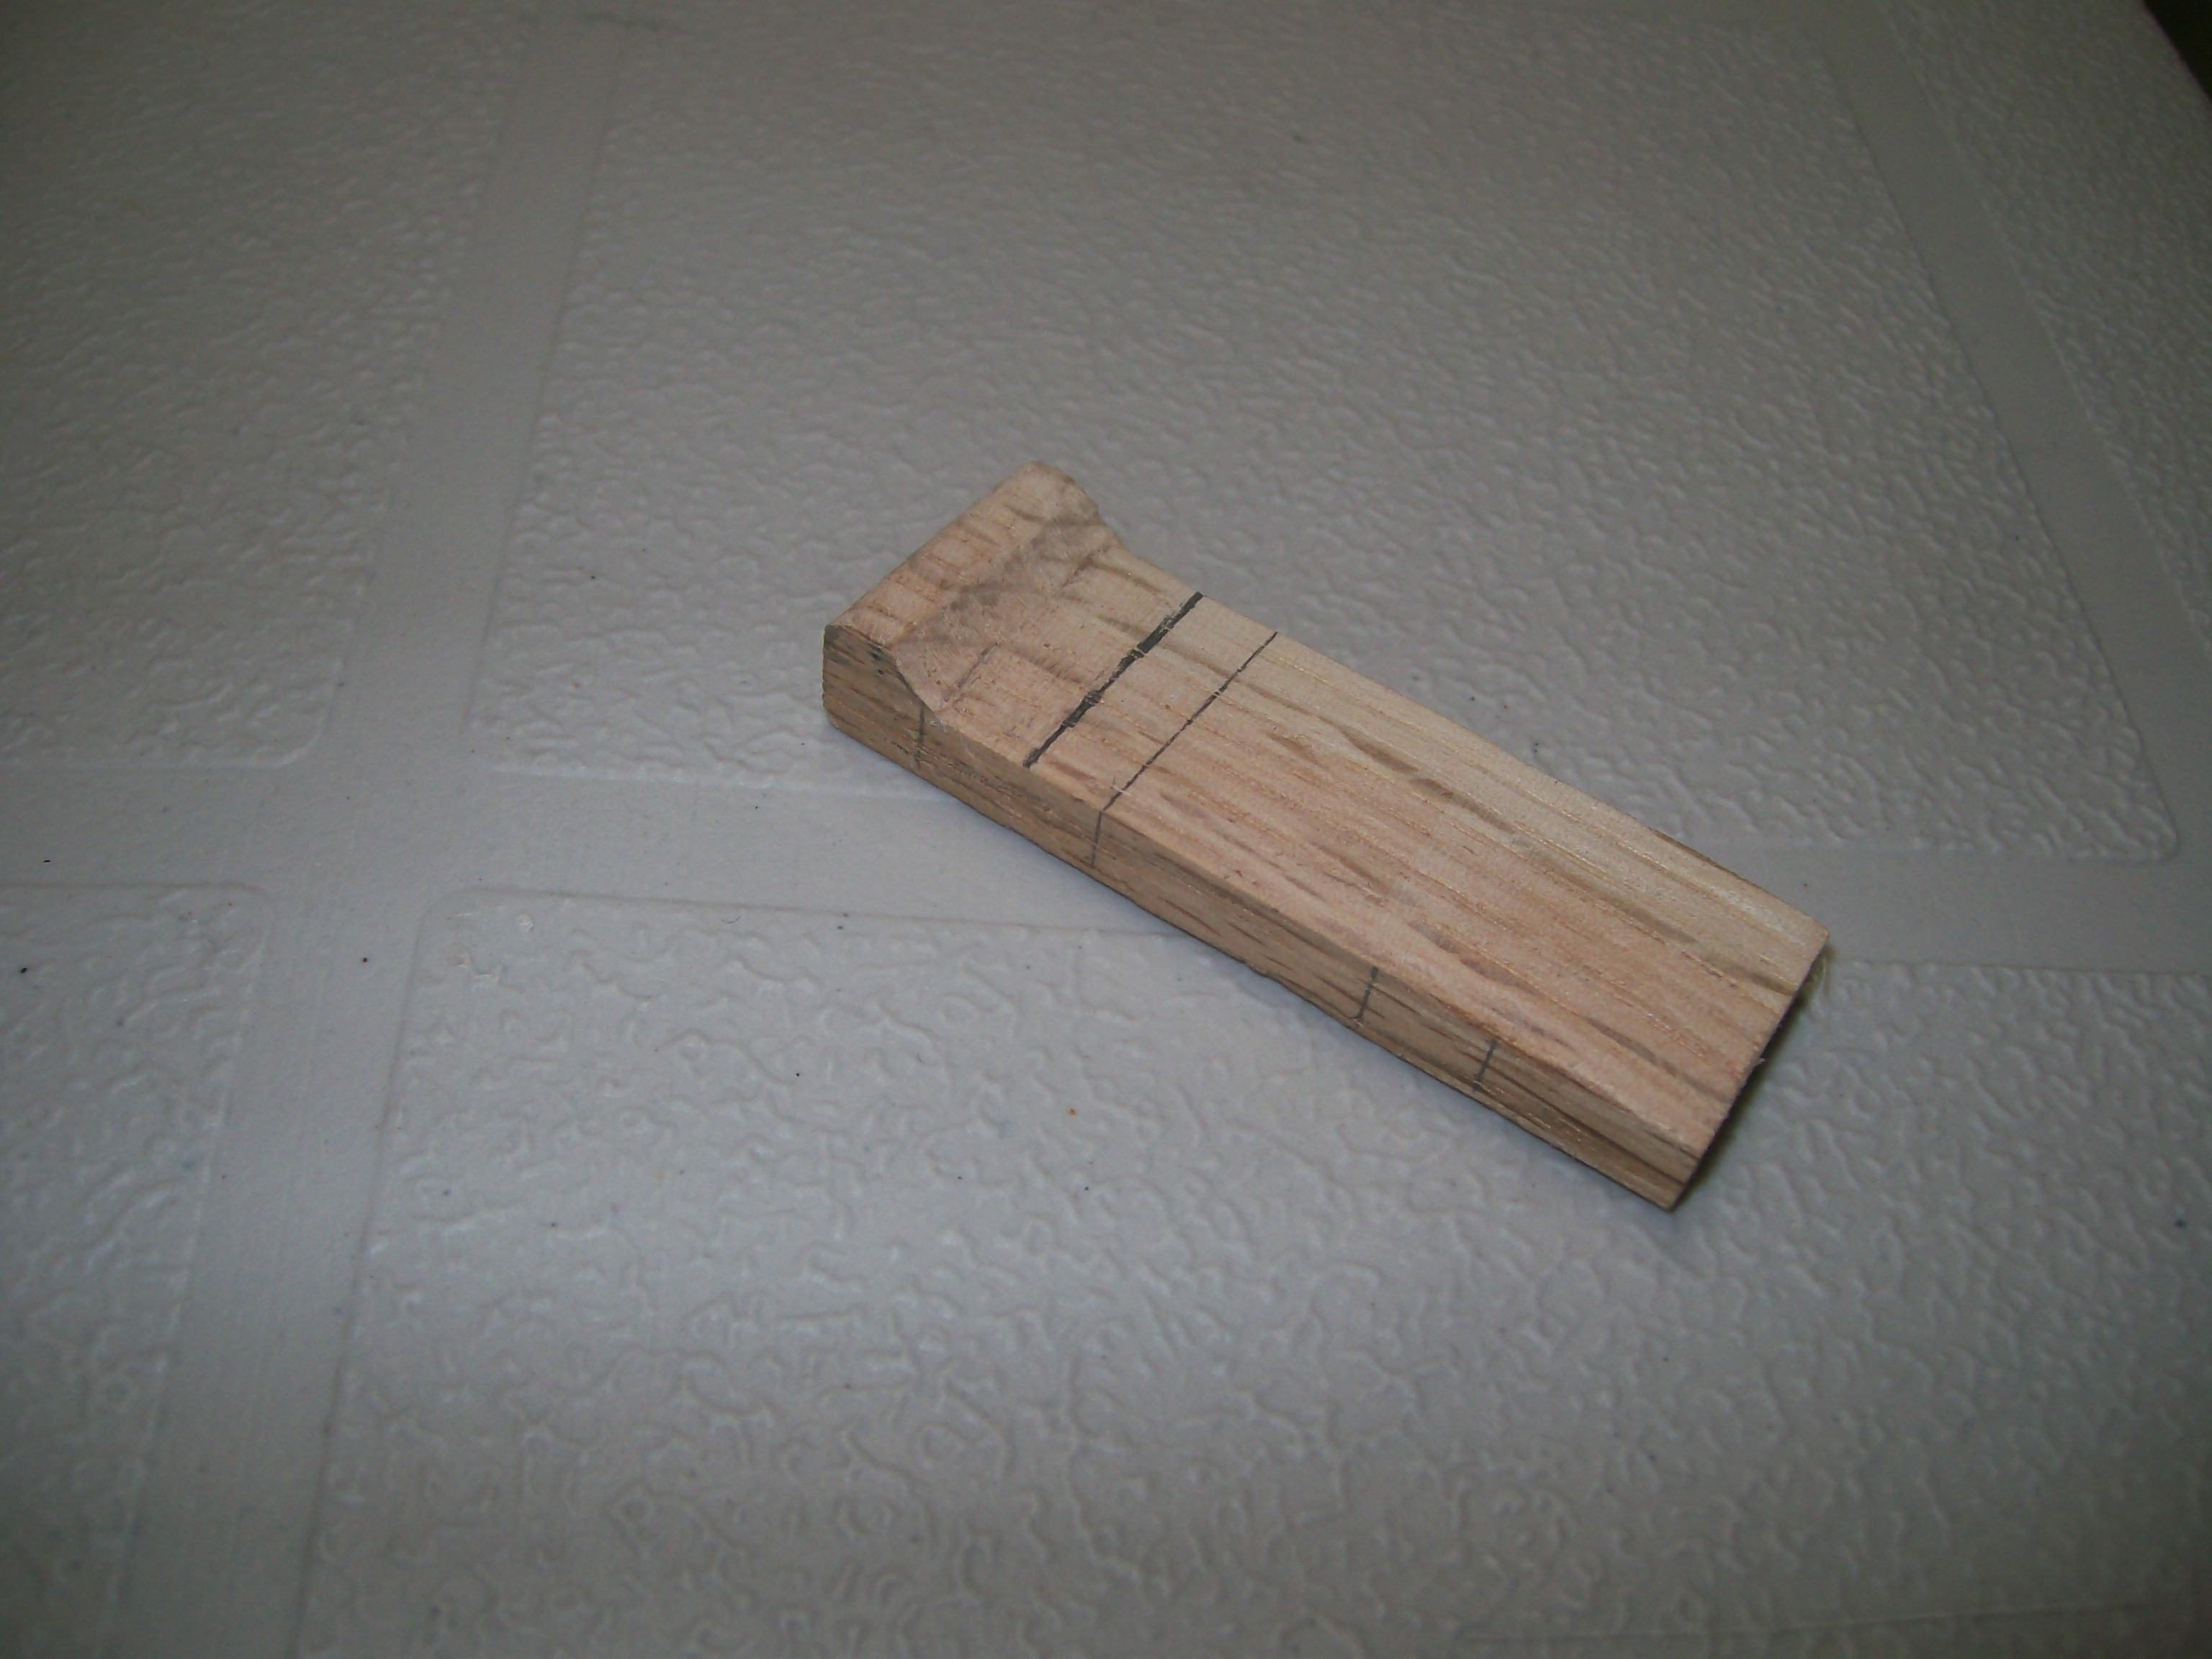
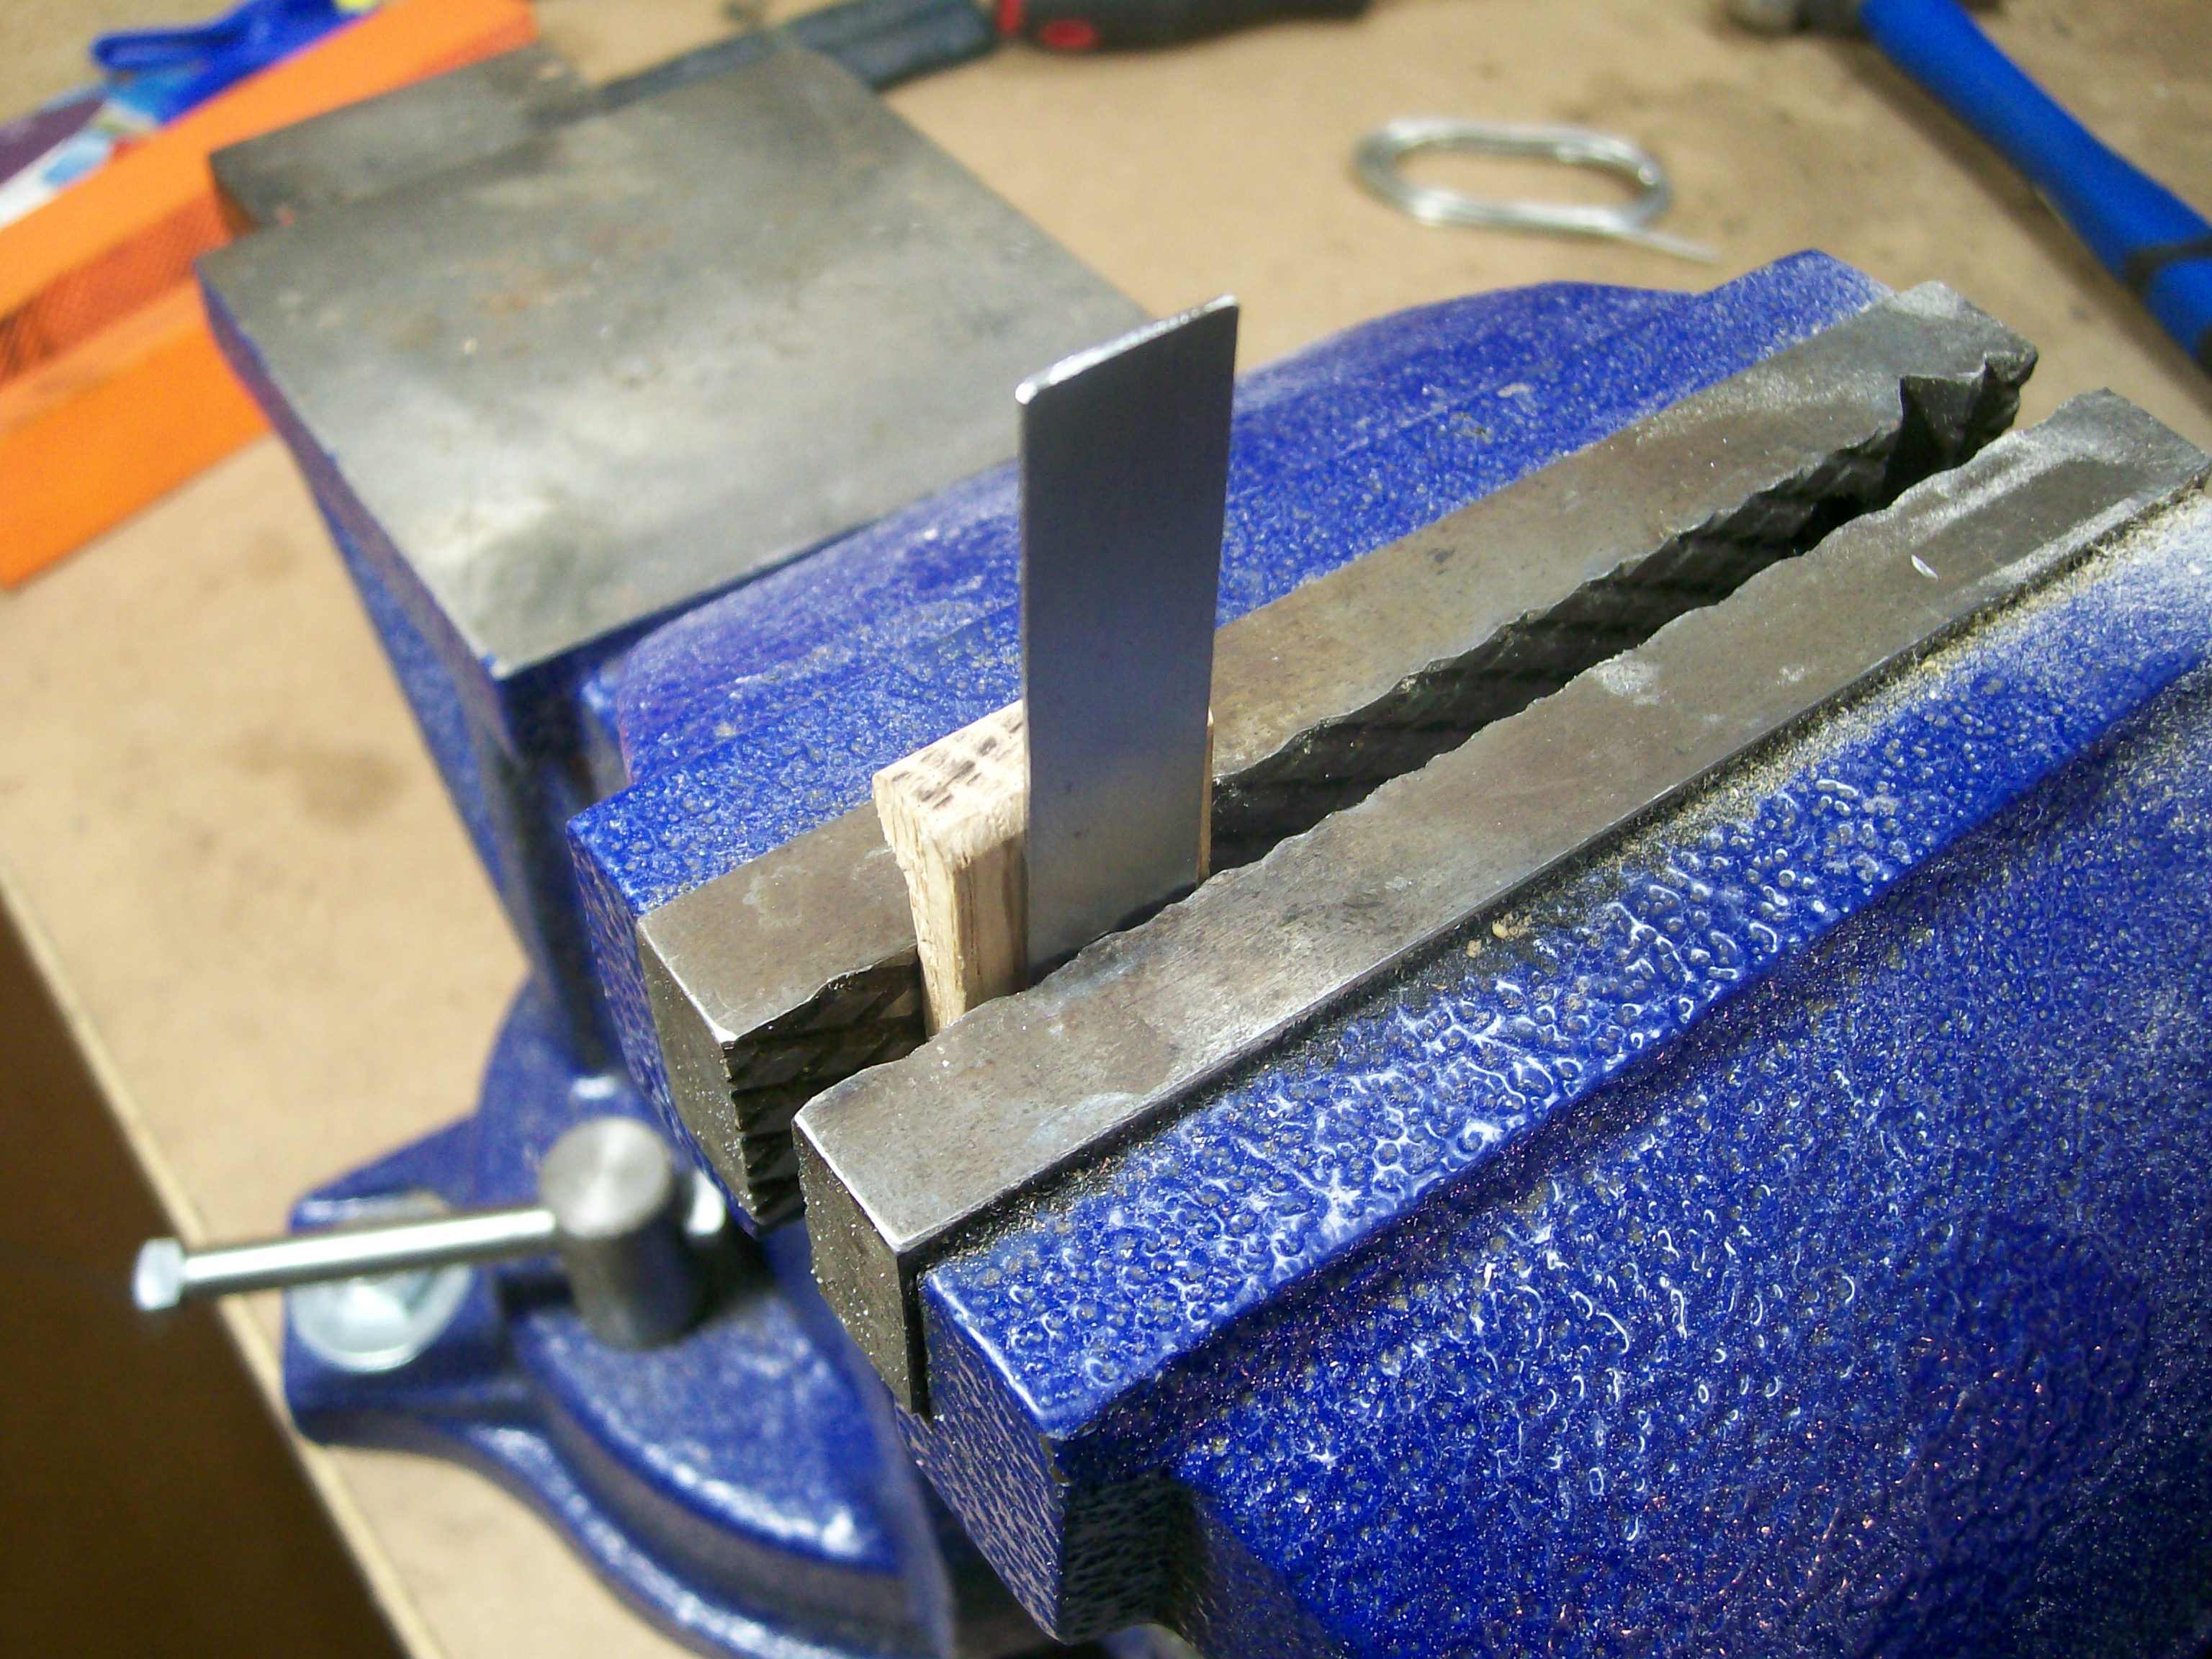
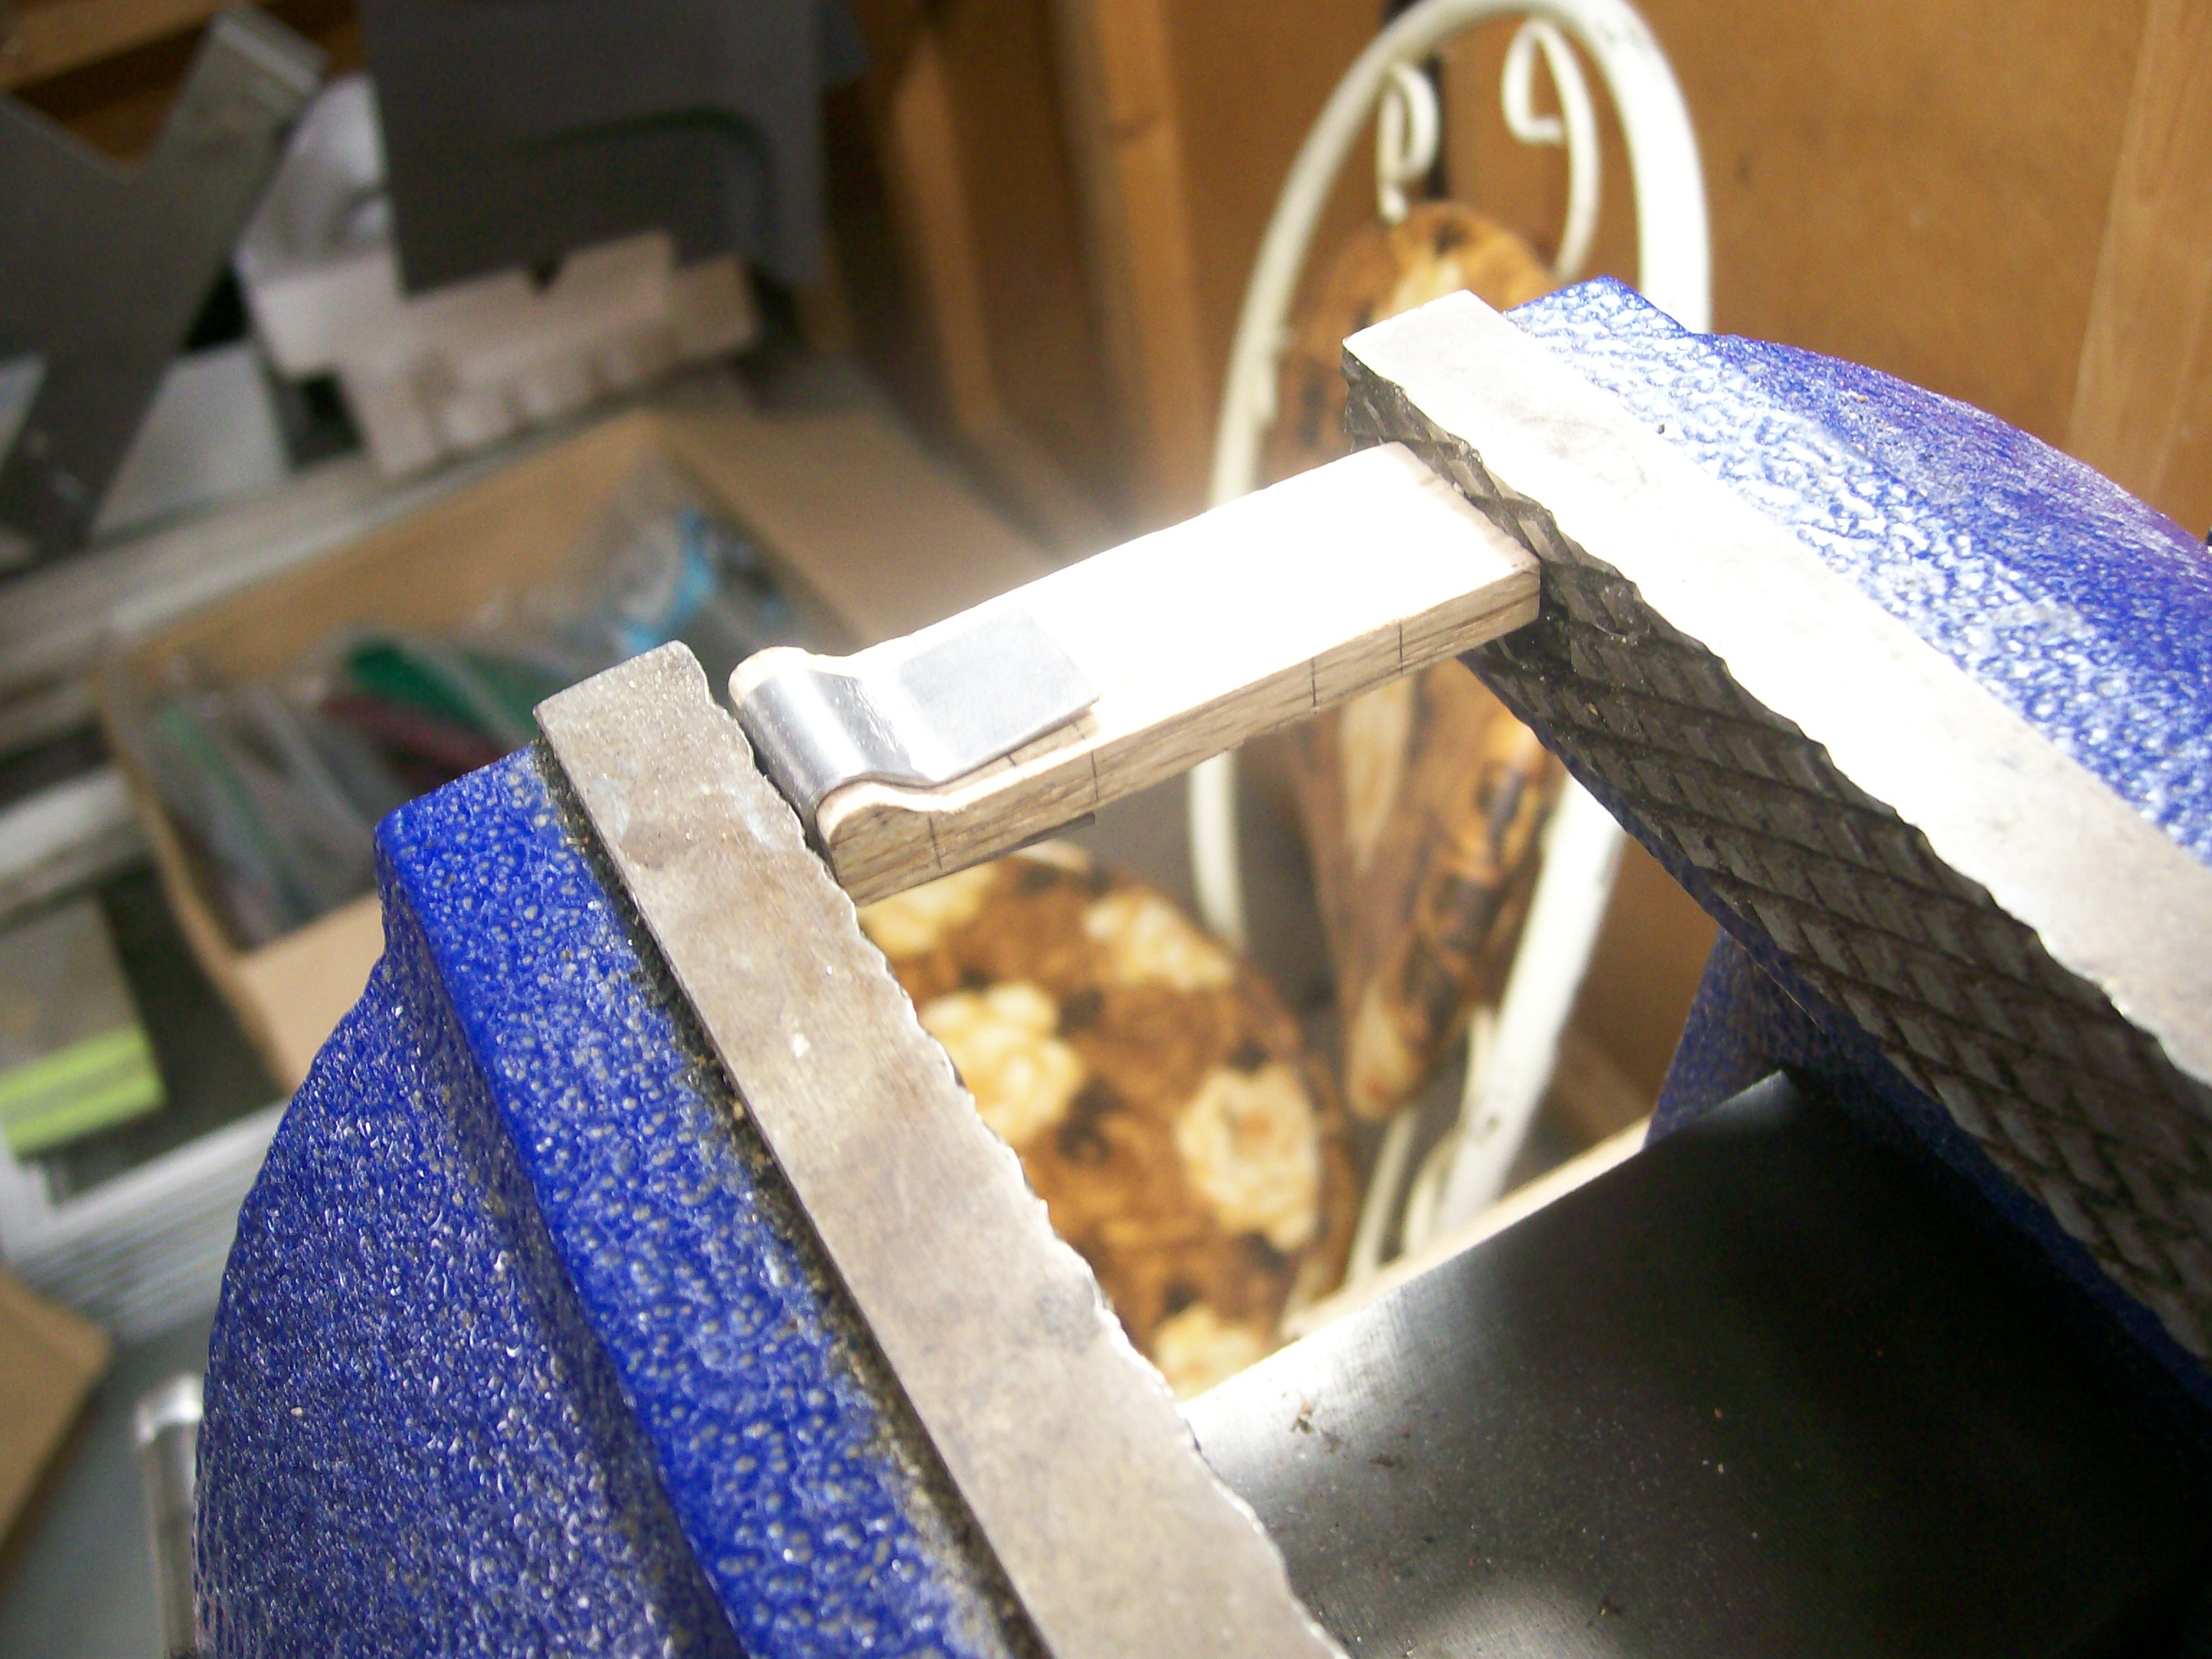
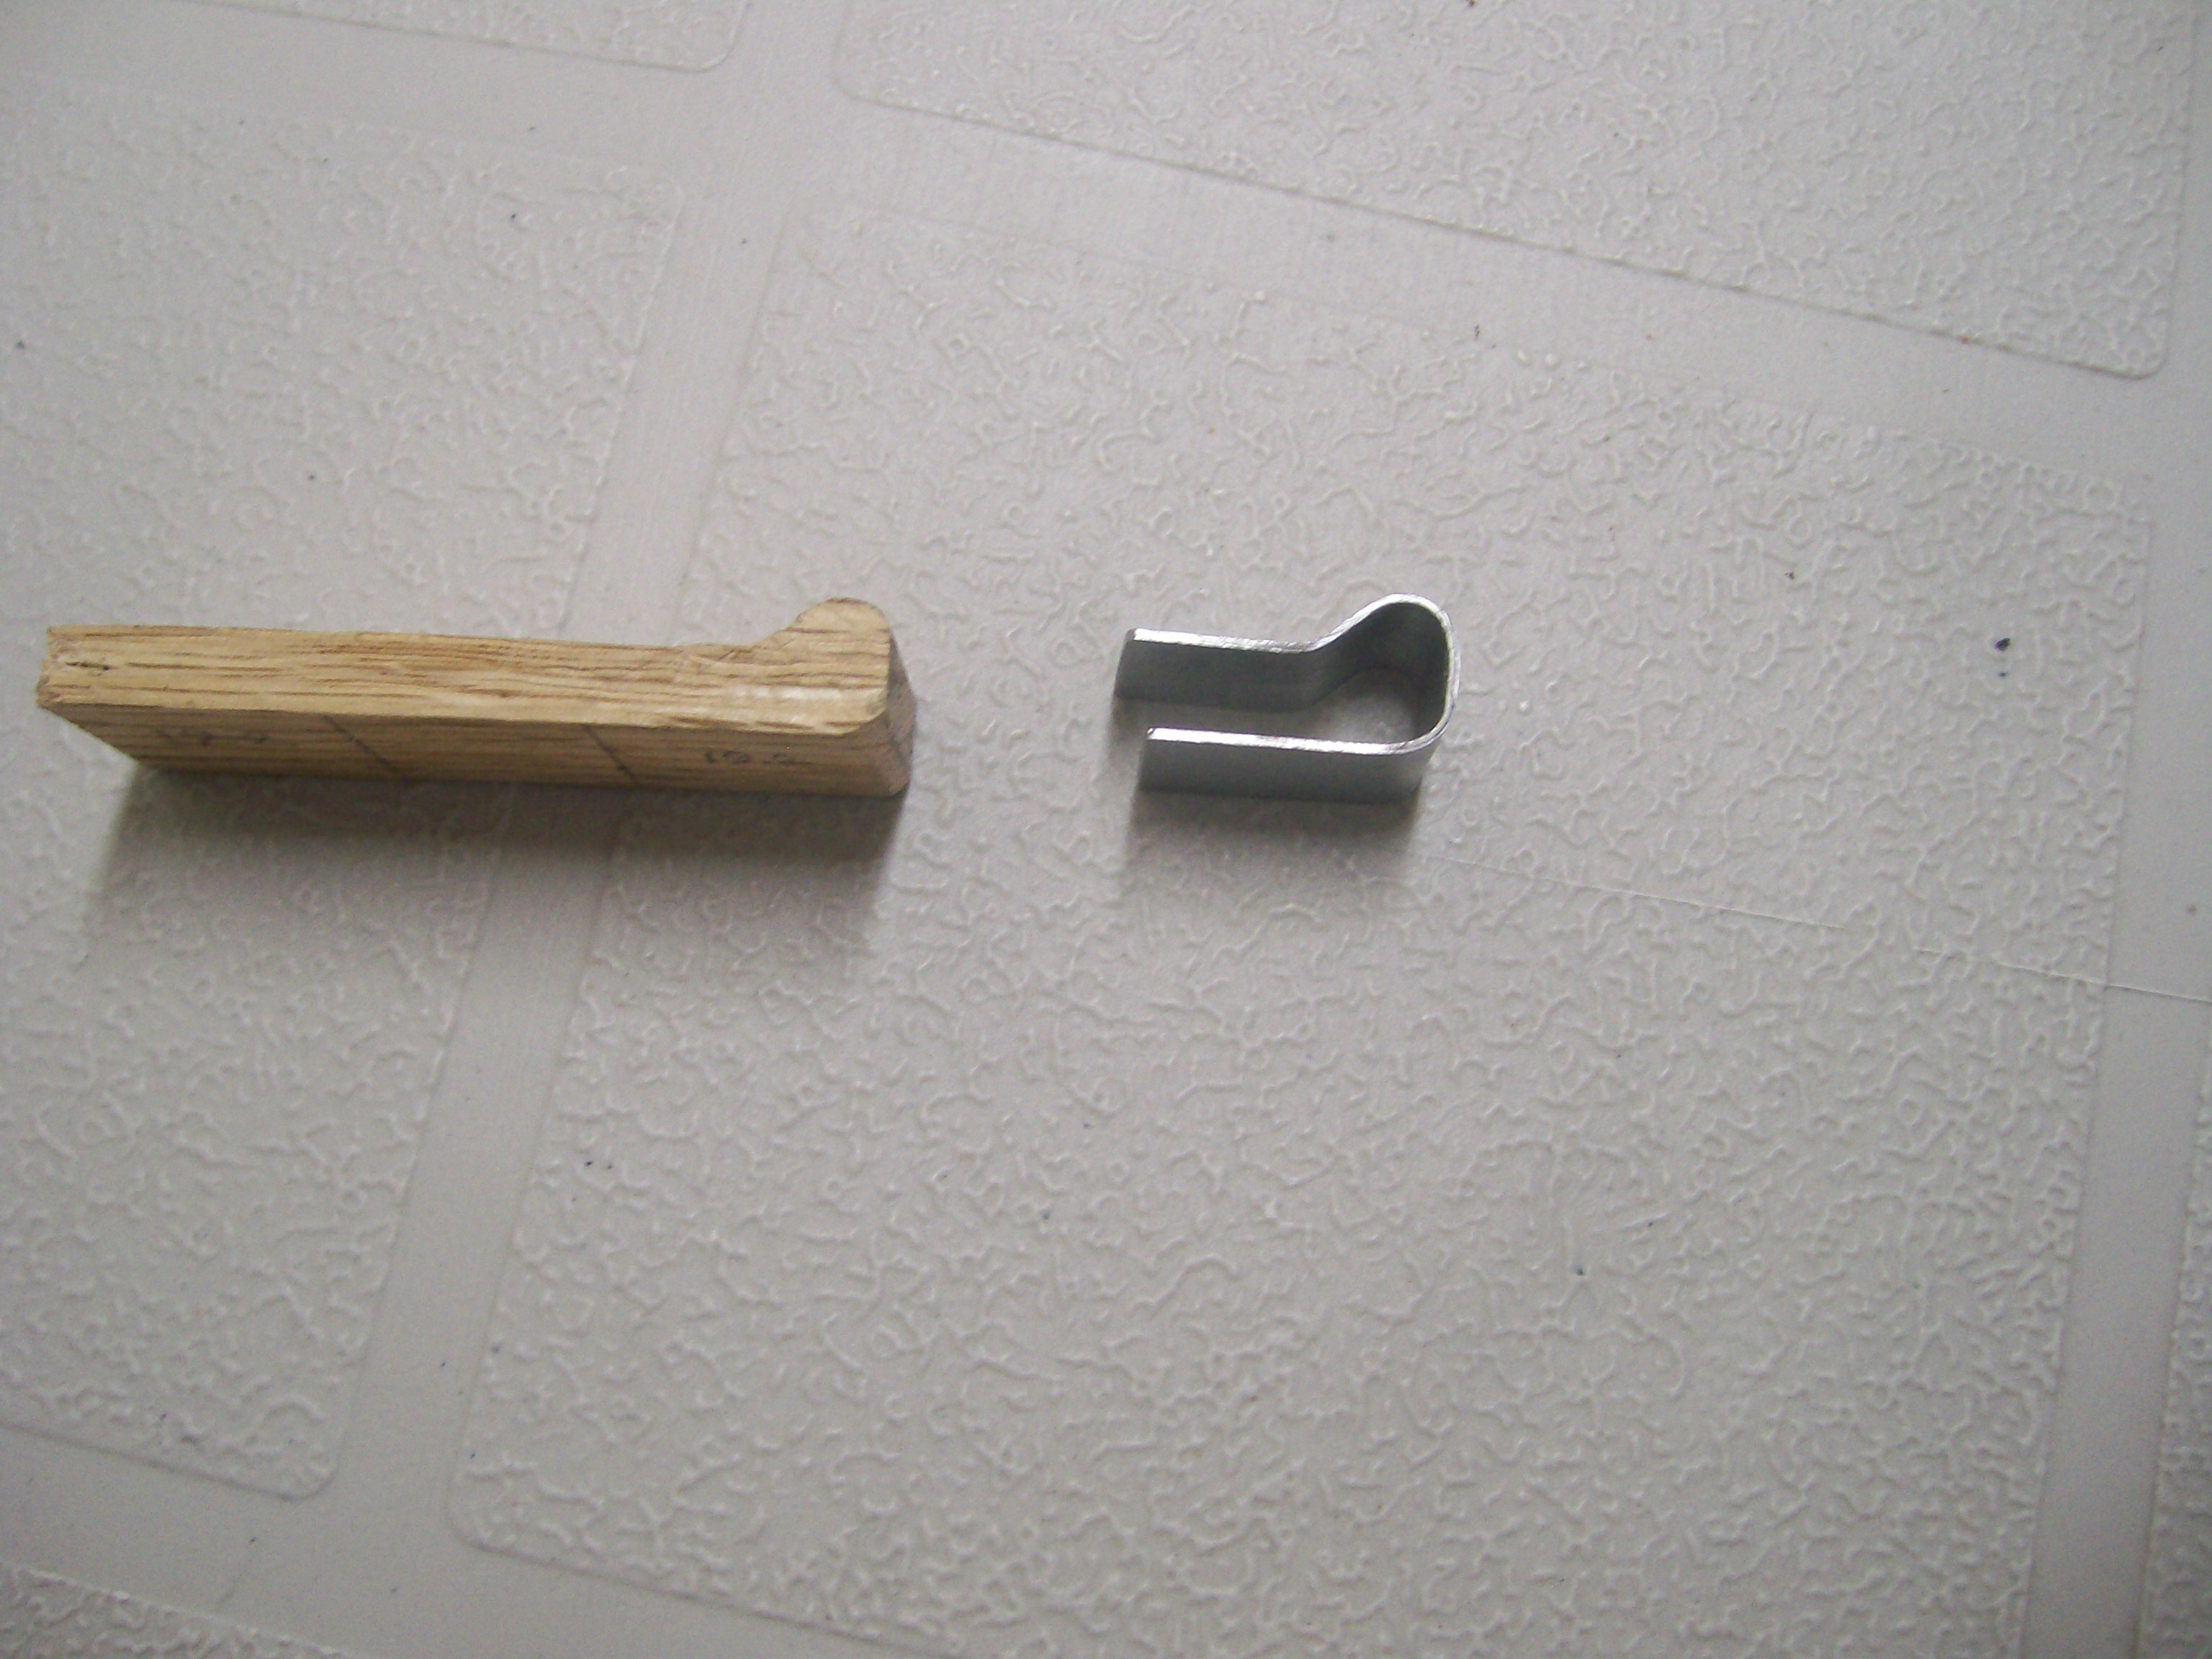
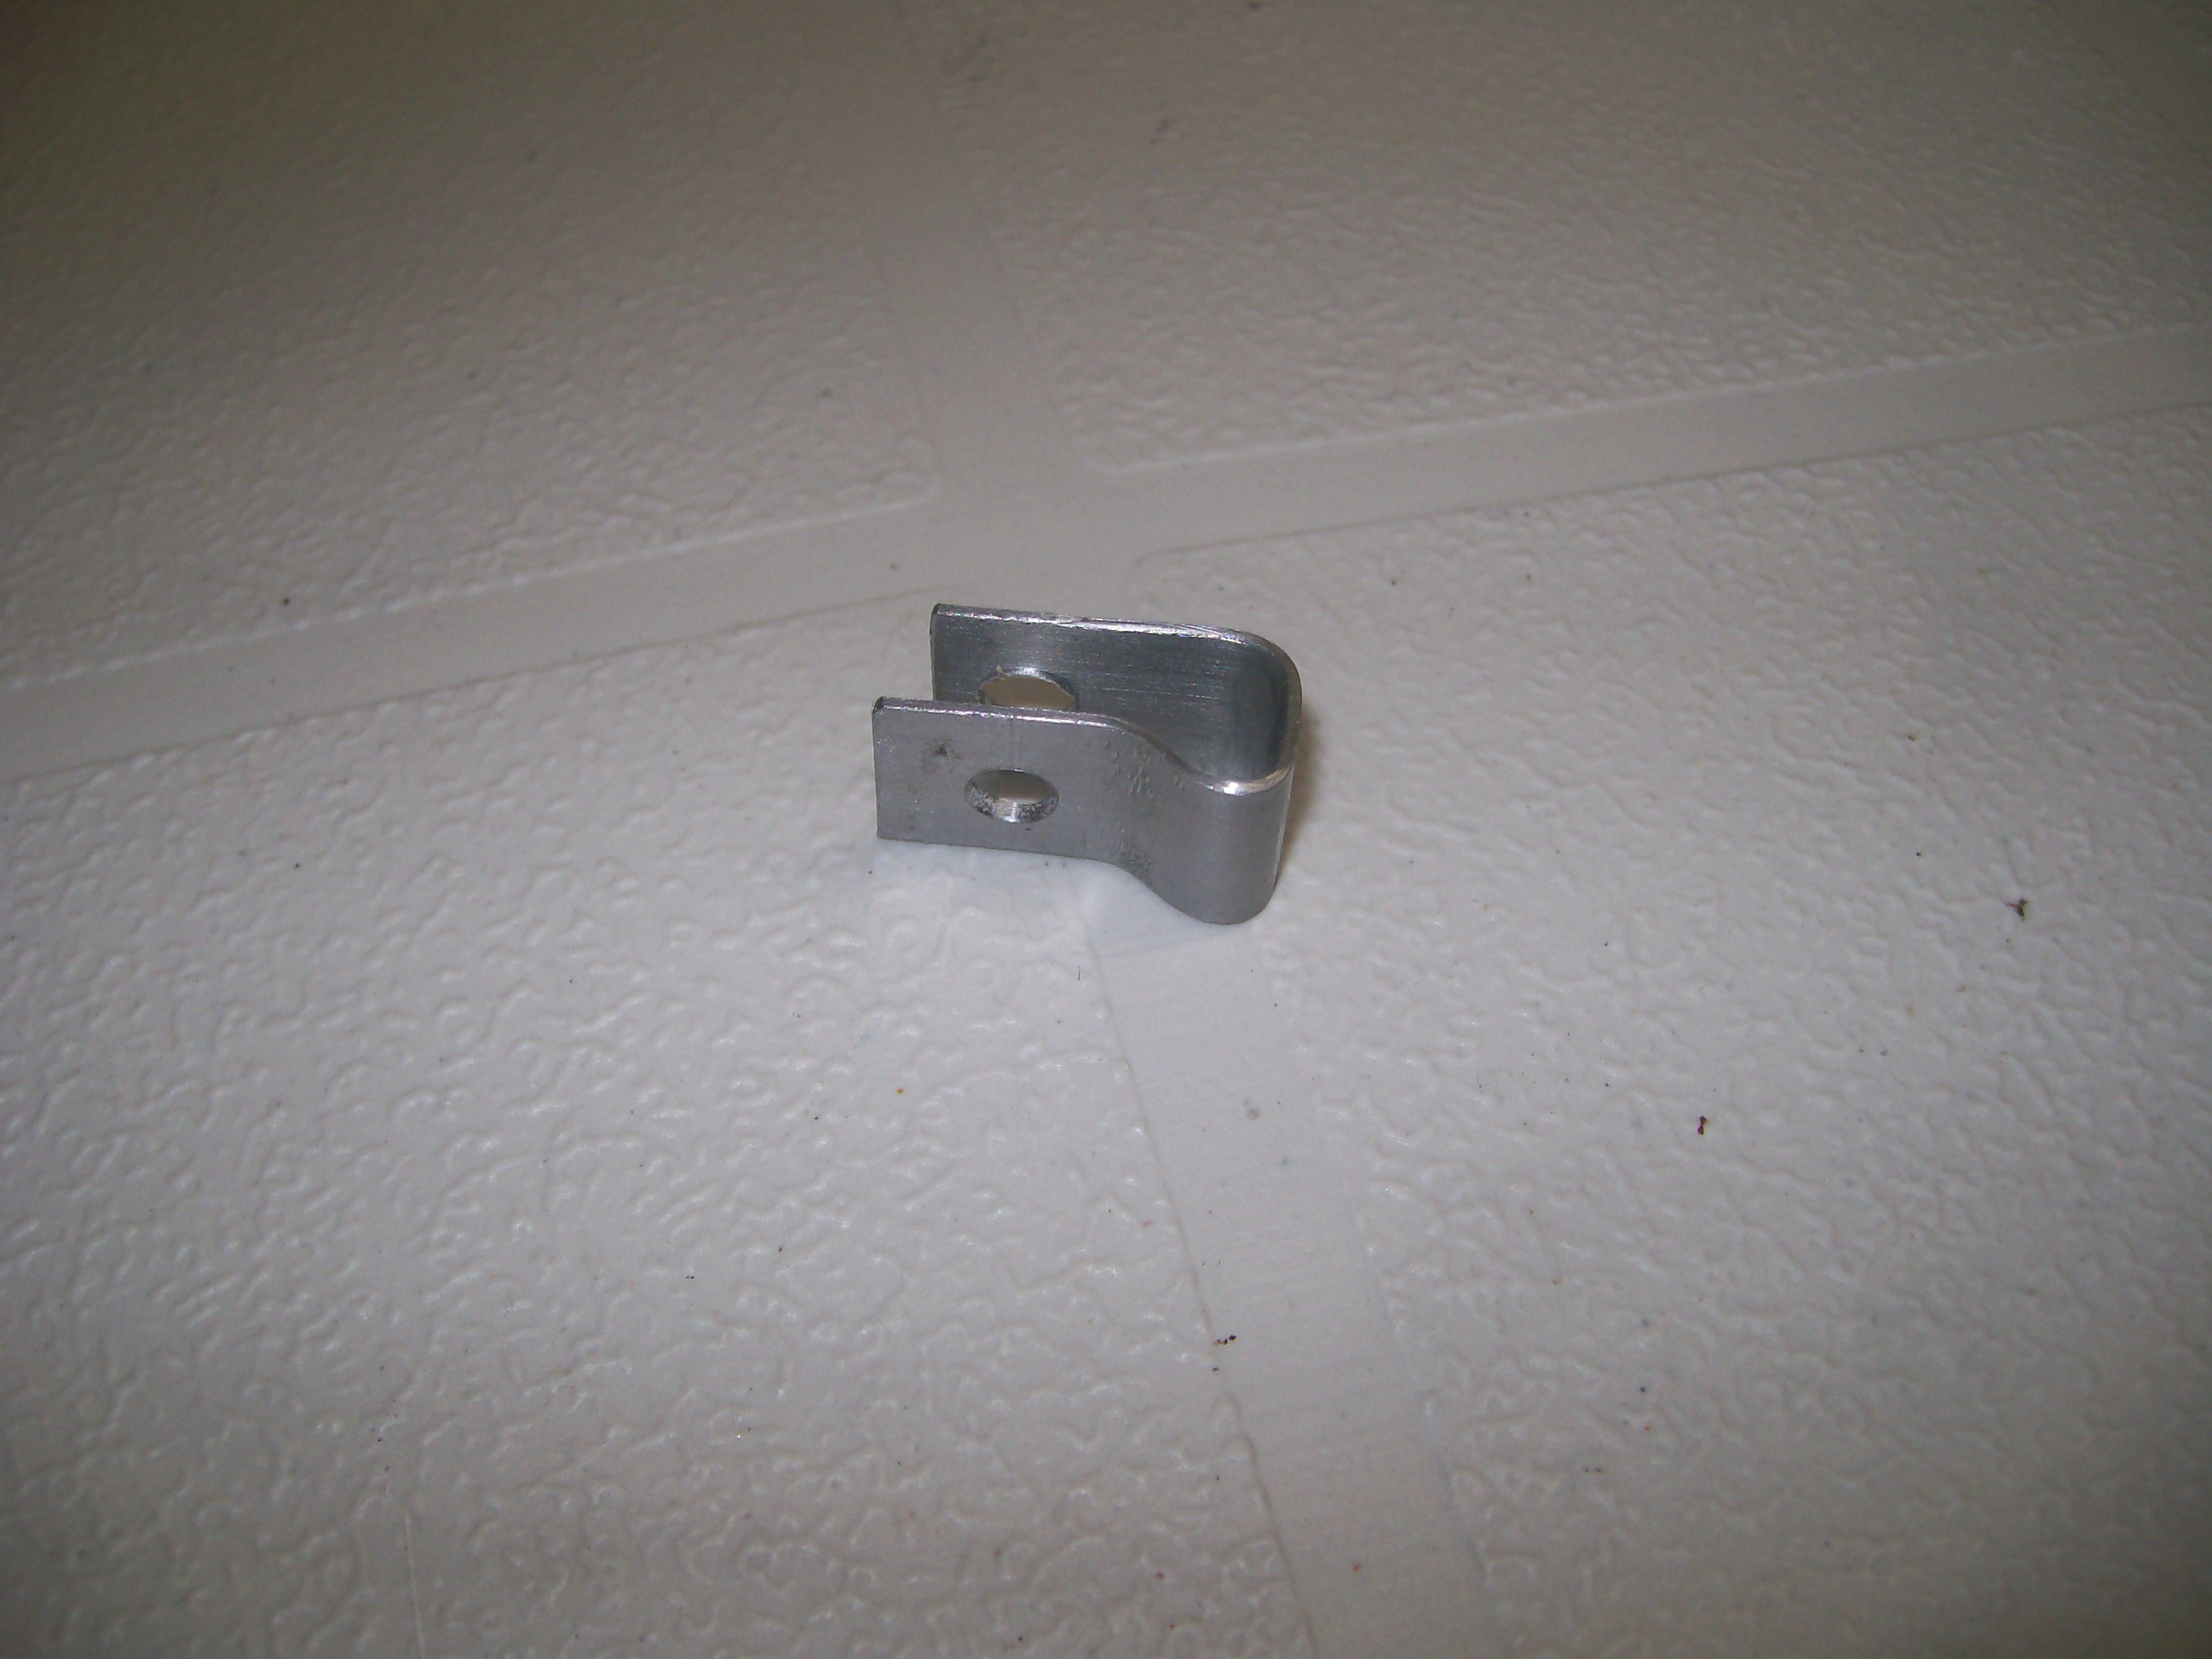
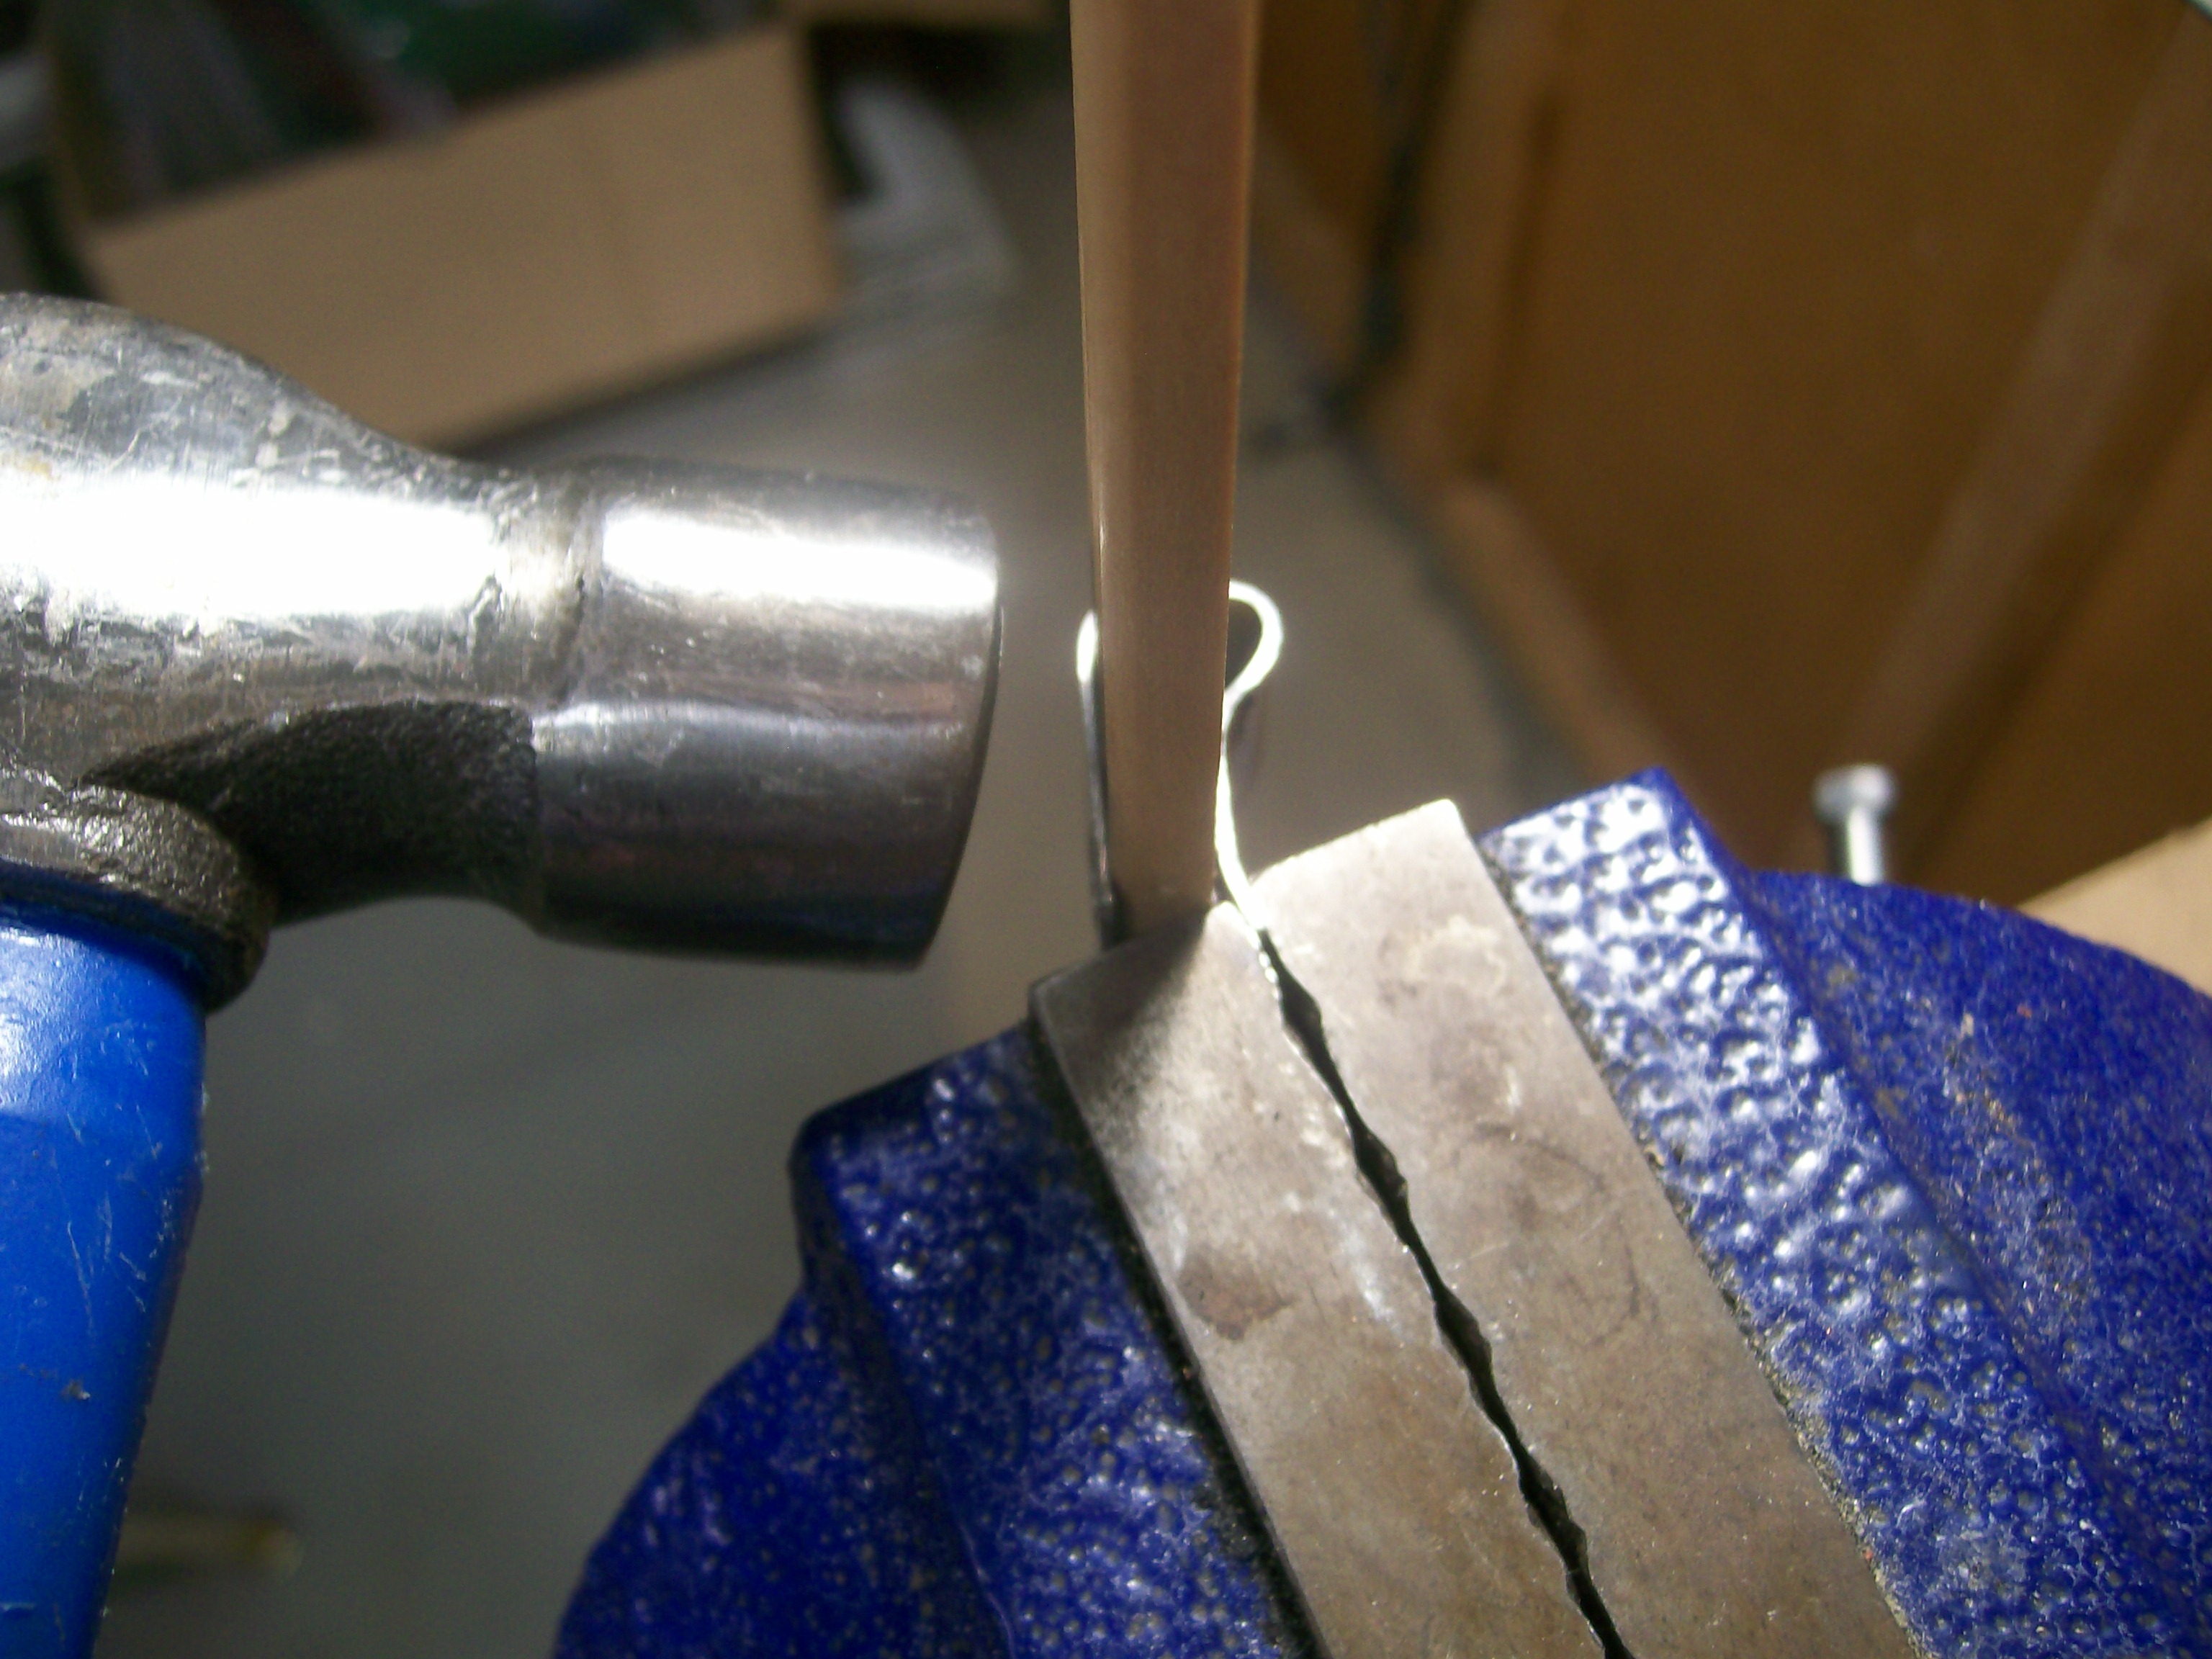
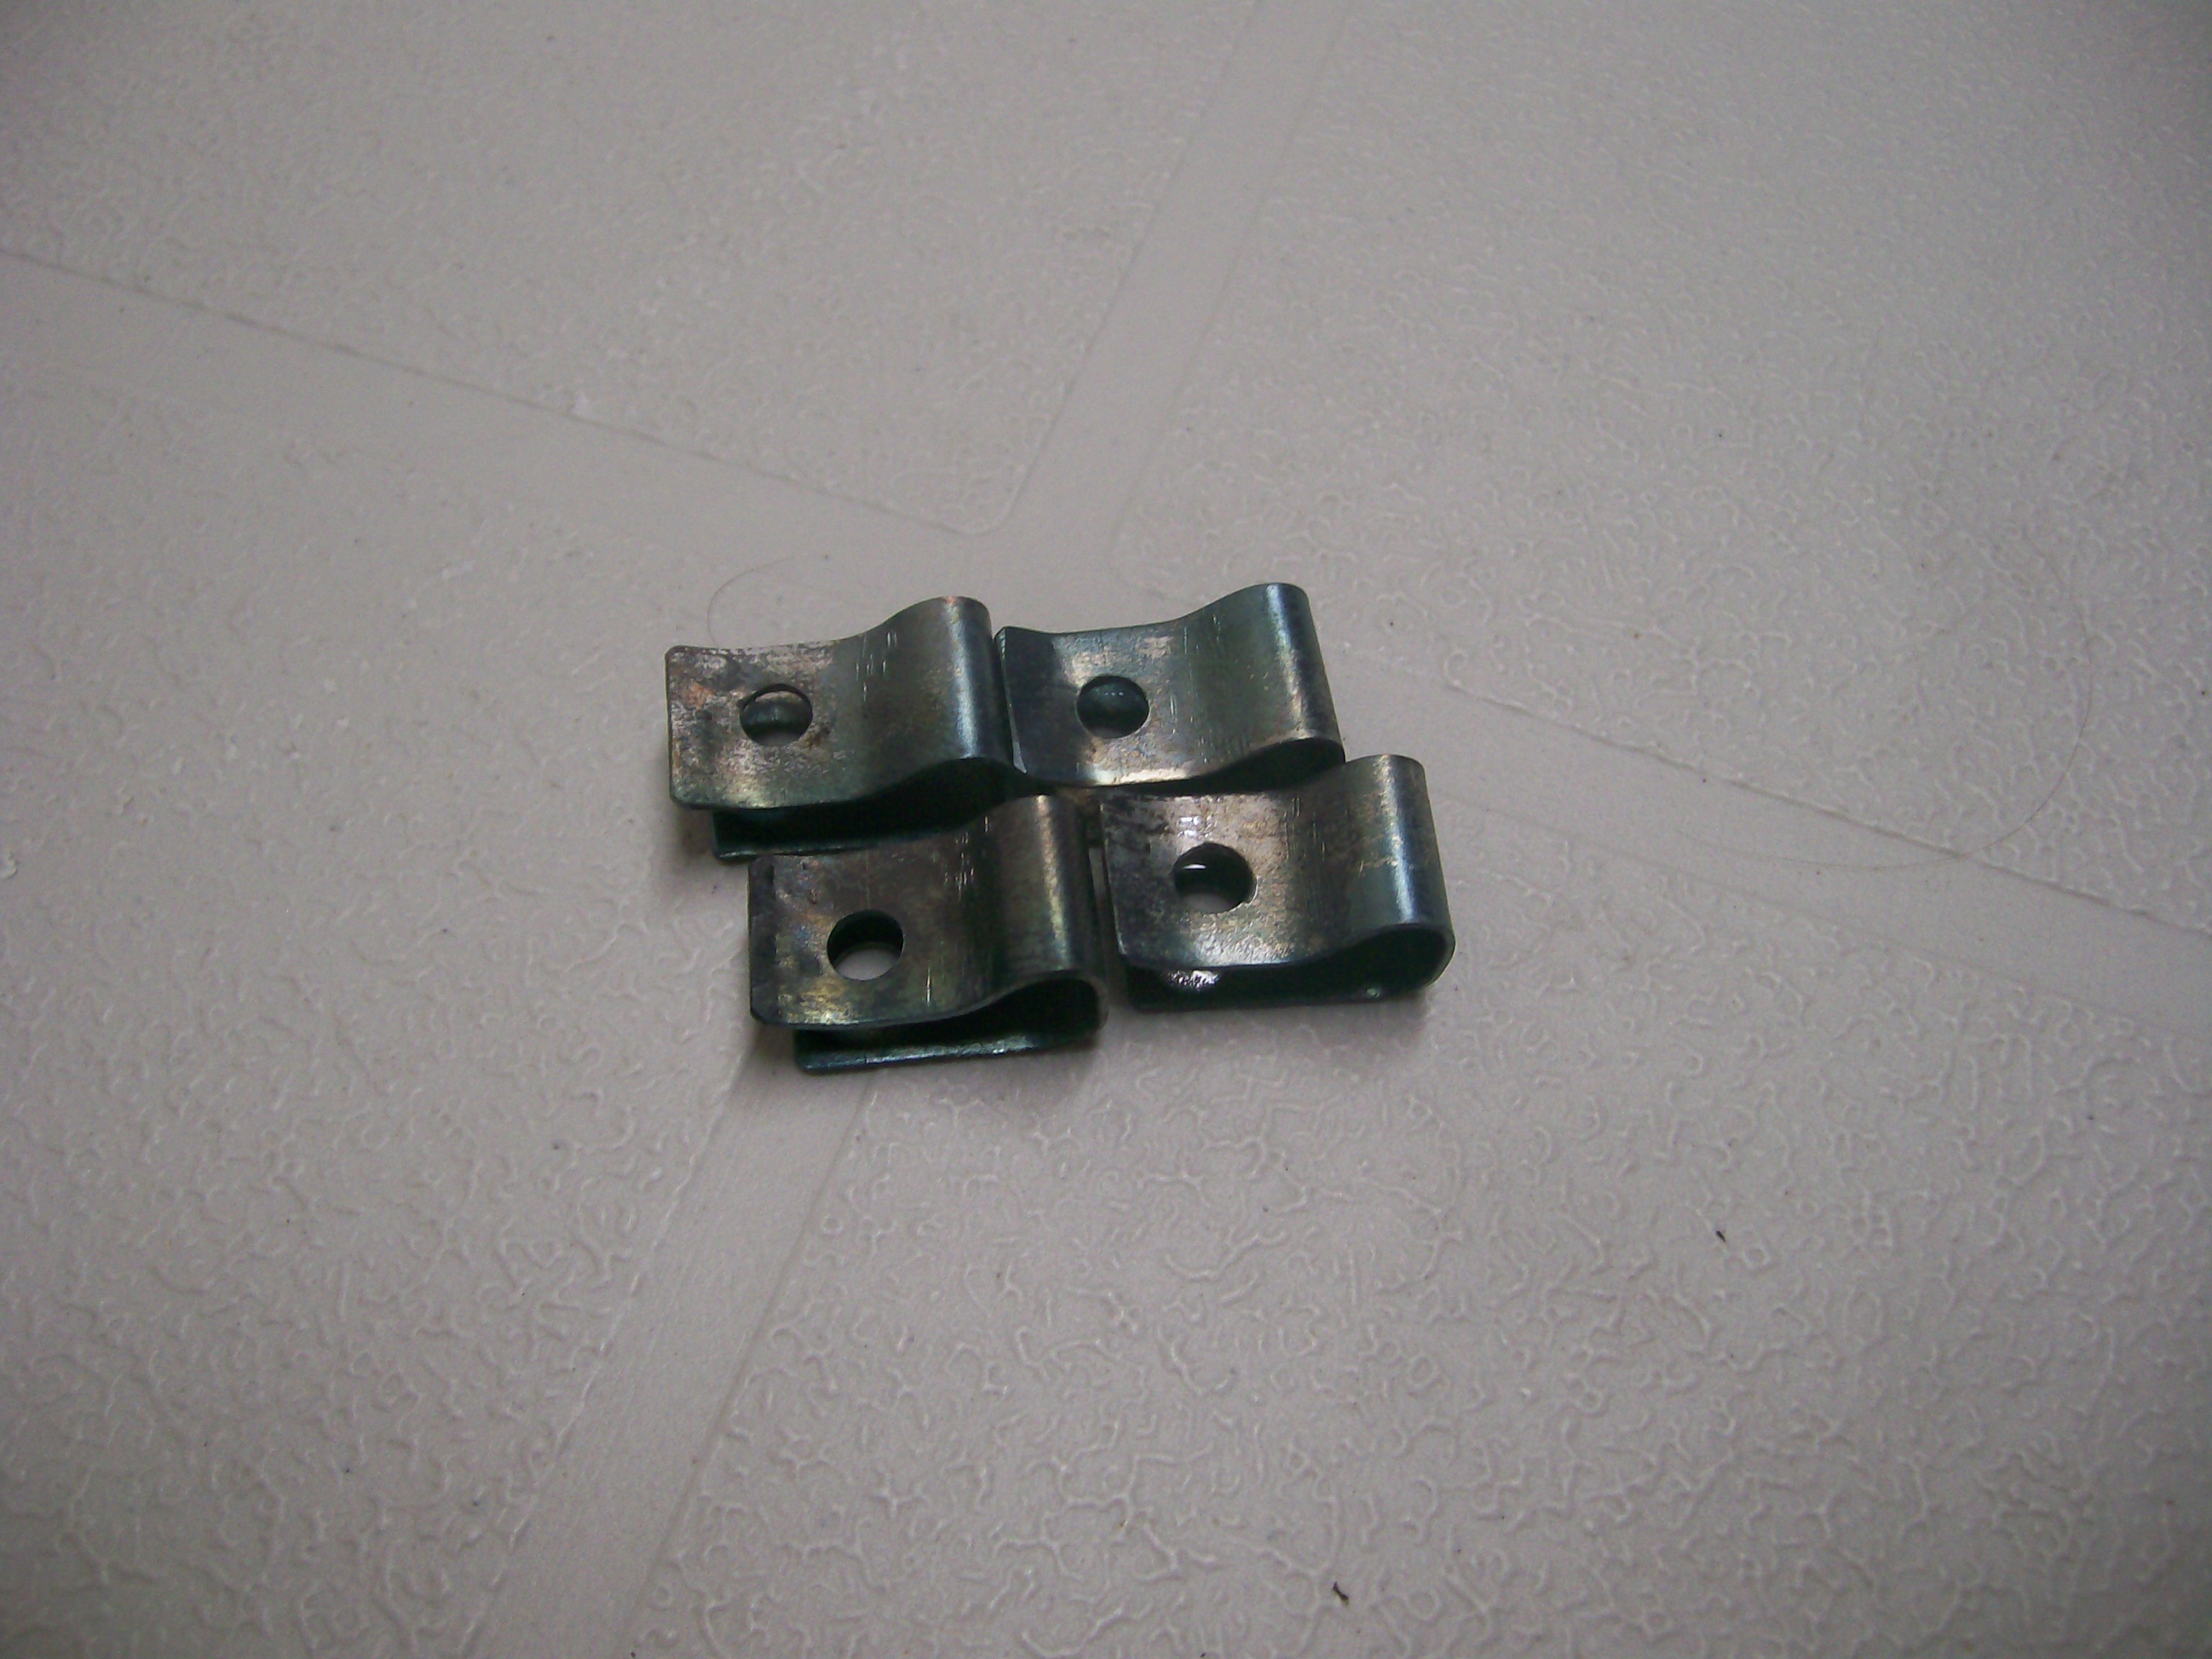
 Now that Hardway has sold off his inventory and doesn't look like he's planning to commission a second run, I feel I can share my D-I-Y strategy with those of you who still need these pieces. The clips aren't terribly difficult to fabricate from sheet stock and they don't have to be made from spring steel (that comes afterwards). Here's how I made mine: 1. Using tin snips, cut 4 metal strips from 0.022" sheet (or close to that). After cutting, flatten the strips on a hard surface with an autobody hammer. Then de-burr all the cut edges with a file. x After cutting, flatten the strips on a hard surface with an autobody hammer. Then de-burr all the cut edges with a file. This had yet to be done for the pieces in the photo. 2. Fabricate a forming buck from a small piece of hardwood (softwood won't do). You'll need the buck to form the 'bump' in the closed end. The 'bump' shape is mandatory -- it provides clearance for the stamped flange that runs around the periphery of the vent opening in the hatch outer sheet metal). I used a power sander and a Dremel sanding drum to make my buck. When you're happy with the shape, mark the side edge for the location of the centreline of the hole that you'll need to drill in the clip after you've bent it to shape. x 3. Mount your buck in a bench vise, along with one of the metal strips. The vise jaws should clamp on one end of the metal strip and the buck simultaneously (keeps the metal strip in position during the bending process). x 4. Now shape each strip using, as appropriate, either hand pressure or your autobody hammer (use the flat part of the hammer for the outside bends and the 'pick' end for the inside bend). x x 5. Mark and centre-punch the hole center before you remove the finished clip from from the buck. Then, using another strip of wood of appropriate thickness as a backing/spacer piece, slide the shaped clip over the wood and then clamp in some fashion to prepare for drilling the hole. Because the hole has to pass through both the upper and lower leg of the clip, you'll need both the spacer piece and a backing board. It's preferable, but not mandatory, to use a drill press here. De-burr both drilled holes afterwards... 6 6. To finish up, give the clips a bit of 'spring tempering' by heating them up with a torch (get them just to start of glowing red) and then dunking them in cold water (sorry, no photo for this step) 7. Here's my end result... The total project probably took me 3 or 4 hours to complete (making the buck is finicky). Materials costs were ~ zero. Best part: The clips worked perfectly during the installation of my vent pieces.


 3 points
 -
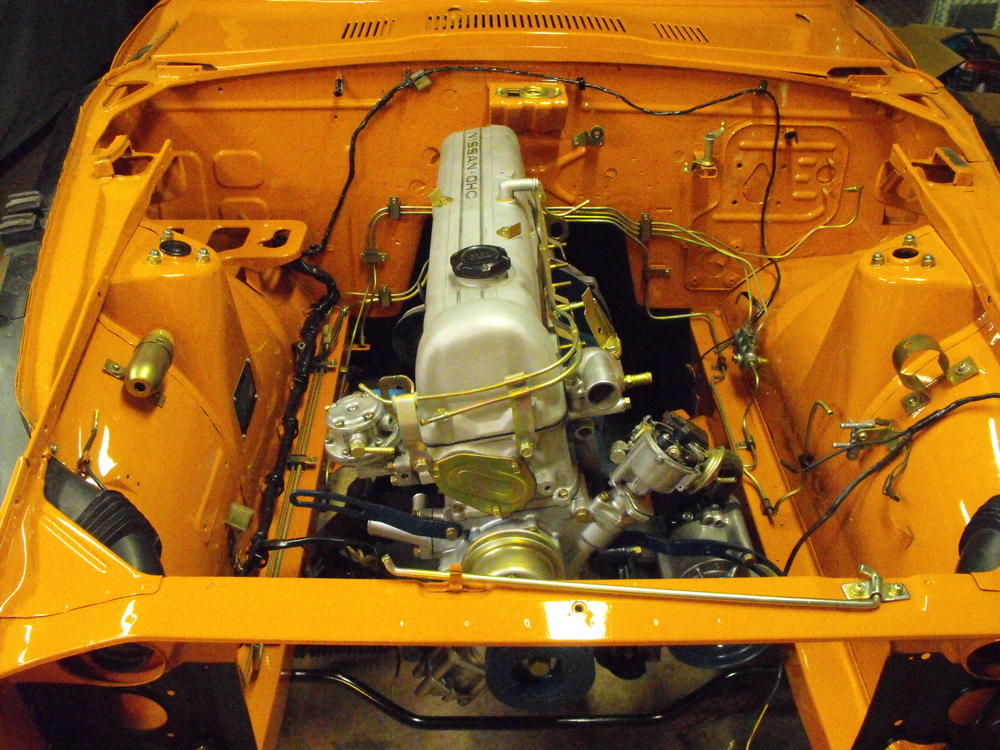
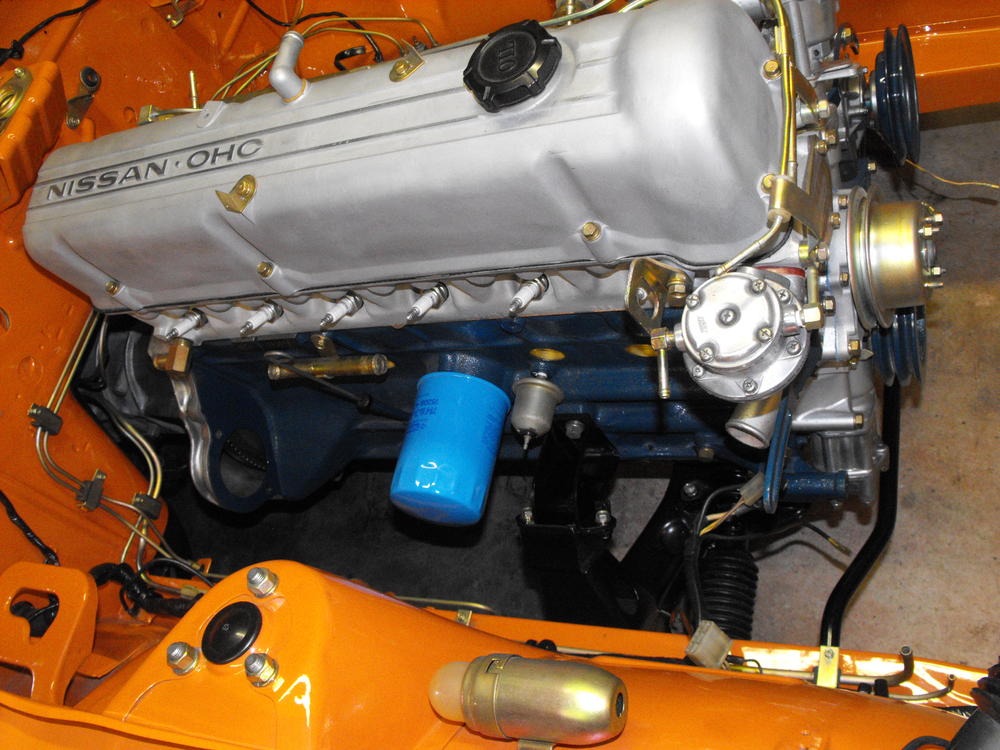
 UPDATE 10/8/2017: Decided to make this my "build thread". Summary: I recently bought a 1978 280z with an L28ET swapped into it. The owner did the swap in 2005 and left the car almost completely stock otherwise while driving it 1k-2k miles per year. It is a perfect base car for a fun project! My goal is to make it drive/handle like a modern car and eliminate any weird noises. I don't know much about the Z's or older cars in general, but I have done a lot of suspension work with my Nissan Xterra and several motorcycles. Once I freshen it up and get suspension and looks down, I'll likely start adding to engine power. Key: [x] = Done [-] = In progress [ ] = Want [x] = Removed Exterior: [ ] Fix rust spots! [ ] Add rear spoiler [ ] Add front spoiler [ ] Add some cool decals or get a new paint job Interior: [ ] Fix/cover split seams in top of dash (use this cover?) [ ] Get new shift knob (the old one has the gear indicator thing broken off) [ ] Fix missing dash lighting when lights are on Wheels/Tires/Brakes: [+] 4Runner four-piston front brake calipers with stainless steel brake lines [ ] Disc brakes conversion in the rear with stainless steel brake lines [-] 205/60/R15 Sumimoto Tires [-] 15" wheels - XXR 557 (15x7 4x114.3 +15mm offset) [-] 1" (25mm) wheel spacers to fit wheels (final offset after spacers is -10mm) [x] Stock 14" wheels Suspension/Steering: [-] Stance Coilovers with Camber Plates and 5k/4k spring rates rear/front [-] Adjustable front control arms (techno toy tuning) [-] New tension rods (techno toy tuning) [-] Adjustable rear lower control arms (techno toy tuning) [-] Aluminum steering coupler (techno toy tuning) [-] New tie rod ends [-] New swaybar bushings in the front [ ] Power steering! Engine/Driveline/Exhaust: [-] Rebuild half shafts with new u-joints [ ] Mandrel bent 3" exhaust and downpipe [ ] One of those mufflers with 2 vertical pipes coming out the back (I like the look) [ ] Upgraded turbo + an intercooler + boost controller [ ] Megasquirt II (instead of stock '82 ZX ECU) Other:1 point
 -
 1 pointTop lever pushed to the right (heat) and won't move back left. Unsuccessfully tried removing that panel. Anyone encountered this or could provide a solution? Many Thanks! Sent from my iPhone using Tapatalk1 point
 -
 Just so you have correct info, Nissan did not offer speakers in this location - what you have were added by a previous owner. With that said, the panels the speakers are mounted to are generally referred to as "kick panels". A matte black repaint would be pretty accurate.1 point
 -
 WHATEVER you do - don't waste your time running duals all the way back - its loud and exotic sounding and a waste of weight and money1 point
 -
 1 point
 -
 1 pointI knew a guy, who knew a guy, who knew a guy, who knew a guy's cousin who temporarily installed a spare speedo in his car because the original was jumpy. The problem turned out to be the routing of the speedo cable and not the gauge itself, but before he put in the replacement, he took it apart and adjusted the odometer to reflect close to the correct mileage. He didn't bother with the 1's or 10's digits, but he changed the others so it was within 100 miles of my actual mileage. And then when he figured out that the speedo was never the problem in the first place, he took out the test unit and put his original back in. From what I heard, it's not too hard, but fiddly with small parts and the like. If you're good working on small delicate things, its not bad. If you're all thumbs and your best tool is a breaker bar or an impact gun, I'd send it to someone else.1 point
 -
 1 point
 1 pointGot clutch and pressure plate installed. Also installed the motor. Things should move along nicely now. I picked up four rims today and have about 8 hubcaps to sort through for the wheels. We are going stock with hubcaps for the final set-up. I will drop the rims off at the powdercoaters next week. Should be able to post some pics of the hubcaps in the next day or two. Radiator has been re-cored and is ready for pick-up. I will get that on Monday and should be able to install that day. Some pics are below.
 1 point
Just seeing if anyone has some performance valve springs for a high lift cam laying around . Maybe a matching cam too1 point
1 point
1 pointJust seeing if anyone has some performance valve springs for a high lift cam laying around . Maybe a matching cam too1 point 1 point
 1 pointCould be WAY too rich.... Sent from my iPhone using Classic Zcar Club mobile1 point
 I've wondered if a loose chain alone is enough to allow the valves to hit the pistons. Doesn't seem like it should unless the camshaft can some how rotate faster than the crankshaft is pulling it, from inertia. The inertia of the mass would have to overcome the valve springs and friction. Maybe at high revs, on a downshift, or something similar. With no tensioner on the loose side there would be a lot of slack to over-rotate on, if it's possible, even if the sprocket timing was right on the tight side.1 point
 My car, which is a US '72 model has the seat belt warning light on the passenger seat - ie the RH seat as you sit in the car - it is pretty original, so I am thinking that is correct.1 point
I am selling my 73 Z, and have an interested buyer in Quebec. He has enlisted the help of an agency to communicate with me since he speaks no English. The guy is great, but it raises questions. but I would like someone I know, who can speak french to make it possible to speak with the buyer rather than his agent. Anyone here with enough french to help a poor Western Anglophone? (For some reason the 6 years of french I took in Grades 7-12 are not quite enough in this situation, never mind how long ago that was...) The guy I'm dealing with is Jacques Andre. His name and number come up in several french language links showing him selling cars, so that part of what he tells me checks out. Anyone ever hear of him or this business? http://classiccarsmarks.com/jaguar/199174-1961-jaguar-mark-ii-ultra-rare-special-ordered-color-combo.html1 point
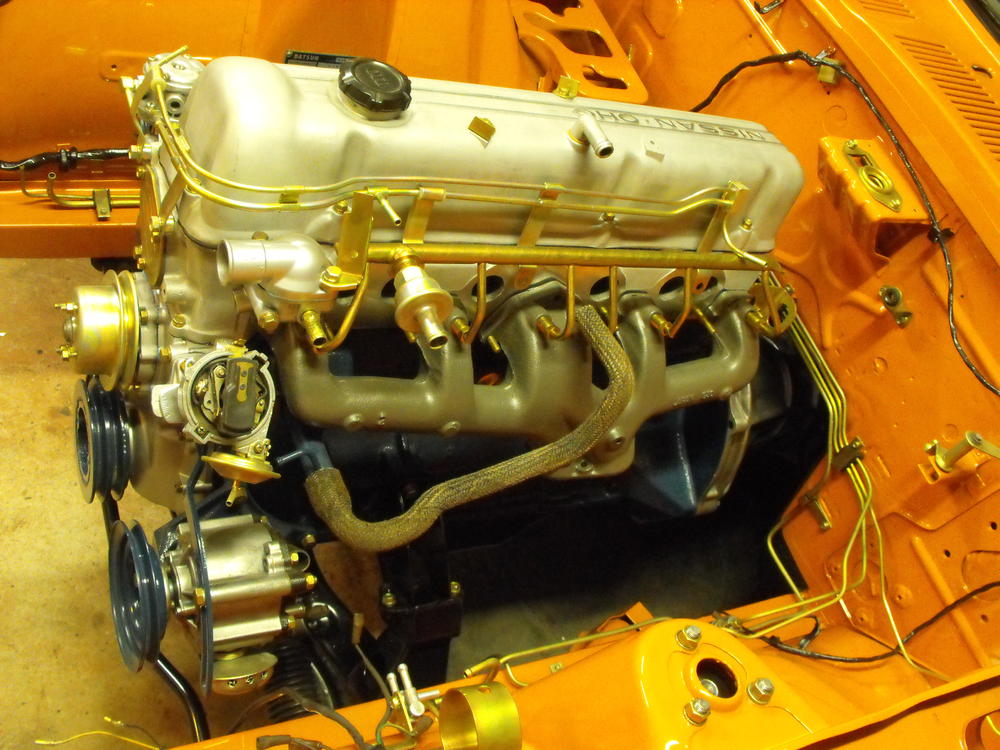
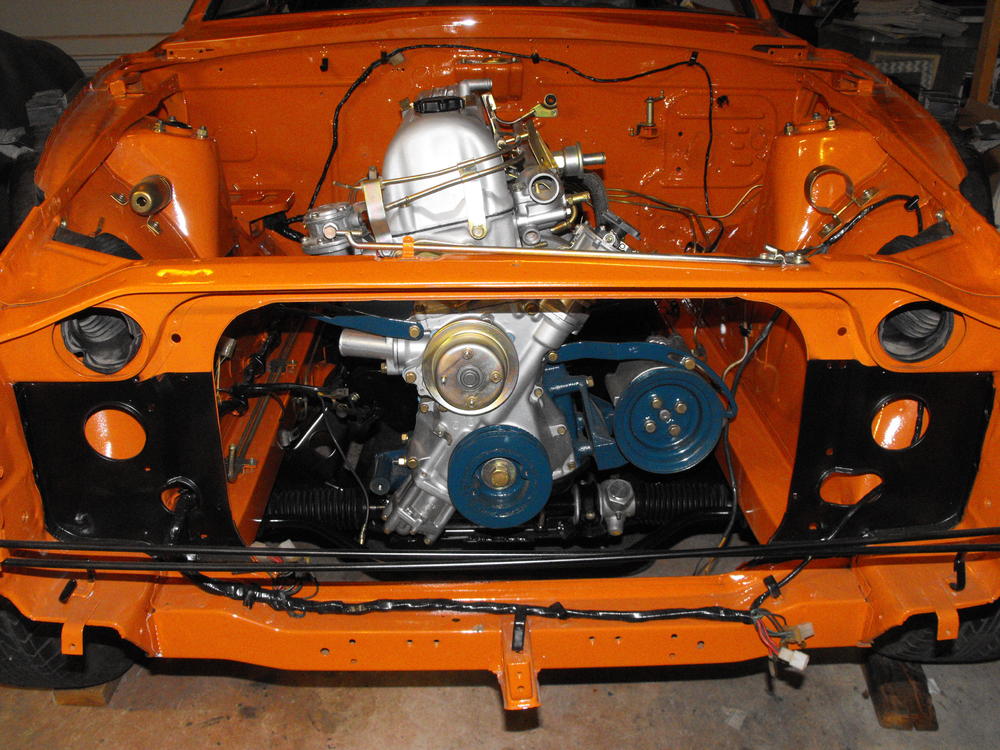
1 pointI remember when mine was going back together and how it looked perfect( not as perfect as yours) , and for that brief unused moment it was so clean and pretty!1 point
My car, which is a US '72 model has the seat belt warning light on the passenger seat - ie the RH seat as you sit in the car - it is pretty original, so I am thinking that is correct.1 point
I am selling my 73 Z, and have an interested buyer in Quebec. He has enlisted the help of an agency to communicate with me since he speaks no English. The guy is great, but it raises questions. but I would like someone I know, who can speak french to make it possible to speak with the buyer rather than his agent. Anyone here with enough french to help a poor Western Anglophone? (For some reason the 6 years of french I took in Grades 7-12 are not quite enough in this situation, never mind how long ago that was...) The guy I'm dealing with is Jacques Andre. His name and number come up in several french language links showing him selling cars, so that part of what he tells me checks out. Anyone ever hear of him or this business? http://classiccarsmarks.com/jaguar/199174-1961-jaguar-mark-ii-ultra-rare-special-ordered-color-combo.html1 point
1 pointI remember when mine was going back together and how it looked perfect( not as perfect as yours) , and for that brief unused moment it was so clean and pretty!1 point


Important Information
By using this site, you agree to our Privacy Policy and Guidelines. We have placed cookies on your device to help make this website better. You can adjust your cookie settings, otherwise we'll assume you're okay to continue.