


Leaderboard
-

JLPurcell
Free Member3Points1,670Posts -
Bruce Palmer
Free Member3Points1,610Posts -
Mike B
Free Member3Points2,195Posts -

siteunseen
Free Member2Points15,175Posts


Popular Content
Showing content with the highest reputation on 02/24/2018 in all areas
-
2 pointsWith the piston in and dome in place start running the screws down unformly while lifting the piston with a finger and allowing it to drop. If you are cattywompis and the needle is binding, back the screws off a smidge and nurse the dome sideways until it (the needle) drops freely. Continue until screws are tight and the needle drops cleanly into the orifice...... Do not under penalty of death, adjust your floats during this operation...... Now that's funny I don't care who you are!!2 points
-
2 pointsYeah, it didn't quite work out that way (I paid full price), but I did get Pete to sign a few things for me. They just lived a few miles away, so I went over and helped them with a few things from time to time.2 points
-
Received the bracket today. Bent, no rust, easily straightened, but the first thing I did was drop it off at a custom rubber stamp vendor to have a stamp made to replicate the part number on the bottom of the bracket. Once that is complete I will straighten, sand blast, powder coat, and stamp the part number back on it. It will then be ready for the NOS pump. Will post more once project moves along.
 2 points
 -
2 pointsI think they're saying the extra 7.5 turns down is that 1/16th you are talking about at 2.5 turns down? This simple thing people have done since they came off the boat has gotten knee deep on this thread and he has 3 active now. I think it'd be easier to raise the plane ticket money and send Mark down there and have boots/wrenches on the ground.2 points
-
1 pointThe car is a blast to drive.....no dyno yet....when it snows, I give it 4 rains before I drive to clear any road salts. We are in the process of building another stroker for the green 72. Eiji will put Mikunis on this motor.1 point
-
1 pointI'm not sure how well that procedure would translate to other languages, or how much sense it would make to someone who's native language is not English. You might be about to find out...1 point
-
1 pointHey, that's one of my cars! The Brock's needed a 240Z to photograph the cover on when they lived in Redmond so I let them use my 72 240Z. I bought the cover afterwards. I also have this one from MSA which is cotton with flannel on the inside and just for inside use. Much softer, but also much heavier and a little more expensive. http://www.thezstore.com/page/TZS/PROD/50-11011 point
-
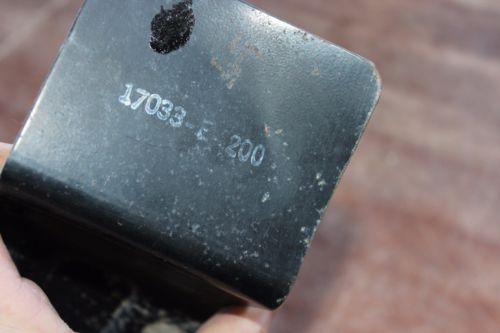
1 pointAdded to my obsession this week. I was able to find and purchase the following for my hoard. A JDM grill from Japan, an original used electric fuel pump bracket part # 17033-4200, NOS original electric fuel pump, and a NOS bullet tip antenna mast.1 point
-
1 pointHaven't done any more on the barrel for now...need a PS first I just ordered the "Monster" Looked at a bunch of power supplies and just decided I would try this one. The wires are gonna add to your plating area. You will have to include them in your calculation. They will also increase your plate useage1 point
-
1 pointFuel adjustment all the way up. Turn it down 10 turns with everything assembled except the domes and pistons. Let the fuel pump fill up the bowls without the car starting. Check the fuel levels relation to the top of the nozzle by eye shining a flashlight in. If it's above the top of the nozzle, remove the float lid, bend the Tang in correspondence with raising or lowering the fuel level, suck out some fuel so it's back below the nozzle top. Reinstall float bowl top. Run the fuel pump again. Check. Repeat until done. You want the fuel level right at the top of the nozzle hole and right on the verge of flooding the top on the nozzle which is now 10 turns down into the bushing. You want the fuel to remain down inside the nozzle but right the the top. I unplug the dizzy and use my starter motor and battery to cycle the fuel pump and check what it fills to. After you are happy with the level... Reassemble everything. Undo all 10 turns so the fuel adjustment is at the top. Then go down 2.5 turns and use that as starting fuel level for tuning.1 point
-
1 pointThis week I get to see how my wing came out, and it was not as great as I hoped.1 point
-
1 pointAnd believe me I do apologize for this problem we seem to carry forward showing the lid/float turned upside down like this. This was shown by the original owner of ZTherapy using Grose Jets which we haven't been able to get for about 14 years. Can I get the video fixed to reflect how to do it with needles and seats? Not so far.....With needles and seats with the tiny spring inside, the weight of the float will over power the spring and your float level will be tits right out of the chute. Turn the damn thing over blow lightly into the fuel inlet tube while moving the float toward the lid. When the needle closes you should feel resistance to your breath. That's where your measurement should take place. Bend the tang on the float to get that gap from the top of the float to the bottom of the lid. Once you get both set the same, put your hands in your pockets and back away. THEN: You start tuning the carbs. First thing is THAT 2 1/2 TURN THING is ONLY a starting point. Steve sets our "out the door REMANS" at 2 1/2. Most any motor (or engine for you sticklers) will start at 2 1/2 turns down but almost assuredly will end up up or down from there BASED ON THE MOTOR. Set the mixture and balance and go use your butt dyno to make 'er run. Keep tweaking til it runs. I do have to ask: who's lid is this in the photo? Don't even tell me the caps are left on the overflows for running. I'm going to my room......1 point
-
Hopefully useful reference: 17033-E4200 Electric Fuel Pump Bracket, as used on S20-powered cars from 1969: Mine, with NISMO-branded, Jidosha Kiki-made, Bendix-licensed pump:1 point
-
1 pointGot around to finishing the drive shaft cleaning and powder coating. Now just waiting for the u joints!1 point


