Leaderboard
-

DaveR
Free Member5Points158Posts -

David F
Free Member2Points142Posts -


Zed Head
Free Member1Points18,785Posts -

AlbatrossCafe
Free Member1Points133Posts
Popular Content
Showing content with the highest reputation on 02/26/2018 in all areas
-
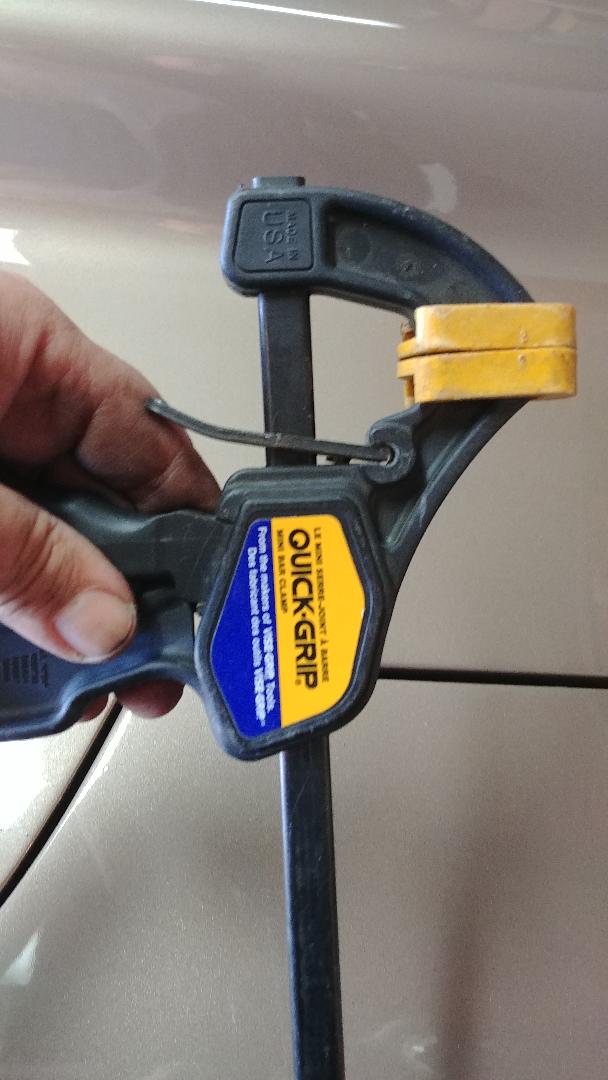
 1 pointFinally got around to installing my new end links from Zcardepot. Bought the kit from them. $20 + shipping. As you can see in the pics I had help. My handy dandy quick grip clamp from H.F. Worked perfect. Was able to do the install without adding any weight to the corners like you read in some of the forums. An hour job total time. While I was under there I took a look around and things sure are oily under there. I think most of it is coming from my front main! Oh well, guess I'll do that next.
 1 point
 -
 1 point
 -
 Looks good ALBY!!!!!!!!!. Be sure to get several good coats of protectant on those welded seams, thats the last place you want rust to form as well as the paint that was cooked away. If you have a West Marine in your town they sell a really good marine sealant. Enjoy the miles and post pictures of how it sits once back on the ground. Nice work space BTW!1 point
 -
HOT DAMN!! I'm finally getting near the end (I'm probably gonna say this on 3 more posts - everything takes longer than I expect). I took my struts to 425 Motorsports along with my new coilover adapter sleeves. They disassembled the struts, tossed the old stuff, cut them (1" above hub in front, 4" up from hub in the back) and slid the adapter sleeves on so they fit 1" over the old strut tube. These guys may not be the cheapest, but they are well renowned in our area and definitely do great work. You can tell by the quality of the welds alone. Took a bold leap and started drilling/cutting into my strut towers to make room for my camber plates. Fronts were manageable. The back is a PITA so far. Especially with the Z up on tall jackstands (it might as well be on 37" tires at this point), it is hard to reach those towers in the rear. I think I will have to climb in there to cut those out. Since the towers are not perfectly flat, I added a couple washers in the back (in the front so far) to allow the "vanity plate" (as Sakura Garage calls it) to sit a little more flush on top. Looks great so far and my short test fit with the coilover top hats is looking good. Lastly, I test fit my spoiler after painting. Who knew a generic silver would be such a pain to match. From far way I can tolerate it, but up close.. well that's what I get for blindly ordering paint off Amazon I bought different paint and will try it again. Tomorrow I think I will take the day off and try to get the coilovers finished and actually on the car so that I can get it back on its own wheels again.1 point
-
 1 point
 -
 1 pointI got my heat shield back from https://www.performancecoatings.com/exhaust-coating I went with glacier black 2000 which is a dark ceramic black that’s good to 2000 degrees. Looks pretty awesome. I will probably do my header in it or another color.
 1 point
 -
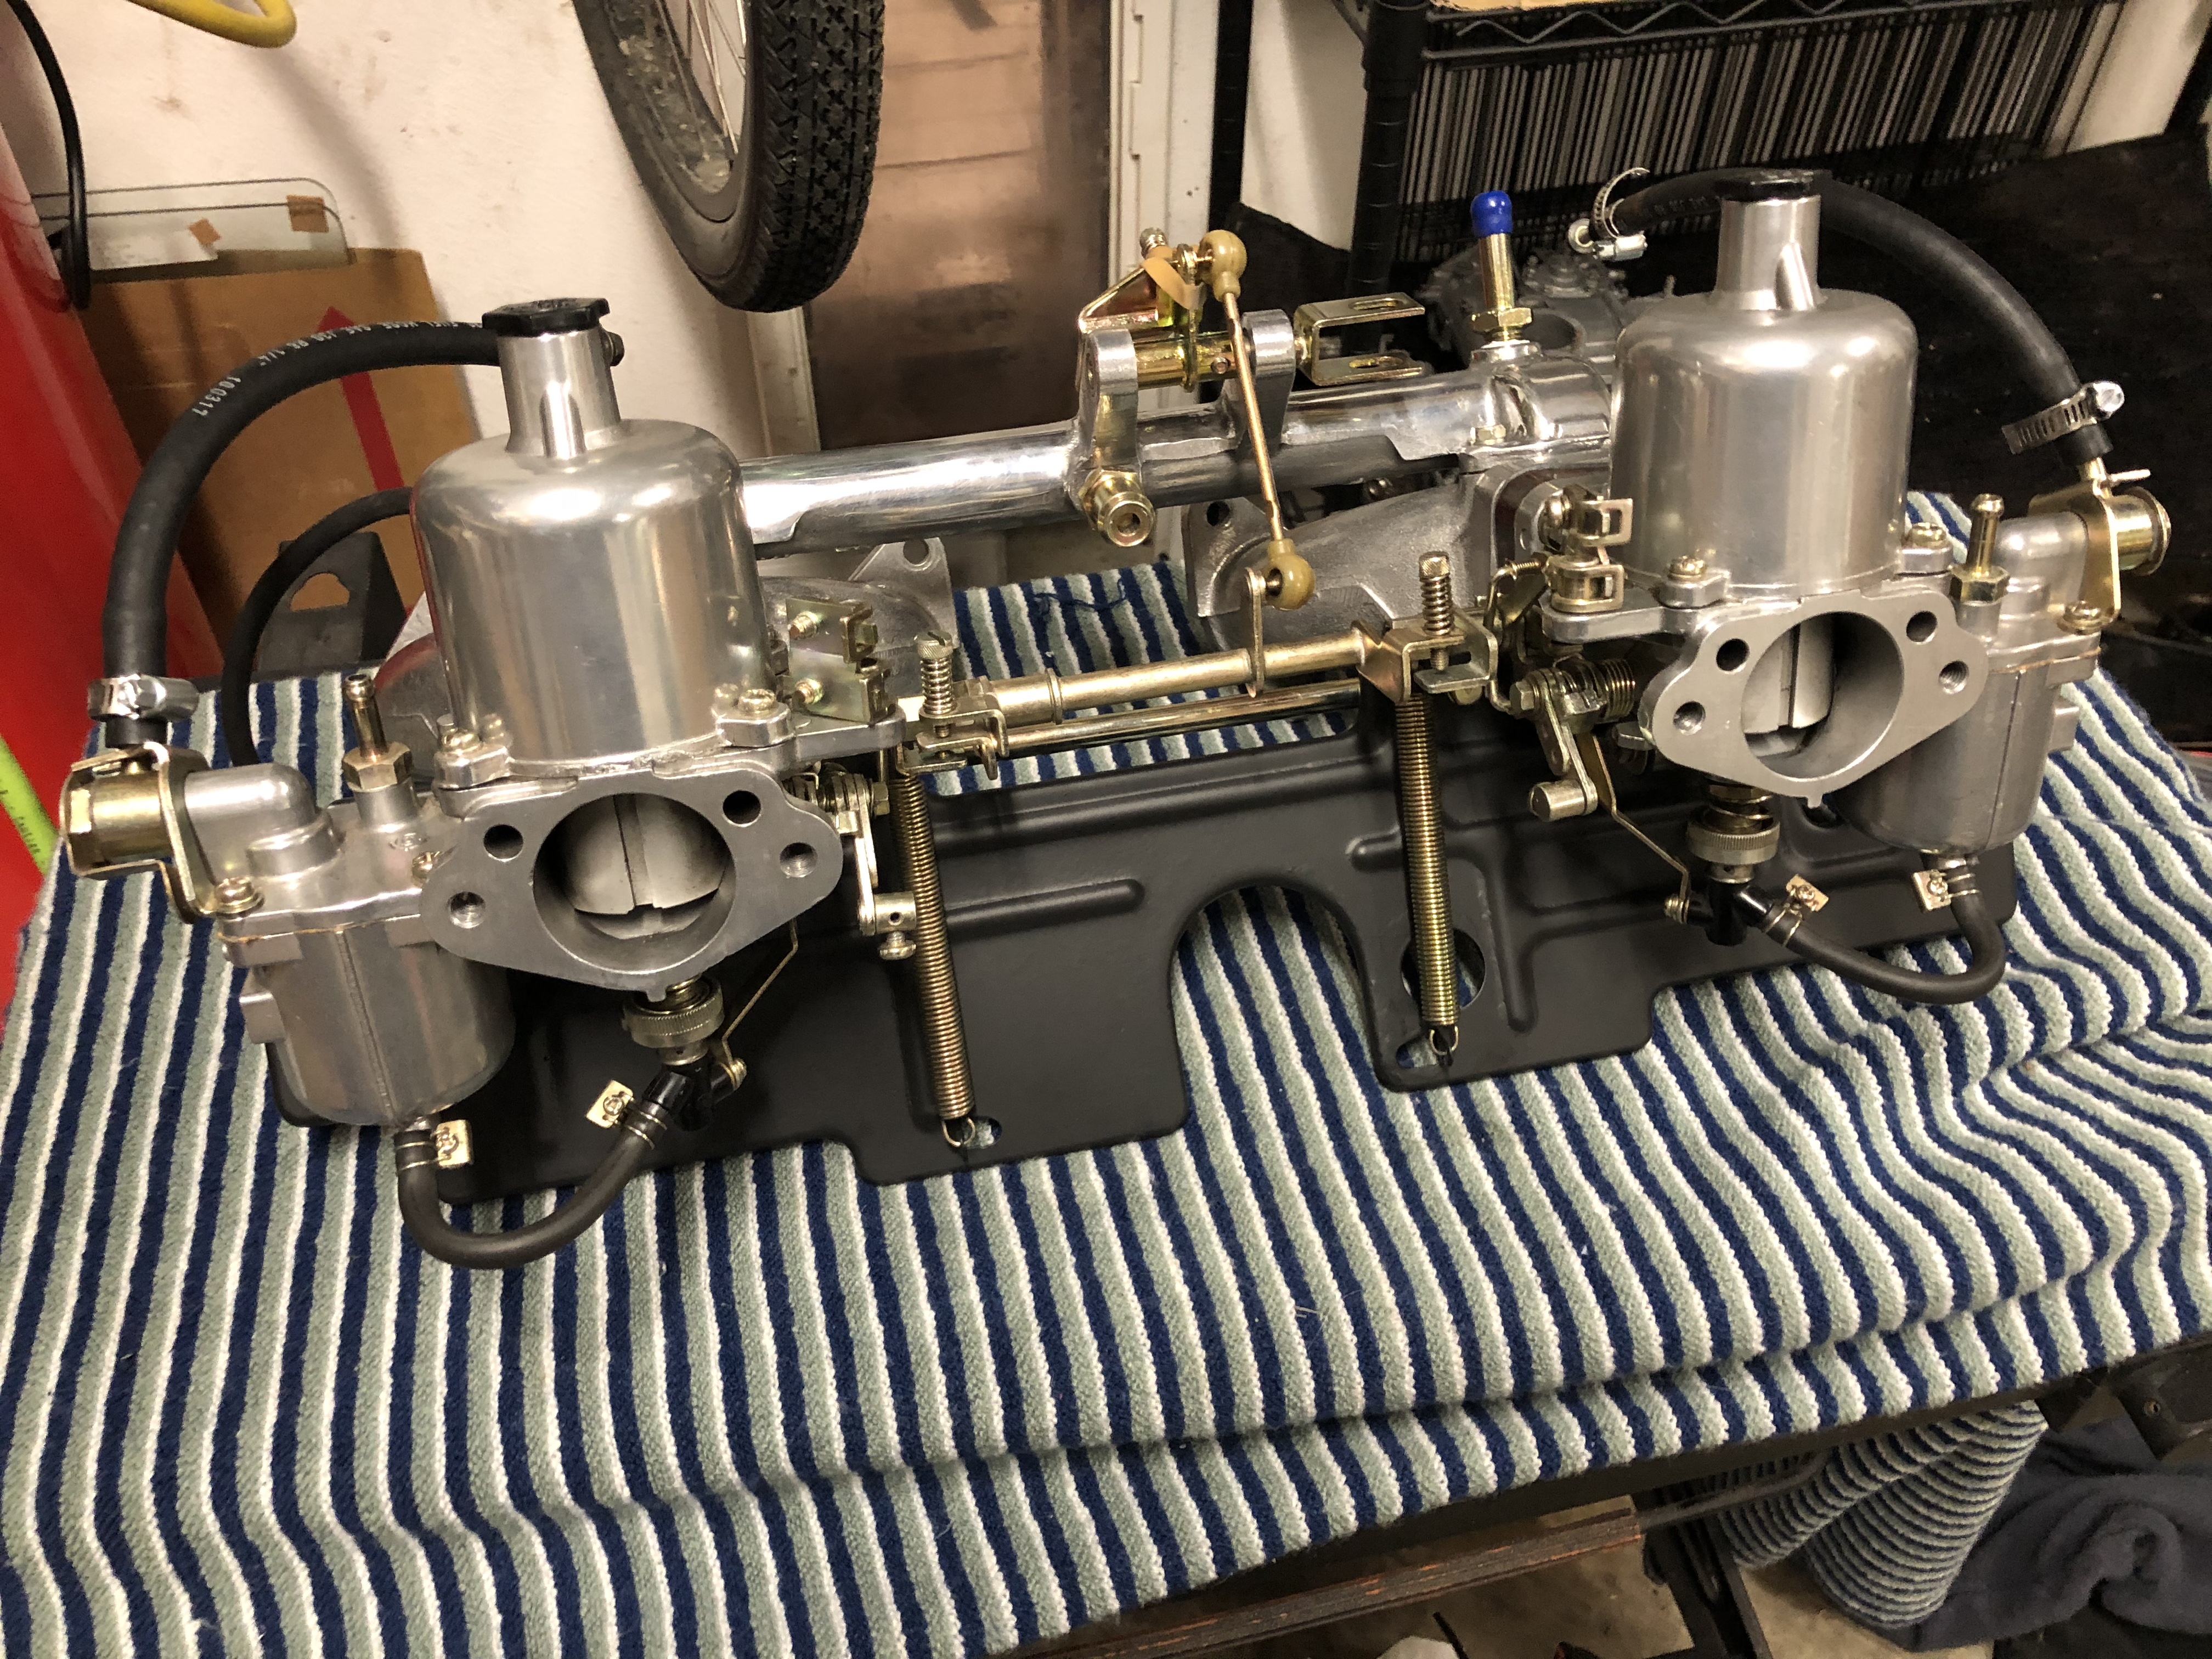
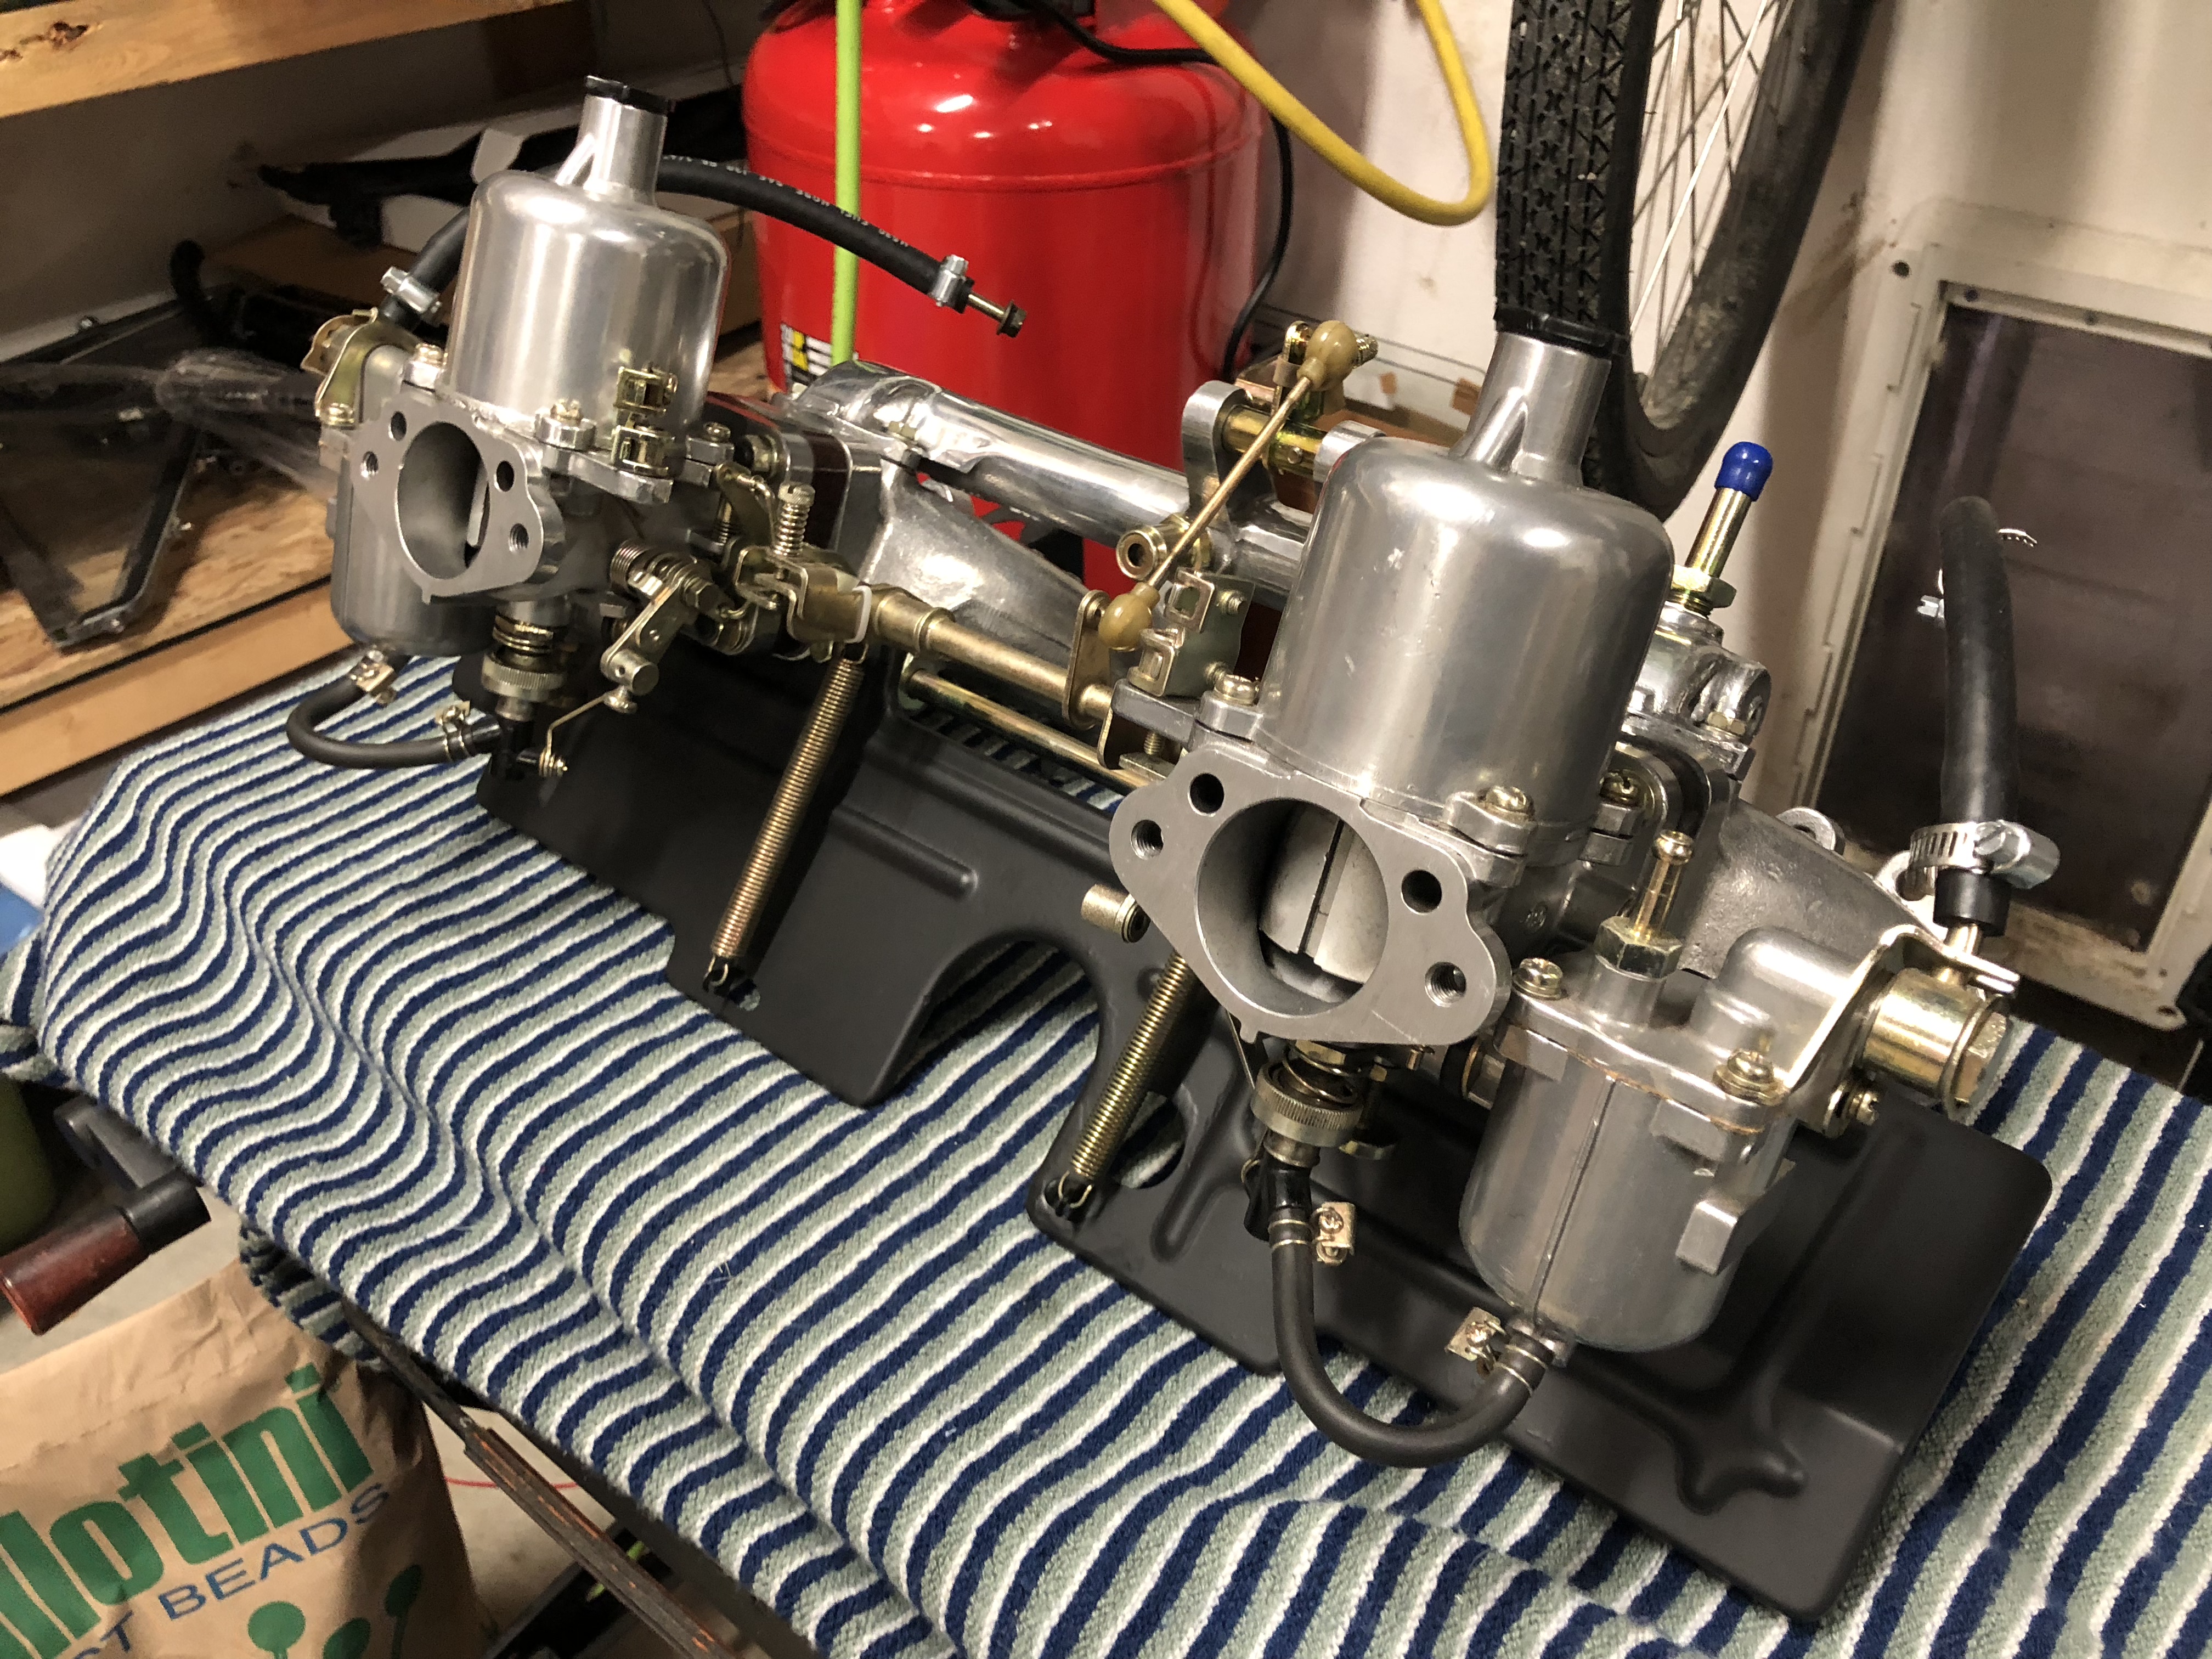
1 pointSo, all this talk about fuel level made me go recheck mine. Especially since I set the rear carb the same as the front using the clear tube method. Removing the pistons and looking at the top of the fuel relative to top of nozzle, the front was perfect and the rear was way low. So, working on the rear, I set the float so that it was about 1/8” from hitting the cover when inverted. Rechecked fuel level and still not even close (ie 1/16” from top of nozzle). Turns out the tang needed to be bent so that float hit top of lid, when inverted. But, this is okay as fuel shut off occurs prior to float hitting lid. Now all is good, both fuel levels set to 1/16” down on 2.5 turns. Fine tune required leaning front and enriching rear...no more than .5 turns for each. I am hoping cold start is vastly improved. 2/26/18 update: Cold start is vastly improved. But, I will need to wait until the temps are in the 30's to know for sure. Also, engine "bucking" when cold and under load has been eliminated. Rear carb was WAY too lean...explains alot.1 point
-
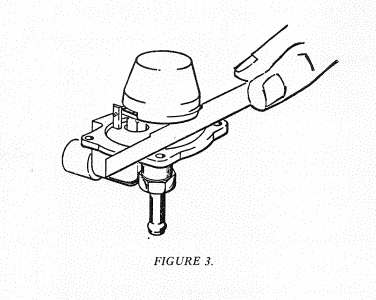
1 pointI know you are frustrated, but I'm not sure anyone is going to be able (or willing) to say your fuel levels are okay based on a picture of the tubing fluid level. I personally think you should give up on the sight glass method you are using, and try something else. or at least check your levels with this method and see if you are way off base. The problem is this diagram shows the level with the float sitting in the fuel, which would bring it further up than it would be when the lid is off. This is why the method i used of 10 turns down of the nozzle checks this... as that would equal the 1cm down shown on the right side. Use a flashlight to check the fluids position on top of the nozzle. See these references: http://datsunzgarage.com/engine/index.htm THE TRICK: I did some measuring with a straightedge and found that on my 4-screw SUs a 23mm fuel level in the float bowl corresponds to exactly 1 centimeter (10 millimeters) below the fuel nozzle "ledge" in the carb. But how do you see to measure fuel 1 centimeter down inside the fuel ozzle? See below. - Remove the dome and main piston from each carb so you can look down the tip of both fuel nozzles. - Screw each mixture nut exactly 10 turns down from fully up. Each full turn drops the nozzle tip 1 mm, so 10 turns puts the tip of the fuel nozzle 10 mm (1cm) down....which happens to be the 23mm float bowl level. - Then look down the tip of each fuel nozzle and adjust each float to set the gas level at the fuel nozzle tip. I ended up taking mine to 9 turns down and set the fuel at the meniscus of the tip. Then when I went to 10 turns the fuel was exactly at the tip. A bit of a juggling act but after a few minutes you will get the hang of it. When you get them to match it's a great feeling. NOTE #1: if your mixture nut won't go down more than a few turns, it's because the factory "stopper" next to the nut is still in place. Unless originality is a concern, you can permenantly remove both stoppers from the bottom of the carb. NOTE#2: if the fuel level is too high and overflows the nozzle tip, you will need to drain each float bowl a bit before starting again. The result was a lower, more solid idle and less choke needed at startup. I get no stumbling off idle and part-throttle acceleration is smoother, acceleration more powerful. Cruising on the interstate requires a lighter touch on the accelerator. Interesting.1 point
-
1 pointI experienced ocassional fuel bowl overflow. I attributed the issue to less than optimal float tang geometry. The modern valve stem design does not glide on the tang as easily as the original design as has been said in this thread previously. My solution was to remove the sealing washers from the base of the fuel valve body to lid/inlet port. Once I did that, tang to valve geometry is improved and issue went away.1 point
-
1 pointFuel adjustment all the way up. Turn it down 10 turns with everything assembled except the domes and pistons. Let the fuel pump fill up the bowls without the car starting. Check the fuel levels relation to the top of the nozzle by eye shining a flashlight in. If it's above the top of the nozzle, remove the float lid, bend the Tang in correspondence with raising or lowering the fuel level, suck out some fuel so it's back below the nozzle top. Reinstall float bowl top. Run the fuel pump again. Check. Repeat until done. You want the fuel level right at the top of the nozzle hole and right on the verge of flooding the top on the nozzle which is now 10 turns down into the bushing. You want the fuel to remain down inside the nozzle but right the the top. I unplug the dizzy and use my starter motor and battery to cycle the fuel pump and check what it fills to. After you are happy with the level... Reassemble everything. Undo all 10 turns so the fuel adjustment is at the top. Then go down 2.5 turns and use that as starting fuel level for tuning.1 point
-
1 pointThere are solutions posted that don't require anything but an initial ballpark for the float position. This is what I had to do. I would suggest not even bothering with a measurement, and instead install it, fill the bowls and see how high they are. Then adjust the float up or down and repeat. This is the only way I could get mine properly set, and I well understood why my original measurements weren't working. Bite the bullet and forget about the 14mm etc. I stand by the 10 turns approach and set as I detailed above. This didn't originate from me, but it did work well for me.1 point
-
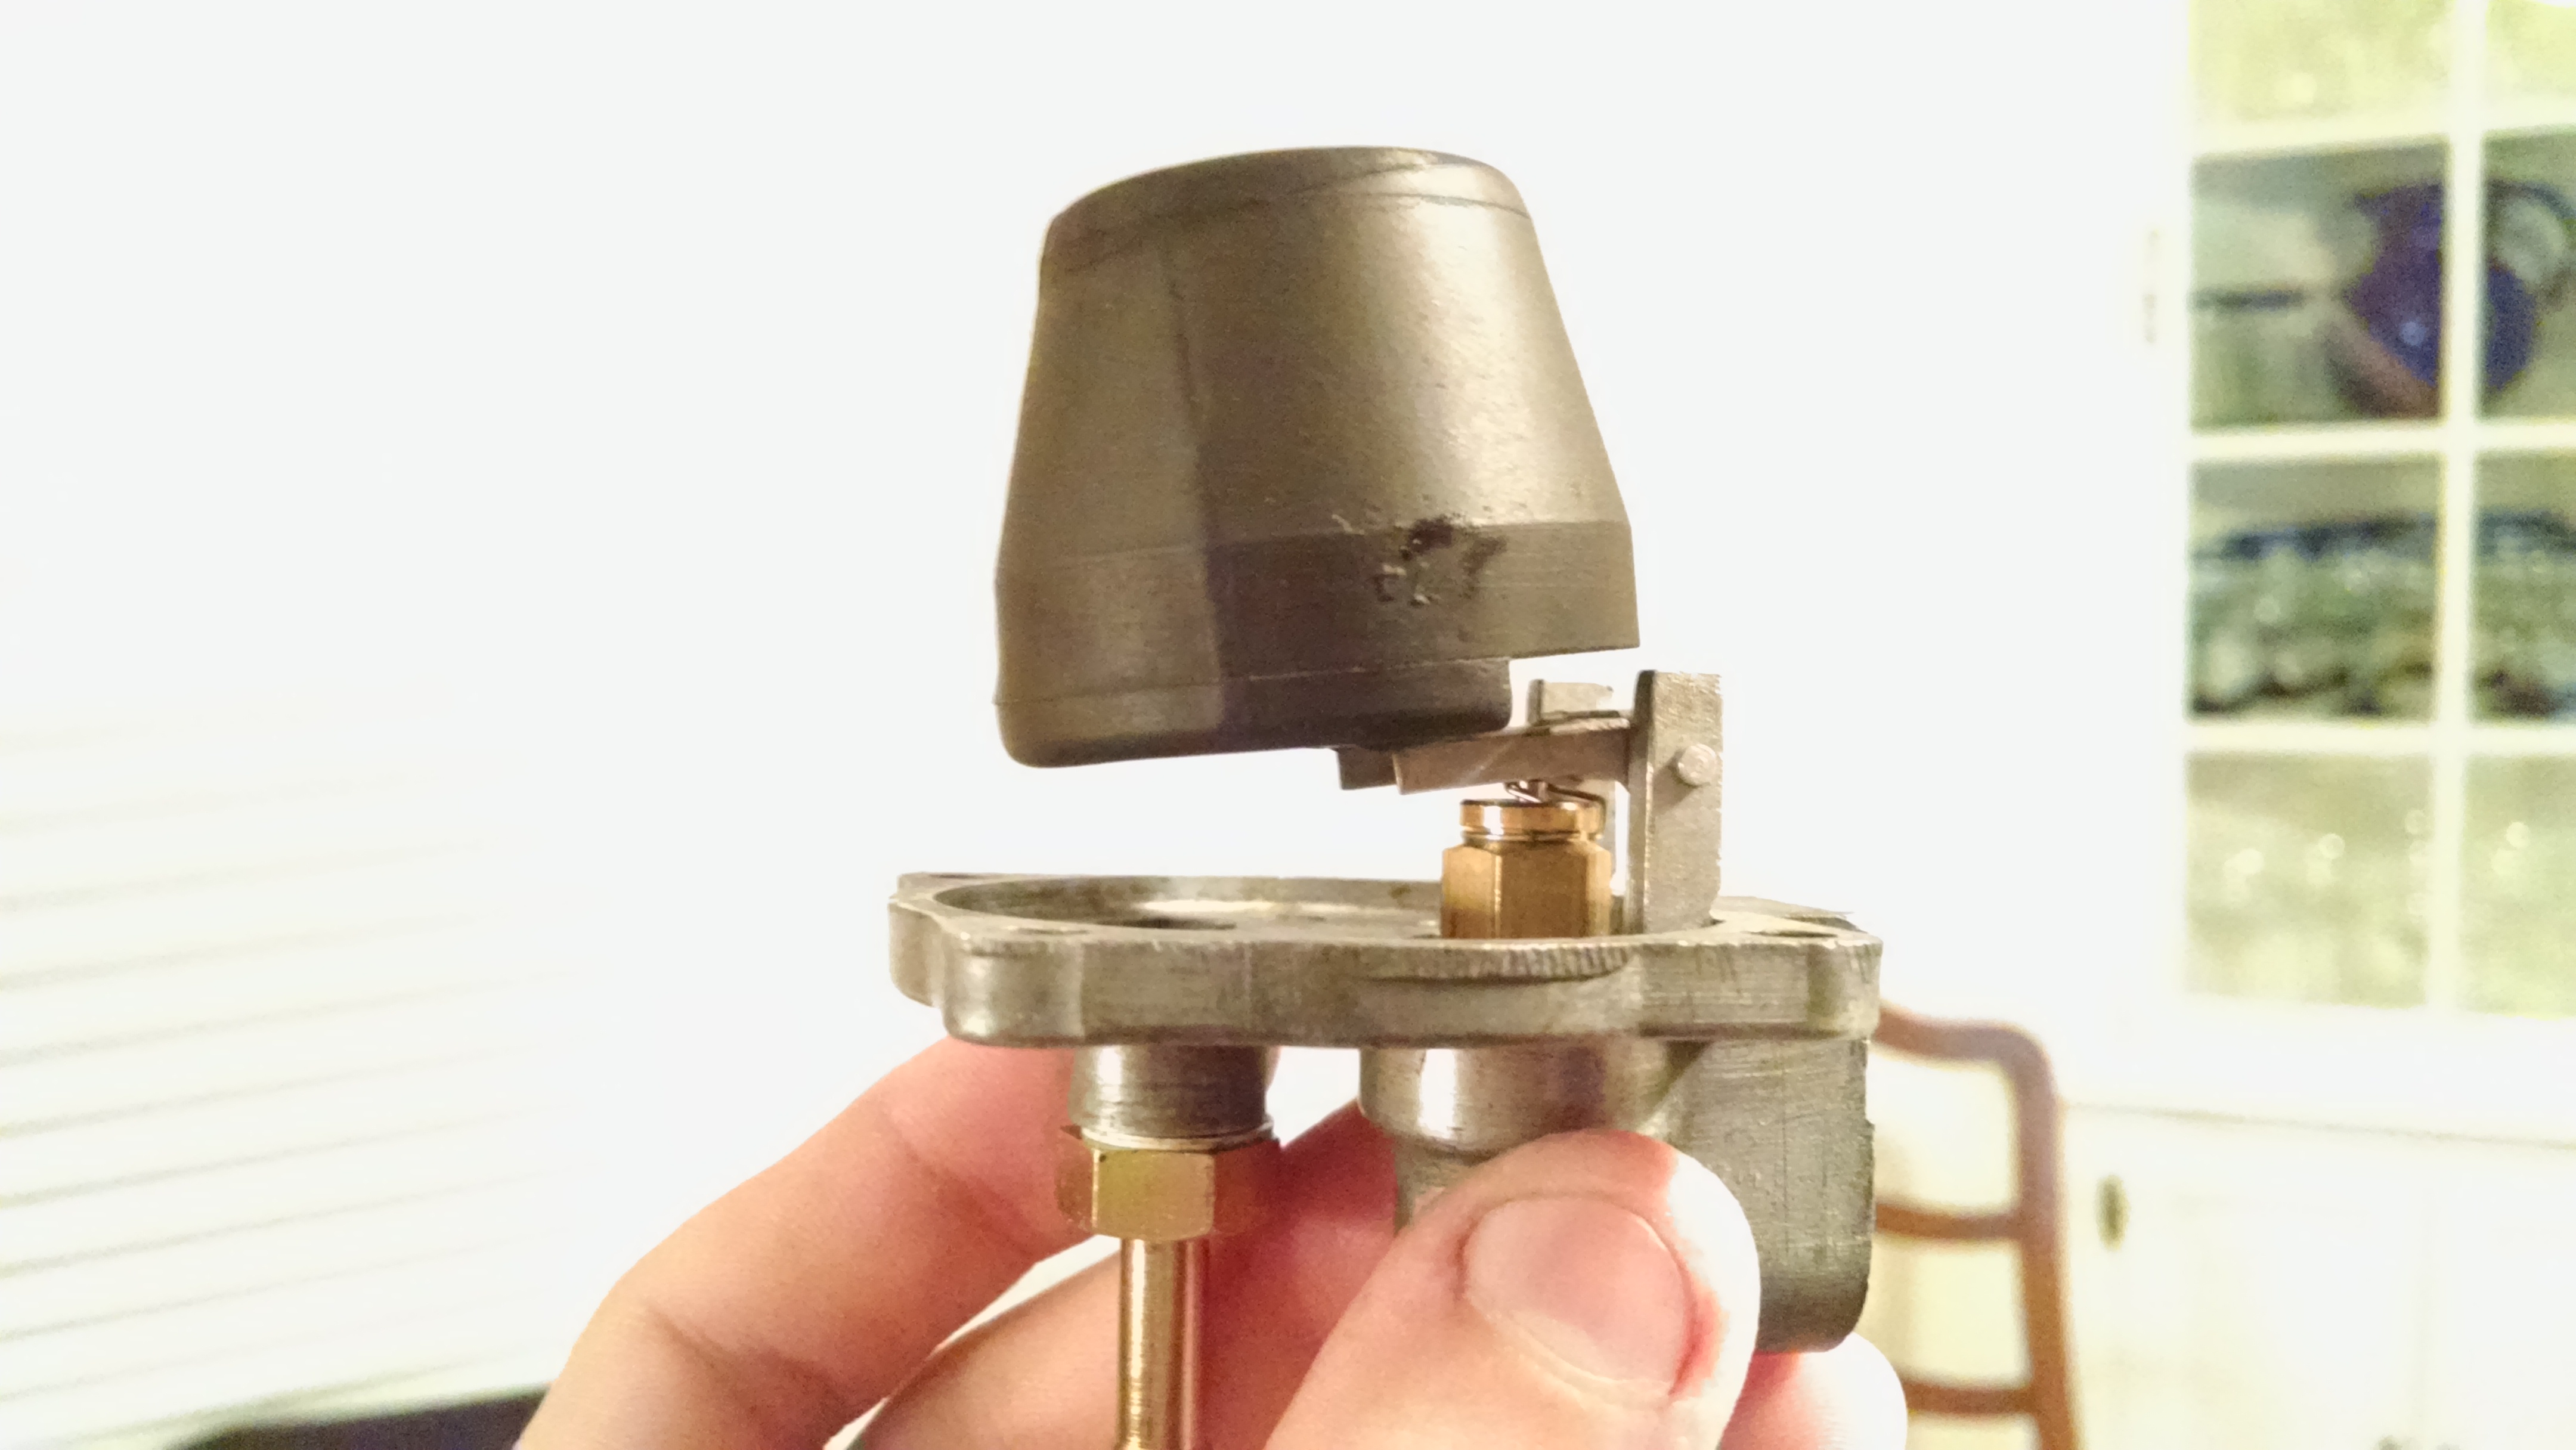
1 pointThe attached image is the method often called for to set it initially, including what ZTherapy's DVD shows. This is what did not work AT ALL for me, because the grose jets that Ztherapy sent me no longer can support the weight of the float and made the adjustment very different from what the original intention was. If you use original jets with stronger springs then you can probably still use the original method. ---- For the Z therapy jets....technically what this image is illustrating is that at this height of the float, you want the grose jet to close and the fuel to shut off. I tried to simulate this by running a hose to the inlet port and pressurizing it by blowing in to. As I moved down the float I noted when the grose jet closed, and at THAT point in the travel, the gap from the lid to the float should be the 9/16" In actuality this didn't work and my levels were way off. So I did it the more cumbersome way by replacing the lid and float assembly each time I needed to adjust the tangs. ---- I even called Ztherapy to ask about this and was basically told that the adjustment method used in the video wasn't valid any more with the style of grose jets they use now. (I can't swear this applies to anyone else besides me, but that's what they said to me) I attached a picture of my float assembly which shows it being very droopy because the spring that forces the grose jet open wasn't strong enough to hold up the additional float weight so it just compressed. I had to bend my float bracket to such an extreme level to get the measurement that it didn't look right. If I recall correctly it made my fuel level way too low. As for the grose jet... I don't know if the Nissan one went NLA... I used the Ztherapy ones.
 1 point
 -
1 pointIf you look around this forum, (it may have even been in this thread or posted by those I am replying to) the method I found for setting the proper float levels was... 1) Adjust your fuel nozzles all the way to the top, so the top of the nozzle is flush with the bushing in the carb housing. (If its not maybe there are pieces missing in the stackup of hardware, not sure.) 2) From there back the nozzles down a full 10 turns of the fuel adjustment. Its quite far. 3) At this point you want the fuel level when the bowls are full to be at the exact top of the nozzles in their lowered position. If you shine a flashlight you can see the fluid kind of "doming" as it reaches the top but hasn't spilled over. (I found it easier to actually go like 9-9.5 turns and have the fluid lower in the nozzle. Then as it turned it to 10 turns watched to see if the fluid changed or spilled over the top as I passed 10 turns.) 4) Once you have this fuel level set correctly your floats are done. You raise the nozzles up all the way to the top, and then back them down the 2.5 turns which is your "starting point" for tuning. From there you can adjust to get maximum airflow and maximum RPM (richness/lean-ness) I'm far from a carb expert, I'm only 34... but this is what my research on this exact forum showed as the most foolproof way to set the float levels especially given my inconsistent results with the Float to Bowl Lid gap method that Ztherapy's DVD calls for. I could be totally off on all this, but my car runs pretty well and tuned as expected so I don't think I am way off base.1 point
-
 1 pointYou could always try and find the factory rally springs, this guy went into immense detail about the factory Torco options with spring rates and diagrams. If the factory rally setup could survive the EAS it can handle whatever you plan to do. http://www.jdmjunkies.ch/wordpress/2017-01-19/240z-the-ultimate-guide-to-factory-suspension-and-options/1 point
 -
 1 pointTurn that assembly upside down and get in front of a mirror. Hold the float with your other hand. Blow into the fuel supply hose barb. When your breathe starts passing through look into the mirror and see where the float is. Bend the tab until the float' roof is parallel with the lid's roof. You will be close. Find something .55" thick and use it between the float and the lid while still using your breathe as fuel to get the float .055" lower than the lid. I can't be any clearer, that's as simple as I can get without puppets. You cannot set the float level upside down with the weight of the float against the pin. The newer style valves are very sensitive and will not resist the float's weight at all, period, done.1 point
 -
 1 pointWe sent out the invites for guests recently, so we don't have responses back, yet. I'm pretty much counting on John Morton being here on account of his friendship with Randy. I can't remember the full invite list, but it does include some familiar names like Yamasan and Matsuosan. The track day will be at Road Atlanta. Even if you're not taking a car on the track, it's a great place to hang out. People in the Southeast who haven't been to Road Atlanta before might want to come down for The Mitty this year and get an idea of what things are like at the track. It's one of my favorite hangouts in the Atlanta area. I believe we will also be trying to recreate the photo taken at the previous ZCON in Atlanta. The autocross will be at Lanier Raceplex. The facility began its life as an oval track, and the current owners paved the infield. It makes for a tight, short autocross course, and competitors should be able to get in several good runs. It will definitely focus on handling and concentration as opposed to horsepower. After autocross, there's not much reason to head back to the hotel quickly because we also have an evening of karting at Lanier Raceplex planned, as well. These karts are capable of speeds up to 60 MPH. For people who aren't able to bring a car for track day or autocross, here's your chance to show off your driving skills. There will be a trip into Atlanta one night for an evening at Sweetwater Brewery where you can sample some local craft beers. For those of us wanting an alternative experience, I am trying another karting event together at K1 Speed. It's an indoor facility with electric karts. It's also within staggering distance of the hotel, though I'm not trying to imply that it's part of a pub crawl event. We're also planning to lead a drive though the North Georgia Mountains. The Prezident of the GZC is a Civil Engineer who has spent much of his career working with GDOT on the roads in North Georgia, so he is very familiar with the best of the twists and turns in the area. We'll plan a route that will take the group up to Helen, GA, a community with architecture modeled after an old German town. I'm getting together a list of shopping and wineries, as well as a good list of local attractions. I'll include some off-beat opportunities and small car museums, too, like the Georgia Racing Hall of Fame, Old Car City USA, and Tank Town USA. By the way, the Sonesta Hotel was picked in part so people can easily drive to places like Road Atlanta, Lanier Raceplex, and the other attractions of North Georgia. If you leave in the morning going north, you should be able to avoid most of the commuter traffic. We are hoping to give convention attendees the opportunity to have as much fun as they want.
 1 point
 -
I sent a message to Greg@TheZStore with a link to this message. They can't help if they don't know. Gonna try oe of those @ things - @Joseph@TheZStore @Joseph@TheZStore siteunseen likes this Like t1 point