


Leaderboard
-

siteunseen
Free Member4Points15,132Posts -
KONI Lee
 Vendor4Points28Posts
 -

wheee!
Free Member4Points4,607Posts -
Captain Obvious
Free Member3Points10,090Posts


Popular Content
Showing content with the highest reputation on 02/11/2019 in all areas
-
4 pointsHello all, my name is Lee Grimes and I am the Automotive Product Manager for KONI Shocks. I have been working with Greg and Joseph to get these new Z-car parts to market and help answer some questions. He pointed me to this discussion to maybe give some clarity or assistance. I won't be able to stay as a regular contributor but I will be happy to check in for a little bit to help people understand the new parts. A bit over a year ago, Motorsport Auto came to KONI to see if we could revive and modernize our offering for the early 240Z, 260Z, 280Z and 280ZX. Needless to say we jumped at the chance to offer proper products for these important cars. Off and on through the years KONI has offered the tradtional red painted KONI Special strut inserts with internal (off the car) adjustment for 240Z through 280ZX. In the late '70s-and early '80s KONI also offered an externally adjustable version for these cars excluding the ZX but they were discontinued by the mid-'80s. Now was time for an update. With Motorsport Auto as an exclusive partner stepping up to take full production run volume, we developed and tested new externally rebound adjustable (knob adjustable on the car) yellow painted KONI Sport strut inserts for these cars and a externally adjustable rear shock for the ZX. We started with the external adjustables from the 1980s as the launching point and even used the same part numbers this time with the SPORT suffix in the part numbers. We then updated the internals a bit (it was no slouch to begin with back then though) to more modern seals and guide components and set the valving to work well with either factory stock springs (starting baseline adjustment at or near full soft) or performance lowering springs for perforamnce street, autocross, track day, etc. use (starting baseline adjustment about 1/2-3/4 turn up from full soft setting). Like all KONIs, the adjustment range is about 100% so they are twice as firm at the maximum setting than at the minimum setting. This is a very large range of adjustment so we suggest that you start in the lower end of the range, drive it for a bit to get a feeling for it, and then tune accordingly from there for your ride and handling preference. I think it will be very rare that people will use more than 1 turn (about 50% higher than full soft) for normal use when they are new. Because the adjustment range is so large, it allows you to compensate for wear over extended time, tune it high for an autocross or track day, and then quickly turn it back down for street use. Because the range is so large, it is possible to overdamp the car for your needs and actually make it more harsh and have less grip than needed so do not just turn it way up figuring that "more is always better". Although these could be used for a dedicated track and racing car, their needs and expectations are different and we do have other racing options (e.g. 8610 RACE and 8611 RACE) where street handling and ride quality, high mileage longevity, etc. are no longer important. These new Z-car Sports are targetted to take you from stock Z- car to just shy of all out racing. They carry KONI's limited lifetime warranty against defects and materials to the original purchaser as long as tht person owns the car registerd for street use. Regarding the discussion about bump rubbers, you can use a good condition OE type bump rubber for a Z-car, one of the black urethane ones that Motorsport Auto sells, or the KONI Racing Silastic bump tops made for use on a 22mm piston rod. KONI does not have a specific bump stop length suggestions as different ride heights and springs will determine what length you need. The imporant part is that you have some bump rubber installed to keep the strut or shock from bottoming out internally which can cause internal damage that will cause loss of function and will not be covered under warranty. The first production runs of the fronts and rears for the 240Z, 260Z, and 280Z are currently in-transit from KONI in The Netherlands due in mid-March. The 280ZX fronts are in-transit as well but the 280ZX rear shocks are awaiting final production due to to different compponent sourcing but will be here ASAP. Please be clear that these were specifically developed only for these Z-car applications and they are not crossovers from ome other vehicle. Because these parts are exclusive to Motorsport Auto and no other KONI dealer has access to them, we will not be listing these part numbers on our official KONI websites for North America www.koni-na.com or Europe www.koni.com. If you have any questions, pelase contact our Technical Staff at info@koni-na.com or 859-586-4100 Option 6 from M-F 8-5 Eastern time.4 points
-
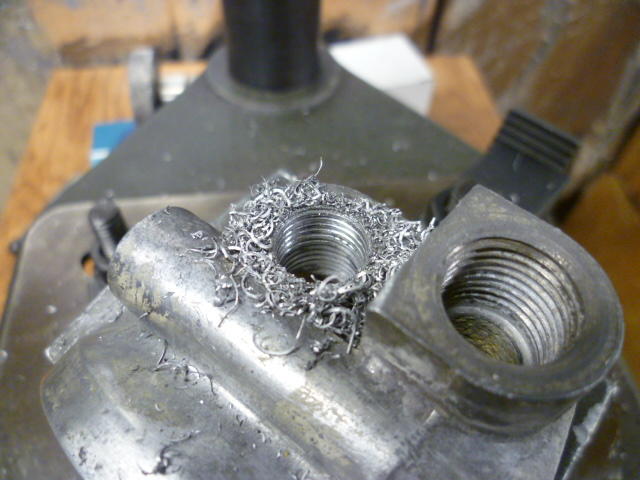
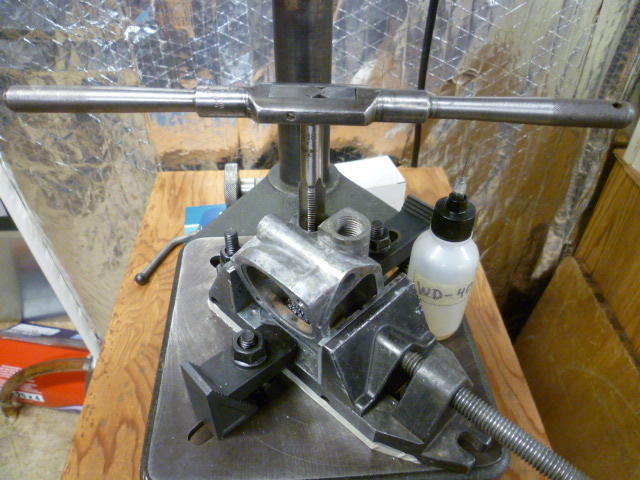
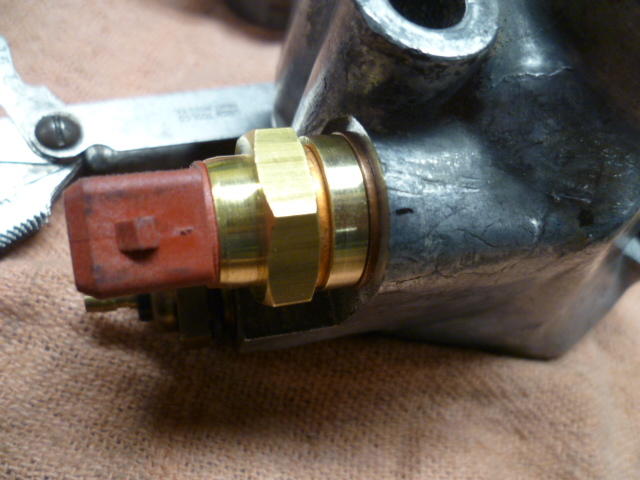
2 pointsNo, unfortunately the 280 temp sensor did not fit correctly into that hole.. And that's one of the things I did to the 260 housing was to figure out a way to make that sensor fit. The temp sensor is straight threads and seals with a washer, so not only is the thread pitch wrong, but the sealing style is wrong too. I wasn't thinking this at first, but my project is actually relatively applicable to what you want to do, isn't it? So here's what I did to get that sensor to fit... First, I drilled out the original hole some: Tapped it to a straight thread. 5/8-18 I believe: And them made a brass adapter to bring the hole size back to what is necessary for the temp sensor: A little blue threadlock so the sensor will turn before the adapter will, and glue the adapter into the housing. Then thread the sensor into the adapter: All that said... That's why I think it would be easier to just use an adapter to the other larger hole. That option was not available to me because I had plans for that other hole. I use the larger hole to supply water to my throttle body. I'll check all the sizes when I get a couple moments in the shop.

 2 points
 -
2 pointsLOL, the Z is is not for sale! ? But it is silver with black inteiror.2 points
-
2 points"To Serve Man". The very best ending to a Twilight Zone. Thoughts on Utopia. When I was young, I felt that way about old people. Anyone over thirty just didn't get it. Now that I'm almost seventy I realize that it's kids that screw up Utopia for the adults.2 points
-
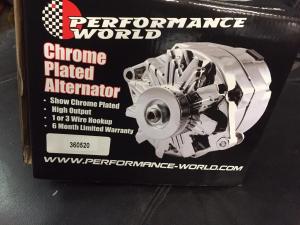
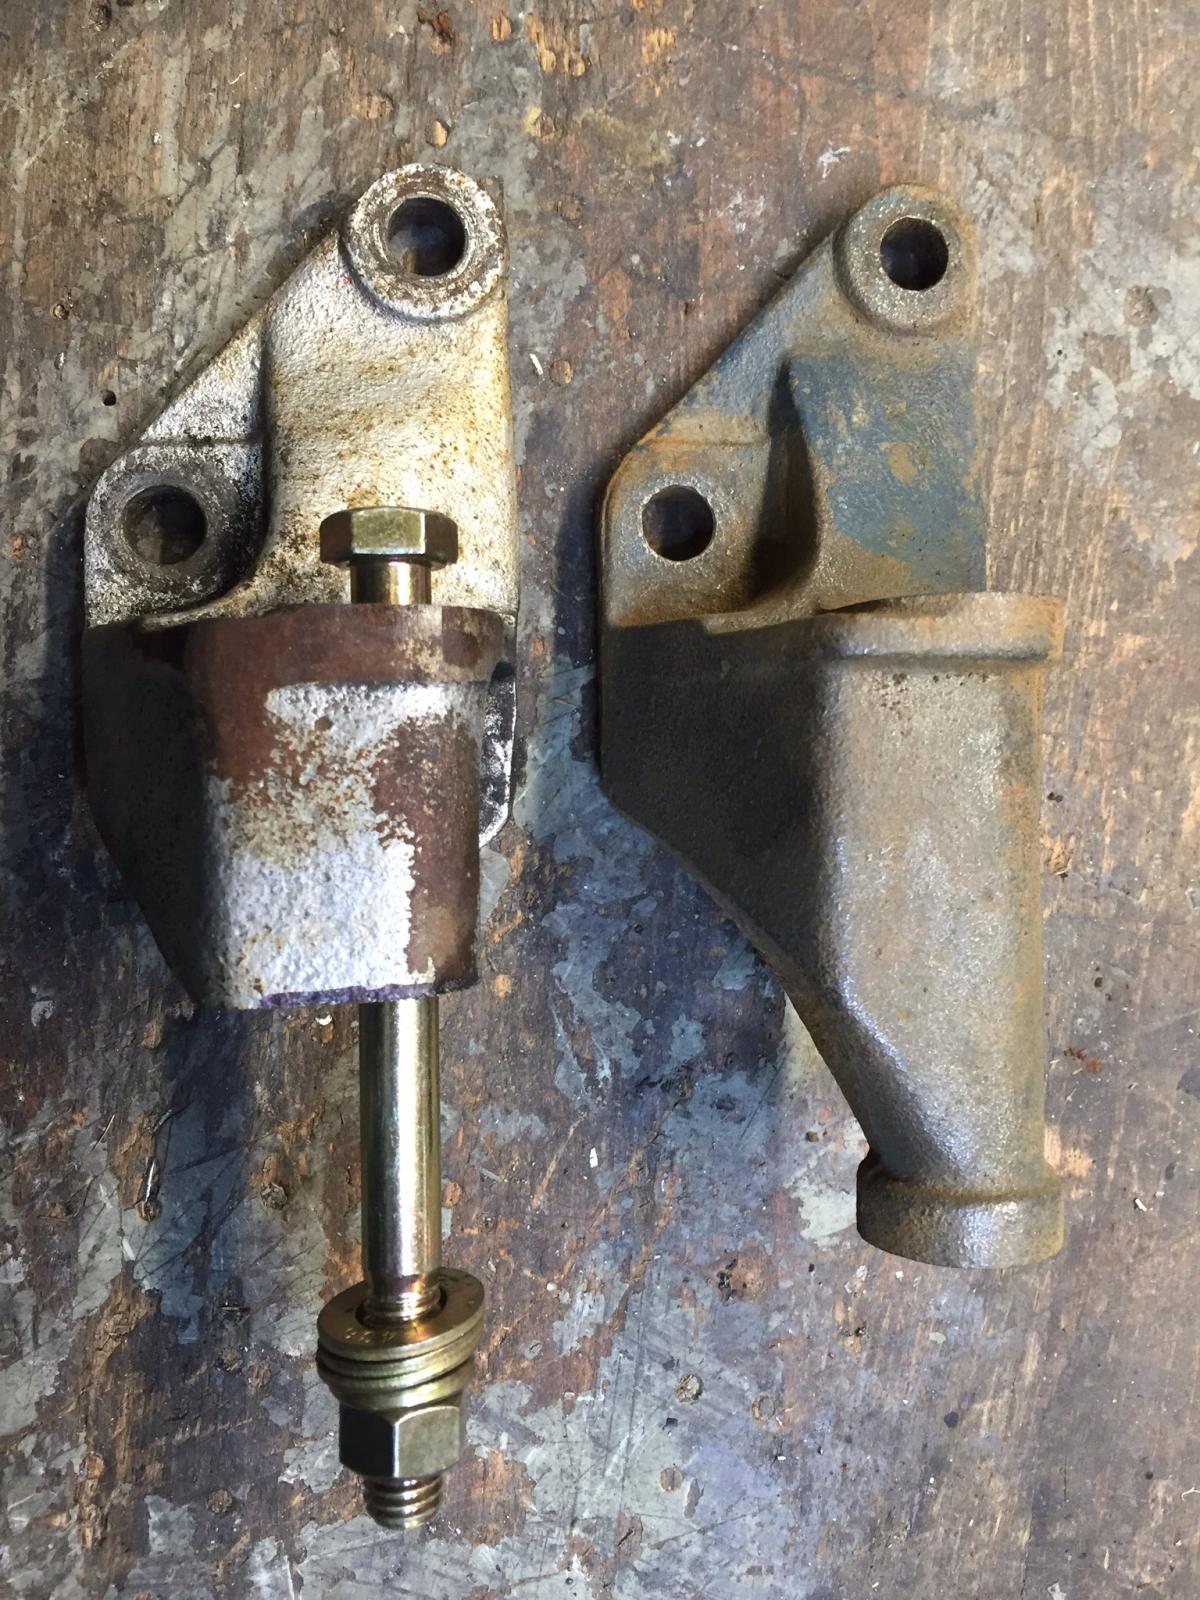
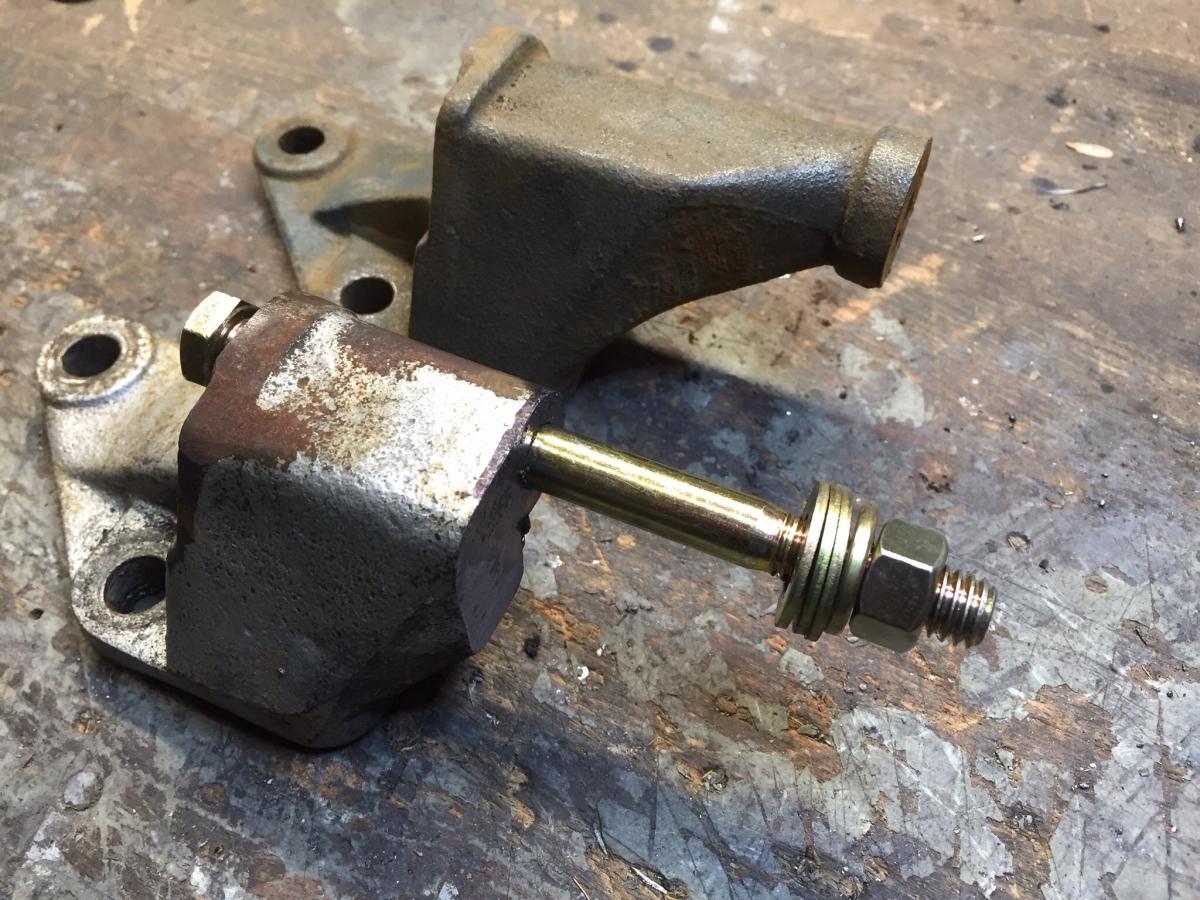
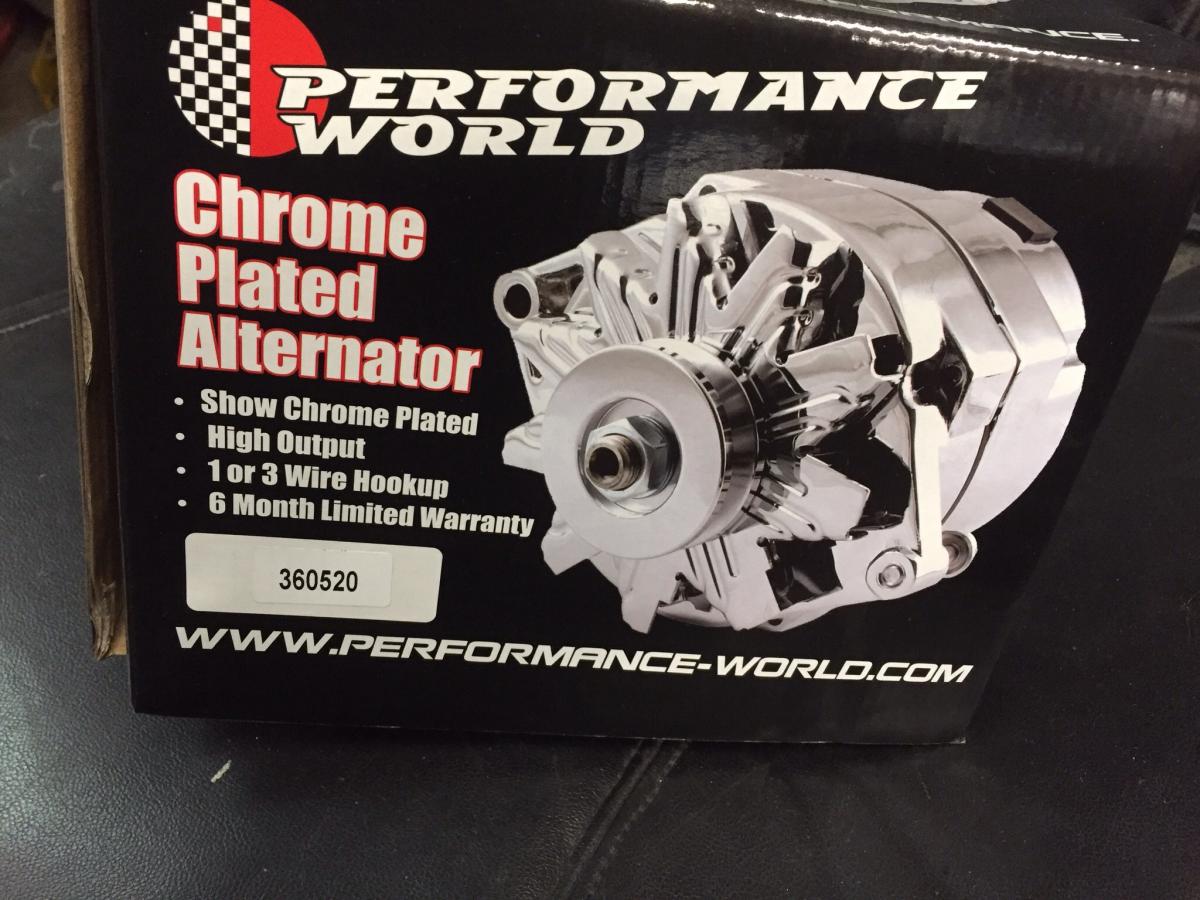
2 points2 pointsThanks guys. Last couple of weekends have been cool and wet here, so I didn't work on it until today. I checked the three (rear) plugs, which looked a little dark brown, but otherwise practically new. Gap was OK on all. The front bowl was clean last time I looked, but there's usually a fine dust at the bottom of the rear bowl. Re: nozzles, Huge THANKS for mentioning it! Rear nozzle was _really_ stuck. Re: valves, I have heard some valve noise (tapping under valve cover), so was considering this too. I balanced the carbs a few weeks ago. I'll focus on mixture-adjustment again, next weekend, weather conducive. Thanks/Cheers.2 pointsSo you're on the road at night cruisin' in your Z. Slowly you notice that your headlights are getting dimmer and dimmer. You check your ammeter or voltmeter and see that your system is in discharge mode. Oh crap. Belt fall off? I hope so. Nope, still there and tight. oh oh oreo... Well you got that "big" 60 AMP internally reg'ed ZX alternator just a few month's ago, but I guess it gave up the ghost. Trouble is you're in Podunk Kansas and the local AutoZone doesn't have one in stock and can't get one for four days. Now what? Me, I'd rather have a common alternator, one I can get anywhere. And I mean anywhere. About the only sane choice is the GM 10SI body alternator. I know I know, you're thinking, "this GM alternator thing has been discussed to death", well, yes, but if you go looking you will find a variety of GM alternators discussed and the mounting of them is a bit of a mess. Advantage 1: Available anywhere, Advantage 2: Cheap Advantage 3: Internally regulated, one wire. Advantage 4: Available from 100-140 amp. Electric fans, big lights, big stereo, no problem. Advantage 5: Available anywhere. Yeah, again. Mounting is pretty easy after you get past the first issue, ie that the lower alternator mount has to be modified. It has to be cut and drilled. Here is where to get one. I picked mine up from Mopac in Calgary for $134 CAD all taxes in It fits the stock space well, even uses a 8x1.25 bolt at the upper mount point. You need to cut the mount off to leave 1.75-1.8 inches remaining. The cut face must be flat and flush and square the mounting surface. The alternator position is determined by this face, it has to be decent. The drill out the 8x1.25 threaded hole to 3/8" through the whole thing. You'll need a 4.5 x 3/8 grade 8 bolt, washers to space it just perfect to match the plane of the water pump pulley, and a nut/lock. I used a 4L350 drive belt. 35 inches long. PS, I have one of these in my Z and 510. Don't leave home without. Here is where to get one if you're the on-line type: https://www.performance-world.com/ProductDetails.asp?ProductCode=360520 I got mine at Mopac in Calgary for $135 CAD all taxes in. Show Chrome polish was $10 more. Yes really. Cutting, facing and drilling those brackets properly is a bit tricky without a mill. I have a couple of spares if you want one. I can wip them up in 15 min. Or send me yours. All I'm missing here i year/make\model spec to tell the young'en behind the counter when you need to find one in Podunk Kansas. (I've been there, its not so bad...)

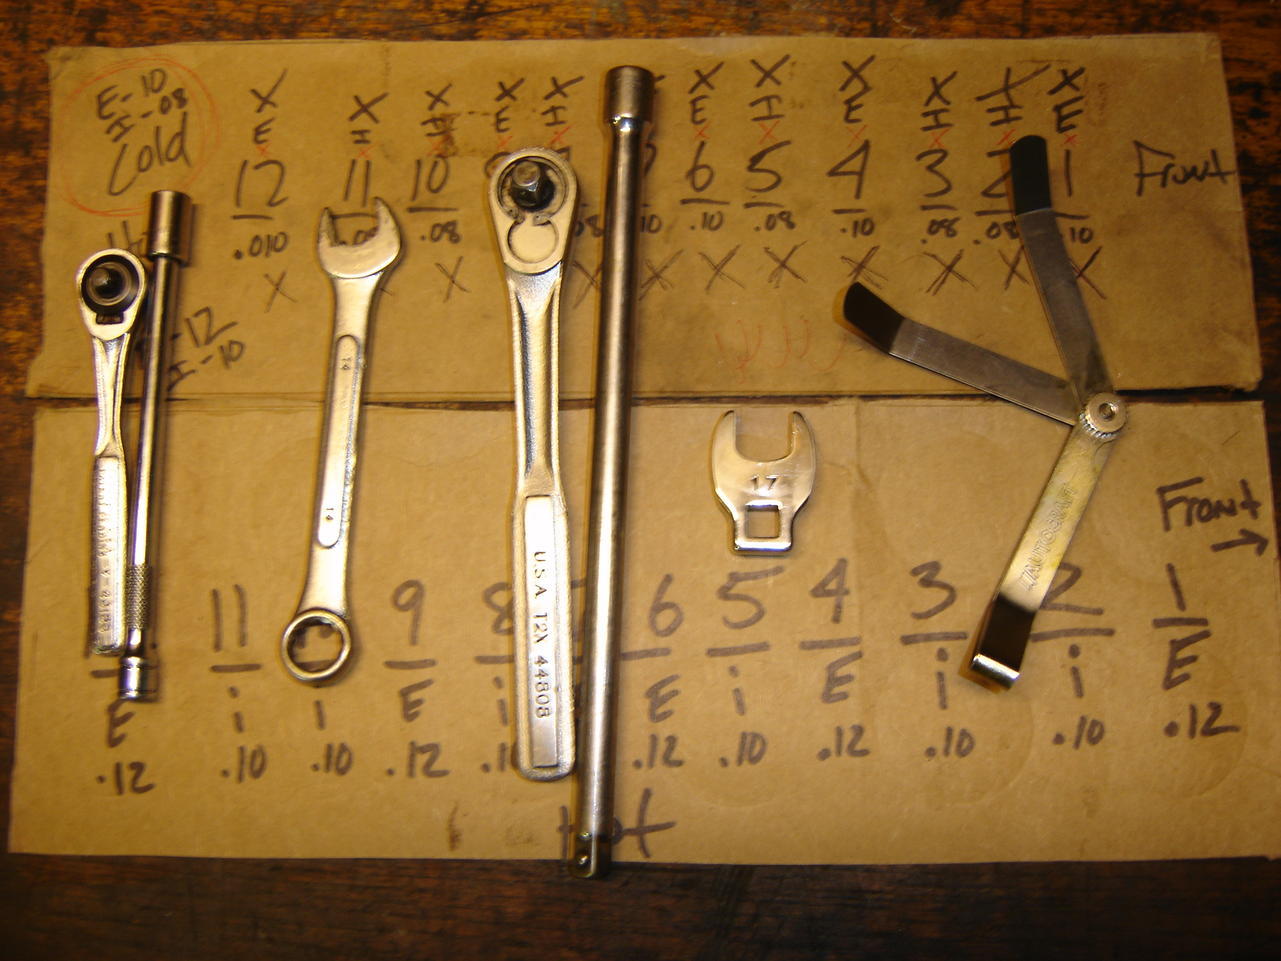
 1 point1 pointMight as well have them block off the rest of the unused vent and evaporative tubes while it's there..1 point1 pointI called and had them reverse the vent tube that has a "u turn" in it.1 point1 pointIf the shop will reverse the output from that vent to eliminate the need for a 180 degree turn in the hose - DO IT - far better solution. There is no need for the hose to be bent, nor reason that vent points the wrong way.1 pointPaddle shifters would be almost impossible. But maybe you can do it. What track will you use, Barber's? We don't have too many around here. Are you looking for an S30 Z or something newer? I will help if i can. I'm up in Gadsden, 1hour north of Birmingham. Good read here for an s30 build. http://datsunzgarage.us/engine/1 point1 pointAngled feeler gauge,14mm and 17mm wrenches plus 17mm crows foot is all you need. I started out rolling my car to get the lobes up but buying a remote starter was a lot easier. The lobes come 2 at a time so to get it done quicker I made a cardboard, actually a piece of a beer box, template i guess you could call it with 12 spots. Intake and exhaust with the numbers written on there. Do the two and mark them off as you go. I put mine under the passenger wiper. Let me see if i can find it... Hold the 14mm while you tighten the 17mm. They'll turn on you and get out of spec. Good luck. Once and you're a pro, simple to do after you figure it out. Oh yeah, the motor is tilted. Take a Sharpie and draw a center line on the cam towers to use for getting the lobes pointed up right.
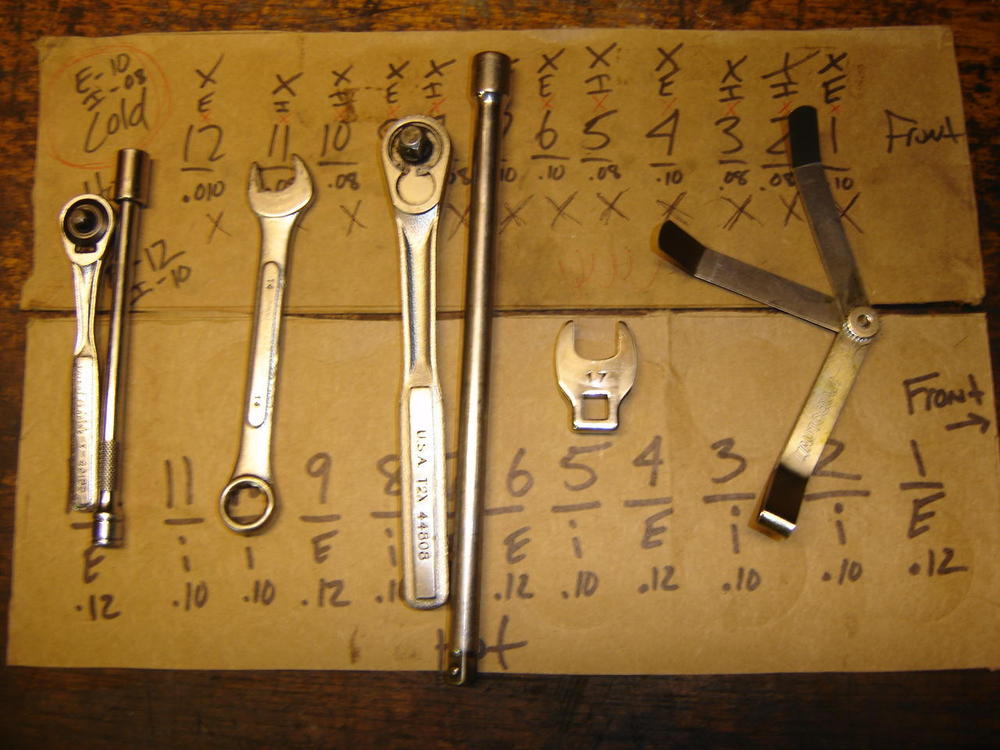 1 pointThanks for the link. @grannyknotis sending me some injector filters that look very close to the correct size. Will show side by side pics with the original filters when they come in.1 point1 pointI was stationed at Lowry AFB 1968, studied weapons systems on F100, F105,, F111, and F4 c,d & e aircraft .1 pointLowry was a victim of a BRAC and closed in 1994. The property was given back to city and it became a mixed use area of housing, light industrial, shopping and dining. The old hanger area became a beer garden!
 1 point1 pointYes, I had the original fuel lines replated. I had to bend the long tubes into thirds to fit in the 48" plating tank. I put a large radius bend in two locations, approximately thirds, to prevent the tubes from kinking. I bent them back after they came back from plating. The bend locations are in the tunnel so not highly visible. I stuck with the black because that is what the car was originally. I tried a different brand of undercoat, but am not very happy with it. It is not producing consistent texture. Will go back to my old brand and redo most of the areas. Sent from my C6902 using Classic Zcar Club mobile1 pointAre you taking the head off? Always good to replace the valve guide seals, pull the oil pump off and have a look for wear, scratches. Maybe a fresh coat of paint on the block and some detailing of other components.1 point1 pointThat's Logan 5. It's a cheesy movie considering today's special effects, but it's a classic sci-fi story. How do you maintain utopia? Step one: Don't have any old people. At least they didn't eat them. You know... To serve man. (how many other references can I stuff into a few short sentences? )1 pointFound this snap shot of myself when I was in college (circa 1980) standing next to my very first 240Z #HLS30-59523. The car was repainted black from its original 115 Blue Metallic by the previous owner, the body shop manager of a Datsun Dealership. Had the car for about 3 years before I sold it. Not sure of the car's whereabouts today.
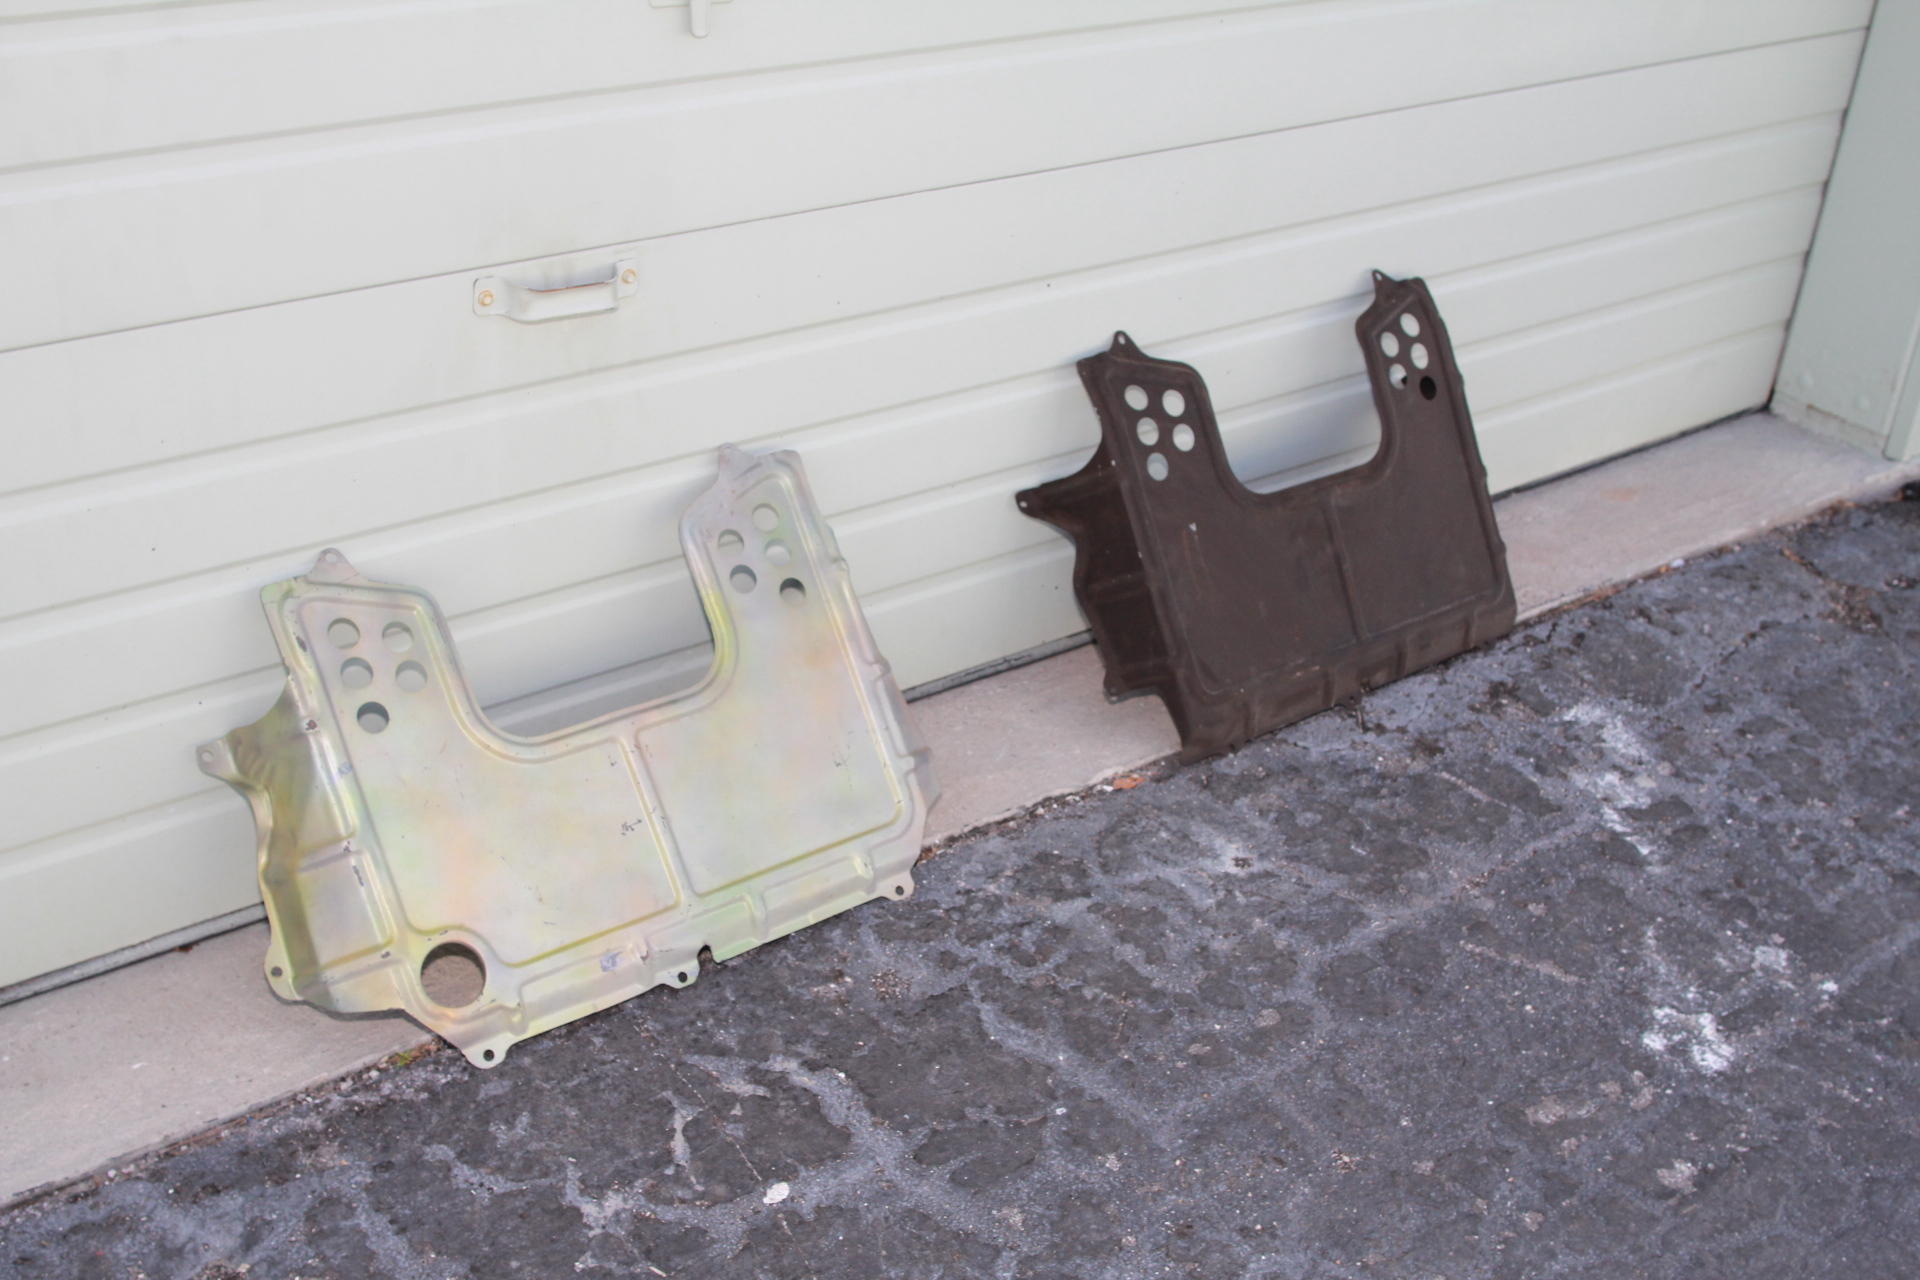
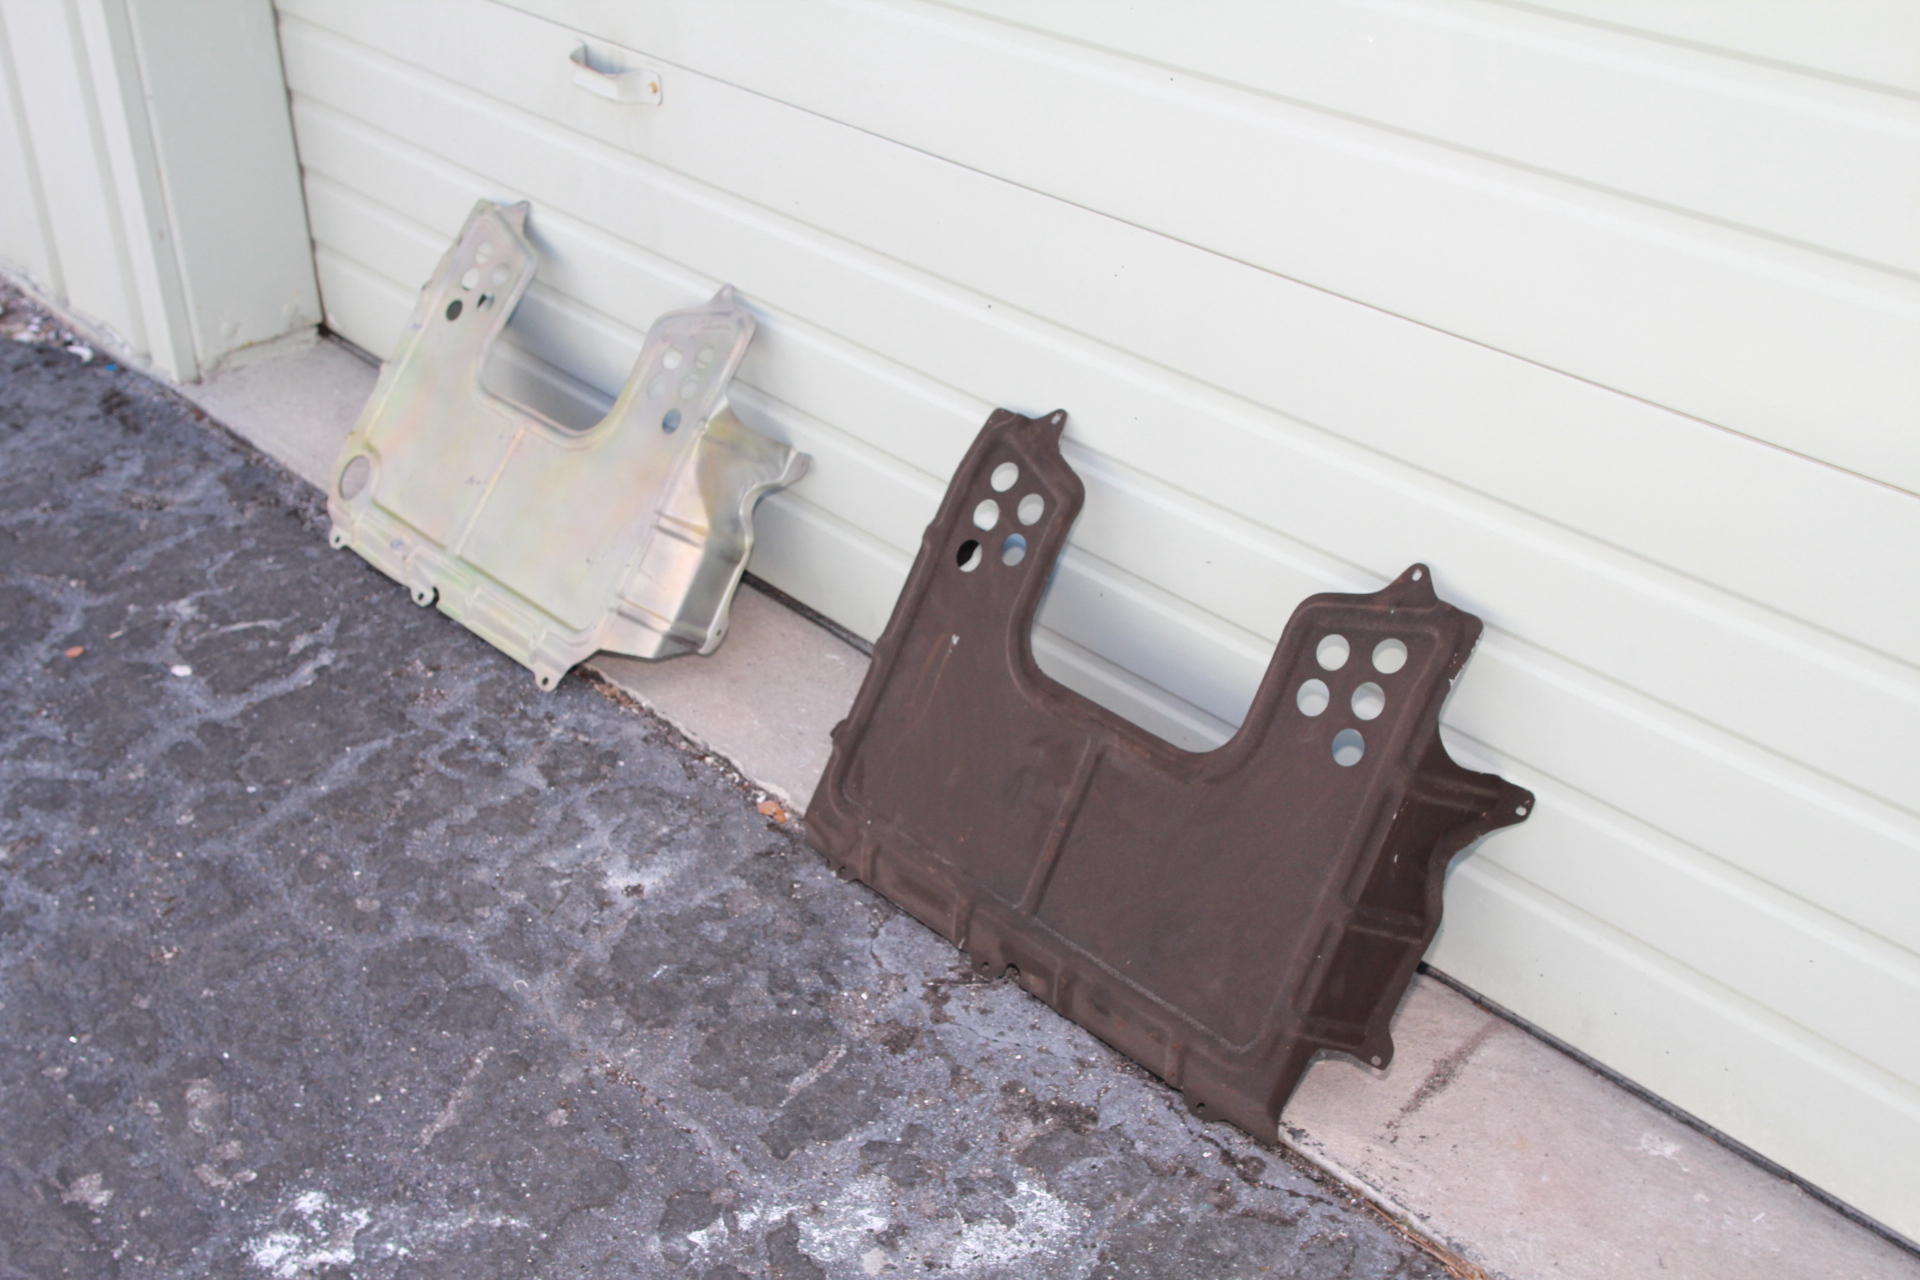
.jpg.03dd1ab6f6510866ec8aeb235c3afbd8.jpg) 1 point1 pointCarpartsmanual.com has the old datsun numbers. courteseynissan.com has them as well. If they can get it so can your dealership. You must play dumb though and let them think they're doing you a special favor. That comes easy for me, i wear a hockey helment when i go in.1 point1 pointI used Red Kote on the inside of mine. I spent a HUGE amount of time reading all kinds of posts about what to use on the outside and have since decided that it probably doesn't make that much of a difference. If I were doing it again, I think I'd just clean up the outside, spray on epoxy primer, and hit it with whatever catalyzed black paint I could find. (For the record, I ended up using this stuff: https://nomorerust.com/store/home/14-mastercoat-super-special-chassis-kit.html)1 point1 pointGreat idea. I have been doing that for years. ZCCW member get a discount from our sponsor. I find the parts numbers, replacement number and go to the parts counter. Their system can verify the parts if you give them the numbers, but they don’t seem to be able to look up numbers for early cars. 72 body and block, everything else 71, Tokico springs, Illumina, R180 CLSD, 83 close ratio, 3.90 gears, Ztherapy SUs, BRE 15X7 Libre wheels and BRE front spoiler.1 point1 pointLooks great Mario! Tell Mr. Vitorino he has done a fine job! Keep up the good work and thanks for the photos of your progress!1 pointHi again! Another great weekend!! The Z is getting shape!!! And all the weekend was dedicated to it! Now it looks like a Z…I’m very happy with all the results! But it’s a hard car to work!!!Too many bolts and tunning around the parts! I started with the lower and center valances, then the headlights and finally the surroundings.~ On the lights, my car is from 2/71 and had the 3rd series front, now I’m restoring it to the original shape. Now I placed the original Toshiba headlights and get rid of the wires excess, even the lamps!!! After a deep cleaning all went simple and clear! I’m waiting for the test… About the grill, I’ll keep the original one, but I don’t know if I will put the 432 instead! But only for the aesthetic reason! Let’s see the photos…. The sill plates were on the shop and I decides to install them! These ones are original, second hand, because the new ones from Nissan are just aluminium made, and these ones are covered with vinil with the same pattern as the seats and interior plastic covers! The headlghts…before… https://i.postimg.cc/FsYycdPv/IMG-20190209-120041.jpg] In the end…. Valances… Installed… The grill… Installed…. The headlights...and the gift… Then work and pacience…ehehehehhe In the end, only the right side of the car needs a hand…only tunning, but it’s a work for Mr.Vitorino…not me!!! Hope you are enjoying so far!!! Regards, Mário1 point1 pointI think it's been long enough, Mark if it hasn't send me a fart in jar, but Mark thought you were the actor on those hotel.com commercials. That's funny to me because I'd guess the same. https://nutmegcreative.com/blog/meet-captain-obvious-brandon-moynihan/1 point1 pointTurns out I have two of them. Both used. One is the 74810-E4100, painted black in a rather old, wrinkled finish. It is in very good shape and needs to be refinished. The other must be a later style - perhaps for the 280Z?- because of the hole in the front. My parts books don't go into the 280Z model years. Finished in that Eastwood CAD simulated paint, it shows some dings and bends that could be easily hammered out. $135 for the black one, $100 for the CAD one. Plus shipping. I'll need to get a box made.
1 point1 pointCarpartsmanual.com has the old datsun numbers. courteseynissan.com has them as well. If they can get it so can your dealership. You must play dumb though and let them think they're doing you a special favor. That comes easy for me, i wear a hockey helment when i go in.1 point1 pointI used Red Kote on the inside of mine. I spent a HUGE amount of time reading all kinds of posts about what to use on the outside and have since decided that it probably doesn't make that much of a difference. If I were doing it again, I think I'd just clean up the outside, spray on epoxy primer, and hit it with whatever catalyzed black paint I could find. (For the record, I ended up using this stuff: https://nomorerust.com/store/home/14-mastercoat-super-special-chassis-kit.html)1 point1 pointGreat idea. I have been doing that for years. ZCCW member get a discount from our sponsor. I find the parts numbers, replacement number and go to the parts counter. Their system can verify the parts if you give them the numbers, but they don’t seem to be able to look up numbers for early cars. 72 body and block, everything else 71, Tokico springs, Illumina, R180 CLSD, 83 close ratio, 3.90 gears, Ztherapy SUs, BRE 15X7 Libre wheels and BRE front spoiler.1 point1 pointLooks great Mario! Tell Mr. Vitorino he has done a fine job! Keep up the good work and thanks for the photos of your progress!1 pointHi again! Another great weekend!! The Z is getting shape!!! And all the weekend was dedicated to it! Now it looks like a Z…I’m very happy with all the results! But it’s a hard car to work!!!Too many bolts and tunning around the parts! I started with the lower and center valances, then the headlights and finally the surroundings.~ On the lights, my car is from 2/71 and had the 3rd series front, now I’m restoring it to the original shape. Now I placed the original Toshiba headlights and get rid of the wires excess, even the lamps!!! After a deep cleaning all went simple and clear! I’m waiting for the test… About the grill, I’ll keep the original one, but I don’t know if I will put the 432 instead! But only for the aesthetic reason! Let’s see the photos…. The sill plates were on the shop and I decides to install them! These ones are original, second hand, because the new ones from Nissan are just aluminium made, and these ones are covered with vinil with the same pattern as the seats and interior plastic covers! The headlghts…before… https://i.postimg.cc/FsYycdPv/IMG-20190209-120041.jpg] In the end…. Valances… Installed… The grill… Installed…. The headlights...and the gift… Then work and pacience…ehehehehhe In the end, only the right side of the car needs a hand…only tunning, but it’s a work for Mr.Vitorino…not me!!! Hope you are enjoying so far!!! Regards, Mário1 point1 pointI think it's been long enough, Mark if it hasn't send me a fart in jar, but Mark thought you were the actor on those hotel.com commercials. That's funny to me because I'd guess the same. https://nutmegcreative.com/blog/meet-captain-obvious-brandon-moynihan/1 point1 pointTurns out I have two of them. Both used. One is the 74810-E4100, painted black in a rather old, wrinkled finish. It is in very good shape and needs to be refinished. The other must be a later style - perhaps for the 280Z?- because of the hole in the front. My parts books don't go into the 280Z model years. Finished in that Eastwood CAD simulated paint, it shows some dings and bends that could be easily hammered out. $135 for the black one, $100 for the CAD one. Plus shipping. I'll need to get a box made.


 1 point1 point1 pointThat's old car smell..... Otherwise, rip out all of the odor retaining fabrics, wash or replace as needed. Note - fabrics can include but are not limited to: carpet, jute (carpet backing and sound insulation), seat foam...... Personally, I think it add character.... I mean, I've showered for all these years and still can't get rid of the funk that follows me... Wayne1 point1 pointThanks Wayne. I have one in mind... the Sanden 508 style v belt. I was thinking used too... but I can get a new one for about $175 Cdn pesos from fleabay. I have the mount for a Sanden already.1 point1 pointI'm surprised that you don't "know" about Konis. I suppose that if you knew anything about the Koni brand, you wouldn't write what you did. Good luck. I have a set of red spec; internal valve adjustment, which is a little more of a pain-in-the-arse than the yellow spec series we are discussing. The yellow spec series allows for valve adjustment while they are installed.1 pointMeasurements... And a solid coat of Zinc Mate until it's ready for paint with the block.... Sent from my iPizzle ringy dingy device....1 pointSuccess! Marked off at 1.78" for margin of error. On the cold cut saw... Ready for drilling out to 3/8ths... Finished after another quick sandblast and final measurements.... Sent from my iPizzle ringy dingy device....1 pointNot that I am aware. You can add more windings theoretically to a stator but the rotor has only so much surface area to create the field. As much as i would like to stay stockish, the commonly available gm alternative makes more sense to me. Plus I really wanted get rid of the external voltage regulator and the associated wiring. Sent from my iPizzle ringy dingy device....1 pointZed, the stock tensioner will work with a GM alternator but you have to mount it on the back side of the Alternator tensioner flange.1 pointThanks for all the feedback. I agree that getting the mounting bracket right is the key to the whole situation. Clearly I find the one wire (really two if you count the ground lug) very handy as it totally simplifies the wiring. True you loose the ability to have the charge light, but with an ammeter or voltmeter, which we all have, there should be no mystery if the thing is charging or not. I meant it when I said I'd make up mounting brackets for who ever needs one. Got the alignment jig built to mill them flat and straight and to drill the 3/8 hole straight through. I have nothing but good things to say about the good citizens of Kansas. The place looks exactly like home (Saskatchewan). No mountains or trees to block the view.1 point


Important Information
By using this site, you agree to our Privacy Policy and Guidelines. We have placed cookies on your device to help make this website better. You can adjust your cookie settings, otherwise we'll assume you're okay to continue.