Leaderboard


Popular Content
Showing content with the highest reputation on 06/19/2019 in all areas
-
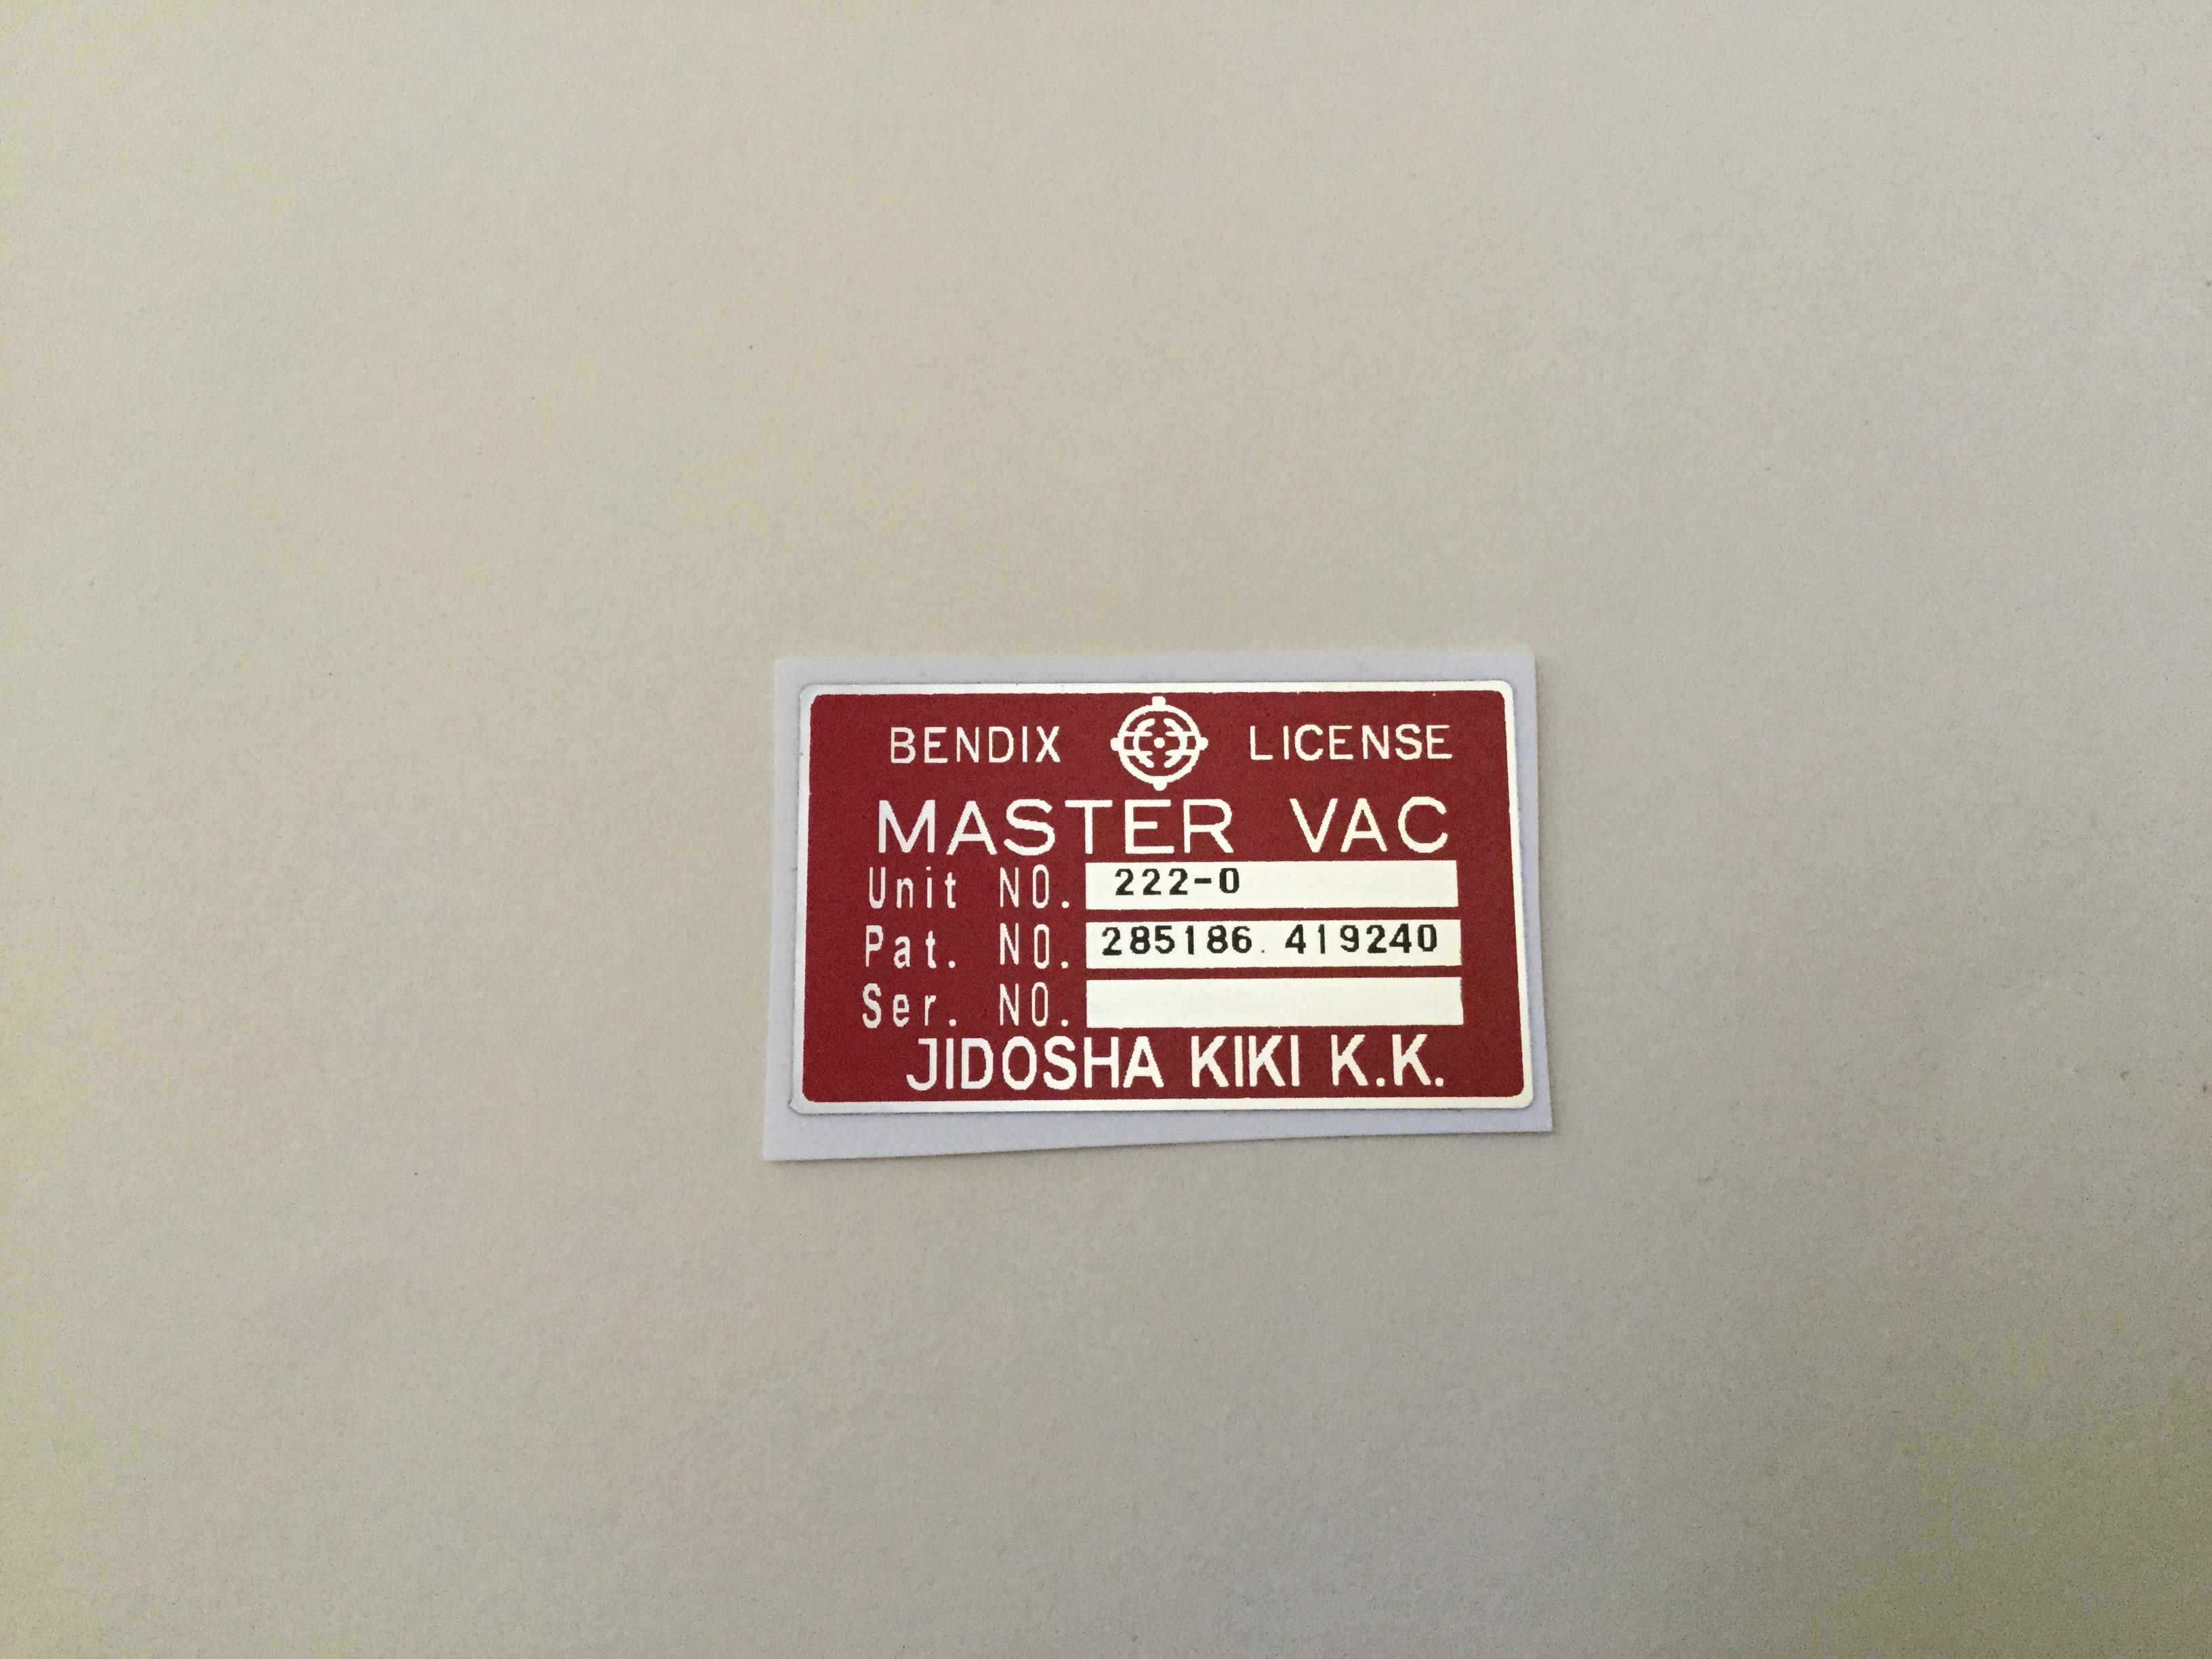
I reproduced this decal years ago and it is being retailed by both Motorsport and Banzai. I am our of town until Monday but would be happy to send you one Tuesday, unless you need it sooner. It is very accurate. Dan
 3 points
 -
I don't know but for me there is a rule. Playing with a distributor =timing light. It's like changing a MC=Bleed the brakes.2 points
-
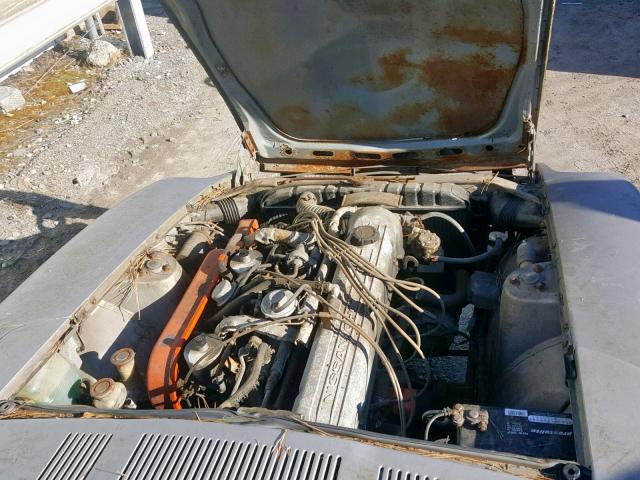
Basically you remove anything that is not sheet metal. That means tail lights and panels, running lights, mirror(s), door handles, antenna, bumpers, headlights, badging, quarter windows, door window frames, probably not the grille. Are you going to paint door jambs and the hatch panel also? Then you might need to remove the hatch hardware and door hardware also and the metal (aluminum) step plates, but the paint shop could handle that with very little effort. The front and back glass is not hard to get out if you just cut it out with a razor knife. Just cut around the edges and have someone help you lift them out. Depending on how well the first refresh was done, there could be rust behind the rear taillight panels or under the front and back glass seals, if it was not handled before. Mine had to be rebuilt.?2 points
-
1 pointGuys pay thousands to get that look on their pick ups and here the expensive part of the rat rodding has already been done for you.1 point
-
1 pointNice combo! I have a 72 240z and a 67 Bronco. A couple of my faves from when I was a kid.1 point
-
1 pointYeah, the classic bronco world (i own a 1977) is totally more expensive for all parts. All brake kits are in the 2-3k range. Stoptech and Zcar got together and designed up this package.1 point
-
1 point
-
1 pointI would start one thread and stay on it. You covered your fuel pump problems in a different thread but that's not mentioned here. Try starting fluid. And remember that "turn over" and "crank" mean the same thing, it's what the starter does, and that "fire" means the engine is trying to run on its own.1 point
-
1 pointIf straight lining works and you can't rely on correcting the oil pressure / AFM switching you could just go with an inertia switch in your new straight line circuit to cut power in the event of an accident.1 point
-
I would think about how you want to spend your time. I would definitely fix the leaks at some point but maybe you don't want to do it now. If you do everything else on your list, plus install a set of KYB strut inserts, you can start driving and enjoying the car. And, you can assess further what all needs to be addressed. If you pull the suspension apart and start painting all of the black under the car, you are starting a big project that likely renders your car on stands for a decently long time. Same goes for fixing the leaks. Those jobs open up multiple boxes of worms and could leave you without a car to enjoy for a while. Also, fixing the transmission seals is totally doable but it isn't an insignificant exercise. I did it last summer and it was pretty challenging getting the bolt that connects the shift fork to the shift rod removed (without damaging it) so I could replace the shifting o-ring and seal. Not trying to scare you. It is just not a clutch swap. It is a messy less than intuitive job if you have never been inside of a transmission before. Again though, it really depends on how you want to spend your time. If you really want to devote 6 months to getting all of these things right so you can drive and enjoy after then great. If you think you will get worn out and a bit frustrated when the car has been on stands for months and you can't drive it then maybe that tells you something also.1 point
-
I have dealt with Norm but it was an ok transaction, but could have been better. He would not be my go to source, if I could help it.1 point
-
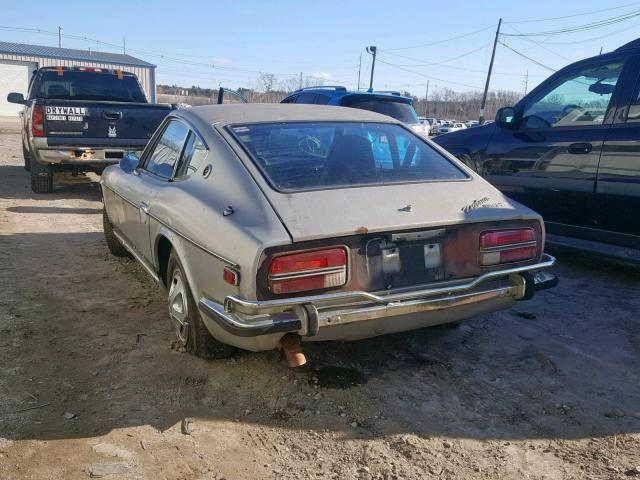
1 pointThis is from the auction in Boston I believe the distortion above the wheel well, might be rust too The door is going to be a mess at the bottom and the rocker and dogleg are going to be a mess. So a lot of my perspective is just suspicion. It's a Massachusetts car for starters! The hood is a mess on the inside and looks like salt damage. A lot of the pictures are also taken from angles that don't show the typical rust areas. If the drivers side is this bad, then I figure the passenger side is the same or not far behind it. Also when I see cars get to this point where there are holes in the doors and rockers, then I figure floors are shot and possible front frame rails. So I am assuming it's fairly rusty. It's too bad because the interior looks pretty good. I am not against saving it, but I wouldn't want to start with $7,500 ($6,000 bid, $1,200 fees, $300 shipping) in the car.
 1 point
 -
gwri8 has a pretty good list. One item I find difficult to remove with out mangling is the drip rail trim. It takes a little practice to get them off with out distorting them. If your window seals are hard at all, I would just cut them and remove the glass. If they are still pliable, I would try to remove the glass with the seal or have a glass company do it. The front windshield is easy to break if you push it too hard. Mark, also makes a very good point. The sheet metal is very thin on these cars and a careless blaster will destroy a car very quickly. I would have them DA the whole car really well. They will find any trouble spots at that point. I don't think I would go looking for extra work. There are risks associated with stripping the car back to bare metal. You can develop surface rust and that can cause paint failures later. Even rust that is really not obvious; been there , done that. If the existing paint is adhered well, I don't believe I would pay someone to strip it off...1 point
-
Another thought. Is the body shop aware of the thickness of the sheet metal in a Z? Sand (media) blasting on thin sheet metal should be done very carefully. It's easy to warp the panels.1 point
-
I agree with removing parts yourself. That way you can clean/ polish/repair while the car's in paint jail. You might even discover more rust spots that way and help avoid any surprises of more rust spots. All of that stuff is pretty easy to remove, except for the door handles and those aren't too difficult, just awkward for my gorilla fingers....1 point
-
1 pointSo I wanted to share one more thing for interest, feel free to shoot me down. Given that a lean mix needs more time to fully burn, it stand to reason that an oxygen starved over rich mix also needs extra time to burn as fully as possible. To put this to the test a few weeks ago, I used the 123 ignition to conservatively add a few more degrees at the dips building up to the troughs and then back again where the engine comes to life again. Ignoring the anti-stall peak at 800rpm -which works brilliantly BTW - I call this my twin peaks timing advance (but sadly no Sheryl Lee - am I showing my age again!?) ... The butt dyno told me that no longer did I feel a dip in power but I felt the dips behave more like flat spots. The flaw in this of course is that it is fixed regardless of throttle position or engine load. So at part throttle, I would have more timing than would normally be there - hence the conservative approach and not whacking it up by 5 or more degrees (above trend) at each point. But I like the fact that it worked. Why? Because I’m a middle aged man in suburbia with 2.4 children, living the dream! Some men have golf, I have my carbs and my timing curves!1 point
-
I was one of the first people to use the 123 ignition on a Z and I have been running this setup since 2015. I concur that the setup and install instructions are lacking and I too experienced an advanced timing situation after the initial "LED Install" procedure but unfortunately did not realize this for quite some time so I was running more advanced that I originally thought. Fortunately nothing catastrophic happened to my engine and I was able to correct this by checking the initial settings with a timing light. Although the 123 people indicated in their emails to the OP that timing should always be checked with a light, I have not seen that written in any of their instructions although it is possible that I might have missed it. One other issue that I have had with the 123 ignition is that periodically my car will refuse to start or it does start but does not run correctly (misfires) and the only thing that solves the issue is to replace the rotor. I was never able to completely figure out the cause of this or why the rotor just seemed to randomly "go bad" until I read through this thread and subsequently did some additional research. As it turns out, I also run an MSD with my ignition and when I was first considering the 123 distributor, I found a warning on their website that said not to use the 123 system with an MSD ignition. I did not understand the engineering reasoning behind this so I contacted the company directly to find out a little more. Their engineers told me that they already had customers using their product with an MSD with no issues being reported and so they really didn't seem to know why that warning was there. They basically told me that it should work without issues. Well fast forward to today and after a little more research I found the root cause of the problem. I happened to stumble on a Triumph TR site where the OP had a similar problem on a 123 ignition although in this case the rotor was actually burned. This led me to another thread on a forum called Pelican Parts and they apparently specialize in parts for older European cars. Well as it turns out, the engineers at 123 chose a readily available, off the shelf distributor where they could house their electronics and just change the drive mechanism to work with numerous different cars. So the cap and rotor, and I suspect even the dizzy body itself was very widely used in VW's, BMW's, Volvo's, etc of the late 60's going through the early 80's. Well during this time, the EU apparently was focused on RFI suppression in newer cars and mandated that auto electronics include RFI suppression hardware. I do not know exactly when this was mandated but I believe it was sometime in the 70's. Well believe it or not this mandate resulted in the inclusion of a resistor in the distributor rotor that sits between the center contact and the end contact. What I learned from the Pelican Parts forum (where a lot of these guys use this same cap and rotor setup as the 123 ignition as that's what the car originally came with) but they have also upgraded to MSD. Unfortunately these rotors with the internal resistors were designed and used at a time when ignition systems were not as powerful as today's systems, including MSD, and so the higher output power of the MSD essentially burns out the resistors over time. I must admit that I thought this seemed rather absurd as I had never heard of such a thing, but I happened to have a number of rotors that had "gone bad" so I decided to do my own checking. Well sure enough when I checked continuity between the center and end conductors, it was a total open! I really couldn't believe what I was seeing so I used a Dremel to cut away at the epoxy and sure enough buried under the epoxy and between the 2 conductors was a burned out resistor. The solution that I also found on the Pelican Parts forum was the Dremel out the epoxy and resistor and simply solder in a 12 gauge piece of wire to replace the resistor, and then simply use JB weld or some other suitable epoxy to seal it back up. You can find more info about this here: http://forums.pelicanparts.com/porsche-911-technical-forum/596559-msd-rotor-modification-detail.html Ironically, 123 Ignition now also sells a modified rotor that replaces the resistor with a wire: https://123ignitionusa.com/oem-rotor-modified-no-resistor-for-all-4-and-6-cyl-123-applications/ $45 for a rotor seemed a little excessive to me so I purchased a couple of Bosch rotors (p/n 04008) and did the mod myself. A little tedious but definitely better than paying $45. So after 4+ years of dealing with this random problem I believe it is finally solved. I will also say that despite some of the startup issues that I and others have had with the 123 system, I am very satisfied with the end result and would not hesitate to use this again. Fortunately my experience with the company and the product was a little more positive than the OP. I hope this helps others that may have experienced the same issue and that I've saved you from pulling your hair out as well. Mike.1 point
-
I can commiserate with you, I have dealt with him twice and will not buy from him again. The vin plate I bought looks okay but the holes don't line up with the original holes in the door jam.0 points