


Leaderboard
-

grannyknot
Free Member6Points5,158Posts -


240260280
Free Member4Points4,441Posts -


siteunseen
Free Member4Points14,903Posts -


kully 560
Free Member3Points400Posts
Popular Content
Showing content with the highest reputation on 11/06/2019 in all areas
-
hi mark , today I bought the blue label 3-in-one oil it is different from the red label one I was using . still had some stumble of line after I richen the back carb but it was better so I went ahead and changed the damping oil to the blue label 3-in-one which is 20wt. the motor idles better and most of the stumble is gone probably about 95% gone. it still could be a tad lean but I do not think by much. I like the fact that I have no fumes in the cabin at all and it idles great. I have to remember this is a carb car and not fuel injection. I will check the plugs again when the motor cools down and see where I am at . thanks again for the tip on the Nissan 20wt damping oil. kully3 points
-
3 points
-
 Super glue is not going to work. I made a metal band that fit tightly around the outside between the plastic and the foam2 points
 -
 2 pointsYou need to verify that the pressure actually dropped first, right? The gauges are very old. Not going to last forever. And the sensors are known to fail. Seems like, no offense, you're forging ahead based on a tenuous assumption. Potential for much wasted time and effort. Unless, of course, you're just a little bit bored.2 points
 -
 2 pointsWell my stock original 1971 series 1 tach works with my fully sequential r35 coil on plug Efi system (haltech elite 750) . I literally ran the coil positive out from the ecu through the white wire with a red band then out to the coils through tachs white wire with a black band. Nothing else was needed. Added about 15” to my entire positive for the coils. I like how the tach feels and reacts the same as it always has. This would work on any 240z tach and a rb swap or aftermarket Efi with COP and fully sequential. I don’t know if it would work on wasted spark or not. Thanks Dirk Stoop for pushing this way vs the others. Where I got the idea https://www.viczcar.com/…/9515-getting-a-240z-tacho-to-wor…/
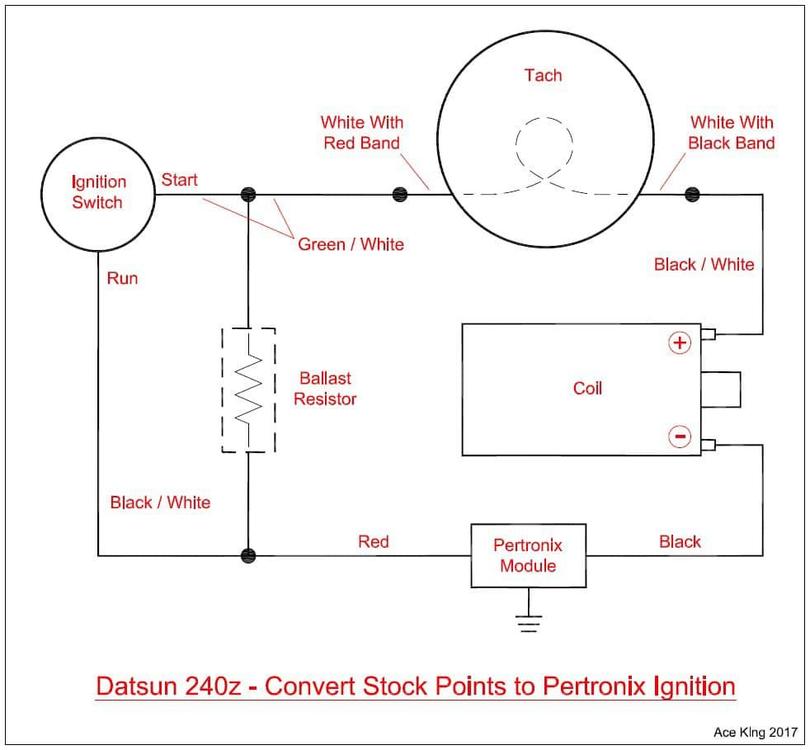
 2 points
 -
2 pointsUse sewer fittings for those really long road trips and you are miles from a toilet.2 points
-
 2 pointsOh, I wouldn't use anything as strong as steel wool. That "chrome" is a silver mylar coating over plastic and the green stuff you see is silver corrosion in the mylar. Use silver polish or my preference is "Eagle One Nevr-Dull". It comes in cotton wadding in a can. It will take off the corrosion and you will find that the mylar will be pitted. Liquid silver polish is much softer and it won't take off the corrosion as well. Both, though, will shine up the silver mylar to your best expectations.2 points
 -
I tightly zip tied mine then Gorilla Glued it. The trick for me was carfully engaging those 3 metal snap clips as you turn it into place. I don't use the horn button anymore. The middle finger works just fine out the window of a bright orange '72 car.2 points
-
1 point
-
 1 point
 -
1 pointSure, if done improperly or too much is taken off, it's the kind of job you want the oldest guy in the shop to do and know that he does it often.1 point
-
 here it is https://www.classiczcars.com/forums/topic/59887-horn-button-refurbish/?do=findComment&comment=5475811 point
 -
 1 pointHaha that's why I always try to have an empty gatorade bottle on hand...1 point
 -
1 pointI had problems with a dual mass flywheel on a 1995 Porsche 911. The rubber that should've kept the two metal sections apart had failed to do it's job, and the flywheel would make clunking (metal on metal) sounds as load on the flywheel changed while driving. In my opinion, the single mass flywheel is simpler and the extra drivetrain noise, when the drivetrain is in good working order, isn't a big deal.1 point
-
1 pointMine is a Tilton or Tifton maybe? Anyway it's aluminum except the contact surface. I don't know what a single or double mass flywheel is. It came with a 240 project car I bought off a dude years ago. My only recollection of clutch chatter is when they get burnt, hot spots on the friction ring from "riding the clutch". Holding your car on a hill with the clutch instead of the brakes. I always have mine cut down to fresh metal when I change out a clutch. Cliff1 point
-
 I removed the foam from the outside of the cracks (enough to expose the outer side of the cracks), epoxied the cracks and also filled the holes left from the removed foam and used a hose clamp to hold the plastic ring tight while the epoxy cured. Be sure to remove any epoxy squeeze out from the inside of the ring before the epoxy cures.1 point
 -
1 point1 point
 1 pointI drilled a hole with a hole saw. There are multiple versions of the fender liner but the 76 is easy to drill plastic.1 point
 1 point
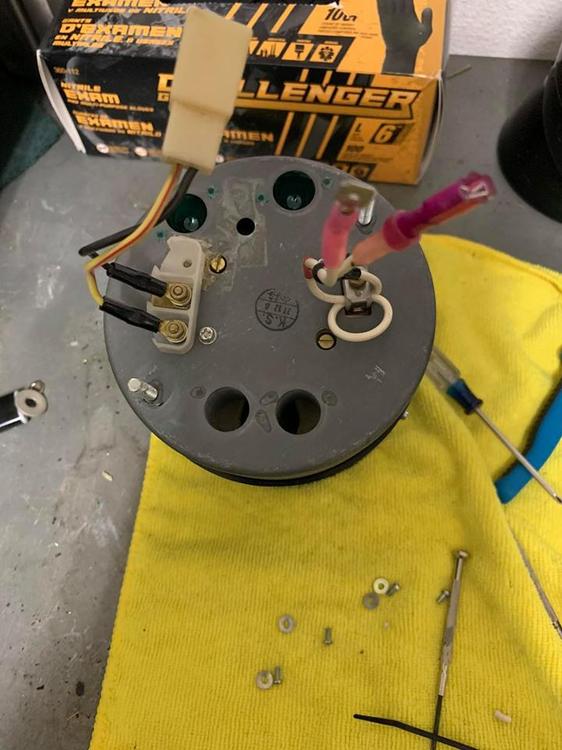
You can separate the black plastic housing and remove the chromed vent, then I use a child's toothbrush and a strong cleaner to get as much of the dirt off as possible. If the chrome is still in good condition I use 0000 steel wool to do the rest of the cleaning, if the the chrome is spotty and worn off in places then I use chrome polish and a small screw driver wrapped in cotton to apply and buff or Qtips.1 point
1 point
1 pointYou can separate the black plastic housing and remove the chromed vent, then I use a child's toothbrush and a strong cleaner to get as much of the dirt off as possible. If the chrome is still in good condition I use 0000 steel wool to do the rest of the cleaning, if the the chrome is spotty and worn off in places then I use chrome polish and a small screw driver wrapped in cotton to apply and buff or Qtips.1 point 1 pointGot the silver zinc parts prepped and ready to send out for plating. Just had to clean off some over-spray from the previous paint job and heavy dirt from the parts. The plating company does the rest.
 1 point
If your plugs look good and the only problem is a little stumble off the line, you may want to run heavier wt. oil in the dampeners. Nissan recommended 20 wt. I always used ATF with good results.1 point
1 point
If your plugs look good and the only problem is a little stumble off the line, you may want to run heavier wt. oil in the dampeners. Nissan recommended 20 wt. I always used ATF with good results.1 point As a follow-up, drilling a "stop crack" hole was done often by my C-130 maintenance guys during the SEA Conflict last century. Seemed to work well as long as the crack wasn't on a fuel cell area. ? Dennis1 point
To really get the rust under the battery tray you have to drill out the spot welds on that large support that curves down to the rail, there is rust under it and it will spread right back after you paint it. You don't have to use sand, there is copper slag that is quite aggressive, also walnut shells.1 point
As a follow-up, drilling a "stop crack" hole was done often by my C-130 maintenance guys during the SEA Conflict last century. Seemed to work well as long as the crack wasn't on a fuel cell area. ? Dennis1 point
To really get the rust under the battery tray you have to drill out the spot welds on that large support that curves down to the rail, there is rust under it and it will spread right back after you paint it. You don't have to use sand, there is copper slag that is quite aggressive, also walnut shells.1 point If the "fusible link" that connects battery power to the wiring harness has failed or if the connectors between the "fusible link" and the wiring harness have opened/pulled apart, that will produce what seems like a total electrical system failure (no cranking, no lights, no horn, no nothing) even though the battery is fine. Just found/fixed this problem on my 71 240z with the kind people of the Help Me! forum.1 point
 Ok hear me out.... My horn pad was doing the same thing and it’s because the cracking plastic no longer holds snug on the wheel. Instead of a zip tie, I used a soldering iron. Just hold the horn pad together so that the cracks in the plastic close, then carefully draw the hot iron back and forth over the plastic melting it back together. The secret is to melt enough material for it to bond with out burning all the way through. After doing that my horn pad fits snug and had a satisfying “click” when pressed back on to the wheel.1 point
1 pointDeath by a thousand mods... Here’s a quick little mod to aid in cowl drainage and save the bulldog nose on the sill....1 point
1 point
Great stories guys...one more warning.... don't put a spoiler on the back or it will amplify your light front end problem!!! Probably end up doing 210kph on back two wheels! Bart will get sick ?
Ok hear me out.... My horn pad was doing the same thing and it’s because the cracking plastic no longer holds snug on the wheel. Instead of a zip tie, I used a soldering iron. Just hold the horn pad together so that the cracks in the plastic close, then carefully draw the hot iron back and forth over the plastic melting it back together. The secret is to melt enough material for it to bond with out burning all the way through. After doing that my horn pad fits snug and had a satisfying “click” when pressed back on to the wheel.1 point
1 pointDeath by a thousand mods... Here’s a quick little mod to aid in cowl drainage and save the bulldog nose on the sill....1 point
1 point
Great stories guys...one more warning.... don't put a spoiler on the back or it will amplify your light front end problem!!! Probably end up doing 210kph on back two wheels! Bart will get sick ? 1 point
 1 point
 1 pointSo what I liked about the “APP” was it was easy, quick and went straight to what I wanted to see “unread posts” and I used it approximately 80% of the time I spent on the site from my iPad or iphone. More detailed work I did on my HP laptop. Today from all of my devises I use a password storage site called “LastPass” that launches the Webpage with my user name and password and requires a thumb print on the iPad and the iPhone. No need to waste your time or money just for me. Keep up good work ps just checked in on the white 72 on BAT: $40K and 7 days to go. Wahoooooo1 point
 1 pointMine also had cracks causing it to fall off easily. To avoid cutting away the foam, I used standard safety wire that is used for securing nuts/bolts on race cars etc. Sent from my iPhone using Classic Zcar Club mobile1 point


Important Information
By using this site, you agree to our Privacy Policy and Guidelines. We have placed cookies on your device to help make this website better. You can adjust your cookie settings, otherwise we'll assume you're okay to continue.