Leaderboard
-

grannyknot
Free Member7Points5,158Posts -


Dave WM
Free Member3Points3,591Posts -


Zup
Free Member3Points1,163Posts -

DatsunZGuy
Free Member2Points925Posts
Popular Content
Showing content with the highest reputation on 01/22/2020 in all areas
-
3 pointsFinally getting around to installing the new dash. Removal went easy, the cluster of connectors on the pass side and a few singles on the driver side. those on the driver side were removed while the dash was being pulled off, the cluster were undone before the removal process. I also removed the steering wheel all the plastic parts, and the turn signal/combo switch just leaving the bare steering shaft and the ign cylinder. That had those silly tamper proof bolts that I did not want to fuss with. removed the console finisher and the floor console of course. I removed the gauges tack and speedo, the vents the hoses. it was a good time to tidy up the connections as they were quite loose due to the loss of the foam that surrounds the hard plastic junctions. I wrapped some electrical tape around the plastic junction ends to increase the OD so the hoses would fit nice and tight. After I sorted the HVAC I moved on to the actual dash install. some observations: On mine the hard point above the cig lighter was misaligned, I ended up drilling my own hole for that sheet metal screw. Careful so as not to punch thru the das pad. carefully cut out the hole for the cig lighter and the two holes for the dimmer pot and trip meter setting. The instrument cluster fit well for the speedo and the tach, the other gauges required a lot of finesse to make sure they were set in enough to make sure there were no gaps around the bezel. It seems to me this could be a bit deeper to allow for a less precise fit being required. I ended up adding some foam tape the backs of the straps that hold the gauges in place, as is the were just a bit too far forward for the straps to hold them tight up to the dash. A good bump and I suspect they could jar loose leaving a gap from the bezel to the dash. Not a show stopper just something to make sure you have secure so it does not happen. Everything installed I moved on to the glove box. this is something that should be addressed. The flap of material around the opening is too thick. On my OE dash the flap of material is JUST the plastic covering. On the V dash its got about 3/32 of foam under the dash material That is just enough to keep the small screws that go around the perimeter from engaging the clip on retainers that fit on the metal dash. I ended up digging out the foam with a small screw driver to thin this out. I should have done this before starting the process with the dash off the metal frame. YOU HAVE BEEN WARNED.... just look at your OE dash and make sure the glove box area is the same. Overall the fit and finish are very good. I presume as good as the OE but for the glove box mentioned and the cig lighter metal hard point being misaligned. I caught the cig lighter and corrected before installing the dash. I thought I could get away with the glove box, but ended up fixing that after all was installed. I have the dash mostly back installed, just have to go around and tighten up the 10mm bolts around the edges, it was a bit of a struggle, my wife helped with the wires on the driver side, after a failed 1st try, we got it. Had to get the dash close enough to connect the wires and still install with out tugging it loose. Another warning you maybe tempted to remove the mount that fits under the AC control panel, it was in the way making things hard. I removed it but failed to consider how I would struggle with reinstalling it after the dash was in. the very control panel that I was trying to avoid made it very hard to get the mount back installed. I am making some videos, not so much of the process as that would be nearly impossible to do by myself, but stages of completion will post up later.3 points
-
2 pointsThat's funny, I have always thought of all 240z stock seat as one person benches, I can't handle them for more than an hour.2 points
-
Kats, Could it be any one of these?? https://www.hemmings.com/classifieds/cars-for-sale/ferrari/dino?page_size=60&pub=hsx2 points
-
2 pointsIt's in lovely condition, I would think seriously about bumping the price up, it's only us old farts that know how to drive stick anymore, automatics are going to rise.2 points
-
 2 pointsIf I didn't have so many projects I would buy it today with mommas approval2 points
 -
 1 pointOur late father's 1972 240Z is for sale in Texas. He was the original owner. Please note the mileage listed is wrong, as the gentleman handling the sale for our mother was not initially aware that the odometer had rolled over. I would be happy to try to answer any questions you may have. I stumbled upon this site by accident, so hope it isn't inappropriate to post this. Listing is here: https://sanantonio.craigslist.org/cto/d/marion-1972-datsun-240z/7056714243.html1 point
 -
 1 pointHey everybody, I'm new to the forums and owning a Z car. I just bought my first one (and hopefully last, but we'll see where that ends up), a 71 series 2 car. At least I think July 71 is a series 2. Anyhoo, I hope to learn a lot from some Z veterans and hope to help anyone with the experiences I have with my car. It's rust free (ha), or as rust free as I'd like it to be. Got it from California and sent to my home state in the rust belt. We got our first snow acouple days ago so my new Z I've driven twice now will have to sleep for most of the season in the garage. In the mean time I'm doing some basic fixups and cosmetic changes. I've taken out all the carpet and padding to clean and replace some bits so far. I think I'll need to replace the padding with new stuff. Thanks for the read and I hope I can help where I can! I'll post pictures as soon as I'm able to. Will1 point
 -
Damnit Jim, I'm buying as fast as I can.1 point
-
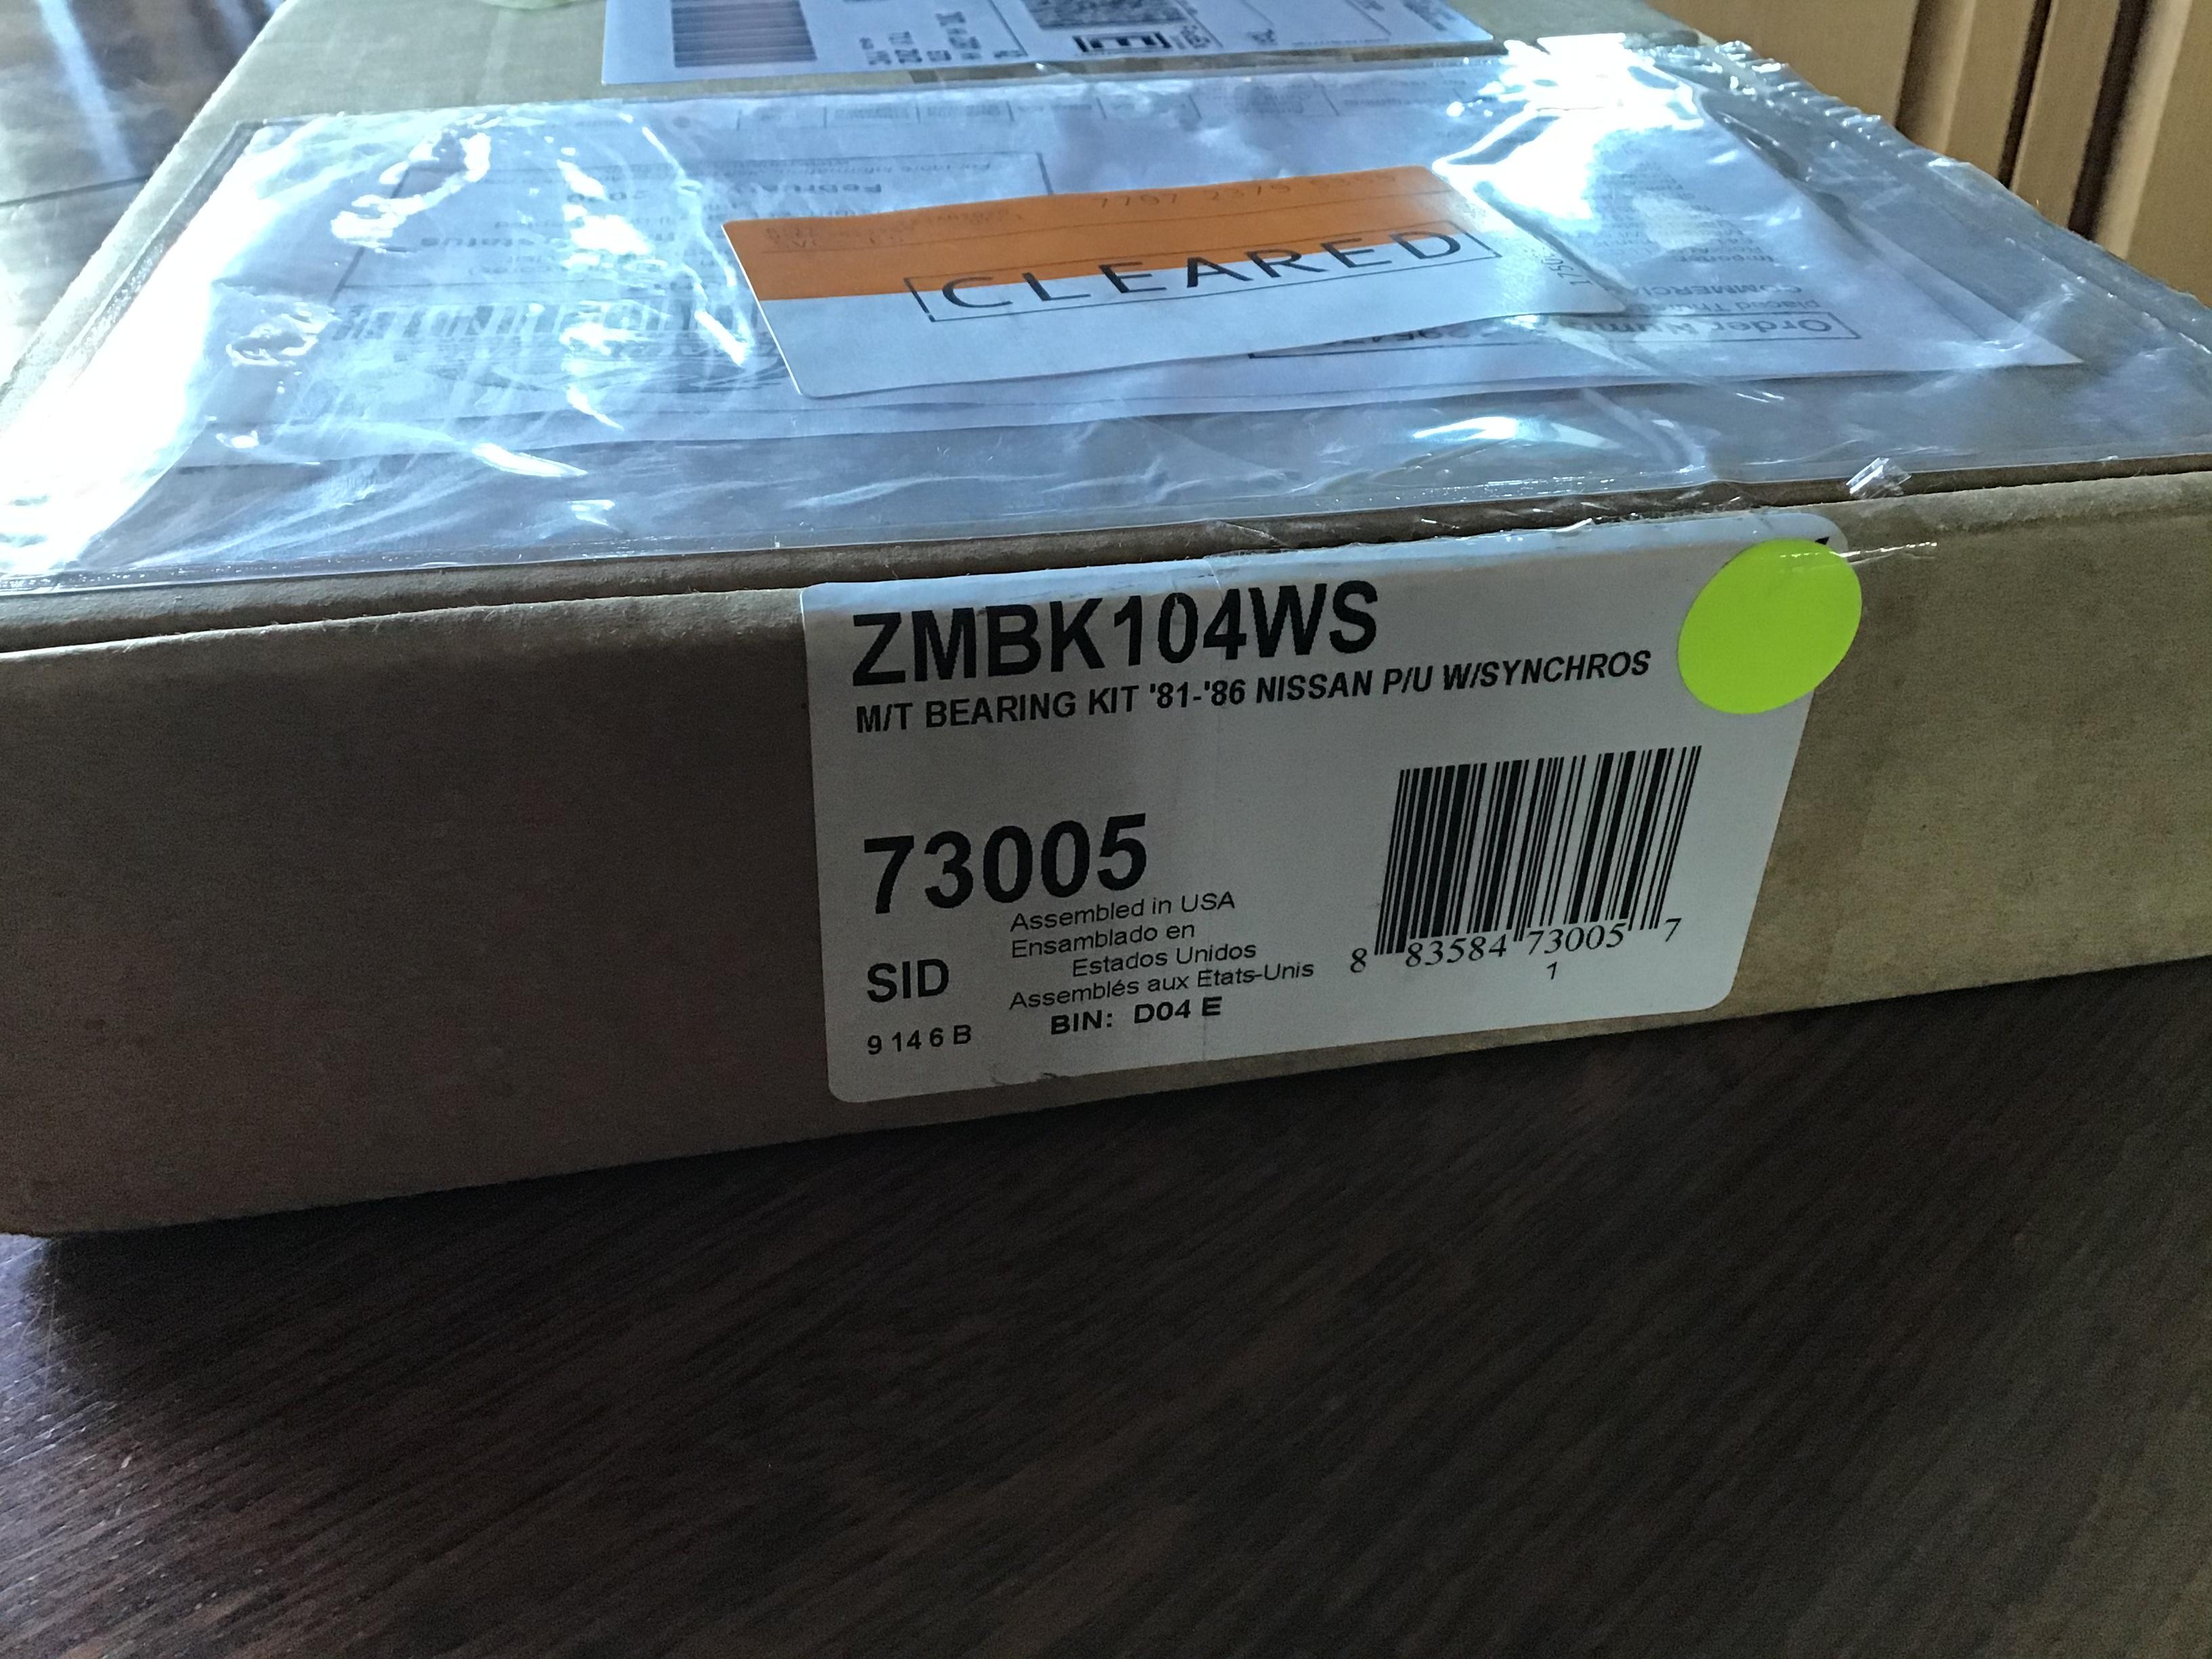
 The Doctor is now in. Finally. Today’s news is about rebuild kit pricing. I have actually found a cheaper source for the Bk104WS kit. Rockauto! I found the kit when looking for 200sx parts (don’t ask, it’s what’s been keeping me ‘occupied lately) ZMBK104WS is the part number. Was looking under 1980 200sx. $87.37 CAD ($66.76 USD) and about $25 CAD shipping. Expecting to be buying cheaper quality parts, I waited until they arrived. Well they are here. Everything in the box appears to be identical to the other kits from drivetrain.com and transpartsdistributors.com. Okay, one bearing is a Koyo rather than a Nachi. Everything else appears identical. Got here faster than the other kits too. One week vs two. Now if I can just store away of a few thousand 510 parts that just showed up, MAYBE I can actually rebuild one of these dang transmissions! Arggghhhhhh!!!!
 1 point
 -
 1 pointOh the glamour! Such fun! [emoji58] Let this be over soon ... I have too much OCD.1 point
 -
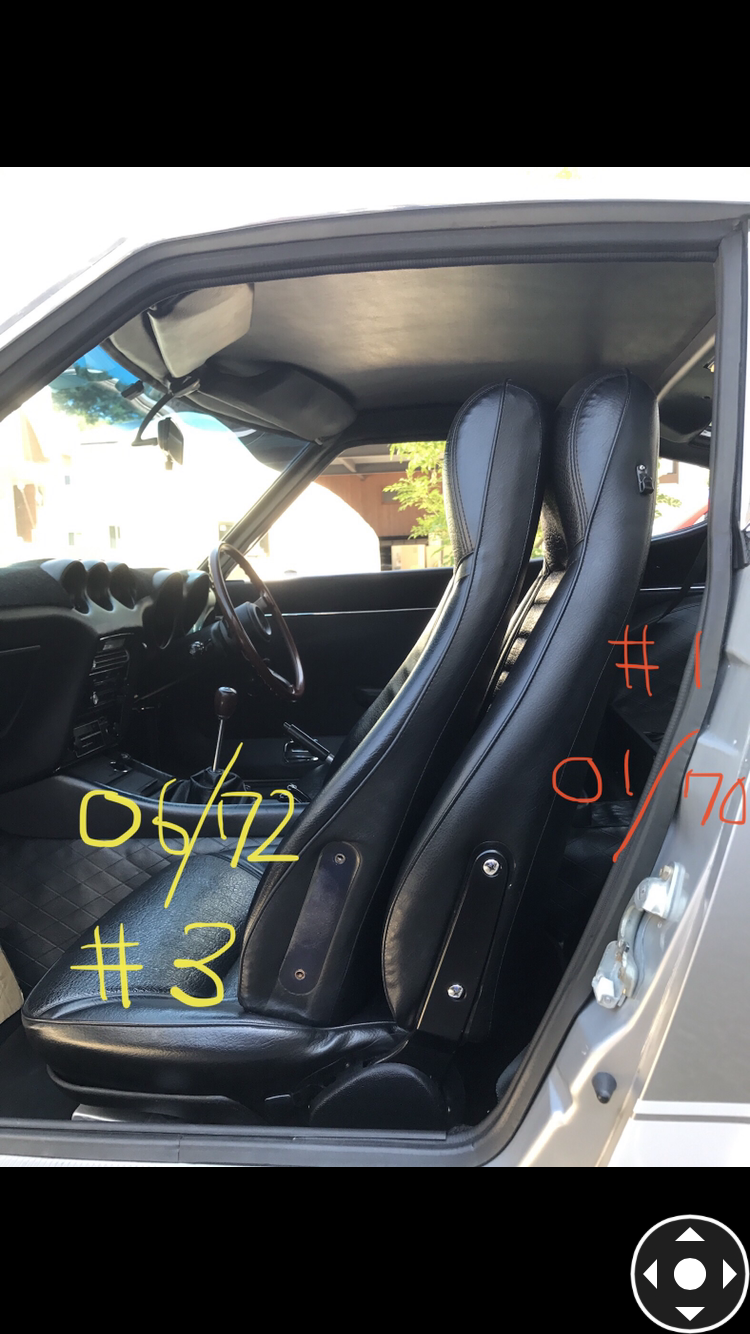
 Recently I found a Dino which I would really love to buy in Europe , so my Z hobby is ending I think ( I hope ) .I feel I did enough for my Zs . But selling all my cars seems not enough at all for buying the price of the Dino , maybe it is going to be a pipe dream ? I am just hoping currency exchanging rate will turn good for Japanese Yen in some day . But JPY going strong means economy of the world is having a big risk / crisis . In that situation , can I sell my cars ?? Chris , thanks for asking the pictures of the jack and tools , this green car still has a paper !! What a wonderful survivor it is . The tire stopper said “ 0 B “ , February 1970 , a little bit earlier than that of the car’s build date , but it is correct for this car and this is a good example of sometimes our cars have a little bit early components in our cars . I noticed the wheel lug nut wrench , it has the teeth facing the same direction as the socket opening , the later ones are facing 90 degrees to the east . This wrench is the correct for this green car. Kats
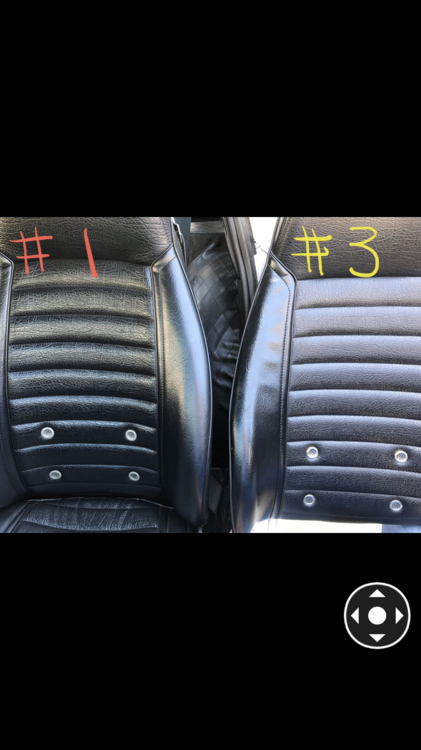
 1 point
 -
 1 pointYou can also take this time to measure piston deck height. Put a straight edge on the deck, turn the crank until the piston rests on the straight edge, zero the indicator and go all the way up. Place the indicator along the wrist pin and the straight edge intersecting the wrist pin.1 point
 -
 1 pointThat's a nice car and should go quick. Very original it looks to me. Our's are similar. Mine had those bumpers too, they hang from the rafters now though.1 point
 -
 I would say that the 50 year old seats on my Z look to be in about the same condition as the seats on this green one...only my seats are black. The 'sag' on the base portions is about the same. The backs are also slightly pressed in, in similar fashion. The foam on mine is really starting to go though. I get small crumbles on the carpet below the seat that are from the decaying foam. I would almost push back on the seats being different. Having re-upholstered several of these, I would say it is pretty dog gone difficult to get the rope in the same place seat after seat. Also, not sure if the holes in the material at the factory were 'pre-drilled'. These holes are not on the aftermarket covers so you just have to feel for it. There really is a lot of 'massaging' to do once the vinyl is over the foam. As a result, the alignment with the rope may vary....I think. Unfortunately my '70 is at he storage unit so no quick pics to verify here. ?1 point
 -
 Thanks Kats! You are a great friend to give me such a thorough explanation. Now I must compare all my seat frames. I DO think the seats in the BaT car look a little gaunt. I liked your post about extra padding in the seats and plan to rebuild my seats with extra padding. Off topic; my 26th is still in the body shop and 27th is still in storage. I was hoping 26th would be green by now but you know how body shops are... I have applied for a building permit to construct a garage / shop at my house. The arrangement for storage of the cars was silly and I finally have some money to construct my own shop. My latest Z projects involve getting all the hardware plated and I just sent the carburetors from both 26th and 27th to Z Therapy. This car on BaT is very pretty. I don't like the white stripes, but the interior is fantastic by the uniform color of the butterscotch. All the plastic appears to be in very good condition. I wonder why the entire brake system has been replaced? And what about the wheels?! I understand that the stock wheels have been powder coated? Aughh!!!1 point
 -
What???? I can't un-see that post Kats-----don't tell us you are serious! The end of time must be nearer than I thought.1 point
-
Interesting observation, Kats. I wonder if this anomaly can be attributed to degrading of the underlying seat foam over nearly half a century. That coupled with the driver's seat being primarily used and the vinyl has possibly conformed to the foam beneath it. Unfortunately, I can't test my hypothesis unless I can see the car firsthand and give the seats the Charmin squeeze test ? Perhaps I'll create a GoFundMe account and have forum members enable me to place the winning bid on this gem, so I can commence with proving or disproving of my theory ?1 point
-
 1 point
 -
Let me play! If idle adjustment does nothing I'd say you have a vacuum leak. Borrow a gauge from a local parts chain and tell us the numbers. https://images.app.goo.gl/Y2DgmnNPhL95LTdg8
 1 point
 -
 1 pointIt’s not that I don’t trust the damper pulley marks but just following the rebuild book which talks about using a dial indicator to set TDC before putting the head on and avoid potentially damaging a valve. The timing cover goes on after and now I can verify the position. I set TDC using the dial Indicator then temporarily placed the timing cover and damper on to validate the markings. With the crankshaft set as the video shows my damper indicates between 0 and 1 deg. Now I know exactly what the pulley should show. Sent from my iPhone using Tapatalk1 point
 -
I get a chuckle that people posted on the BaT auction thread if the clock works. As if an inoperative clock will be a deal breaker on what will easily be a six-figure auction result.1 point
-
OMG. Does the guy that bid $55,000 know? Crazy numbers...1 point
-
 1 pointThank you, will forward your number to Joyce, the owner of the 75 280z. I gave her your email address, she may have already contacted you thru that.1 point
 -
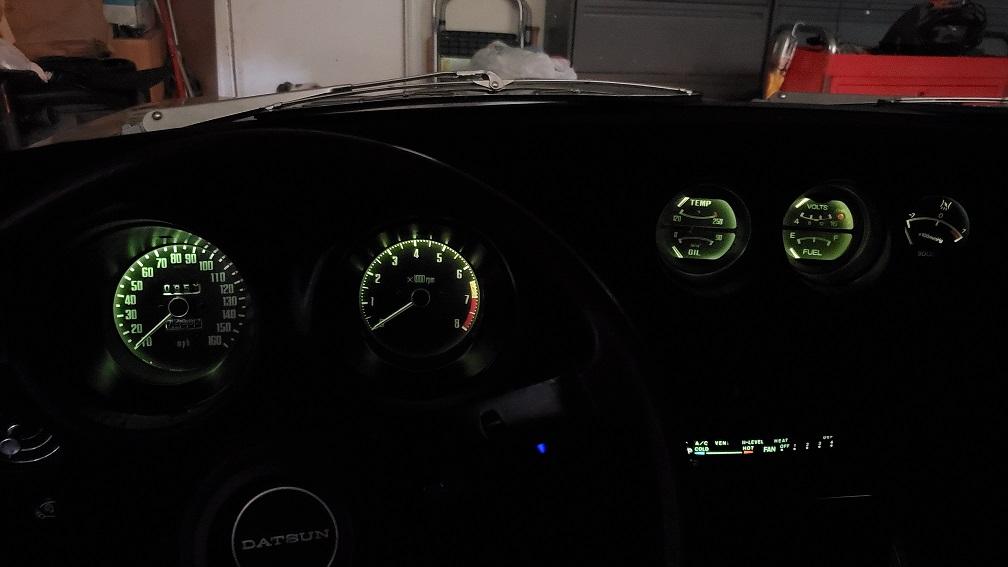
 1 pointWhile you have those gauges apart you should pull the guts and repaint the insides of the cans a nice bright flat white. No matter what bulbs you choose, that will always help. Personally I don't like the harshness of the LED replacement "bulbs" that I have seen - I'm very old school that way. But repainting the inside of my gauges made a huge change in the brightness even using stock 3.4 watt bulbs.
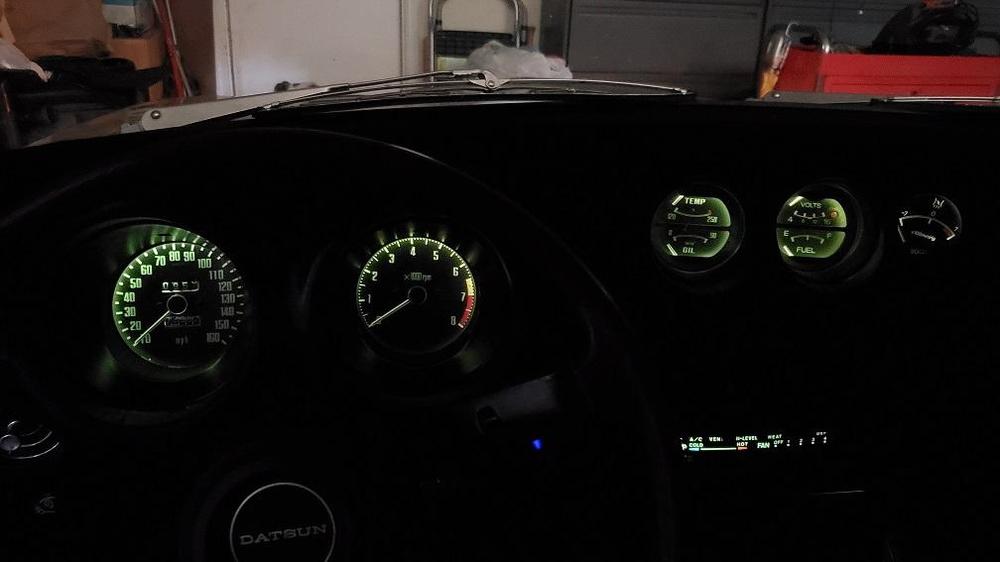 1 point
 -
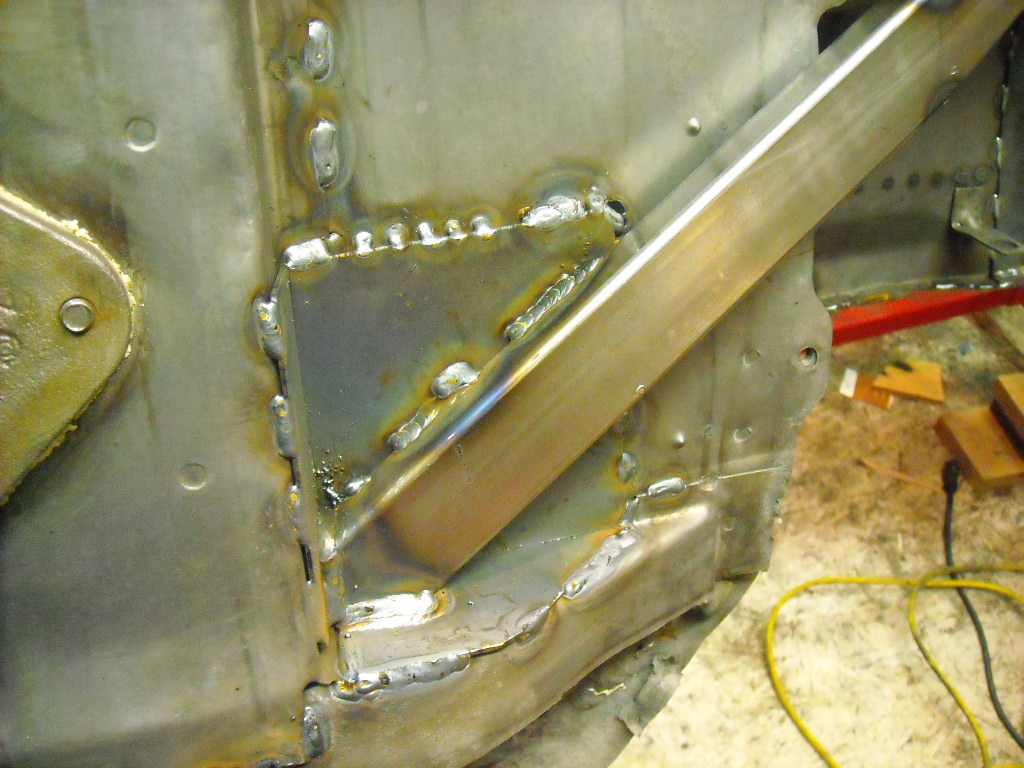
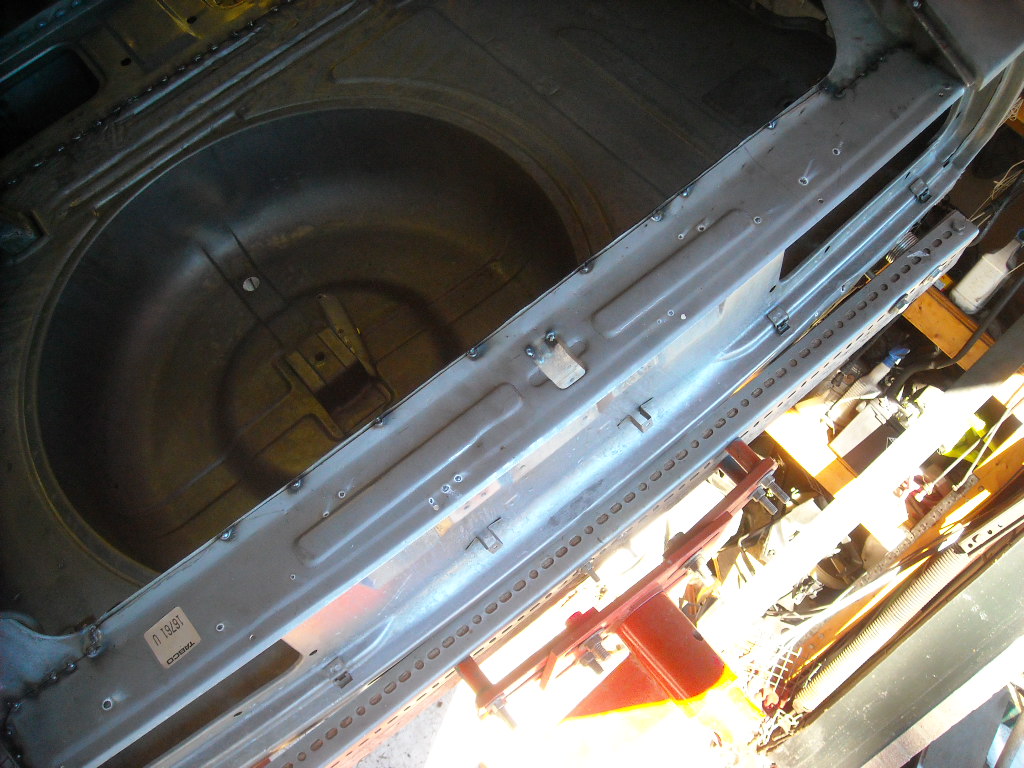
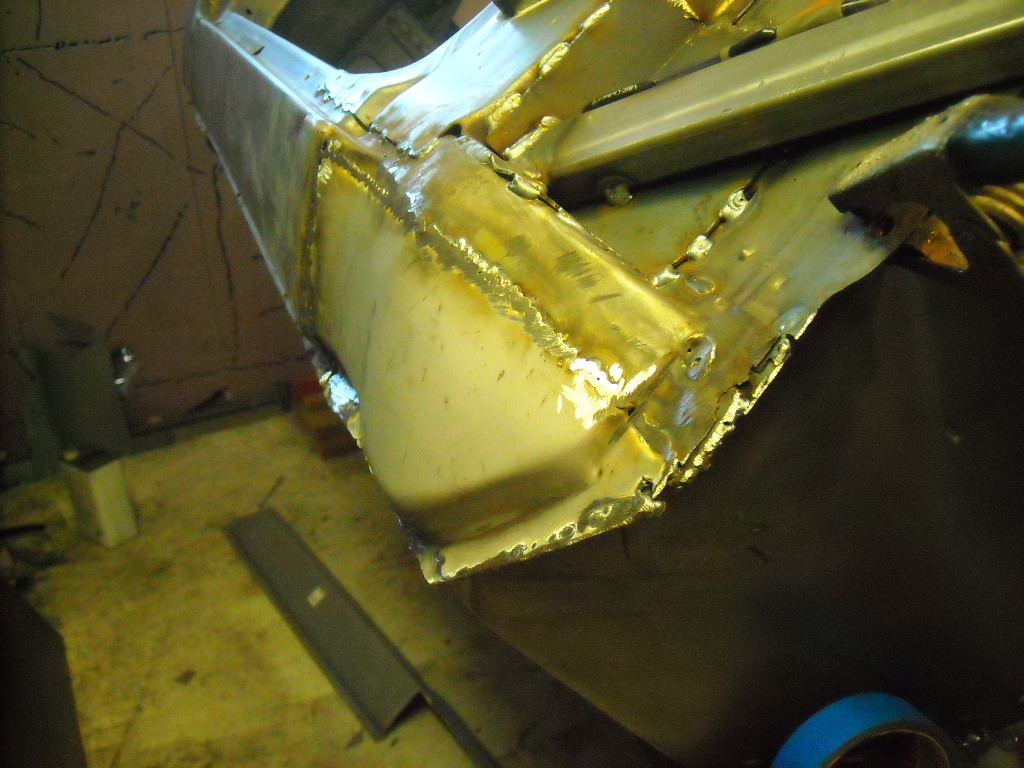
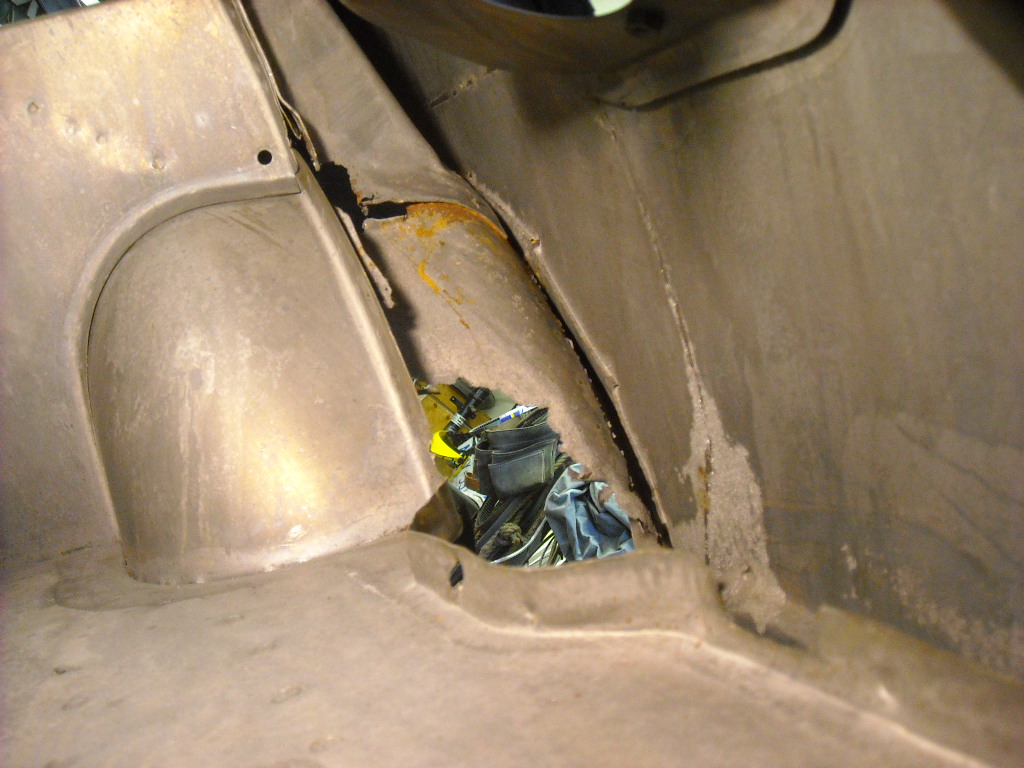
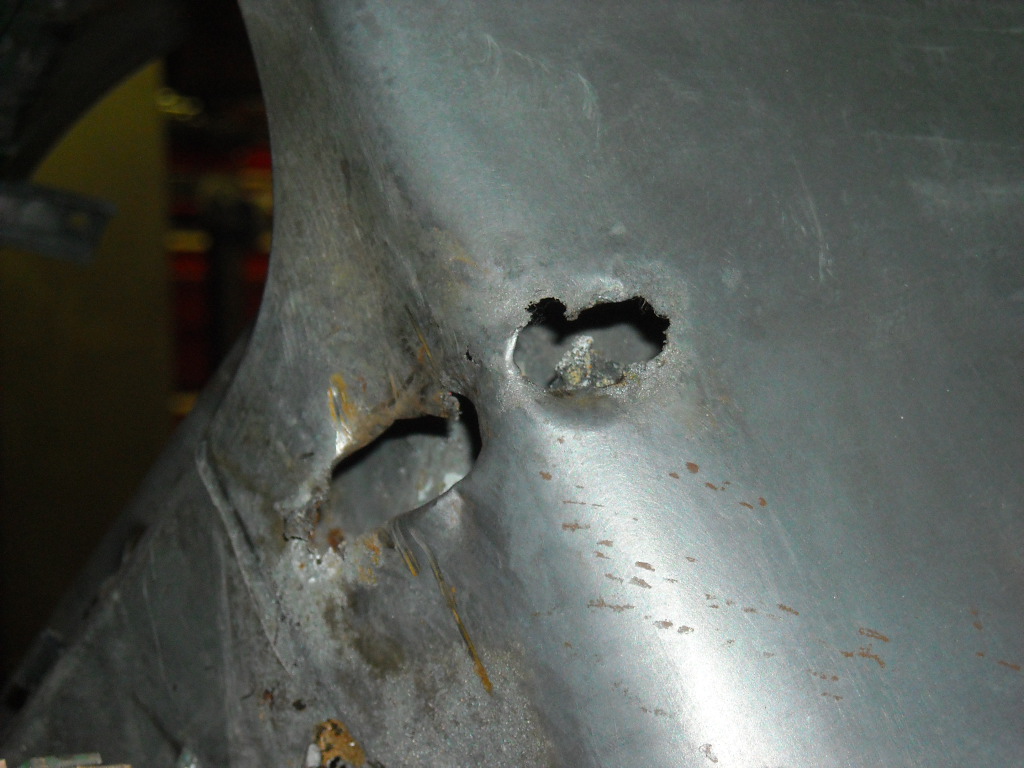
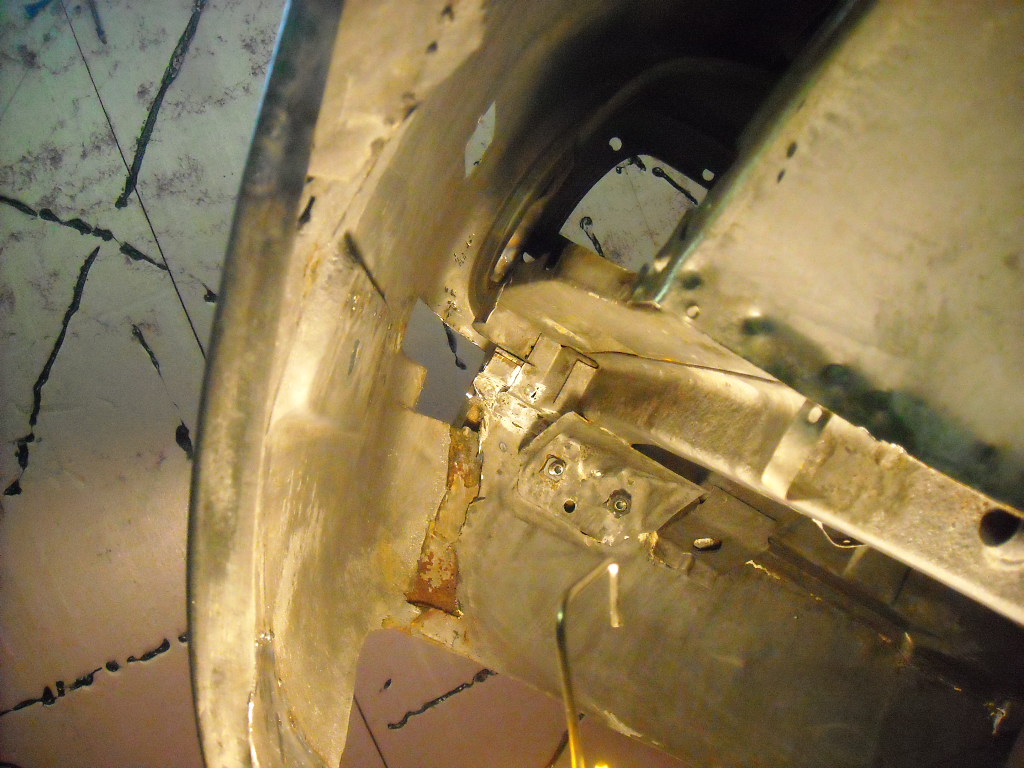
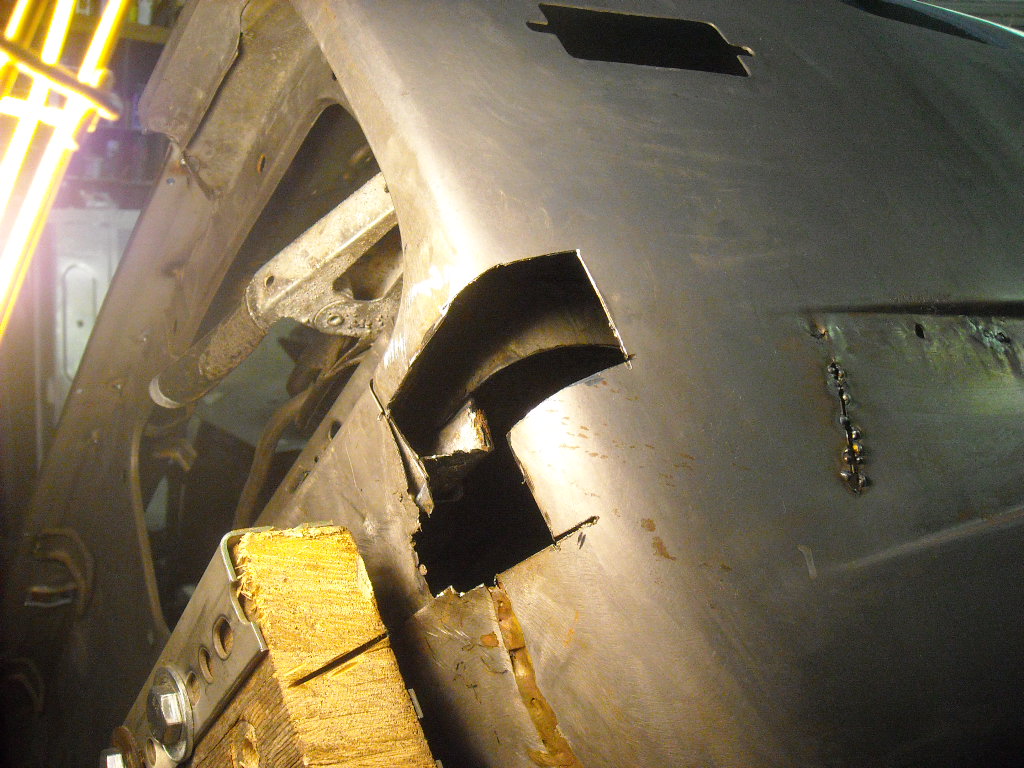
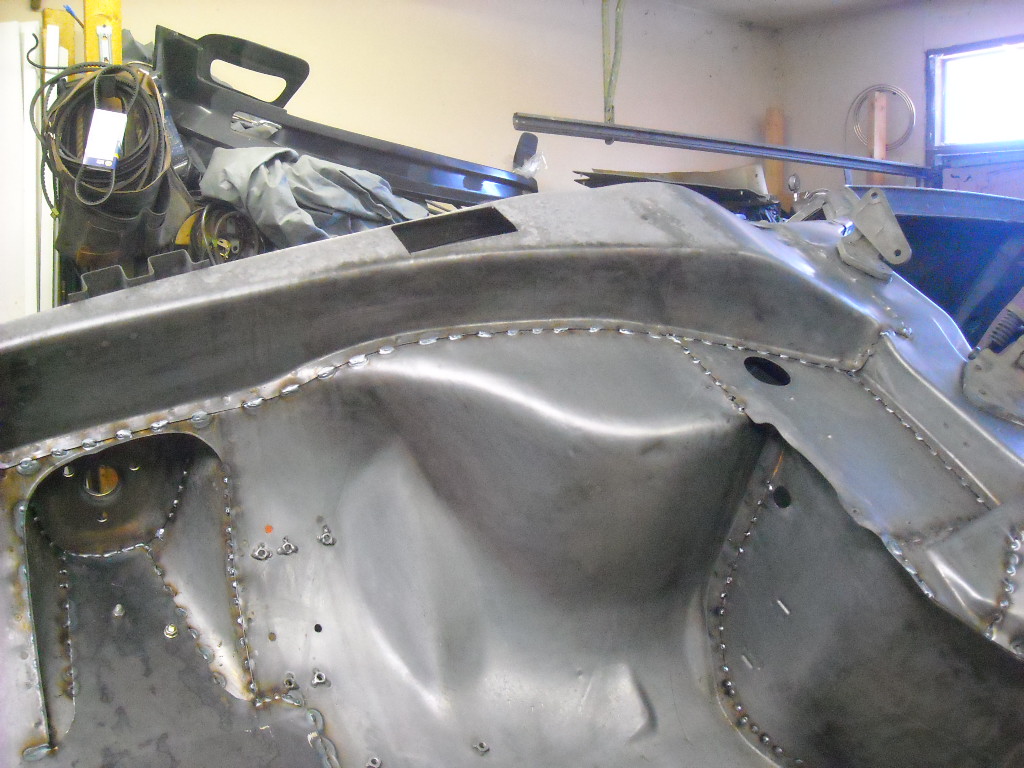
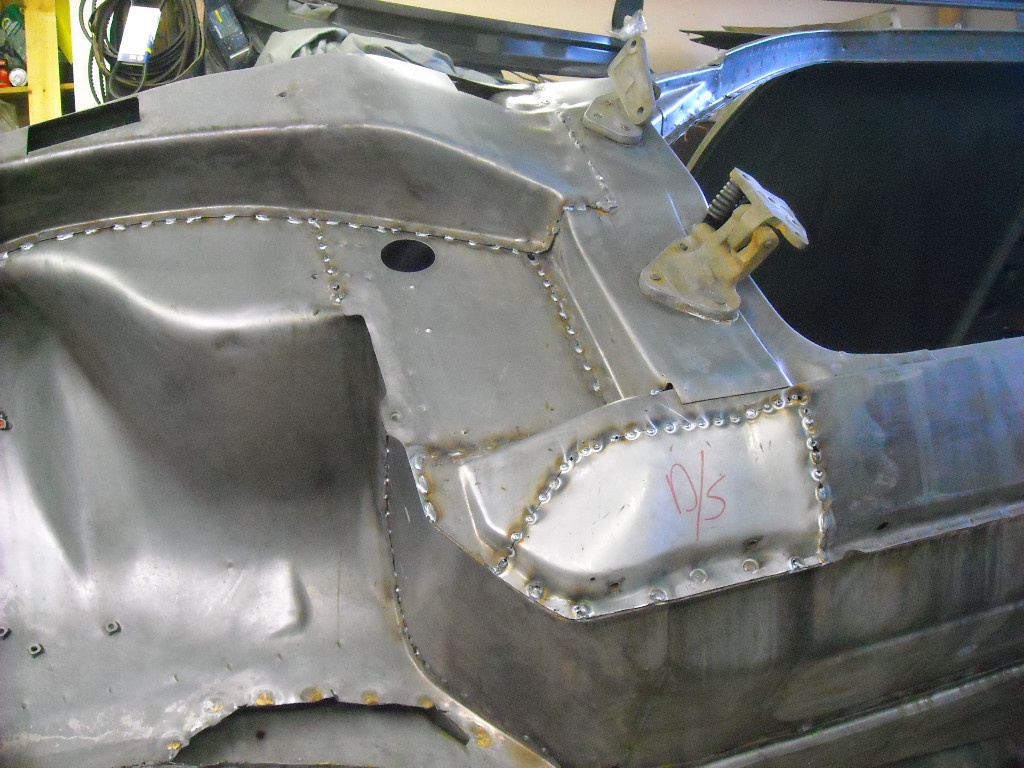
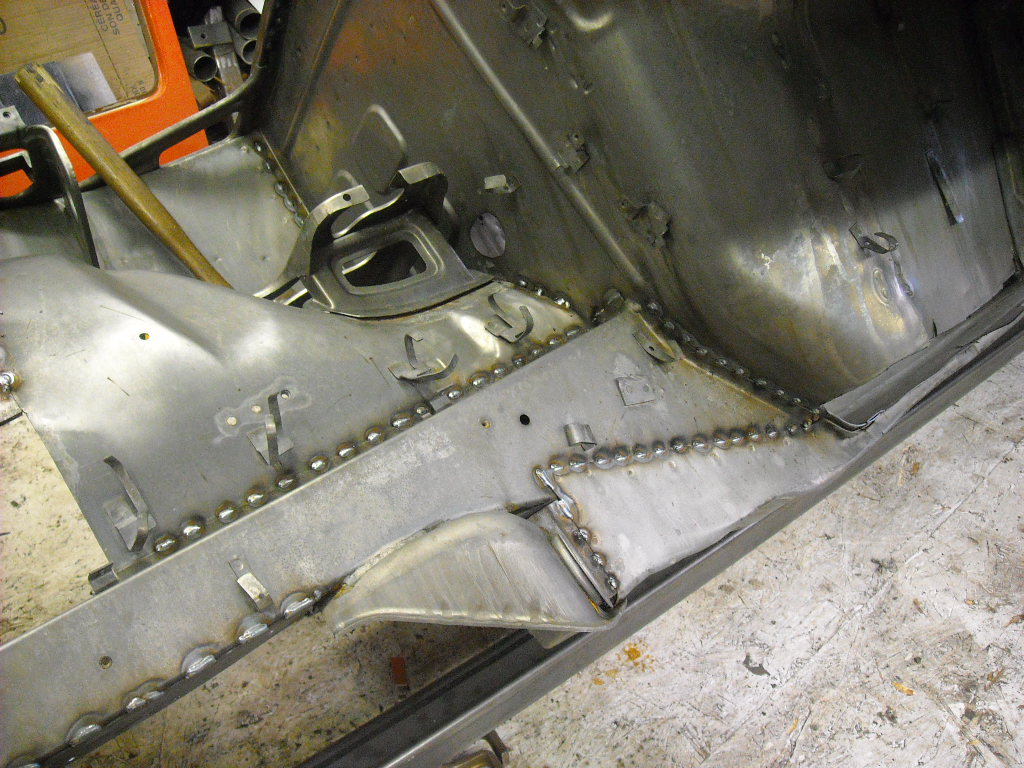
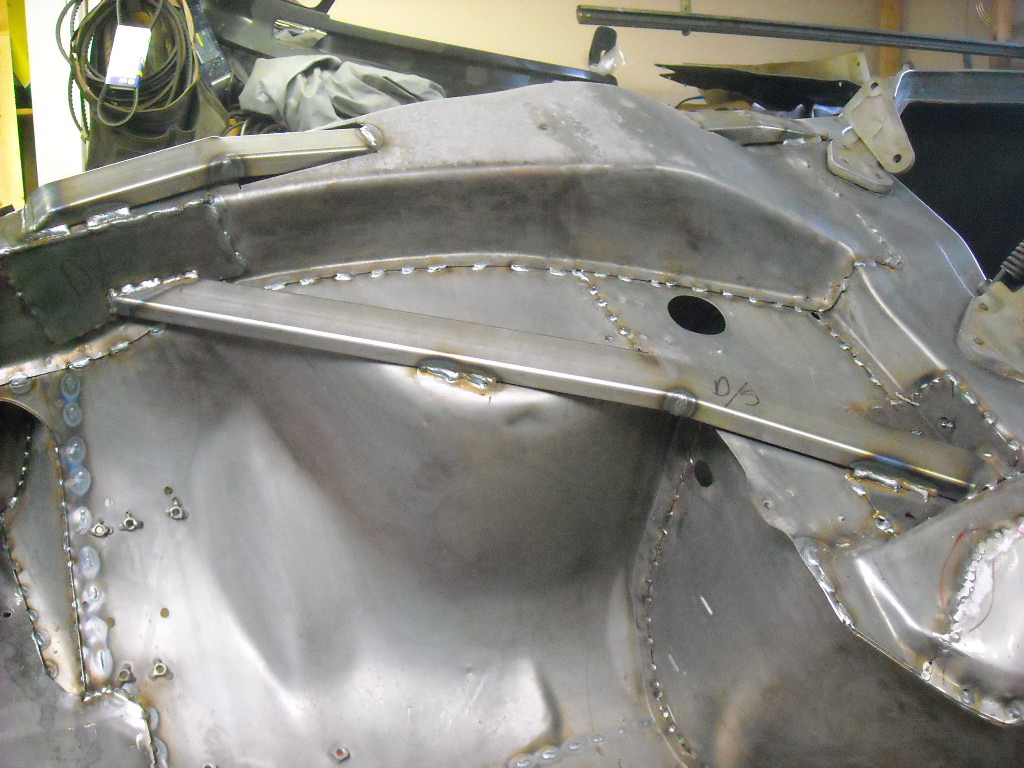
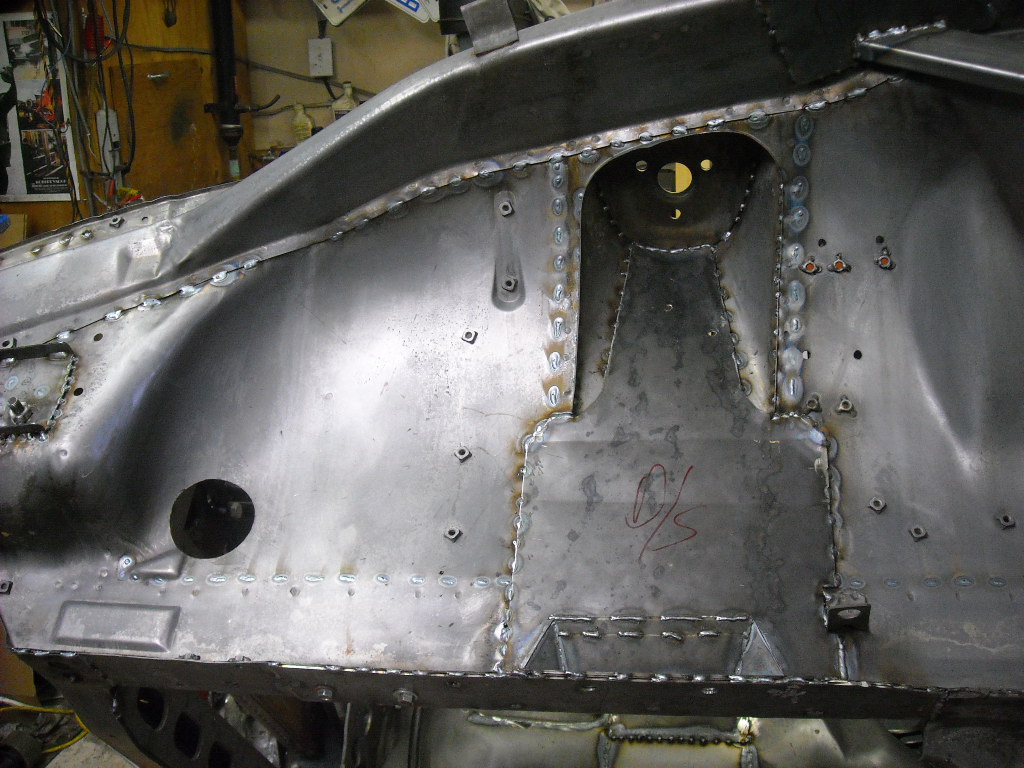
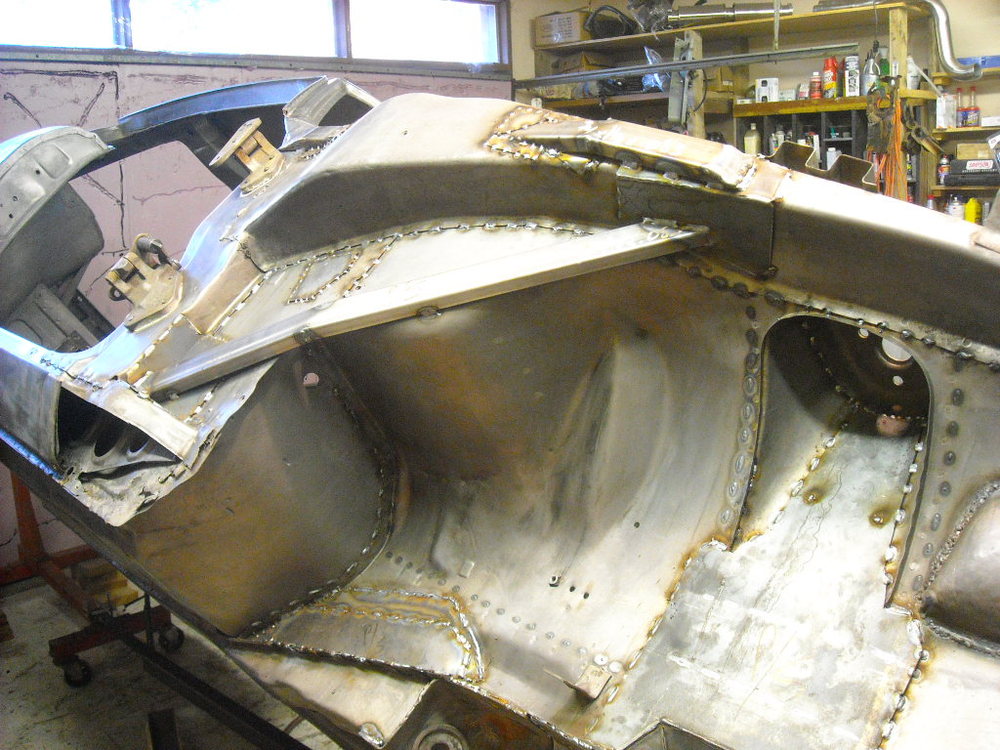
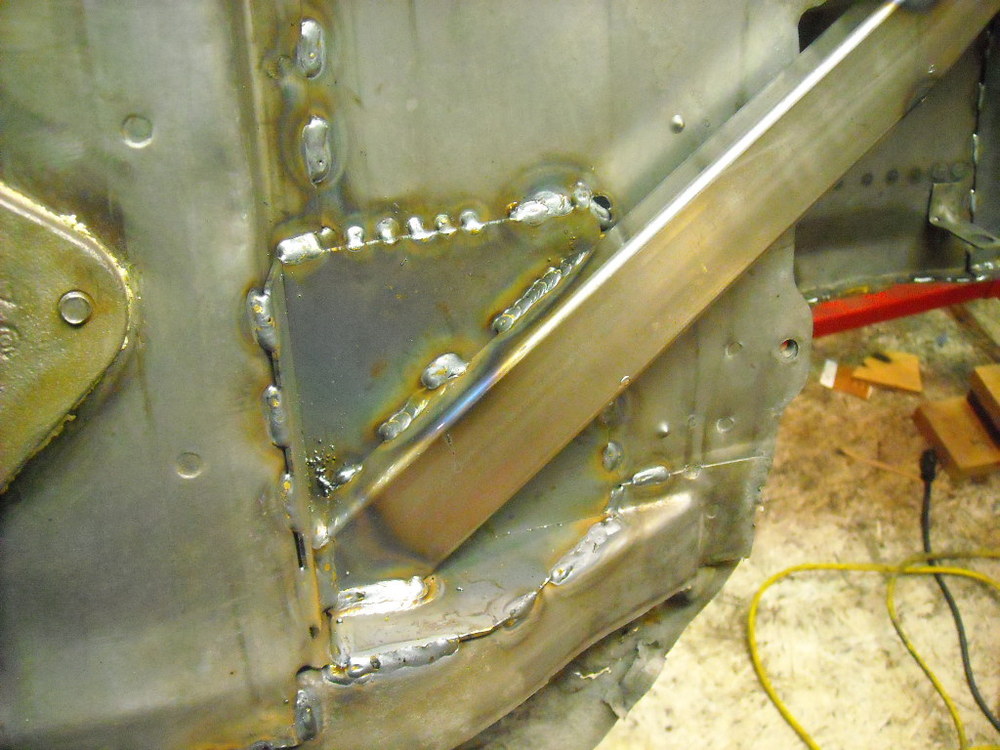
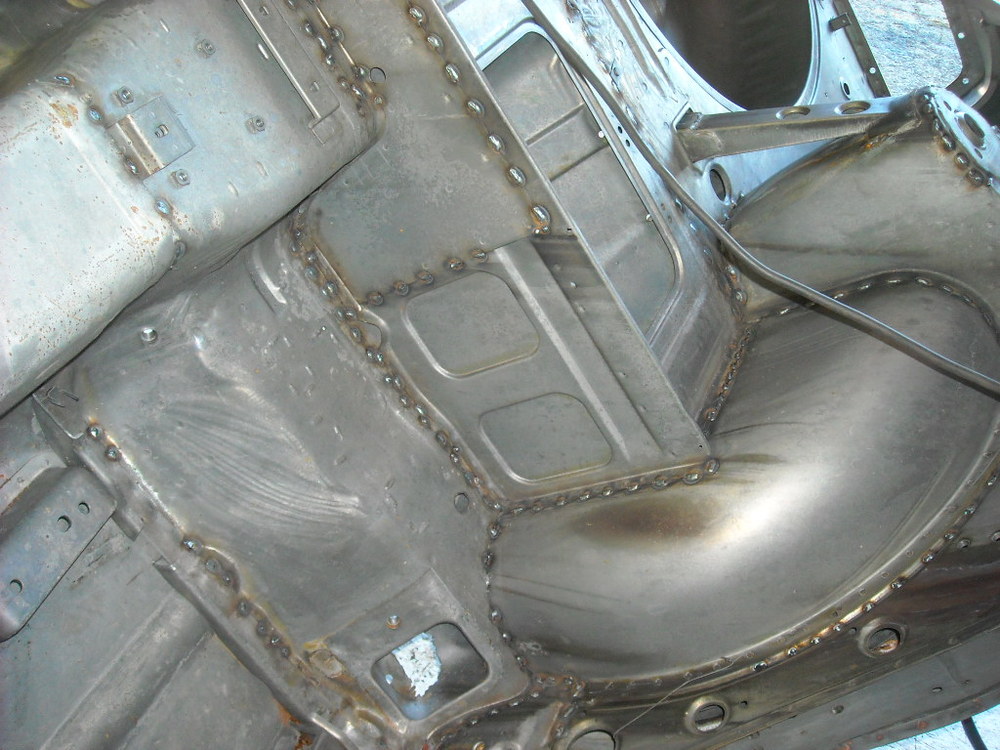
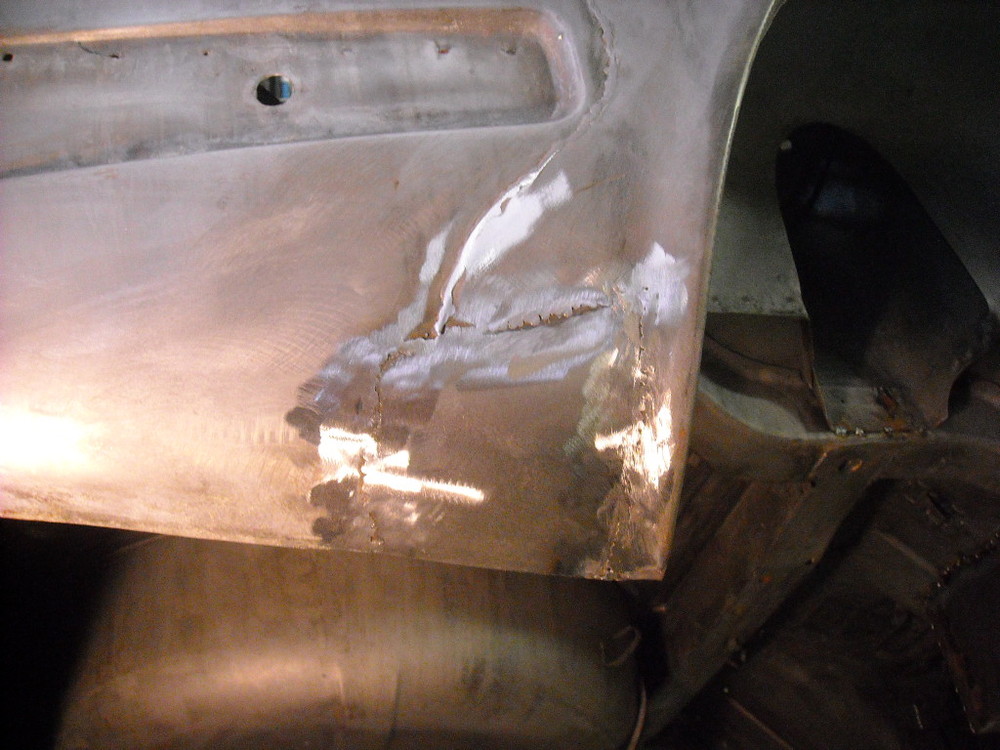
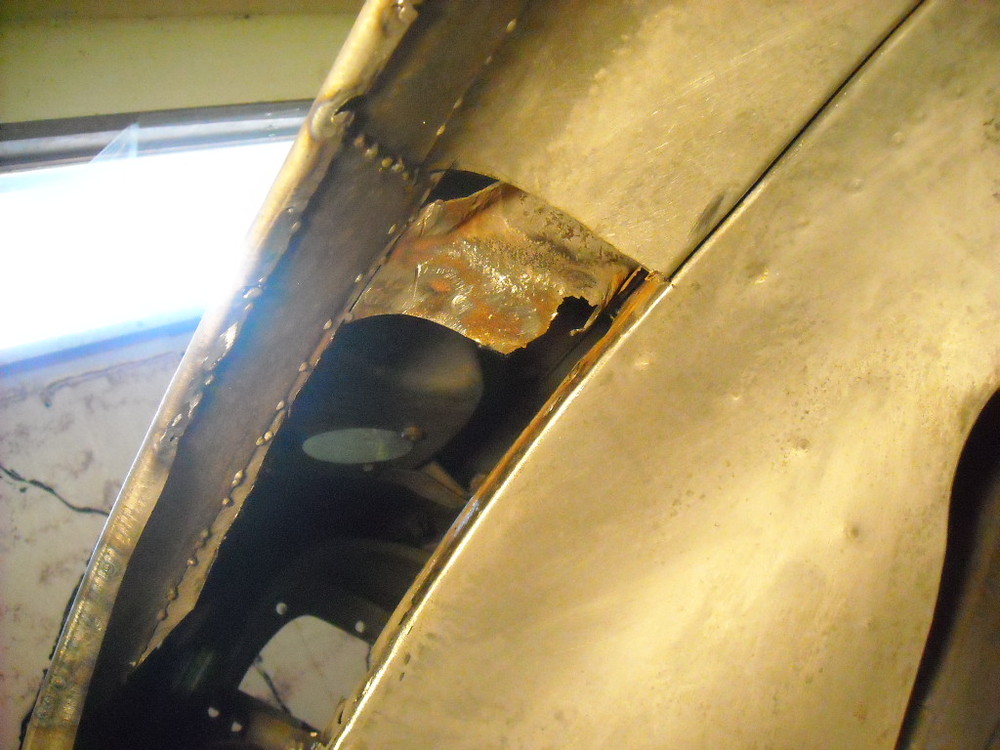
Got the other side finished and the rest of the stitch welding done and a few other patches, Now this the job I have been putting off cause I'm not sure if I'm up to the task, compound angles, multiple layers and not much room to work without removing the quarter panel and I really don't want to do that. Oh, and those patches on the inside lip of the wheel well, that's not my work. I'm way down that rabbit hole now, got most of the garbage out of the way before I called it a day.


 1 point
 -
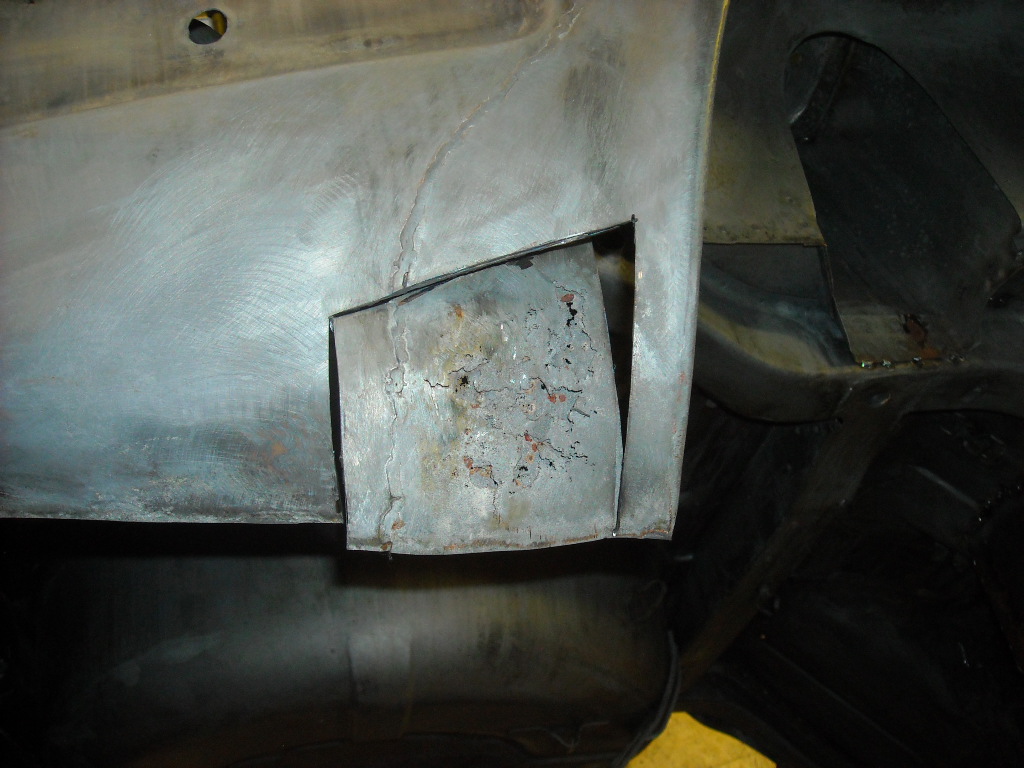
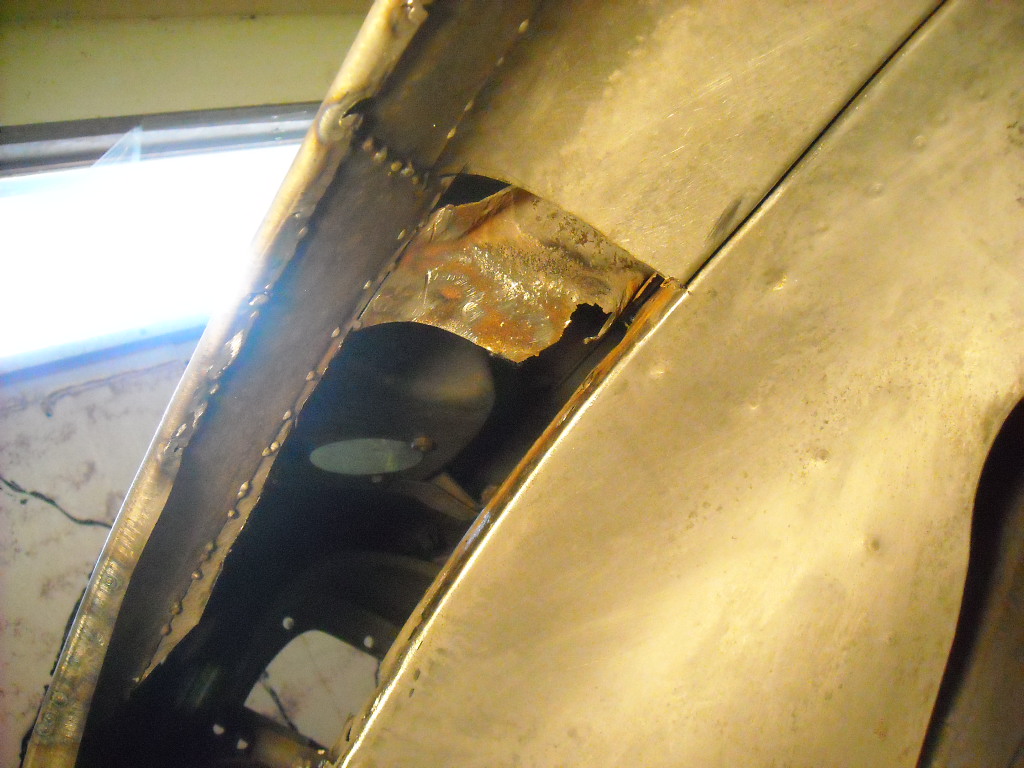
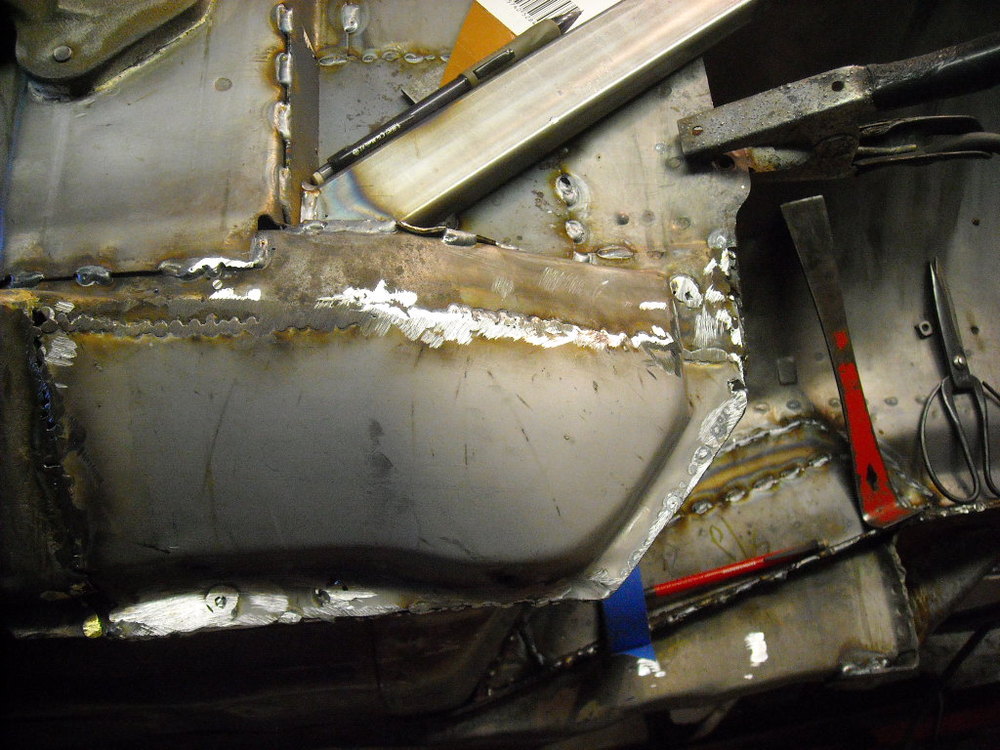
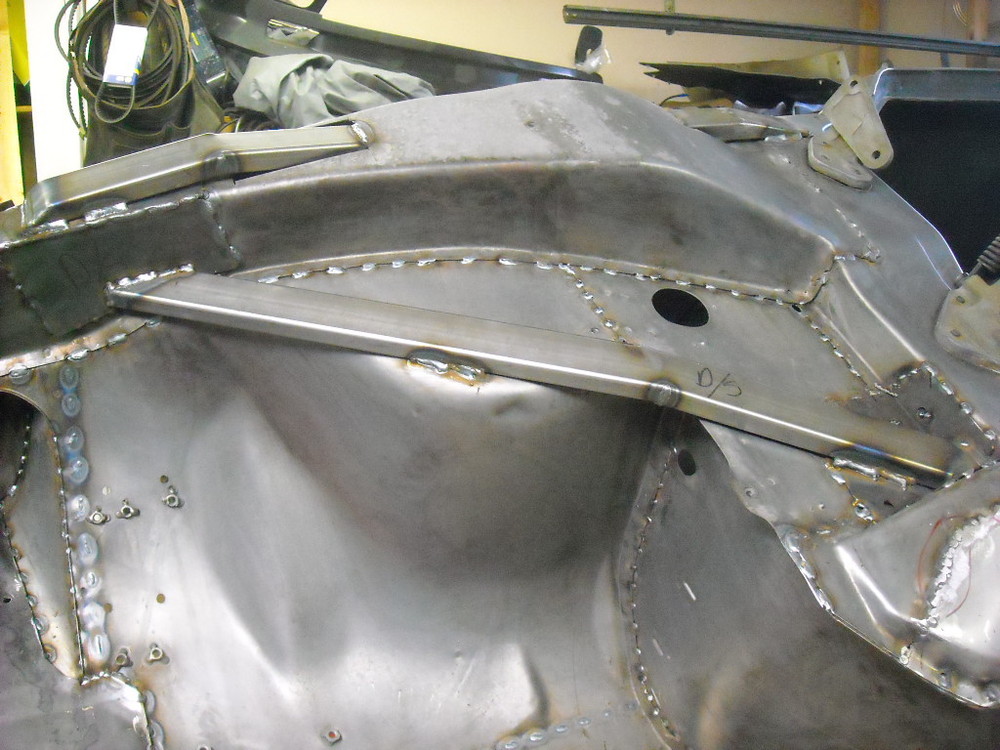
Well this is a subject that I leave to guys that understand it but I'm pretty sure megasquirt has this algorithm that combines the TPS, air and coolant temp to form a map that allows multiple ITBs like mine to function properly. Matt didn't seem to have any problem tuning the engine back in the summer. I'm probably not mentioning some other key sensor that ties it all together. Jumped in today and started installing patches, bracing and working on the stitch welds.


 1 point
 -
 1 point
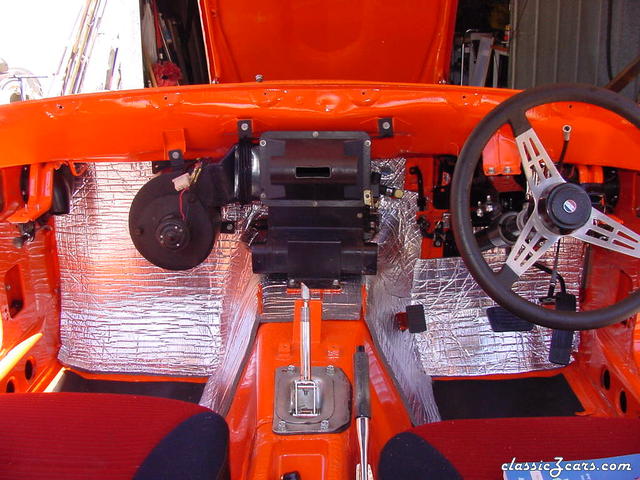 A shot of the new firewall insulation on my '73 240Z See more at: http://www.zparts.com/zptech/articles/bs_insulation/webtour-1/index.htm1 point
 -
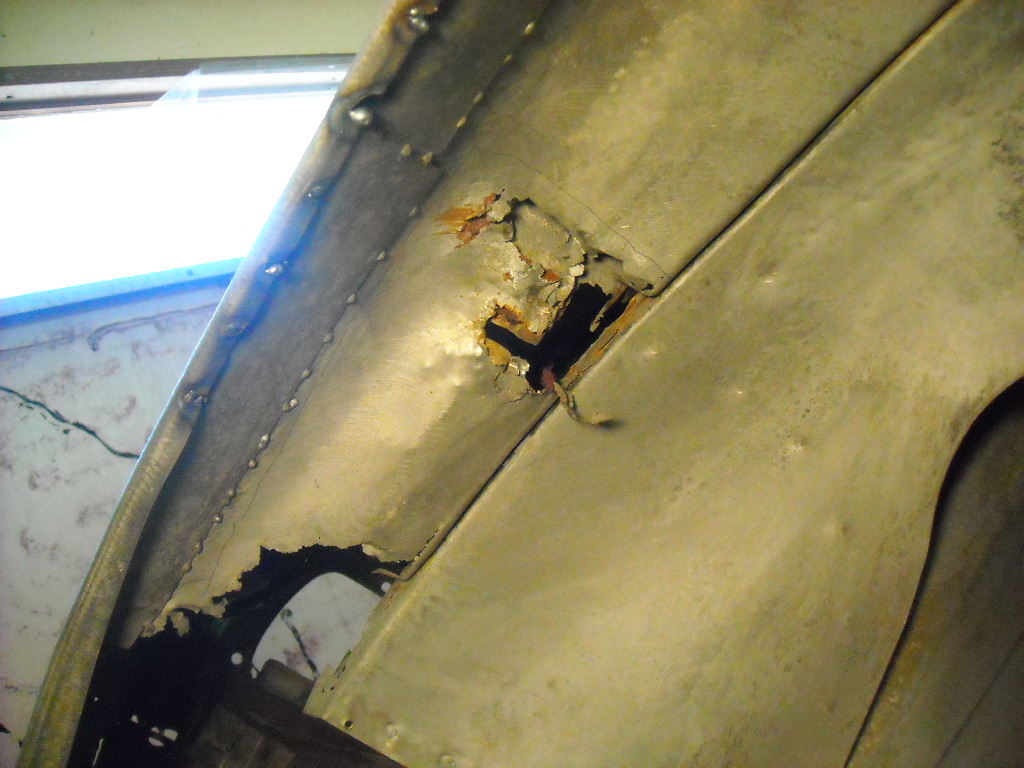
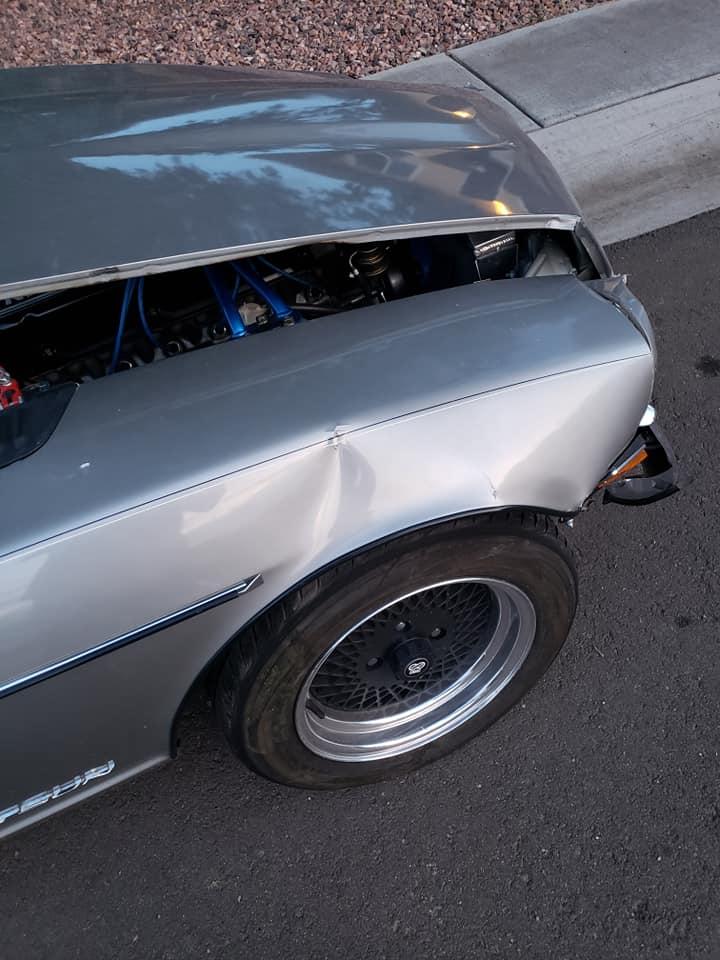
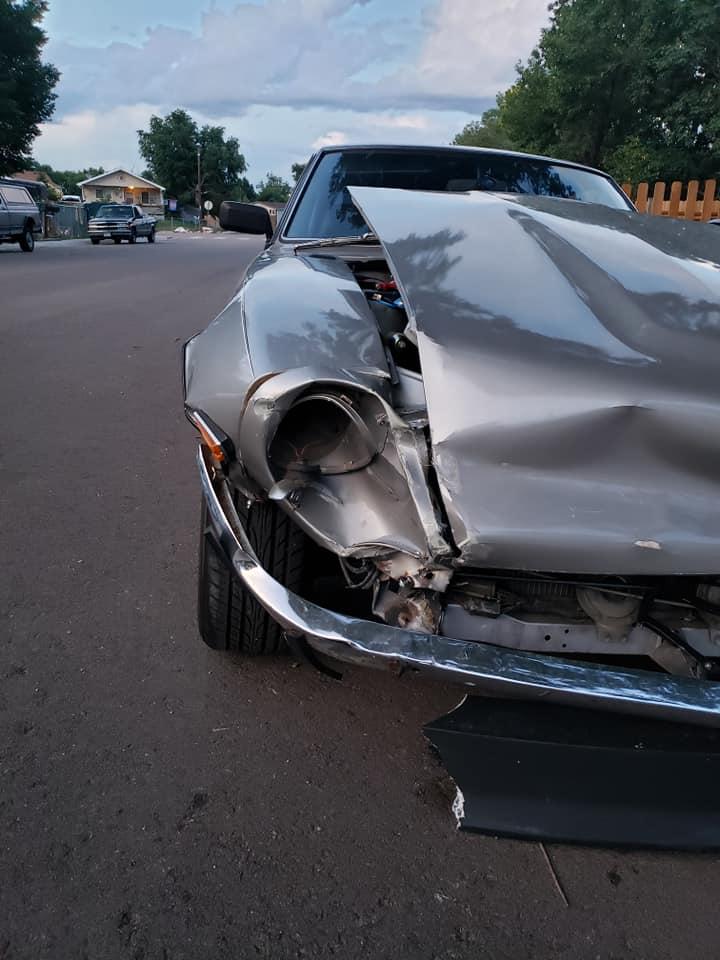
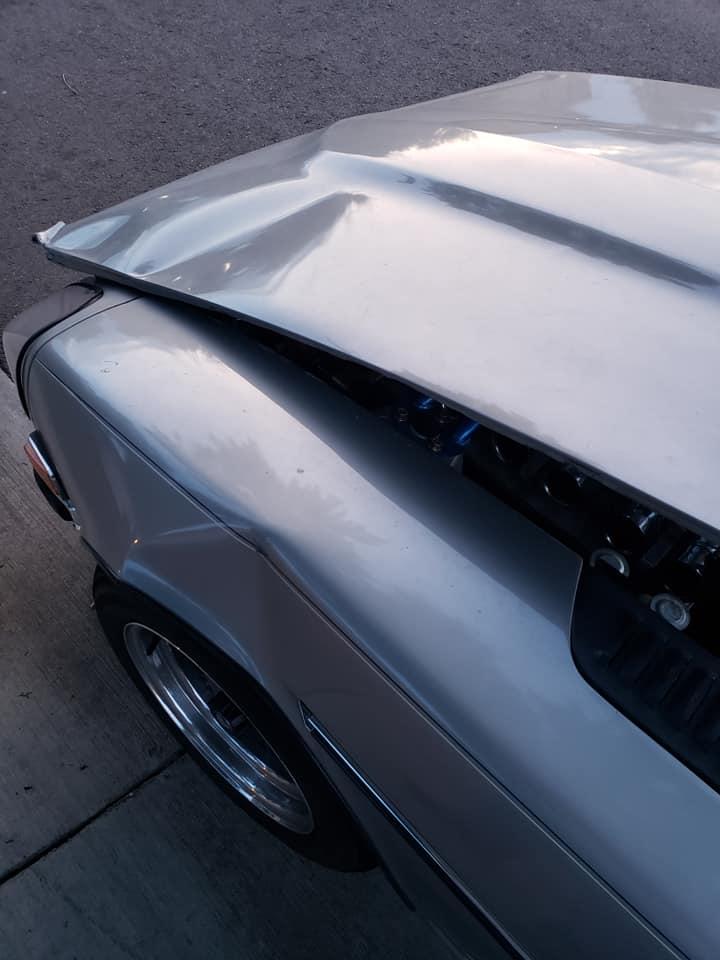
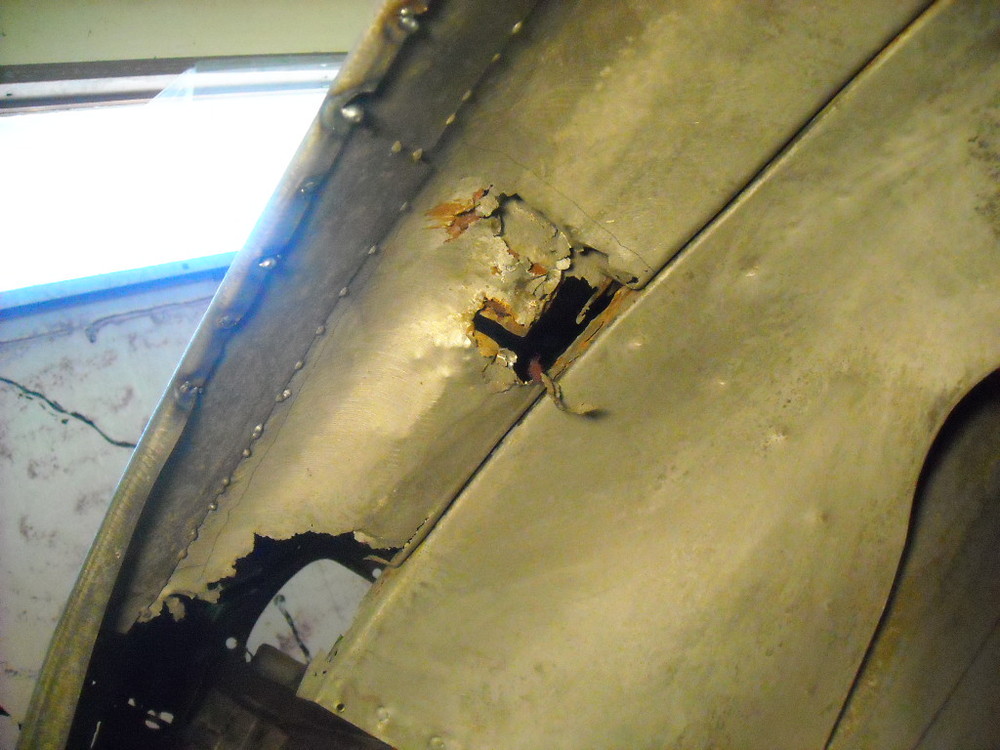
 Tragic news. 11/2019: I was entering my neighborhood, slowing down from 45mph and turning left. I cut my wheel 90 degrees directly on top of a 2 inch pile of sand and skidded into a guardrail at 10-15mph. I will be pulling my motor and drivetrain and selling this poor 240z on ebay within a month or two. She is definitely repairable but beyond my abilities.
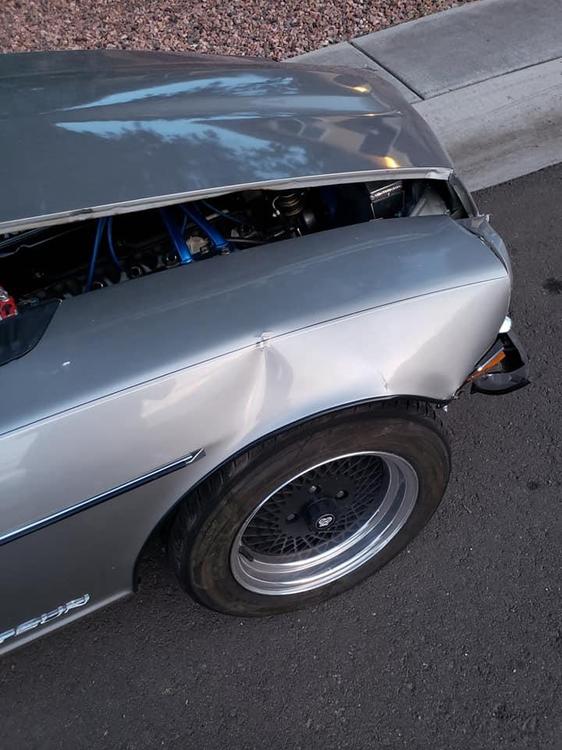

 0 points
 -
0 pointsI thought the same thing when I read that. Sometimes it's nice to let the car do the work. Too bad the autos don't have a bench seat. No offense. A bench seat has its advantages...0 points