Leaderboard
-

LeonV
Free Member3Points2,270Posts -

S30Driver
Free Member2Points1,580Posts -


Zed Head
Free Member2Points18,944Posts -

Terrapin Z
 Subscriber
 2Points1,303Posts
Popular Content
Showing content with the highest reputation on 06/19/2020 in all areas
-
3 pointsFresh engines should have the valve lash checked often. As the valves wear into the seats, lash will tighten and keep the valves open longer. This can cause rough-running and compression problems. Also do a leak-down check before tossing the engine out of the car. That will tell you where your problem may lie and is a fundamental step in troubleshooting compression issues.3 points
-
2 pointsAs previously mentioned, you need to make a change with the headlight harness to convert it from the negative ground switched to positive switched for the led lights to work. If you are in the market for led's, take a look at Vintage Car Led Headlights (they don't look funny) https://vintagecarleds.com/7-inch-round-headlights/ Highly recommended ....2 points
-
1 pointThe passenger side is slightly longer and a different end angle, as oppose to the drivers side.1 point
-
You could do what zKars wrote about, linked below (meta?, a link to a post in the thread being used to post the link). Pretty clear that it will probably fail. If it were me I'd contact GMB and see if they'll send you one of theirs after they fix the issue.1 point
-
 1 pointSold for $1300, a bit more than this would cost from ZTherapy and without the wait (they are backlogged 4 months last I talked to them).1 point
 -
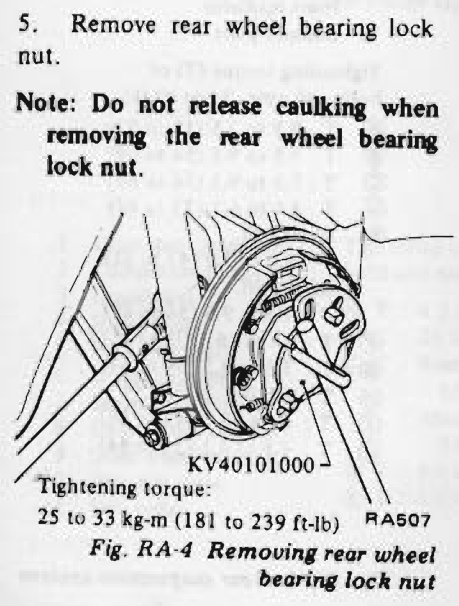
1 pointThe illustration also shows the nut thread orientation. It's a normal righty-tighty.
 1 point
 -
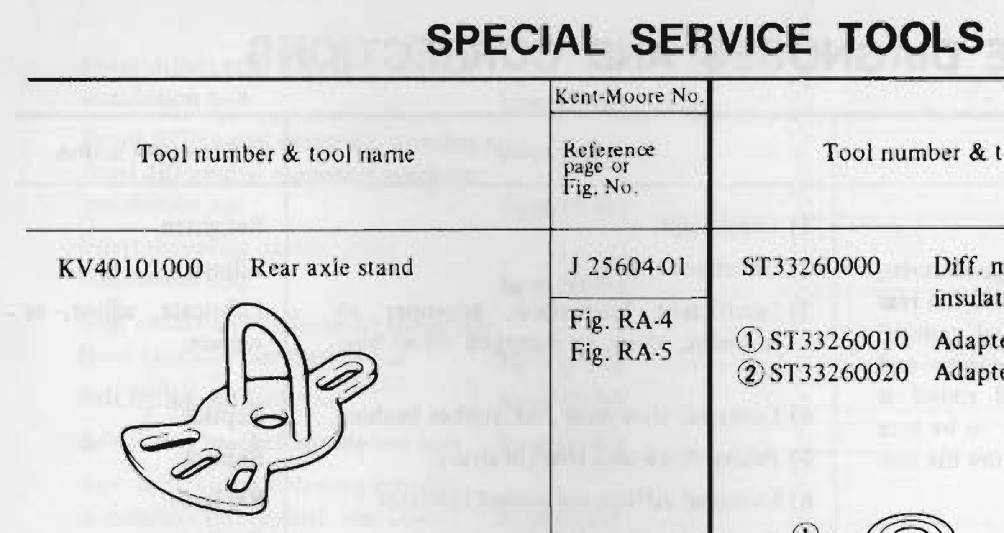
 1 pointTry Z Cars of Arizona for a more reliable source of quality used steering rack assemblies. Several years ago, our friend Mr. Hoover ( @240260280 ) produced an excellent photo-article guide on the topic of replacing the Z rear wheel bearings. It includes his secret tips for getting the staked nut off. I just checked and the full article is still available (along with all of his other great 'tech tip' guides) on the Atlantic Zcar website. Go here... http://www.atlanticz.ca/zclub/techtips/rearwheelbearings/index.html1 point
 -
 1 pointNew timing chain kit too, don’t think I’ve seen a pullout that clean before...probably fresh from the machine shop. I would install the engine and run it as is in a heartbeat. Keep your other block as a backup / future n/a build.1 point
 -
I agree that is plausible, I intended to lubricate the cable when I serviced the brakes, but with the RT mount it was near impossible to get up in there to remove the cable as it does not just unhook. A 50 year old cable and yoke might not slide like it used to to balance out when new. I should have serviced that when I had the diff out 5 years ago. I can say that after using this technique the brakes do seem to work better. I made no other changes other then a re-bleed having replaced the springs on the front and rear. My brake handle never seemed to change after the 5 years of use. Yet now travels less than before. Could be a fluke I suppose.1 point
-
 1 pointSite, The biggest issue I found with the LED headlights is the way Datsun did the wiring. Since LED's are diodes they only allow electricity to flow in one direction. Rather than the center post being a common ground, the center post is hot and the switching is done between the 2 posts that are ground in the Datsun world. Here's a thread where I asked Dave about his harness and how it's wired. The thread also has the headlights I ended up going with. Because I've been lazy and the lights are working I haven't taken the anti flicker block out yet, but according to Dave the harness puts the ground on post 3 where it typically is outside the Datsun 240z world.1 point
 -
 1 point@siteunseen is the master of searching on this site. There is also this thread that talks about LED headlight installation:1 point
 -
 1 pointI've been using H4's for quite a while. Just recently I replaced the bulbs in my H4's with LED "bulbs". They're bright (12,000 lumen). Had to make sure my headlights were aimed properly.1 point
 -
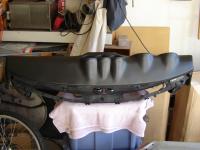
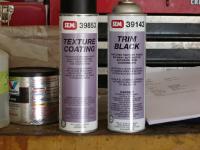
 1 pointAfter the repair areas were finish sanded, I scuff sanded the rest of the dash with 220 grit paper and cleaned the surface with SEM plastic/leather prep. After that, I sprayed the complete dash with SEM's texture coating. I followed the directions on the can. I kept the spray nozzle approximately 20 inches from the surface and when the coating was finger dry, I knocked down the texture with scotch-brite. I let the dash dry for 24 hours and then lightly scuffed the complete surface. I cleaned again with the plastic/leather prep and then applied two wet coats of SEM's Trim Black for my finish coat. Here's some pictures of the finished product, it isn't perfect but it exceeded my expectations. I don't think I would have attempted this repair if the dash was in the car. Total cost was approximately $60 and maybe five hours of labor total. Bruce

 1 point