


Leaderboard


 Subscriber


Popular Content
Showing content with the highest reputation on 07/31/2020 in all areas
-
2 pointsHi all. Fun to see pics from my site. Like I said on the page, the RT mount didn't fit my '71 right. It took a few hours to modify but I think I've got it in the right spot. I thought about drilling a hole to move the bushing back but the bracket itself interfere with the parking brake yoke so cutting and welding seemed like the only choice. I haven't driven it yet, so I don't know how well it works but I think it'll be better than the original strap which was shredded into pieces. I bought the car as a semi-basket case so I don't know if it's the stock moustache bar but it seems to fit right. Hopefully you got a laugh at the gold differential. Clay, if you run into problems don't hesitate to email me - I'll be happy to help. Had I known how much different a '70-71 would be, I would have looked for a '72 (which is what I owned years ago) but it's too late to change and I'm happy with the way this one is turning out.2 points
-
1 pointThat doesn't sound right at all. Can you remove the converter from the transmission and test fit it to the flex plate. I think there might be something going on there. It should slide onto the bolts. Make sure when you refit the converter to the transmission to turn slowly while gently pressing it into the pump. The two prongs wil click into the notchss and you will feel the converter slide in. Btw: In Australia you could buy a performance upgrade kit for the 4N71B transmission, which is basically the 3N71B with a lockable sprag clutch. They used the RB30 engine with the 4N71B in the Holden VL commodores in 1985.1 point
-
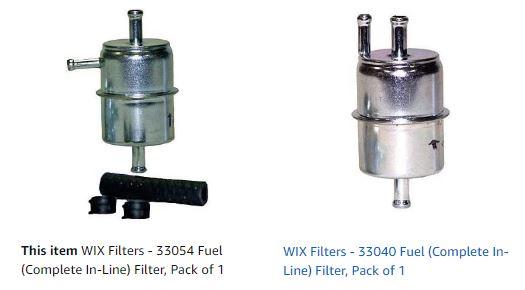
1 pointThe filter Mark is referring to is on the right. Appears to be for horizontal mounting, as it is important to have the offset return line in the 12 o'clock position. The left one looks like it is intended to be mounted vertically. In & out are 5/16" the return is 1/4". Amazon, about 7 bucks. Thanks Mark, I think you're on to something!
 1 point
 -
1 pointMany Z owners in the past reported the 1st gen. (circa 1980) Rx7s elec. fuel pumps were almost silent and were a great replacement in a Z. I've put many miles in an 80 RX7 and don't ever remember hearing the pump. Getting back to vapor lock, has anyone ever tried installing a Vapor Separator Fuel Filter under the hood? One inlet and two outlets. One outlet to the carbs and one to the return line. Good up to 75 psi. They were OEM parts on many American cars back in the 1960s and 1970's.Wix 33040 is the one I looked at. I've yet to find one negative review when it comes to solving vapor lock.1 point
-
1 pointSo far, it looks like the 13/16" Craftsman 1/2" drive socket will work. I might take a trip to a few stores to see if any sockets are just a hair bigger, but for now, I should have a winner. Ideally, I'll find a Harbor Freight or other non-chromed impact socket that only costs a few bucks. I don't want to ruin my 40 year old Craftsman socket that can't be replaced with another USA made one.1 point
-
I have read/heard the same thing about bondo vs. fiberglass. Since both use the same activator, I would think the resin isn't the part that is susceptible to water, but the other primary material might be the issue. And now searching (via Google), it looks like the other primary ingredient in body filler is clay/talc which absorbs water, whereas fiberglass does not. So, that is the difference. In applications for which I can not be 100% sure that exposure to water is eliminated, I use fiberglass filler. For example, I used a bit in the inside of the dog leg of the quarter panel/rear of the rocker, in an earlier repair, mainly to fill pitting and a few very small holes left after sandblasting prior rust damage. I will attempt to seal the car so water will not get in there ever again, but I used a bit of fiberglass filler there just in case. For repair areas where I am sure water will not ever be present, I use standard body filler. Along that door edge, seam sealer will seal the lap joint of the skin to the frame, primer and paint will seal the outside of the repair, and I will be using a spray on sound deadening coating on the entire interior of the door which will seal the joint on the inside and keep any water away from the area.1 point
-
1 pointAll thanks for the help! I got it together! I removed the clutch and re-centered it and I still could not close that gap. It made no sense. So I removed the clutch again and I removed the pilot bushing that I had put on about a month ago. The bushing's inner diameter is slightly too large and does not fit over the spindle. But the plastic tool worked just fine which is why I didn't think of this at first. WTF??!! Luckily as I was searching through my parts boxes I had bought another one on ebay a long time ago and forgot I had it. Once I put the new one in and put the clutch back on the whole job took 5 mins to align. She is ready to go back in! Been a long time coming.
 1 point


