Leaderboard
-
qz16
Free Member5Points147Posts -
Captain Obvious
Free Member2Points10,081Posts -
conedodger
Free Member2Points12,513Posts -
zKars
 Subscriber
 2Points3,769Posts


Popular Content
Showing content with the highest reputation on 09/01/2020 in all areas
-
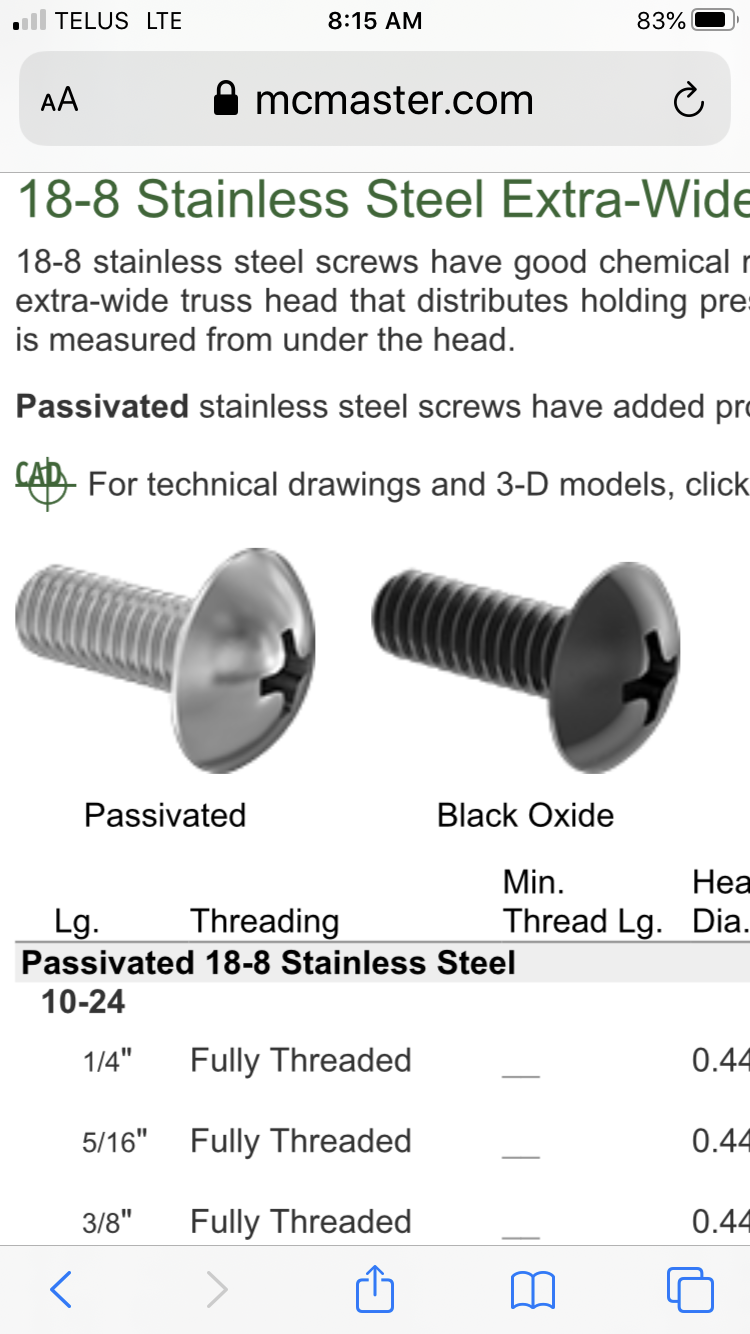
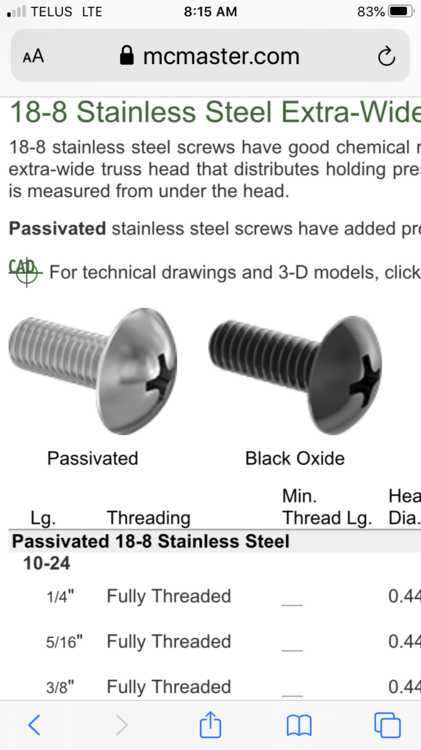
2 pointshttps://www.mcmaster.com/screws/thread-size~10-24/18-8-stainless-steel-extra-wide-truss-head-phillips-screws-9/ I would have chosen M5 metric but they do not have a black oxide option, just SS silver
 2 points
 -
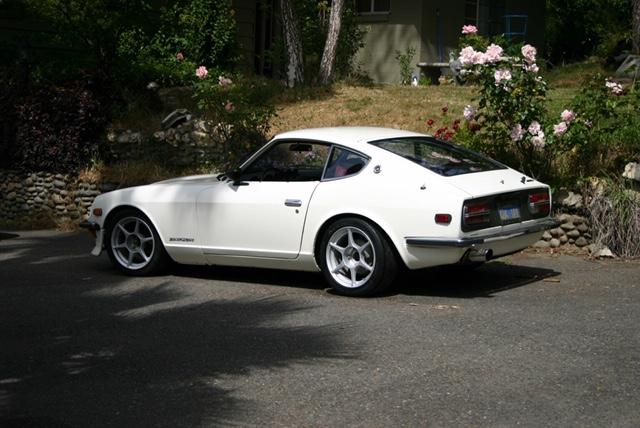
Pardon my rudeness. I should have introduced you to Pricilla first. She has Panasports now but these wheels are still in the barn if I want to change back...
 2 points
 -
2 pointsPatcon - As you know 3mm screws are fairly small. Just wanted to let you know that you were right. I could not locate wide enough pan head screws with a phillips head. But screwing a lot of small screws with an allen head wrench, sometimes in the blind, sometimes upside down is not a lot of fun. And the mere thought of doing it more than once drove me to use pan head phillips, still with a washer. Much easier to locate a hole with a magnetic tip phillips screwdriver and fiddle with an allen head. Thanks.2 points
-
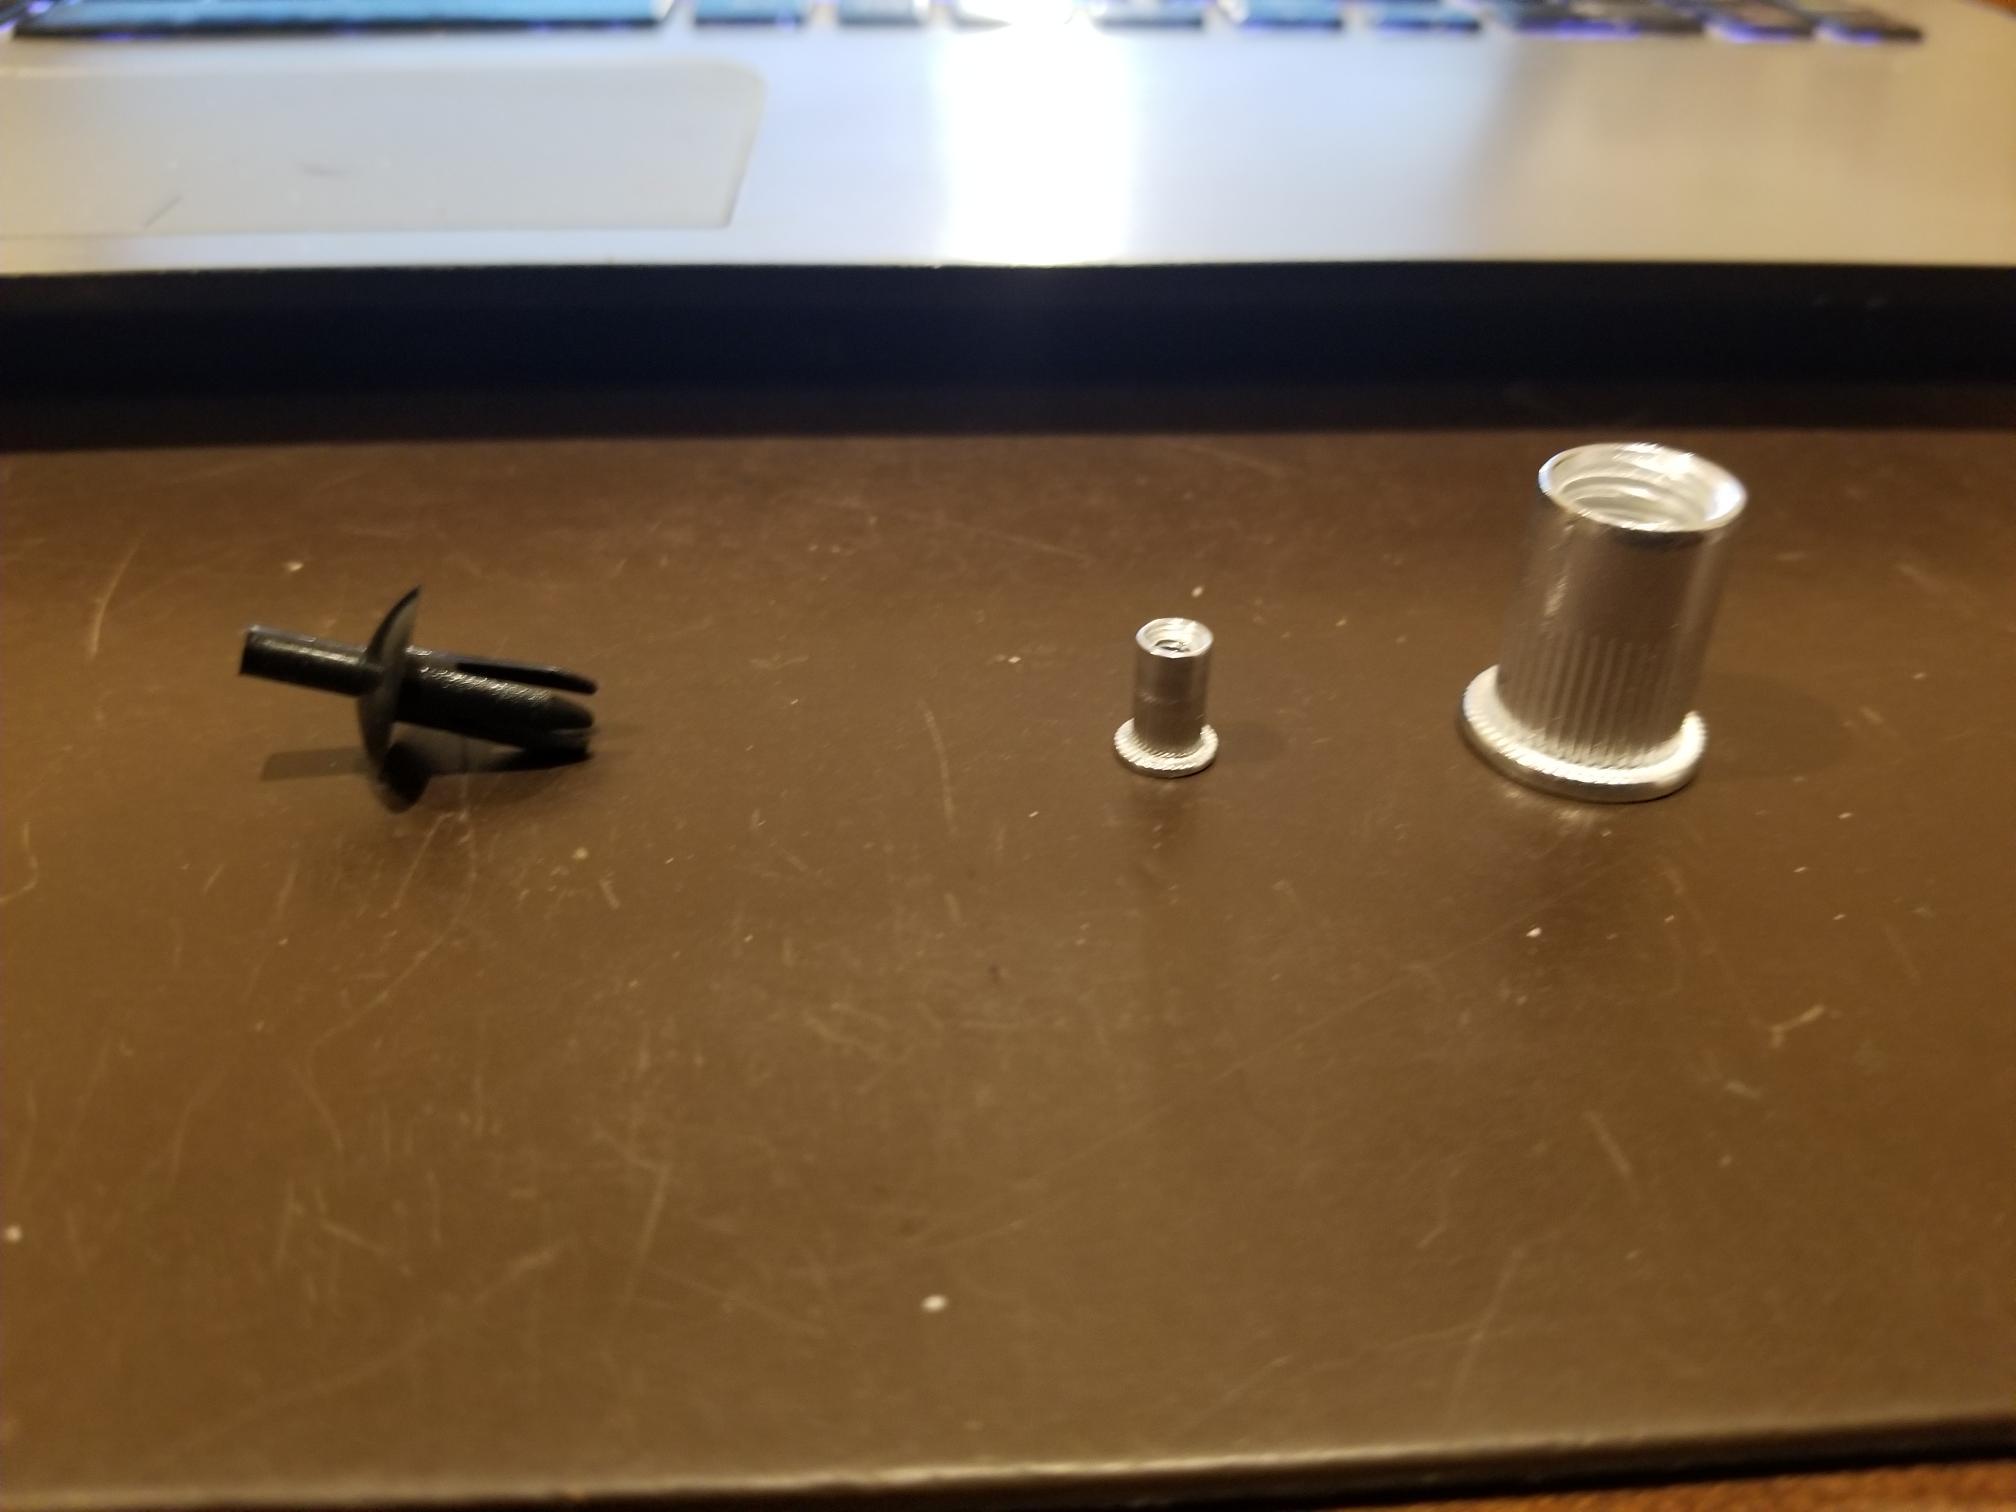
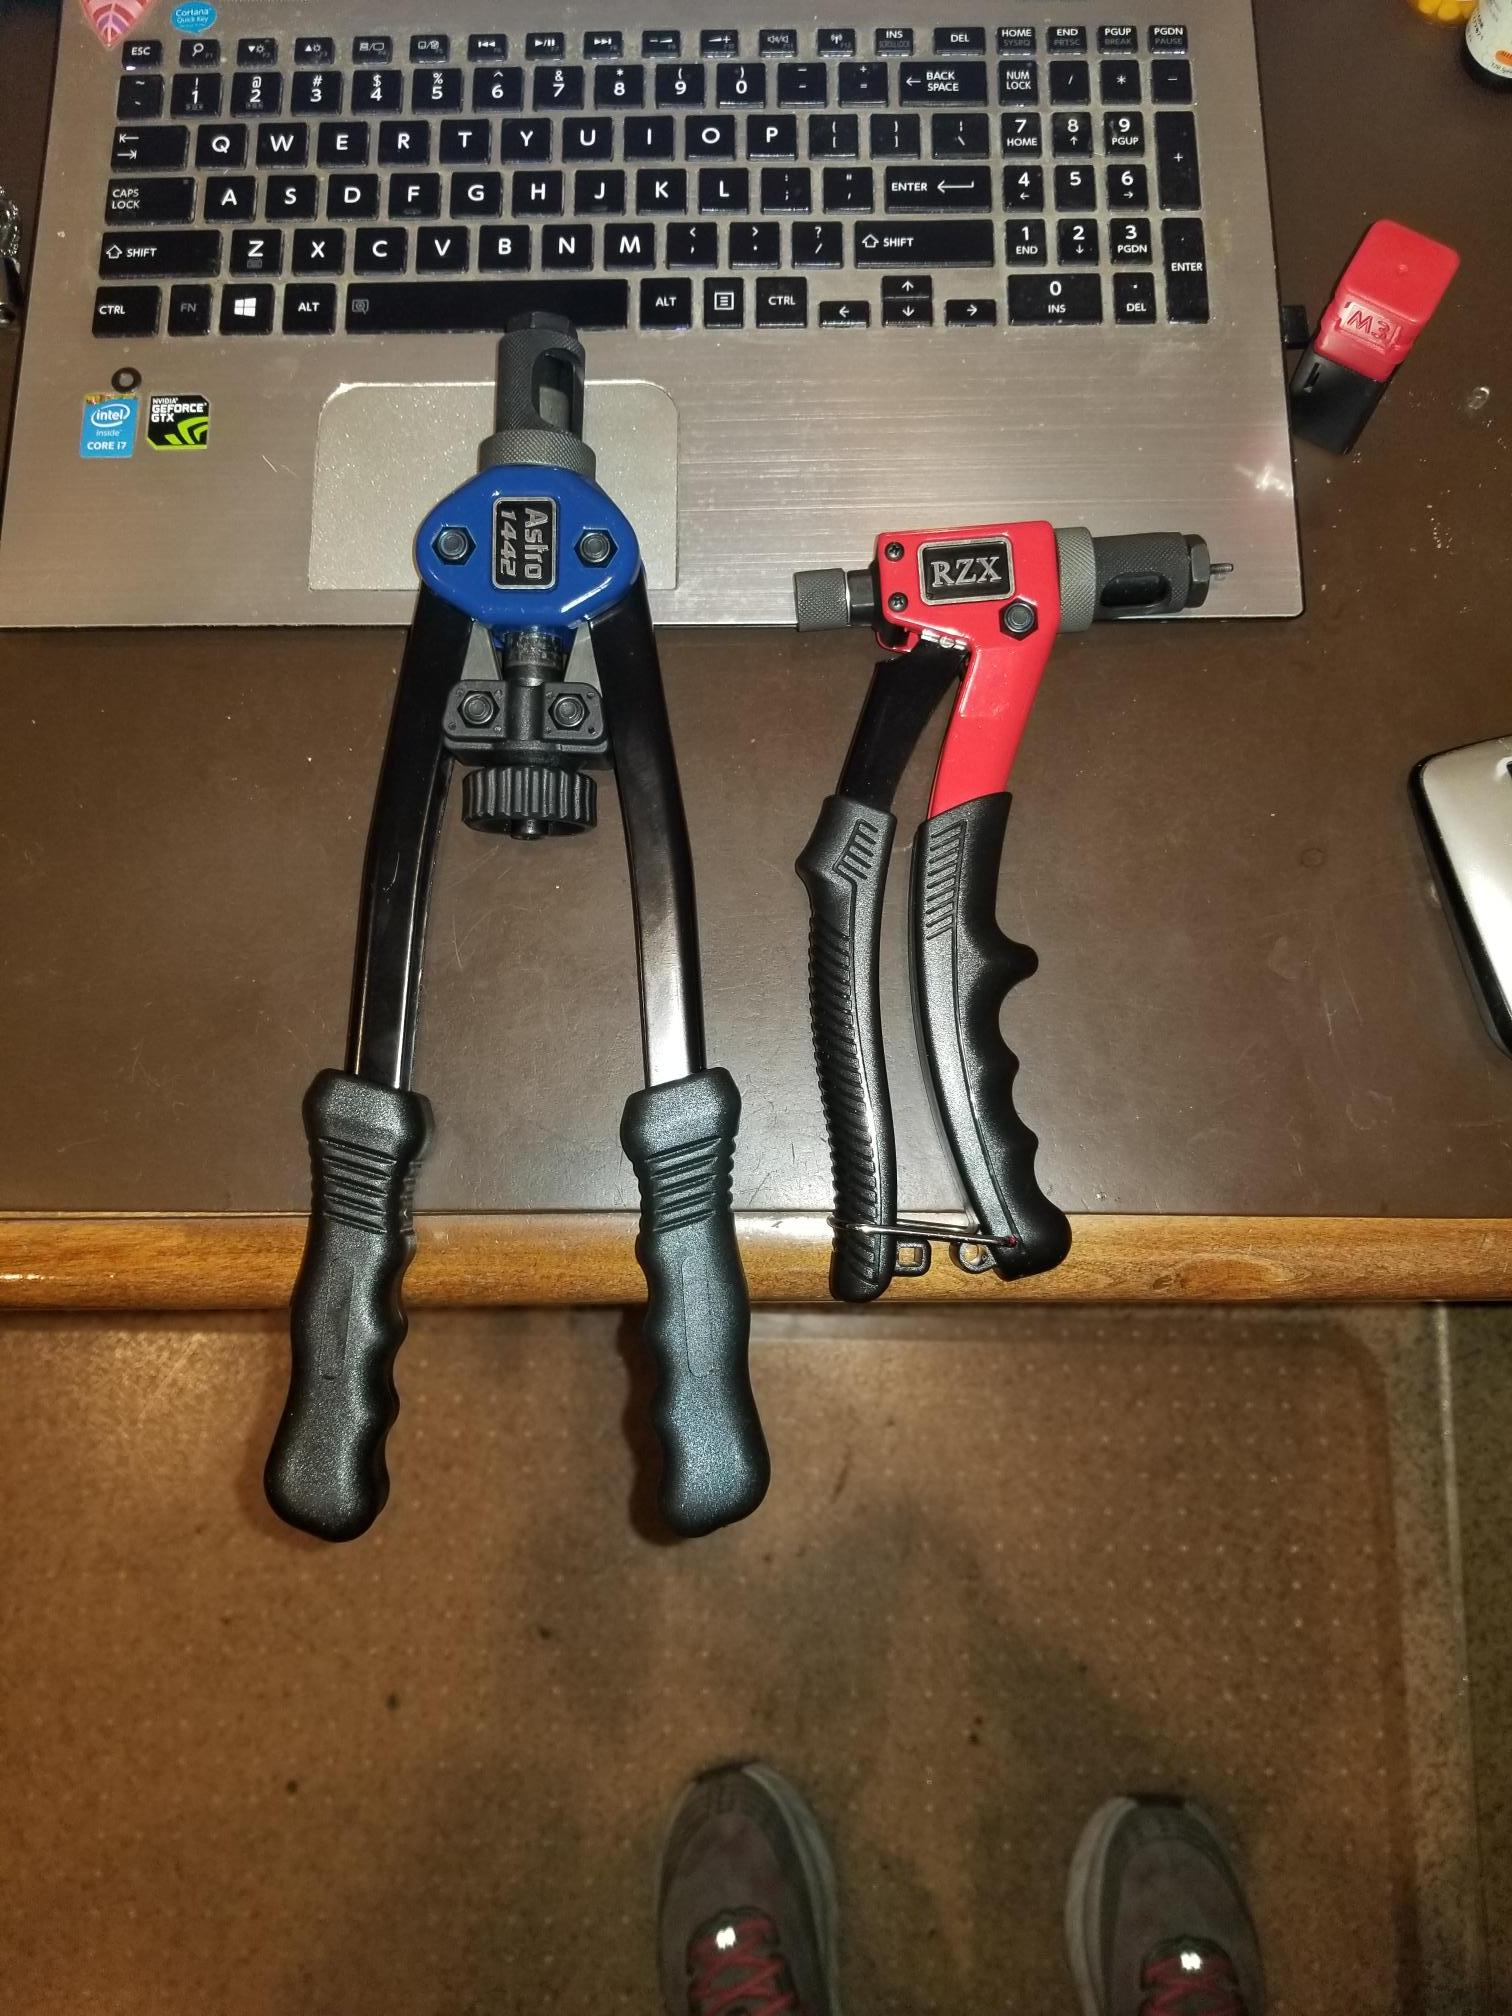
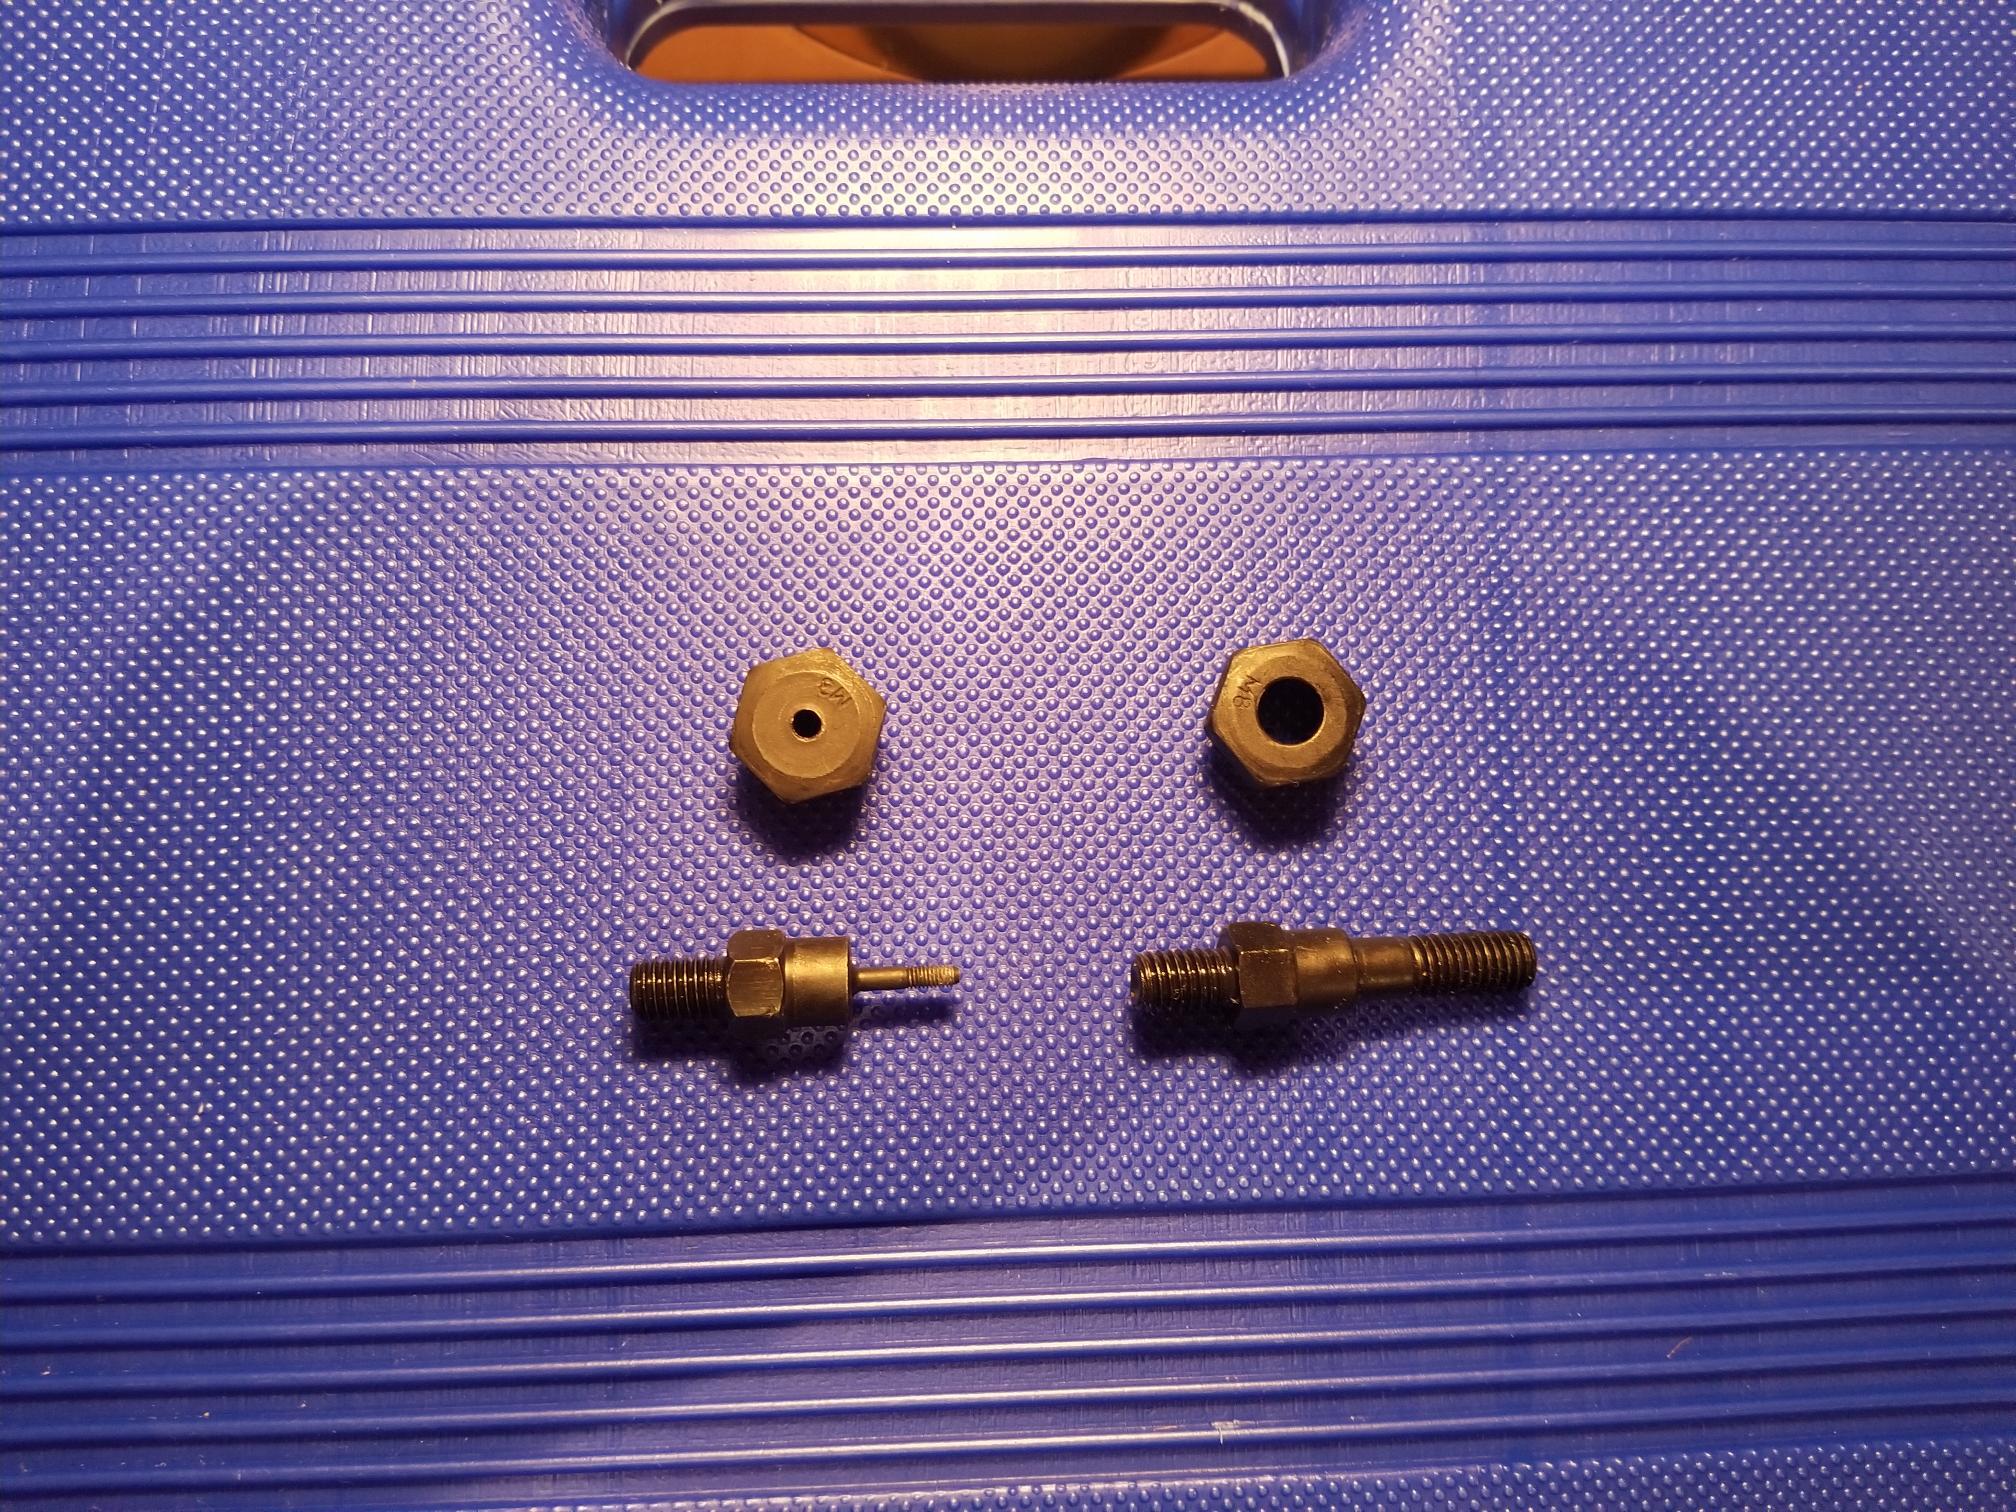
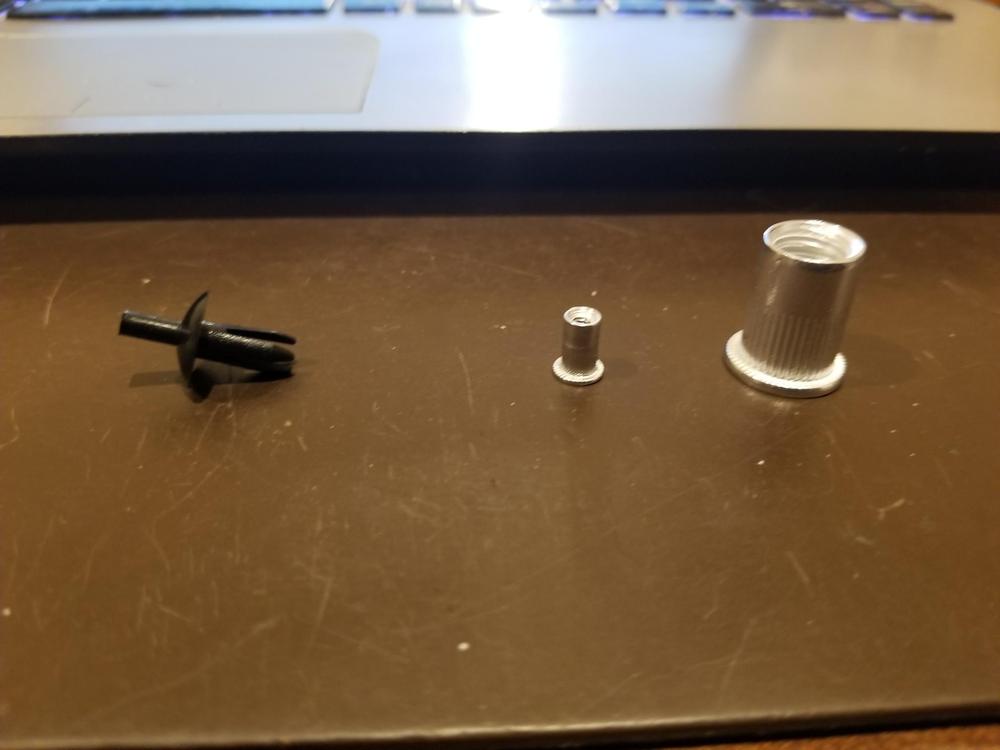
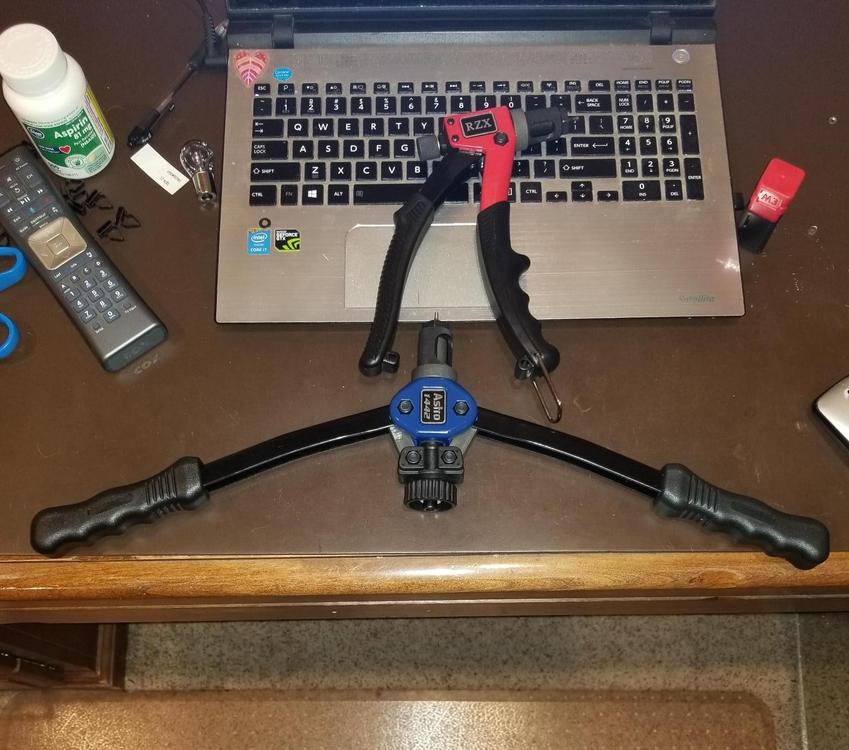
1 pointI am in the process of installing the bucket’s interior. Often times I find that parts need to installed, removed, adjusted/repaired and then re-installed. A while back I bought plastic rivets for interior. Two sizes are required. The taillight panel requires 8. I believe they are $3.00 each. The interior plastic requires approximately 40. These are larger and come in bags of 10 at approximately $7.00 a bag. I don’t think that they are available at your local hardware store so there is shipping cost and worst of all for me time delay. So, the cost of these plastic rivets is annoyingly expensive (approximately $50+) considering it is just a fastener. These rivets are neat but in my opinion there are a few issues. To remove one you poke the plastic inset pin through the rivet. In a blind situation the pin goes into the bowels of the chassis never to be found. Without the center pin the rivet is useless so it is a throw away. Some suggest using a nail, or a cotter pin or something else. If I did, I would have a bunch of these alternatives rusting away and clinking and clattering away somewhere within the bucket. A bit of this is tongue in cheek – but mostly not. The second issue is that these plastic rivets cannot be tightened. Oddly enough on some of the plastic panels one of the fasteners is an actual 4mm screw. I think they did this because – they could. The material the panel was being attached to was thick enough to accept threads. Where the plastic panels attach to the remainder of the body the material is too thin to accept a thread so they used the plastic rivet. In addition to the single use aspect of the plastic rivet the panels wind up becoming loose or squeaking especially after 40+ years. I recently stumbled across a post discussing “internal rivets”. ZCARS (forum member) offered an alternative called a Riv-Nut. I was not aware of this device, but became intrigued with the solution. I suppose most of you have experience with this, so this might be a bit boring, but for the uninitiated I hope this will help you in the future. I am a novice when it comes to the use of this device or the install process. These are my opinions and experiences, and should not be considered the end all. If there are errors – they are not intentional and I would appreciate your corrections/improvements. Riv-Nut goes by a number of other names: Rivet nut, nutsert, blind nut. It is installed in a fashion similar to a common rivet. It’s purpose is to provide a means of creating the equivalent of threads for a screw in thin metal, and it additionally works when you cannot get behind the material, for example in the middle of a panel where there is no access to the backside. I could have used this countless times in the past. Often times this problem is solved with a nut that is tac welded to the back of the material. This does not work well for the DIYer. Many have no experience or equipment to weld, sometimes you cant get to the back of an area, and in some cases the material does not accommodate a welding solution. Of course, I have used sheet metal screws in the past. I hate screwing anything with a point on it into a blind area, and sheet metal screws do not like to be unscrewed and refastened many times. There is a fastener I don’t recall its name but you slide it over the edge of a hole. It creates the equivalent of a thread to hold a sheet metal screw. I have even used something similar with a captured nut embedded for a screw. This however only works at an edge. The Riv-nut is, in my opinion, an elegant solution – Thank you ZCARS. Here is a photo of a plastic rivet (on the left, and riv-nuts on the right #3, #10 Above image you can see the threads inside the riv-nut .How it works - The tool has a main body with some sort of handle or arms to apply pressure. There is a part called a mandrel which attaches to the tool. The mandrel is specific to the size of the Riv-Nut involved. The size of the hole is not the same size as the bolt or screw to be installed. Install the mandrel on the main body of the tool. The end of the mandrel that is exposed is threaded. Inside the riv-nut are threads. You screw the riv-nut onto the mandrel. Next you put the riv-nut through the material (just like a common rivet). While holding the riv-nut in place in the hole you apply pressure by squeezing the handle. Different tools have different handles. To provide more leverage, necessary for larger bolts, some tools have longer arms and require two handed operation. Other tools look like a common rivet gun and operate using a single hand. At much higher cost there are air powered versions, some attach to a drill others use just a mandrel and two wrenches. All of them have some sort of mechanism that applies pressure to the mandrel threaded end and withdraws the mandrel from the material which causes outward force, which then collapses the outer part of the riv-nut trapping the material. Obviously the portion of the riv-nut that collapses cannot be associated with the threads in the riv-nut. If you look at the outside of the riv-nut there is a collar which rests against the outside of the material that you are attaching to the riv-nut. There is a knurled portion of the riv-nut next to the collar. The threads of the riv-nut begin where the knurled portion stops. The knurled area is the part of the riv-nut that collapses against the blindside (backside) of the material. You then unscrew the mandrel from the riv-nut. There is a bit of technique involved which is gained through experience. You don’t snap the riv-nut like a common rivet. Recall that the tool is threaded on to the riv-nut. You need those threads in tact. If the riv-nut snaps it is because one of two things has happened. Either the threads on the riv-nut have given way or the threads on the mandrel have given way. So, you only want to collapse the riv-nut enough to grab the material surrounding it. Now there are different types of riv-nuts: aluminum and steel for example. Using a 3mm mandrel is a fairly delicate operation. I used aluminum riv-nuts. I thought that I would rather have the riv-nut break rather than the mandrel. Also, since I was only attaching light plastic panels the amount of holding force required was minimal. The main difference between aluminum and steel riv-nuts is holding force. So, the material of the riv-nut and the size of the riv-nut affect the holding power. When a riv-nut is destroyed during installation you need to remove it by drilling it out. When an aluminum riv-nut fails you can see the remnants of the threads on the mandrel. They need to be removed. There are a number of very good videos and printed descriptions that will do a far better job of describing the process then this post, but I thought this might get you interested enough to consider this solution. There are a number of different tools to install riv-nuts. They come in different sizes and shapes and of course at a range of price points, from $15 to many hundreds of dollars. My research led me to buy an astro-pneumatic 1442. It costs around $90. It has many very good reviews. It will accommodate a number of different size fasteners including metric (#5- #8) and a number of SAE screw sizes. I believe this is a great long term choice for me. Having said that Astro-Pneumatic does not offer a #3 or a #4 mandrel. I called Astro and they confirmed that they do not offer smaller mandrels. Most of the holes involved for these plastic panels are 5mm (diameter). This requires a 3mm riv-nut. Turns out most of the more robust tools do not offer a 3mm option. You could drill the holes to accept a larger diameter fastener, I wanted to leave myself the option of going back to plastic rivets if necessary so I decided to invest in a second tool. The 1442 requires two hands. It is medium size 13 inch handles. The handles open wide to give you more leverage. Some of the places that you will want to install a 3mm riv-nut require a tool with a smaller profile. A smaller tool will cost between $15-$30 approximately. In fact if you are using aluminum riv-nuts that are small, then a small profile, inexpensive tool might be the smart choice. Now here is an interesting data point. It turns out that #3 and #4 mandrels that are part of some less expensive sets actually fit the astro 1442. I actually bought a cheaper kit and used its mandrels on the astro 1442. So, in retrospect I would still buy the astro 1442 – it works very well, and it appears to be quite robust. I think it handles small and large riv-nuts in aluminum or steel very well. I would then enhance its capability by purchasing a #3 and a #4 mandrel. The smaller, one handed tool, is not a necessity, but I think it will help in tight places. I think it will probably have a shorter lifespan, but I do not think that it will be utilized as often as the astro. 13 inch Astro 1442 (Left), RZX 8 inch (Right) both are in their closed position Above: Astro 1442 and RZX in Open position #3 mandrel (left), #8 mandrel (right) Update 8/31/20 So it has only been a short while but I have installed a number of RiV-Nuts. Most of them were 3mm and the remainder were 4mm. All were Aluminum. I can not comment on the performance of these tools using steel rivets. I was very impressed with the performance of BOTH tools ( the Astro-Pneumatic 1442 ANd the RZX. The RZX single handed tool worked much better than I exppected it would. Some of the nut-serts have to be installed in the hatch area with the tool facing the sky. Using a 2 handed tool would have been impossible there just isn't enough room, but the RZX performed excellently. With the 1442 and a 3mm nut-sert some experience is required to know har far to close the handles. Too much pressure and you snap the aluminum insert. The RZX reliably worked when closing the hand grip all the way. As I said I have no experience with the RZX and steel Riv-Nuts, but I believe both tools are good additions to my tool set.


 1 point
 -
1 point0.70mm is what I used for "squish" in an engine build tool... nice to have a real world limit! THANKS!1 point
-
1 pointI have 0.58 mm clearance in my engine. I originally had 0.56 mm and a piston just kissed the head.1 point
-
1 pointYou'll have to measure, and make your own decision. Once you start modifying factory parts, that's the deal...1 point
-
1 pointNo need to measure, 240260280’s post shows these pistons are .7mm taller, and I’ve seen that when I used these later pop up pistons. When you order replacement pistons from Nissan, this is what you get.....or got (not sure if still available). With allowable clearance varying from builder to builder ( most want 1 to 1.5 mm clearance), is .8mm clearance enough? It was in my build, but some may argue it’s not. My question is how much can be shaved off the top of the piston to reach a comfort zone of clearance in the early engines?1 point
-
Cool. Hope that keeps the gremlins away. And if it does come back, think of it as an opportunity to find and put a stake it for good. Haha! So remote electrical troubleshooting over the internets is always questionable. But from here, it really sounds like a poor connection in the main power branch of the car... Battery terminals and cables, starter wiring, fusible links, shunt assembly, some big ground connection near the battery... Something like that. Not the ignition switch. Hoping you already took care of it and you're good to go!1 point
-
1 pointAMPCO was/is a majority Nissan-owned affiliate company, making parts for use on Nissan vehicles. Whilst the H2716 'Pop-up' pistons were not OEM on any S30-series Z, they were supplied by Nissan as a service replacement part on Nissan L-series engines. They are not 'aftermarket' or custom.1 point
-
Right. One of them (the big one) goes to the starter, and the other one powers the EFI system (and only the EFI system). The rest of the car (everything except the EFI) is powered off the white wire is connected to the other end of that big (+) battery wire down on the starter.* Next time it happens, wiggle stuff around and see if you can pinpoint where the issue is. Battery terminals up on the battery. Other end of the (+) wire down at the starter. Wiggle the fusible links. Wiggle the body ground wire next to the battery below the wiper connector. Happy hunting, and here's hoping you find it. * Want proof? Disconnect that EFI spade connector and then turn the headlights on. They should light up. Then try to start the car. The starter will turn the engine over, but it won't start.1 point
-
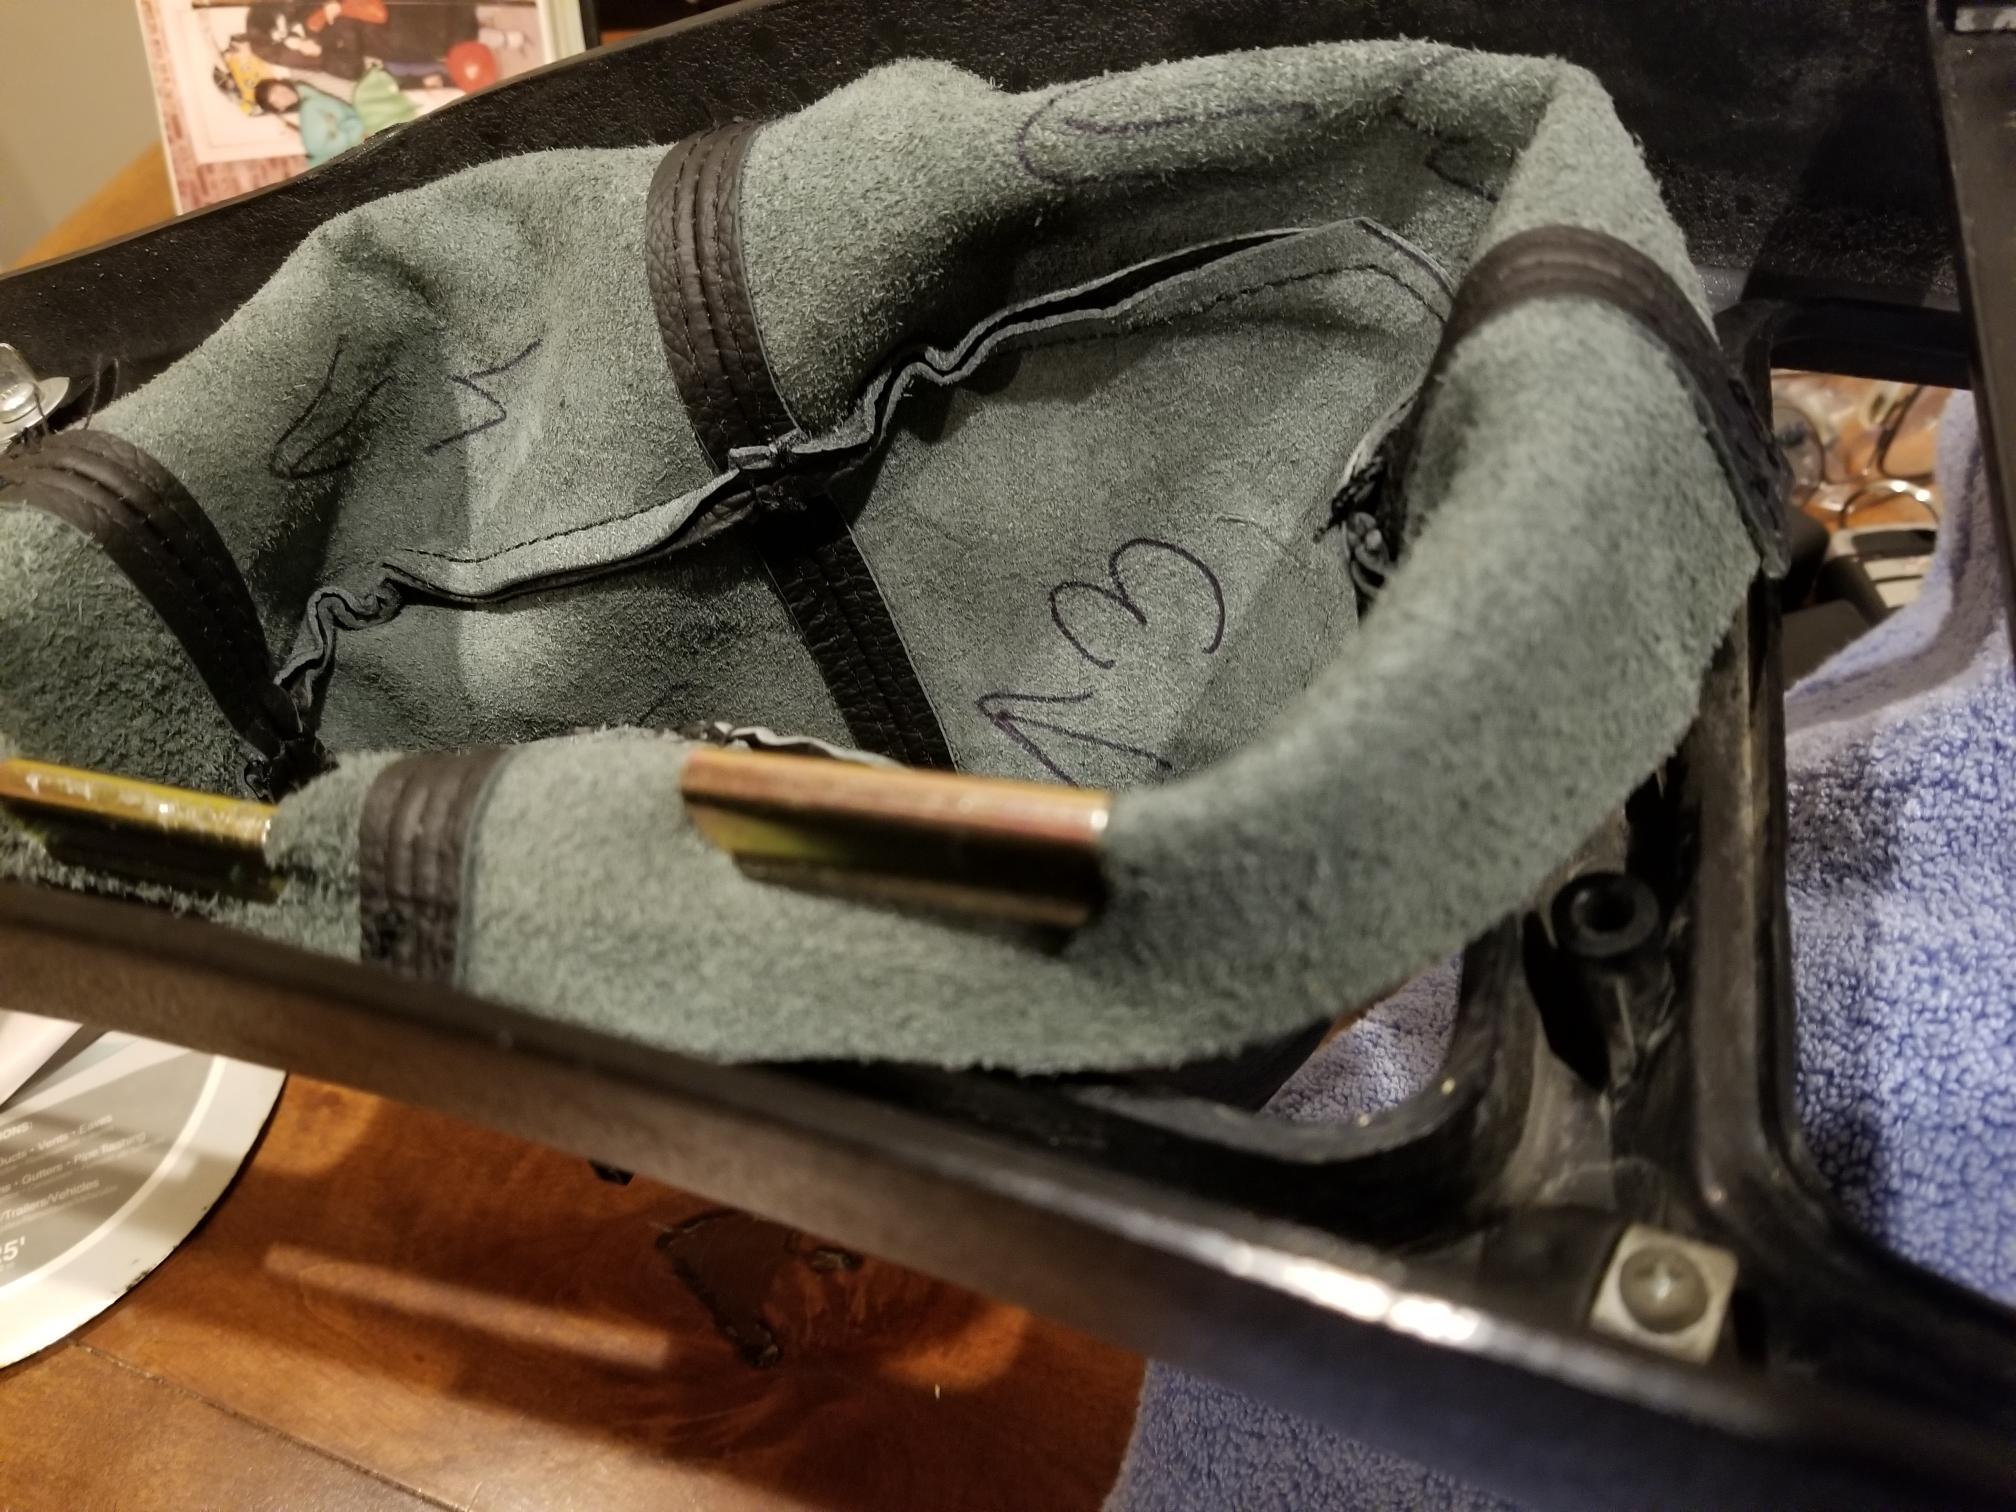
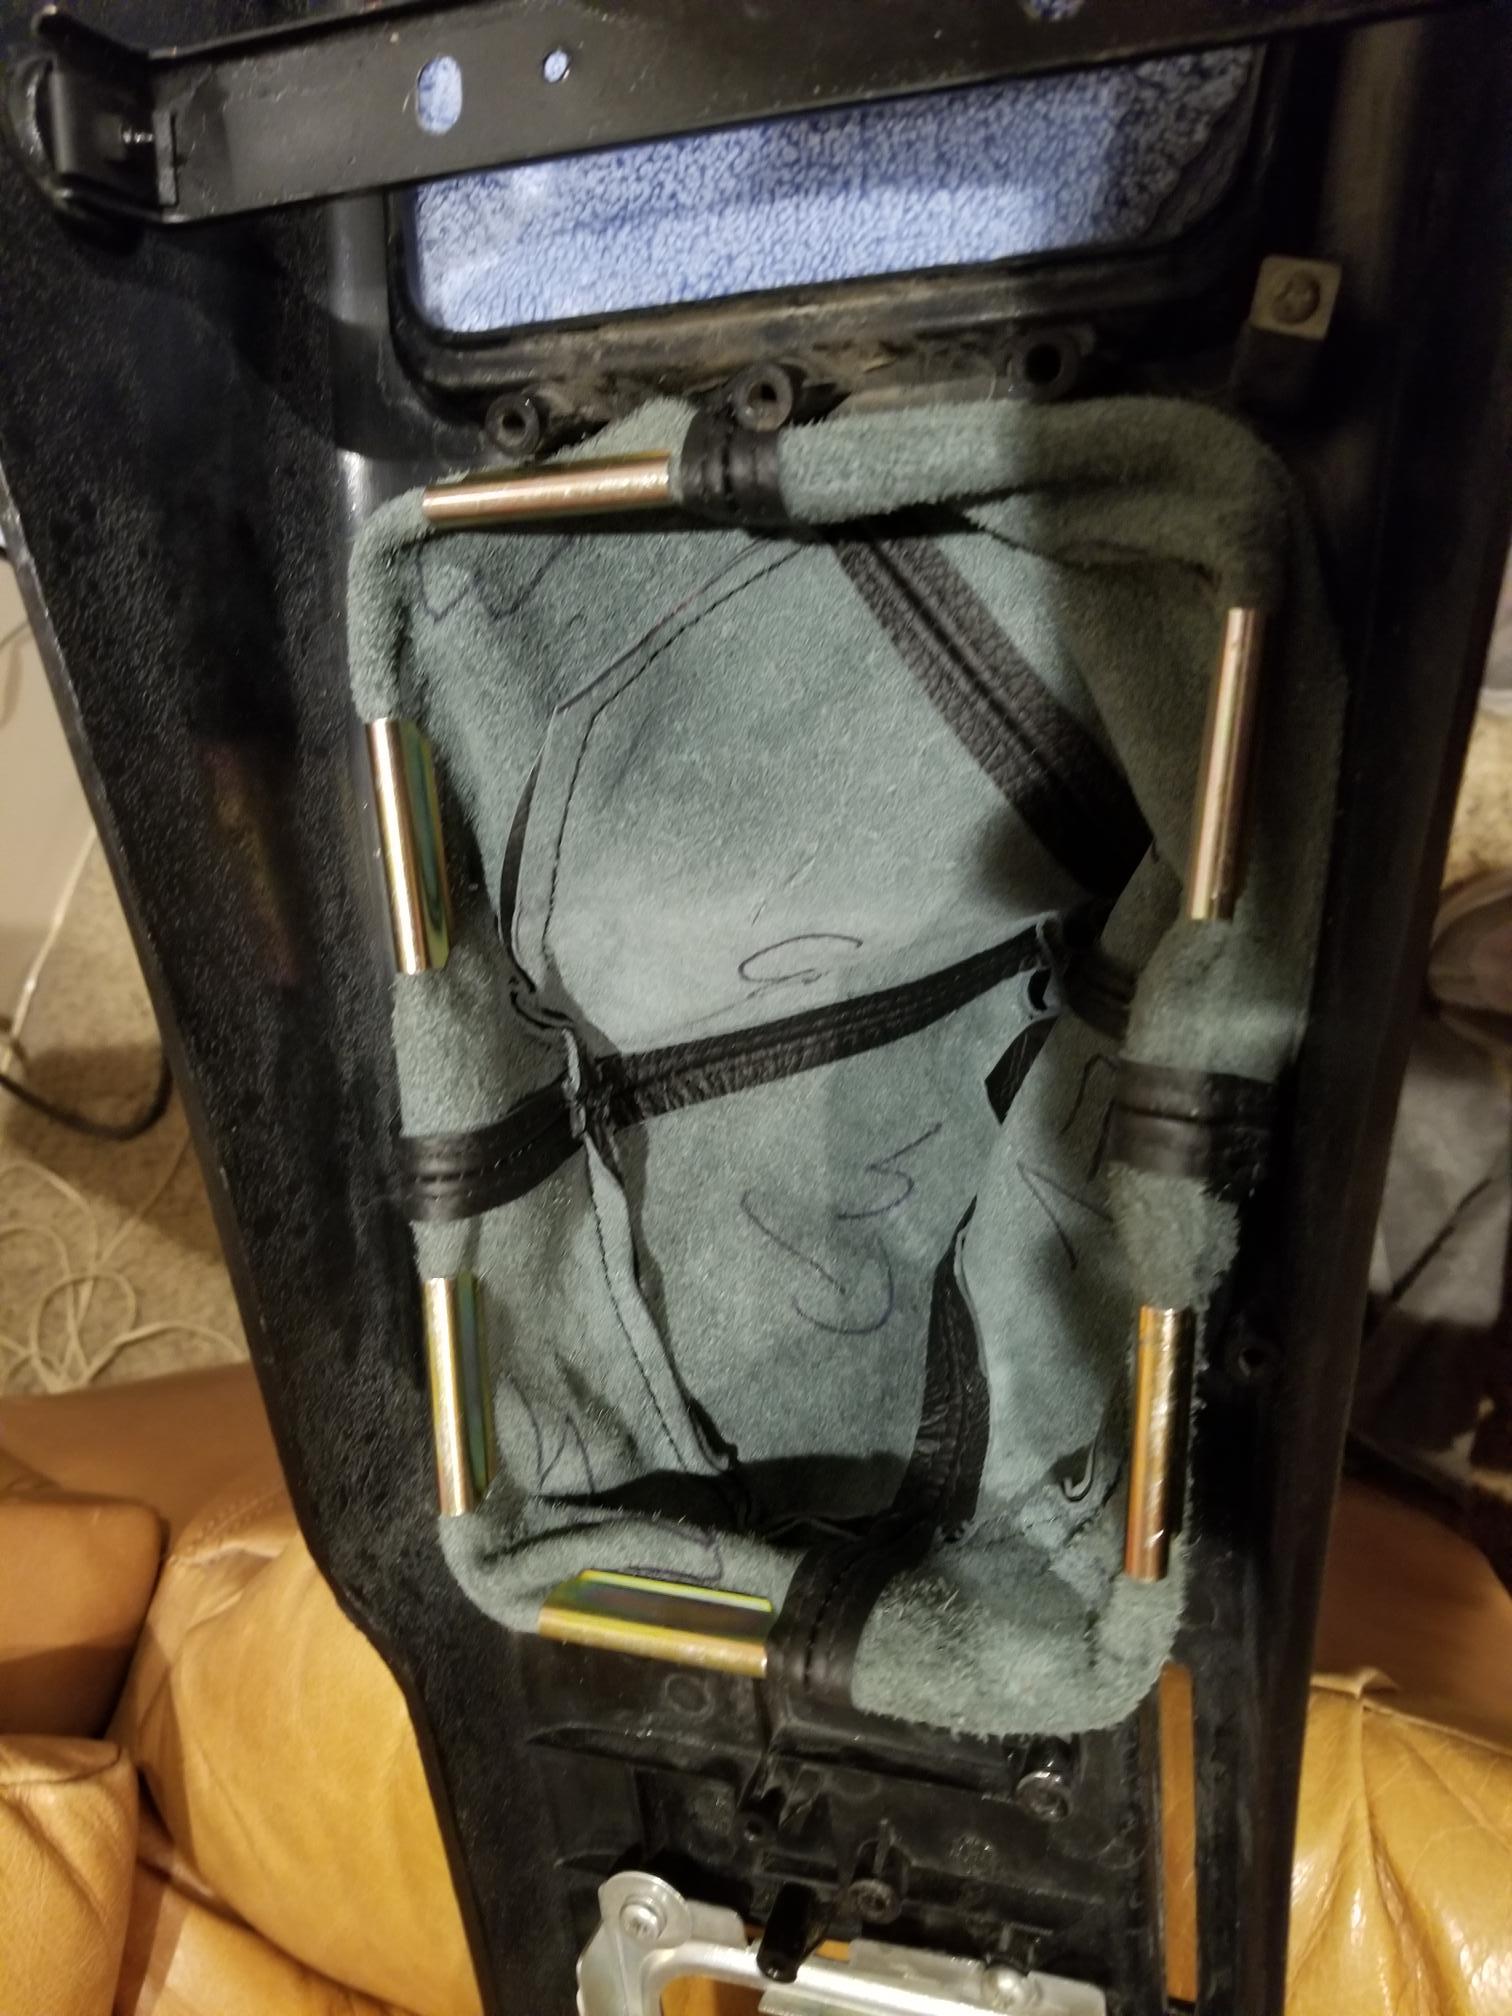
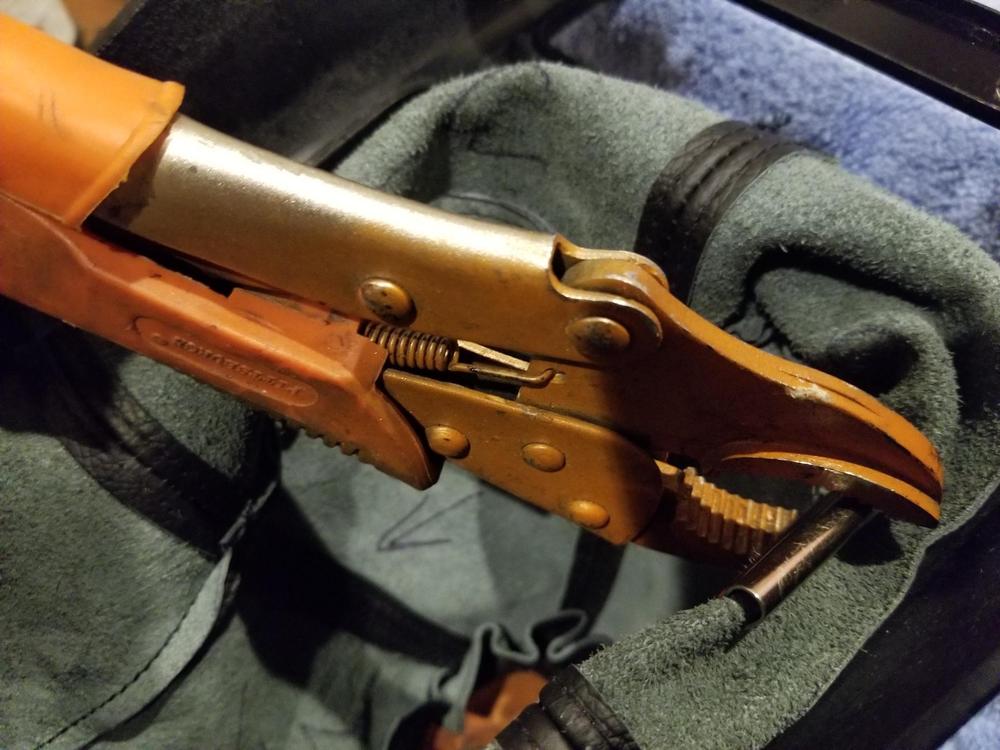
1 pointReplacement of the Inner and outer Shift boot When I bought the bucket it did not have an inner or an outer shift boot. Replacing the inner shift boot is fairly obvious. There is a rectangular ring that surrounds the boot and holds it in place. The outer boot is soft vinyl, or leather and it slips over the gear stick. Mistake 1: I installed the center console after completing work on the center console area and everything that is involved with that like the vinyl over the trans. tunnel, choke control, fuse box lid, indicators, radio etc. It turns out to install the outer shift boot you must remove the center console so that you can press the spring clips onto the underside of the center console, seems obvious now, and it would be exceptionally obvious if I had removed the previous outer shift boot. I did not think this was going to be a particularly difficult task. I recall seeing someone hammer the clips into place to hold the boot to the backside lip of the boot hole in the center console. This proved to be way too scary for me. My center console is in pretty good shape but I suspect it is 40+ year old plastic. The new leather boot is thick and the new clips are very tight. One blow with the mallet and I put the bludgeon down and started typing. There must be a secret that I was unaware of and if I find the decoder ring or learn the secret hand shake the leather boot will be installed on the clips, it will be tight, the center console WILL NOT crack and this minor nightmare will be over. Unfortunately, a search of the forum and the internet did not provide much in the way of guidance or tips. So this post is NOT for those of you that have been successful in the past and did not think it would be valuable to document the process because it was such an easy project. I was not having much luck draping the material over the console and hammering or squeezing the clip over the boot onto the console. It seems insignificant and it may be so, but putting the leather inside the clip and then putting the clip on top of the edge of the console made a big difference, for me. It took me a while but it finally came to me. Hammering was too scary, pushing the clip into place seemed impossible. So I went to my second most popular GOTO tool. The first being the mallet and the second being a pair of vise grips. I slowly and carefully squeezed the clip over the console lip. It was easy. I cant explain why it took me so long to figure it out. Now that it is completed my memory of the task was that it was easy. I feel a bit silly posting this, but hopefully the next person to replace their outer shift boot will not have to think twice about how to go about it. One more thing. I read that you only need 6 clips. In my opinion you would be better off with eight. There is no way to get a clip over the seam and if you did the clip would be expanded to the point that I doubt it would hold very well. Below are some photos that may be useful . By the way the console did not crack -----yet!


 1 point
 -
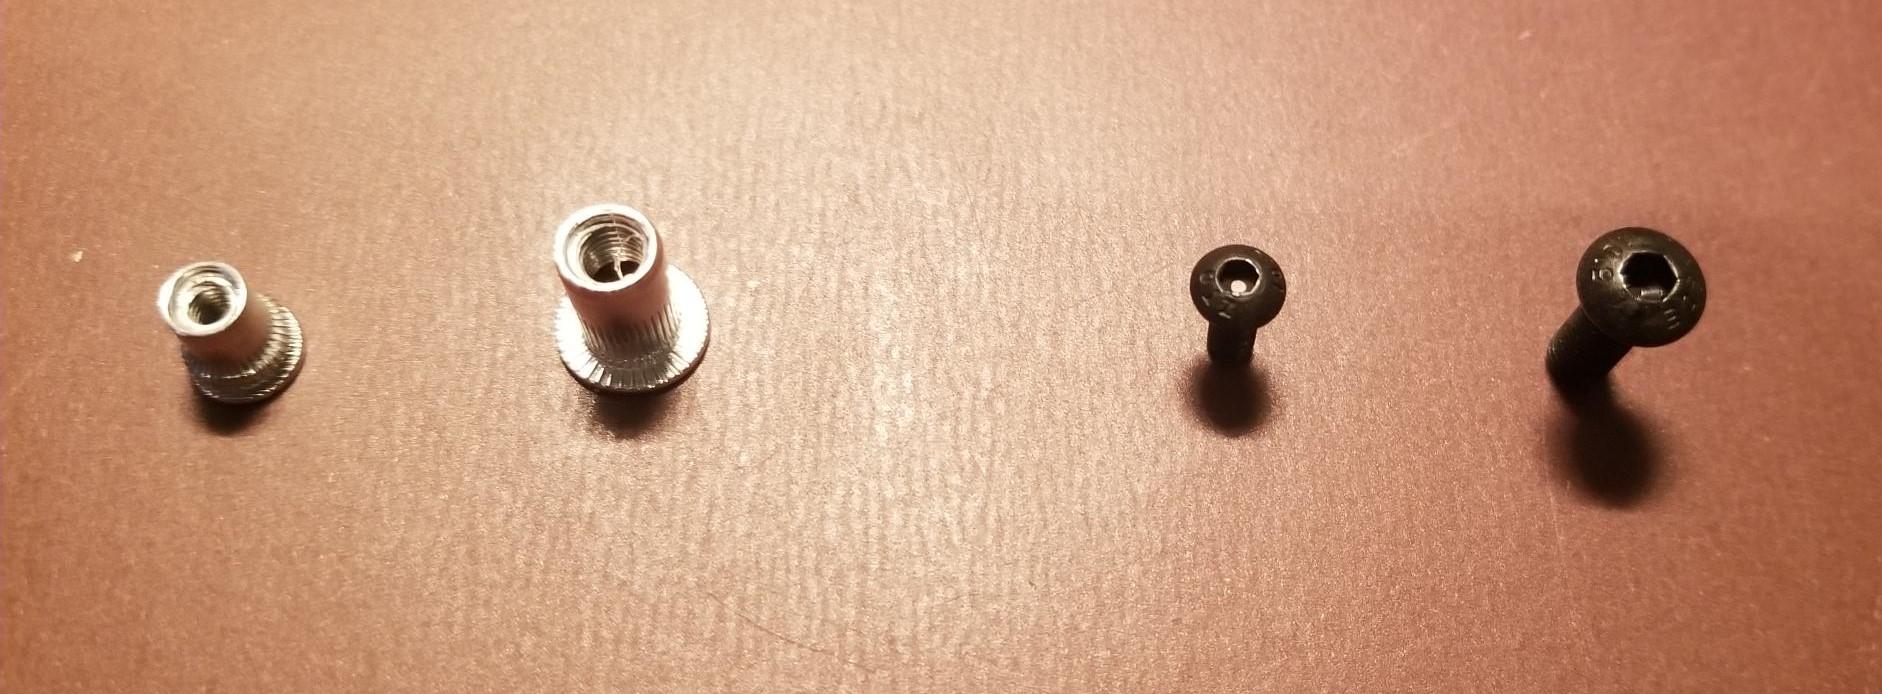
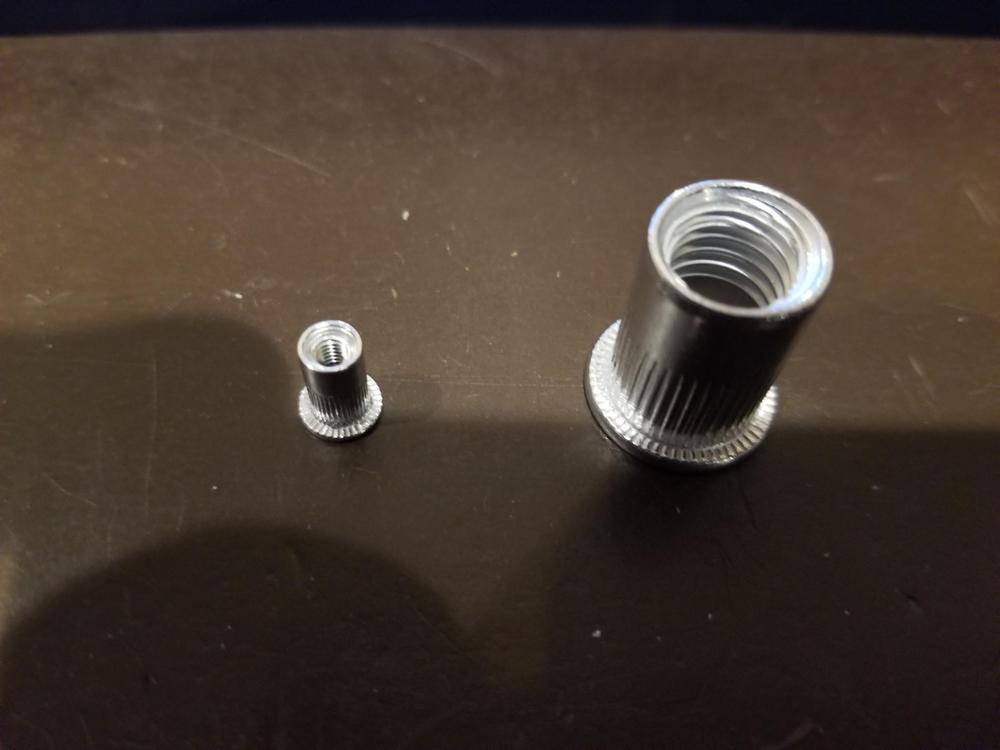
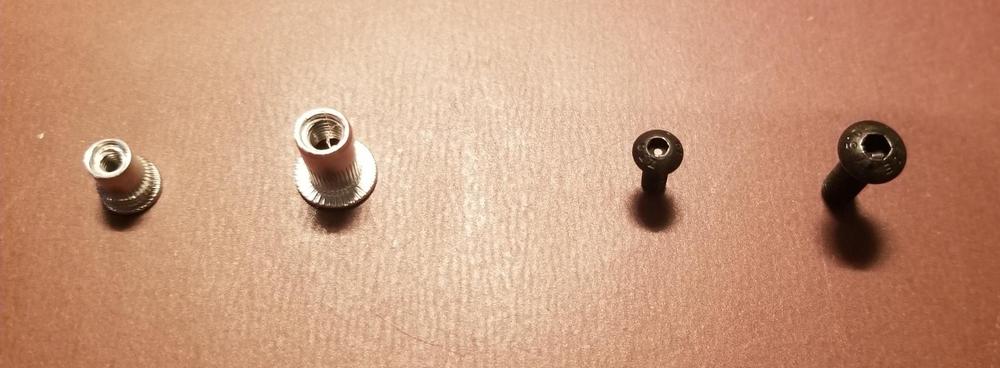
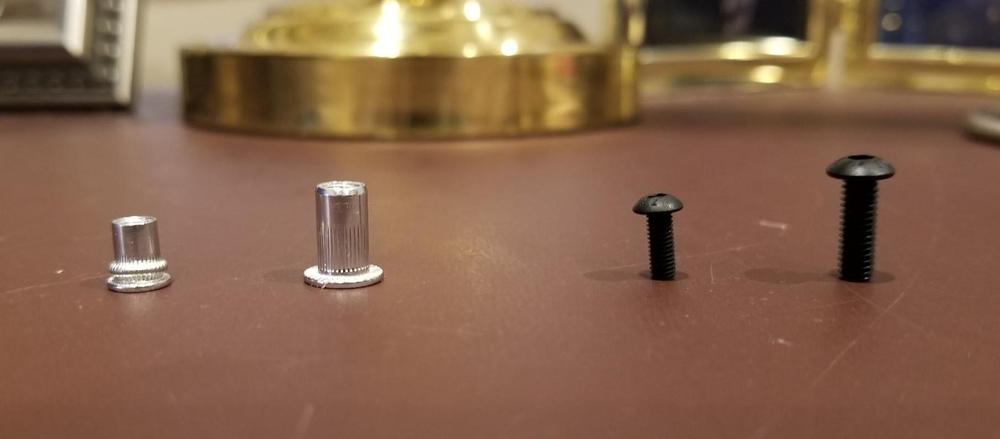
1 pointPatcon - Great question. I am using a button head screw, with an allen head that has a black oxide finish. Above right to left is a 4mm button head, and a 3mm button head I thought the button head with an allen head would be the least conspicuous. As you can see the 3mm screw is quite small. A phillips head would be easier to install/remove, but I thought it would be more noticeable. Unfortunately the 3mm head is too small for the hole in the plastic panel so I am also using a flat washer with a black oxide finish. I would be very interested if you have any other suggestions. Also for anyone that is interested on the left side of the images above is an aluminum riv-nut. In the center is a new (unmolested) 3mm rivnut. On the left is a 3mm riv-nut after an install attempt. You can see that it is crushed on the knurled portion of the riv-nut between its collar and its threads. One more thing that might be of interest. There isn't a great deal of room between the plastic panels and the car body. Having said that I am in the process of trying to fit some sound deadner between the two. Where possible I am going to try to put some thermal insulation. Can't do much because I am concerned about damaging the plastic panel if there is too much stress due to the increased depth required by the insulation. If someone has tried this please let me know if it is worth the effort - thanks.
 1 point
 -
1 point
-
1 pointHere a calculator that can help you see how each veritable can effect the actual speed of the car. Knowing your transmission gear ratios and final drive ratio is imperative. By hanging tire height you can see the difference in final speed. https://www.tremec.com/calculadora.php1 point
-
1 pointAbout 1/4th down you'll see it here. Hopefully it'll help, did me. https://datsunzgarage.us/engine/
 1 point