Leaderboard
-

pogden
Free Member6Points60Posts -


Zed Head
Free Member4Points18,936Posts -

ZCarFever
Free Member3Points61Posts -

Kevin McSweeney
Free Member3Points145Posts
Popular Content
Showing content with the highest reputation on 10/02/2020 in all areas
-
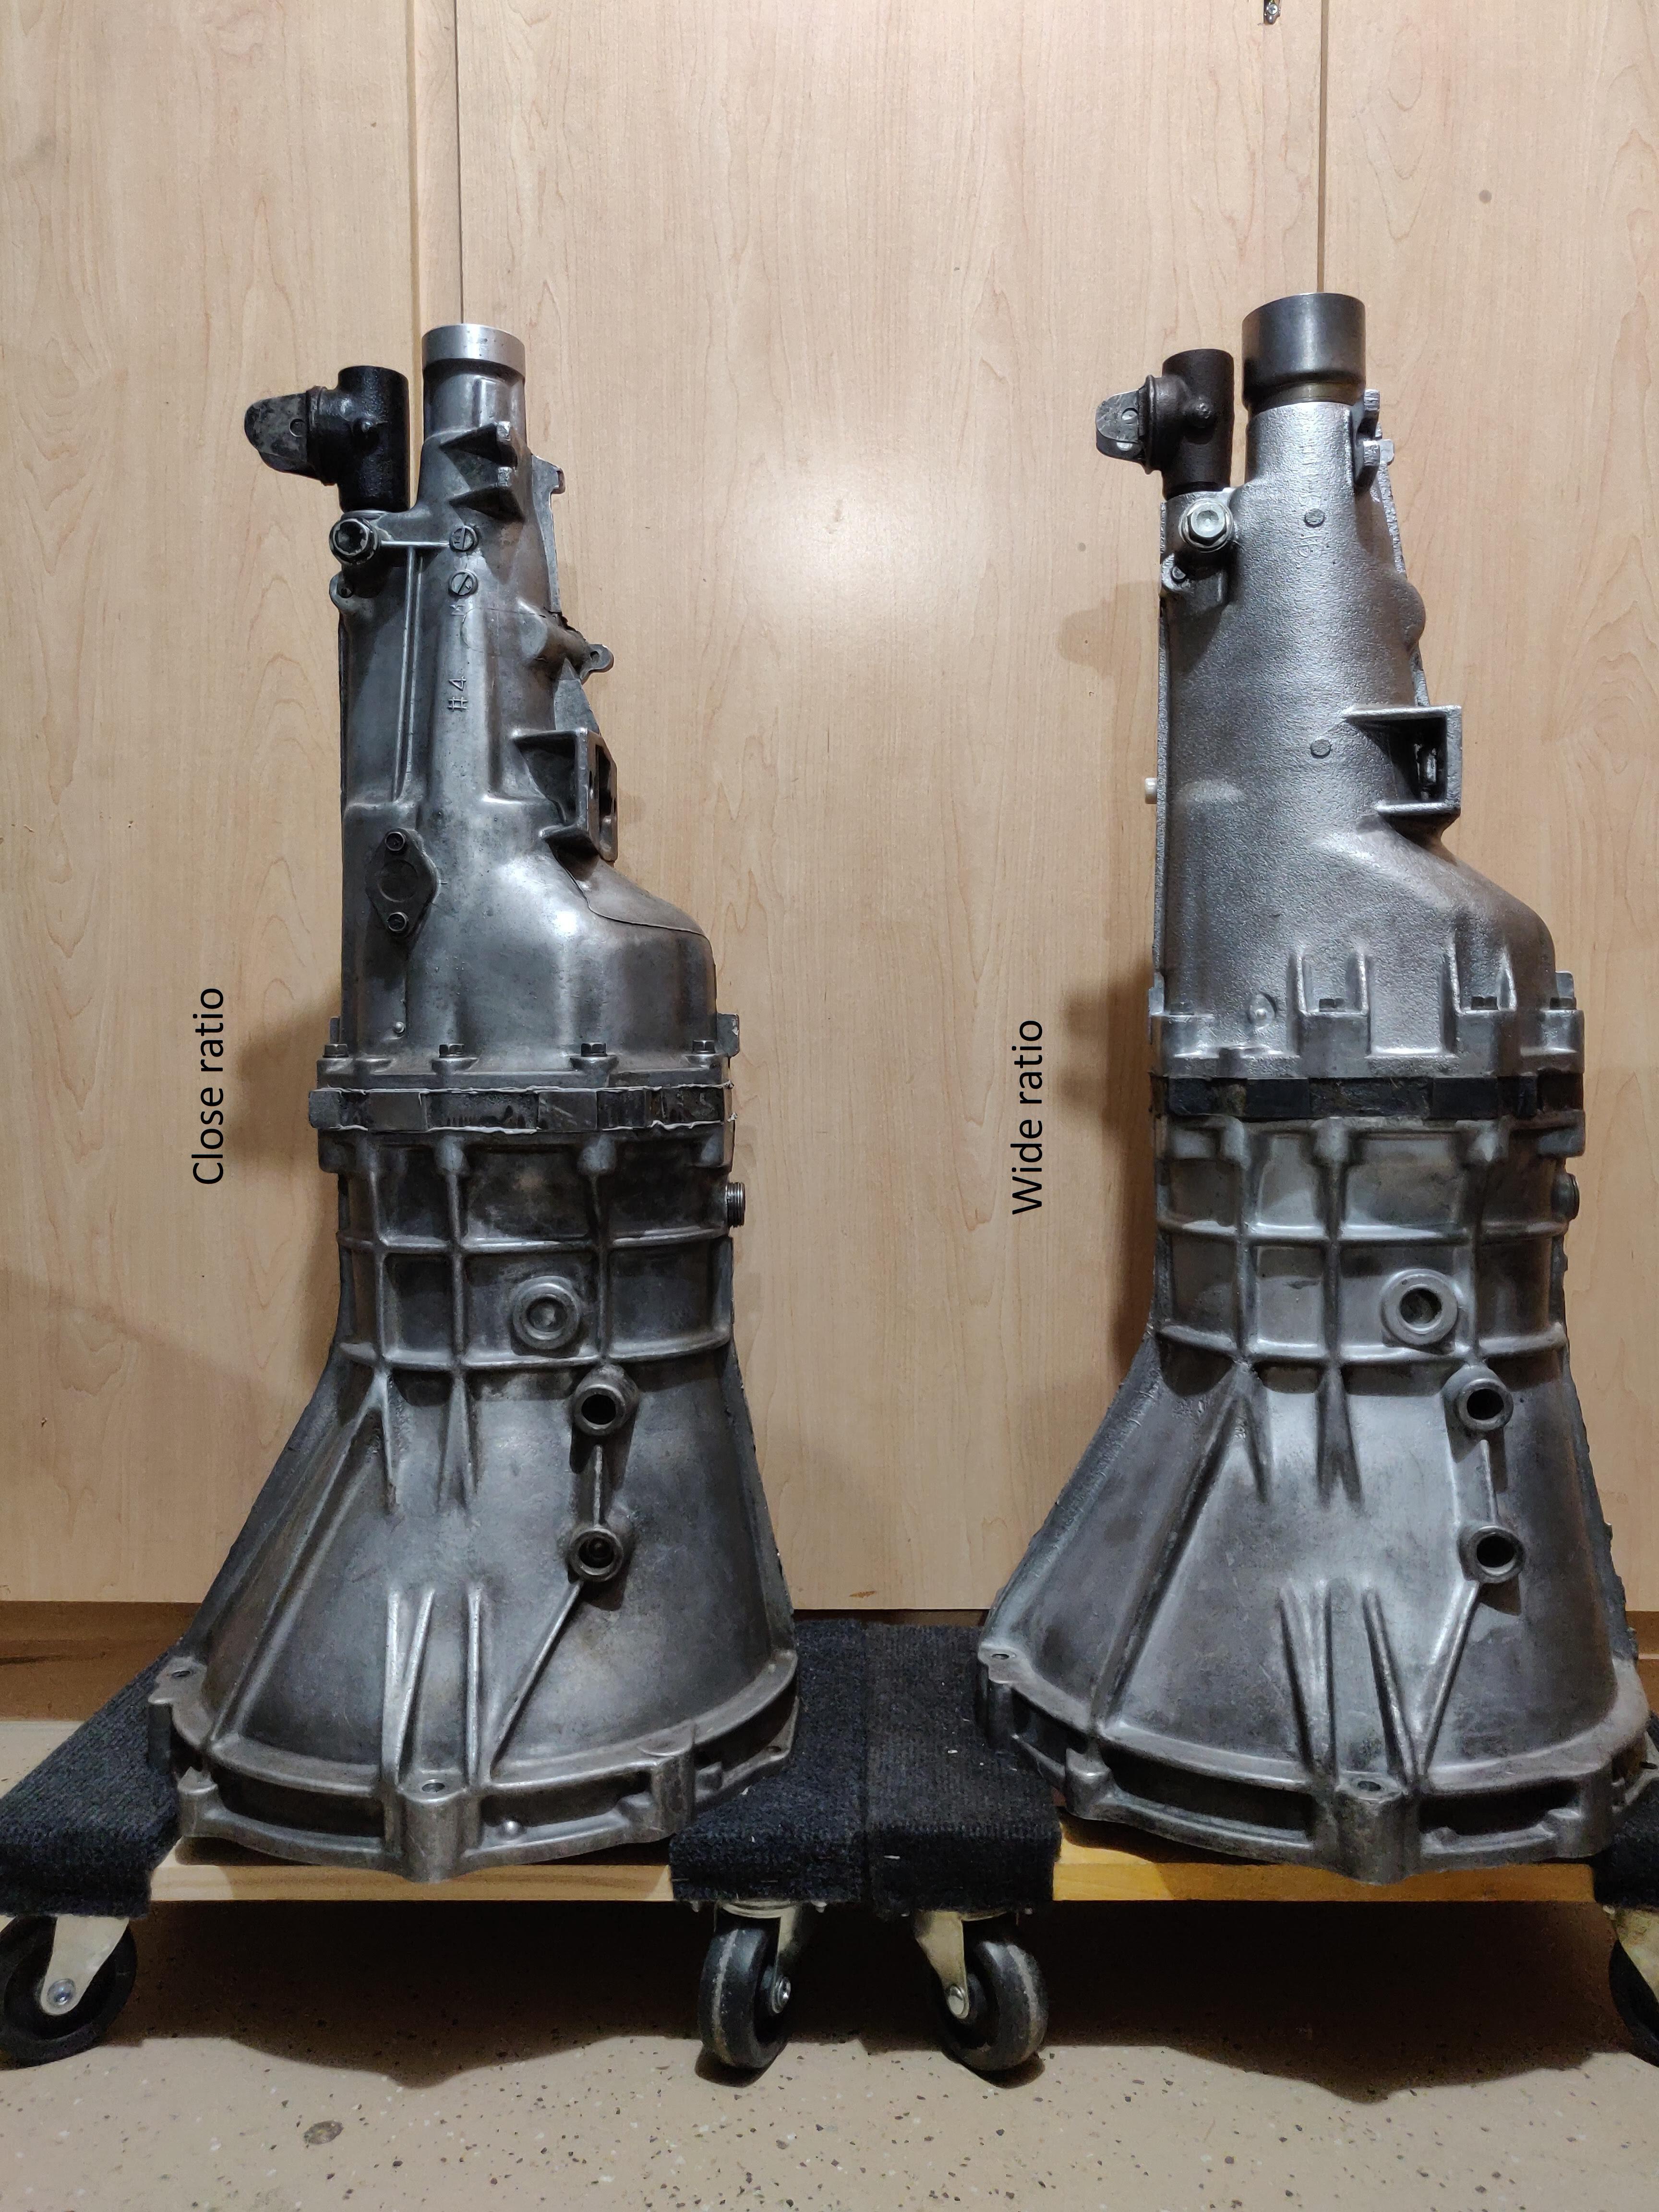
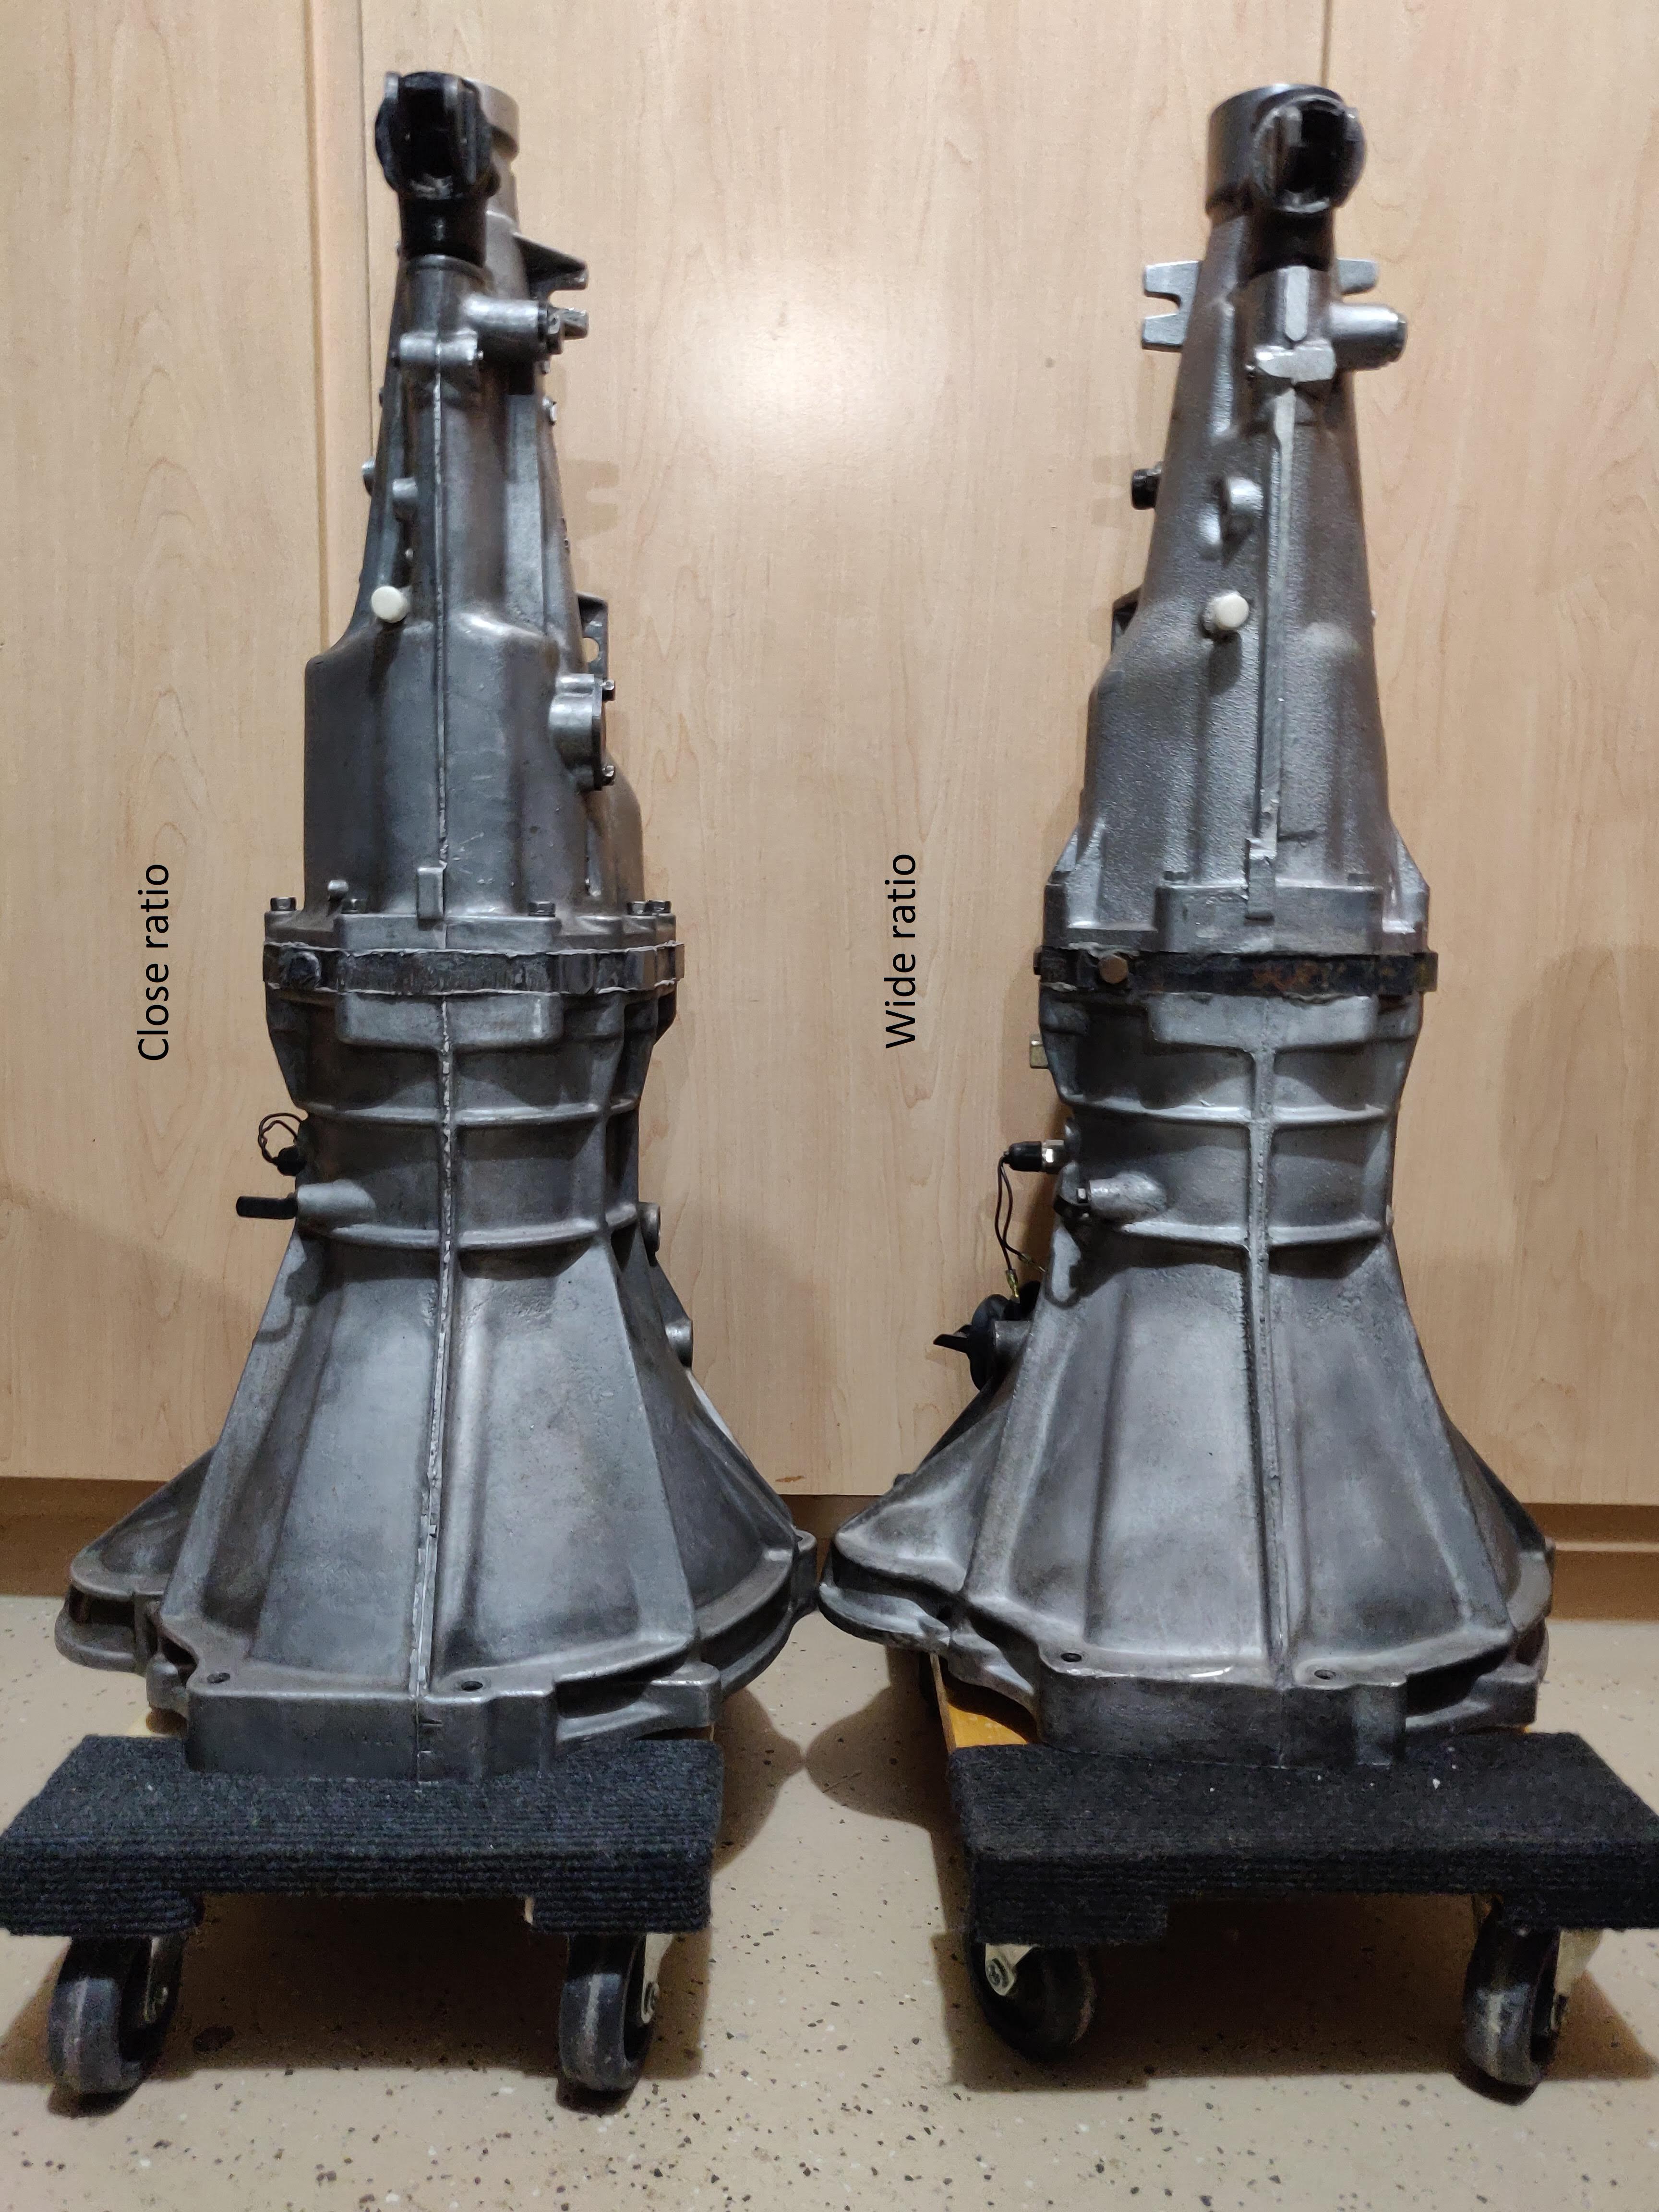
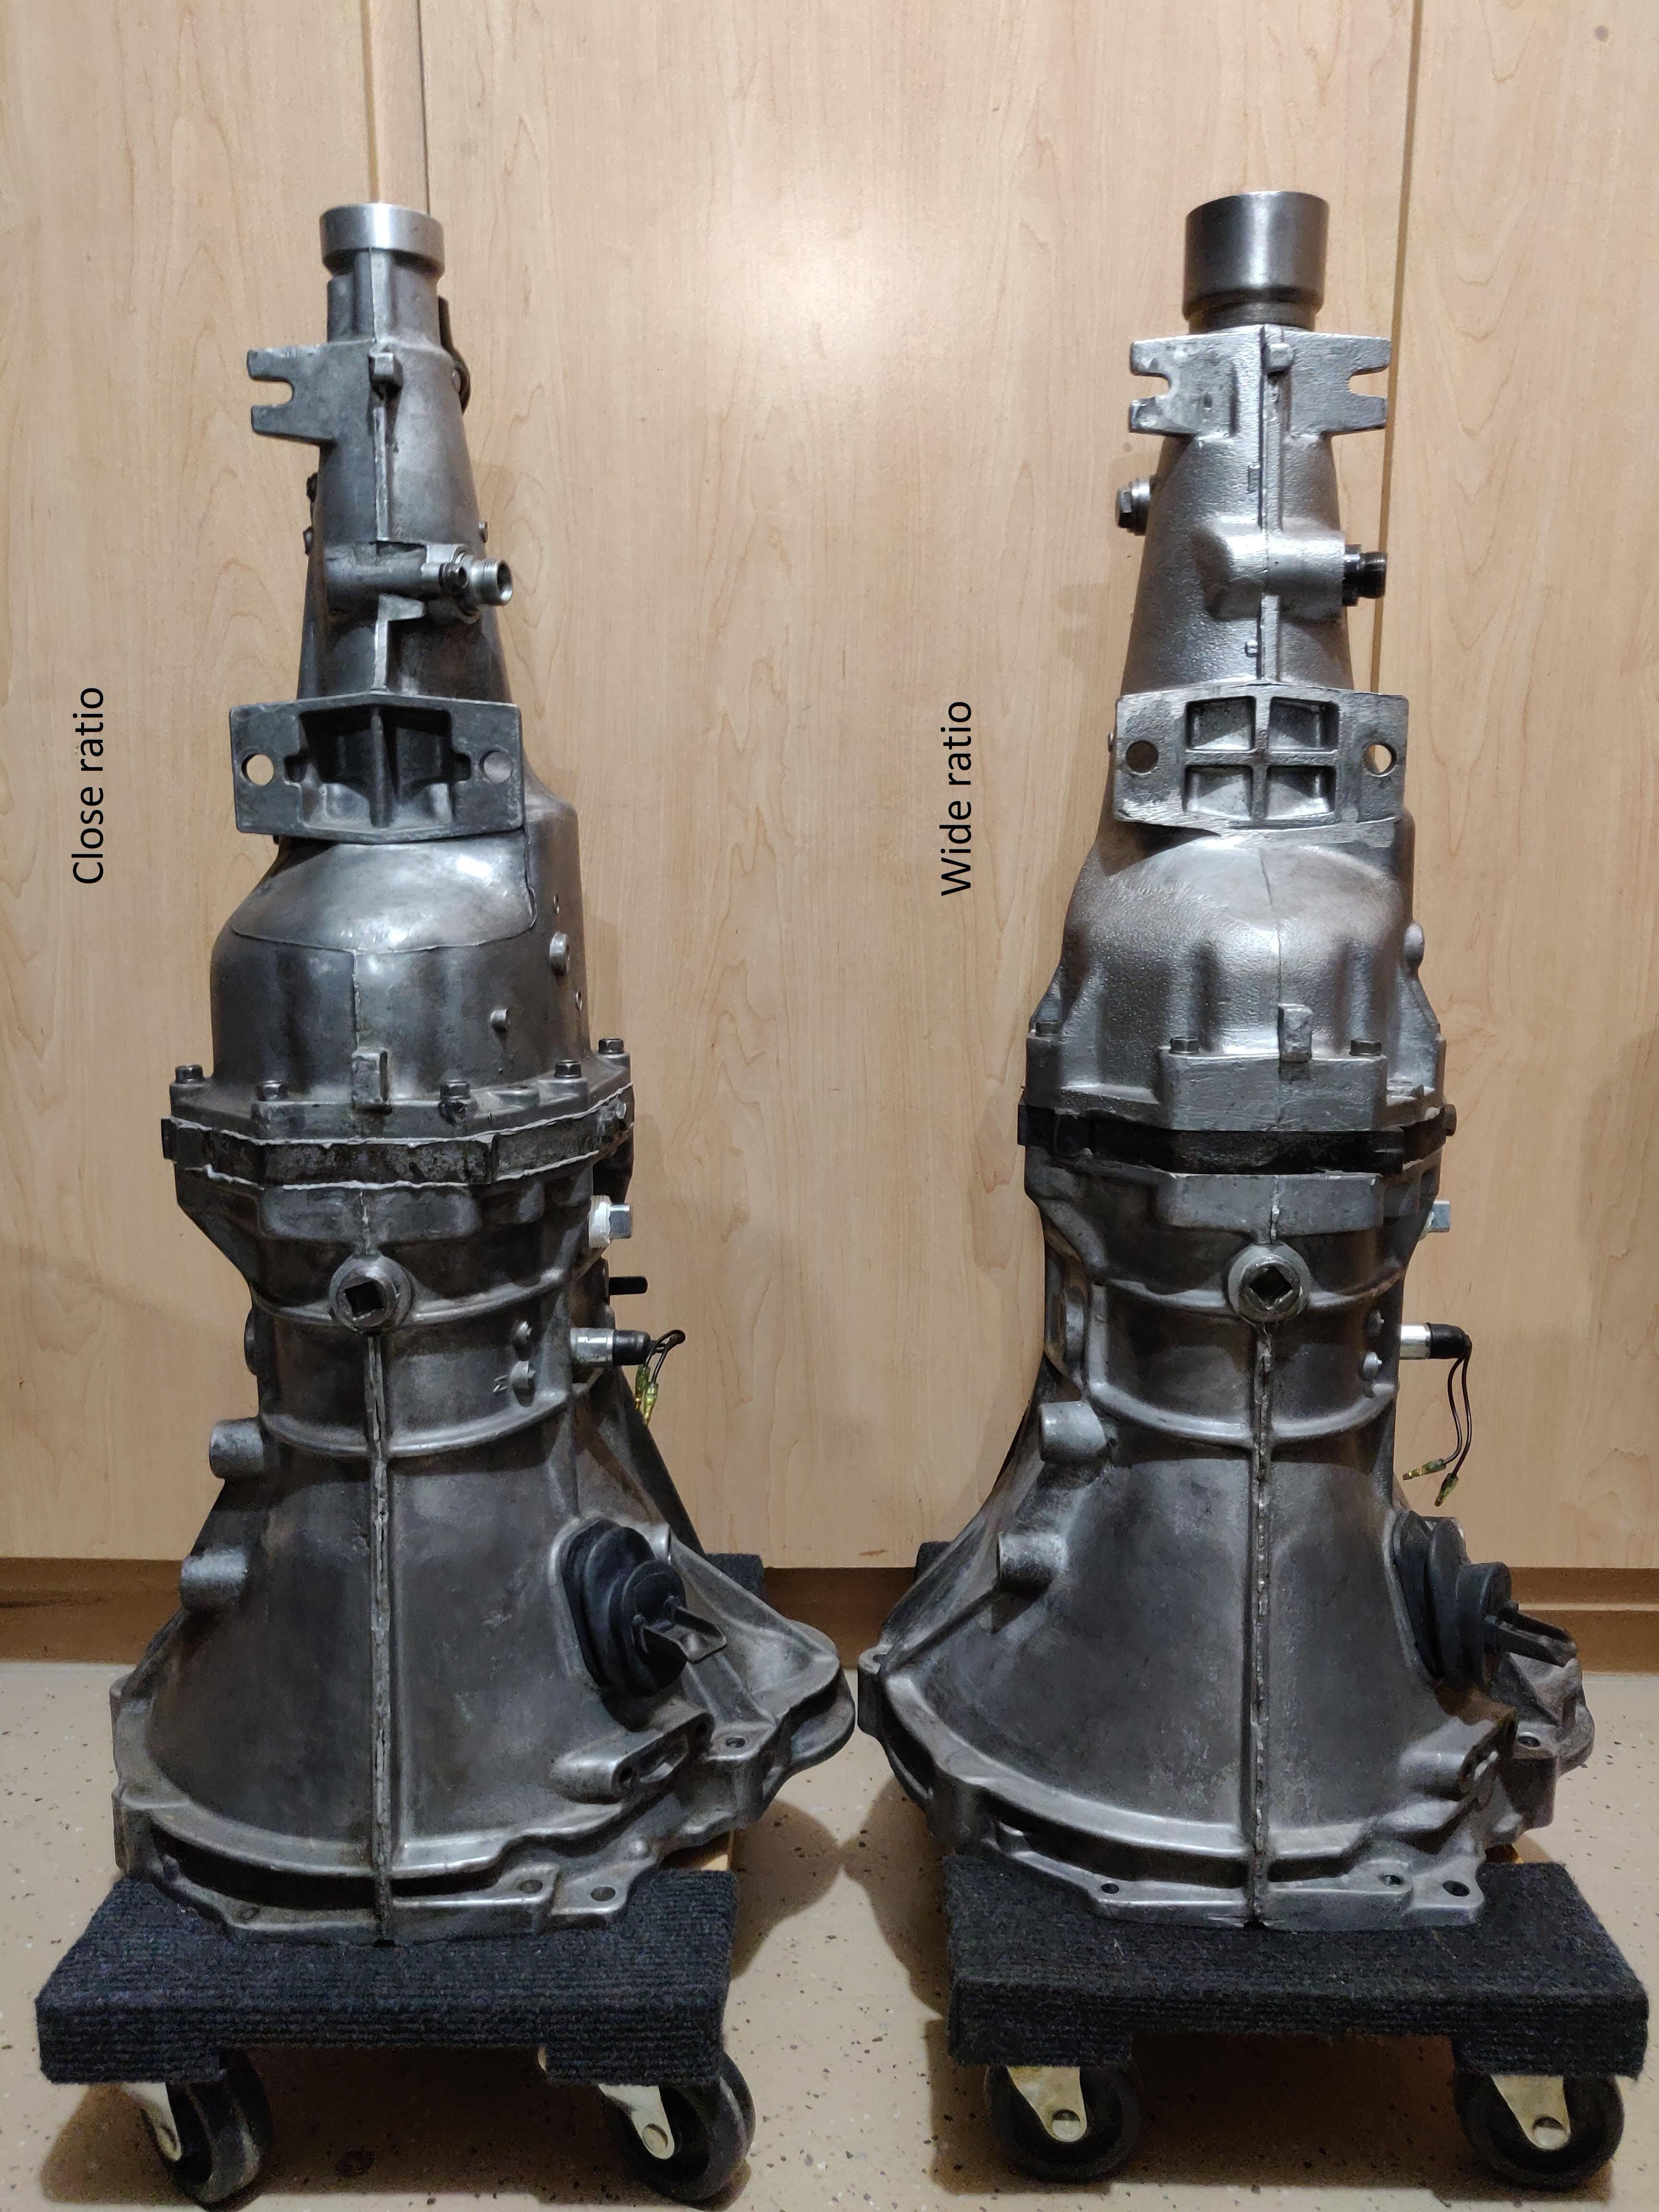
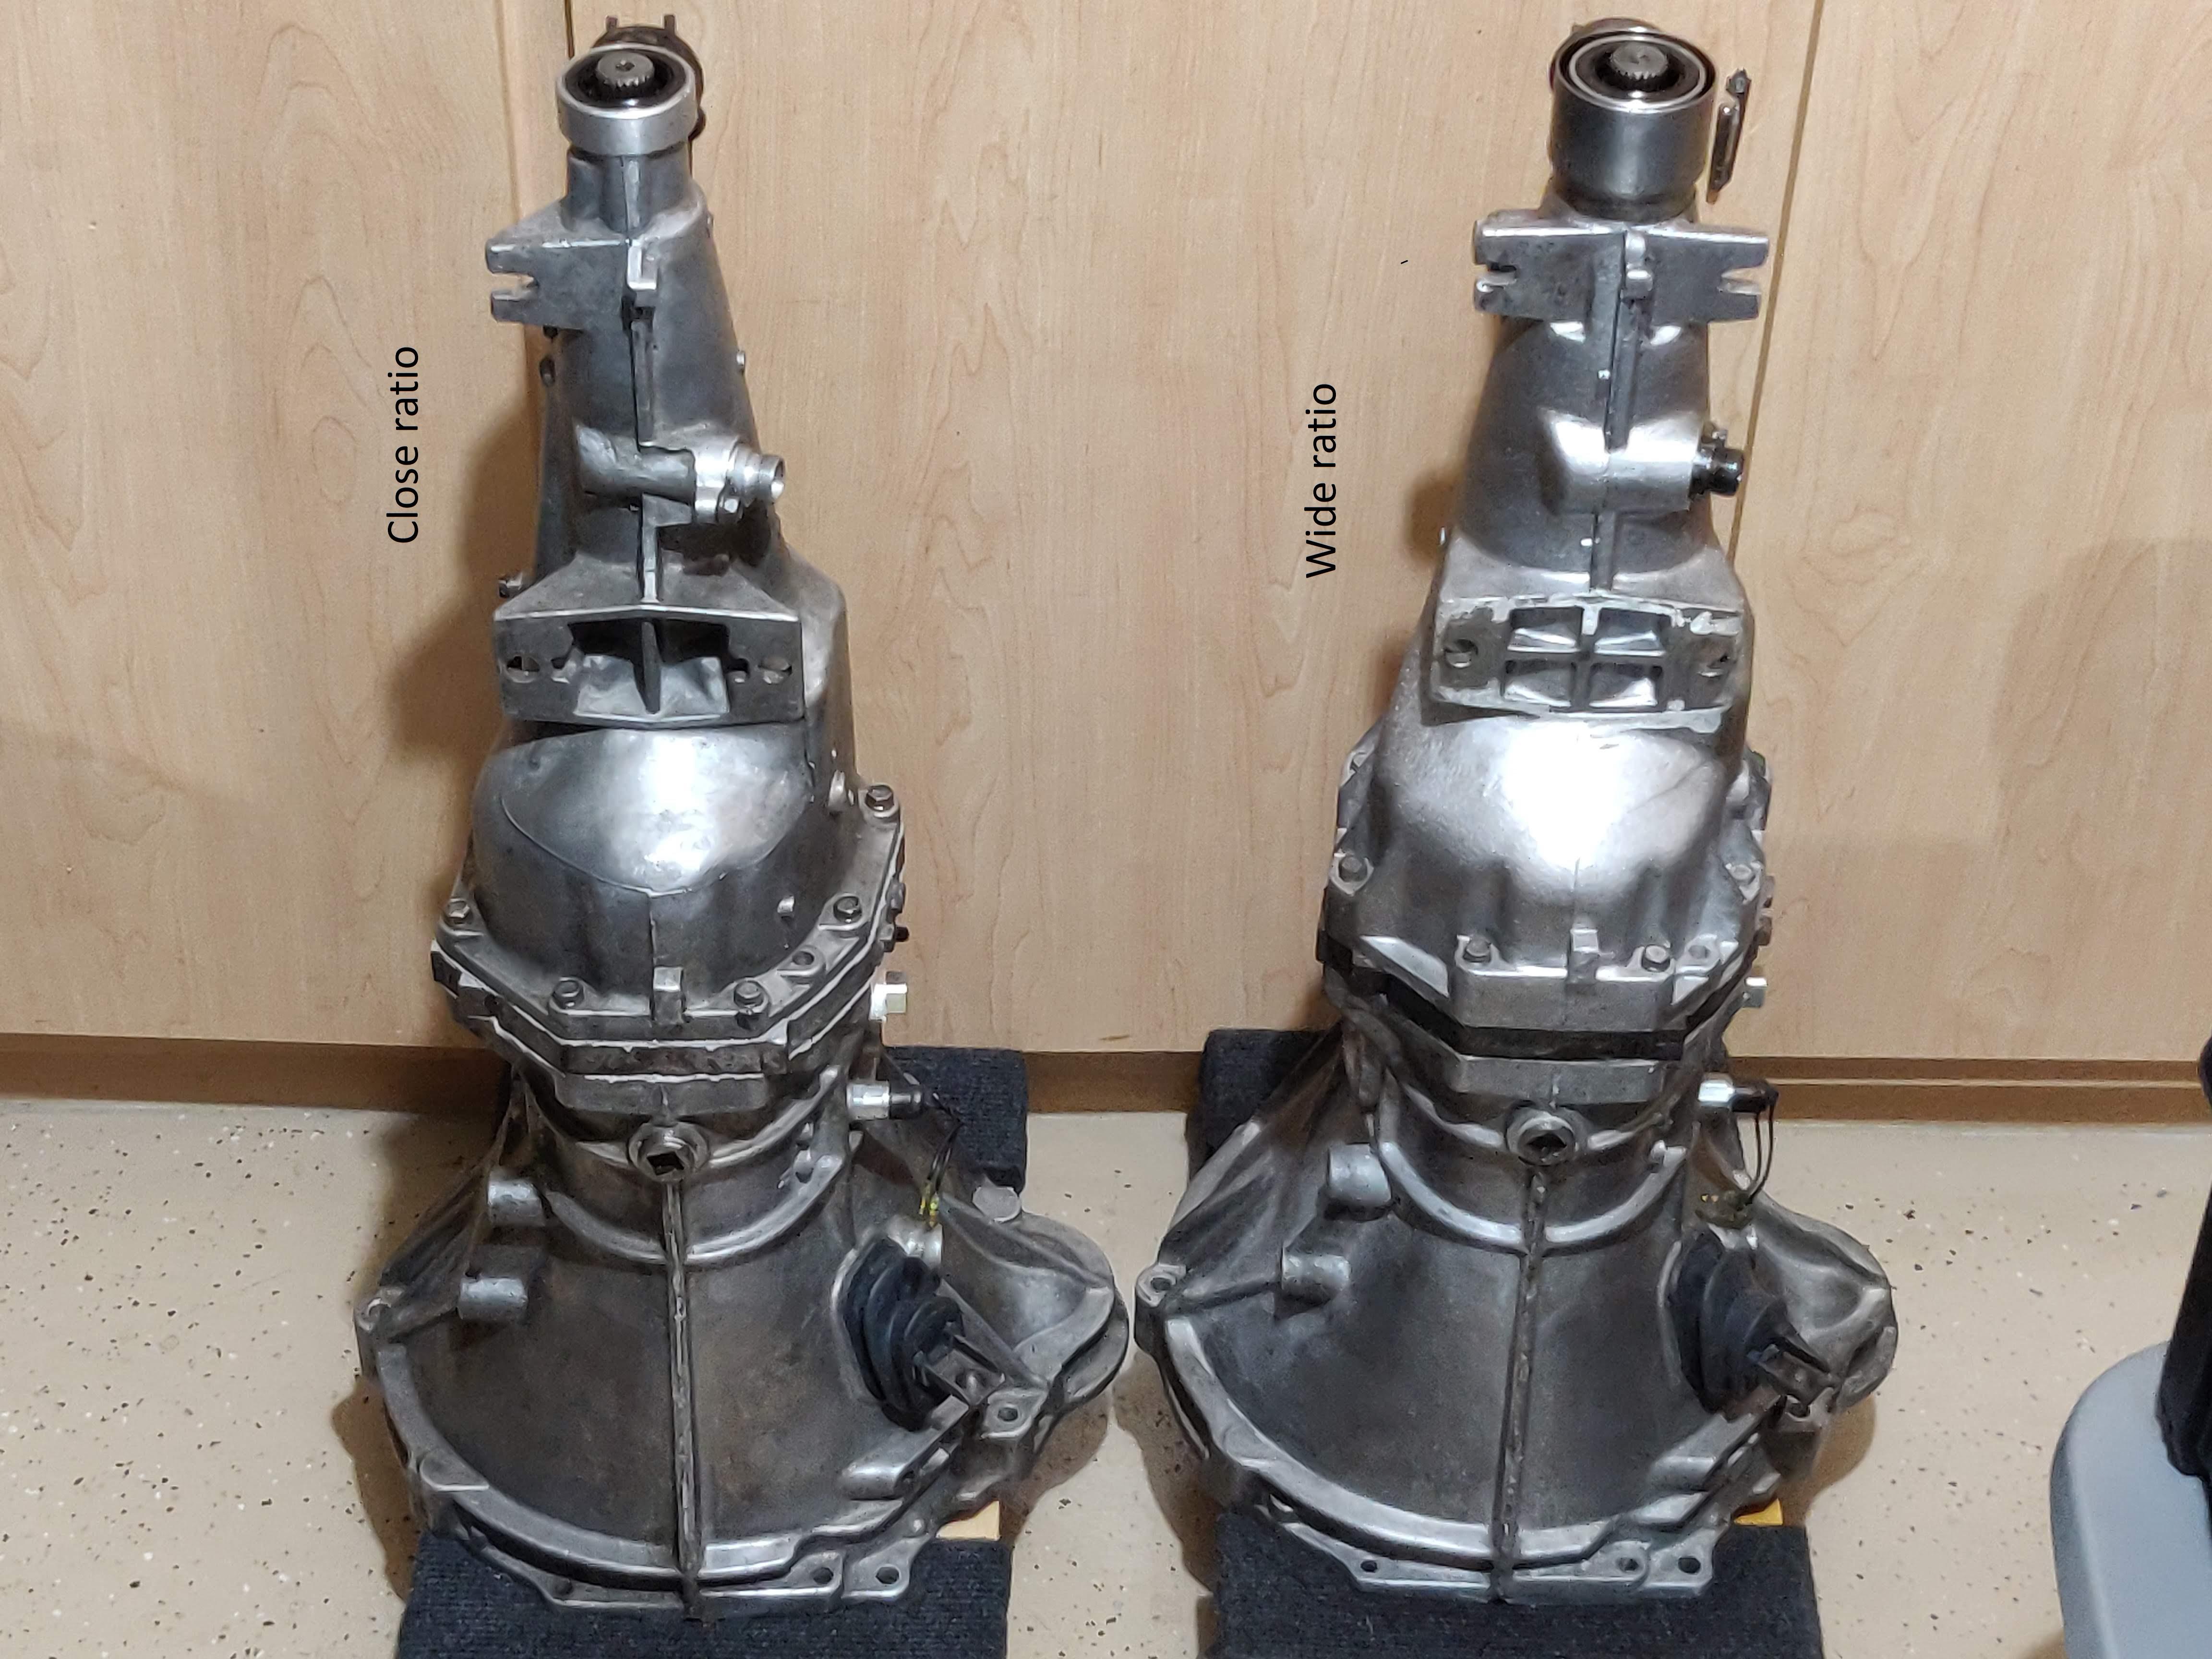
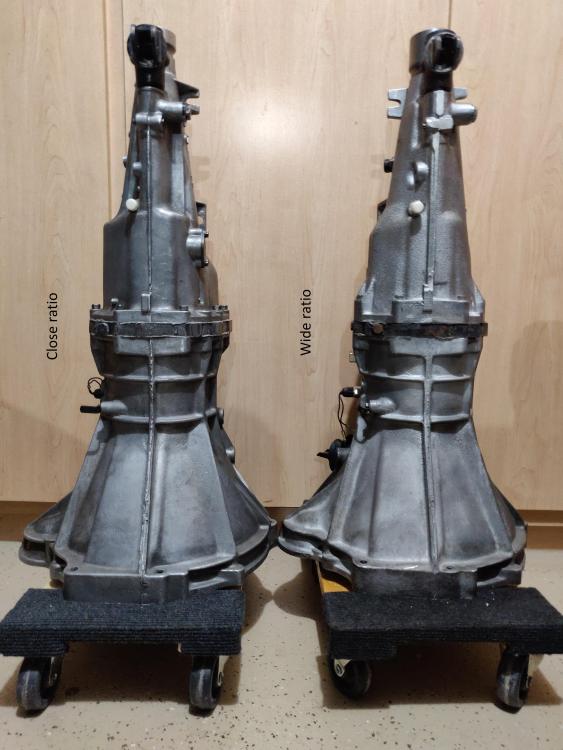
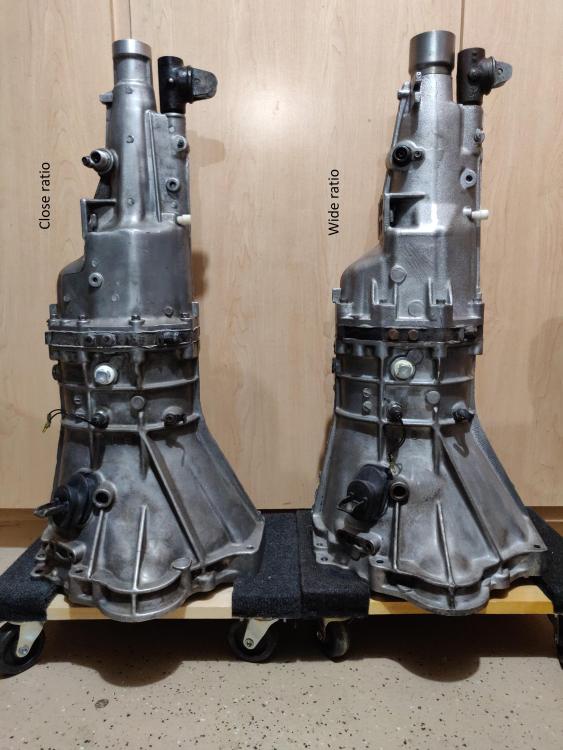
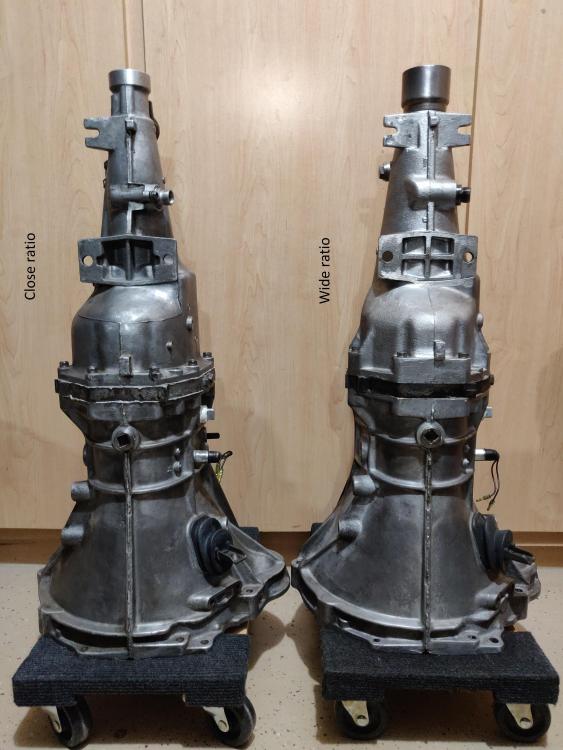
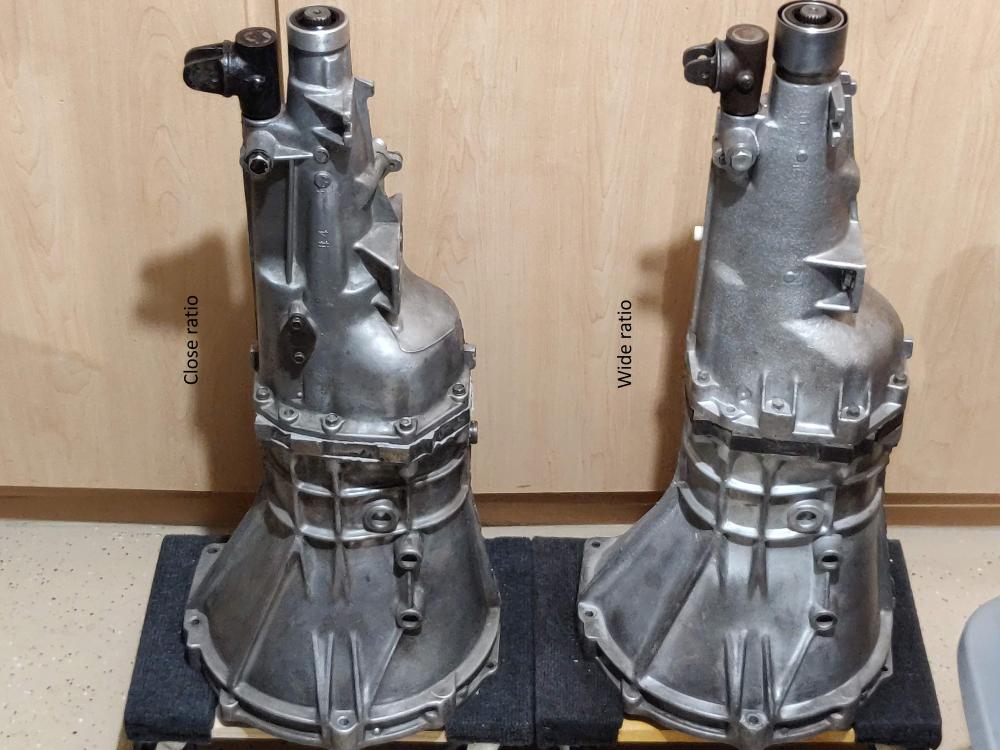
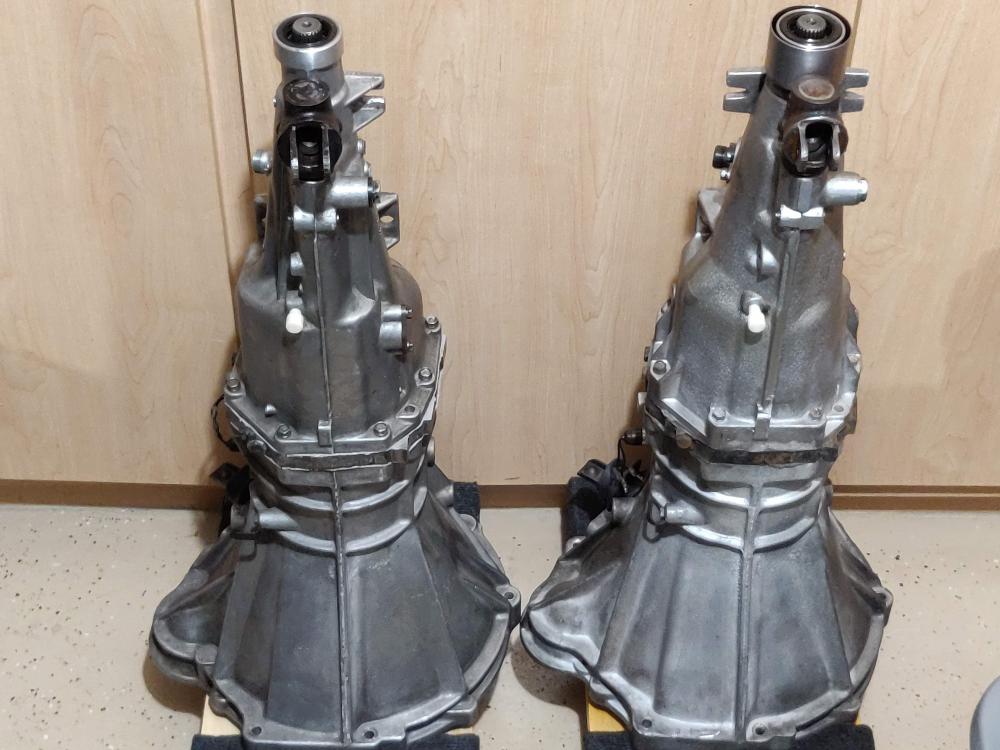
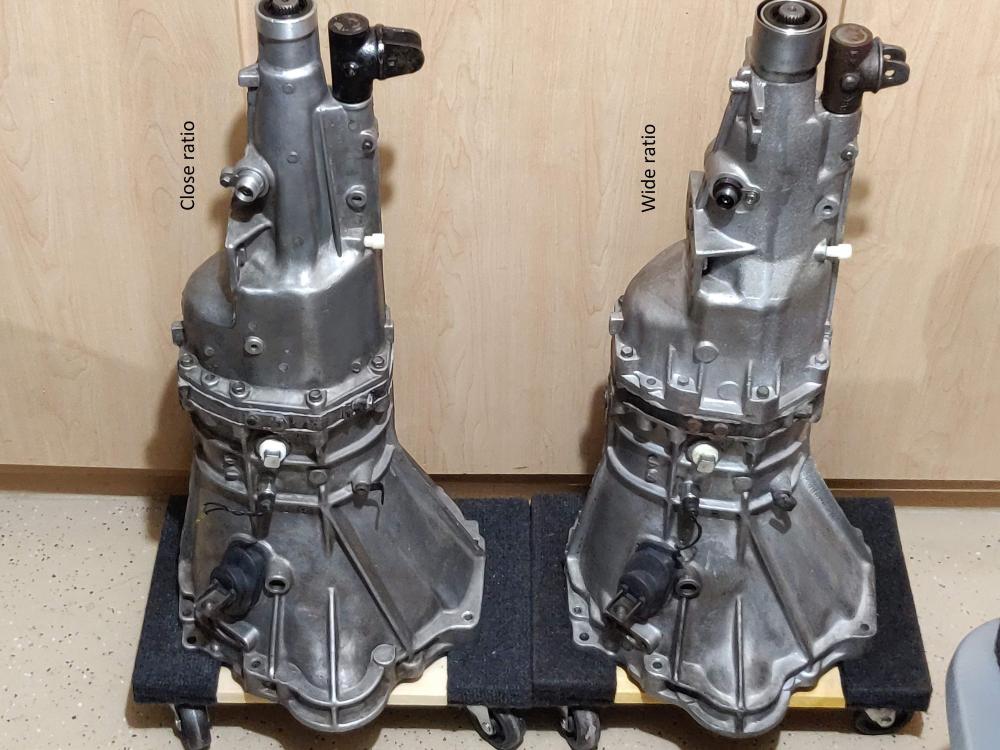
A few years ago when I was looking for a 5-speed transmission for my 1976 280Z project, I searched and searched for photos of the early ("wide ratio") and later ("close ratio") versions side-by-side. I never really found any, but I did acquire one of each, and thought I'd post pictures of them for easy comparison. The main things to notice are all on the rear extension housing: The wide ratio gearbox has two exhaust hanger ears on the rear extension housing, the close ratio has only one (on the driver's side). The wide ratio has a dust collar/shroud surrounding the end of the tail piece, the close ratio does not. The close ratio box has a cover for the reverse loickout mechanism on the left side, the wide ratio does not. On the close ratio, the screw that secures the speedometer drive assembly to the rear extension housing is located at 6 o'clock (toward the bottom of the transmission), on the wide ratio the screw is at 12 o'clock (toward the top). The striking rod guide (where the shift lever attaches) is slightly wider/taller on the close ratio than on the wide ratio. Overall, the wide ratio rear extension housing has s smoother, more rounded appearance.

 6 points
 -
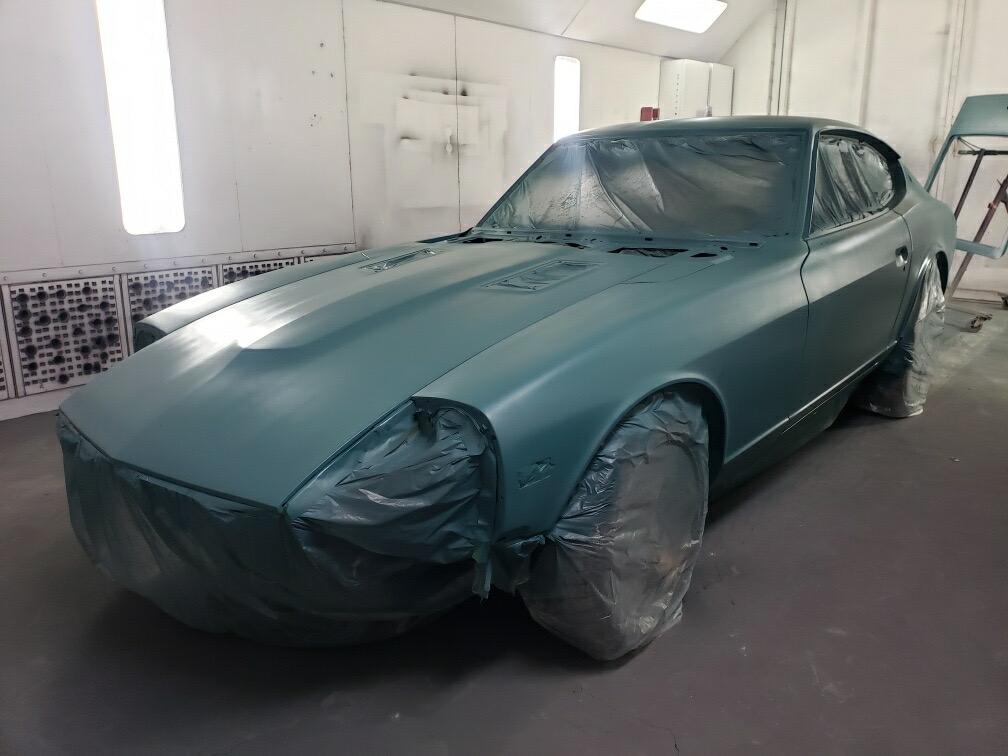
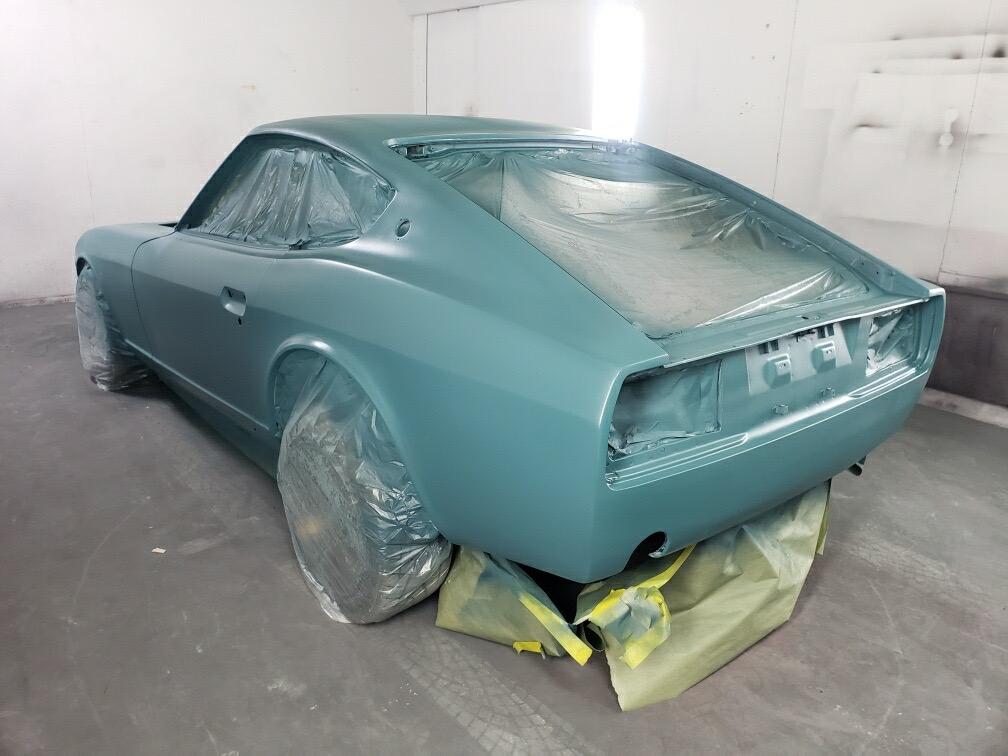
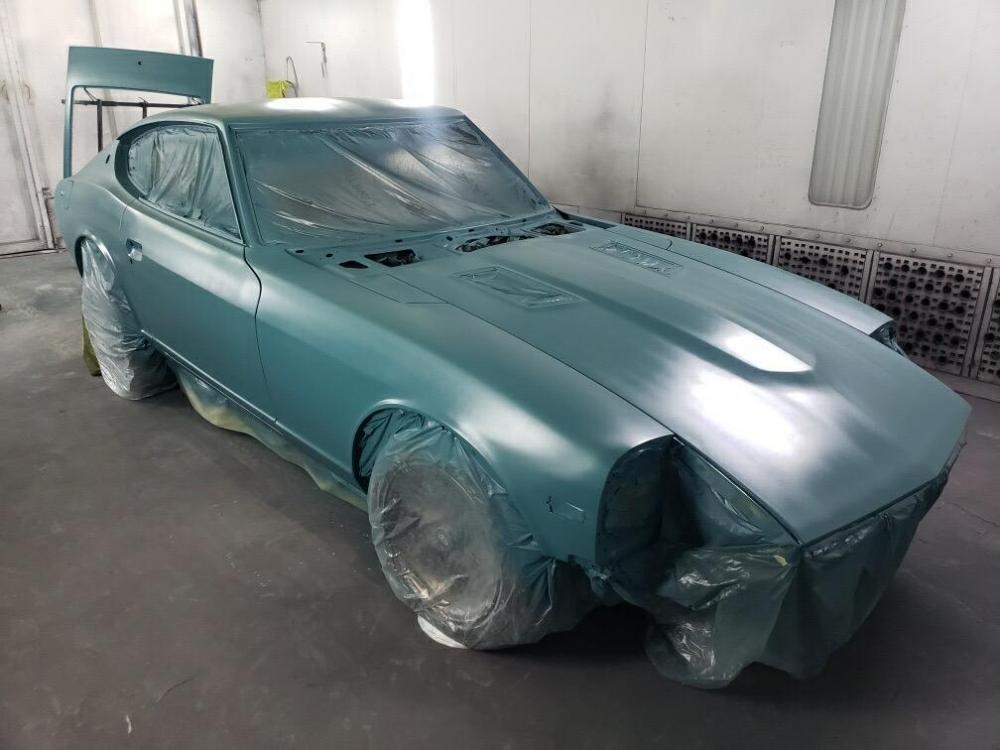
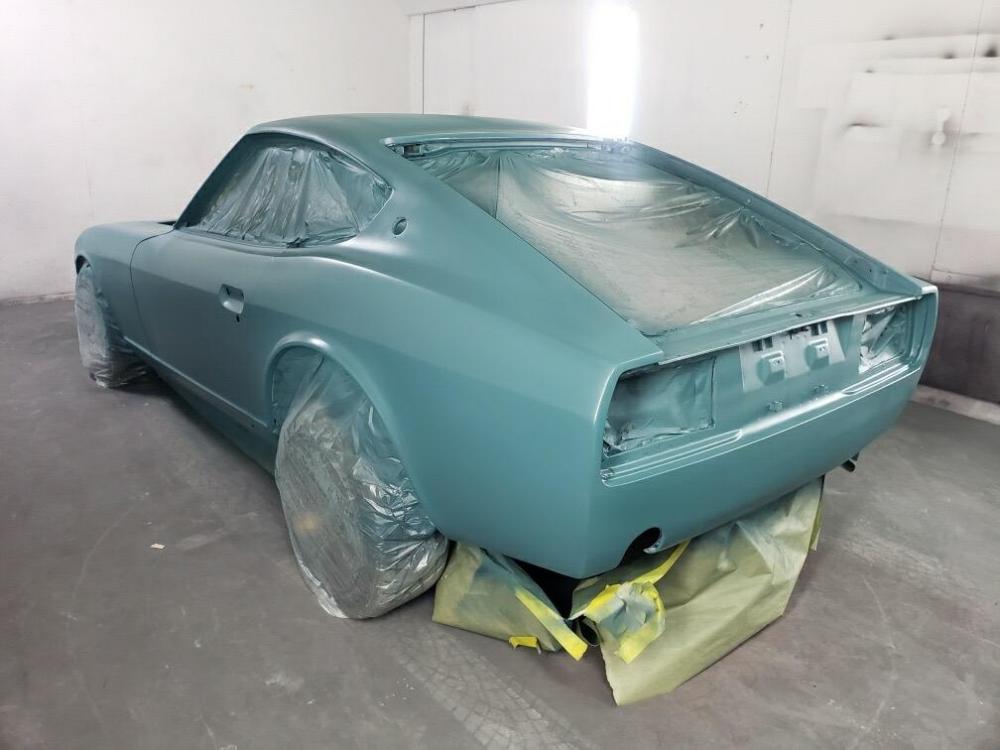
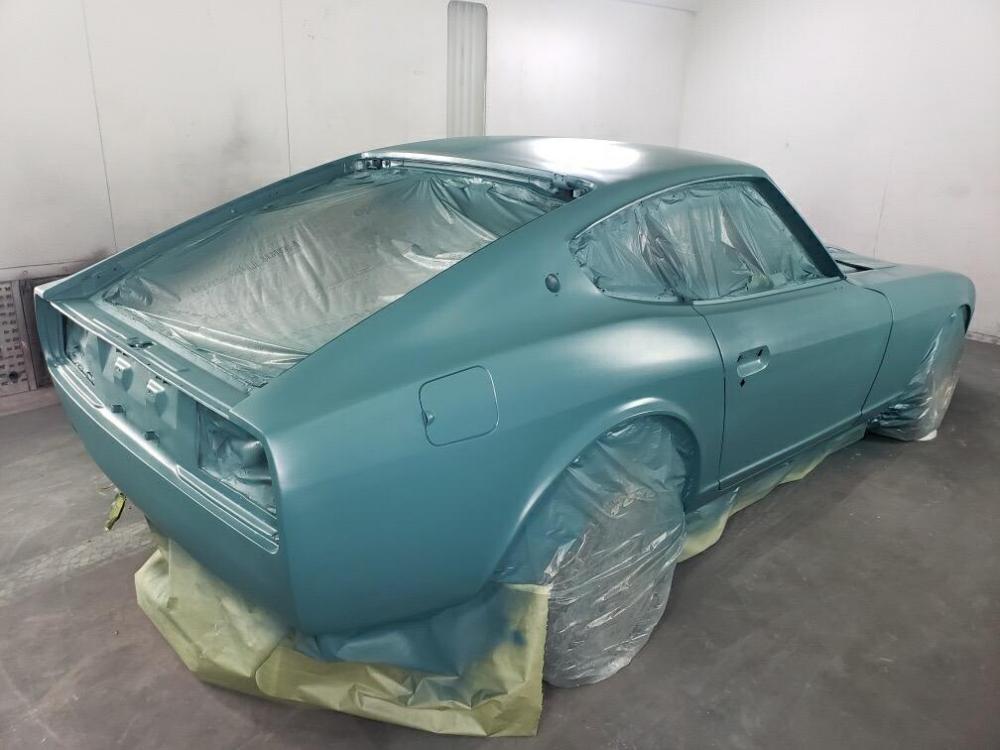
3 pointsFinal tinted primer yesterday. Very happy with the result. Wet sanding today and hopefully painting over the weekend.

 3 points
 -
Just trying to understand what is going on here... Already 70 posts on that topic?! Accusations, he says she says, I got a bigger pecker than yours, my father is stronger than yours, 3rd grade schoolyard BS. If anyone wants to be an activist, pick a real fight, plenty to choose from In the real world nowadays... The most important question is; What could be the end result of that back and forth endless non sens...? NOTHING but a big waste of time, that’s what is going to come out of it! No moderator on this forum? If you want the damn wheels buy them, if you don't want them for whatever reasons or beliefs then just dont! That is the most important influence anyone could have on it! My 2 cents... Gentlemen please move on!3 points
-
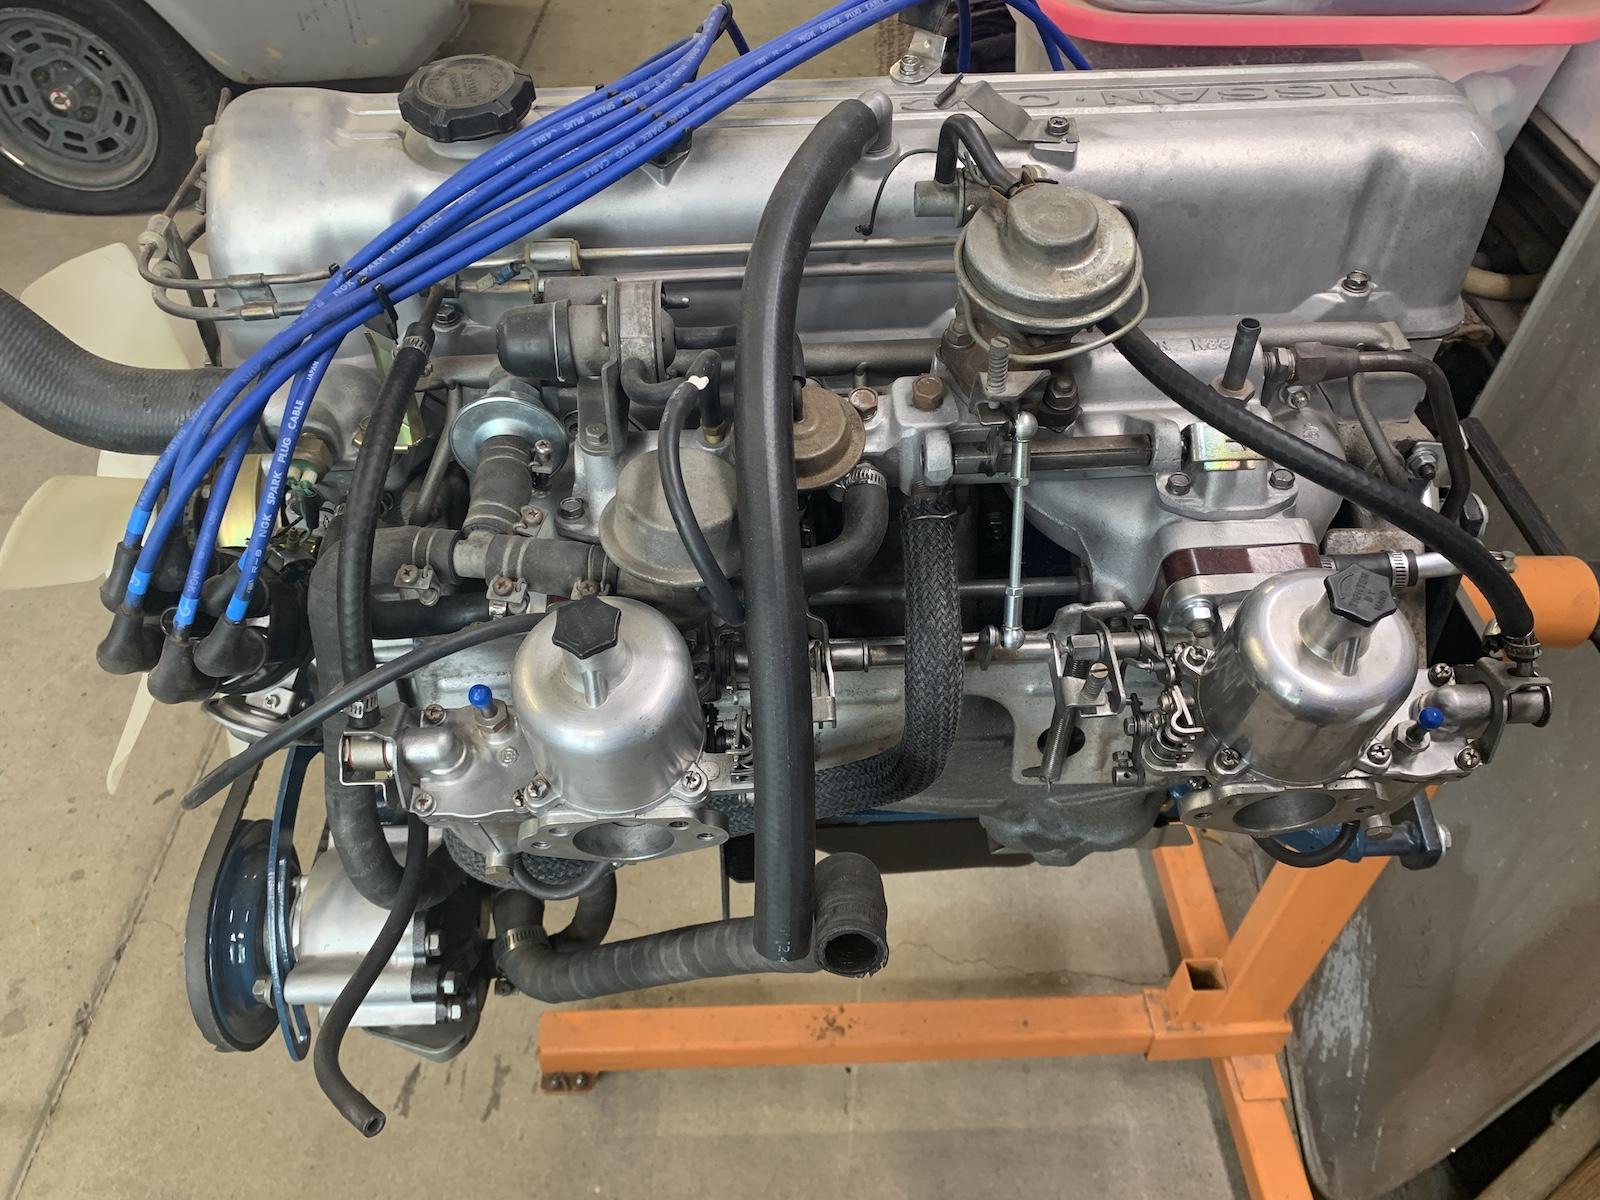
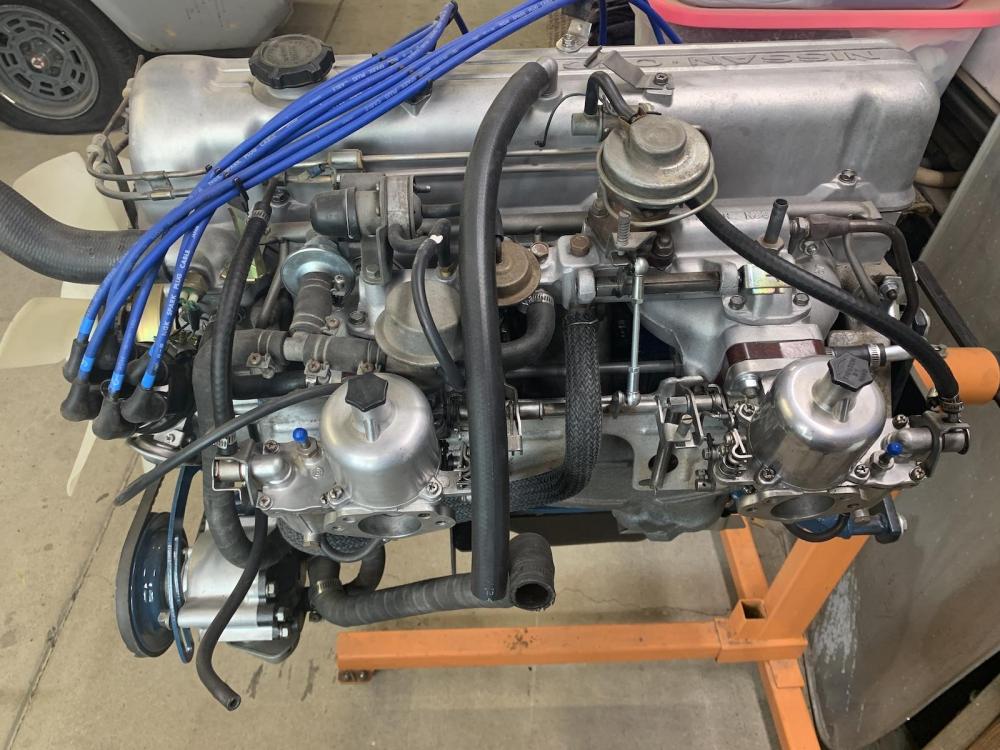
 A good read on Site's thread, thanks! I've got the same leveler, so I guess I shouldn't worry about it too much. Years ago I pulled the motor sideways over the fender after removing trans. I guess I'll do the the engine with trans method this time. Hopefully no need to remove the front bumper, I'll do some measuring first. Engine is not as great as some I've seen here, but will hopefully run good. Decided to try to keep this 73 on the stock side, even the smog stuff. Well, it does have earlier carbs. I'll probably regret that choice later. 🙄
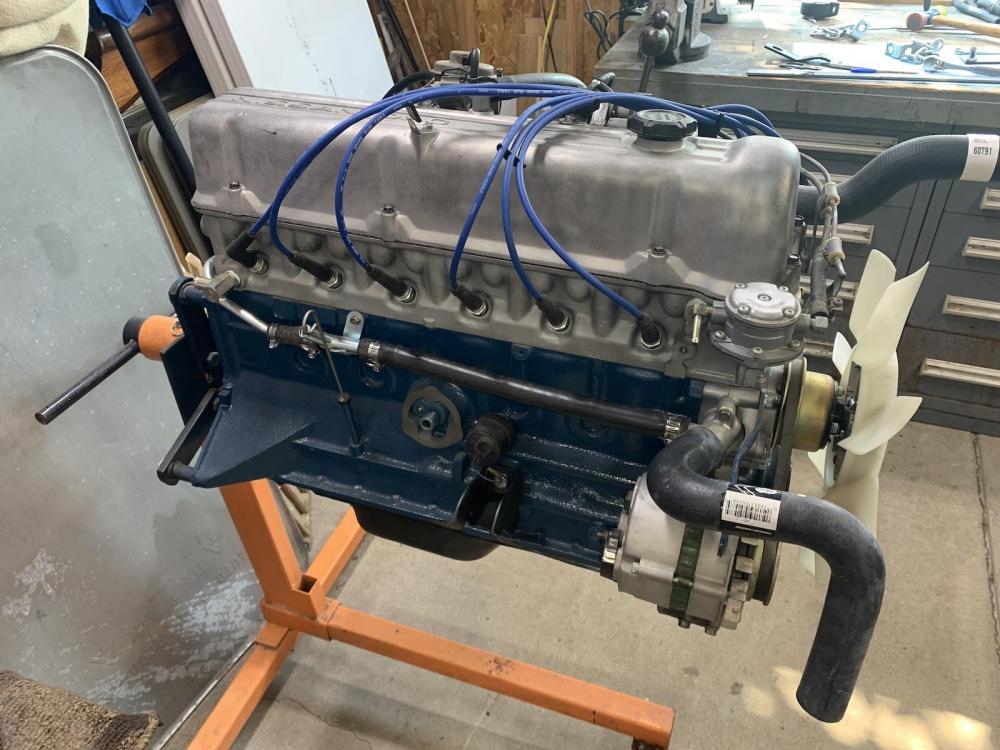
 2 points
 -
I think it's 50/50. If you do the transmission separately make sure that you have the car lifted high enough to slide it underneath before you start. Or put it under the car through the engine bay before you install the engine. Otherwise you have to rig up some device to hold the engine in place while you lift the car if you didn't have it high enough. A trick I learned if you do both together (after I had already installed both together, and struggled mightily) is to tie a rope around the tail of the transmission and lift from the inside through the shifter hole to get the cross member installed. Use a piece of wood to roll up the rope to hold it in place. It's very difficult to get underneath the tail and lift when you have the weight of both hanging there. I don't know how much range you have on the load leveler. You might run it through it's range with the engine and transmission to see if it will work before you get it all hanging over the car.2 points
-
 One day later.... So I spent the afternoon trying to figure out this problem. After checking all the basic connections, I finally decided to start disassembling the components to check them out individually. The first component to come out was the brake master cylinder. Upon disconnecting the two brake lines from the bottom of the master cylinder, I immediately noticed that the brake lines were blocked/plugged up with the remnants of paper towel. Apparently, in my haste to reassemble everything I forgot to remove all of the paper towel pieces that I had used to plug up the lines/ports while everything was apart. After a few hours of blowing out lines with compressed air and taking apart the master cylinder I'm pretty sure that I've now successfully removed all the offending material. I feel like Homer Simpson....DOH!!!! A self imposed headache for sure. My wife said that I shouldn't confess to this mistake on the forum...but I felt obligated to disclose what the solution was to the problem that I originally posted...maybe it will help someone else out sometime down the line... I'm feeling confident that tomorrow the brake bleeding job will go much easier!2 points
 -
 Unless an individual wants to pay - in advance - for a set in Magnesium, it is highly unlikely. Working with Mg creates a whole new group of issues... As Mr T alluded to in an earlier post, the cost of is exercise is exorbitant, as we are doing it buy the book - FEA, Stress Calcs, destructive testing, engineering type approval... And no Mr Desert, they are not commercially viable - we may not even make them available to anyone other than Gav and myself. Time will tell. I digress... I have nothing to add to this merry-go-round other than: If you want a set of Mr Deserts wheels, then buy a set. Or don't. Simples.2 points
 -
 Sean, I used to respect you but you just lost it. I'd never buy your wheels nor your exhausts....nor recommend them,... based on your attitude. You have to become a business person and be able to accept helpful guidance and objectively discuss it. I also hope the wheels you sell do not kill anyone otherwise this thread my come back to visit you in court.1 point
 -
 1 pointWell done chap! That must be very satisfying. Good luck with spindle pin - I’ve read they are a breeze [emoji2957][emoji13]1 point
 -
 1 pointEverything is back together and feels good. As far as the grease catch, I straightened the lip and made sure the everything is pressed in enough to where the lip of the grease catch is in the groove on the housing. At first it was binding and I noticed it need to go in just a bit more. Also, I noticed that as soon you put the companion flange on it makes contact with the inside of the grease seal and will cause some friction. The axle went from spinning really easily, but when I inserted the companion flange I did notice some friction even before the putting the lock nut on. I have the copper washer so I torqued it to 100 ft lbs. The pre-load using a fish scale is still under 2 lbs. Now for the other side...god I hope that spindle pin comes out easy!1 point
 -
The bipod, use the bipod. That weird looking knobby thing in the right hand corner. For sharing. There's a lot of pages in that thread. Thanks for the compliment too, I do try.1 point
-
 1 point
 -
 We all do stuff like that, some admit it, some don't.1 point
 -
 I am soon going to get the 240z I have been working on for a couple of years painted. It was originally 901 silver. My plan is to have the painter paint it like the factory did it. And so, I'd like to confirm how the factory did it, if possible. Why? While doing the body work for the last many months, I have concluded that the fasteners that secure some of the body panels in place change the final shape of the panel. A good example of this is the front fender. There are two bolts that secure the bottom of the fender panel to the unibody. Tightening those bolts down causes a slight distortion in the panel. If you get the bottom of the fender perfect while off of the car, and then bolt it to the car, you will have more body work to do to get the bottom of the fender perfect again. Additionally, I have found that aligning body panels is a task that takes several attempts before I achieve success. I don't want to risk chipping paint while handling freshly painted doors, fenders, etc., and attempting to align, tighten bolts with wrenches, etc. Therefore, my preference is to achieve correct alignment and fit while the car is in primer instead. So, I have these observations based on close examination of my car (production 6/1971) to share: It appears to me that everything on the car originally painted in 901 silver at the Nissan factory was securely fastened in place when the paint was applied with two exceptions: the rear hatch and the front cowl panel. I deduce this primarily from the following: Hatch panel: There was no silver paint on the 4 large, phillips screws that secure the hatch panel to the hinges. Additionally, it appears that the hinges were bolted in place on the body with the rubber hinge "seals" in place before primer and paint were applied. I suspect that the seals, hatch hinges, alignment shims and hatch panel were installed at the factory and correct alignment was achieved. And once properly aligned, the rear hatch panel was taken off by removing the 4 large phillips head screws that attach the panel to the hinges. Then, the hatch panel was painted while off of the car. This would greatly ease the job of applying paint in the top recess area of the hatch opening which appeared to have very good coverage on my car. Cowl panel: For the cowl panel, I note that the 5 phillips pan head screws that secure it to the car were not 901 silver. They were bare plated screws. And of course the black, plastic "receivers" which seal the body at the back of the cowl panel were not installed when the car was sprayed at the factory. Interestingly, the dark grey primer that was sprayed over the entire car just prior to paint, was not covered in silver in the cowl area just below the cowl panel. Examining the silver paint "overspray" from the factory in the cowl area (through the slats in the cowl panel), I believe that the cowl panel was loosely placed on the car body in its proper location, but without the plastic receivers or pan head screws to hold it in place, at the time the car was sprayed with color. The rest of the panels: Other than those two panels, all indications (to me) are that the rest of the panels which were painted 901 silver were all bolted in place when sprayed with grey primer, and the 901 silver paint that followed. All of the fasteners on the remaining panels were undisturbed after paint. Also, I specifically noted a lack of coverage of both the grey primer and silver paint in the area from the top to the bottom of the front, inside surface (frame) of the doors. In this same general area, I found a few silver paint runs on the doors and the hinges (bottom edge of the hinge springs especially). Other than the hood "alignment blocks", which are painted black, and were clearly installed after the car was painted, the hardware which attaches the front fenders to the body was finished with either in the grey primer (the fasteners accessed under the cowl panel) or finished with the 901 silver, indicating the fenders were bolted in place at the time that the car was sprayed with grey primer and then silver. The back edges of the headlight housings (those on my car are fiberglass) were bare, white gel coat - they were not grey or silver, indicating they were bolted in place on the front of the fender at the time that the car was sprayed with grey primer and then silver. The hardware securing the front left, right, and center valences had 901 silver on them indicating they were bolted in place when color was sprayed. The hardware securing the front left and right inspection panels was 901 silver indicating they were bolted in place when color was sprayed. The hardware securing the tool doors in the interior of the car was 901 silver indicating they were bolted in place when color was sprayed. Here is a picture that reveals a lot when you look closely. Note that the car had been repainted once in gold prior to my purchase of it. You can see that the silver is visible "under the gold" in various places where the gold has departed, such as just forward of where the front edge of the cowl panel seats against the unibody. Note where the grey primer is, and where it is not, such as the bottom left corner in the pic, which is where the fender bolts to the unibody. I'd love to hear from others on this topic. Please share what you have found either consistent with my observations or otherwise! Thanks!
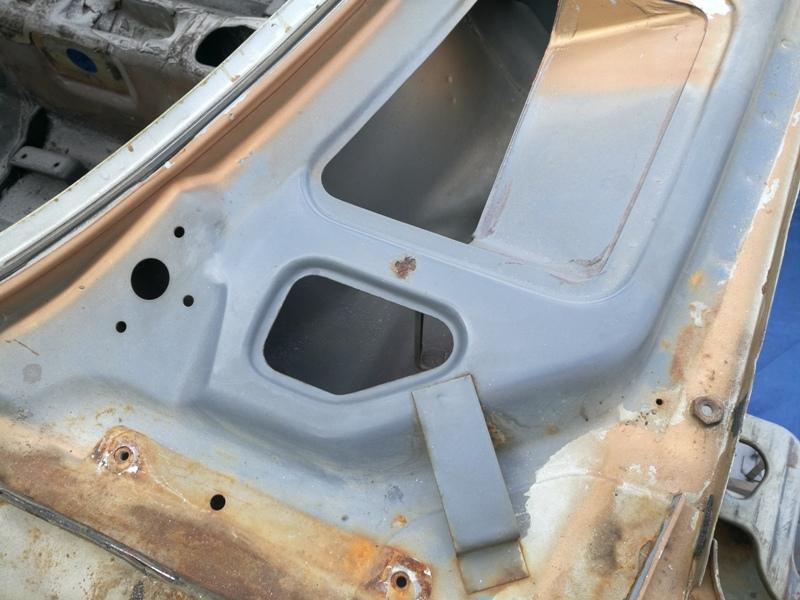 1 point
 -
 1 pointWith the plugs removed, you can also try to rotate the motor (clockwise) with a 27mm or 1 1/16" socket on the crankshaft pulley bolt. it is easier to do if you remove the fan assembly - 4 10mm nuts. You may have to let the oil of choice that you put into the cylinders work its way thru the rings for a few days. Best of luck!1 point
 -
 I enquired about this some months back. M-Speed Japan's representative told me that they had made a legal contract with the Chinese casting foundry when they had engaged them to manufacture their wheels for them, and that the Chinese factory had breached this contract by selling these wheels to third parties. M-Speed Japan were quite clear that they do not authorise these parallel - effectively 'back door' - sales, and that the Chinese factory are in breach of contract.1 point
 -
 1 pointIf the car is in gear can you move the car and see if the fan belt is moving? To unlock an Engine, take out the spark plugs, [label the wires well] put penetrating oil in every cylinder. Rock the car back and forth in gear, and it should break free. NOTE: penetrating is bad for an engine. When you can get the car running, change the oil & filter. Add some SFR oil treatment to new oil. Change again in 500 miles. (https://sfrcorp.com/products/category/oil-additives/)1 point
 -
I read your first post and wanted to reply but didn't have a clue. Those rags and paper towels are common problem sources, form what I've seen. You should keep a count of your paper towels like a surgical team with sponges, and verify all accounted for after a procedure.1 point
-
 Yeah "Cha Bu Duo" basically. 😄 I once bought a Guitar second hand off a so-called collector... It appeared genuine in every sense of the word. I still have the photos of it. https://photos.app.goo.gl/6ZSeZFcdnZPfjh7M7 Notice how it has a serial number, Epiphone Branding, and it even came with a little Epiphone Brochure. For all intents and purposes it looks the same, certainly in photos it still looks impressive. I was naive and it was my first electric guitar (still a learner at the time and still am really), but not knowing much about setting up the action or how good pickups should sound I tested it and it seemed ok (the amp was small and not great) so it was hard to really know if it was "kosher" or not. Anyway after a while I was a bit frustrated with it and took it to my guitar teacher who said the 'action' on it (usually defined by how the strings sit against the fretboard was all off) and it wasn't nice to play. He suggested I take it to get set up right. I take it to a specialist to have to re-configured. He calls me and say "where did you get this guitar from?" I said I bought it off a guy on the Internet second hand - he said he was a collector. He goes on to explain the guitar is not very good and there isn't much that can be done to fix it. He also said it looks like it's made of chipboard type wood.. as oppose to Rosewood. Also the pickups and pots were of interior quality. Sure enough if you look at the photos you can see the Chipboard under the pickups. So I sent photos to Epiphone / Gibson and they confirmed it was indeed a fake. Turns out a lot of places in China that make the official good version for some big American brands of guitar, also as mentioned sometimes have another factory in parallel churn out the "fakes" at a much lower standard but pass them off as legit. It's a huge mess for these companies who then have to try and stop the behavior. Of course the fella I bought the guitar off had no knowledge of the guitar being a fake and pretty much washed his hands of it. True or not, I was down 400 euros and ended up giving the guitar away.. Just my experience with such situations.1 point
 -
 1 pointI This is the way I do it. 1) jack up your car , pull you battery out of the car , place it as close to the rear of the car, and using wire with alligator clips on each end connect the battery to the fuel pump. No need to disconnect fuel pump wire. There are two connections on the pump, one is larger than the other. The larger connection is the (- or ground) and the other is the +12vdc. This method just checks the pump operation. 2) The second method is open your rear hatch place your meter where you can read it from the drivers seat. Use jumper wire with alligator clips and connect to the fuel pump. Using extra hookup wire you have laying around to extend the wire to the test leads of your meter. Disconnect the spade connector( see previous pix of starter) that goes to your solenoid of the starter(so the starter won't turn) and then turn your ignition switch to start. If you are getting power to the pump you should read battery voltage. If you see voltage and the pump turns you have checked the FI relay, ignition switch, wire to the pump and the fuel pump. If voltage is there and the pump doesn't turn then the pump is bad. Hope this helps. And yes you very often need to be a one trick pony to work solo on your car.1 point
 -
1 pointThis is the problem.... Chinese crap metal and fakes are getting in all the supply chains everywhere... when planes start falling out of the sky because of fake electronic etc.then hopefully it will be dealt with appropriately... until then we have to wait sadly. I have two 2000 Honda Insights and crap Chinese replacement batteries are prevalent... they fail after a couple of years from strange manufacturing short cuts. Some people have paid ~ $3k for a set of crap!!! The original Panasonic from 20 years ago still last longer and are better to keep in and grid charge. Don't dare buy a used expensive guitar without checking. MAINLAND Chinese fakes are everywhere... btw Made in Taiwan is totally different...low risk there.1 point
-
 Here you go...and this is only with respect to the primaries contacting the steering shaft, not the impact around other items like the heat near the SU's, etc. As you can see, the primaries have been "clearanced" as far as I am willing to go. This also included shimming the motor mounts to gain some clearance. More monkeying around than I was interested in so here we go, round 3...0 points
 -
 Sorry but if that is not clear to you, you better leave that brake job to a qualified mechanic.. oeps..0 points