


Leaderboard
-


Zed Head
Free Member8Points18,794Posts -


siteunseen
Free Member7Points14,904Posts -


Racer X
Free Member4Points1,877Posts -
.JPG.cfcada9cf1c1b502df3f5f2f2ca3ff36.JPG)

SteveJ
Free Member4Points9,570Posts
Popular Content
Showing content with the highest reputation on 12/05/2020 in all areas
-
3 pointsMaybe ZCD got a "deal" on a batch of wheel bearings. Counterfeit wheel bearings is a big problem, apparently. Regardless, they don't fit. Racer X's suggestion to take a measurement is a good one. The proper dimensions are in the Timken link. I looked for an article on counterfeit bearings and found a lot more than I thought I would. Here's a few, below. Besides counterfeits, off-spec. parts can go out the back door for resale. Overall, Tweeds should let ZCD know that the bearings didn't fit the spindle. He would save ZCD bad press and problems in the future and he might (should) get a refund or proper replacement parts. https://www.youtube.com/watch?v=U2wg3EXqlKM https://www.machinedesign.com/mechanical-motion-systems/article/21835371/the-dangers-of-fake-bearings https://www.nskamericas.com/en/company/counterfeiting.html
 3 points
 -
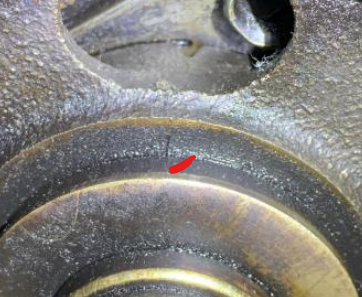
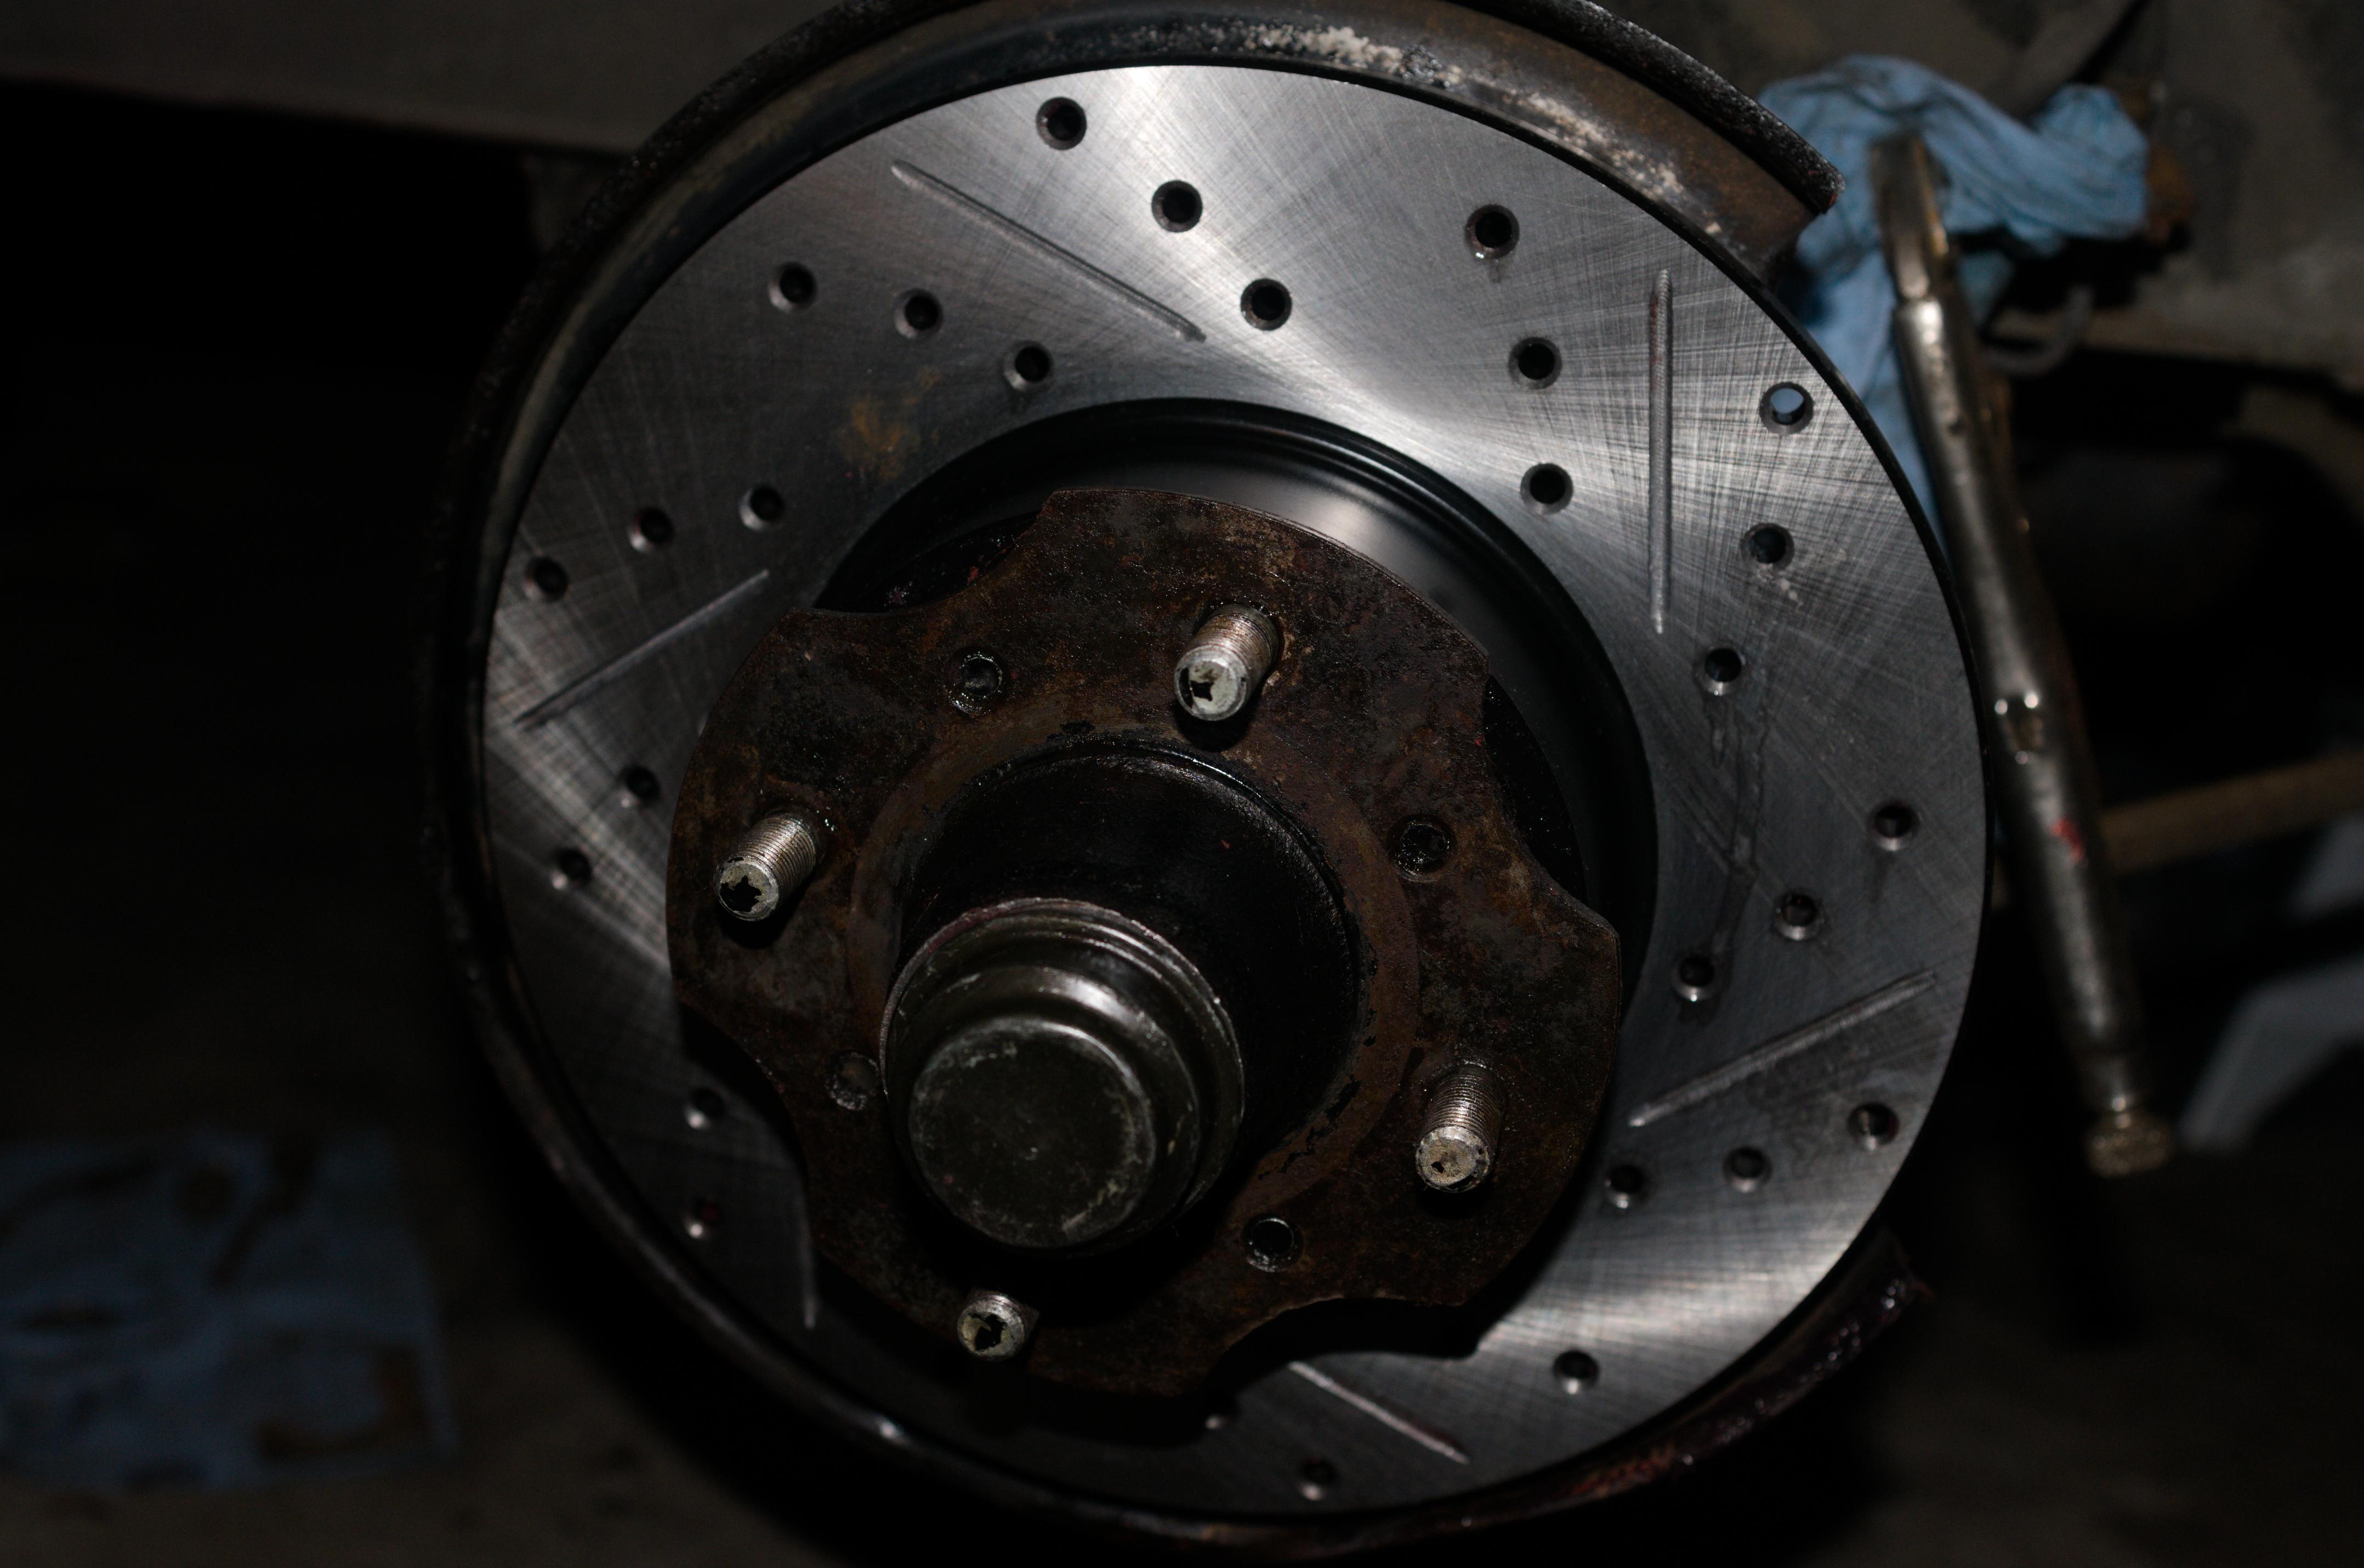
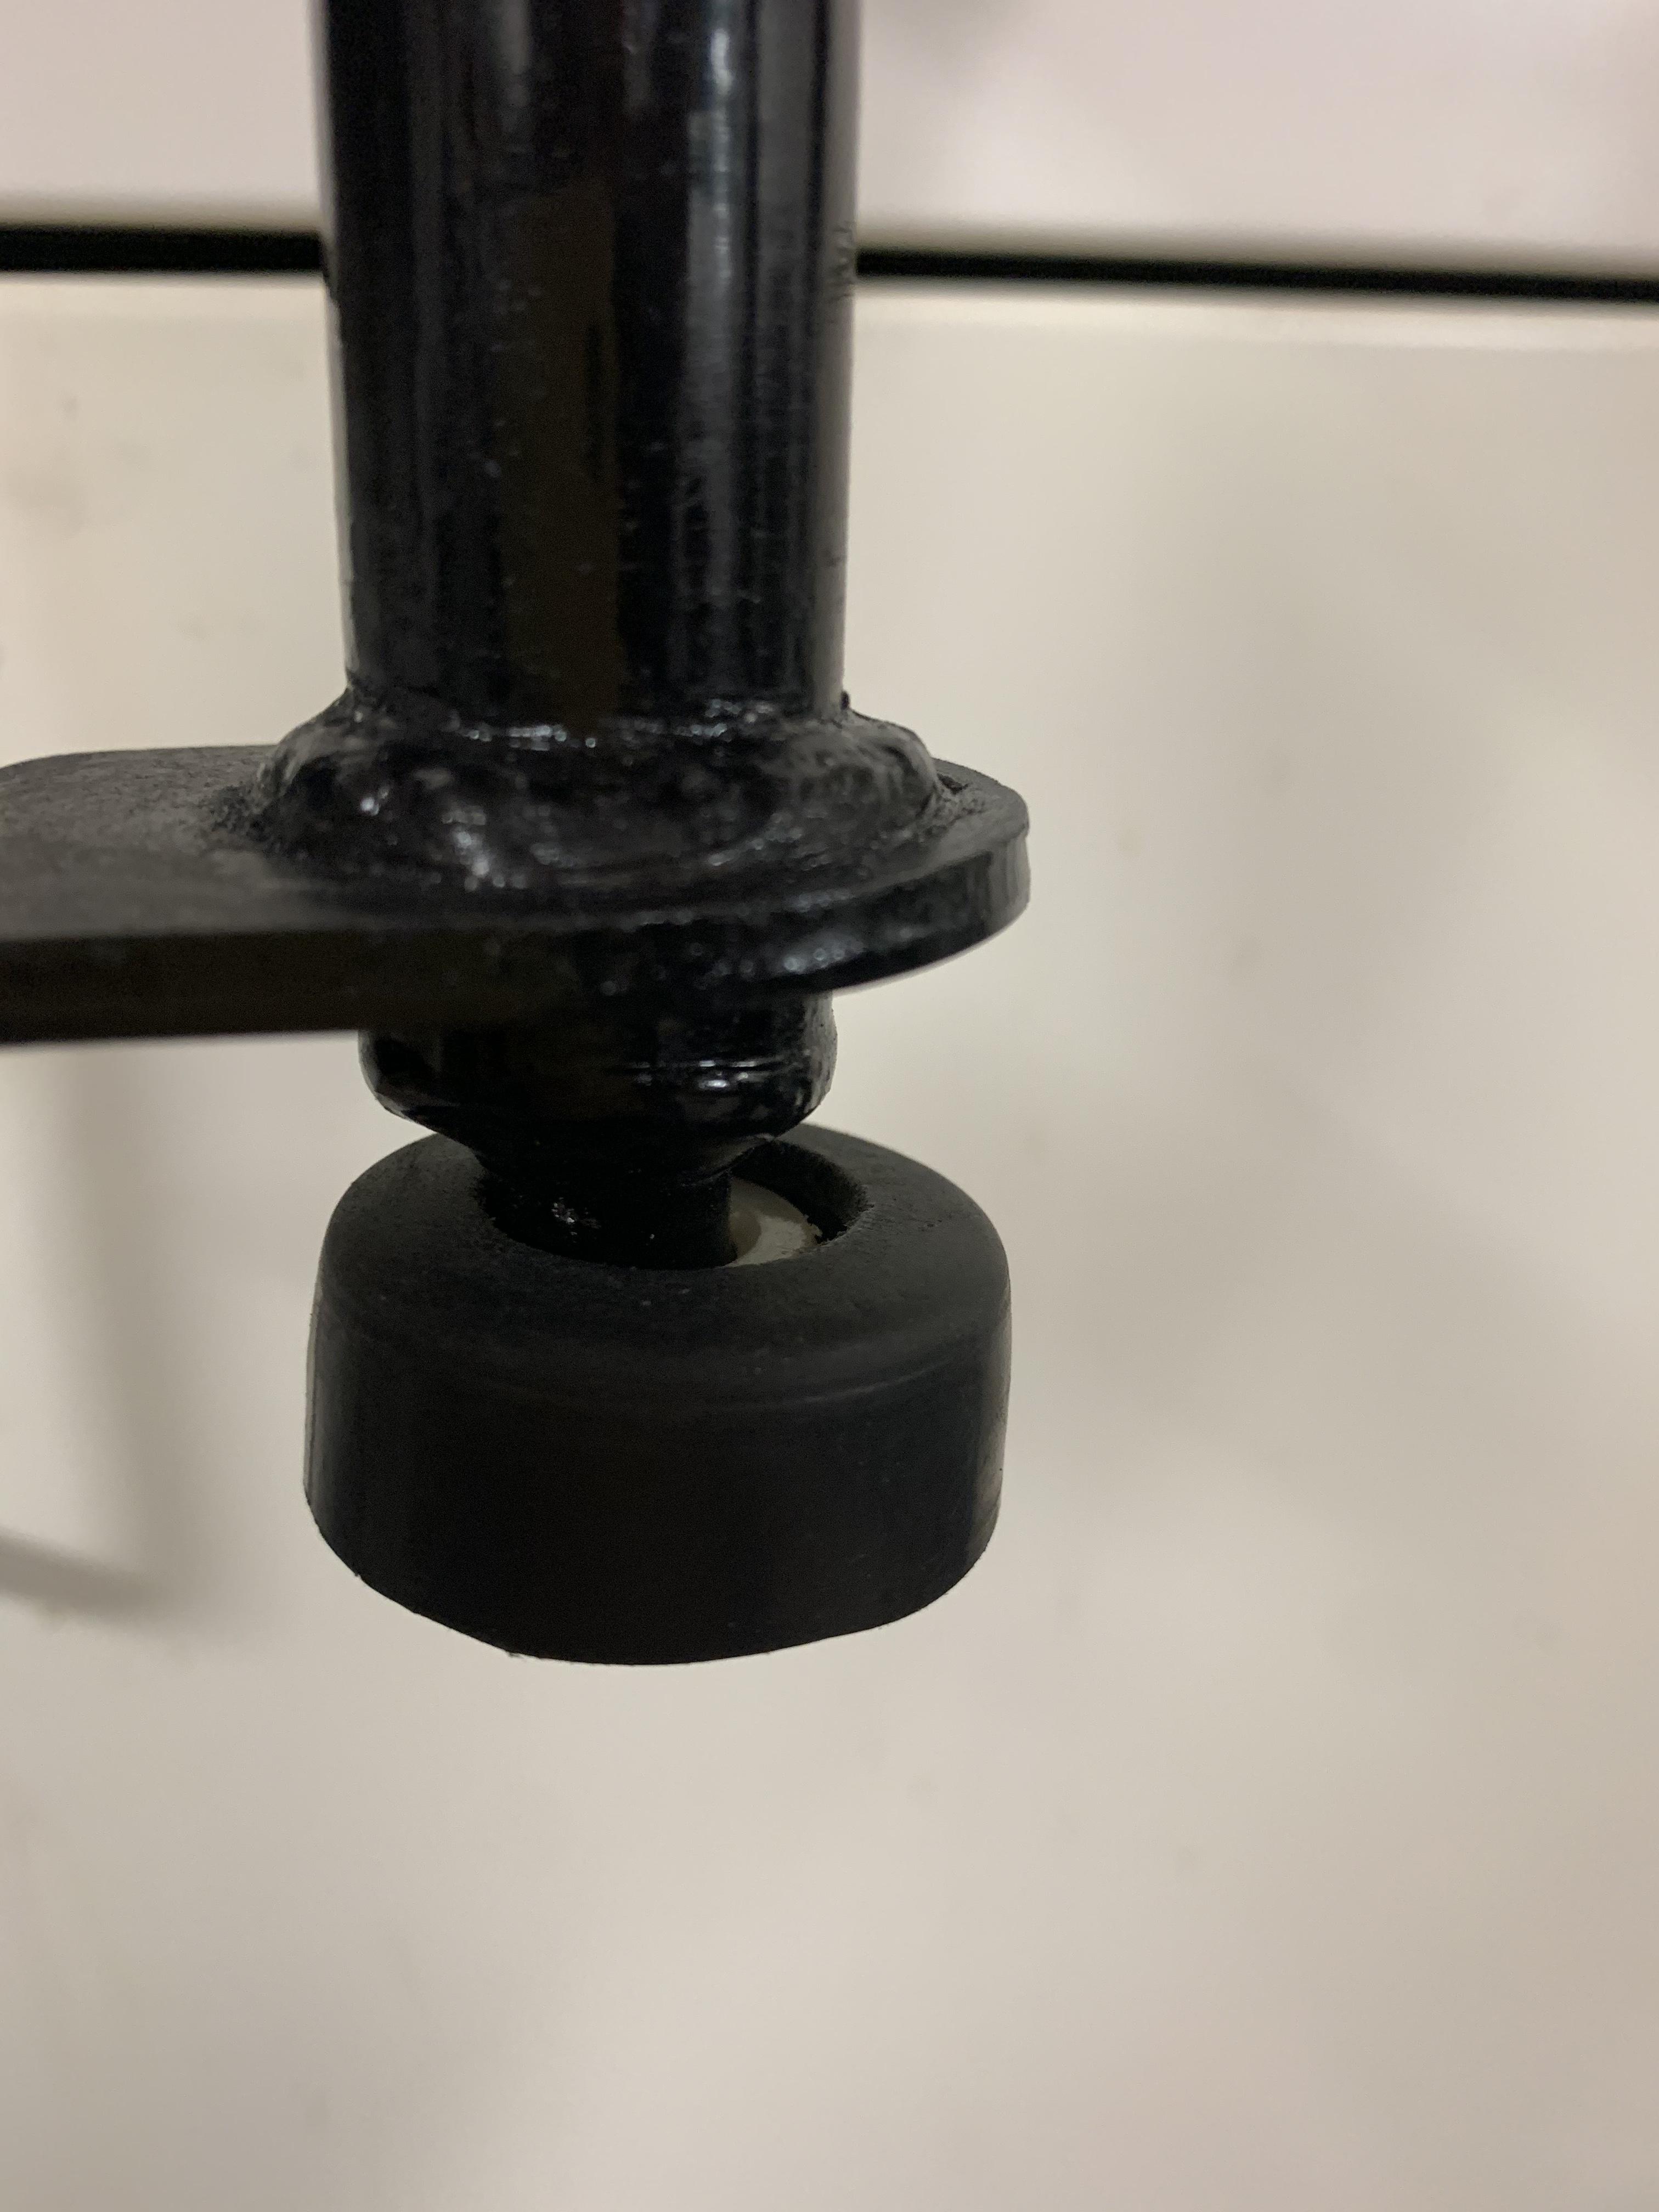
2 pointsThere should be no wear in that area. Once the hub is assembled, the bearing preload set, and locked, that part of the bearing should not move. It does seem odd that several different bearings aren't fitting. If you have a caliper measure the bearings and compare the size differences. Get some emery cloth (also called crocus cloth, any good auto supply store should carry it). It comes in a roll, but some stores will sell it by the foot. I get the roll and beat inflation a bit. Tear off a strip about 12 to 14 inches long and sand briskly, on a clean and dry surface, moving around so that you sand all the way around. Wipe it off with some solvent on a rag, followed with a dry rag, and inspect it visually with a bright light, and feel it. It should be smooth as a baby's butt., and shiny. Before sliding the bearing on to check the fit, wipe it clean with solvent on a rag, followed by a wipe with a clean dry rag. Neatness counts here, the tolerances are close and anything that shouldn't be there may keep things from fitting together, and after all, wheel bearings are very important. Have a clean work area, lay freshly cleaned bearings, nuts, washers, seals, etc. on a clean dry shop towel. A roll of those blue things they sell at the chain parts places are suitable, and disposable so your wife won't shoot you for washing the cloth variety out in her washing machine. Also, I looked at the FSM procedure for setting the bearing preload. For reference, here it is (I'm skipping the first two steps): Tighten the wheel bearing locknut to 18 to 22 ft lbs. Rotate wheel hub a few turns in both directions to seat wheel correctly. Then, retighten spindle nut to the above torque. (this means to losen and then reset the nut torque) Loosen the wheel bearing lock nut 60 degrees. Install adjusting cap and align groove of nut with hole in spindle. If grove does not align with hole, relocate adjusting cap. If hole and groove still do not come into alignment, loosen wheel bearing lock nut as much as 15 degrees more. Again, spin wheel hub several times in both directions to see if it rotates freely. Then measure bearing preload as follows: (the diagram shows the mechanic using a small scale to pull and check the rotating force required to begin rotating the hub) The starting torque is 3.5 to 7.4 inch pounds. Having done a zillion wheel bearings I have developed a feel for the task, so I don't bother with a torque wrench or a scale. I can say that if I did, I would stick to the lower side of the range for the nut tightening. The FSM stresses that care be taken to not overtighten the bearings, and I think even 18 ft lbs is too tight. I also spin the hub as I snug the nut down, something the FSM fails to require. When you finally get this resolved, choose the correct length cotter key, so the ends can be neatly bent tightly around the spindle and not rub on the dust cap. And when installing the dust cap, don't bash on it with a hammer, tap it in gently on the lip around the edges with a flat tip screwdriver (about 5/16" wide). it should slide in snugly, but easily. If you bend the dome it will rub against the spindle. Good luck, this really sounds like a trying endeavor for you. I hope this information helps you get your Z back on the road!2 points
-
 2 pointsThe extra $17.00 that O'Reilly charges probably goes towards all that advertising that we wish would go away.Timken bearings have always been my first choice.2 points
 -
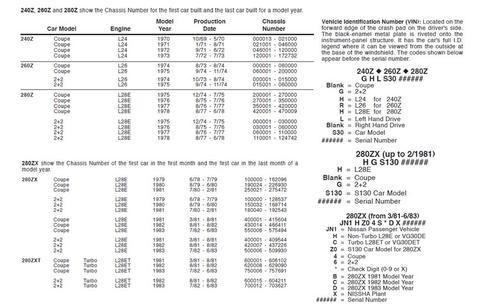
The VIN posted by @lonetreesteve was HLS3056312. What I didn't notice is that it's one digit short. If the missing digit is a leading "0", that would put it in the range for a 72. The 76 VIN should be HLS30270001 to HLS30350000 for a coupe and GLS30030001 to GLS30060000 according to the chart below (though I suspect it might be GLS30003001 to GLS30006000 due to the lower production numbers - unless the VINs were unified for the 75 and later worldwide). They may have got it screwed up in the email they sent him. They wouldn't have re-set VIN numbers, though I think it has been established that VINs are not necessarily sequential. In my observations, it appears that the bumper indentations on rear quarter panels disappeared after 74. Here is a restoration in progress on a 75 that shows the lack of indentations: http://mybuildgarage.com/2010/09/1975-datsun-280z-restoration/ I'm not willing to bet against you for the lack of title or the parts car status. I'm not sure you could get more than a couple of hundred in parts off of that car.
 2 points
 -
The FSM shows the "Okay" range as pretty much across the groove. The notch starts at one side and as the chain wears it ends up at the other side. If you're in the middle, you can't make it better. And I think you're still in the "1" hole, see picture. Your engine seems to be in good shape. Almost disappointing, nothing to work on. Something will crop up...
 2 points
 -
 2 pointsI was assuming that was the race that was cracked. Yes you could use old inner bearing and race with new outer bearing and race but you don't want to keep it like that for very long. Every time you take that inner bearing and race out there is the chance of twisting, scratching or damaging them in some way besides the fact that they are old and probably worn out. Considering how inexpensive those bearings are you might want to cut your loses and pitch them in the bin, get yourself a different set from another supplier. FSM says to torque that nut for a reason, it's to make sure that the inner bearing and both races are fully seated against the hub and bottom of the spindle, hand tightening that nut isn't going to do that. After you back off the nut then it can be finger tightened.2 points
 -
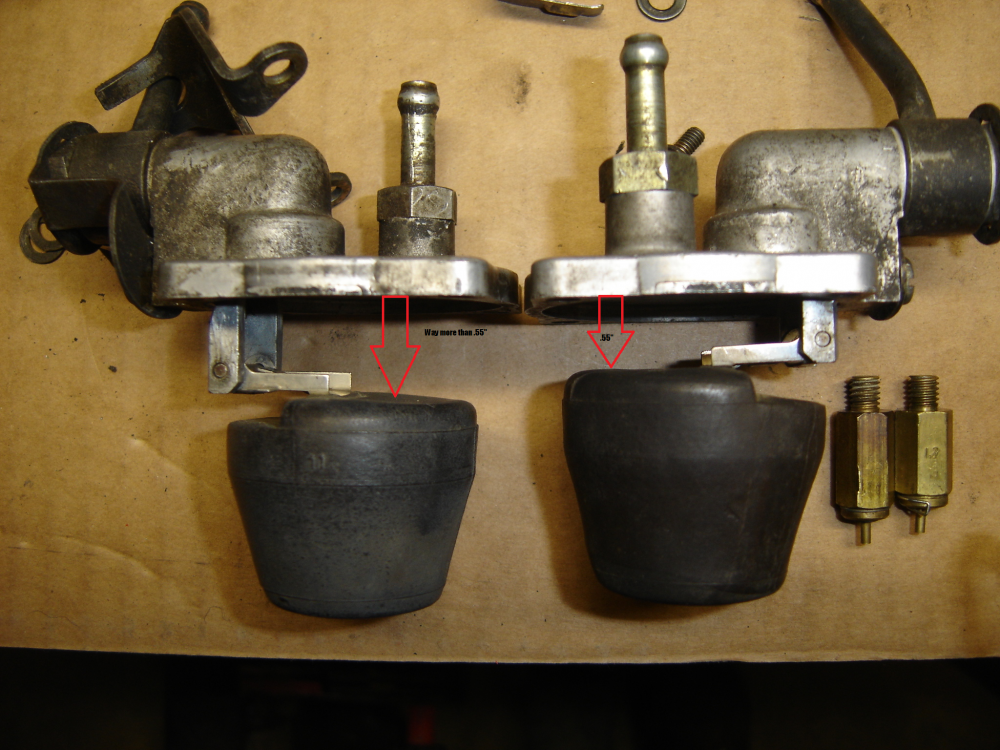
2 pointsThis is bothering me. I don't see there's any way to put the bowls on wrong. He's got to be talking about the lids.? The front carb lids have longer ears that attach the floats. They did this to compensate for the fuel sloshing back on acceleration but that was the 3 screw domes @heyitsrama spoke of earlier. Here's a pic I posted to show someone the different length valves. You'll see the mounting difference for the floats. Good luck figuring out your issue or non-issue I guess.
 2 points
 -
 1 pointThe problem is that Darwin's Natural Selection does not work for humans anymore. There are unnatural ways to correct their wrongs.1 point
 -
 1 pointVictory! With about 30 mins to an hour of careful sanding, testing the fit of the bearing on the spindle and repeating until it was perfect, I finally got everything to seat properly. I strayed away from the FSM a little, using a socket wrench rather than a torque wrench. Tightened the nut while rotating the hub until it became both hard to tighten the nut and rotate the hub. I then gave one more strong (but not too strong) go on the nut and then backed off the nut until the hub rotated freely, finally tightening and loosening the nut to get it as close as possible to the point where the hub starts to drag a bit, for lack of a better word, but still allowing smooth rotation. It has been a trying endeavor, yes. I'd never done something like this before, and, going into it, it seemed like it'd be a relatively straight forward affair. I kept getting thrown curveballs though, and what I figured would be a couple days work turned into about two weeks. I'm not complaining though, it was a good learning experience, and now I'll be that much more proud if my car doesn't fall apart next time I take it out. All I'm really complaining about is the fact I haven't driven my z in two weeks 😢 Thanks everybody for your invaluable know how! Cheers!
 1 point
 -
 1 pointIf this were 100 years ago (like the flu pandemic) it would be much more of a field exercise in Darwin's theory. Snark aside, we are fortunate that it is not 1918 or we would literally have bodies stacked in refrigerator trucks in every city in the country.1 point
 -
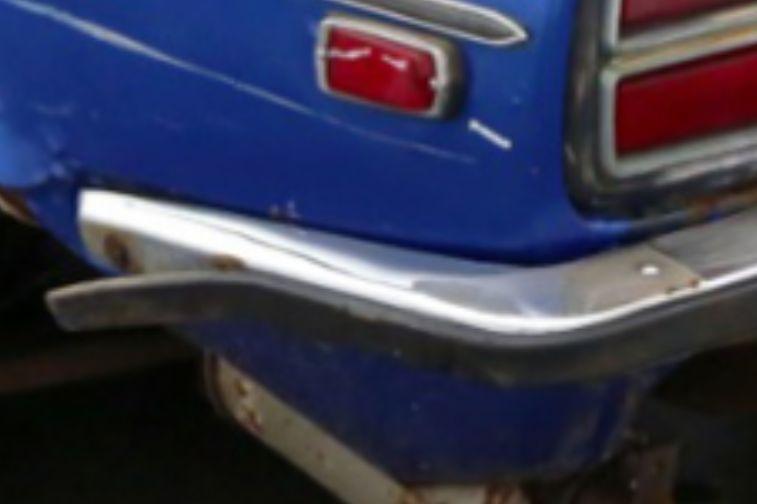
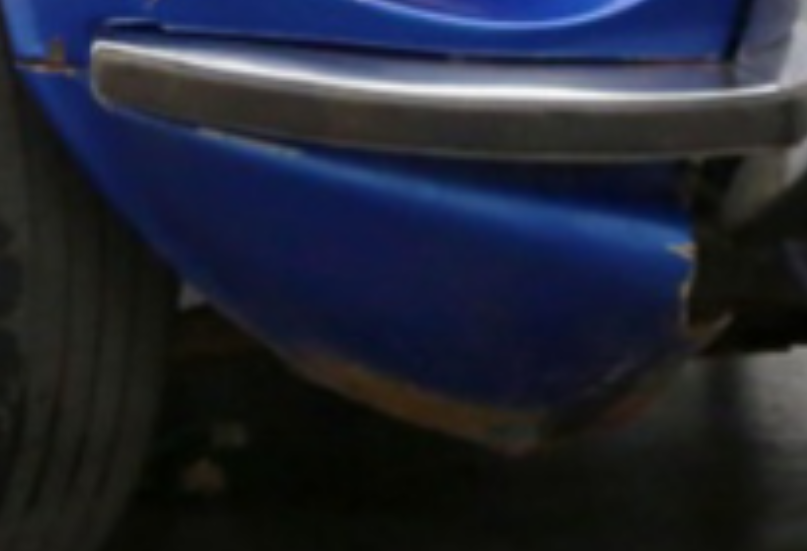
If it has the indents I'd guess that they were smashed in there when the car was dragged through the field. And the front end might just be smashed and rusty 76 parts. JUST SAYING!! (Why am I even writing about this turd...)
 1 point
 -
The sheet metal is let in for the bumper for the 240. The later 260 and 280 are smooth, no depression for the bumper.1 point
-
1 pointThat counterfeit bearings is an actual problem, and relatively big problem at that, is surprising to me. Bearings aren't too expensive all things considered, so it seems odd people would make fakes. Fake Rolex's, Mont Blanc pens, and luxurious handbags make sense, but wheel bearings? Odd. Though if there's money to be made, somebody will do it. One thing I'll point out is that the I'll shoot zcardepot an email.1 point
-
 My block had a similar looking funk in it also albeit not nearly as bad. I think it’s a slurry of rust and minerals. Someone may have used regular tap water for the cooling system. Mix minerals with rust and I bet it looks something like that. How hard is it? Hot tanking is cheap, so I agree go hot tank it and see what happens. I’ll see if I can find pics of mine and post them for comparison. Sent from my iPhone using Tapatalk1 point
 -
 1 pointRemoving those plugs was a bit of a chore. My head and camshaft was quite rusty and I wnted a thorough cylinder head cleaning, The thread sealant on those plugs was badly deteriorated, portions of it hanging out, so I removed them and soaked them in some EVAP-O-RUST for a few days. I will be using some good high temp thread sealant on those plugs when I get to reassembling my cylinder head on this resurrection project. I believe they are somehow used in the casting project for the water jackets? The threaded plugs are certainly more substantial than freeze plugs that also seal off water jackets in the engine casting. Merry CHRISTmas-John, Lugoff, SC.1 point
 -
 1 pointNo. You might inquire with your mechanic what his reasoning is for that statement. Yes. If what the mechanic is referring to is not as Cliff describes in his posts above regarding the float bowl lids, I haven't a clue as to what he's talking about. So----how is it running? Any issues?1 point
 -
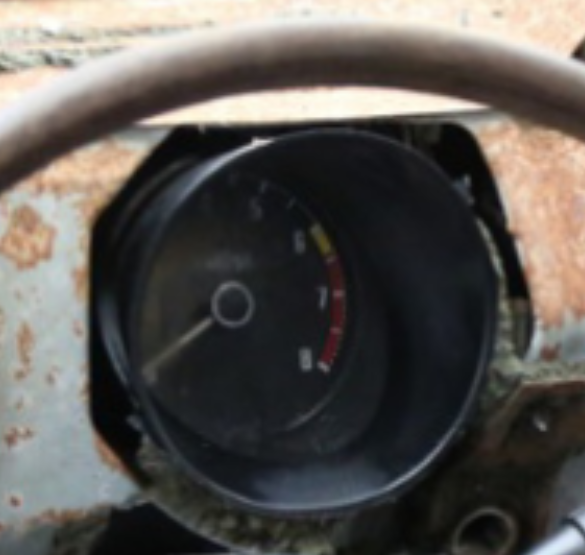
It does have the 6400 RPM redline tachometer also. A 280Z part. It's a messy car.
 1 point
 -
I should let him take this since you ask hin, not me.1 point
-
It needs to be to the left a little. But #1 should be back some more. Looks like you went a little too far. I think you're okay. Like Zed said the oil will clean up with new change and adjustment.
 1 point
 -
Many people have performed the ZX distributor swap into 260Zs and 280Zs and maintained tach functionality. Did you unplug the TIU? The resistor is most likely on the passenger side. It is on my 260Z, but I can't say for sure on a 78.1 point
-
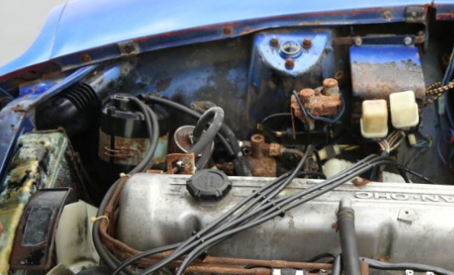
The VIN is consistent with a 72. The rear quarter panels, bumpers, and grill are consistent with a 72. The interior (notice the voltmeter), the tail panel, the engine bay, and radiator support are consistent with a 76. (A friend tried to use a 280Z airbox on a fuel injection conversion of a 260Z and found that the intake piping couldn't pass through the radiator support on the earlier cars.) My guess is that it was a wreck and rebuild at some point.1 point
-
 So does that VIN work out to be a 72? I'm with Zed Head. With near 100% confidence, I say it's (what's left of) a 76 with some 240 parts bolted on years ago. Yes, yes... I looked at the pics again and studied them. And yes, I wish I hadn't.1 point
 -
Should have posted the link to your high idle thread. Don't remember the details. It sounds like you might have a gasket mismatch problem. The P90 has injector notches. You didn't mention if you used an L24 intake gasket or an L28 gasket. Found it -1 point
-
1 point
-
 I sent an email last night to Beverly Hills Car Club and asked them what the car's VIN was. Here's the email I received this afternoon: 1972 Datsun 240Z Gevik Karimmassihi | Beverly Hills Car Club<gevik@beverlyhillscarclub.com> Hello Steve, Thank you for contacting us. This vehicle is available. We do not put the VIN on the website. 12785 is our inventory stock number. The VIN number is (HLS3056312). Here’s a link to our website with photos. https://www.beverlyhillscarclub.com/1972-datsun-240z-c-11820.htm Let me know if you are interested. Best regards and talk soon, Gevik Karimmassihi Sales Associate Beverly Hills Car Club Inc. 4576 1/2 Worth Street Los Angeles, CA 90063 Office: (310) 975-0272 Ex:9015 Email: Gevik@beverlyhillscarclub.com Website: www.beverlyhillscarclub.com Our shipping department for pick up contact 310-846-8117 or email shipping@beverlyhillscarclub.com All cars are available to the open market until we receive a signed contract from the buyer. Below is a website that you can securely pay and it only takes 36 hours to arrive in our account. https://transferwise.com/
 1 point
 -
1 pointI've read casting plugs. But that's what I do. So take that with a grain of salt. To add to that. They had to make those holes in the casting of the aluminum heads, with sand or something? Anyhow that's the reason.1 point
-
1 point
-
1 pointYou should never need to use force to assemble wheel bearings. Take it all apart, clean everything up. Inspect the spindle where the bearings slide on, and if there are any burrs, clean them up with a strip of emery cloth. Then see if the new bearings will slide into place. Also, measure the ID of the bearings, and the OD of the spindle. You should have a couple thousandths of an inch of clearance. Once you get it sorted out, and things are slipping together properly, grease the bearings (also, don’t pack the journals full of grease, it isn’t needed and wastes grease), drop the inner bearing into the hub, install the dust seal, slide the hub and bearing onto the spindle, then insert the outer bearing, washer and nut. Tighten the nut by hand, while spinning the hub. When you get it as snug as you can by hand, then use a socket, and a 3/8” drive ratchet to set the bearings while again rotating the hub. I believe the service manual specifies a torque, but I usually snug by feel, then back the nut to the first point the nut lines up with the cotter key hole, then insert the key, and replace the dust cap. There should be a very small amount of free play.1 point
-
 Two different publications, both factory Competition Preparation manuals for models that are not S30-series Zs.1 point
 -
 1 pointGotta say my wife and I had a close call. We both got covid a month and a half ago, she is 35, I am 31. Hers wasn't too bad though she still is short of breath. I had to go to the hospital for four days as it was getting worse; I got weaker, fever wouldnt leave, and breathing was getting tougher. The doctors put me on remdisiver, an blood clot thinner, and steroids. I started feeling better almost immediately. I ate my first meal in over a week the very next day. My fever left and 4 days later I was home. It still took 2 weeks before we could go back to work. I am still short of breath though lung capacity is growing and I am slowly regaining strength. My wife is still very short of breath so pray for her. God has brought us this far, he'll see us the rest of the way. Blessed be his name.1 point
 -
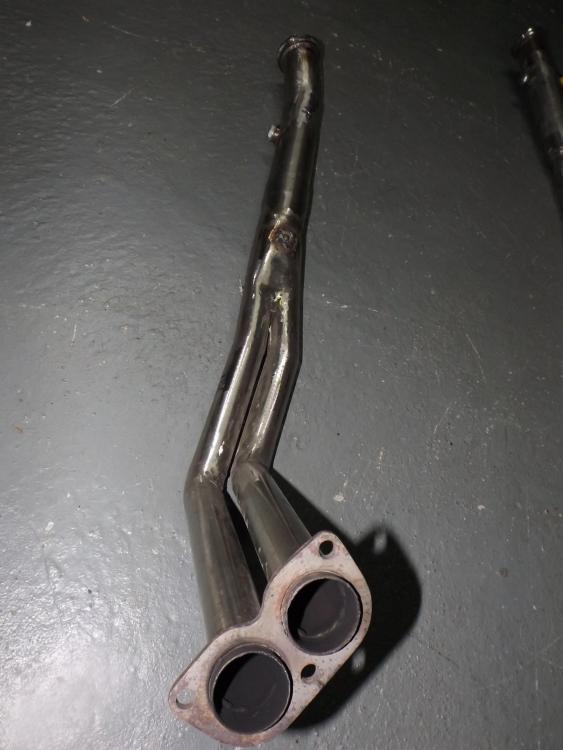
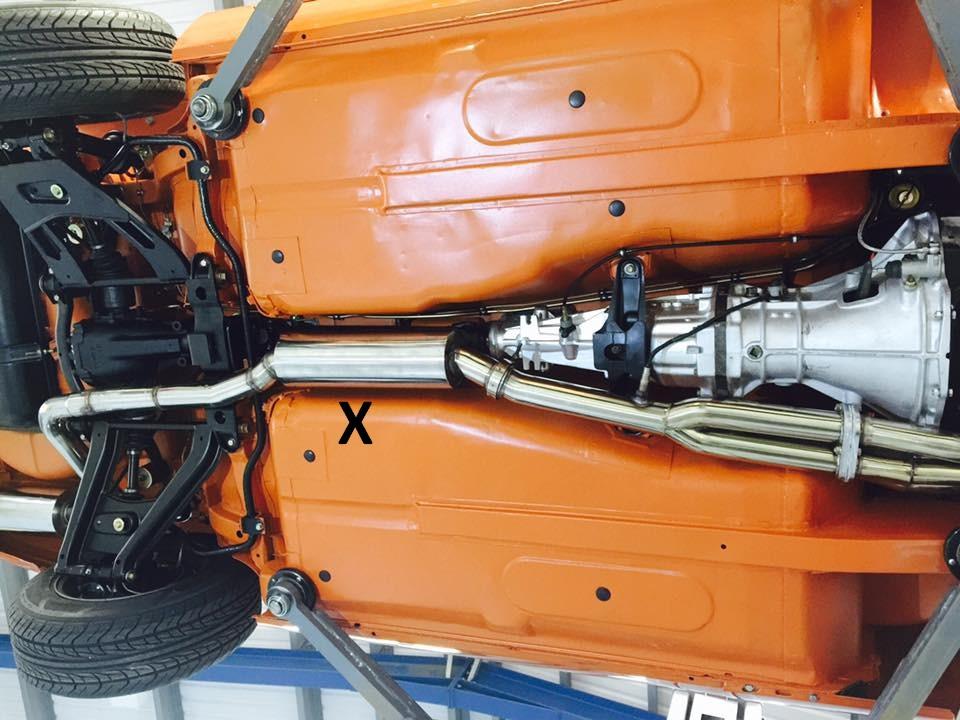
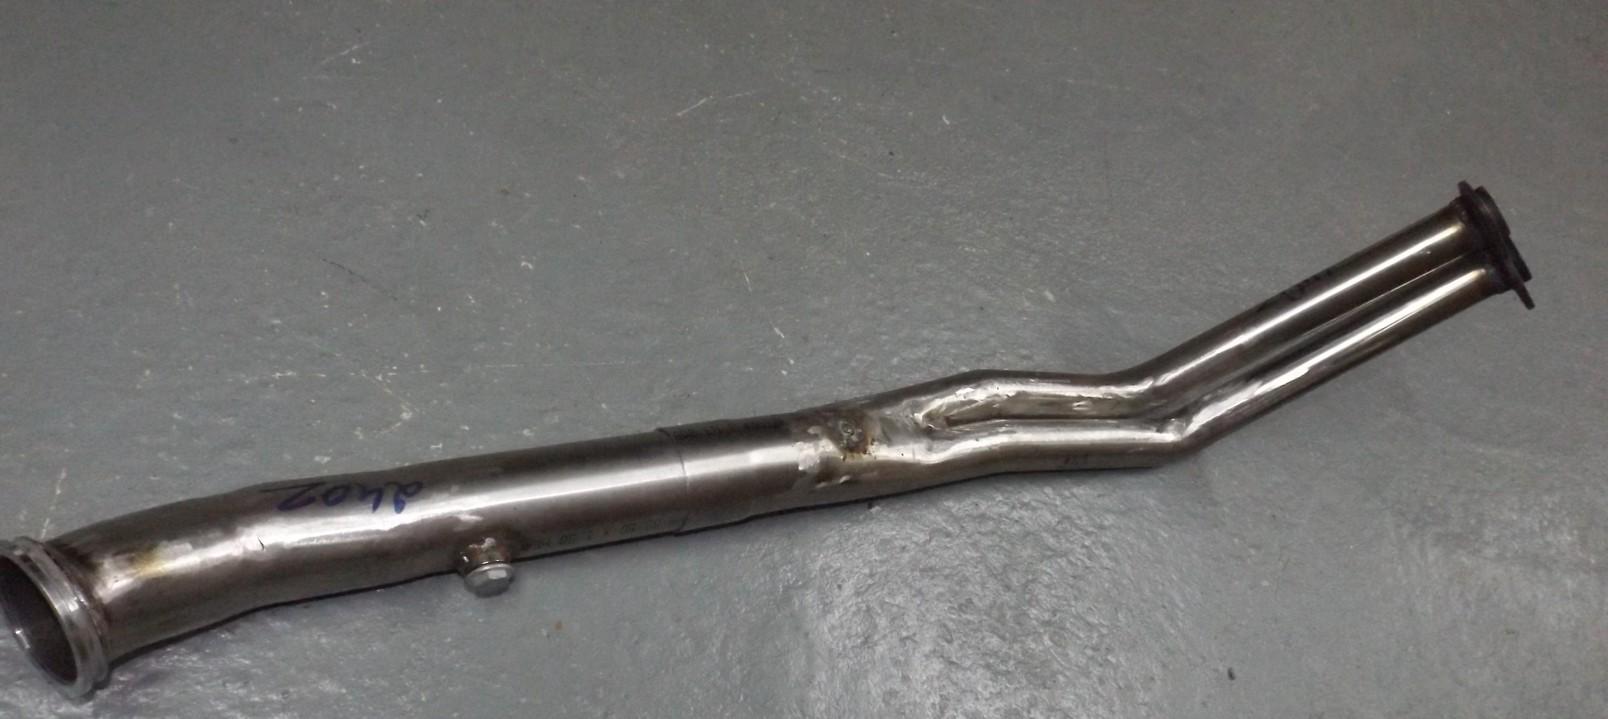
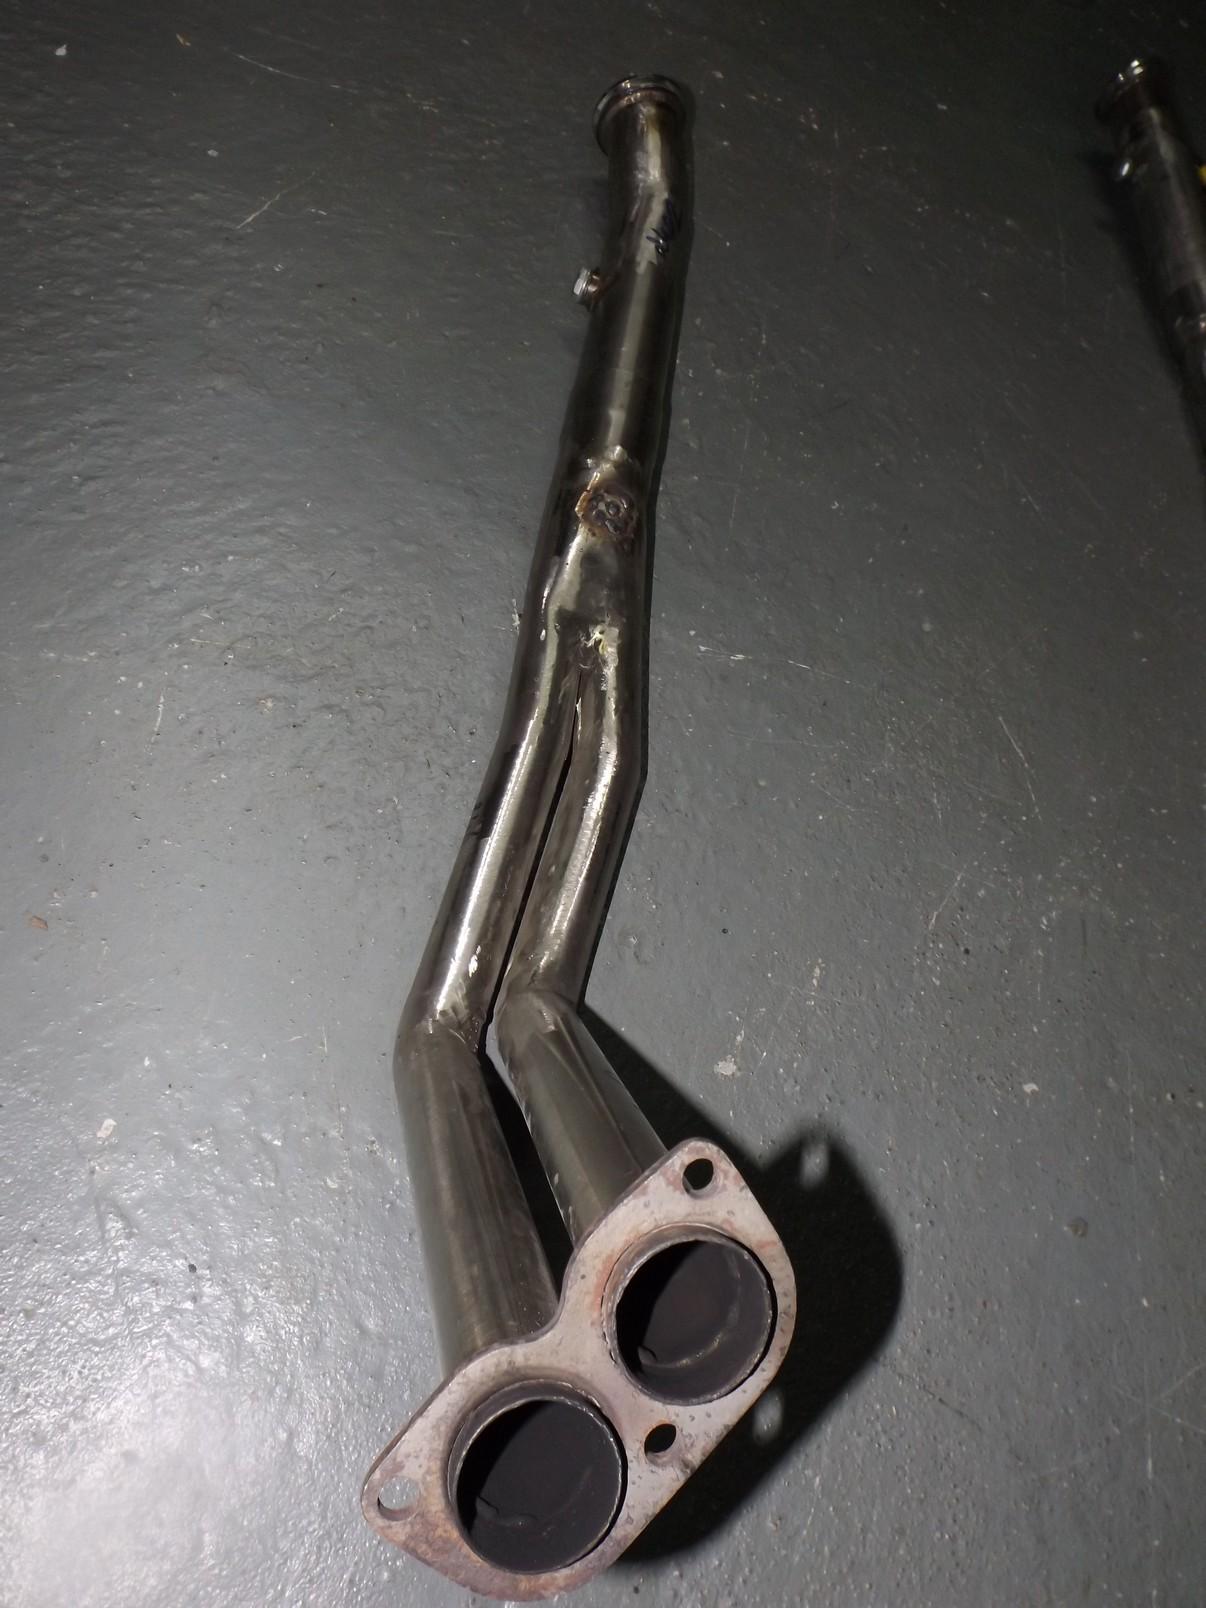
 1 pointHi. It's already been done by a client. The only hurdle is to extend the 2-1 collector back to join with my line which begins with the reasonator at the rear of the gearbox. I would reccomend lengthening the twin pipes to finish as far back as possible and I will supply you, free, with an extra V-band kit so as to make a gas-tight fit or it might be possible to use one half of my new down-pipe kit (which'll be available in late March). I'll have exhaust lines back in stock at end of January....Covid affects us all with delays at each level ; everyone talks of GNPs but I wonder if the worlds' economy hasn't shrunk since March ! Kind regards, Sean
 1 point
 -
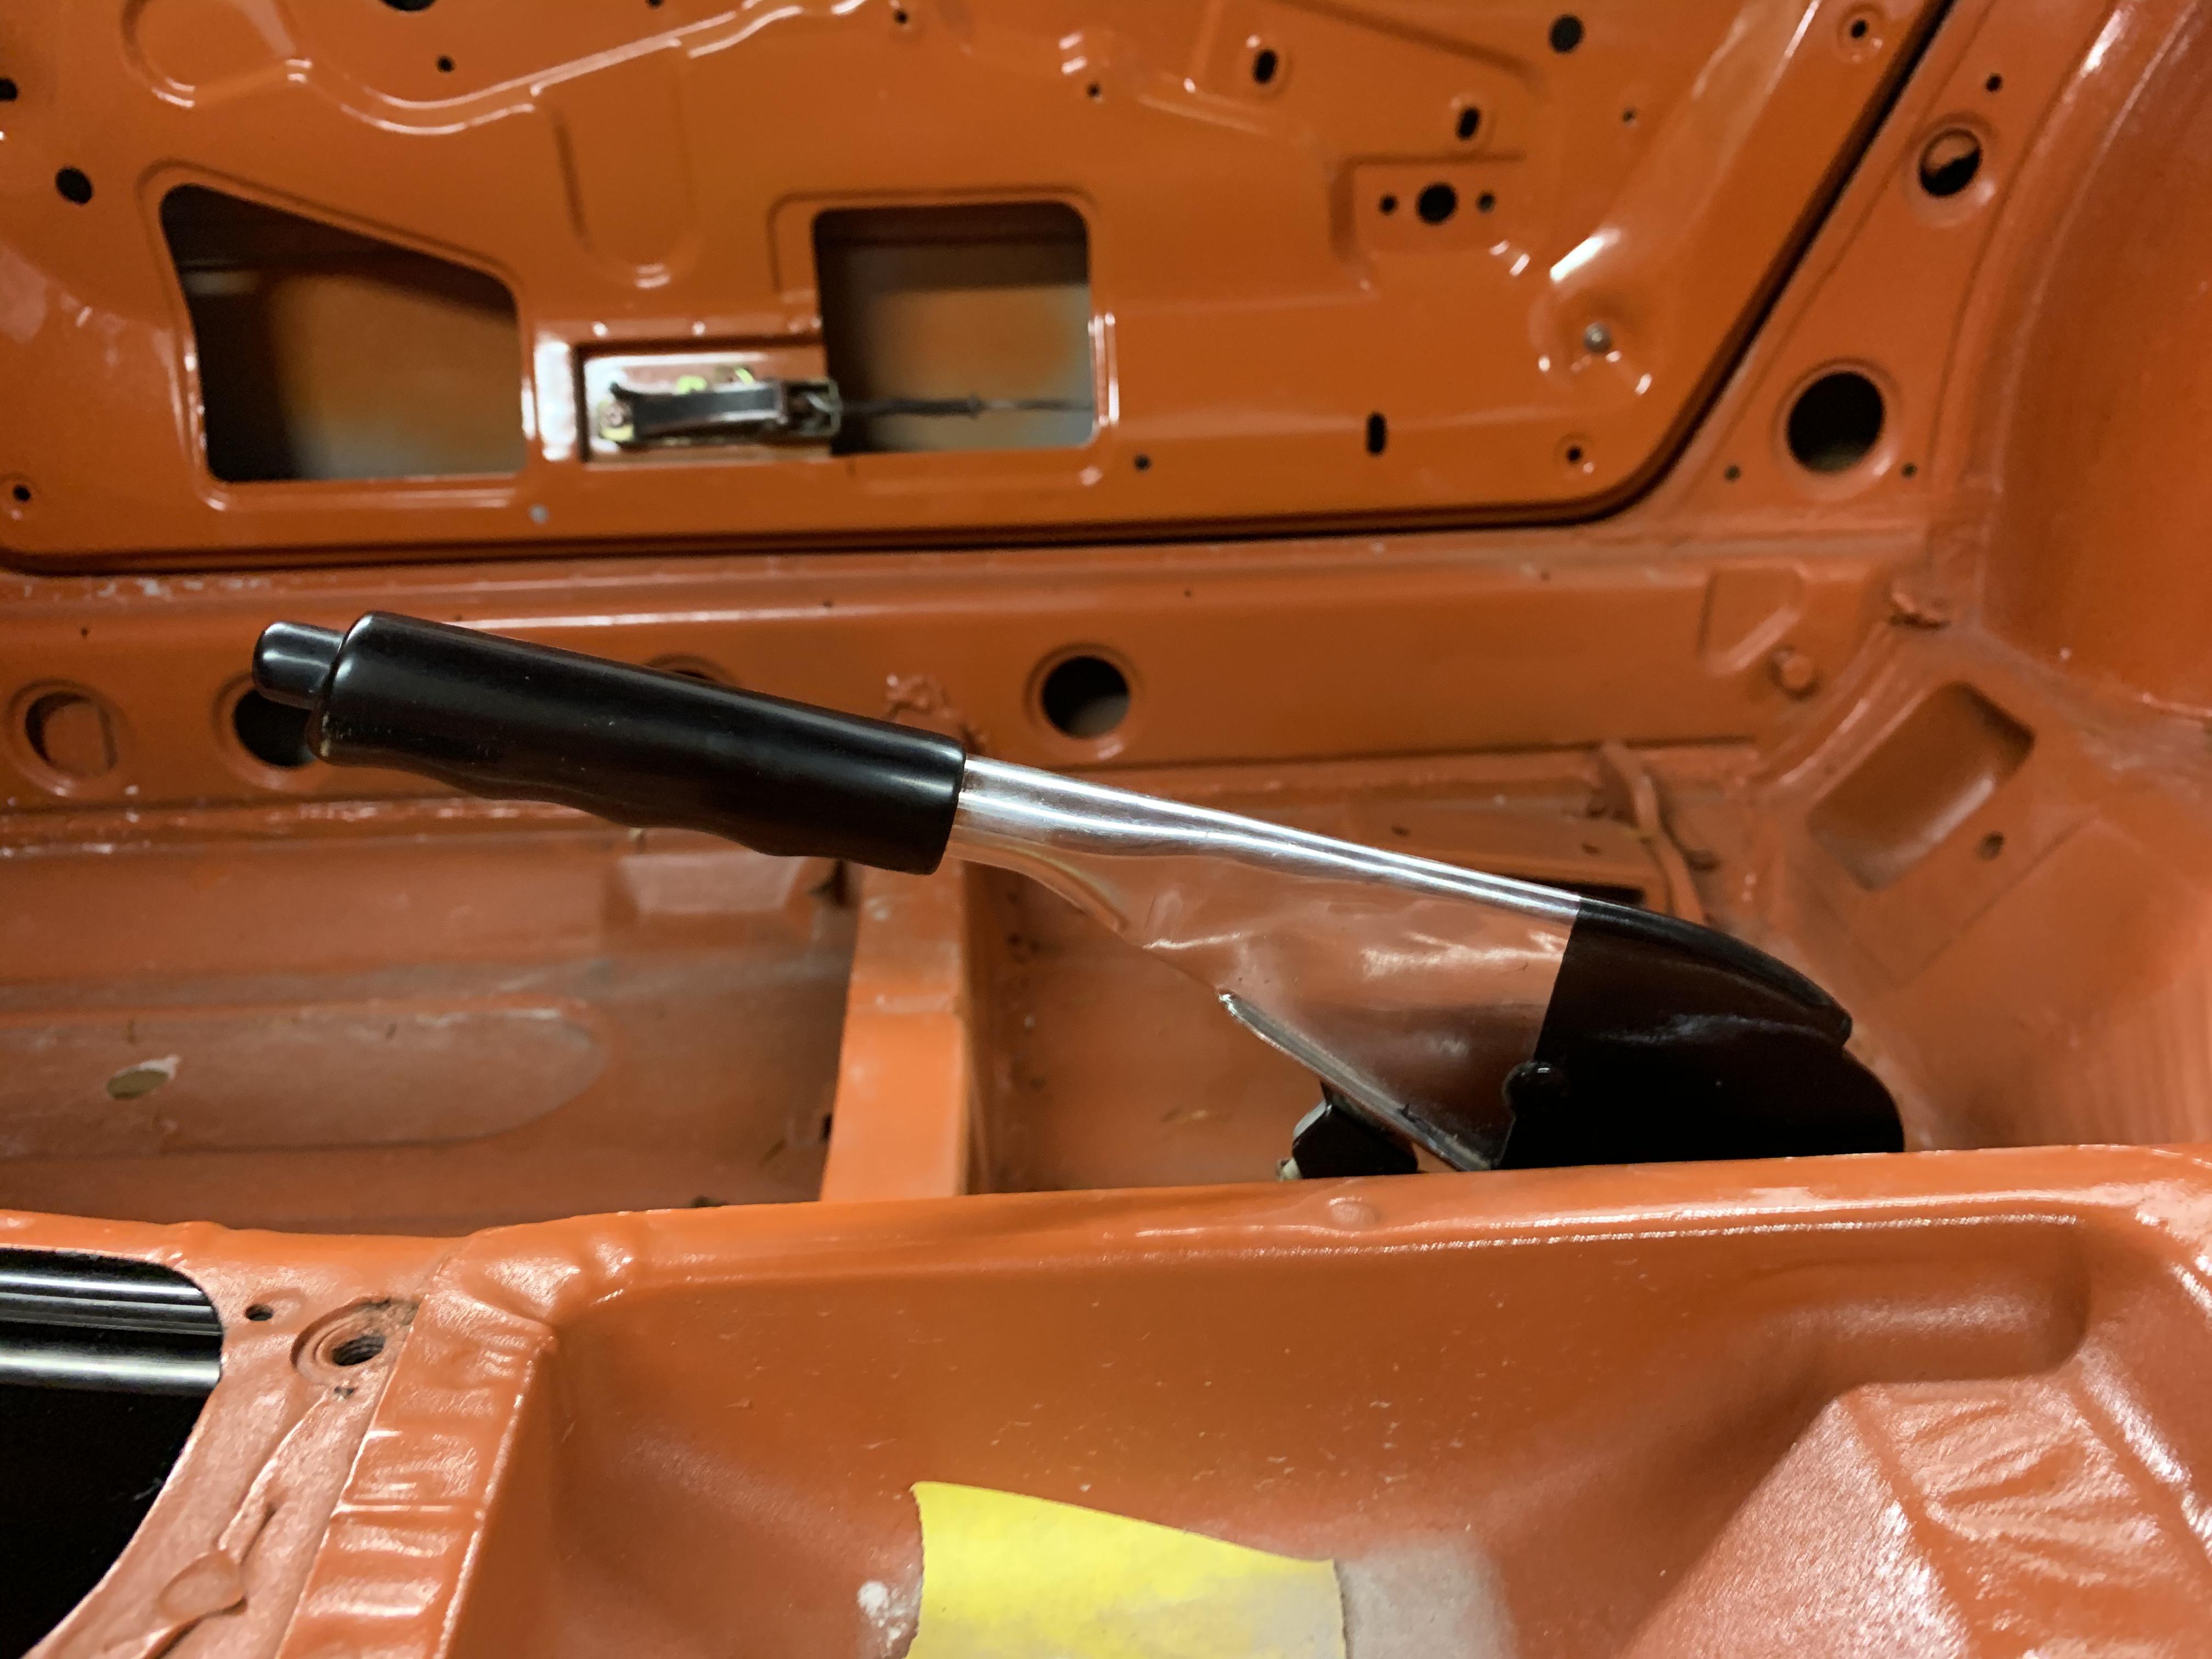
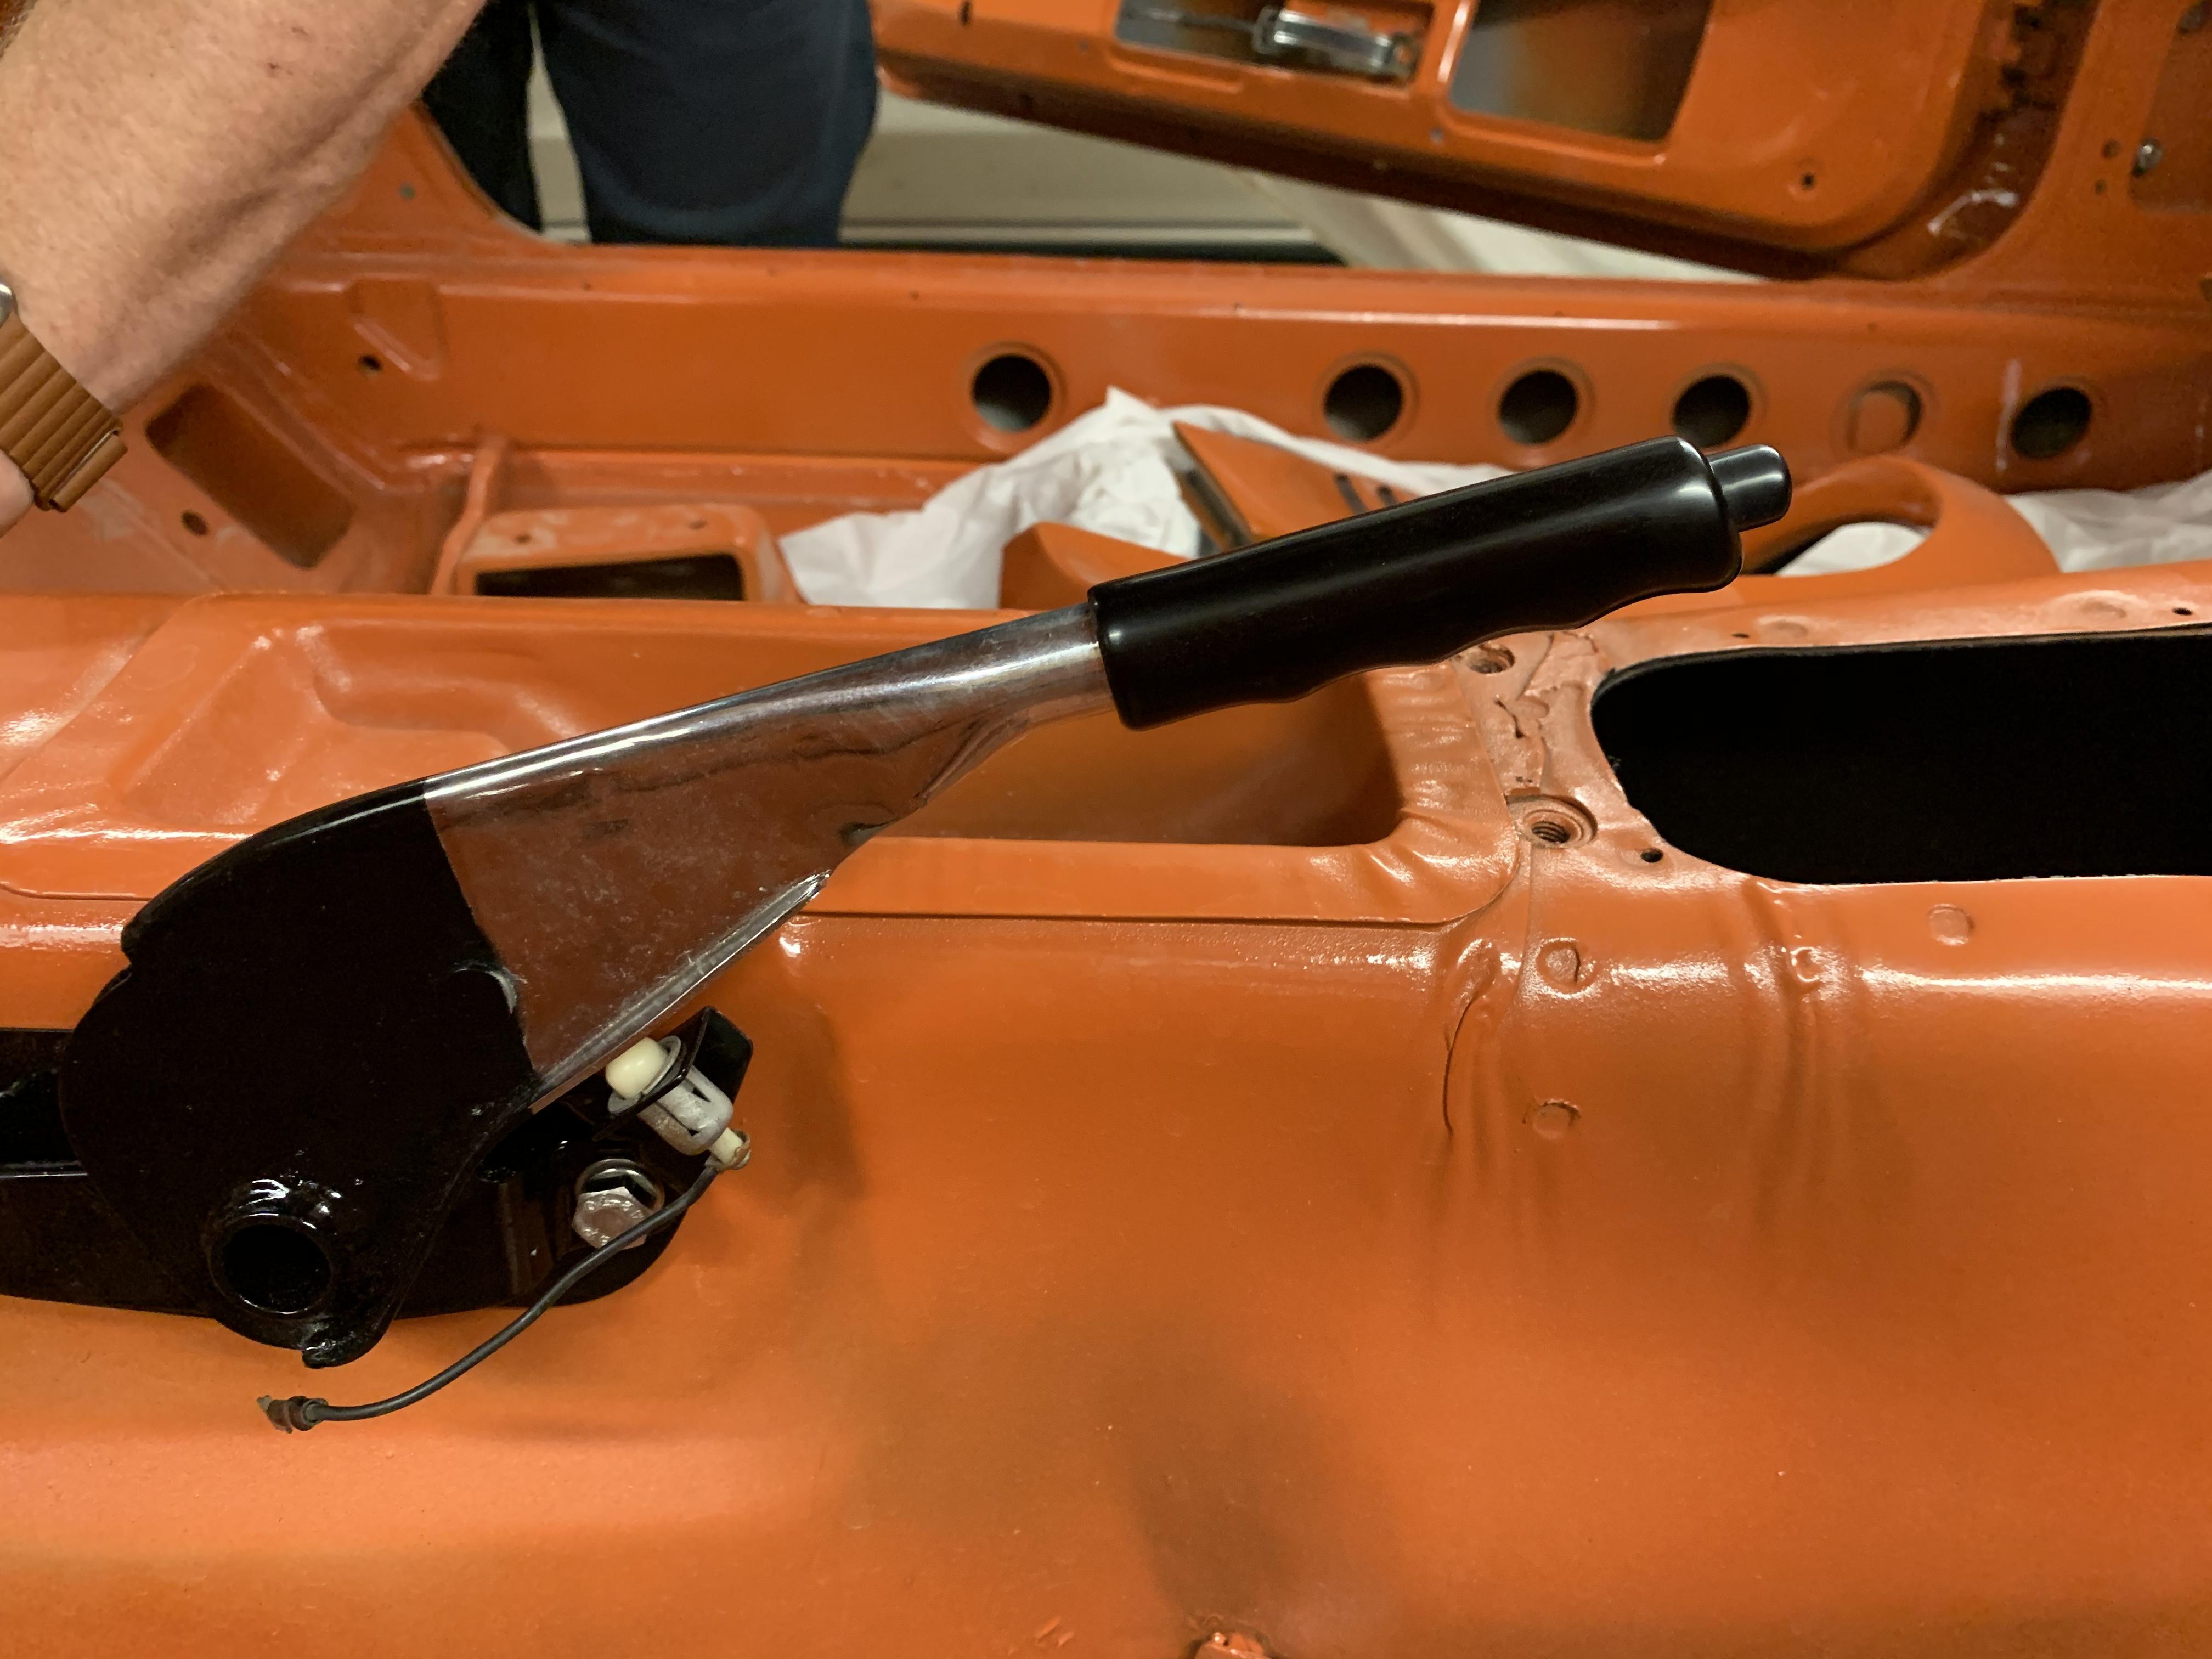
 1 pointOkay. It’s in and all the linkage is together. I had forgot to mention how I solved not being able to get the rubber bushing cover. it’s one of those caps from the end of a piece of black pipe from Home Depot. I just over there and grabbed one of the floor that was close to the same size, then cut it down until it was about the same length and drilled a hole in it. Problem solved.

 1 point
 -
1 pointI found this. https://www.google.com/search?client=ms-android-americamovil-us-revc&source=android-home&source=hp&ei=qxK3X5brCIPU5gKN6rP4Dg&q=abs+plastic+glue+classiczcars.com+&oq=abs+plastic+glue+classiczcars.com+&gs_lcp=ChFtb2JpbGUtZ3dzLXdpei1ocBADMgUIIRCgATIFCCEQqwI6AggpOgYIKRAWEB46BwgpELEDEAo6BQgpEMkDOg4IKRCxAxCDARDJAxCTAjoICAAQsQMQgwE6AgguOgIIADoFCAAQsQM6BQguELEDOggIABCxAxDJAzoFCAAQkgM6BQgAEMkDOgYIABAWEB46CAghEBYQHRAeOgcIIRAKEKABOgUIABDNAlDMFlijmAJg0KcCaAJwAHgAgAGtAYgBuhySAQQxLjI2mAEAoAEBsAEP&sclient=mobile-gws-wiz-hp1 point
-
 1 pointWhat is your address PM me and I will send them out in tomorrow’s mail. Do you need a rush?1 point
 -

Important Information
By using this site, you agree to our Privacy Policy and Guidelines. We have placed cookies on your device to help make this website better. You can adjust your cookie settings, otherwise we'll assume you're okay to continue.