


Leaderboard
-


wheee!
Free Member10Points4,607Posts -

conedodger
Free Member9Points11,316Posts -

jfa.series1
 Subscriber
 9Points2,687Posts
 -


siteunseen
Free Member4Points14,904Posts
Popular Content
Showing content with the highest reputation on 04/09/2021 in all areas
-
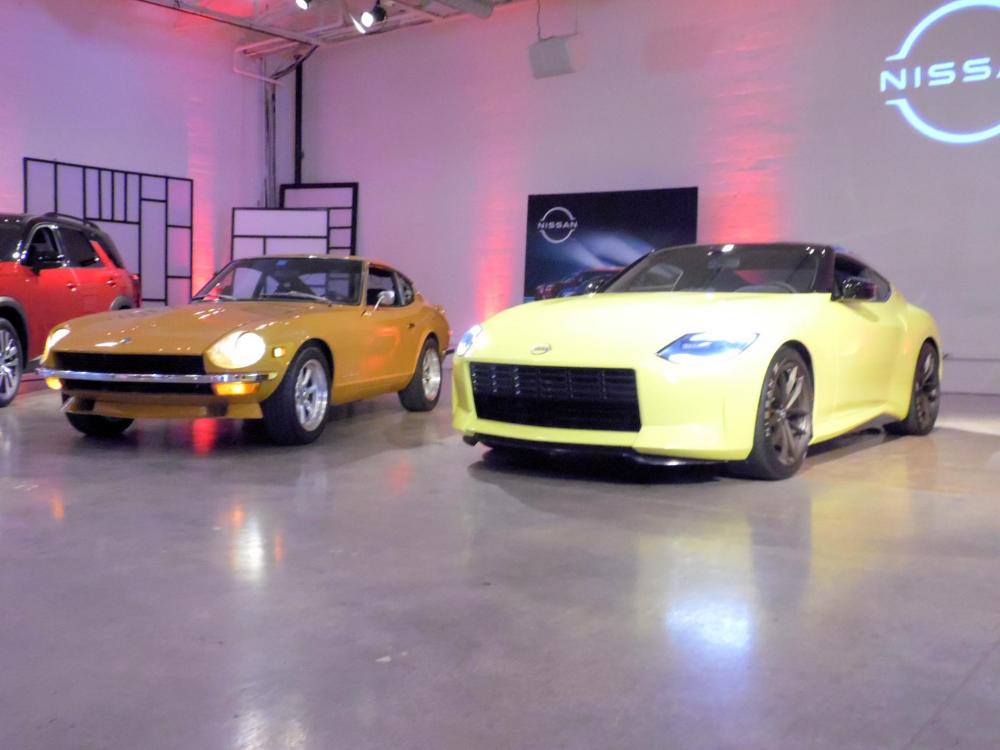
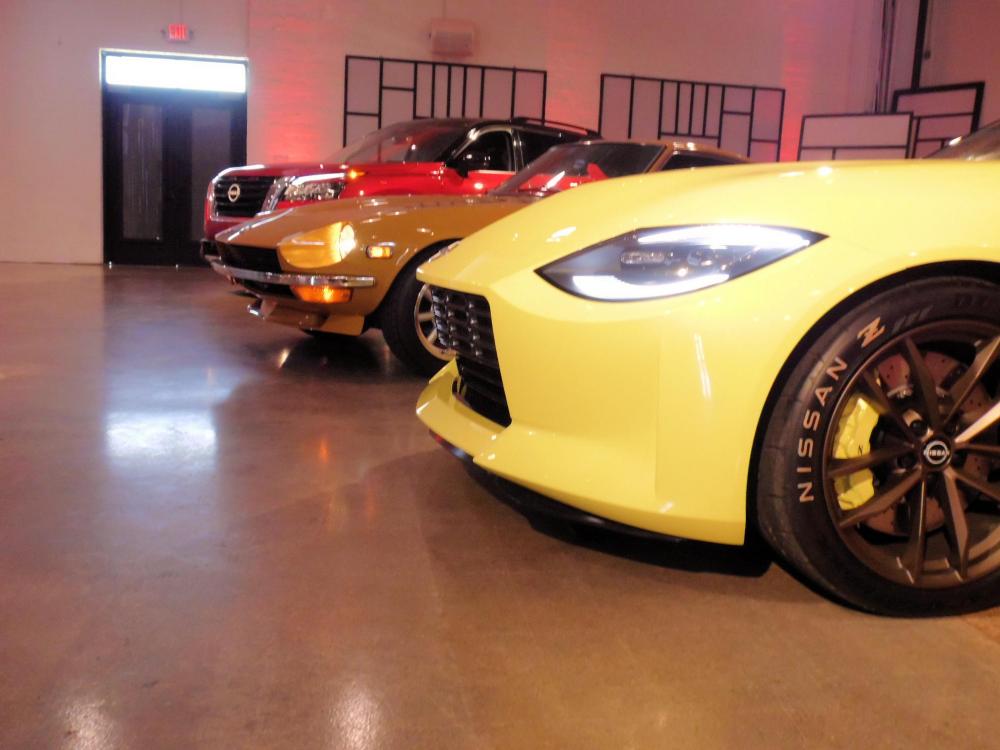
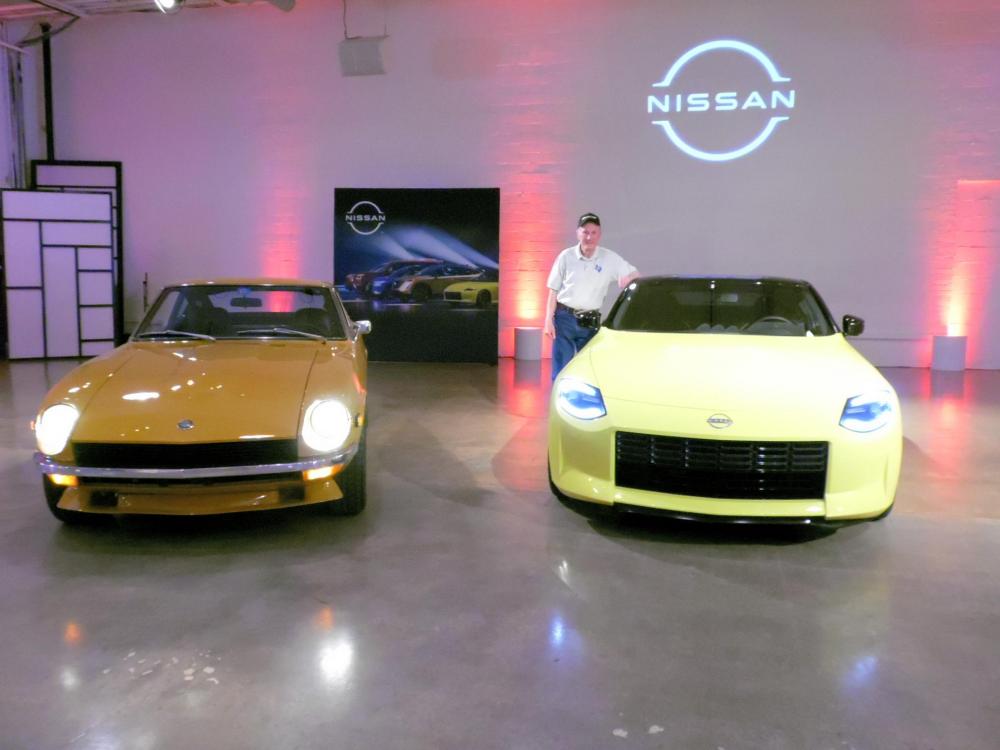
9 pointsThe Z Proto wrapped up a three-day visit in Dallas today. I had recently posted on the Nissan USA Facebook page about our 50th anniversary and they reached out to me with an invite to see the Z Proto. What followed was an unexpected photo and interview session where they posed my car next to the new Z. The new Z is a sleek and stylish car with none of the faux vents, overwrought bulges and creases, or chrome embellishments; the interior is exceptionally comfortable and well done. The Nissan team was very welcoming and showed a genuine interest in my car. I expect to get copies of the photos taken by the pros in the coming weeks.

 9 points
 -
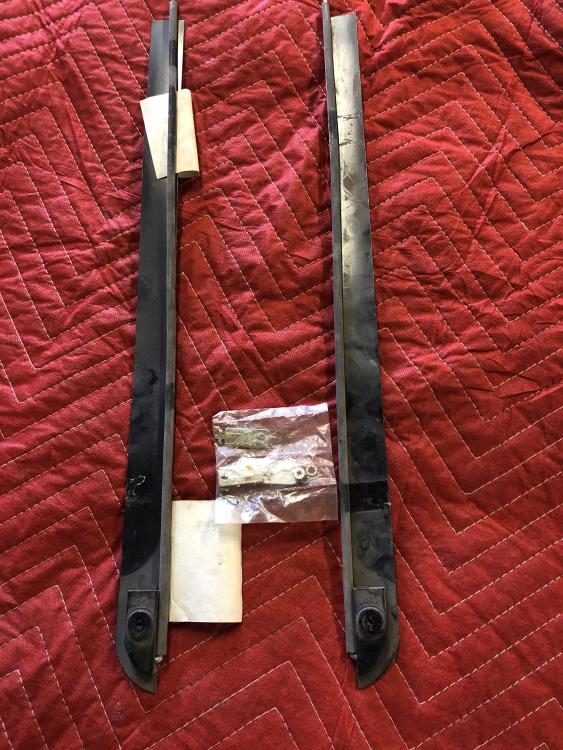
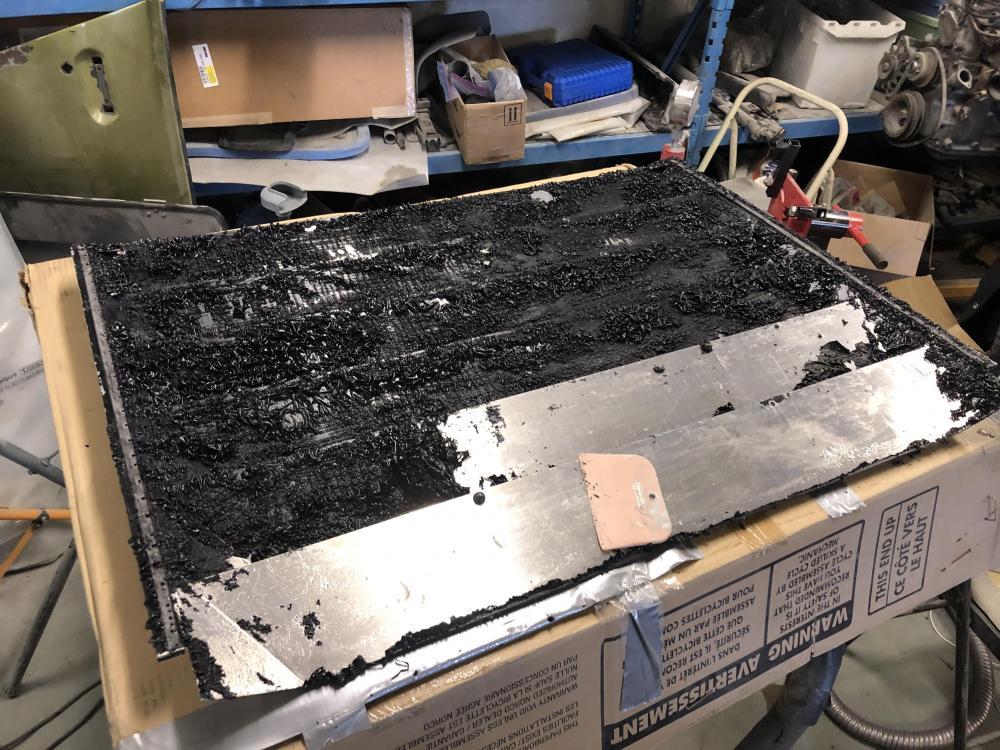
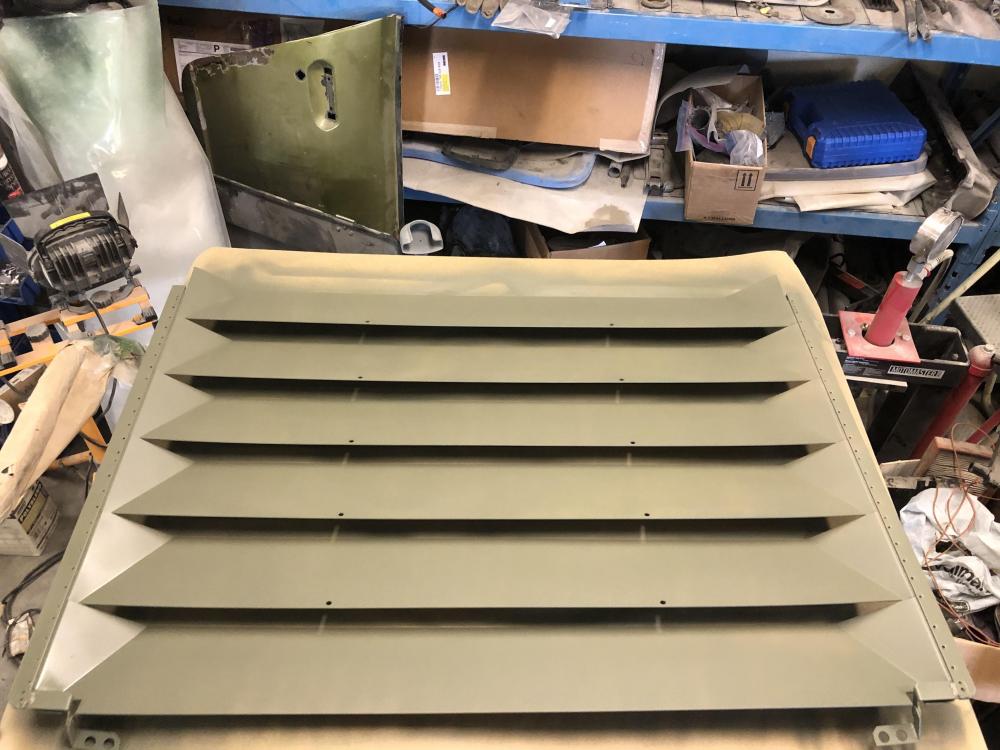
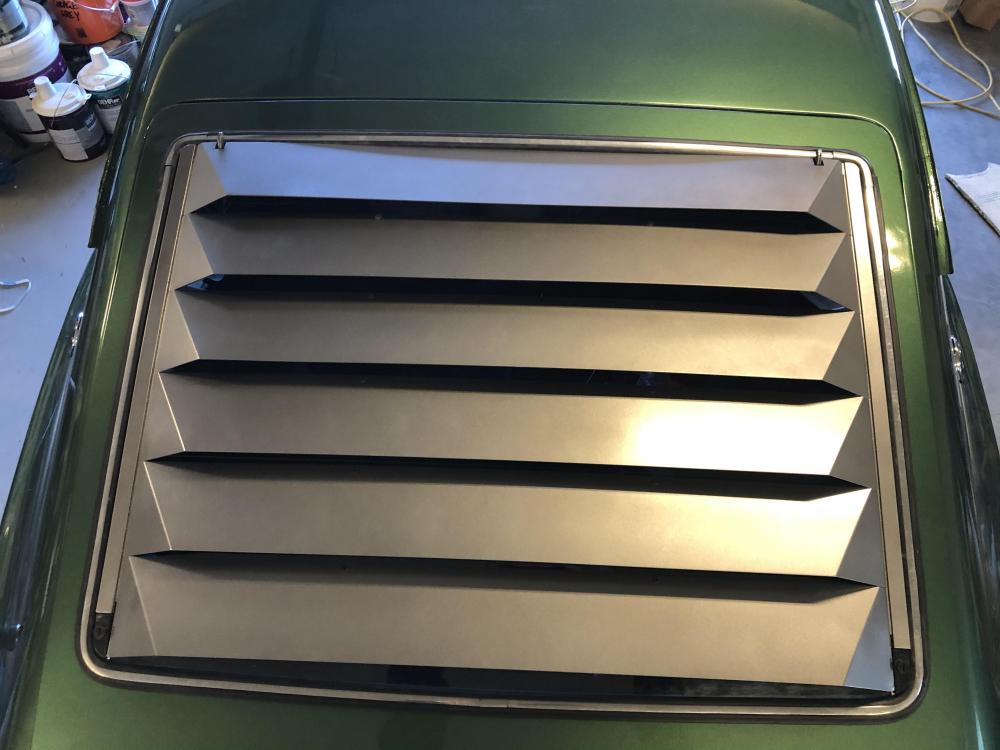
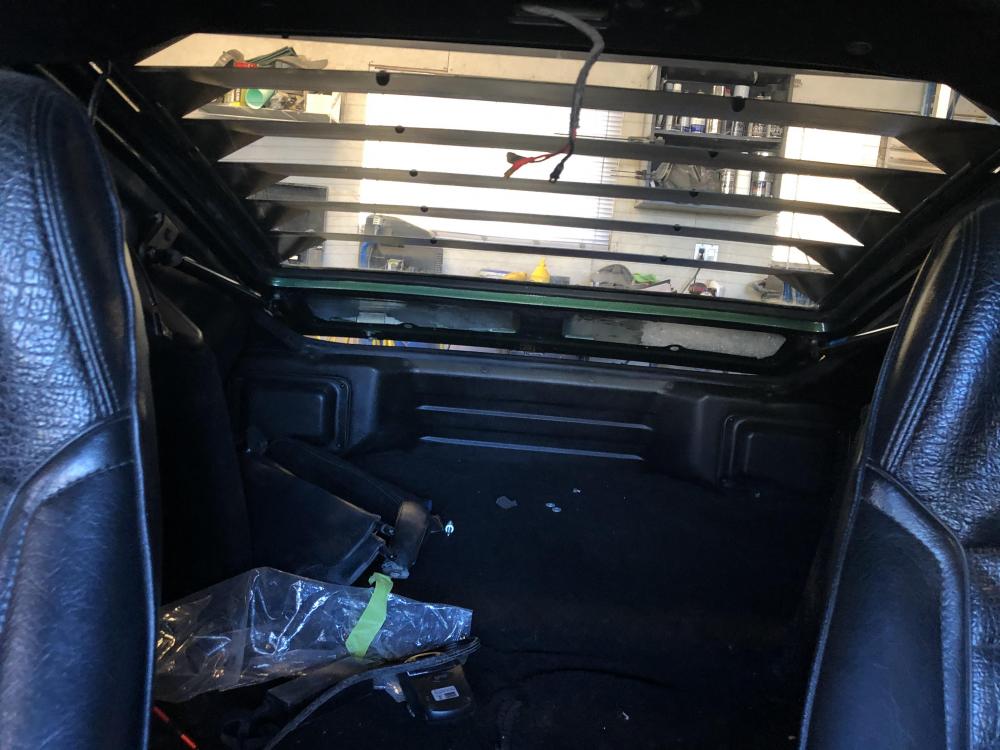
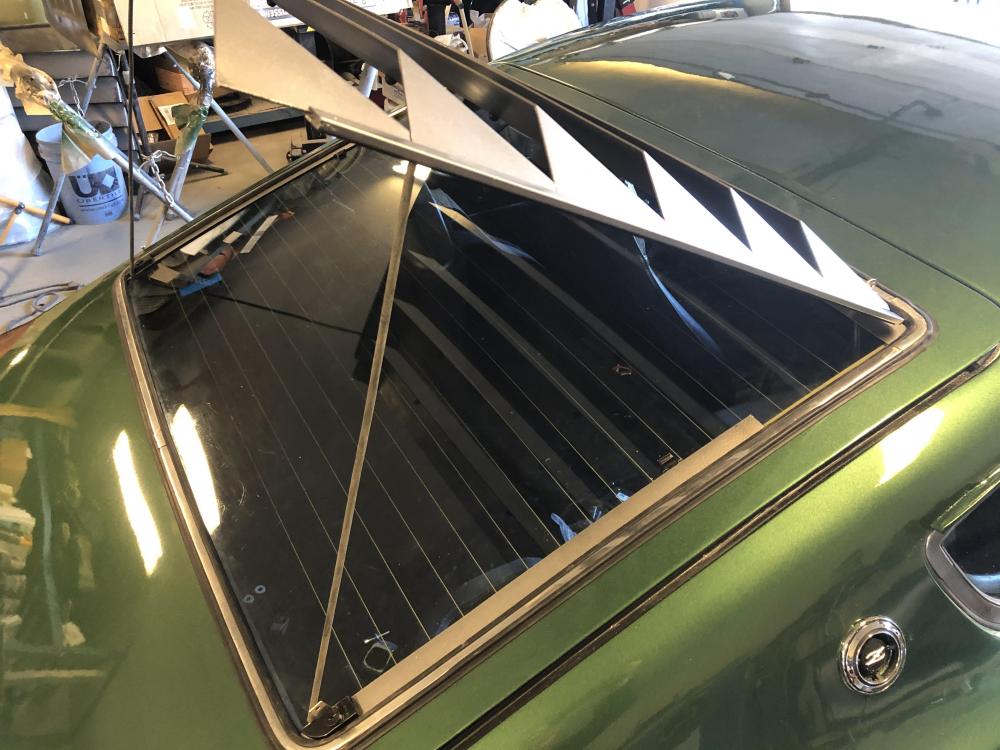
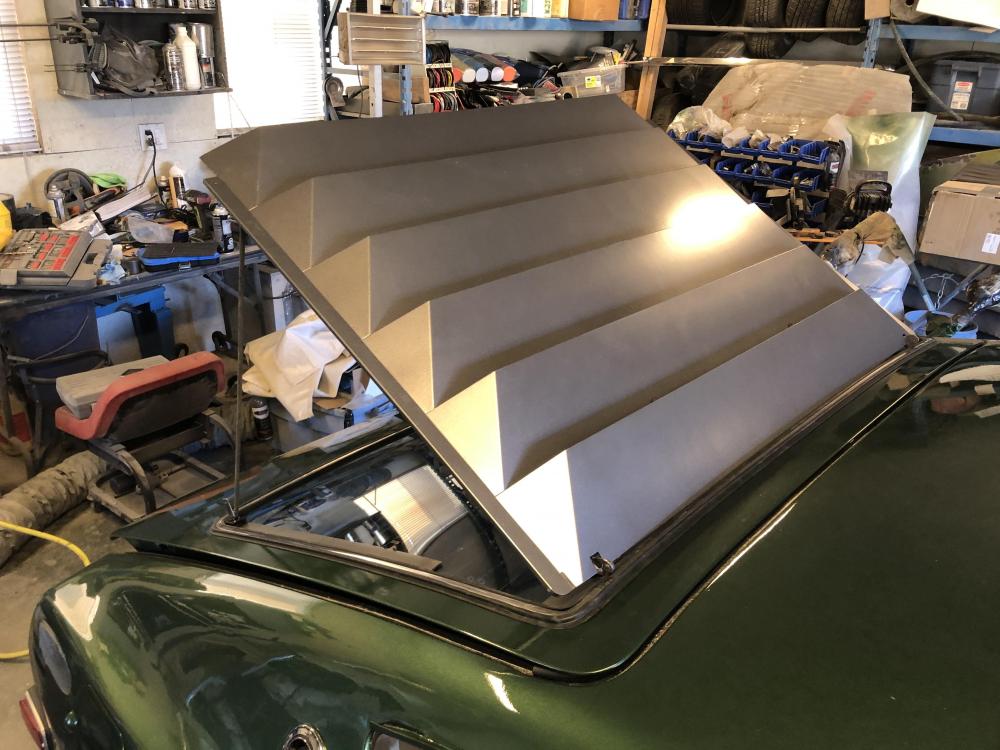
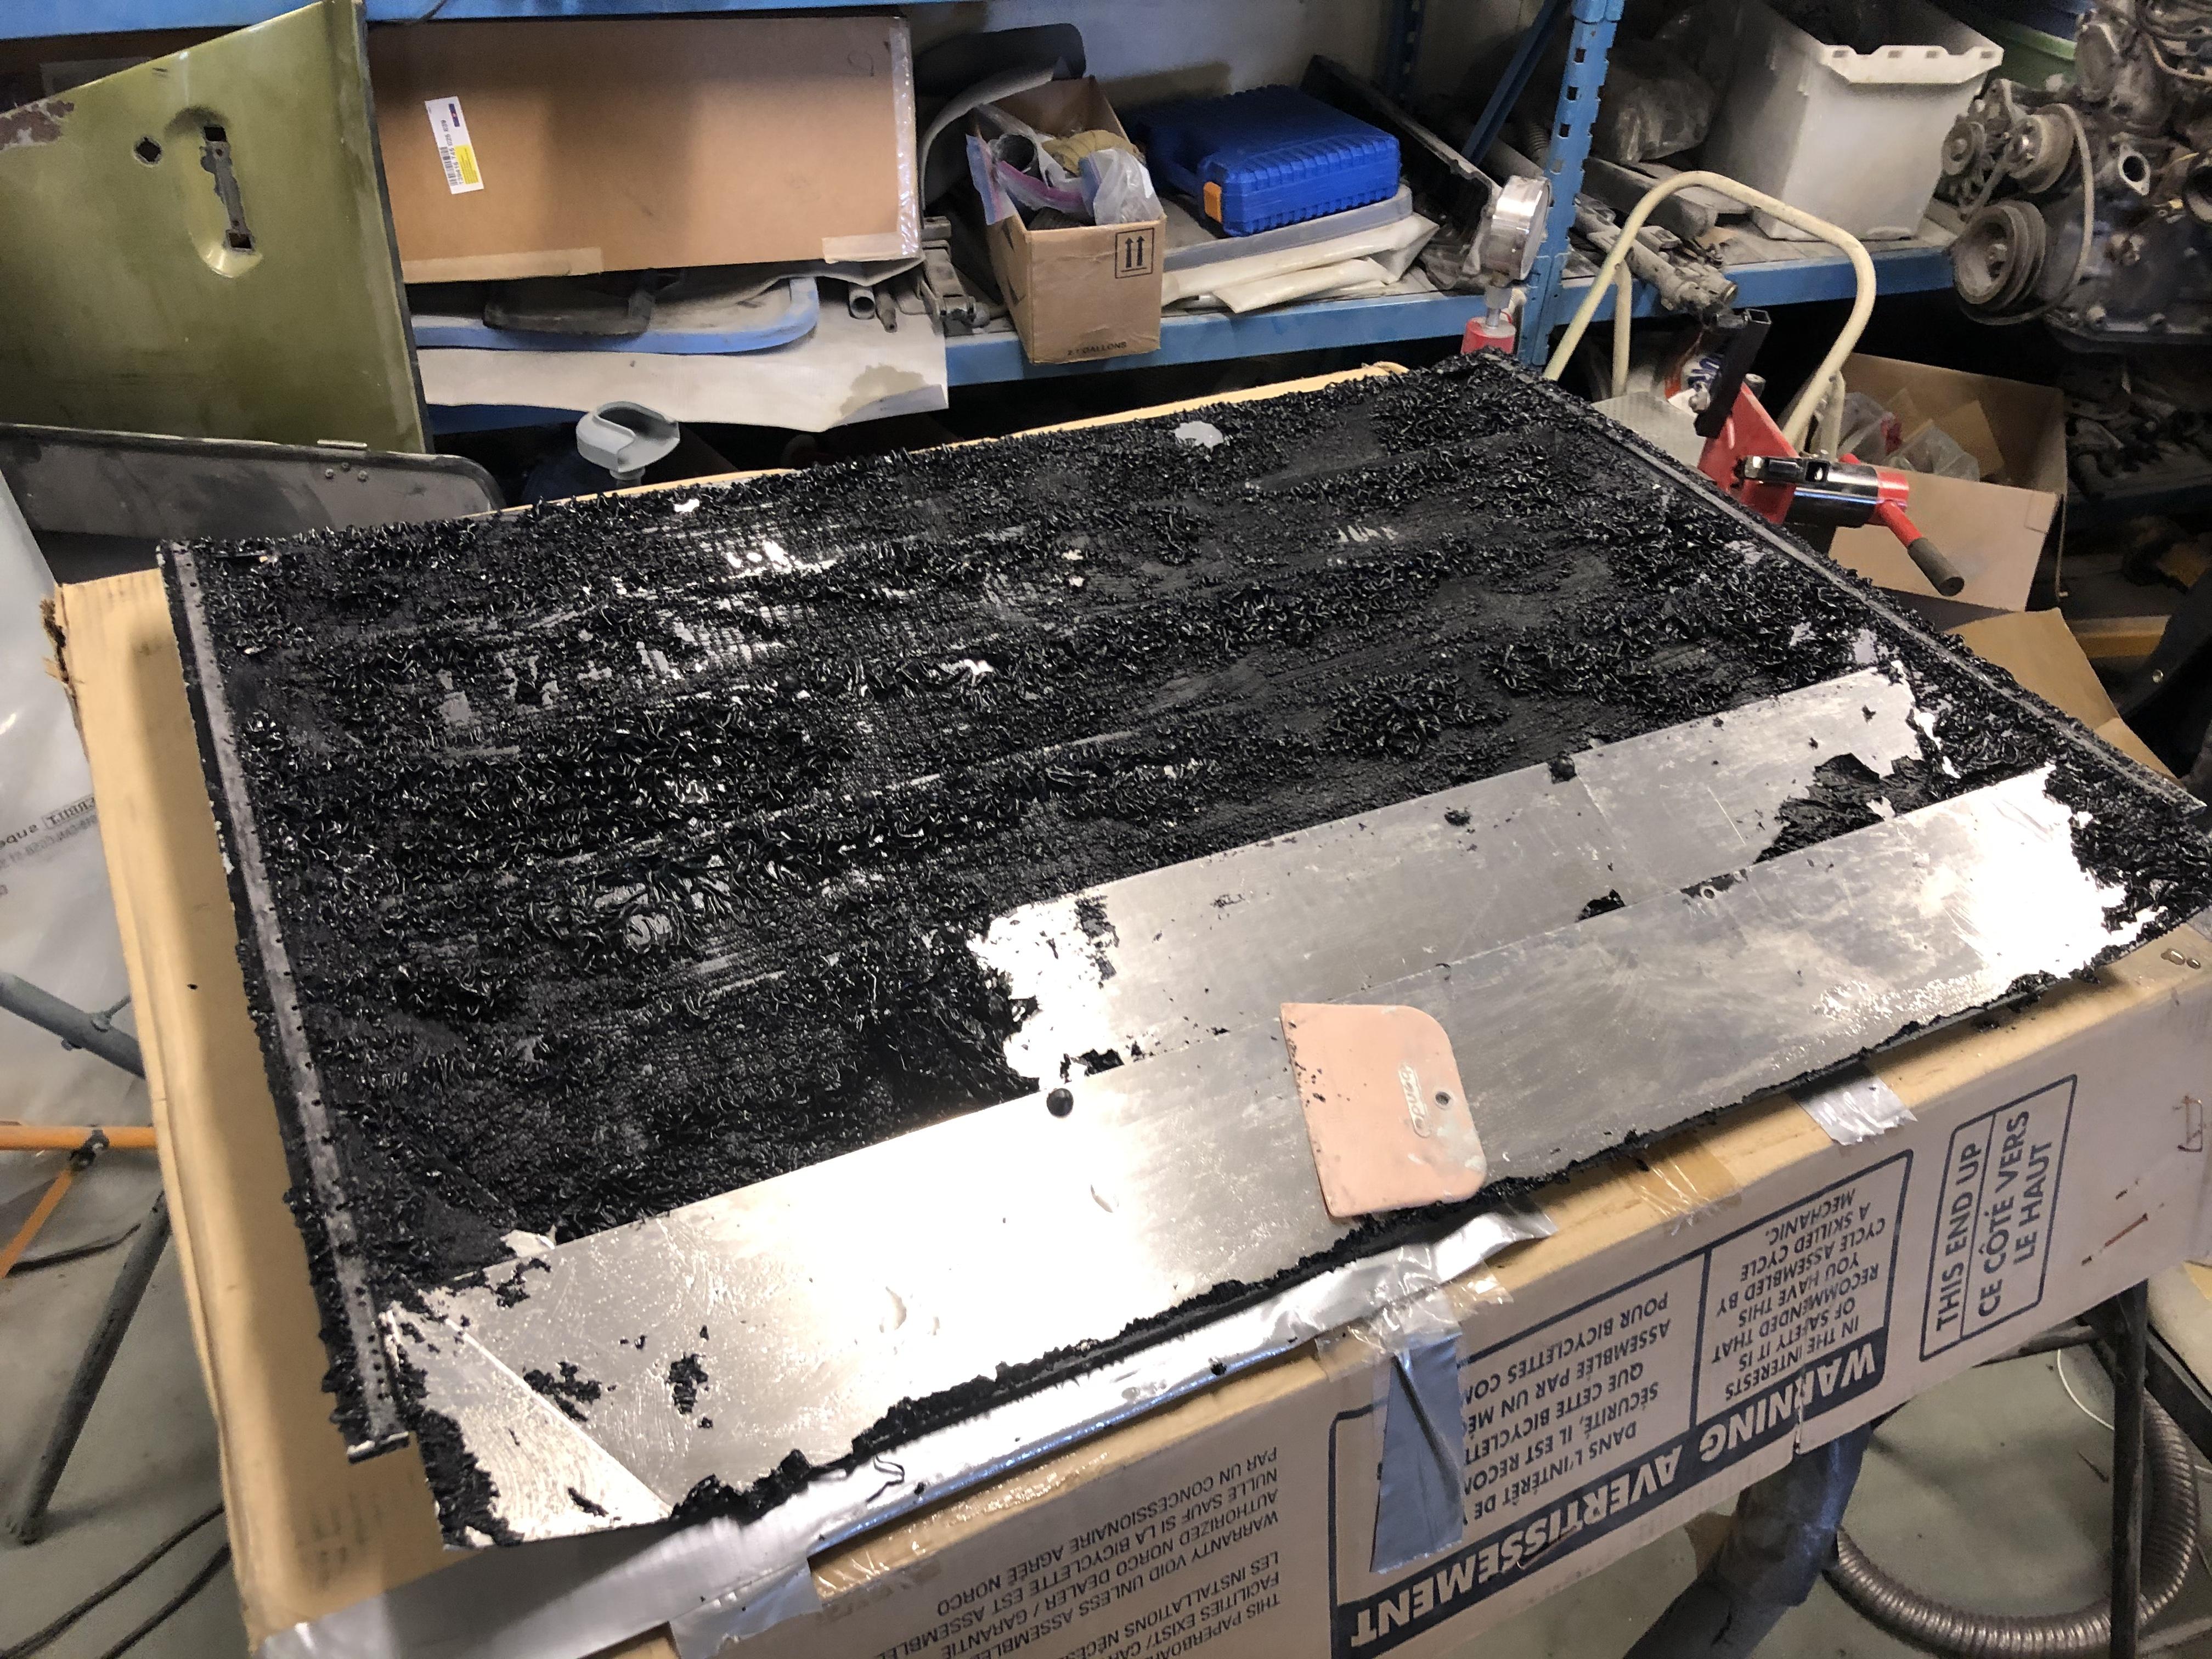
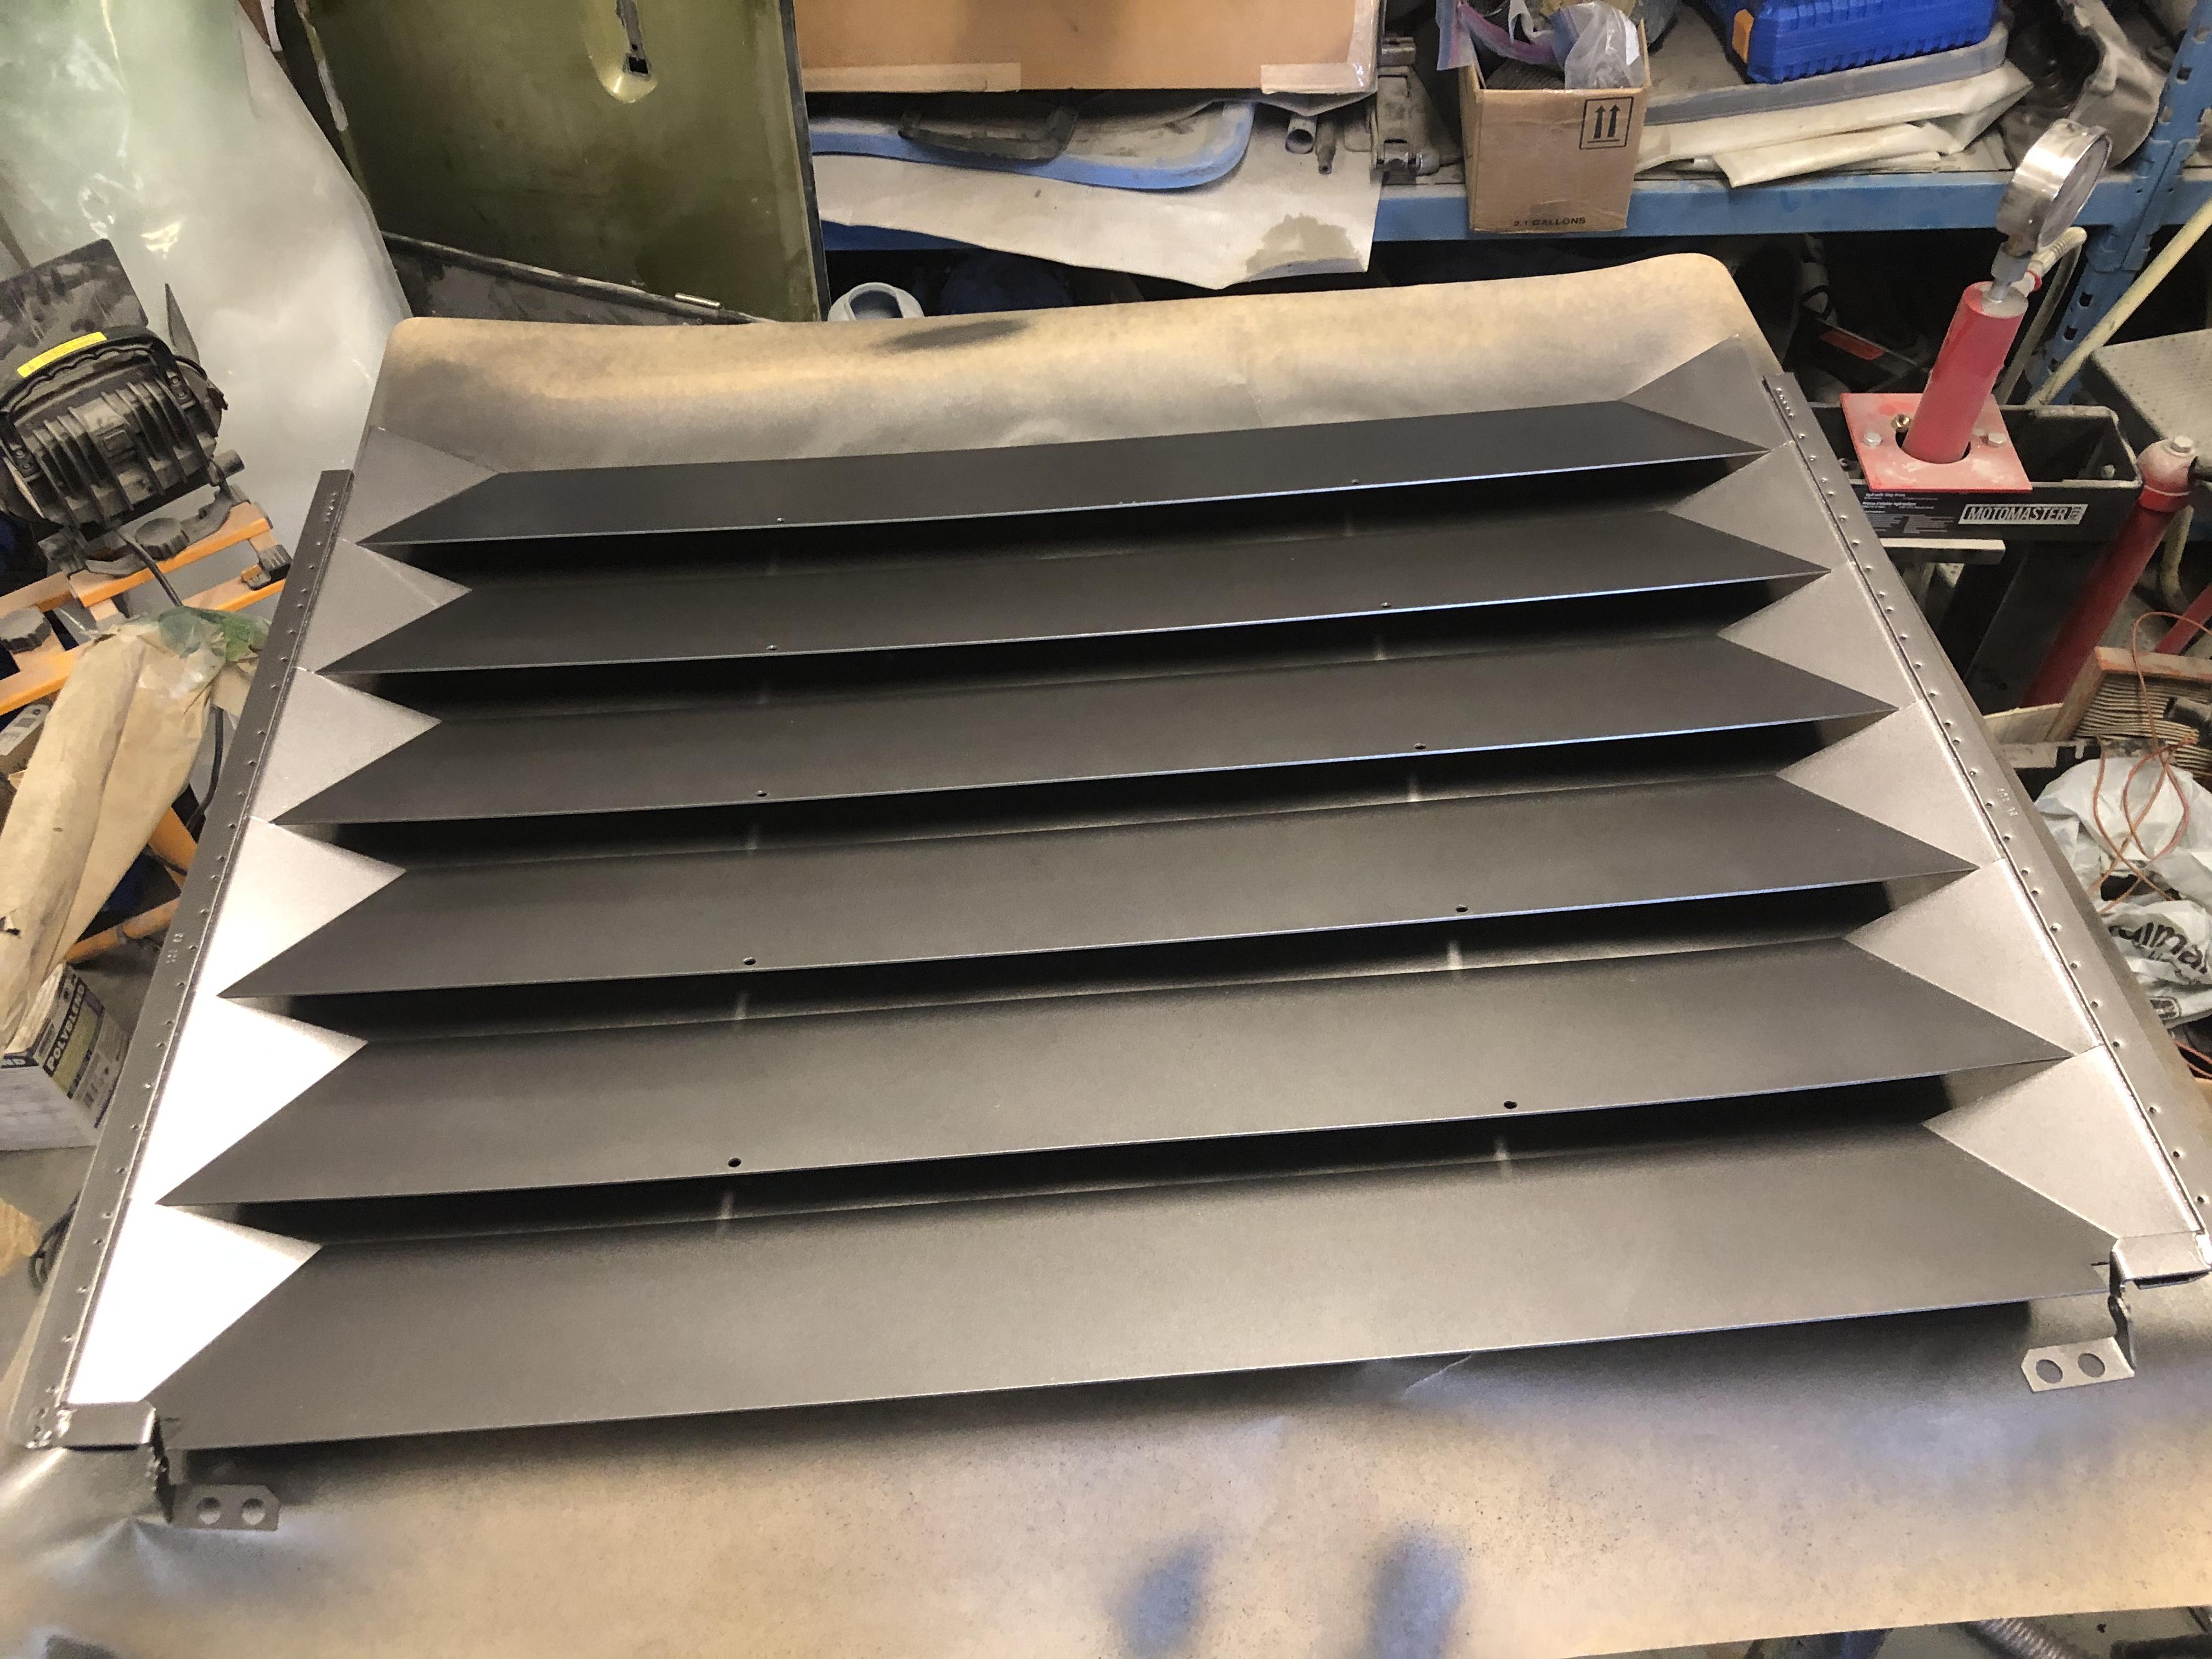
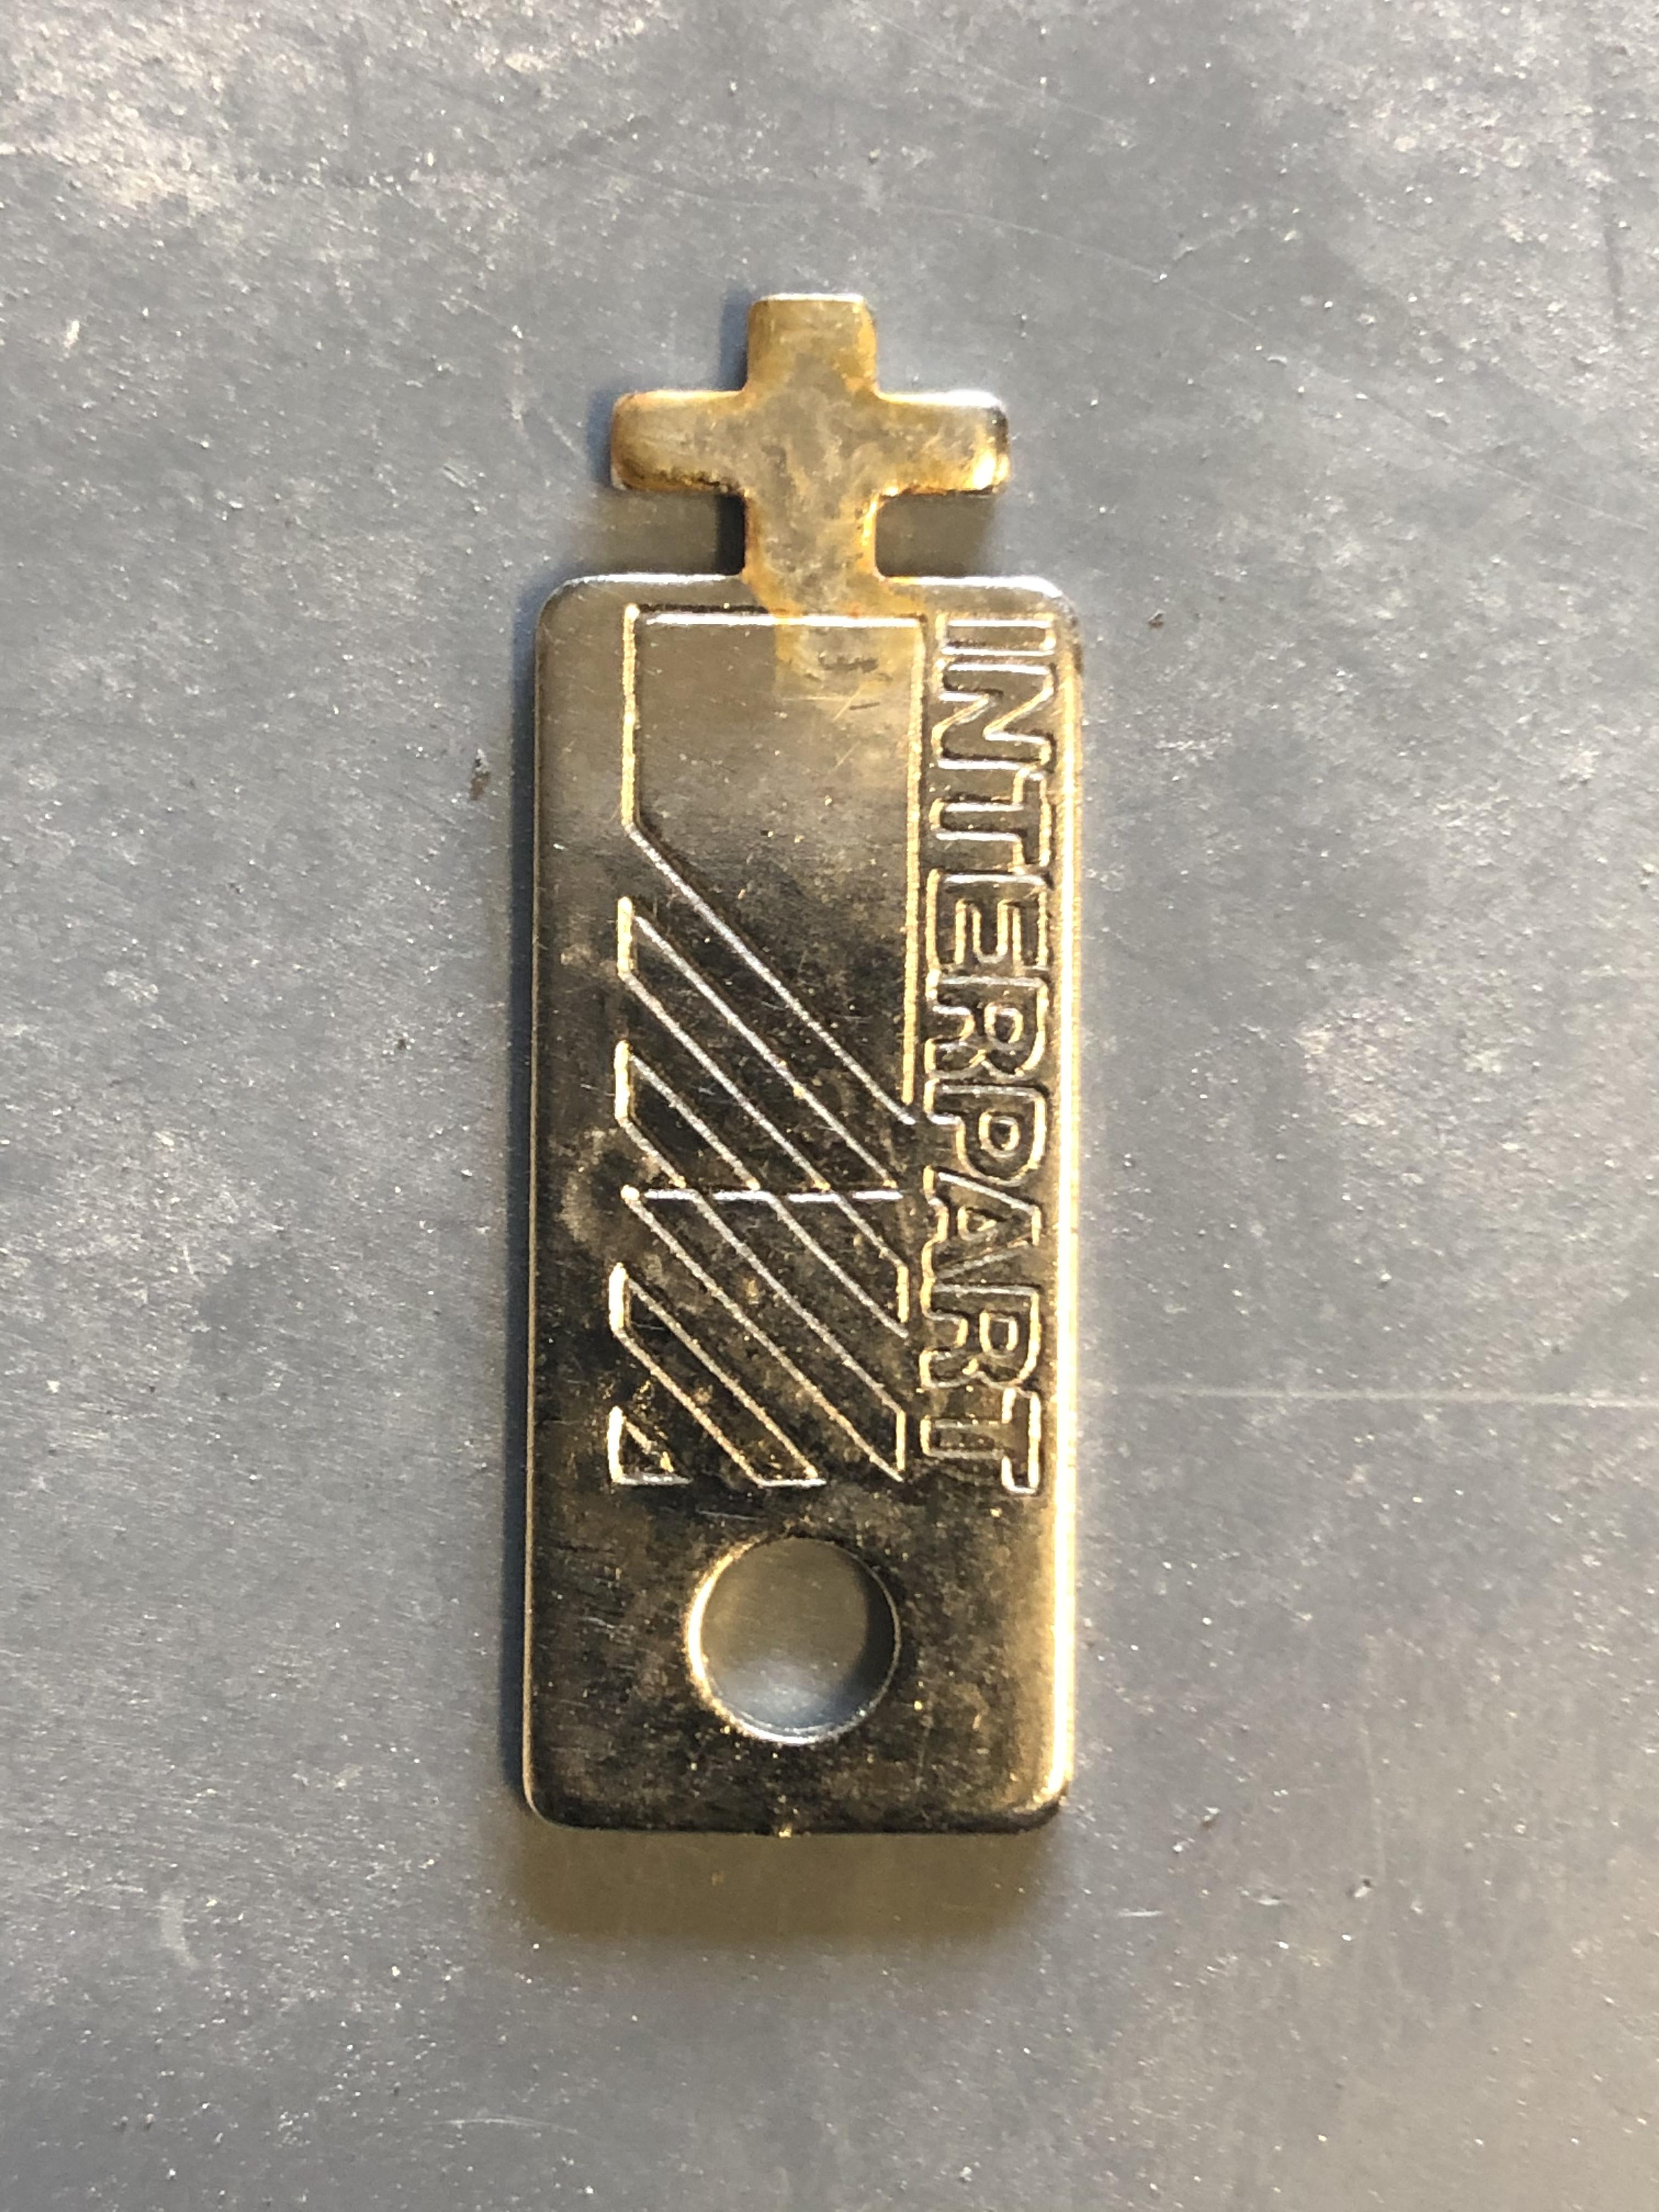
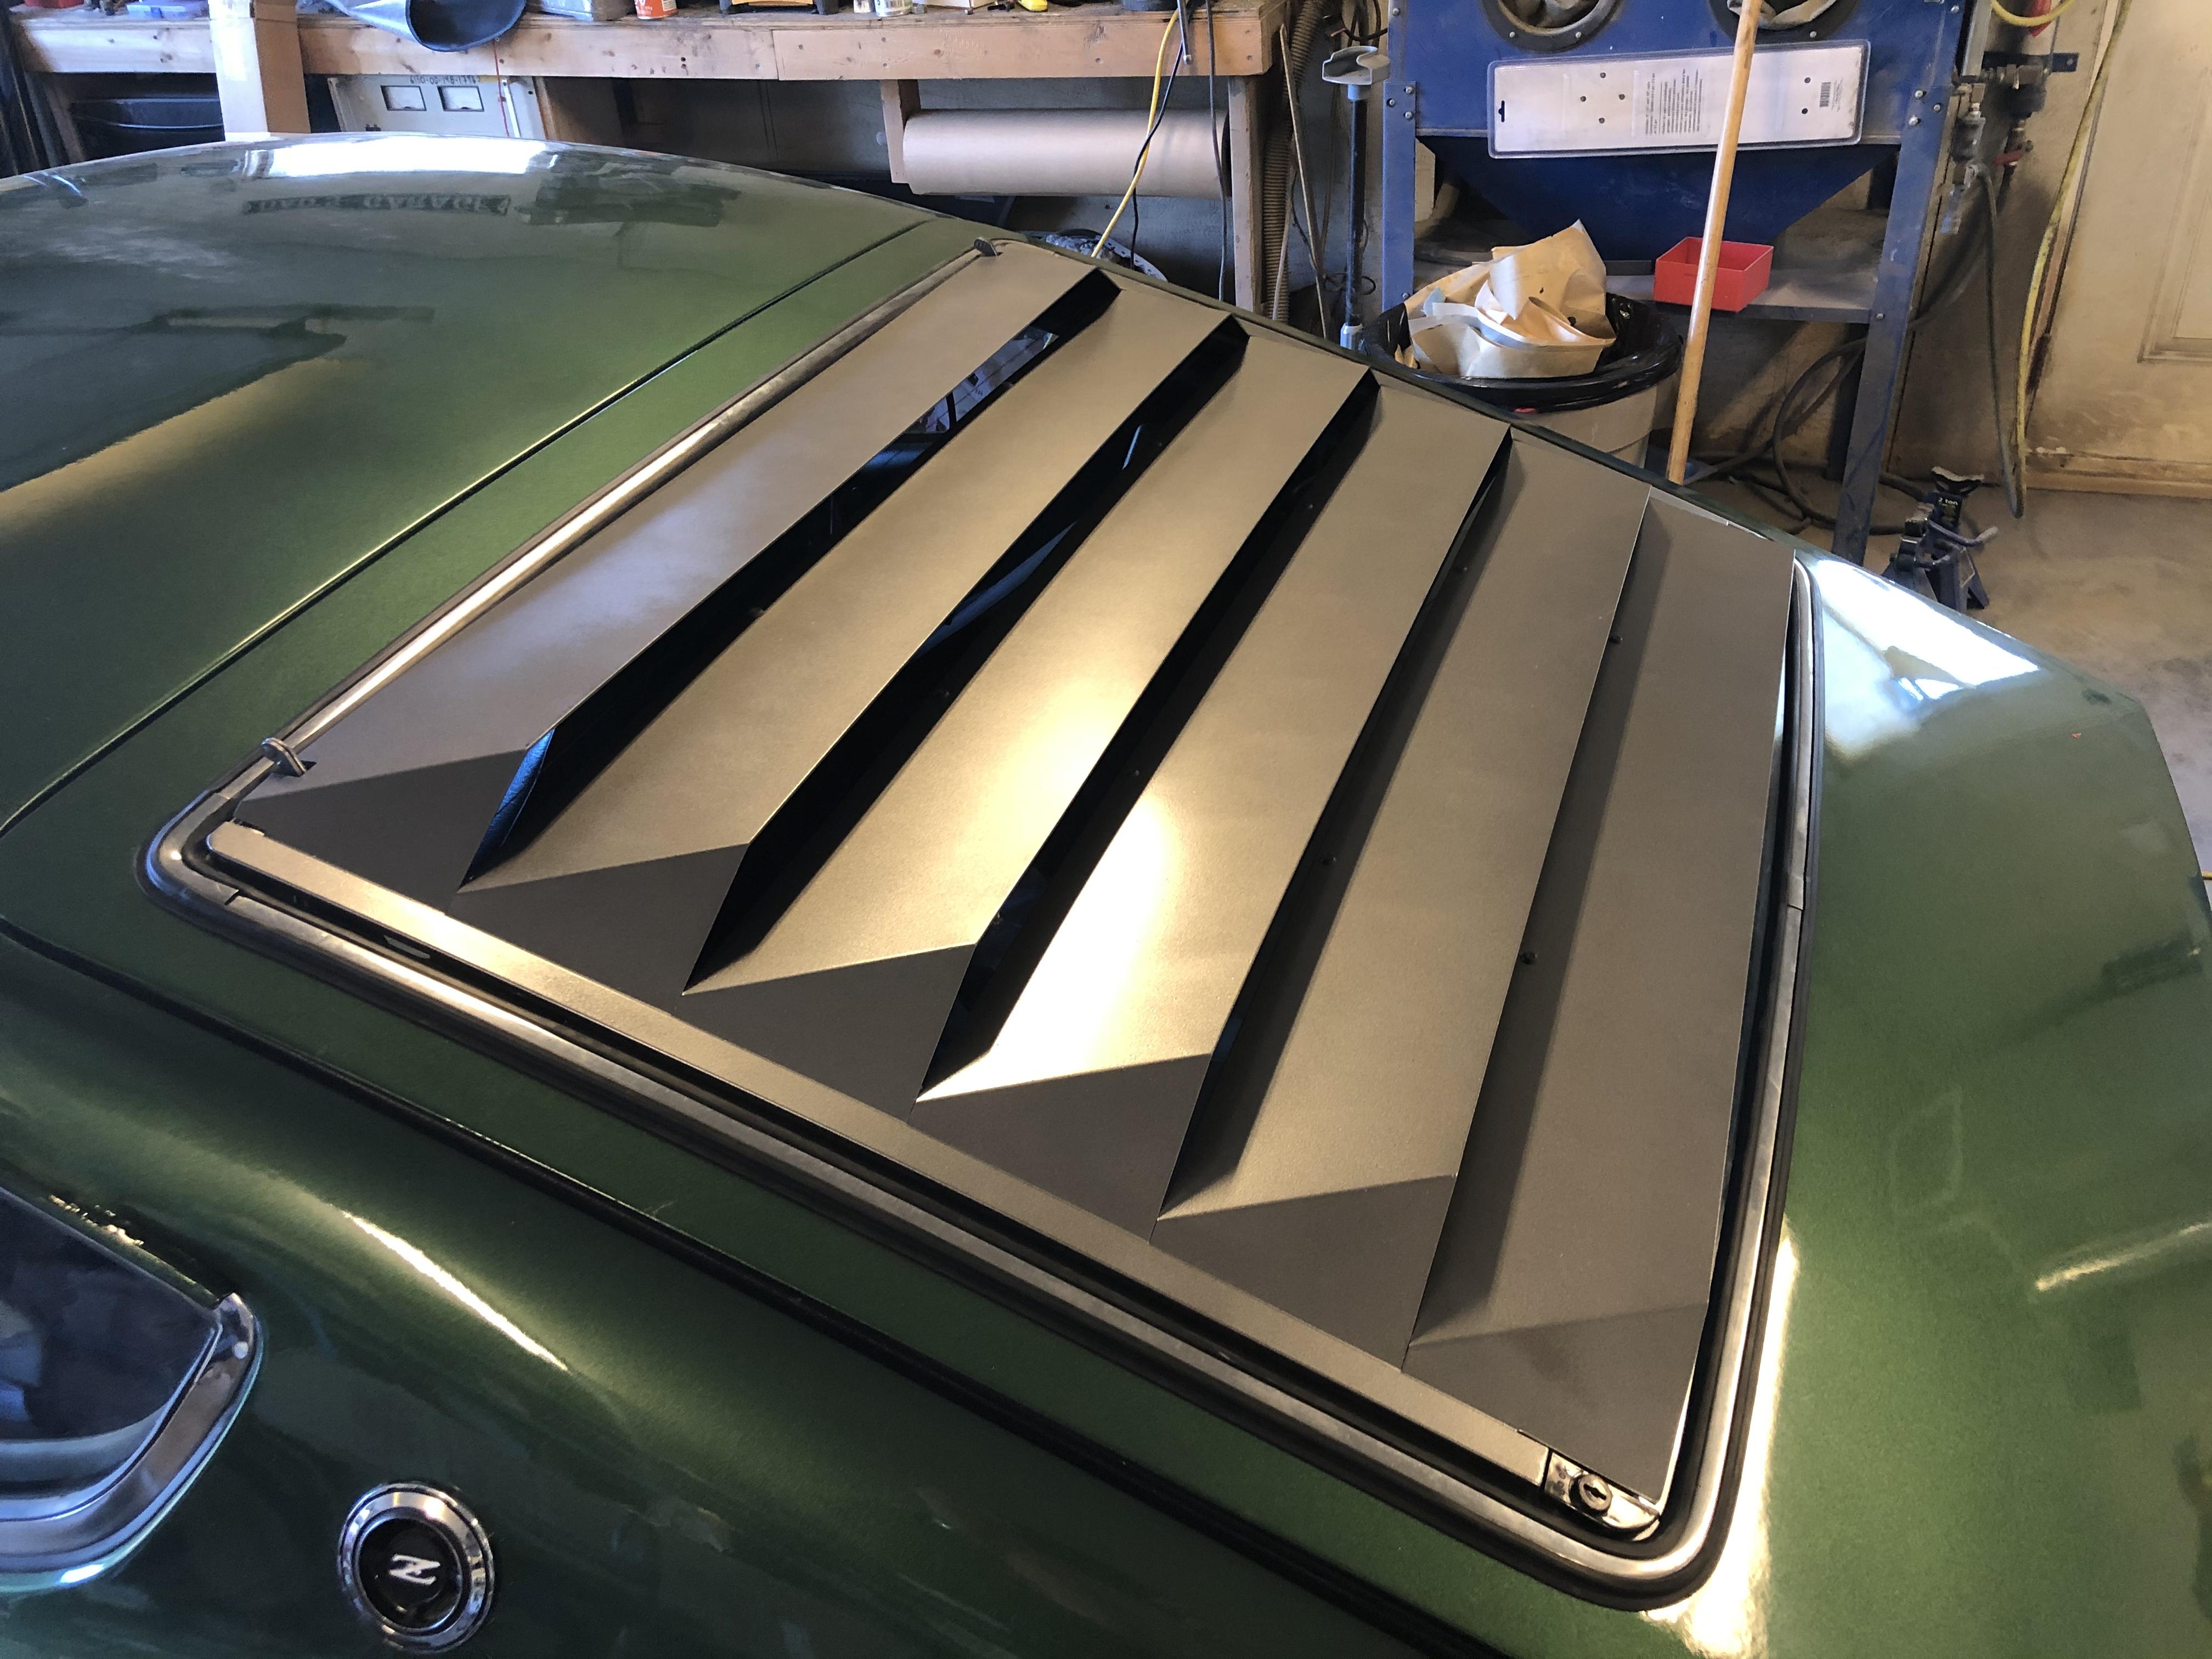
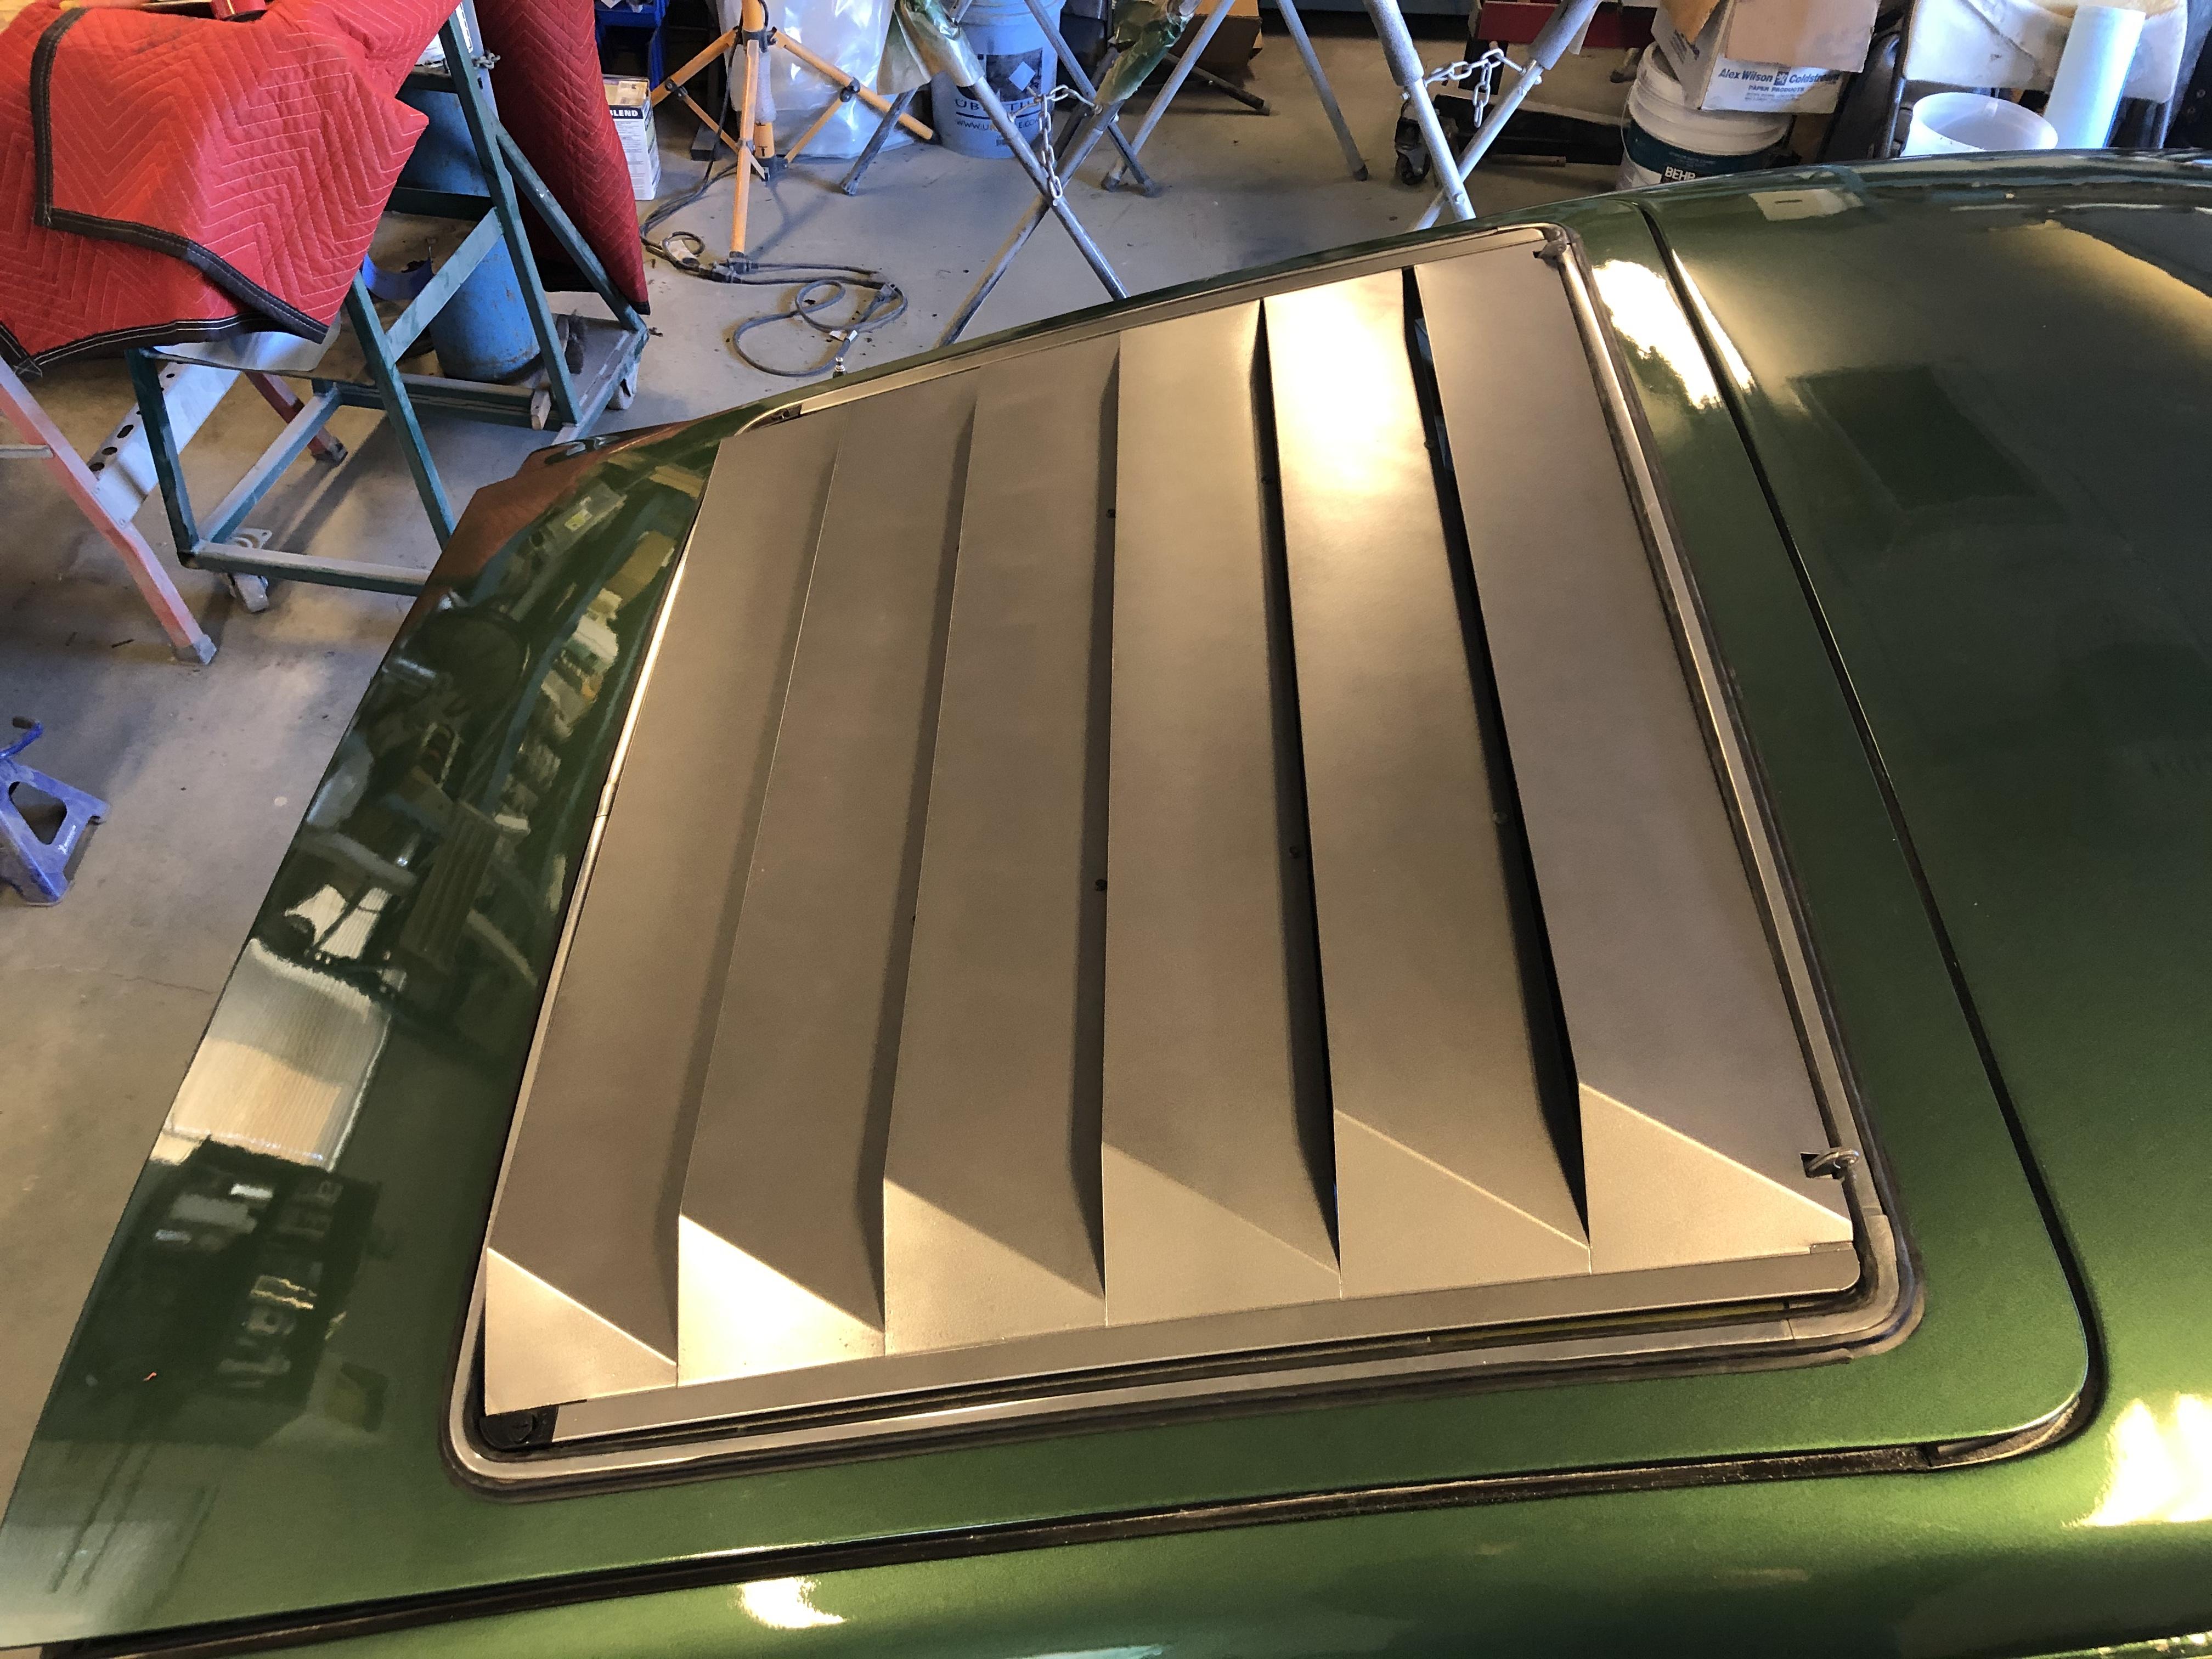
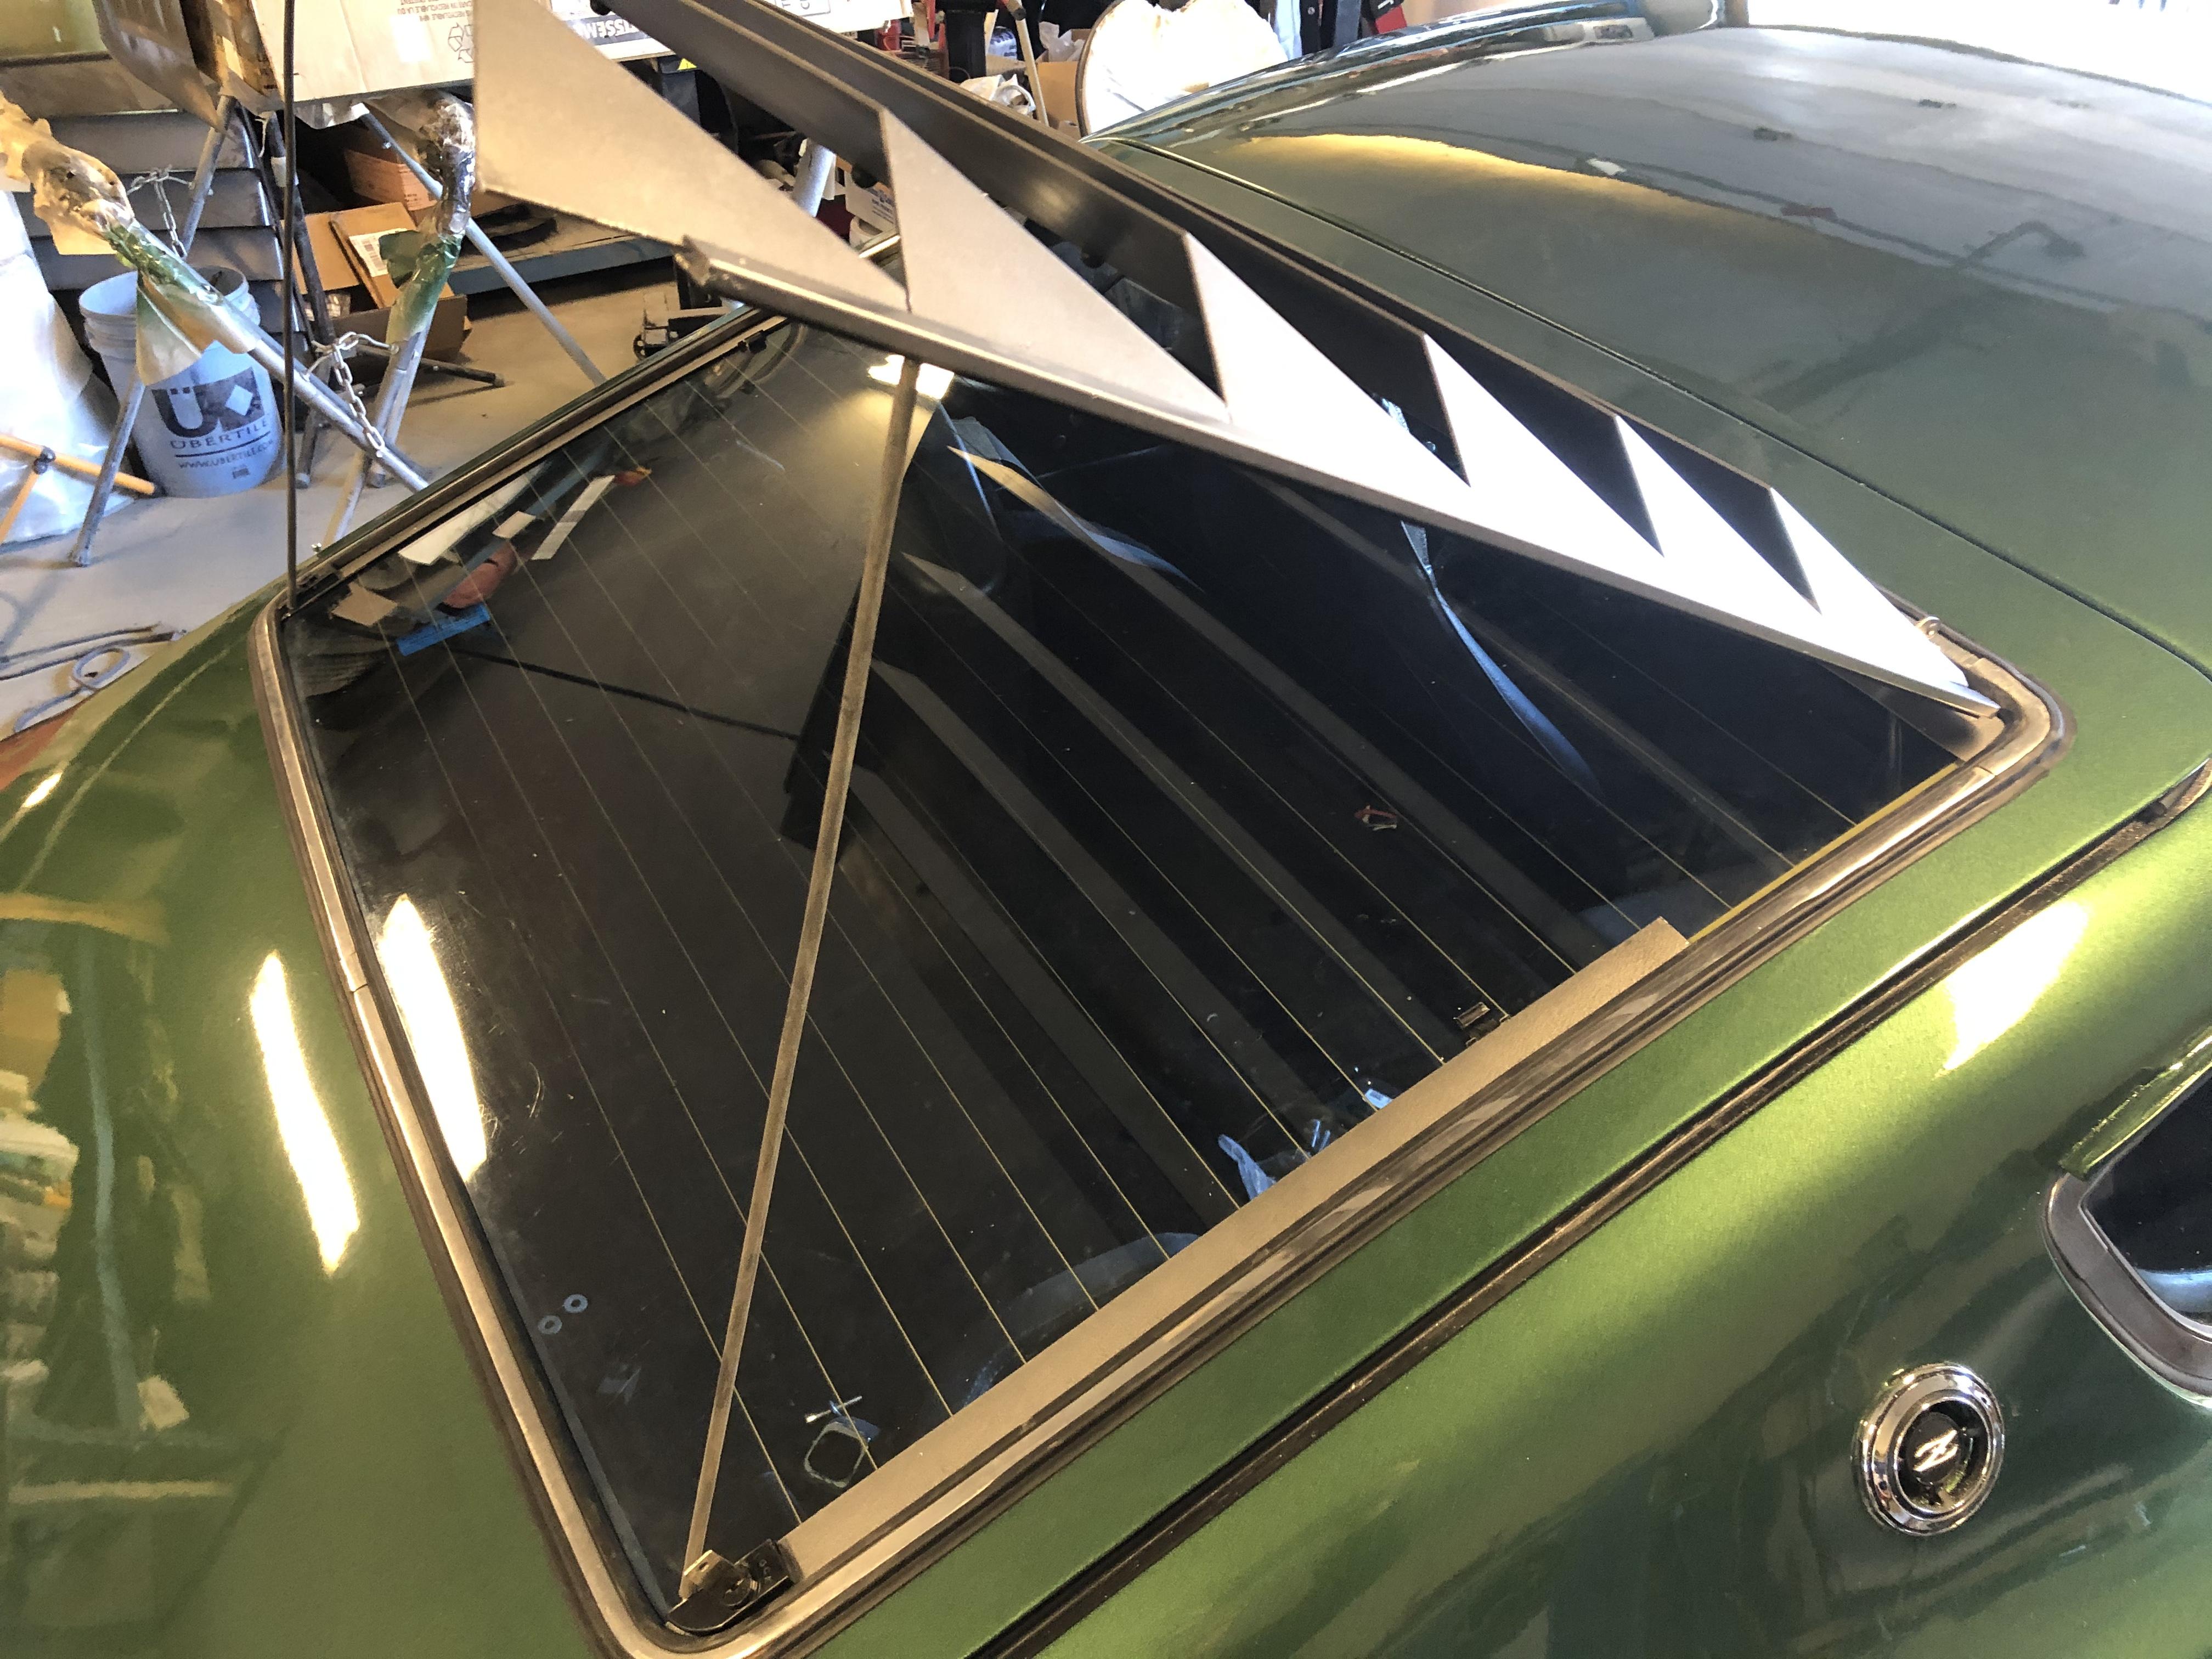
7 pointsCompleted restoring the Interpart louvers. Year ago I bought a mounting kit that was NOS from @zKars Years later I found a set of the louvers in the states missing the mounting hardware. So I decided now was a good time to start the restoration. I stripped the louvers down to bare metal and then used etching primer to seal them up. Then I applied the duplicolor Graphite wheel paint to match the rear taillight panel. The trusts are very good and they look great!


 7 points
 -
3 pointsI regret teasing my father about taking seven years to finish his Mini Cooper....3 points
-
 3 pointsWell, I can FINALLY update on this topic! I had the Datsun booster (thanks, terrapin) rebuilt by boostersteve in Oregon. Problem solved! Brakes are now behaving properly. My takeaways from this are: . Cardone boosters are not a compatible swap into a 240Z (at least for 1973). don’t know why. . Datsun boosters, even the crusty ones, can be saved. cheers!3 points
 -
 2 points
 -

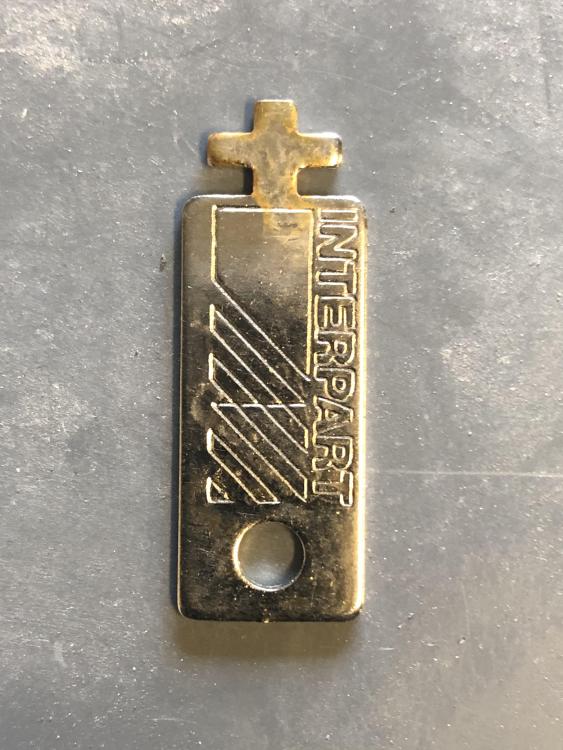
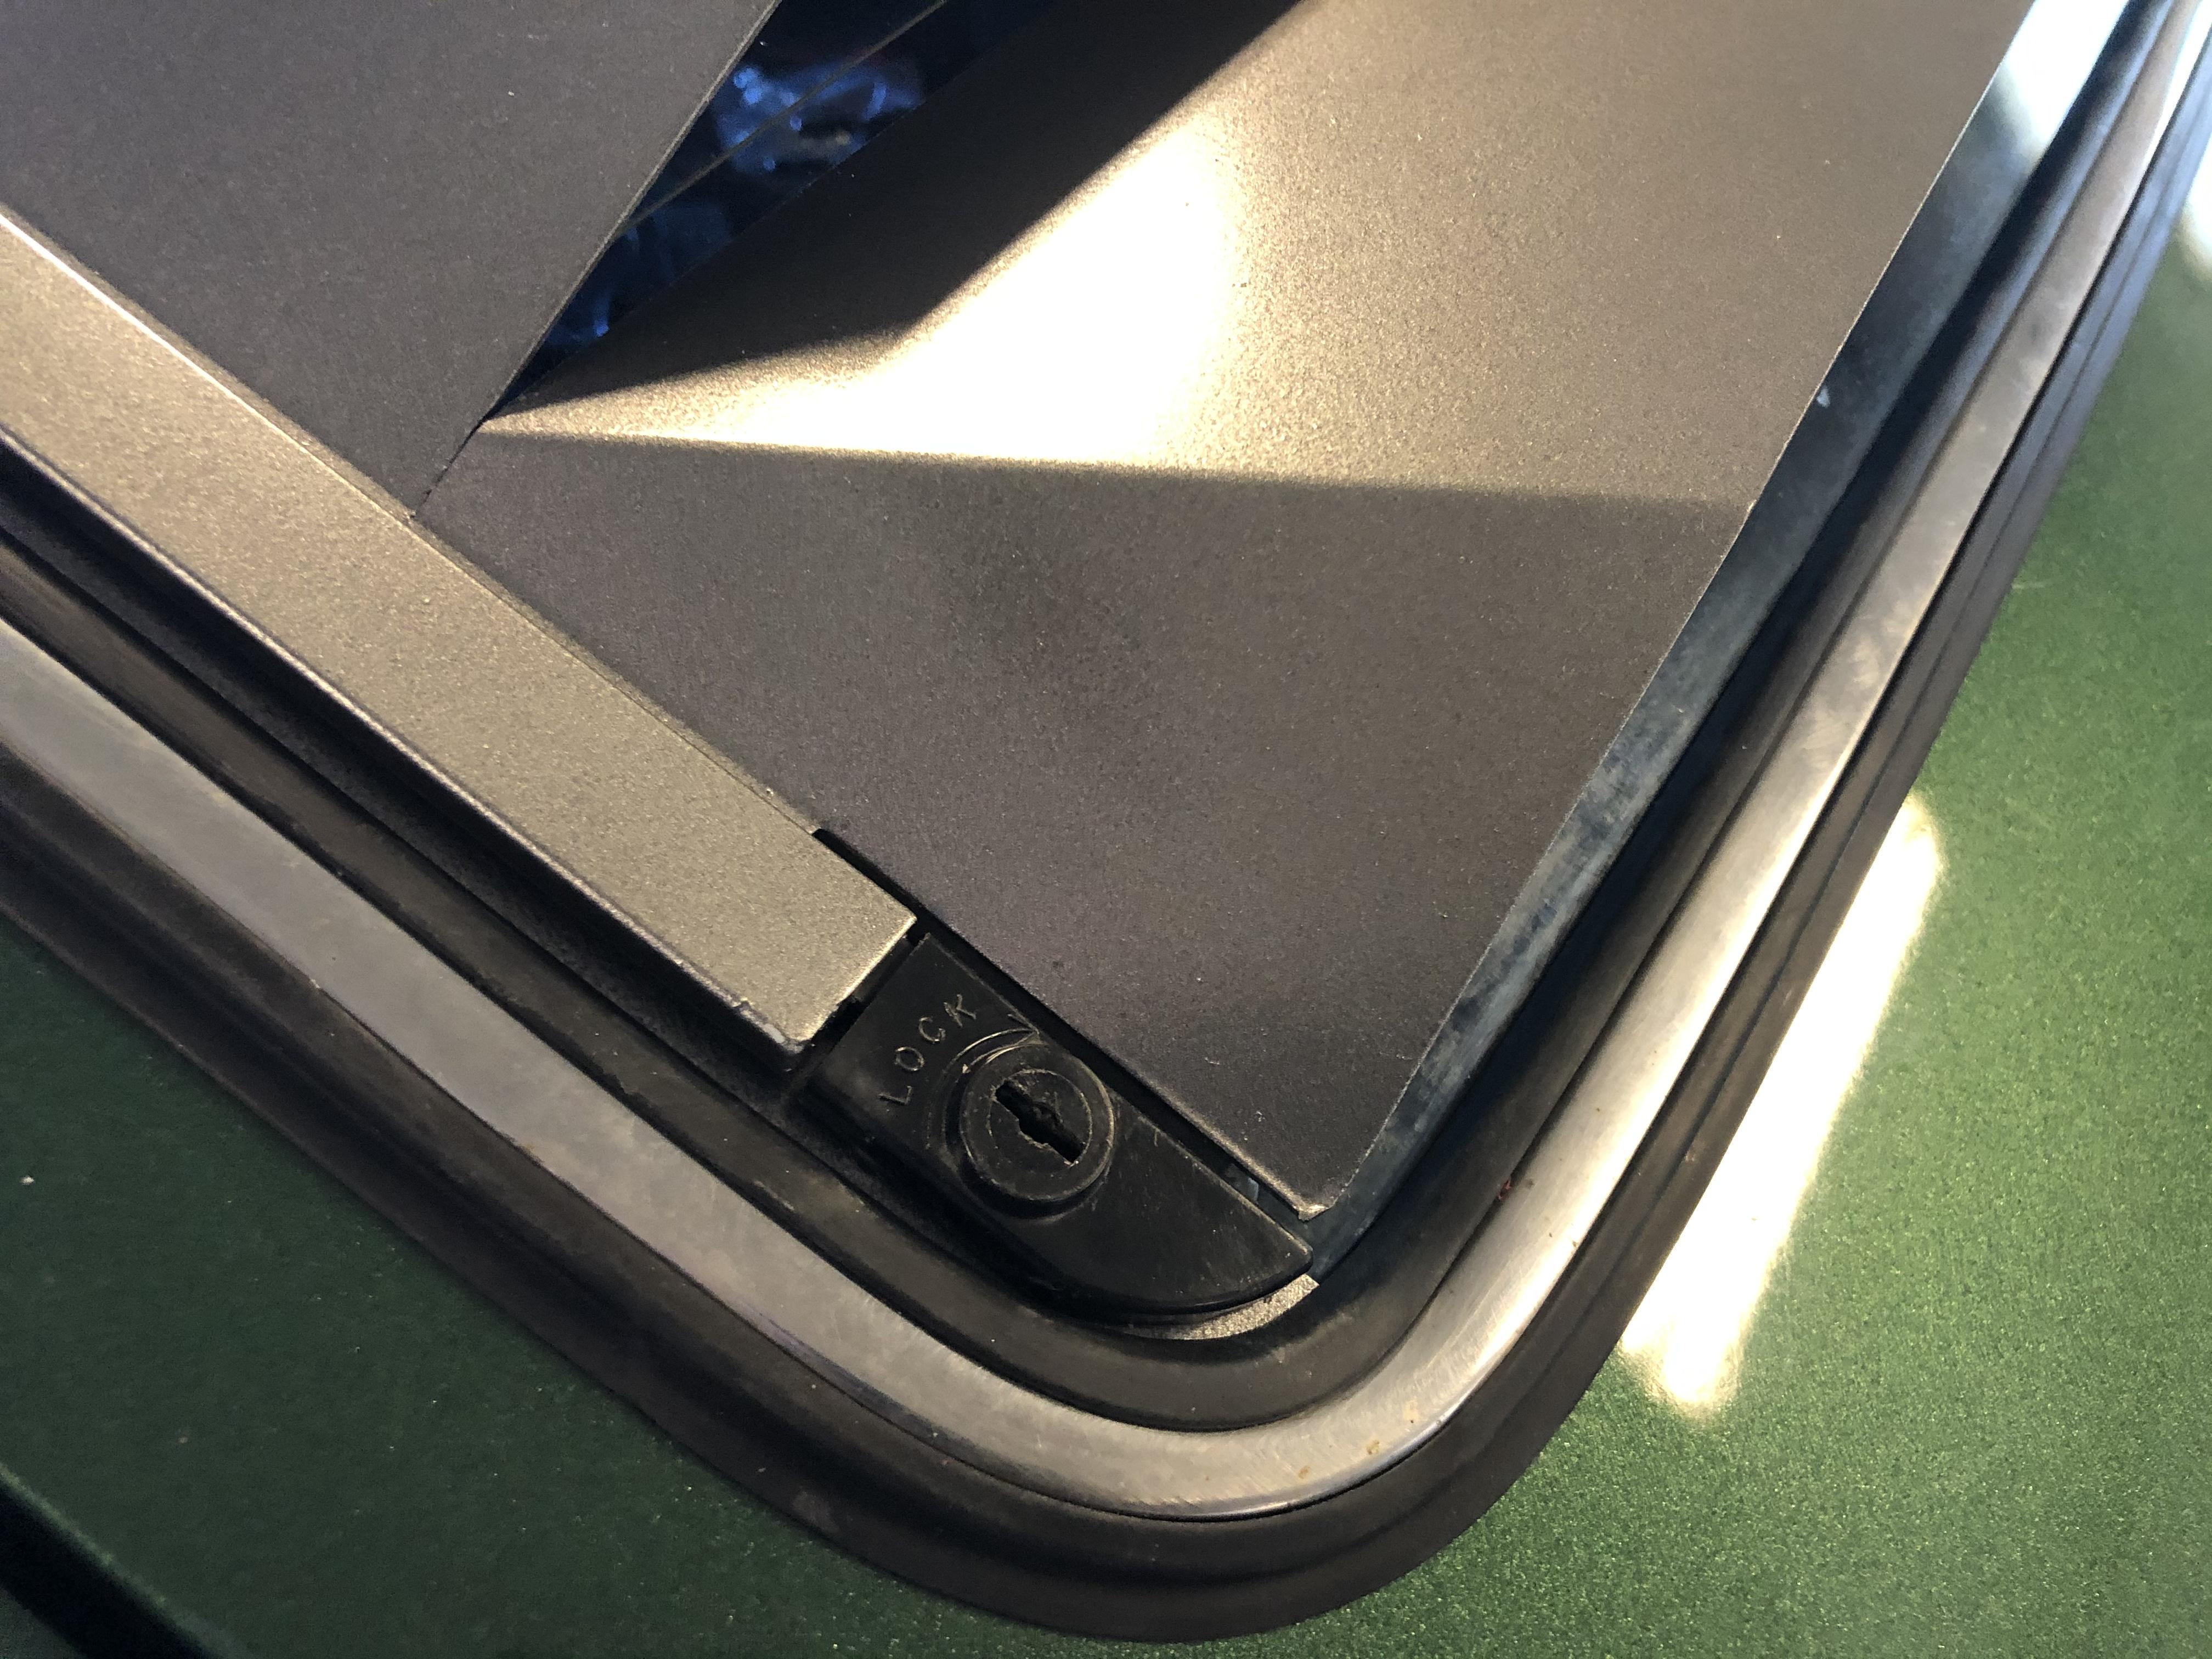
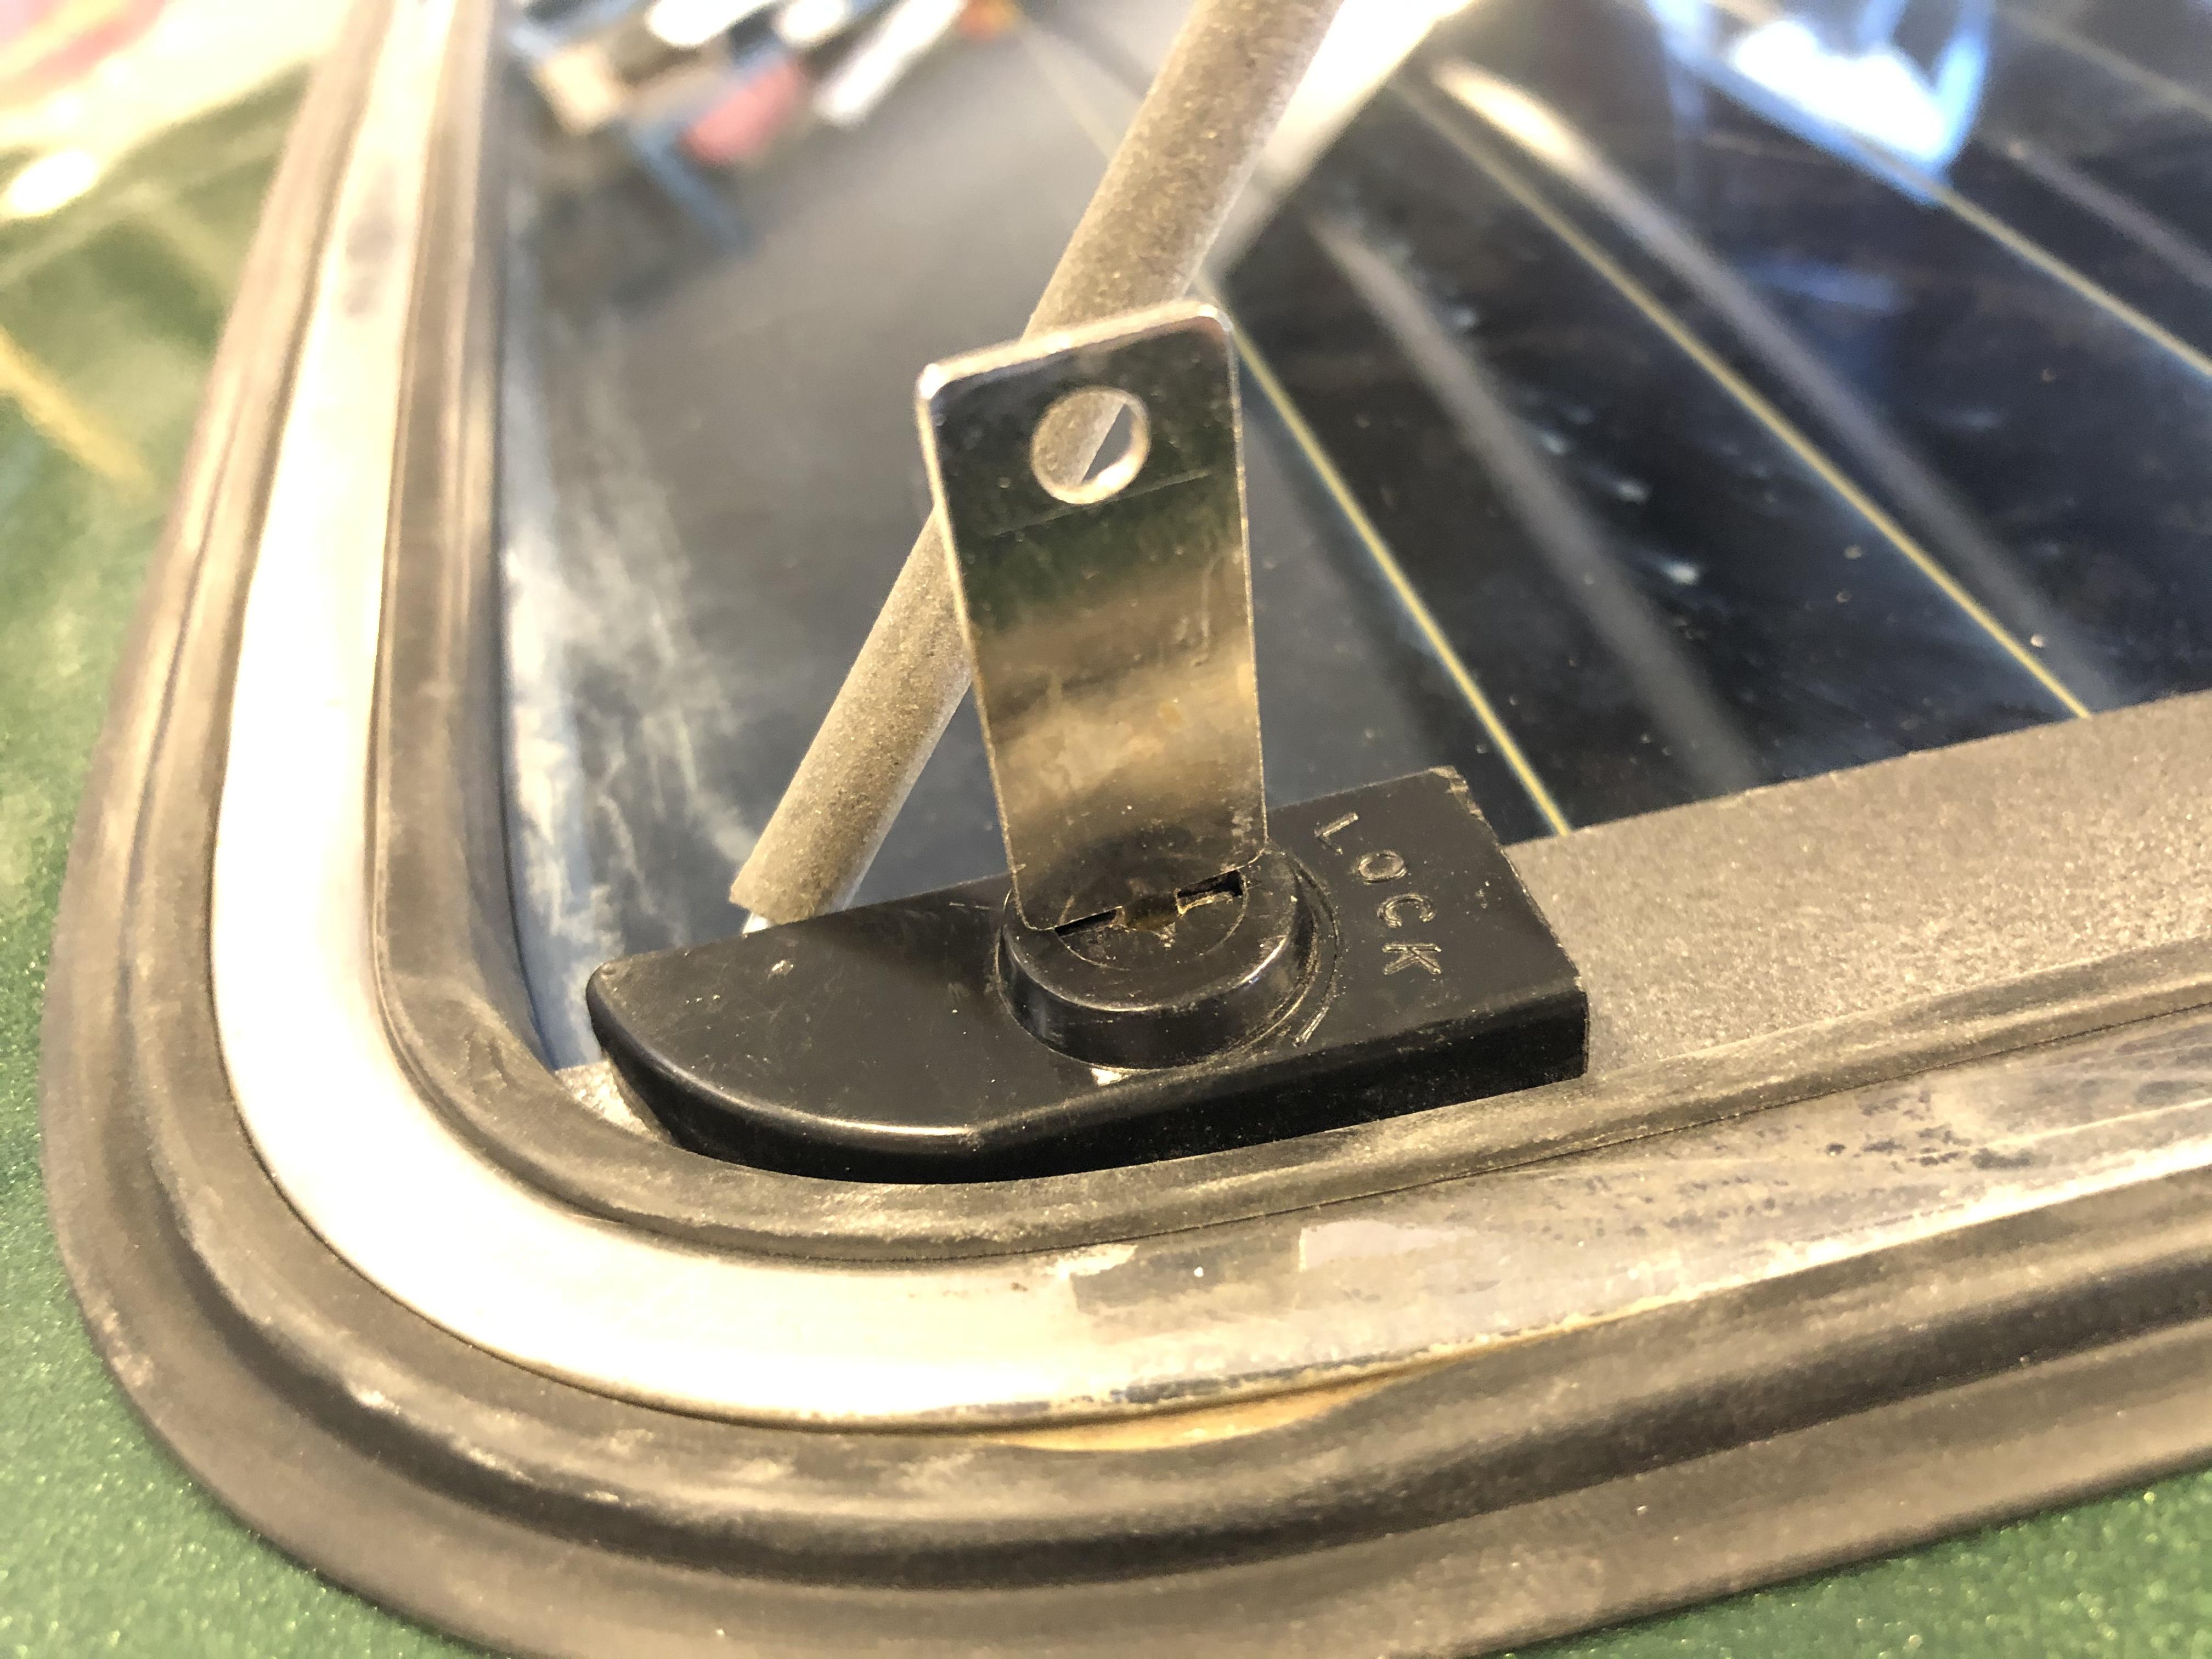
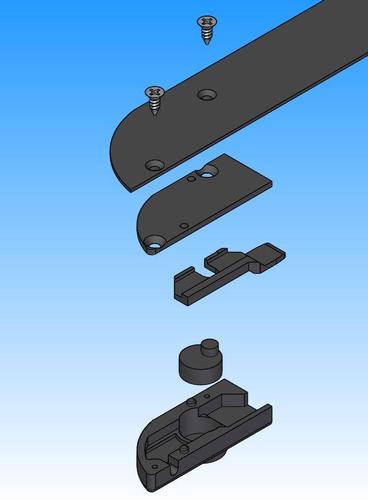 This is a 3D Assembly Model (.stp format) of a pair of LH and RH Interpart Lift Louvre Lock Assemblies. The assembly contains individual part models of the lock components. These plastic locks are no longer available so I hoping that these files will be of use to someone that needs to make replacements. This model was created using Solid Edge ST5. Also included is 3D pdf file of the same assembly for those that don't have a cad program and simply would like to view the model, it requires Adobe Reader X or higher to use. I have done my best to accurately model these with measurements taken from a good condition set of parts. These might be suitable for 3D printing, or could be used for CNC machining. Users of these files should check them for suitability with the manufacturing process they plan to use. The assembly includes the left and right aluminum mounting strips to show the complete assembly. Other CAD 3D formats can be supplied on request.Free1 point
 -
 A little late to the party, but here is my 2 pennies worth: It can’t be your cam as it’s only affecting 3 cyls not all six. So IMHO it’s definitely fuelling / carb / intake related. The only time my headers have been visibly glowing is when I’ve been heating the car up at night on choke at around 2-2.5k rpm with an AFR of around 12 (so read very rich). The camera does make it look 10x hotter than it was to the naked eye!!! 4k is high indeed for a leak but also do we know how advanced your idle timing is? Just advancing the distributor I’ve had the engine at 2k rpm, let alone adding in a leak. Either way, I would focus on the carb serving the bank of 3 not glowing. Good luck, I’m confident you will find something simple soon as the culprit!1 point
 -
It was Igor, but this was one on the best scenes. Abnormal >>>> Abby normal. As you already knew.1 point
-
1 point
-
 1 point
 -
 1 pointVery nice work, lapriser! As mentioned above, the only thing that I saw was that the upper image didn't have the white plastic "bump plate" but I see it on the angleD view. As Joseph mentioned, it is a surface for the bump rubber to impact into and allow any road grit or puffs of air from the fast moving bump stop to be blown out to the side and not into and possibly passed the piston rod seal. It is simply an extra layer of protection for the rod seal to have a nice long life in the sometimes harsh and dirty environment of a roadgoing fender well. Also if your car is lowered and has oversized wheels and tires such that the tire may hit a fender lip occasionally during deep suspension compression, you can stack a few extra bump plates on each other (called "packers" by the racing community) as a fine tuning to make the bump rubber impact happen a little sooner and keep the fender off your tires. Just for fine tuning though, if you need a lot of added strut length to keep the fender off the tire, you really should consider a higher spring rate, a higher ride height, or less wheel or tire width to keep the fender away.1 point
 -
 1 point1 point
 1 point
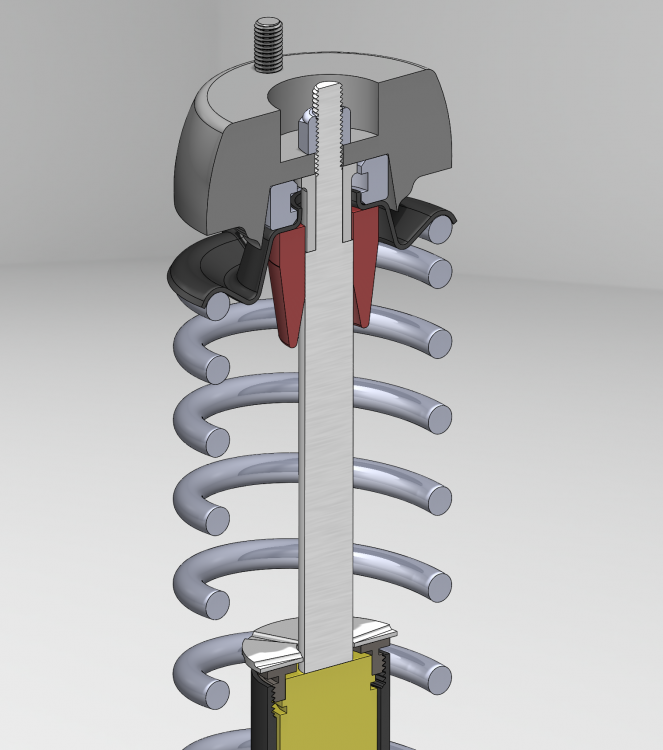
Utterly brilliant chap - massively applauded!! Yes it is but don’t forget the white washer that goes at the bottom to stop air locking if bottomed out.1 point
1 pointHey guys, I was thinking about drawing up some Datsun Specific instructions for these. Is that something anyone would be interested in? I started modeling some reference 3D files for my own sake. Can anyone confirm this is the stack up for the fronts?
1 point
1 pointUtterly brilliant chap - massively applauded!! Yes it is but don’t forget the white washer that goes at the bottom to stop air locking if bottomed out.1 point
1 pointHey guys, I was thinking about drawing up some Datsun Specific instructions for these. Is that something anyone would be interested in? I started modeling some reference 3D files for my own sake. Can anyone confirm this is the stack up for the fronts?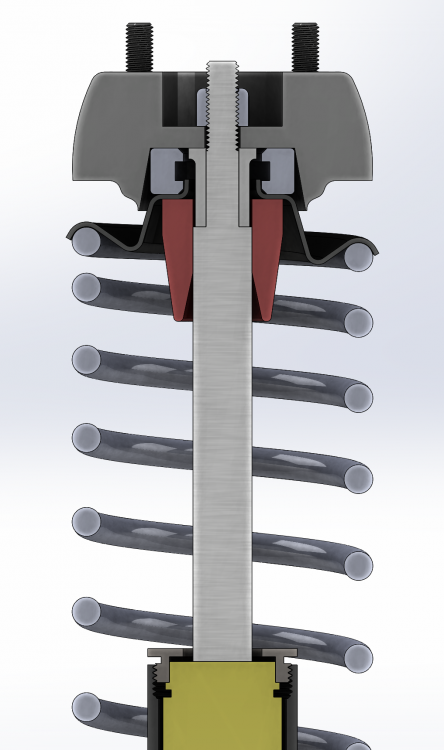
 1 point
 1 pointMakes some sense. The caliper from the other side was much more rusted, but I'd noticed that all the suspension parts from one side are in worse shape than the other. There was a very noticeable difference between the calipers, though, so I think this one was a replacement. Hopefully I'll never have to separate the two sides of it. Looks like someone once tried to do it and made a real mess of one of the bolts. All the parts I ordered from Rock Auto have now made it to the cross border shipping location, so hopefully I'll receive them next week and get on with this!1 point
 1 pointAnd the icing on the cake is you've got another project waiting to begin 🤥1 point
 1 pointJust to make sure you're numbering the pins on the 35 pin connector, here's a pic looking into the harness. You can use this to double check your results:
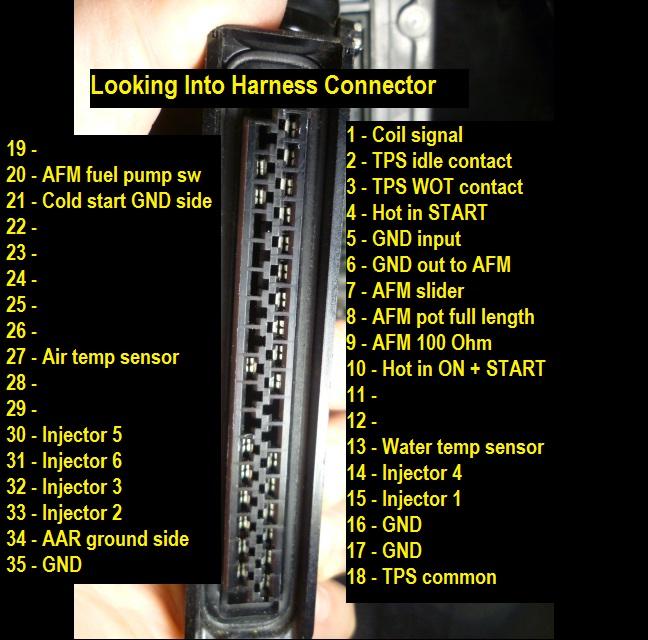 1 point
 1 point
 Thanks for that. I see differences in the brackets. I will work on mine more and make it look like that one.1 point
 1 pointVery cool Jim, such an awesome opportunity. You, and your car a celebrity among us now.1 point
I have not used that product, but I will say if you are trying to get close original, I would say test spray something first to see the amount of "metallic". The original is a matte finish that had virtually no metallic except a very minimal amount at certain angles. Five years later I am still very happy with the choice I made, as in the link above that @siteunseenposted. HTH, Mike1 point
1 pointVery cool Jim, such an awesome opportunity. You, and your car a celebrity among us now.1 point
I have not used that product, but I will say if you are trying to get close original, I would say test spray something first to see the amount of "metallic". The original is a matte finish that had virtually no metallic except a very minimal amount at certain angles. Five years later I am still very happy with the choice I made, as in the link above that @siteunseenposted. HTH, Mike1 point 1 pointTotally agreed with both comments above. But at this time (and with my current budget), my main focus is getting the car driving. I fully understand it is not the cure, but it should last me a couple years before I do a full strip down. Theres a couple other spots of rust (hatch lid corner, lower fender, for example) that I would want to tackle at the same time. Luckily Arizona is DRY, so fingers crossed no new spots come up1 point
 What a great deal that was! Hope he keeps it original. Be nice if the buyer shows up here and joins the club.1 point
1 point
What a great deal that was! Hope he keeps it original. Be nice if the buyer shows up here and joins the club.1 point
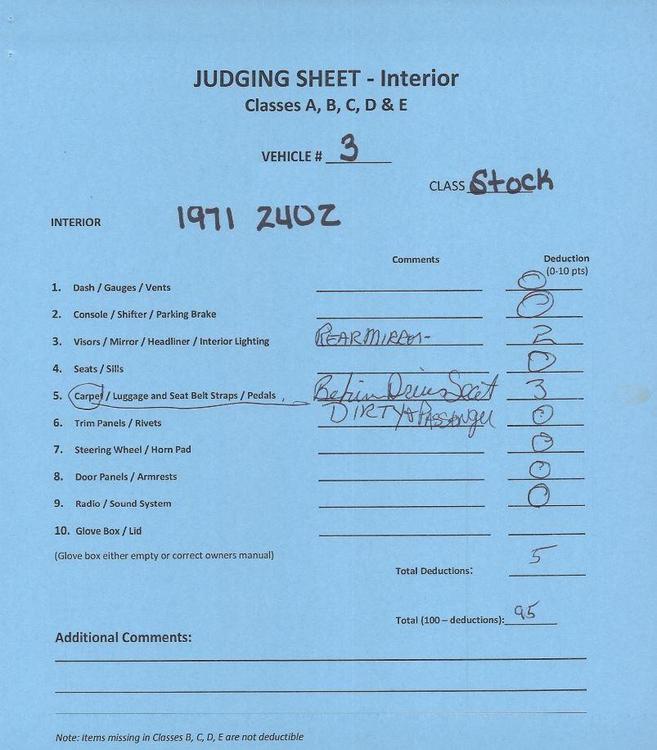
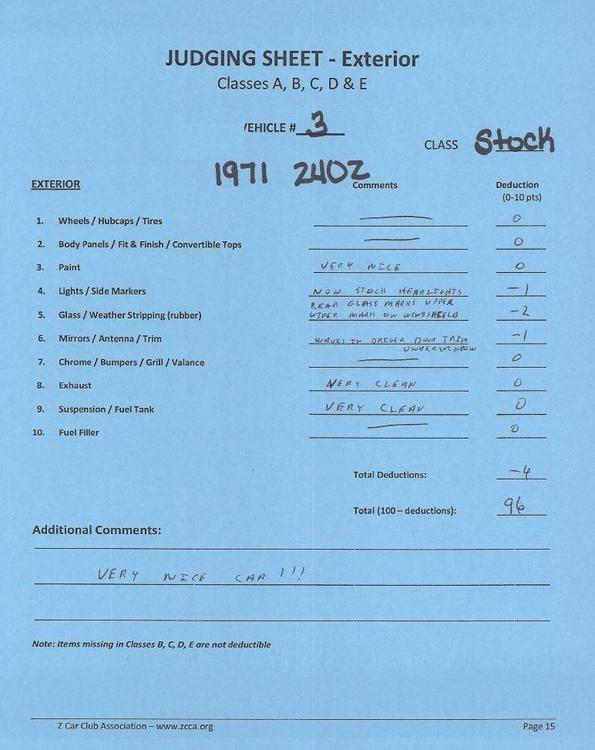
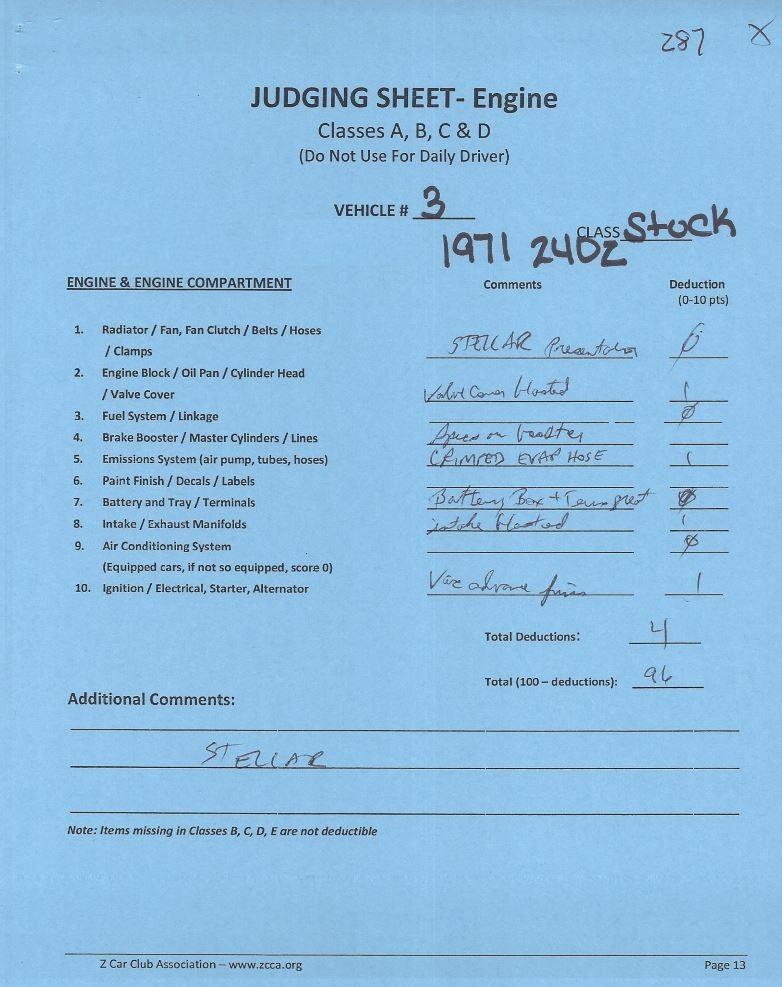
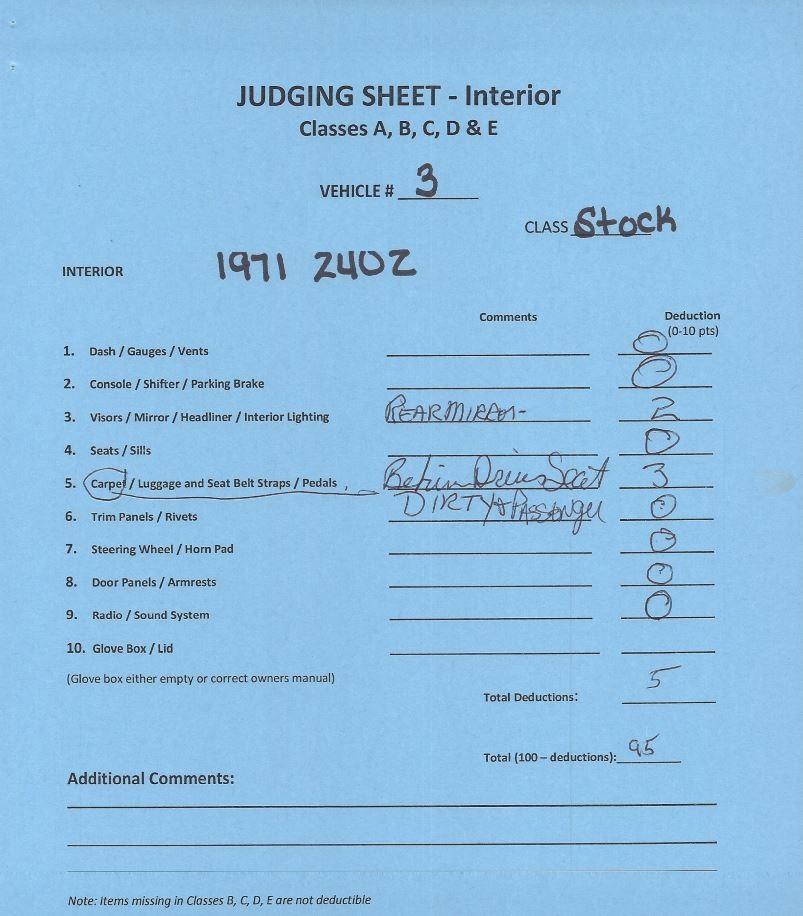
1 point Thanks @mbz ! It really was a fun show and the car got lots of attention. Amazing how many cars there were (over 500) and the crowds that came out to the show. It has papers in the window...the original dealer sticker is posted on the passenger side ☺️. I don't think any other vehicle at the show had that. That is a small metal vacuum tube that goes to the EGR valve solenoid. It's a bit kinked, but still functional. Also, we got the judging sheets back. (Note: car is actually a 1973 and not a 1971, wonder which judge wrote that down) I think we did fairly well in spite of the mad scrambling the last couple weeks to get everything ready for the show. We were marked off 3 points for dirt behind the seats. Will have to pay better attention to that next time. Seems like a lot of points off just for dirt, but oh well. I was surprised the we were marked off for the bead blast finish on the valve cover and intake manifold. I thought that looked pretty close to stock that way, but apparently not. I wonder if all judges would mark that off or if it was just this judge. Personally, I thought the flat tops were too shiny and we would get dinged for that. We were also missing a few small vacuum tube clamps. That has since been corrected along with the kinked hose that has now been replaced with the correct hose (Thanks @Zup ). Most of the other items I was aware of and was surprised that we did not get marked off for some other items I knew about, like the rear carpet plastic trim finisher which was installed backwards or luggage straps that were installed with hex bolts among other things. These have since been corrected now that we have time, but I would have marked me off for those things. Guess that makes up for the 3 point dirt deduction. Anyway, the shows have been great fun. Car is now on it's way up to it's new home in the Bay area with @jayhawk .
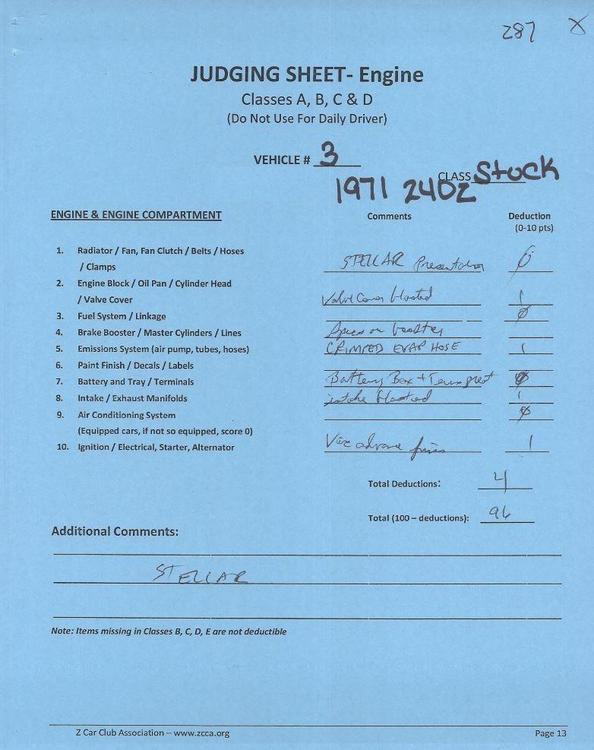
 1 point


Important Information
By using this site, you agree to our Privacy Policy and Guidelines. We have placed cookies on your device to help make this website better. You can adjust your cookie settings, otherwise we'll assume you're okay to continue.