


Leaderboard
-

Dave Forster
Free Member7Points5Posts -

Patcon
 Subscriber
 4Points10,905Posts
 -

Seppi72
Subscriber4Points304Posts -


Diseazd
Free Member3Points3,335Posts
Popular Content
Showing content with the highest reputation on 11/05/2021 in all areas
-
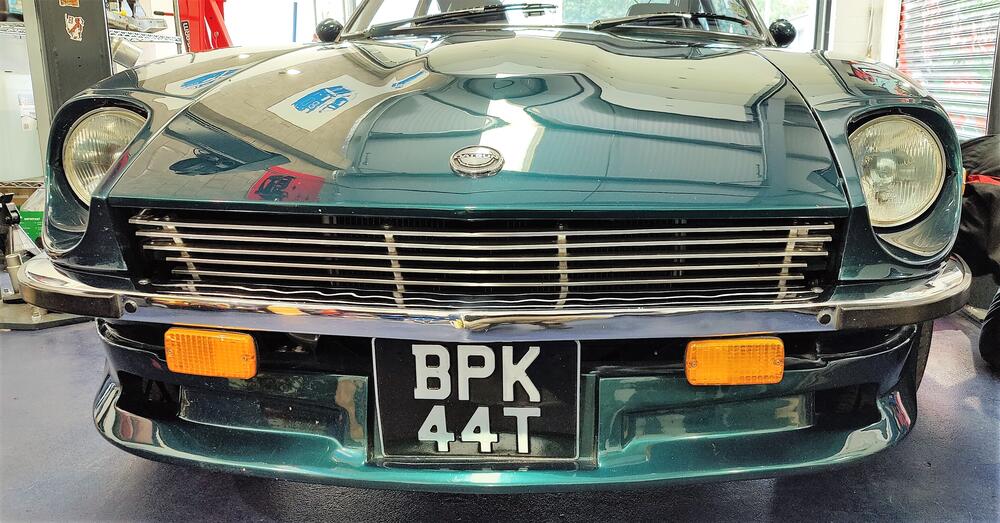
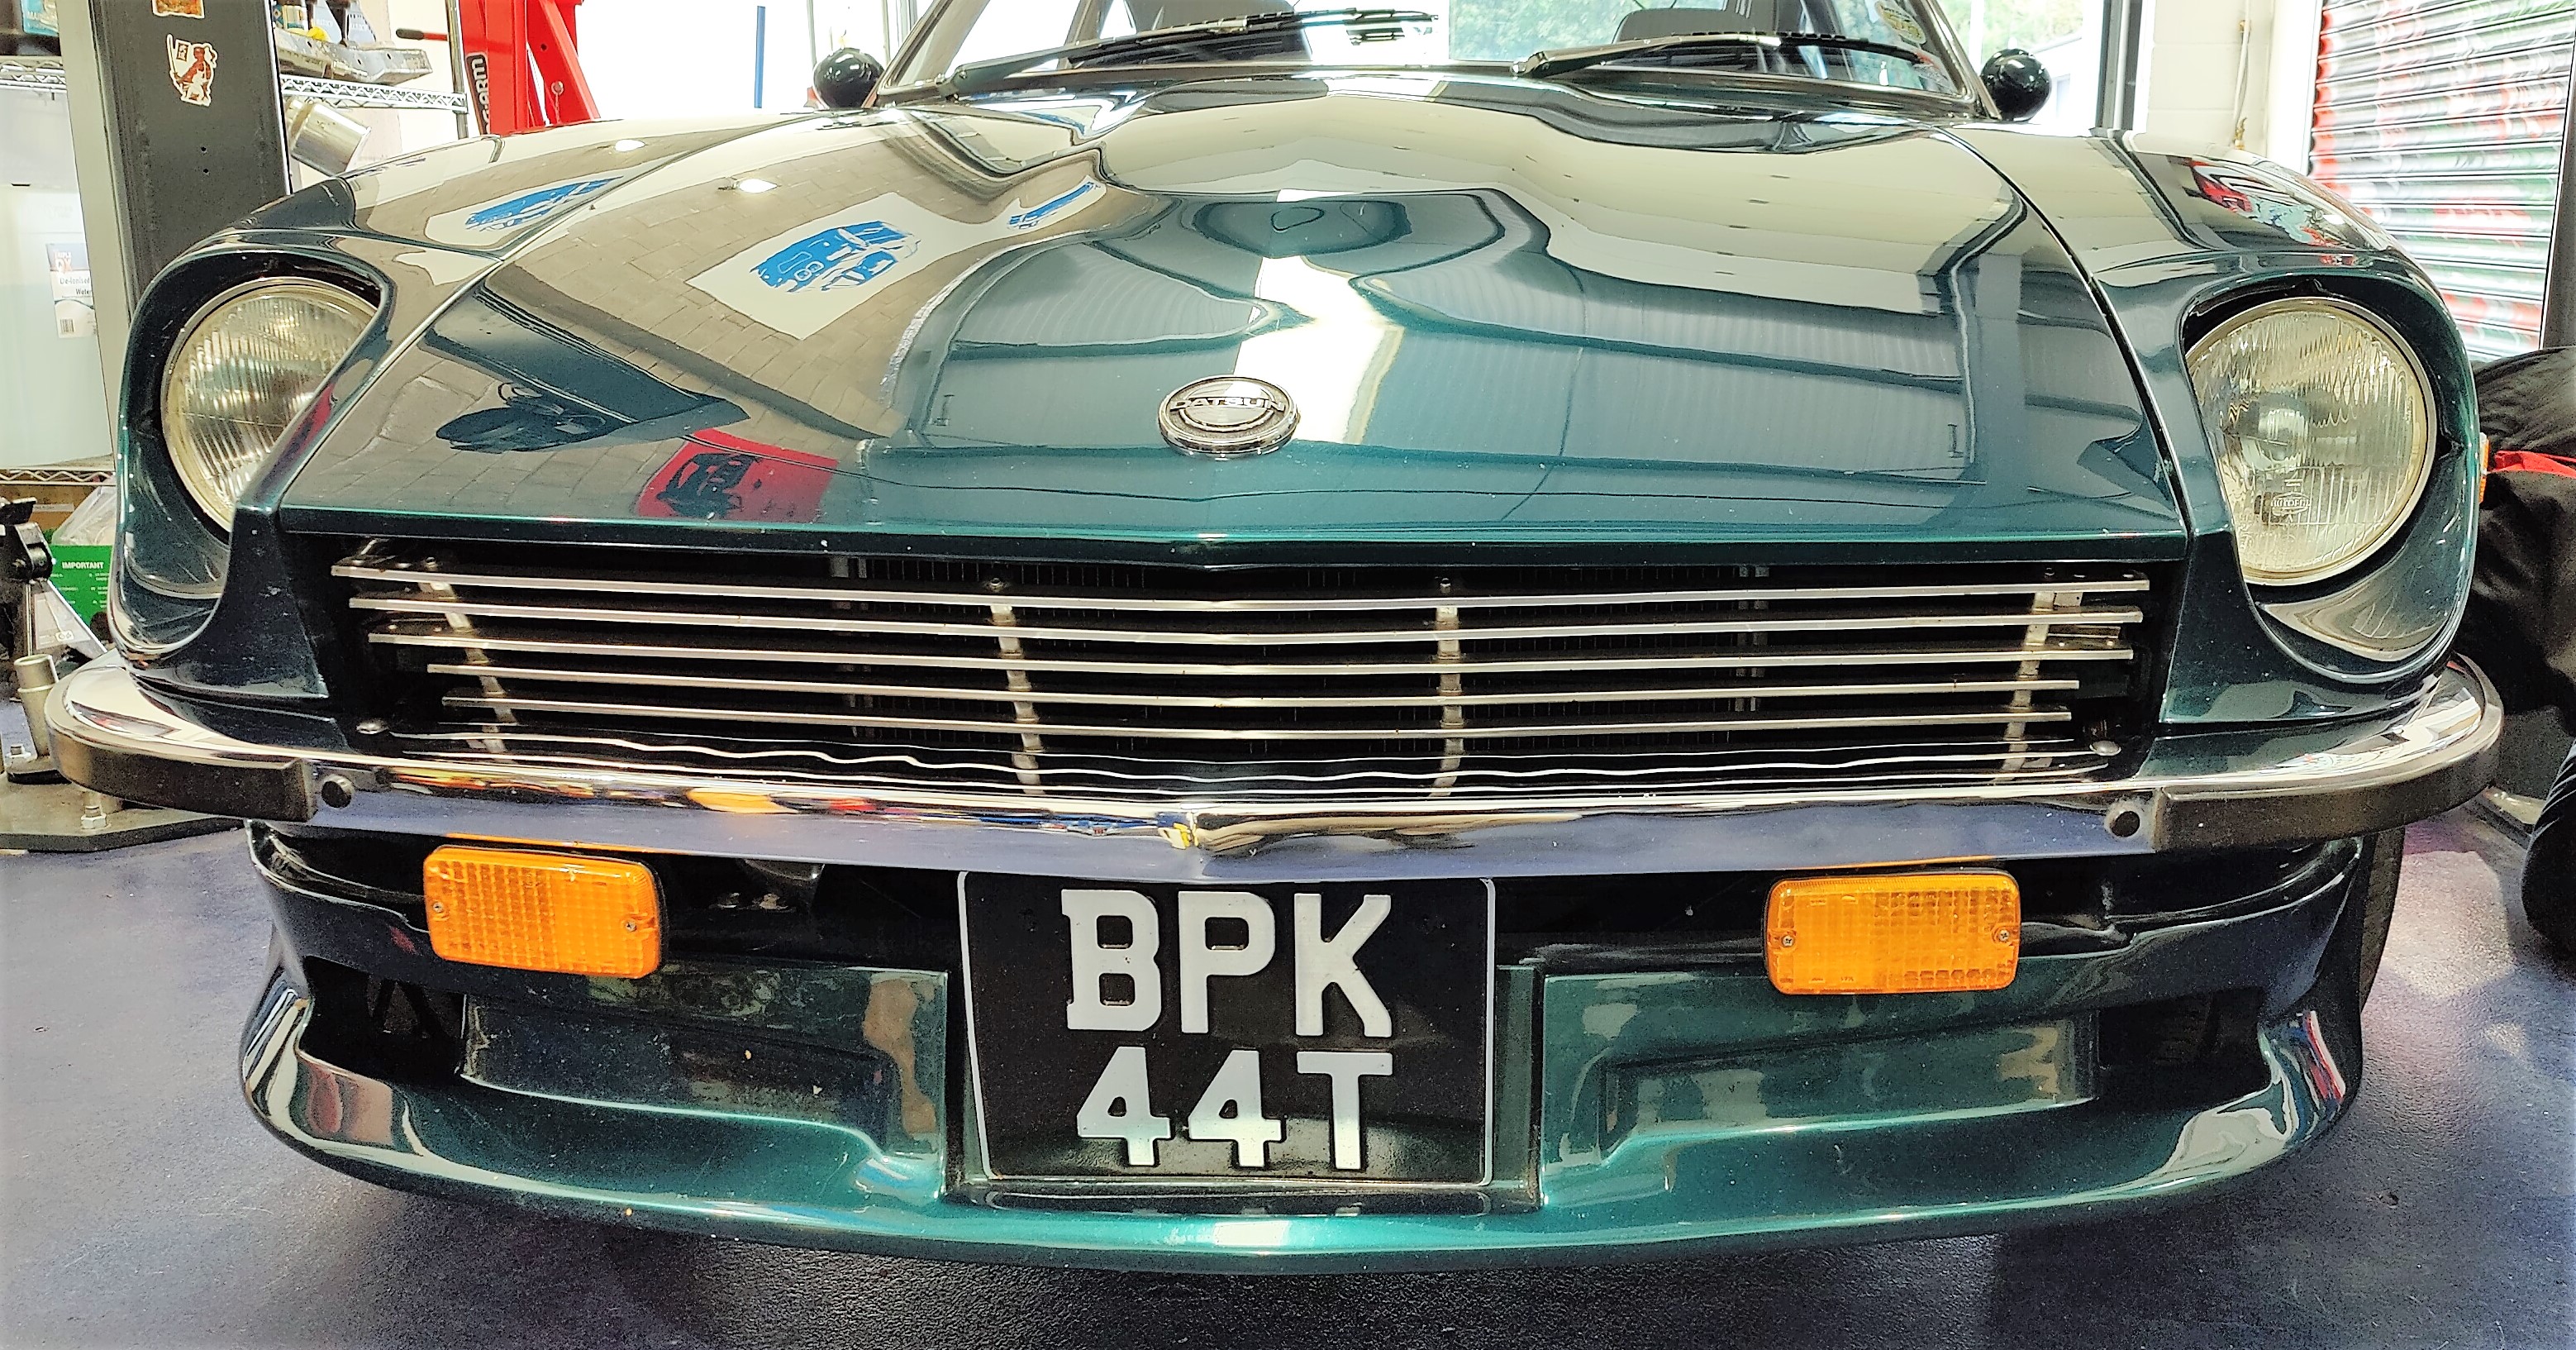
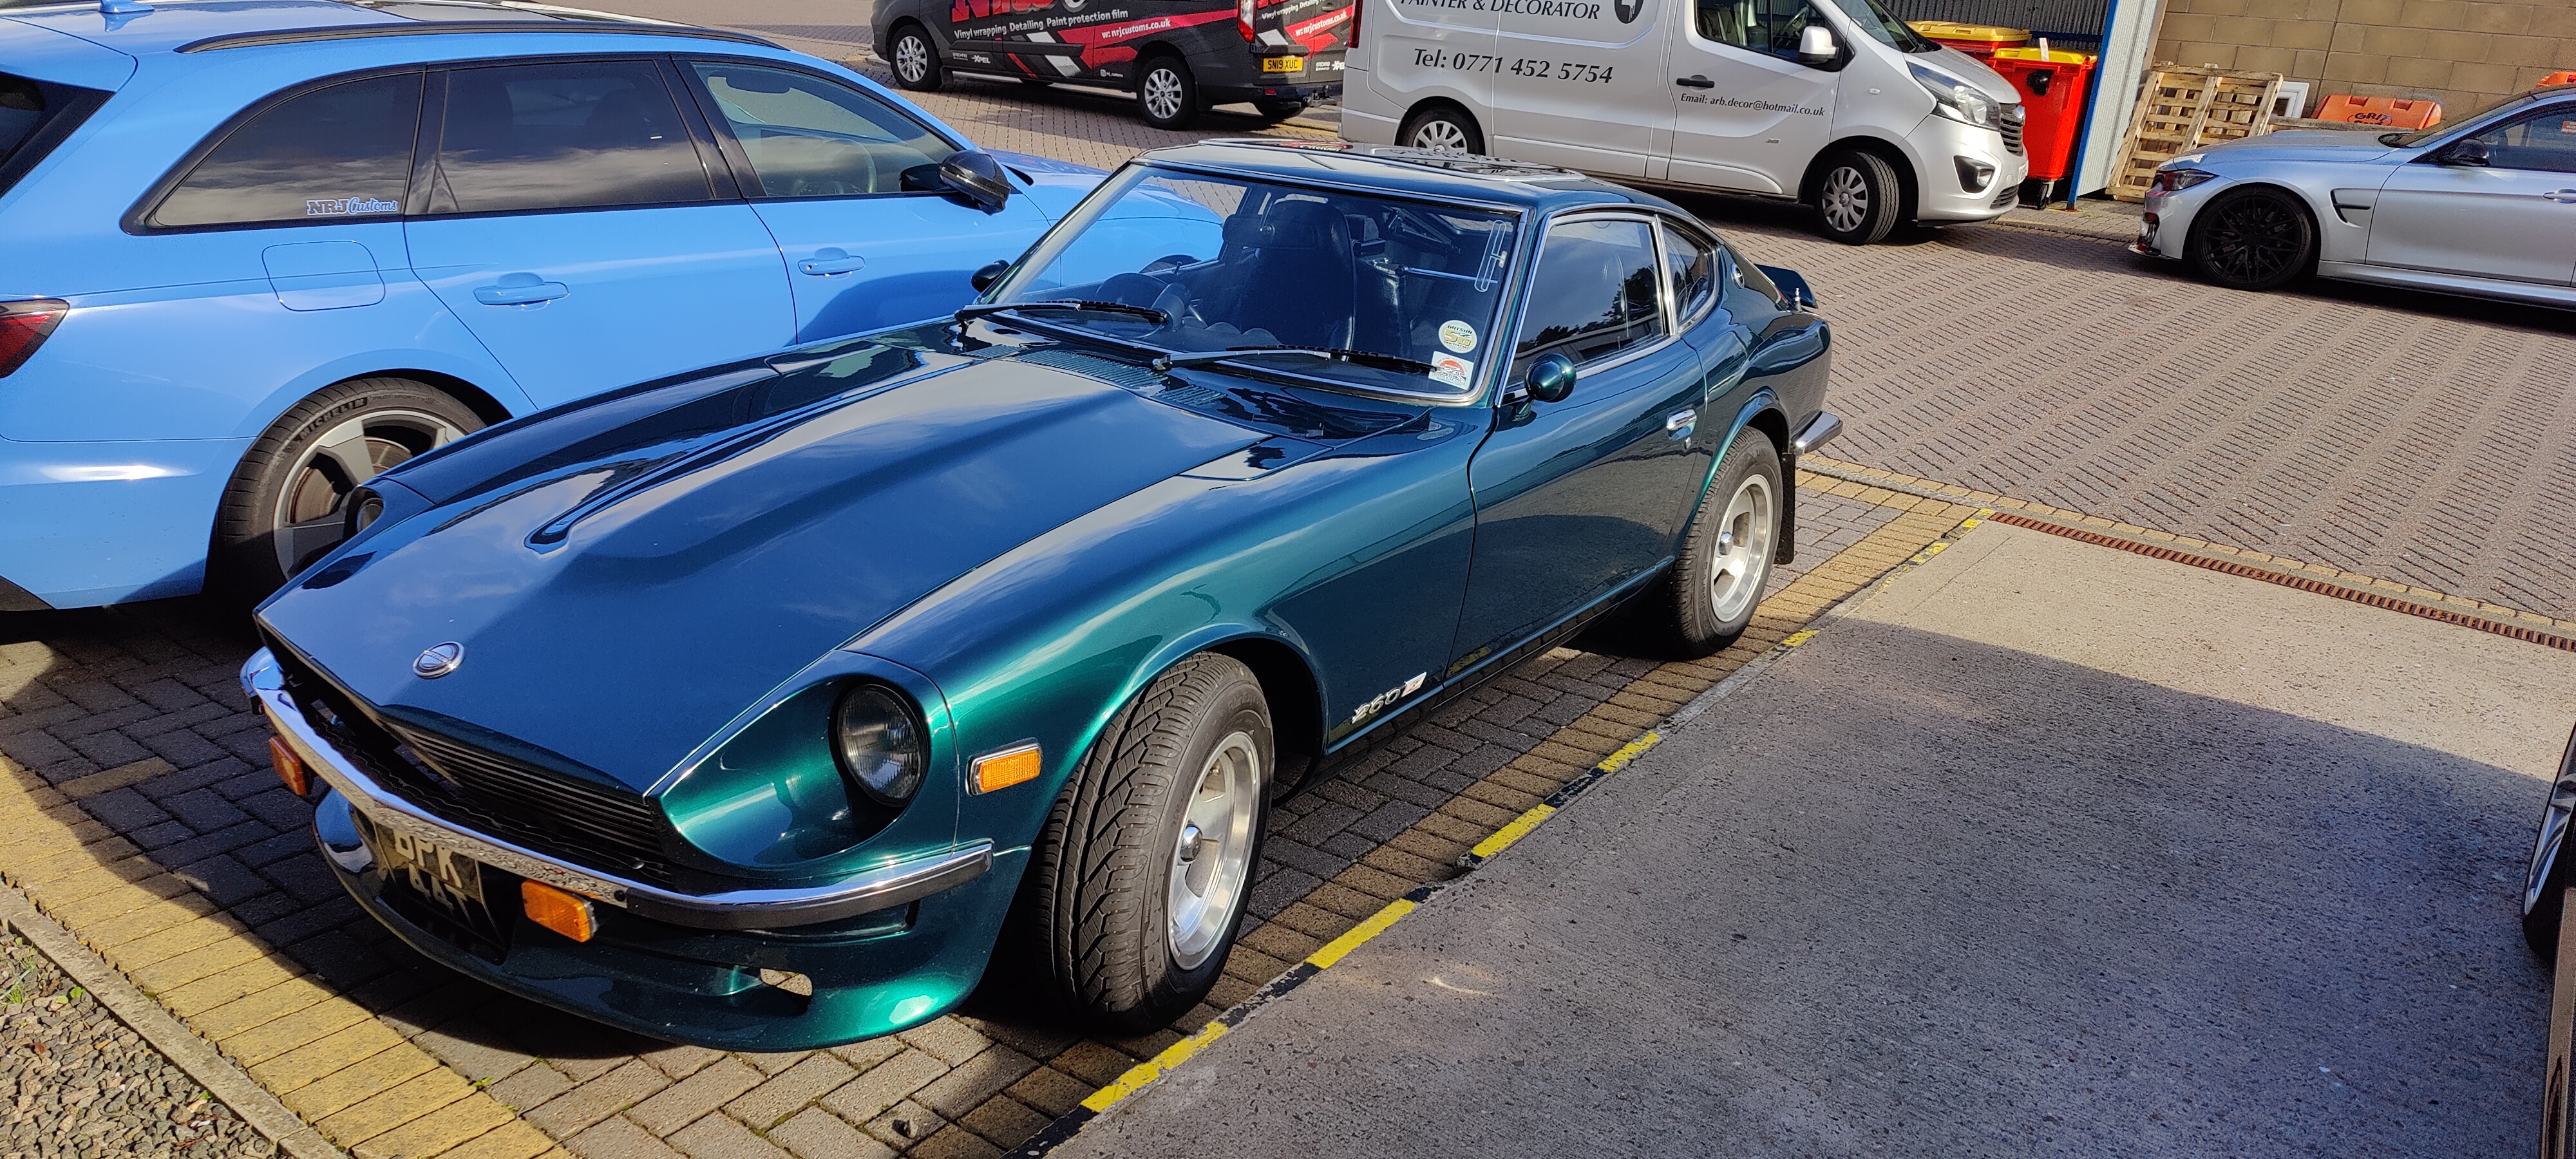
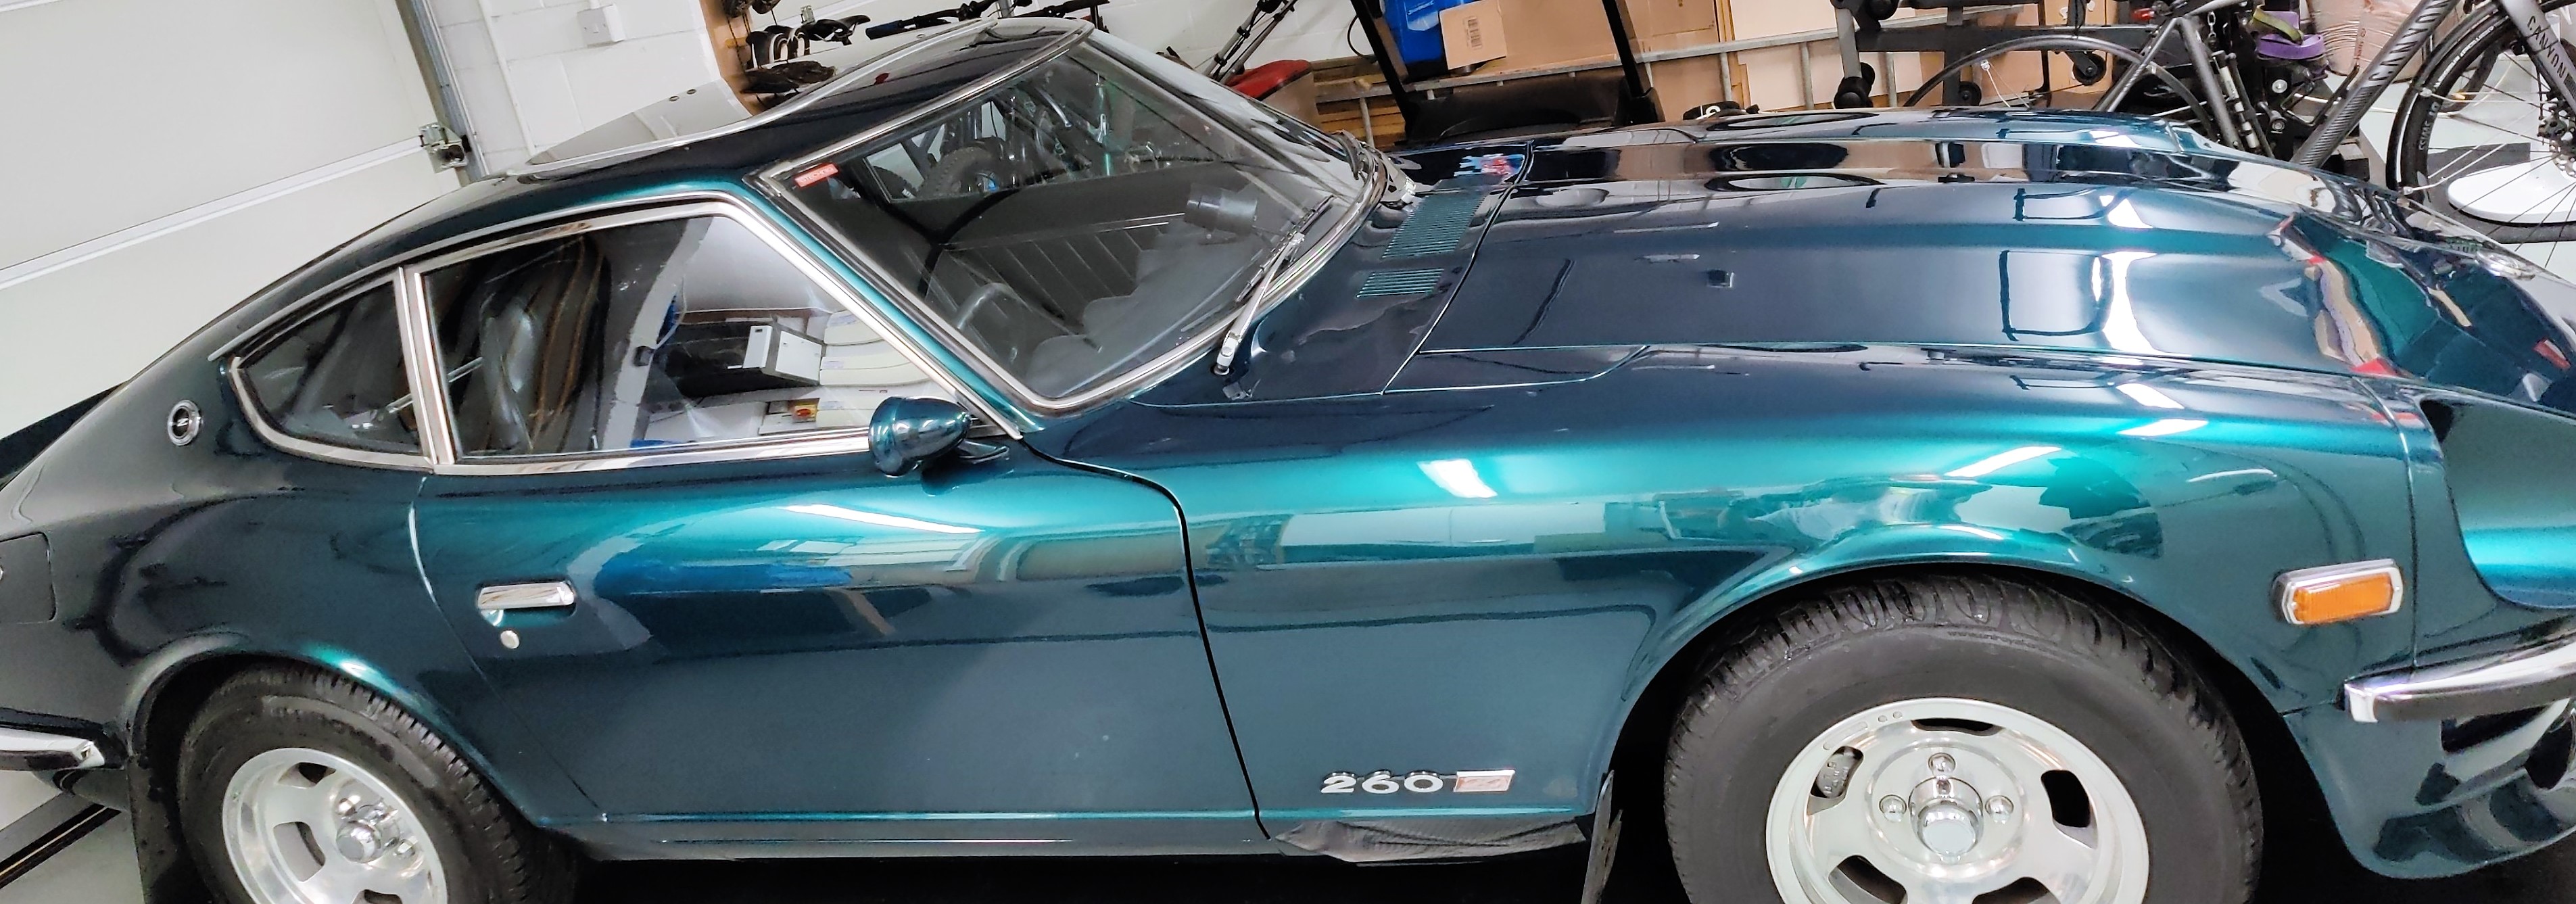
Hi all, Picked up my first 260Z a couple of weeks ago and I'm already hooked! I think she's a 1978 260Z although not registered in the UK until April 1979, which I think might just make her the youngest or last 260Z registered in the UK? I'm the 10th owner and I'm looking forward to compiling the history of the car over the coming months. The original colour was a metallic brown but she had a full colour change in 1998-1999 to Boston Green Metallic. A few bits and pieces to do next year, but generally she's in superb condition and still pulls like a freight train!


 5 points
 -
3 pointsSuccess !! The broken idle screw tip is now but a memory and I can see light through the hole. Now I can resume refreshing this carb and not have to purchase a new 40 DCOE for about $350 from www.carbparts.eu in the Czech Republic or even more from Pegasus Racing here in the U.S. I also have learned that simply buying a new aluminum carb body is difficult, if not impossible. I did not end up using mechanical force to remove the tip. In looking through old threads here, I found someone who had the same issue several years ago and resolved it using concentrated (conc.) nitric acid (70%) to dissolve the iron tip while leaving the aluminum carb body intact. As a retired chemist, that approach appealed to me and that's the route I eventually took. There is also a similar technique using a boiling, saturated alum solution with YouTube videos to back it up. I tried that approach first and was unsatisfied. In addition, the alum treatment darkened the aluminum alloy. So, nitric acid it was to be. But, just a warning to any others, it has to be conc. nitric acid as that will passivate (and thus protect) the aluminum surface. Dilute nitric acid will react with aluminum. Fortunately, I had a small amount of conc. nitric acid that I had brought home from work many years ago just to have it "in case." Well, this was the case and it was just as well that I already had some because obtaining conc. nitric acid is not that easy to do here. There's no problem if you want to buy conc. hydrochloric acid (muriatic acid) to do cement work as you can get that in any hardware store. And if you want conc. sulfuric acid (oleum) to top up a car battery, you can get that at any auto parts store. Both are exceedingly dangerous chemicals and must be handled as such, but no one will question your intent. Not so with conc. nitric acid. To my knowledge, it's not available in local stores; and certainly not here in my small town. People also seem to assume that you're going to use it to make explosives so that many chemical supply businesses ask a lot of questions and have rules about who can purchase it, shipping, etc. But, I did see where you could order twelve, 1-ounce bottles through Walmart.com at a hideous price. But, if you need it, you need it. In order to be the most effective, I blocked off the channel between the idle screw and the progression holes on the top of the carb using butyl rubber as it would also be unaffected by the acid. I placed the carb body on a level surface and used a small eyedropper to fill the idle screw hole to the top with acid. That didn't take a lot of acid, perhaps one mL. I think I initially saw some bubbling but that isn't important. I replaced the acid twice a day. The process took a long time to achieve the desired result. The "tell" of success was when I saw liquid leaking out of the bottom of the idle screw hole. That took about a week. Once this happened, a small pick was used to push the screw tip remnant up into the port where it could be removed. There is no obvious damage to the outlet hole. I know that I've gone on a long time about this but I think it's important to provide as much detail as possible so others can benefit from my experience. I'll probably write up a technical article on the matter.3 points
-
3 points
-
Thanks and yes, she's getting put away tonight until next Spring!2 points
-
 Have you set the engine at top dead center on the compression stroke, remove the distributor and check the drive spindle for 11:20. That’s going to give you the indicator your looking for.2 points
 -
 2 points
 -
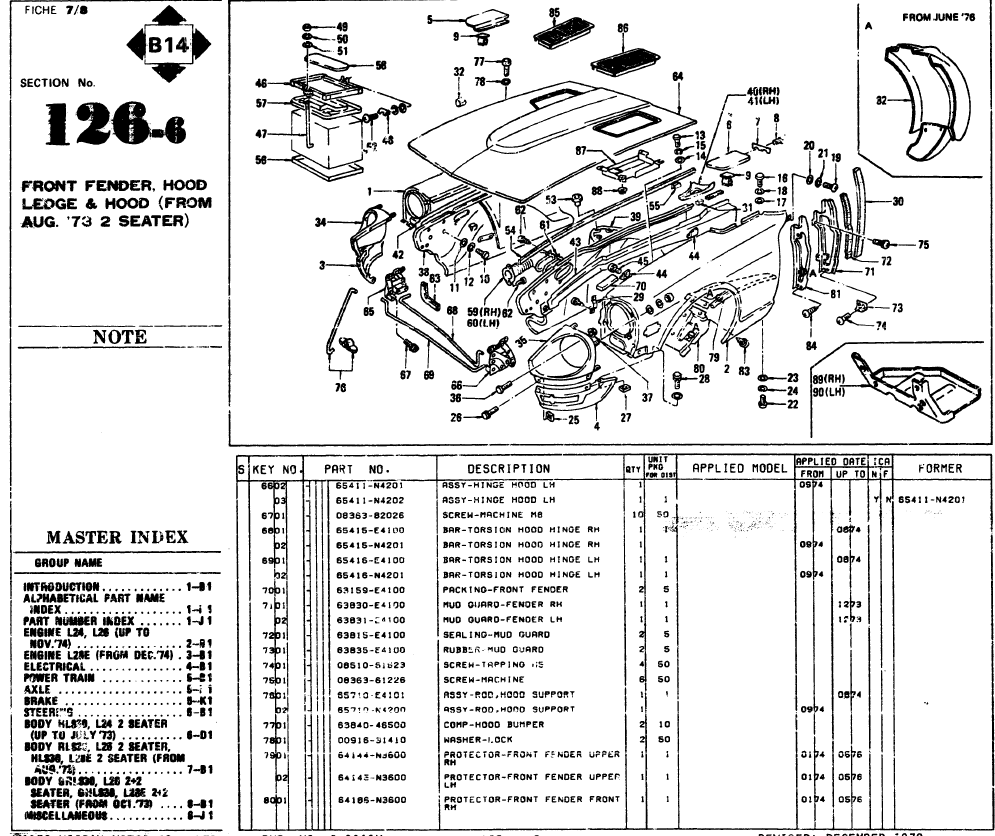
 2 pointsI believe they are for inner fender liners, item 80 on this parts diagram. They were not on the 240Z's IIRC, so your fenders might have been replaced. I could be wrong, but I recall something about this on the forum previously.
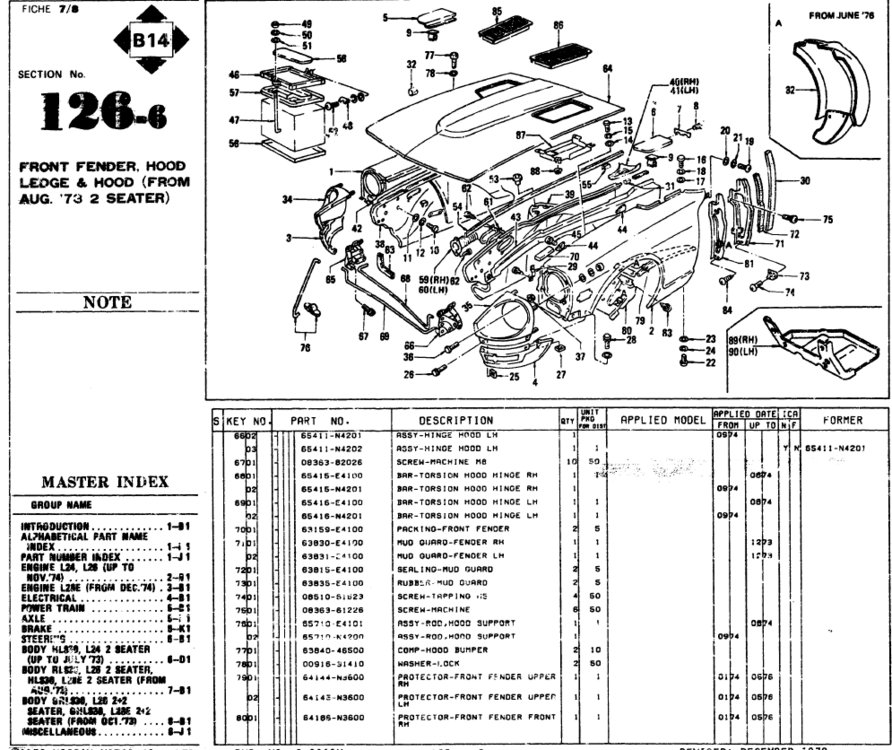 2 points
 -
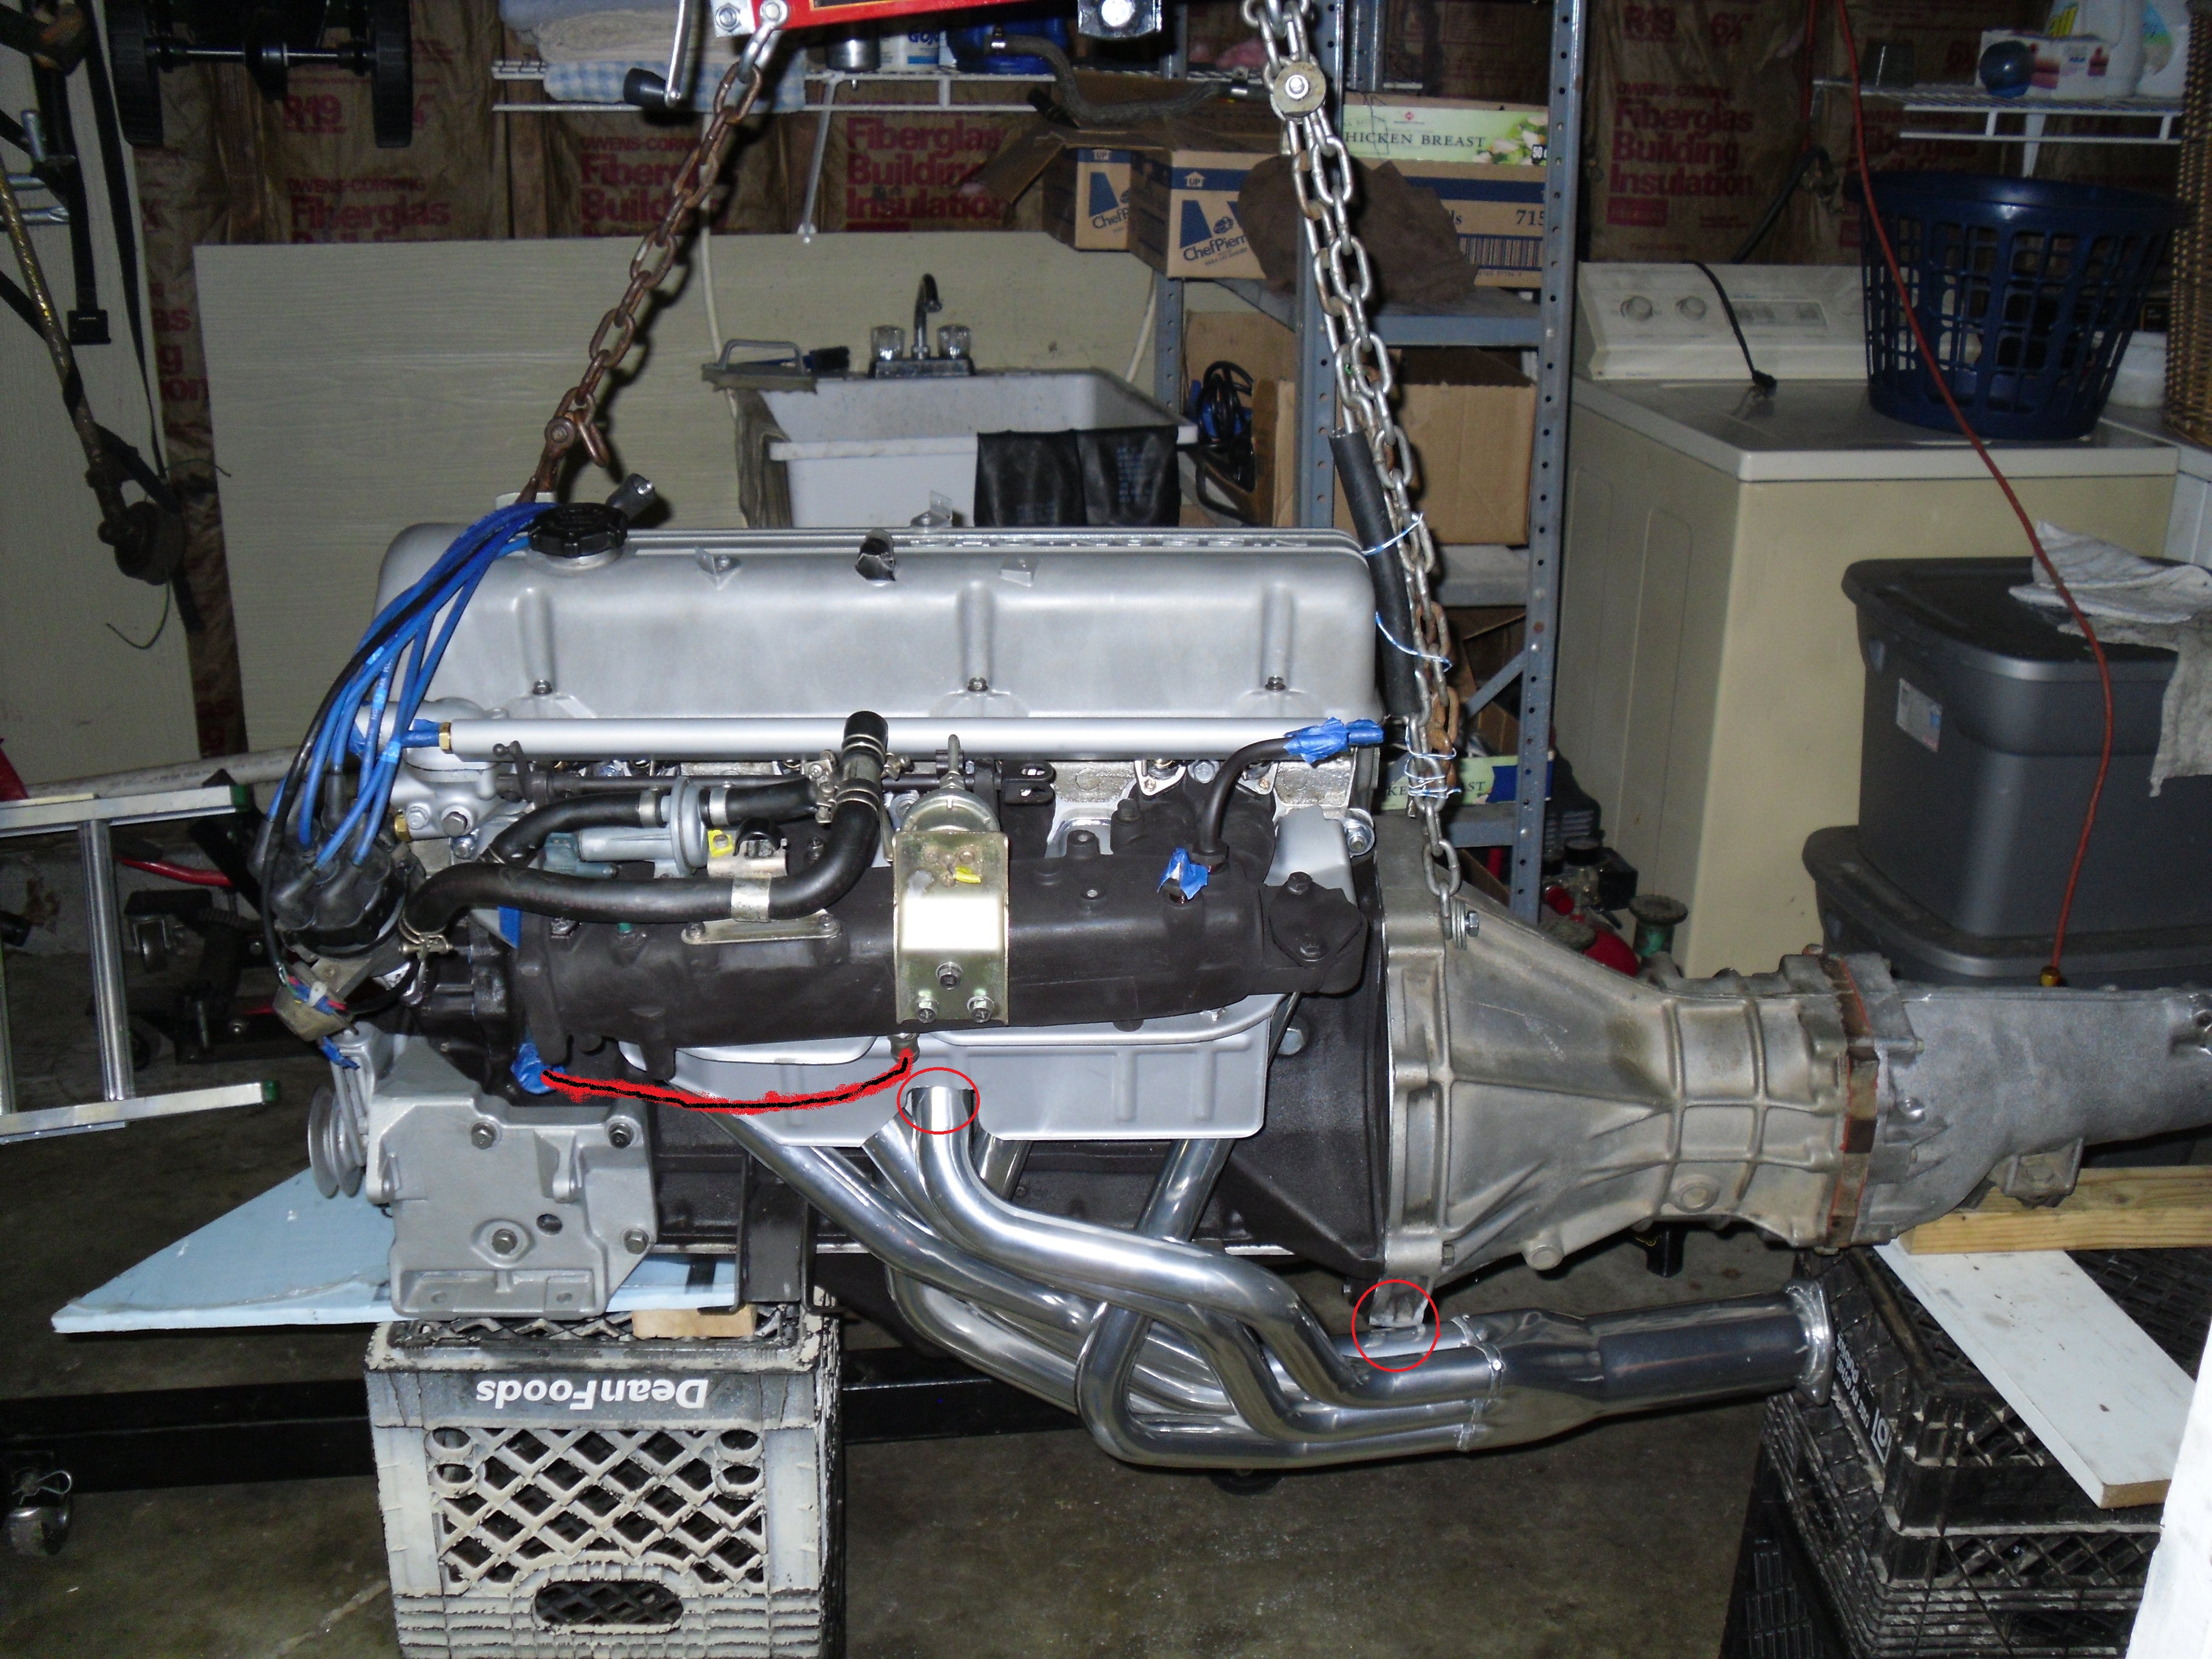
 2 pointsIt's been a long time but I remember people telling me the header would melt the PCV hose coming off the bottom of the intake to the block. I cut my shield to fit my 6 to 1 coated header. Maybe someone could chime in with better knowledge on that?
 2 points
 -
 This may help, it'd the parts numbers of all the gaskets in the factory kit for the 240Z.1 point
 -
 1 point
 -
You know we should probably have a copy of the parts reference numbers on this site. If carpartsmanuals closes their servers I think we would all be upset.1 point
-
 Welcome to the group and your purchase of a great looking car. It has truly been well cared for - especially with a history of nine previous owners. I can't be sure but looking at your pics I suspect the front sidemarkers are installed backwards. The flat lens surface should be parallel to the body line, i.e. the thick part of the lens should be forward. The rear markers are not shown but might have the same issue - the thick part should be rearward. Looking forward to your updates as you become more familiar with your new ride. Cheers!1 point
 -
 Charles, thanks for looking I really appreciate that ! Sent from my iPhone using Tapatalk1 point
 -
Confused about the replacement damper from MSA being +20. Someone please chime in…1 point
-
1 point
-
1 point
-
1 pointSorry, it took me a lot longer than I anticipated to getting to doing the measurements. And now that I have them probably to within + 1 mm -- the 2 mm cardboard is somewhat distorted after 50 years -- I need to get them onto a sketch and then a drawing. I wish I had my CAD software from where I used to work, but it will have to be freehand. And I haven't done a perspective drawing in ages. So, it's going to take some time. The glove box is distorted from being rectangular and what makes it almost diabolical is that there are "cut ins" along both of the short top edges and they are not symmetrical. They are to avoid interfering with the duct work to the passenger eyeball vent. As such, those dimensions are not terribly critical. To get you started, however, let me suggest that you begin with a block of rigid, open-cell foam that is cut to be 306 mm x 140 mm x 200 mm. You will then need to shave and contour that block to get the final dimensions that I shall provide in the drawing. Once that's done, you can "harden up" the finished plug by applying polyester resin to the foam. Let the fun begin.1 point
-
 1 pointThese fenders have depot tags on the backside dated 1986 so this is probably what’s going. Thanks for the info everyone.1 point
 -
1 pointMy first question is what year is your car? Signature line would be helpful My second is they are later fenders with the brackets for fender liners1 point
-
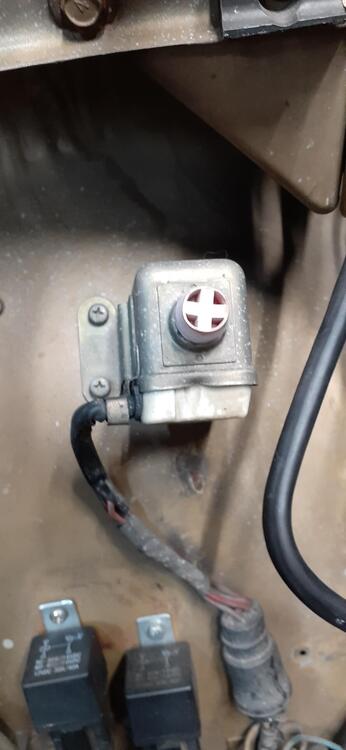
1 pointStwveJ, I found a pic I took before I tore everything apart and found that all three black wires were grounded to the chassis. Another pic I can see the yellow wire tucking down under the thermostat. I forgot I took those pics. Thanks again. Sent from my iPhone using Tapatalk1 point
-
1 pointThe "relay" is the voltage regulator. The W/B wire is for the field. It should inject current into the alternator when the voltage is low. A failure to produce an output from the alternator could be a problem within the voltage regulator or the alternator. What makes you think I don't like that grotesque abomination called the Interlock Relay Unit? Have you ever buckled up an inanimate object in the passenger seat because the car would not start otherwise? Seatbelt interlocks came from a push by Ford to make itself look good to the NHTSA about getting people to use their seatbelts more. While Ford had already designed and debugged their system, the NHTSA mandated the implementation of a seatbelt interlock for all cars in the 74 model year. With the relatively short notice most automakers implemented the rules poorly. The NHTSA quickly retired the rule. Here is some reading on the subject: https://www.allpar.com/threads/the-return-of-the-seat-belt-interlock-crazy-rule-or-money-saver.236643/. People found ways to defeat these systems because a faulty interlock would make it where you couldn't drive your car. There is an emergency button under the hood on the passenger fender. There's a picture below. In its early life, the button was red. It's an annoyance to have intact, but it won't affect charging.
 1 point
 -
Well, we recently had some guests over the house maybe 6-8 weeks ago and it was like the 3rd time someone made very positive comments about the Z. I think she finally gets it, she doesn’t love it but she realizes it’s a unique car. So with that said she hasn’t made a single comment about the car or the money I spend on it. As long as I bring home the bacon, clean up my messes she’s been letting me do my thing. So we’ve made progress, plus I’m acting like a politician....just tell her what she wants to hear (like “ l’ll sell it someday when it’s fixed up”) and then blow it off, (I’m never selling it)! [emoji23] Sent from my iPhone using Tapatalk1 point
-
1 point
-
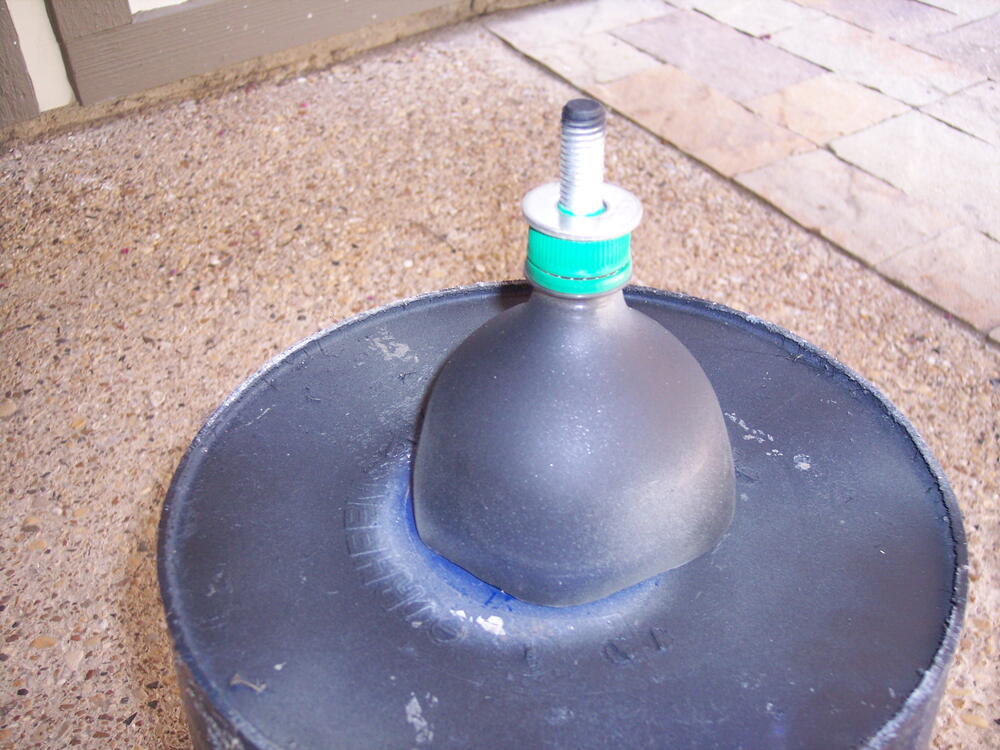
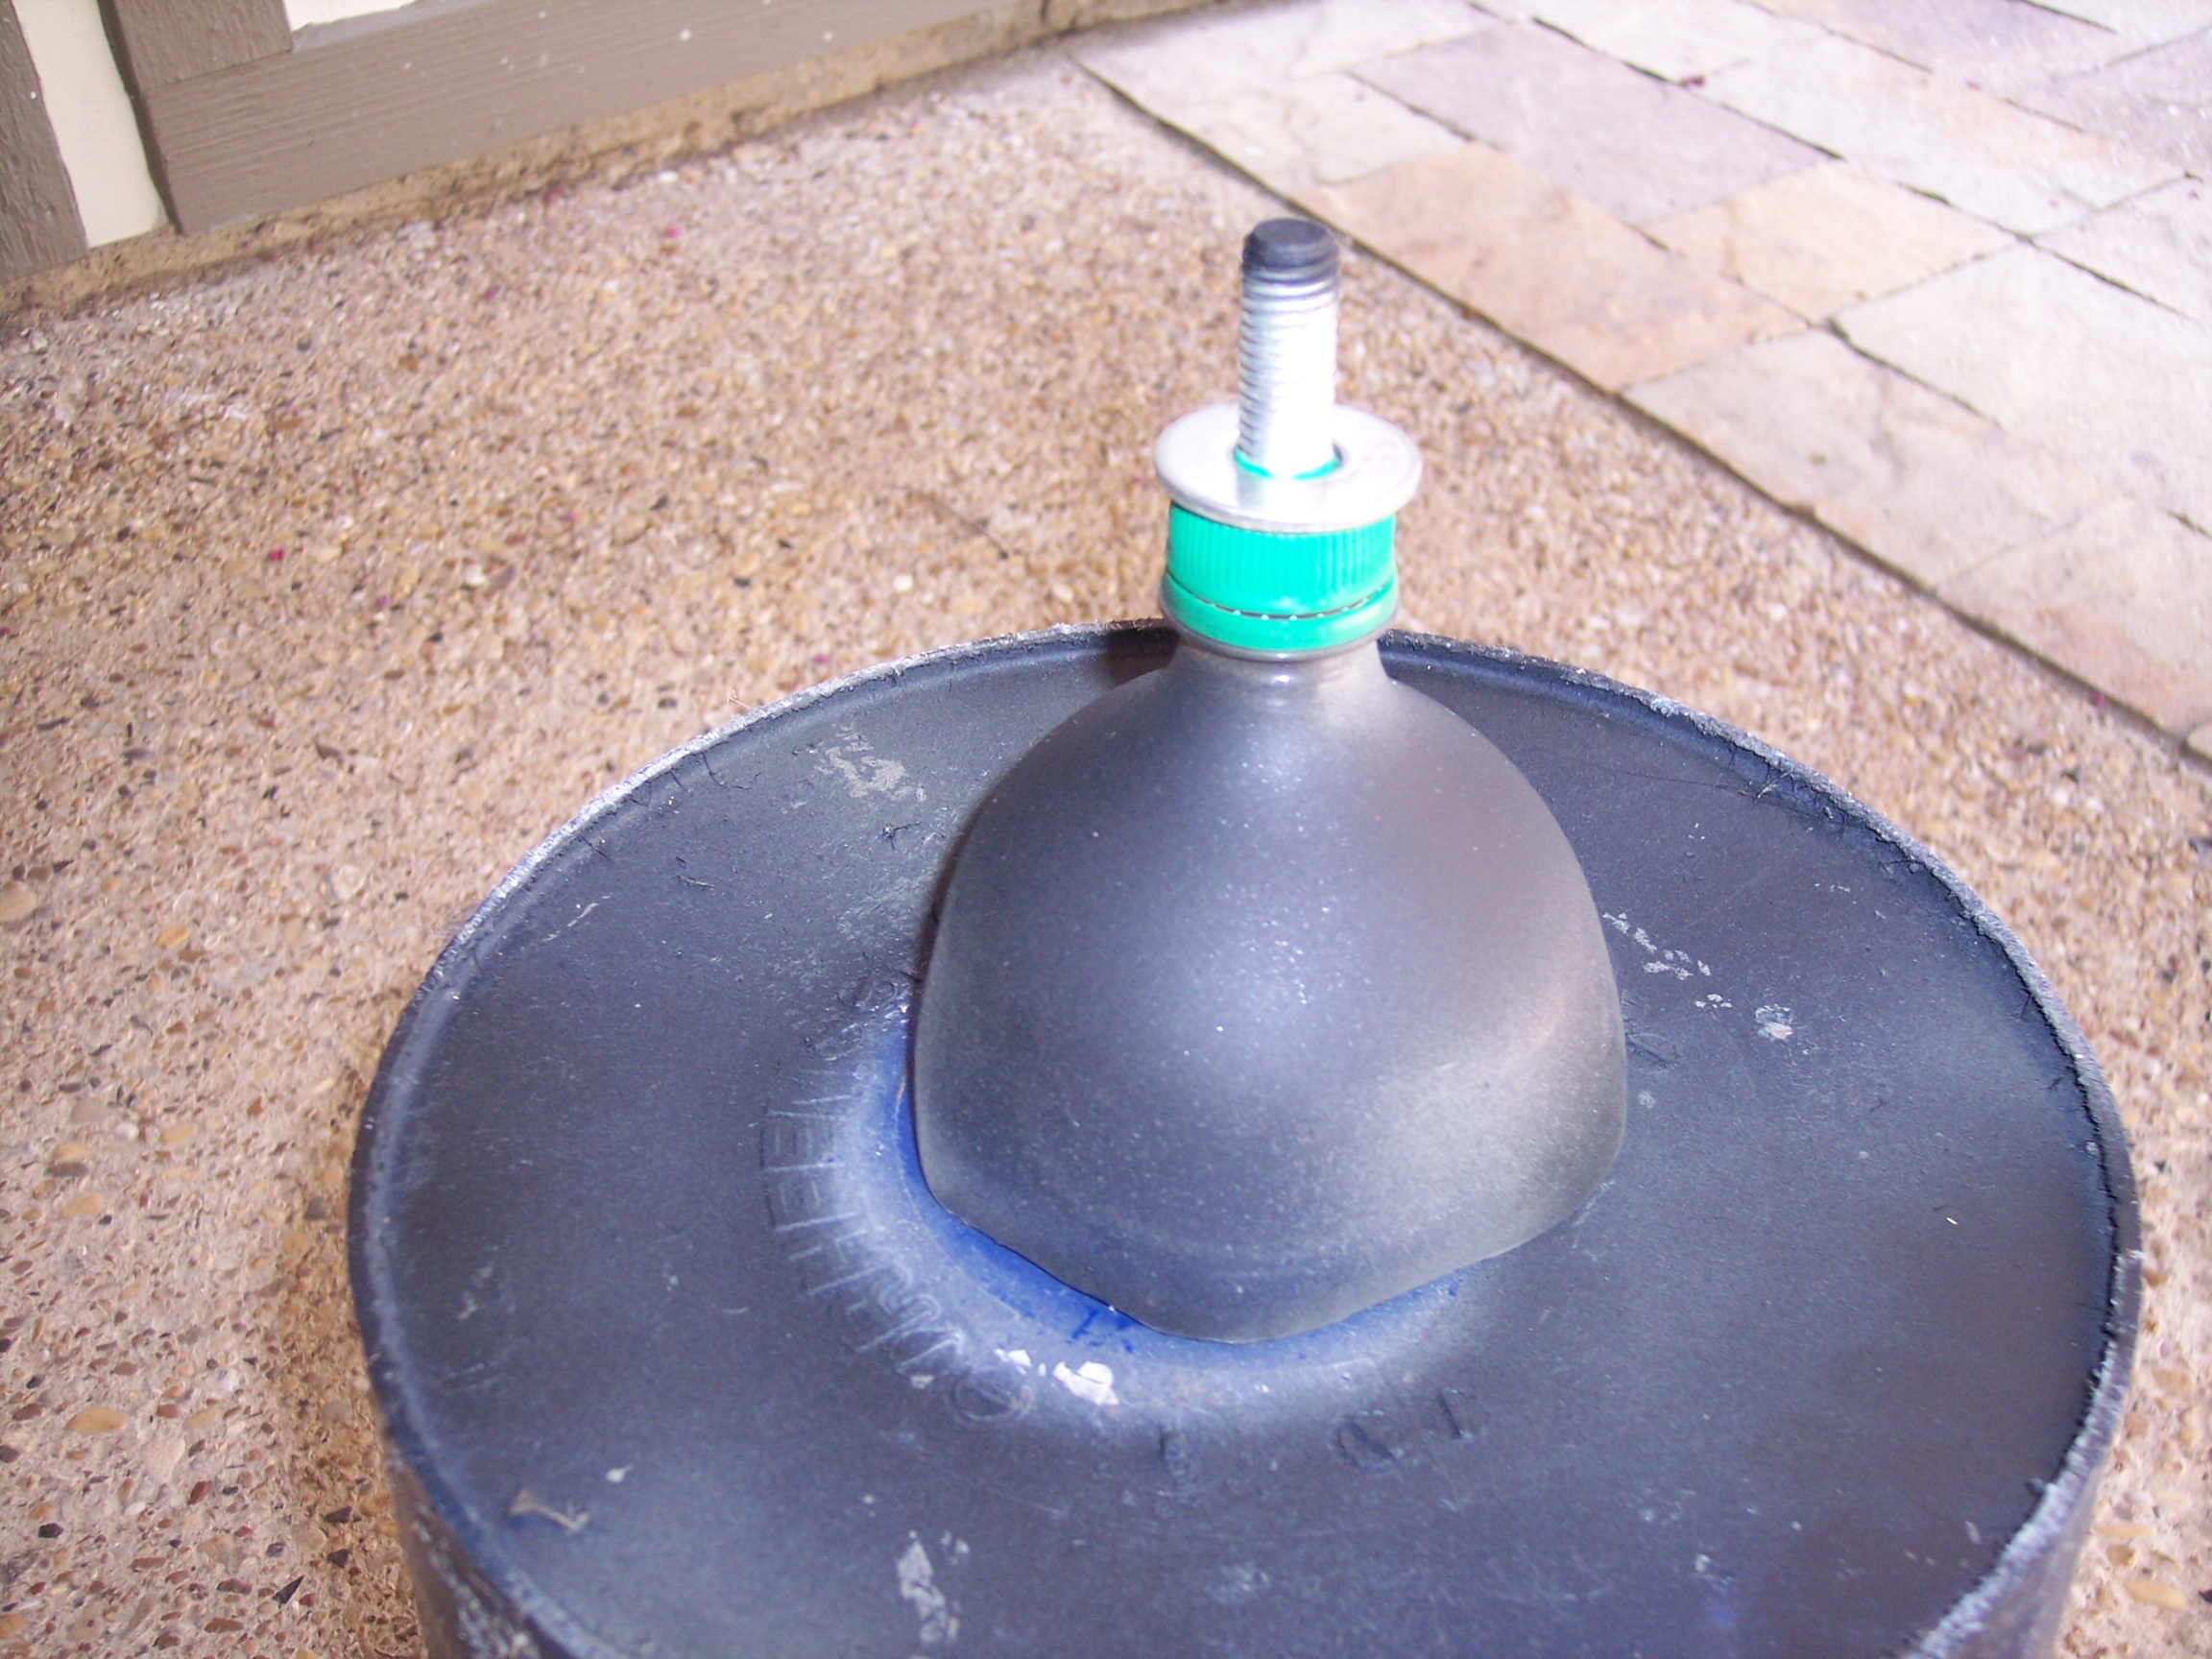
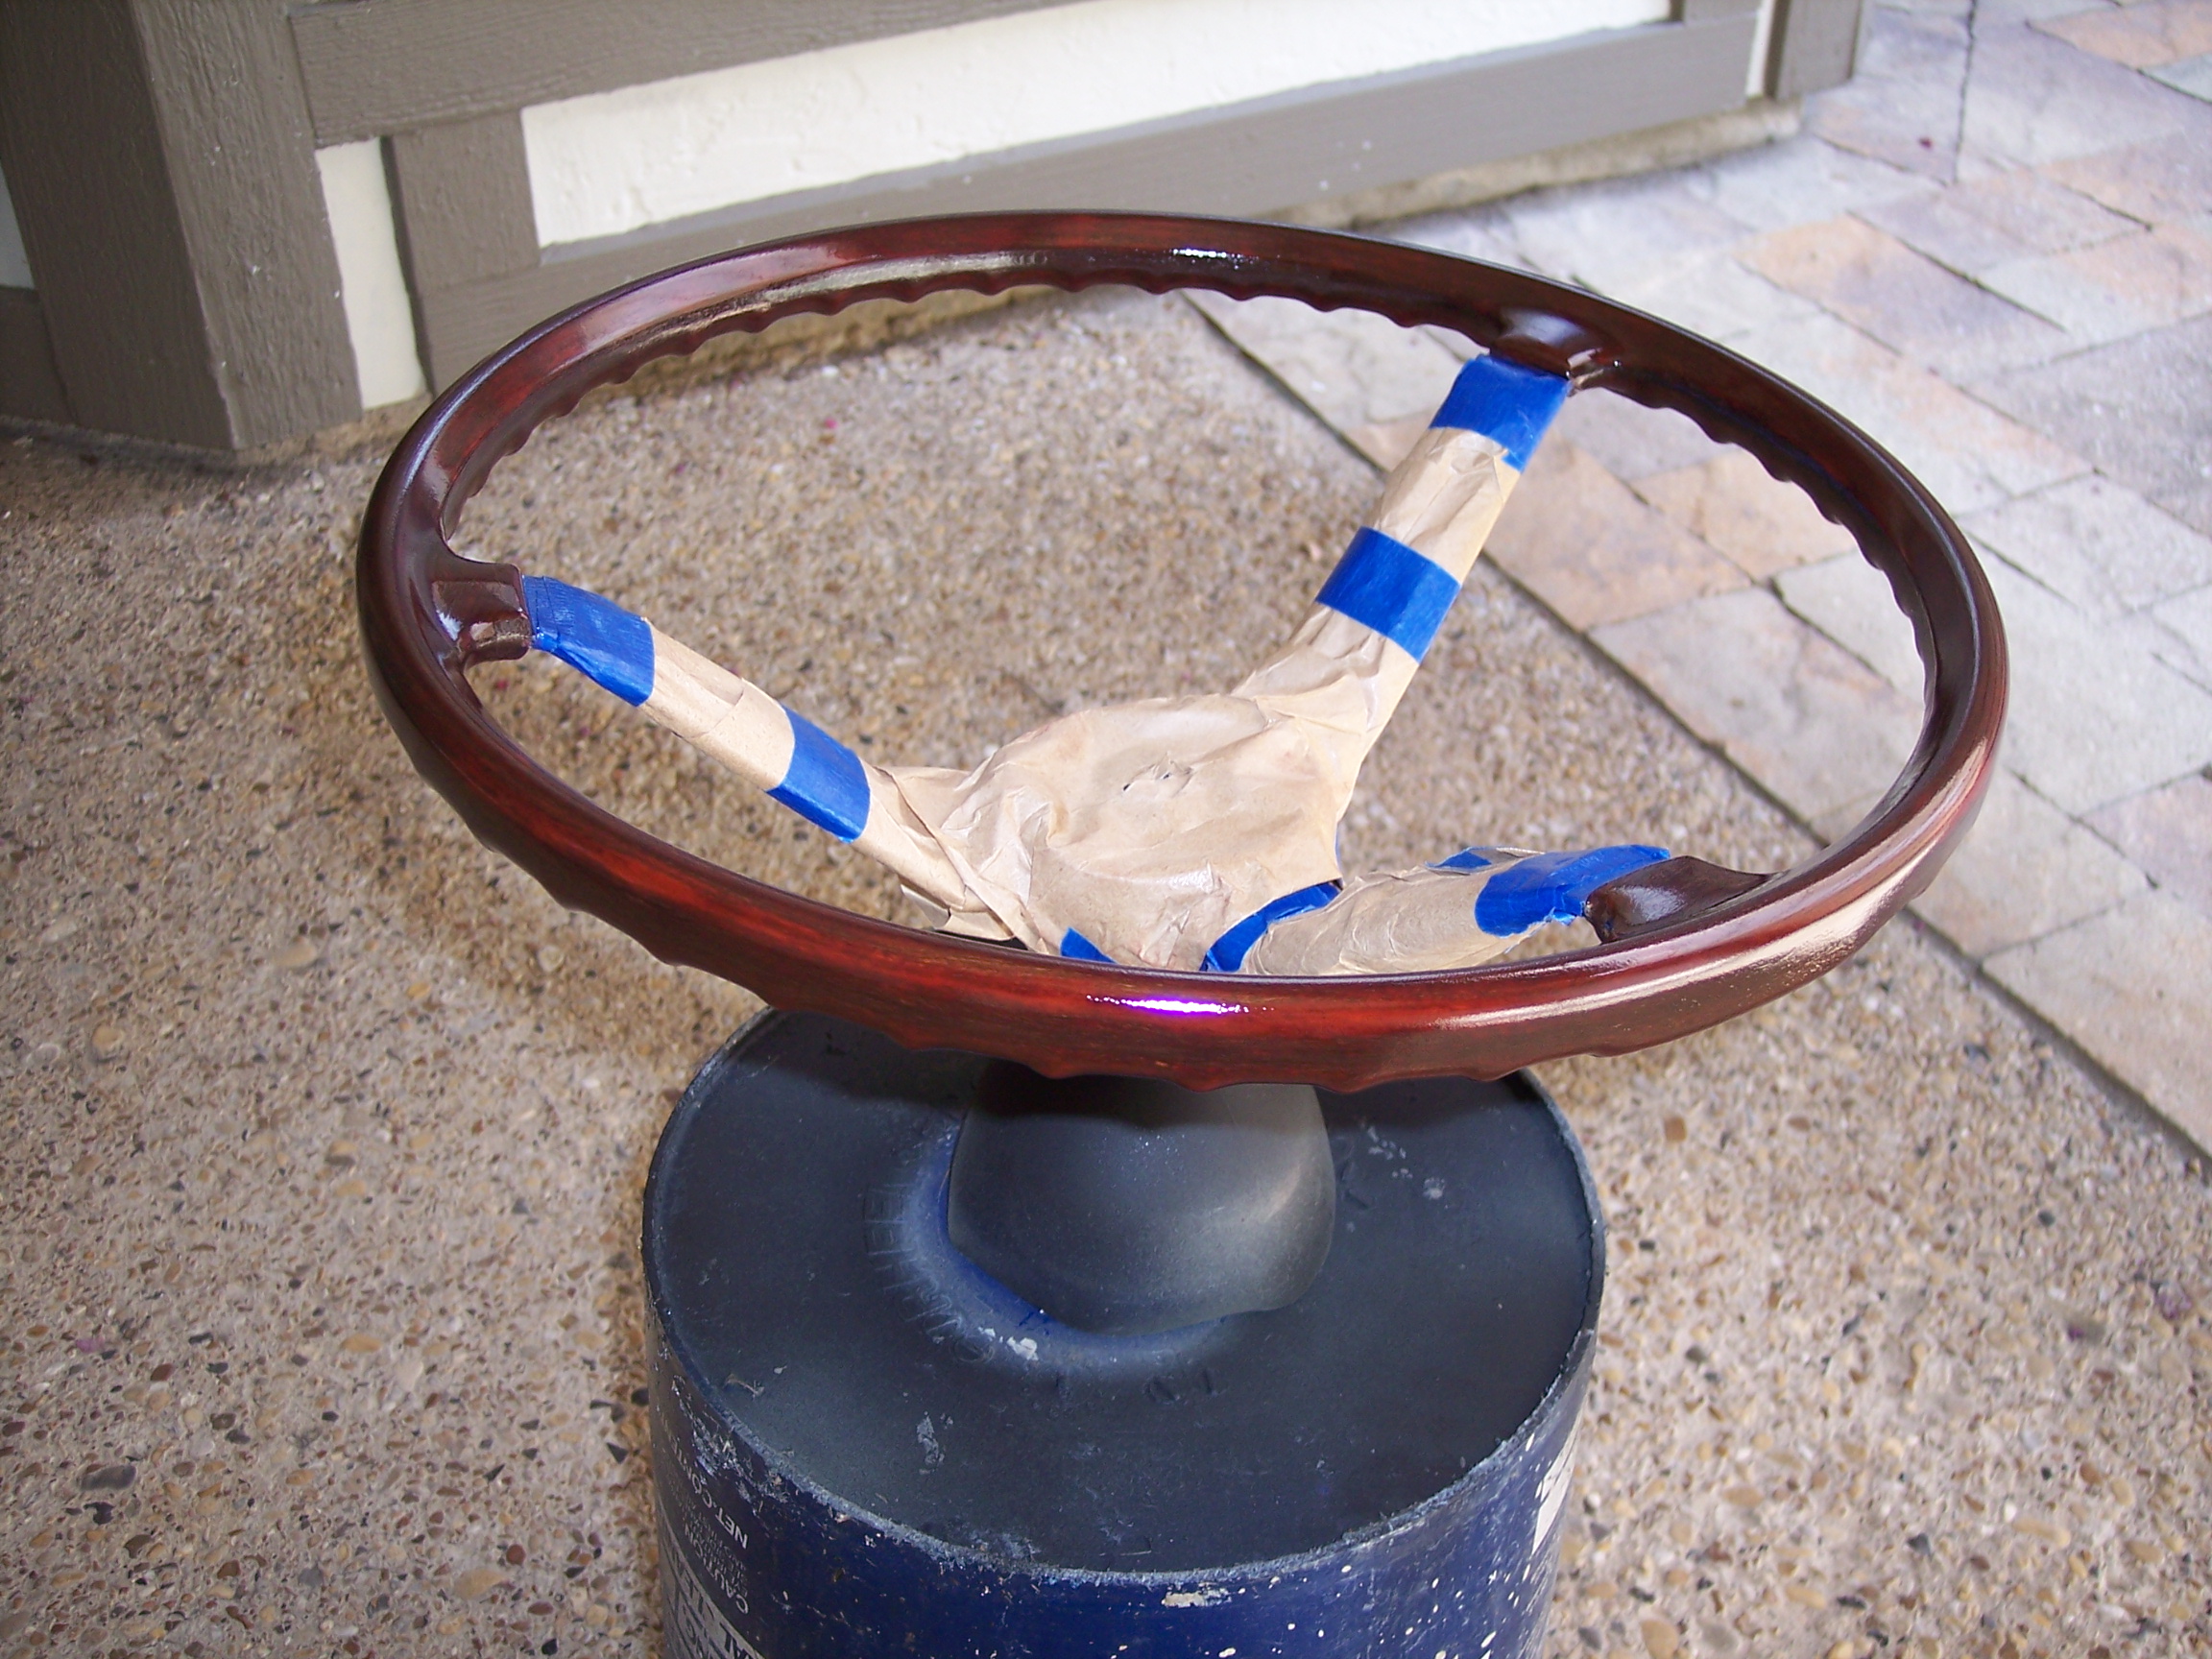
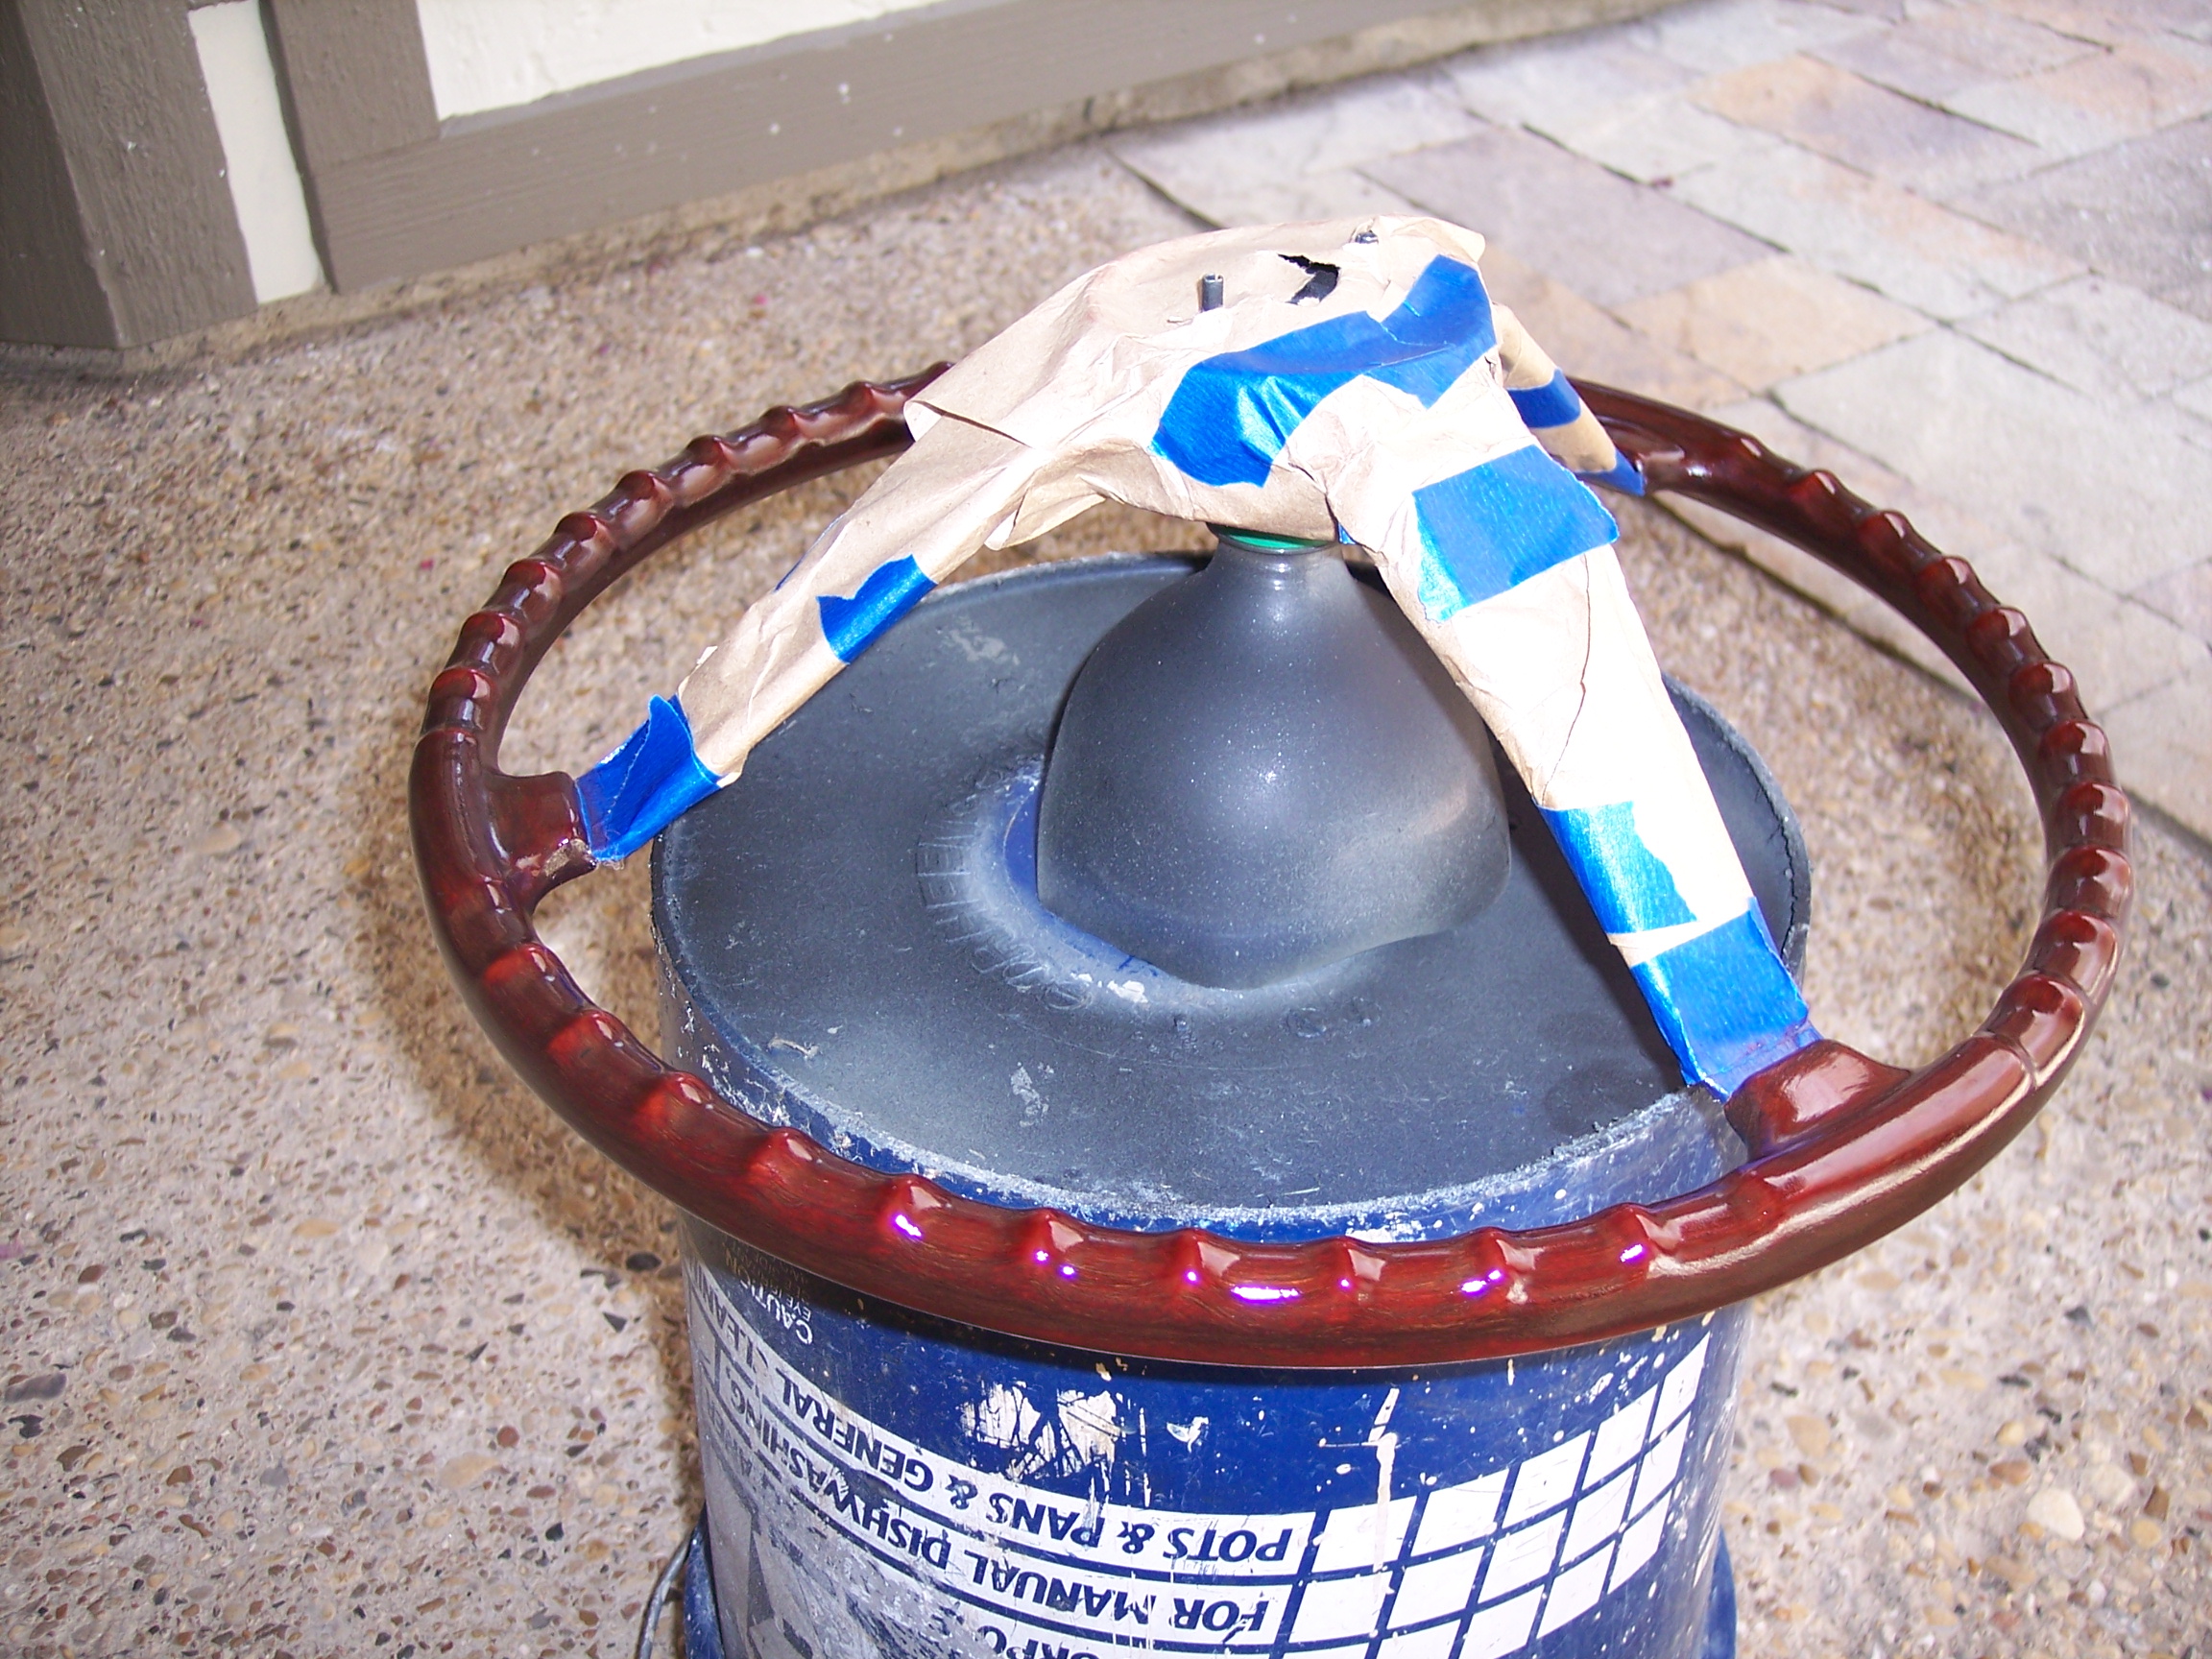
1 pointNothing as exotic as most of the entries in this thread but here is a little paint accessory I made this week to help in refinishing my steering wheel. It is the top of a 2 liter bottle with a nice fat bolt installed in the cap. It served as a stand for painting the spokes and hub and then it provided a spinner base to rotate the wheel evenly while spraying the spar urethane.

 1 point
 -
 1 point1 point
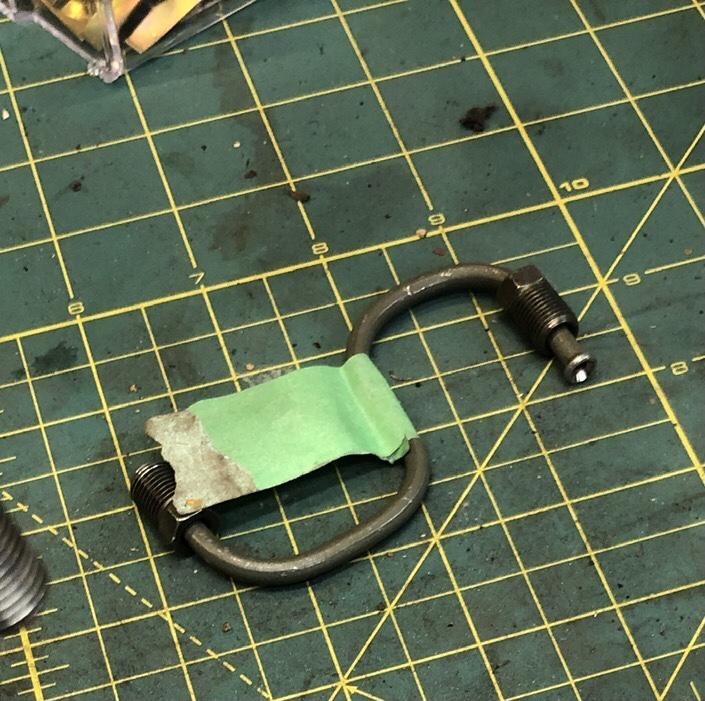
 1 pointJust stare at that little beauty for a minute. The brake line threaded into that little remnant of an old brake line welded to the bar is the secret weapon. I already use the CuNi tubing and have for years. It is very soft and forms nicely in my powerful hands. However, there is one bend type that is always challenging and of course occurs frequently. A tight curve near the end of the tube. Bending the end of the tube requires more force as the leverage is reduced with shorter length. Don’t believe me, make a 180 in the middle of a 12 long piece, then make it again at the end. My finger tips cringe at the thought of it. Dang, if only there was a way to safely, easily grab the end of the tube in a vise grip or something without screwing up the threads or crushing the tubing and giving me an extension handle to increase leverage. BINGO! Thread the tube nut into an old female brake fitting welded to the end of a scrap. Consider that little devil tight S curve on the stock front caliper. TWO tight 180 bends near BOTH ends! Impossible to make it nice and pretty and kink free! Not any more. I made a bunch. Need any? All of these were created on the car on real stock calipers and strut tube mounted hose ends, so they fit perfectly. They are R and L sided. They took literally 5 minutes each to bend and fit. Yes, they are not the exact same shape as the stock ones, sorry. Those bends are ridiculous.
 1 point
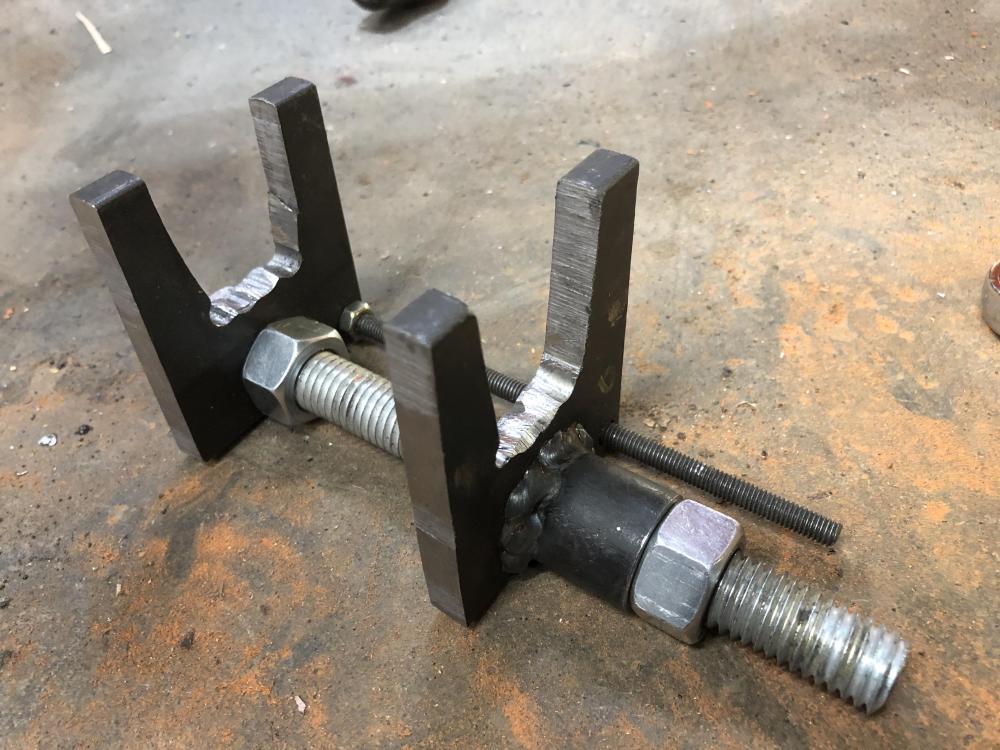
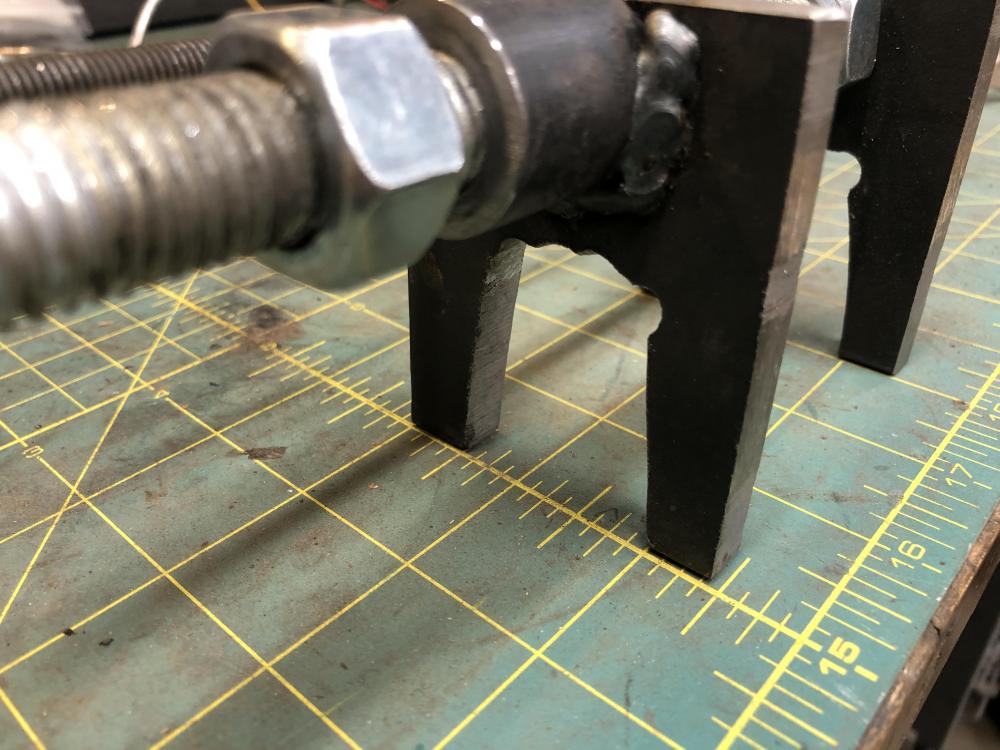
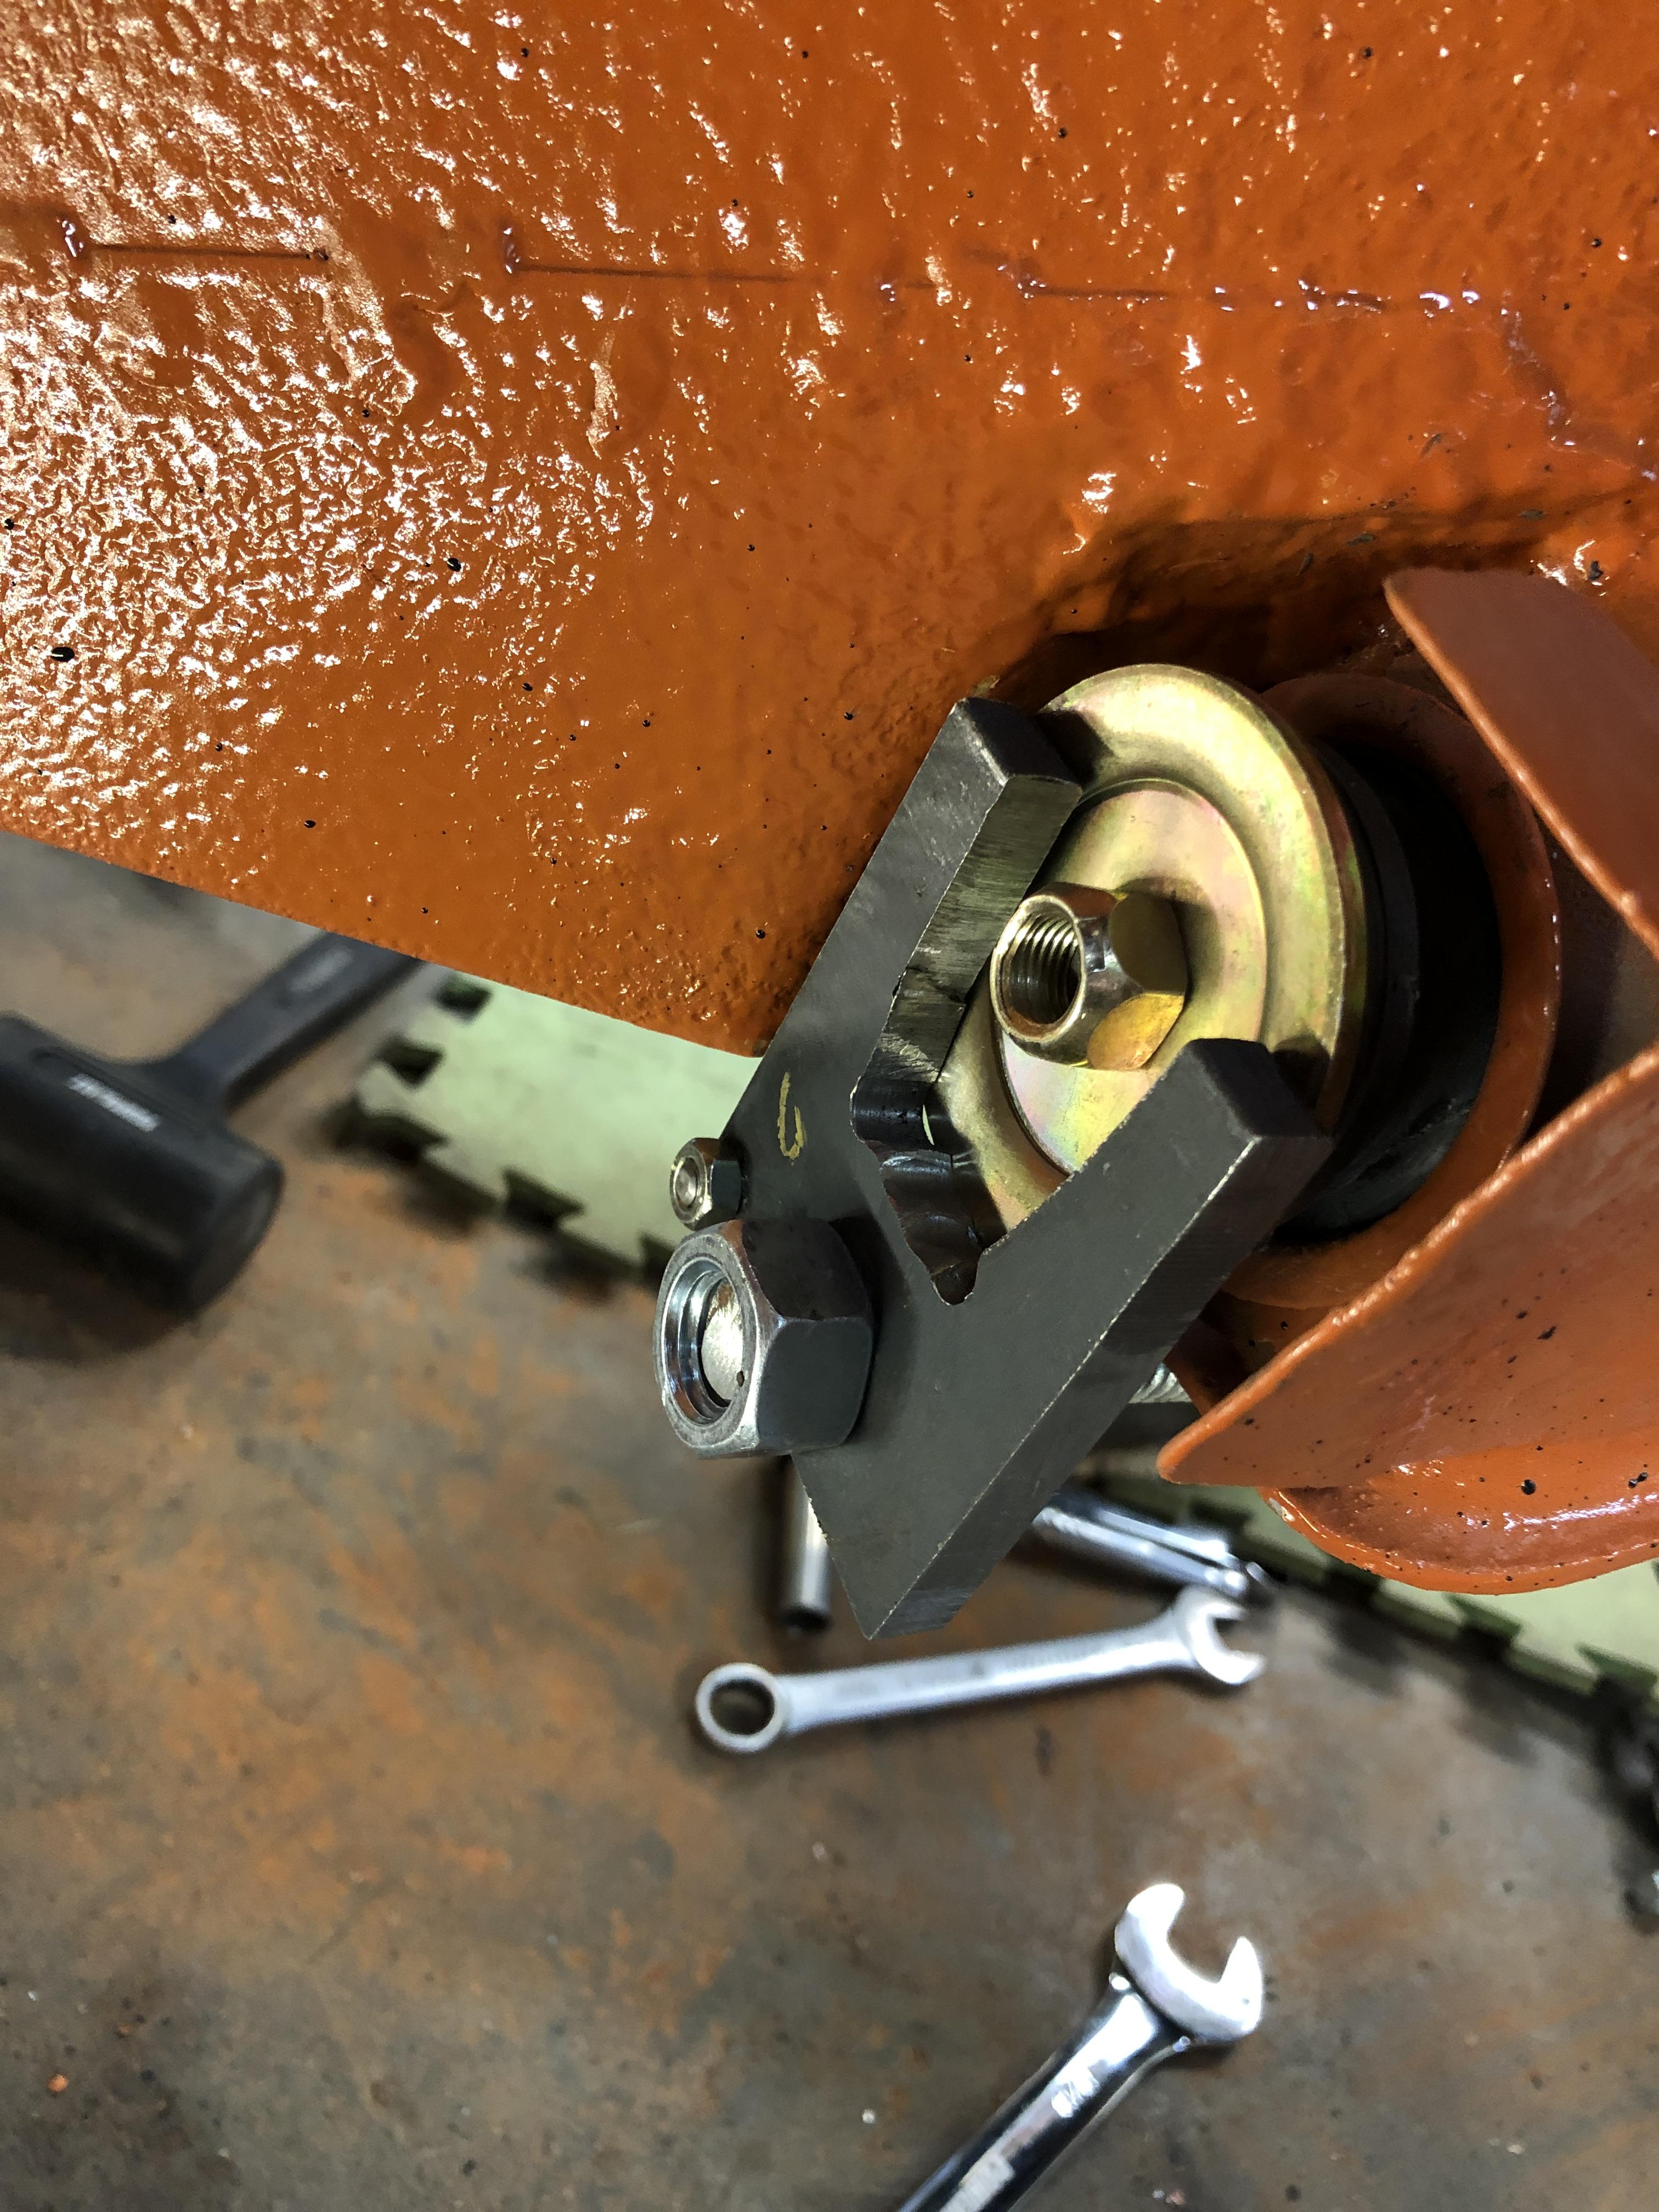
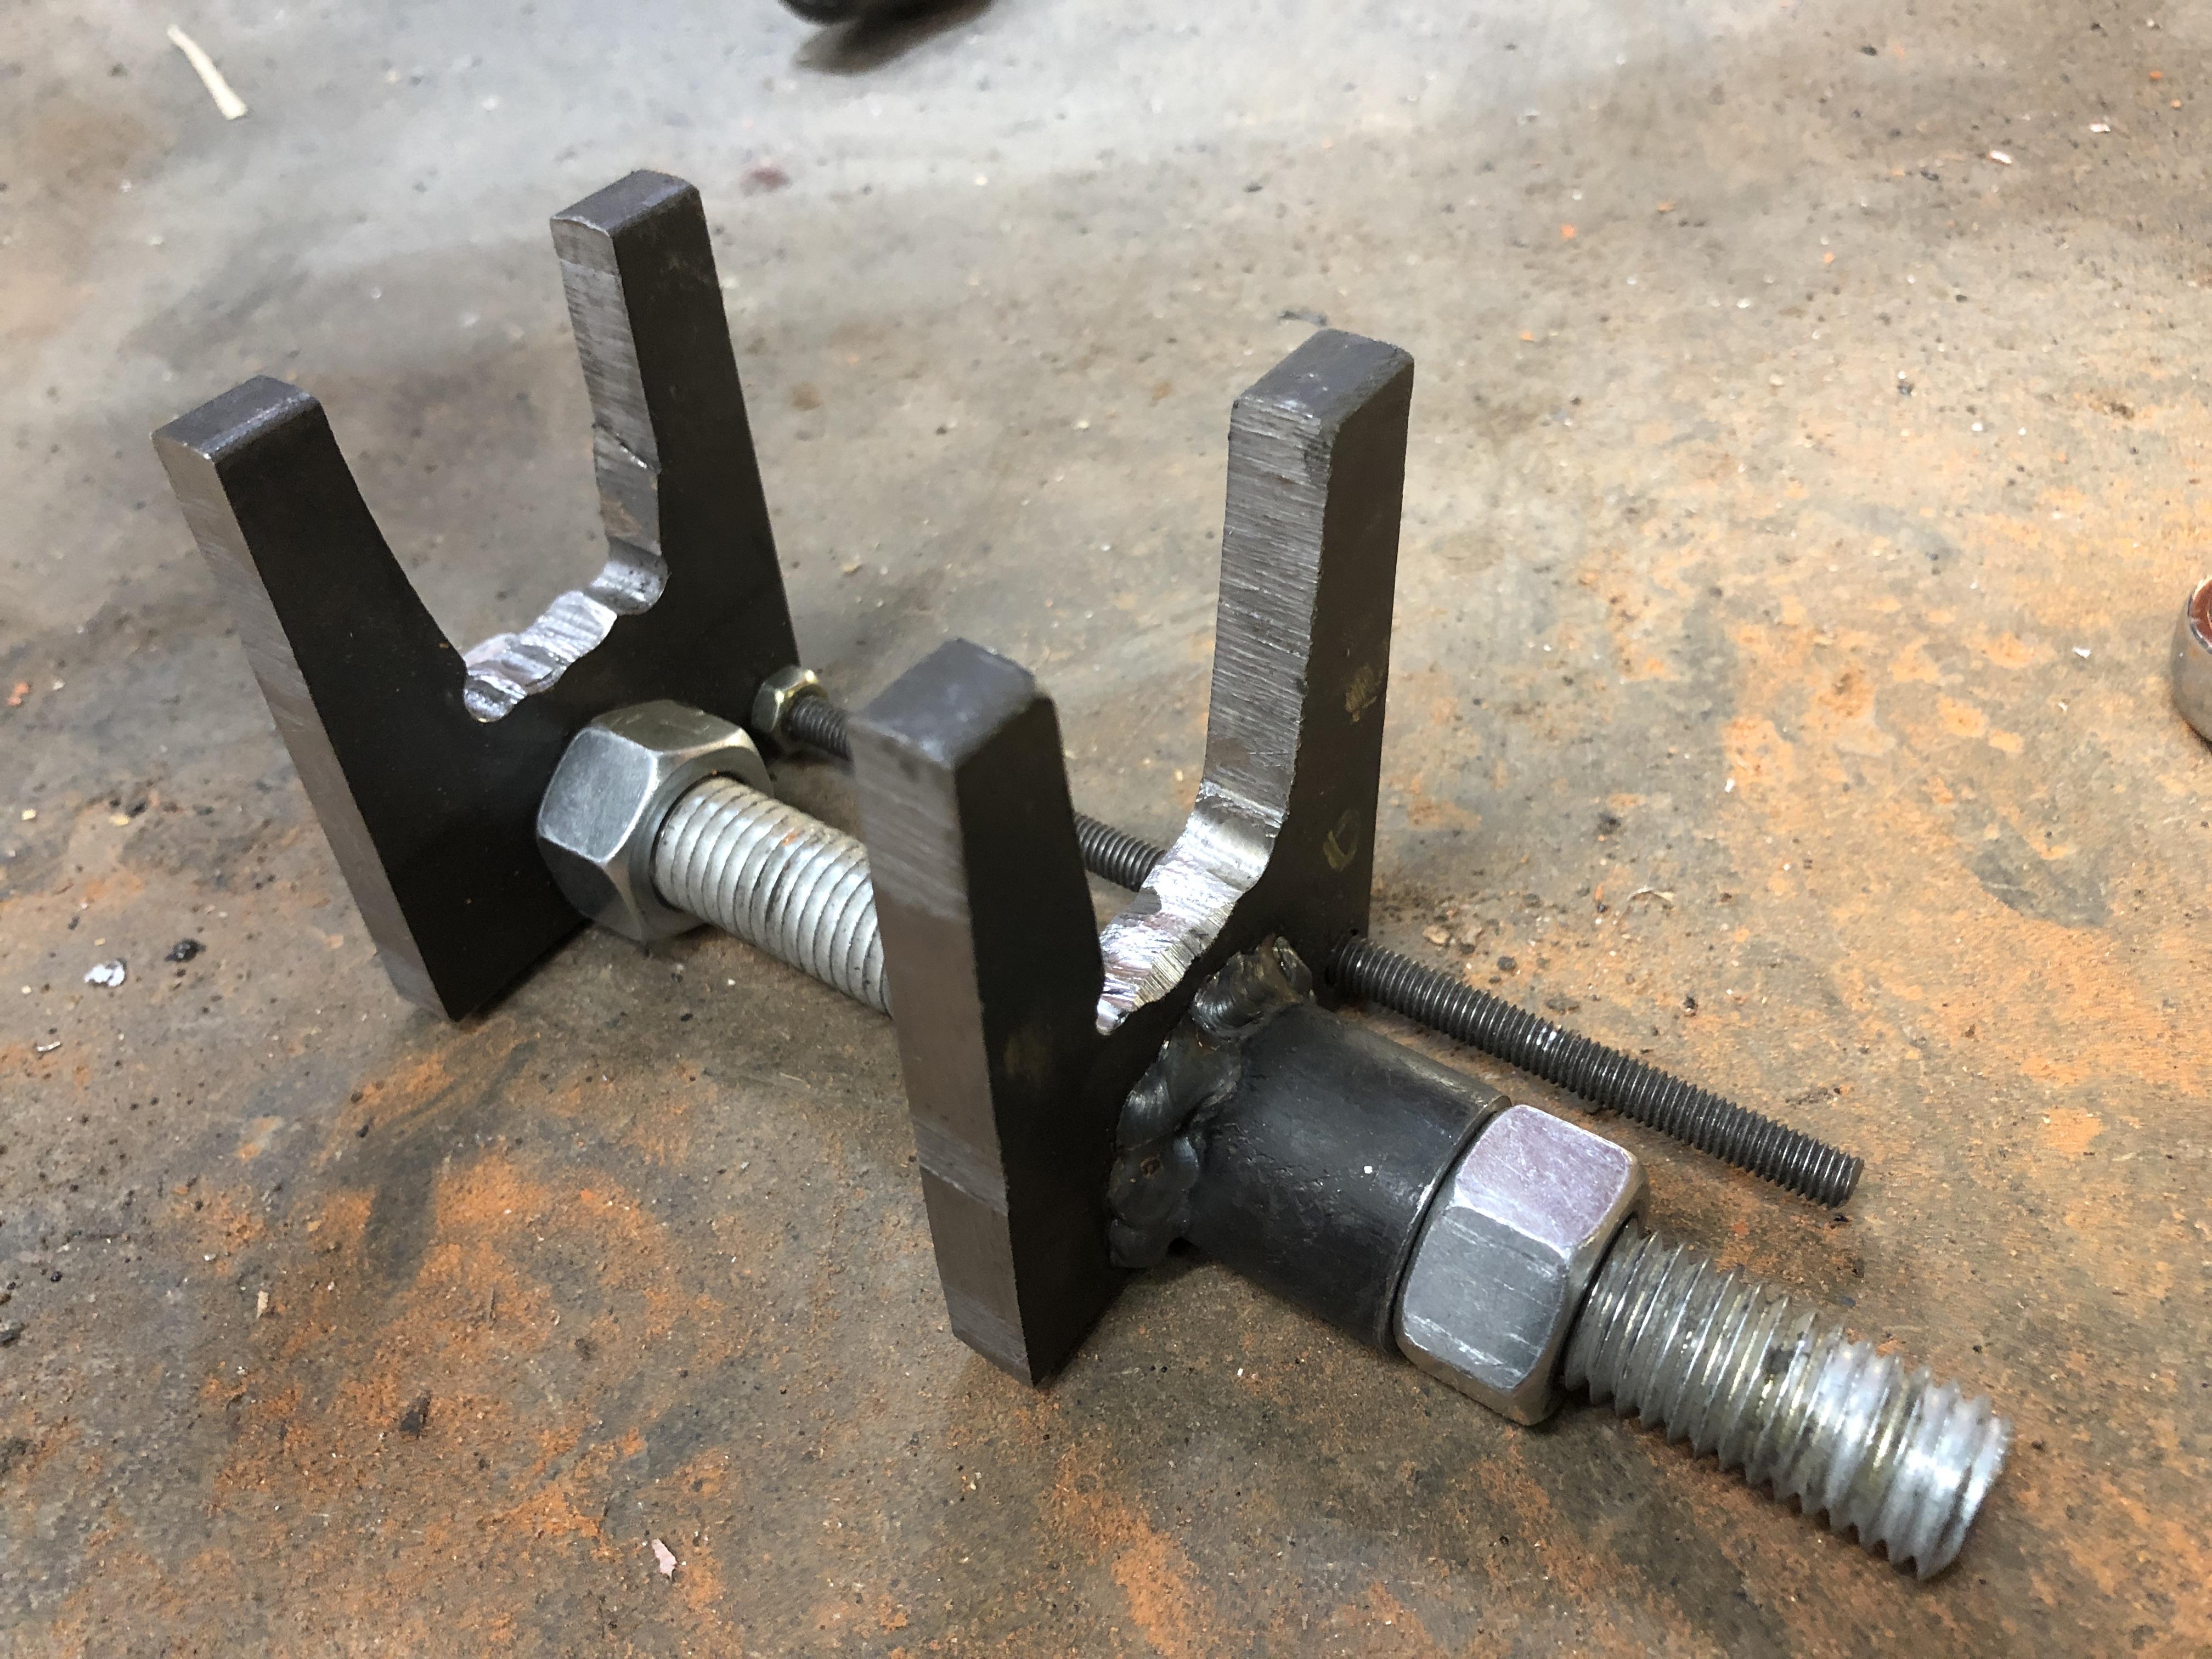
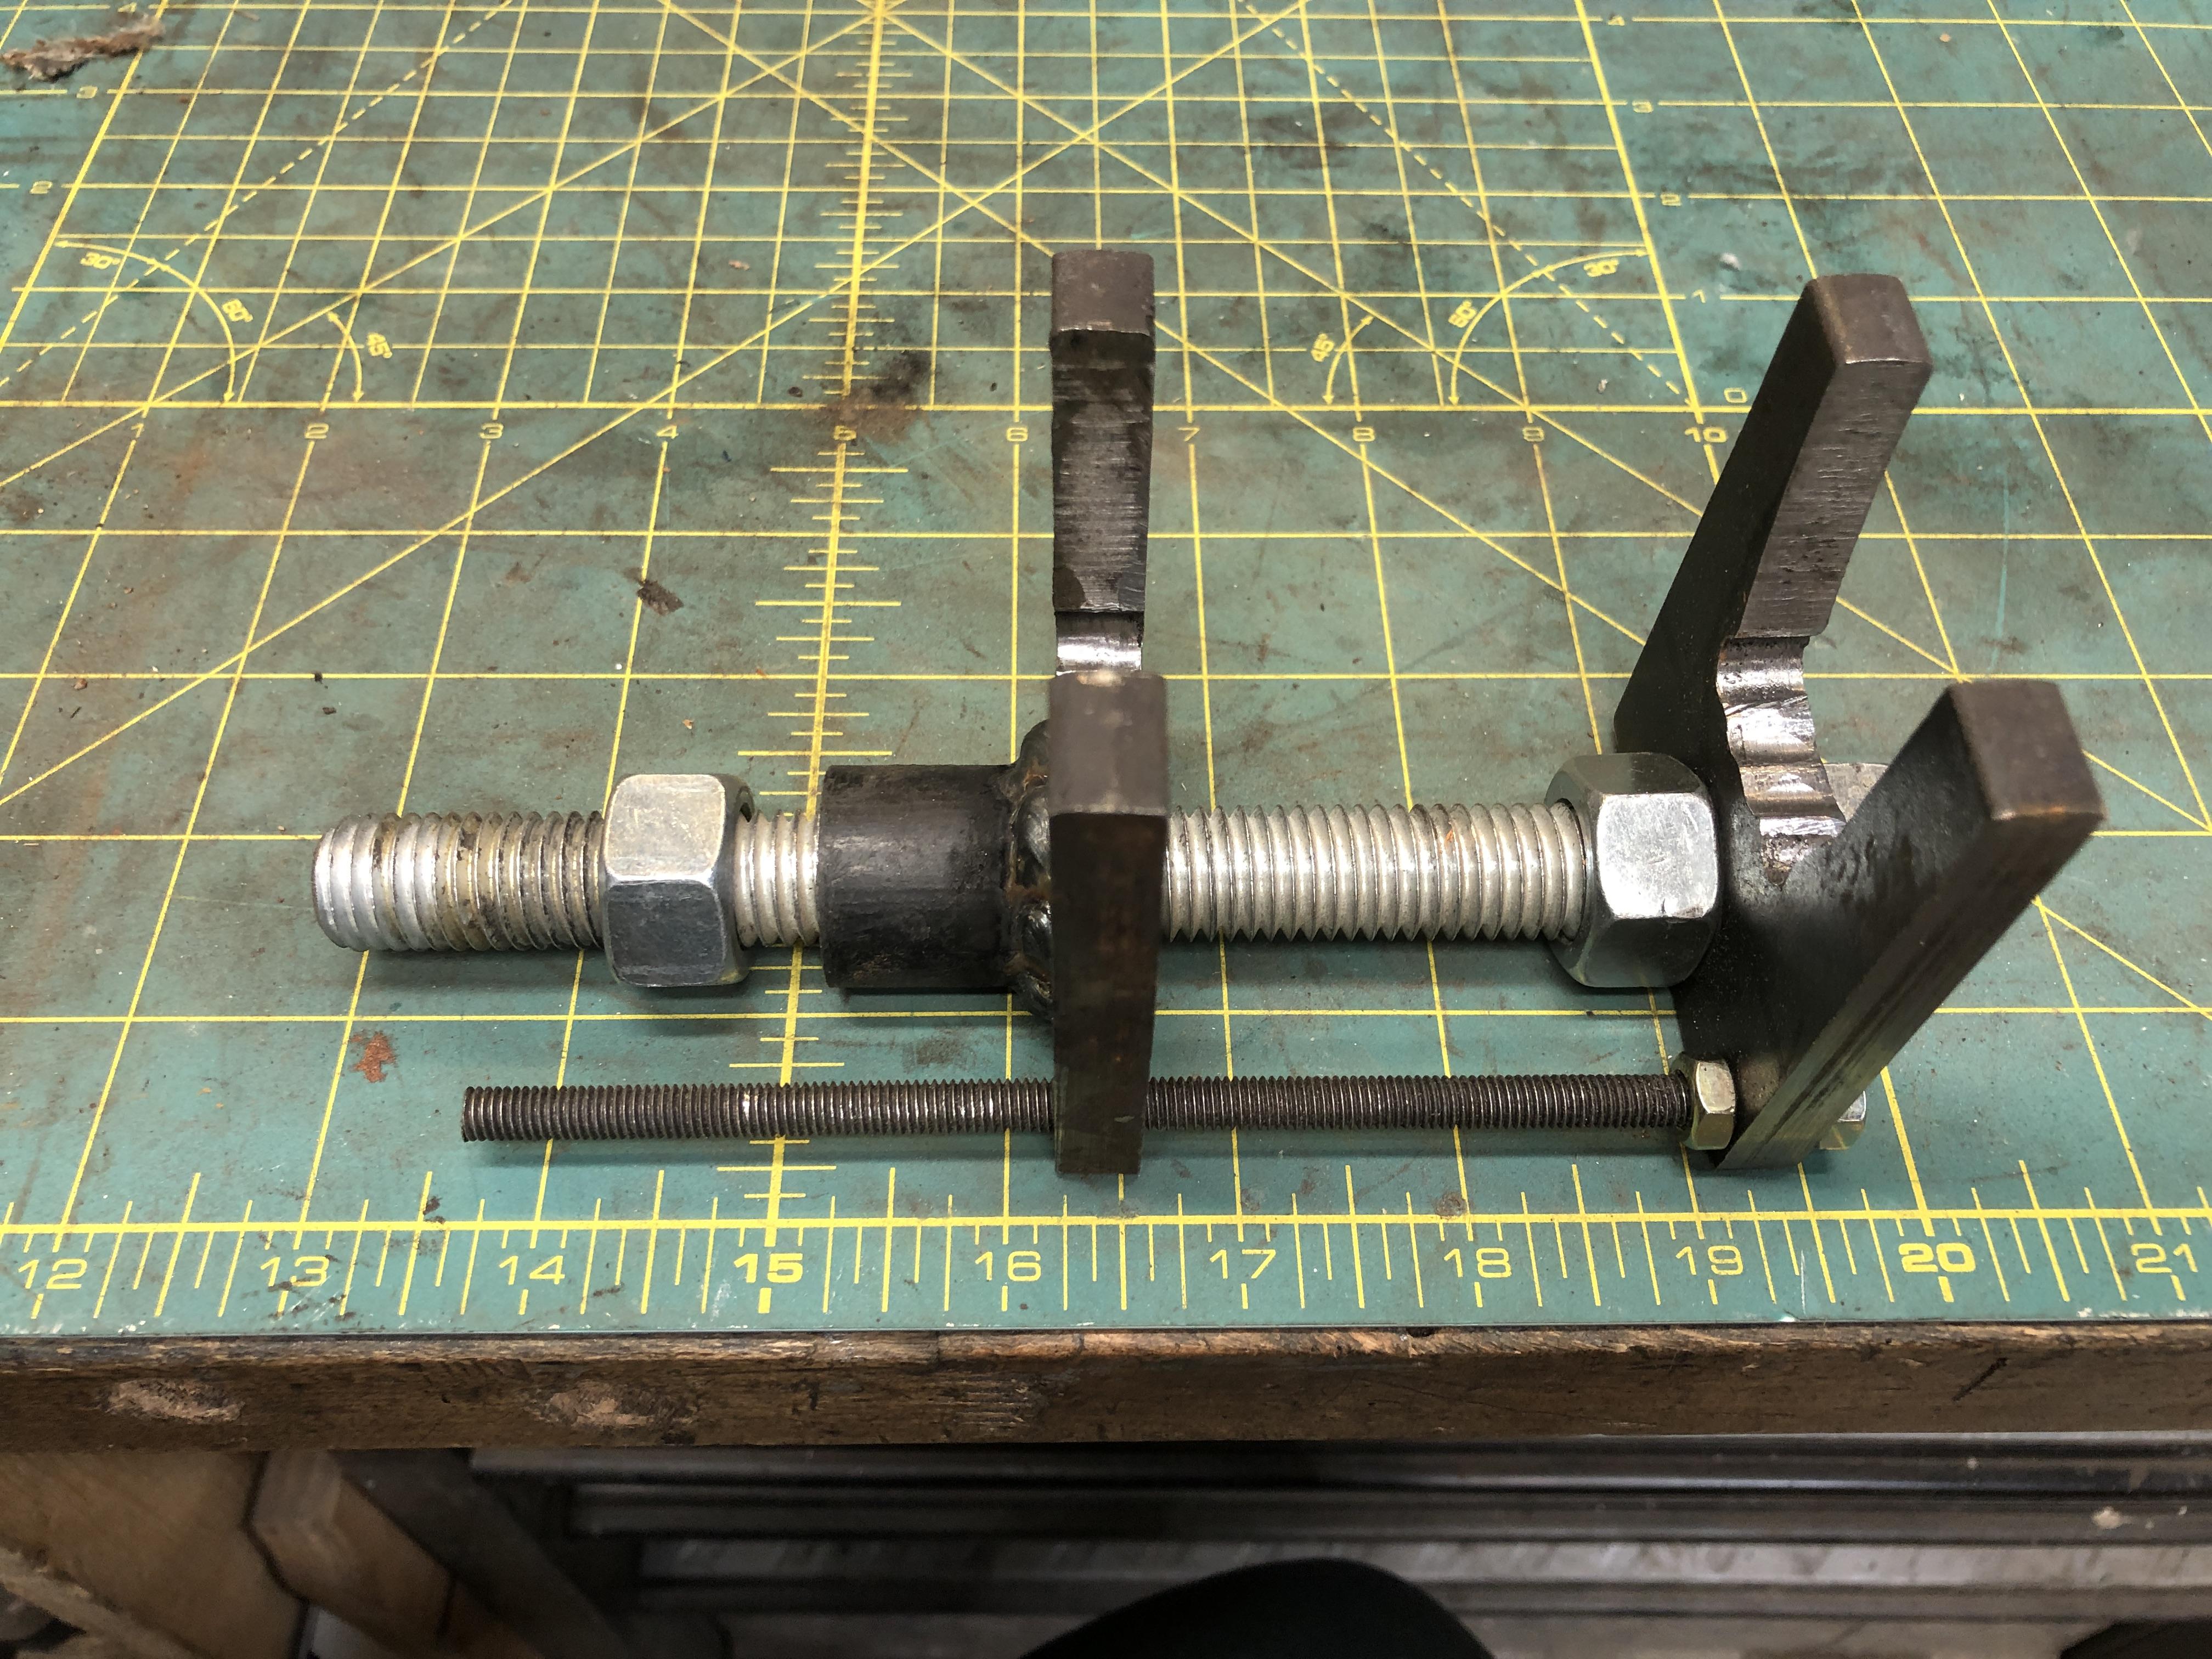
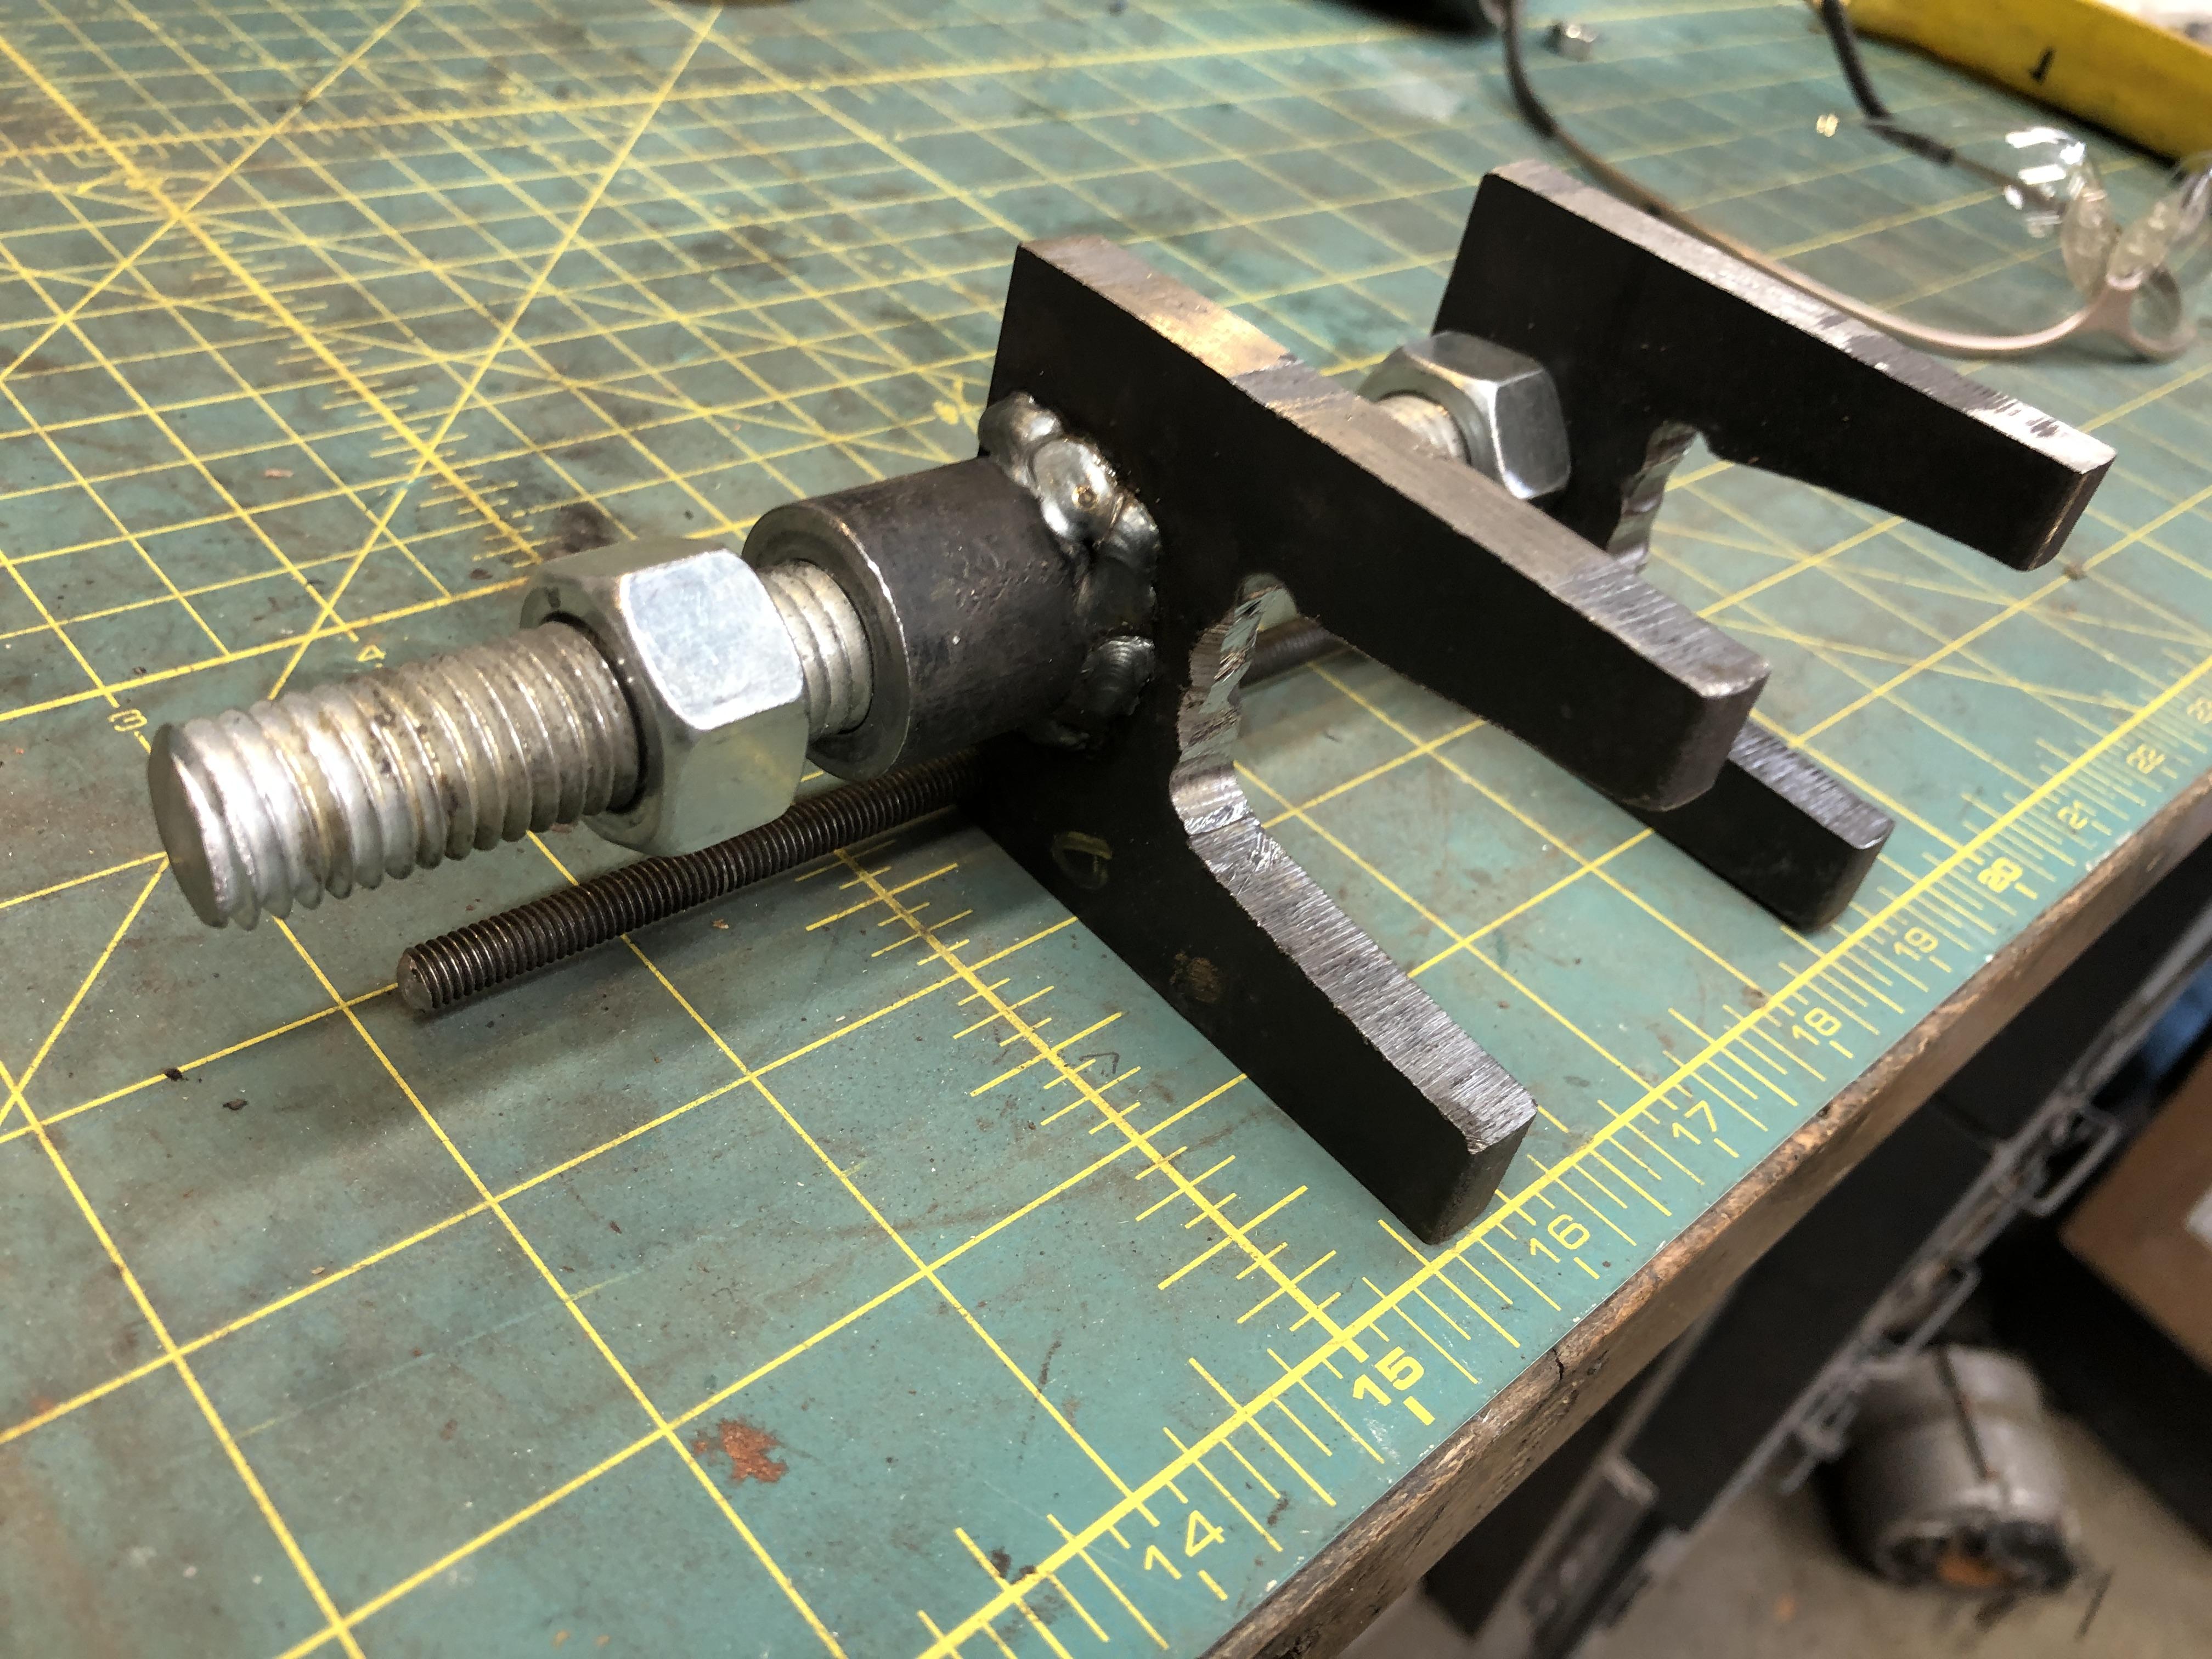
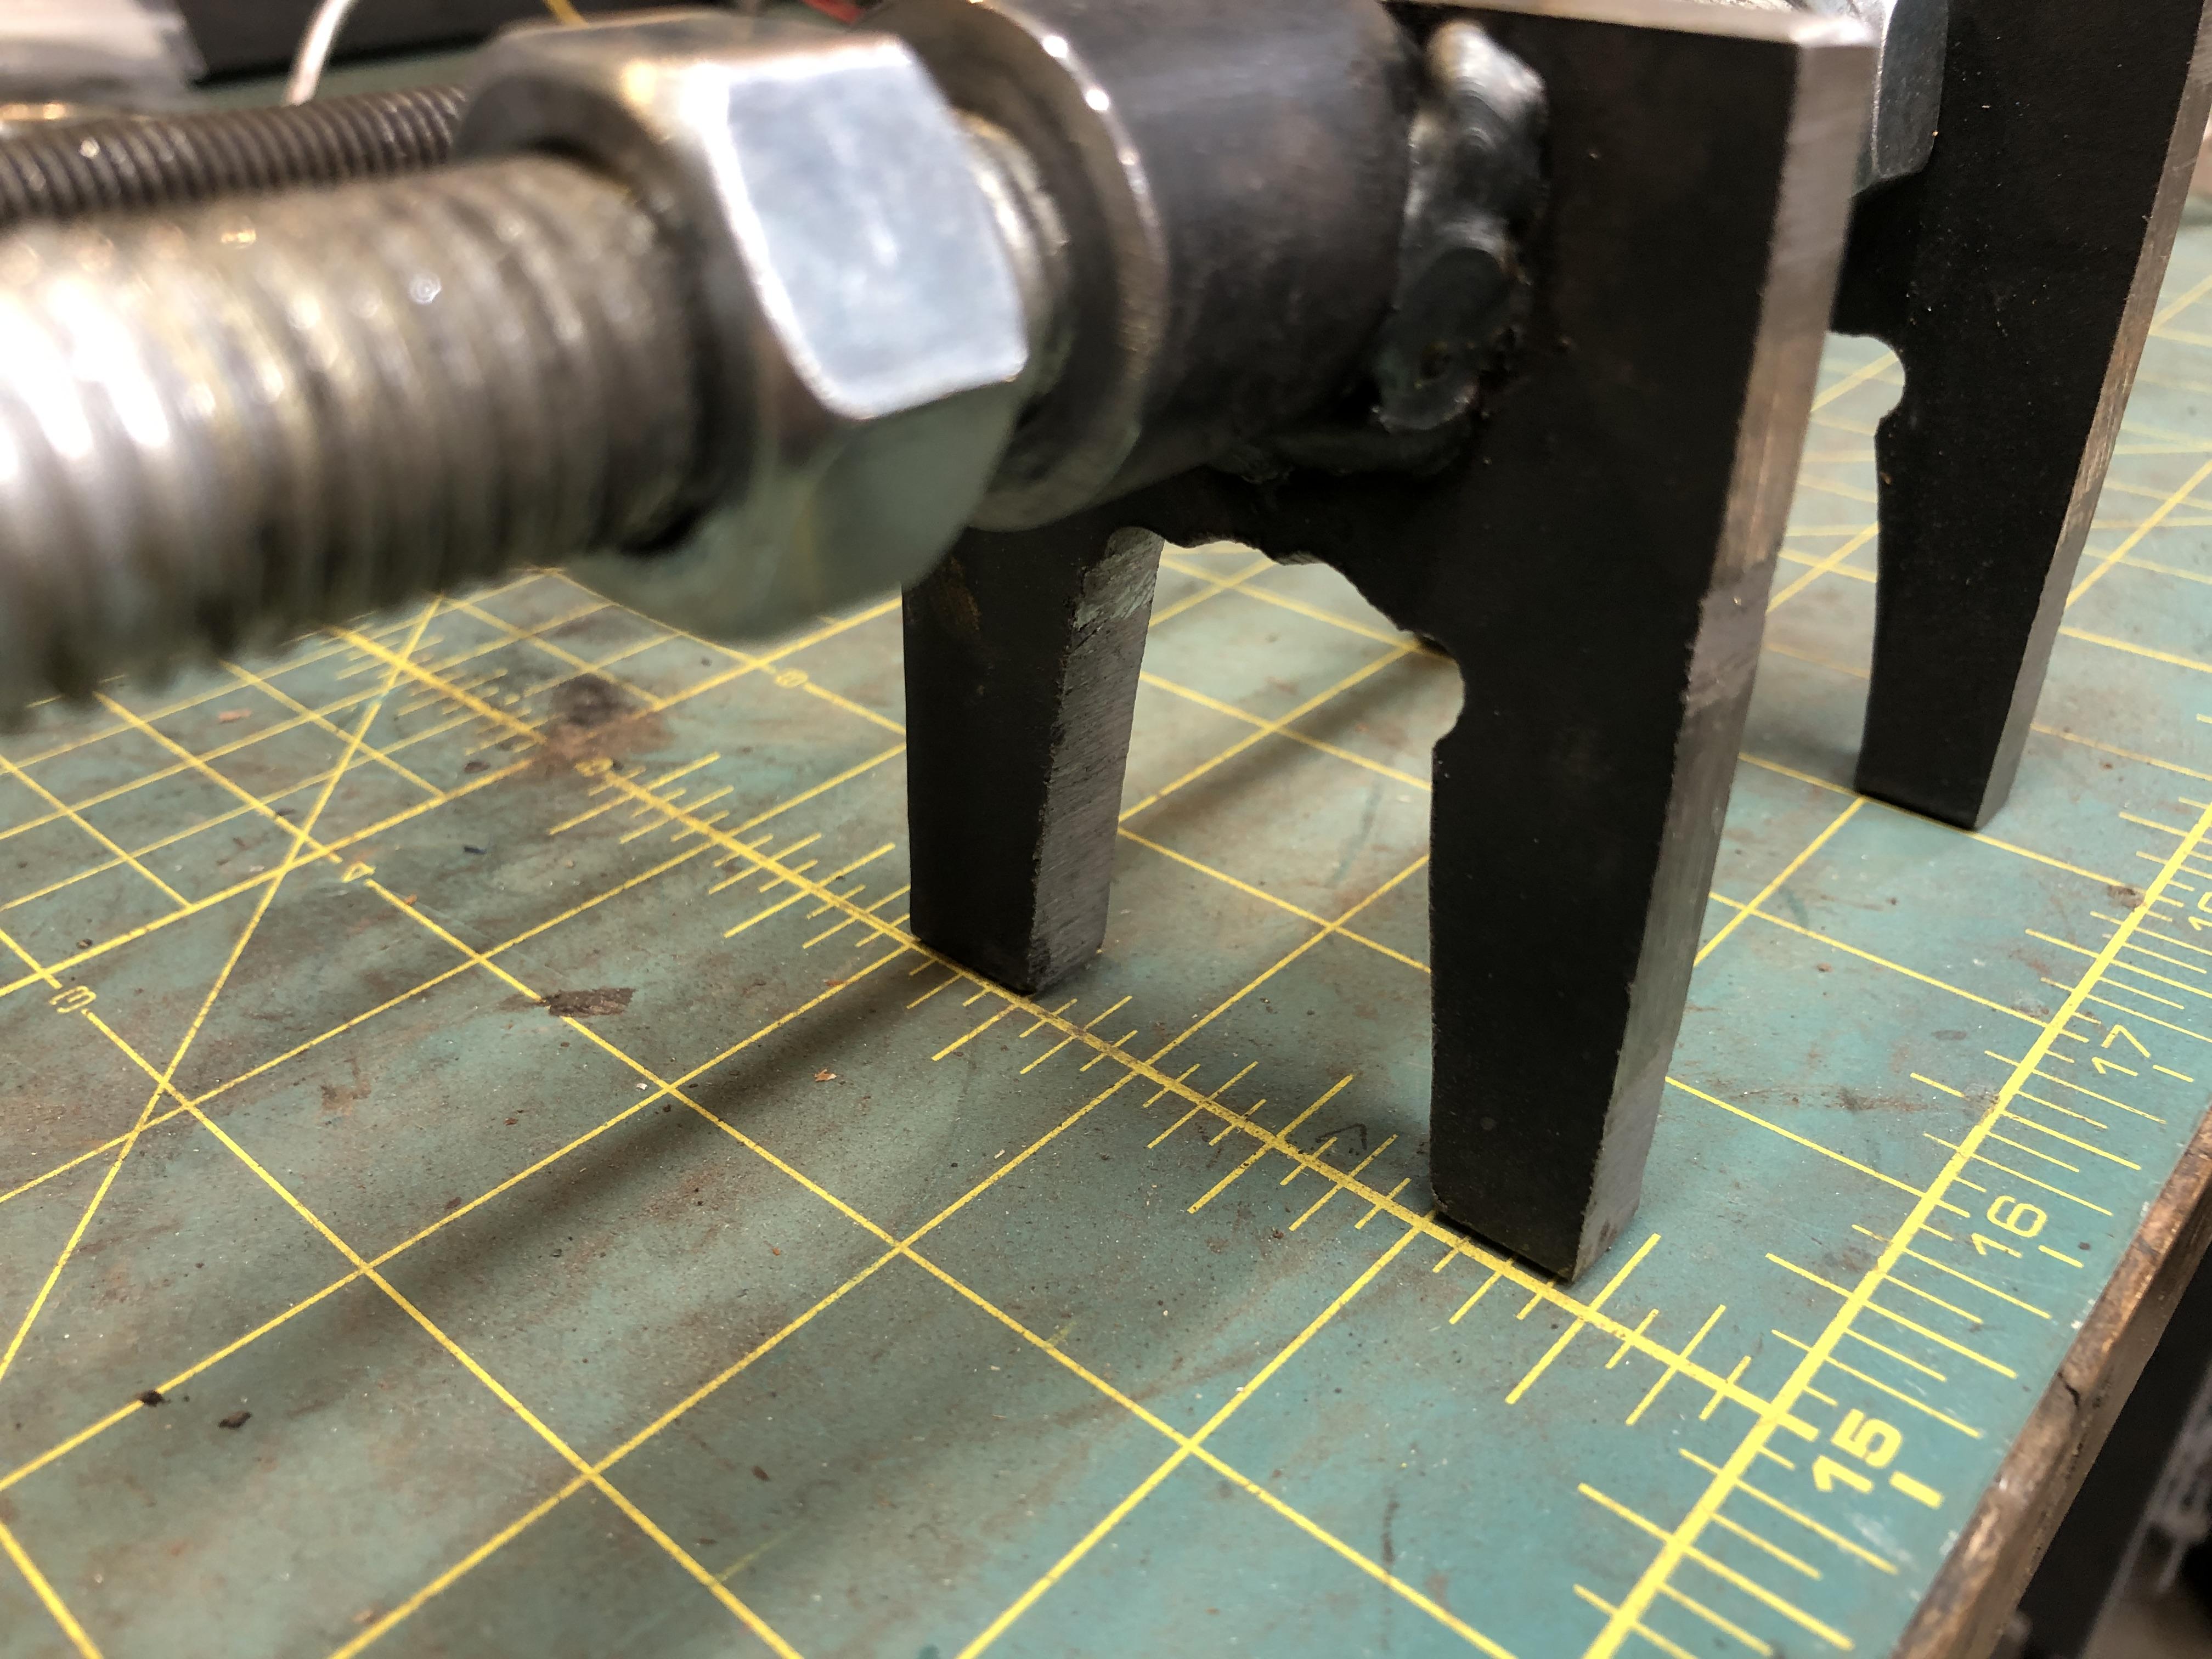
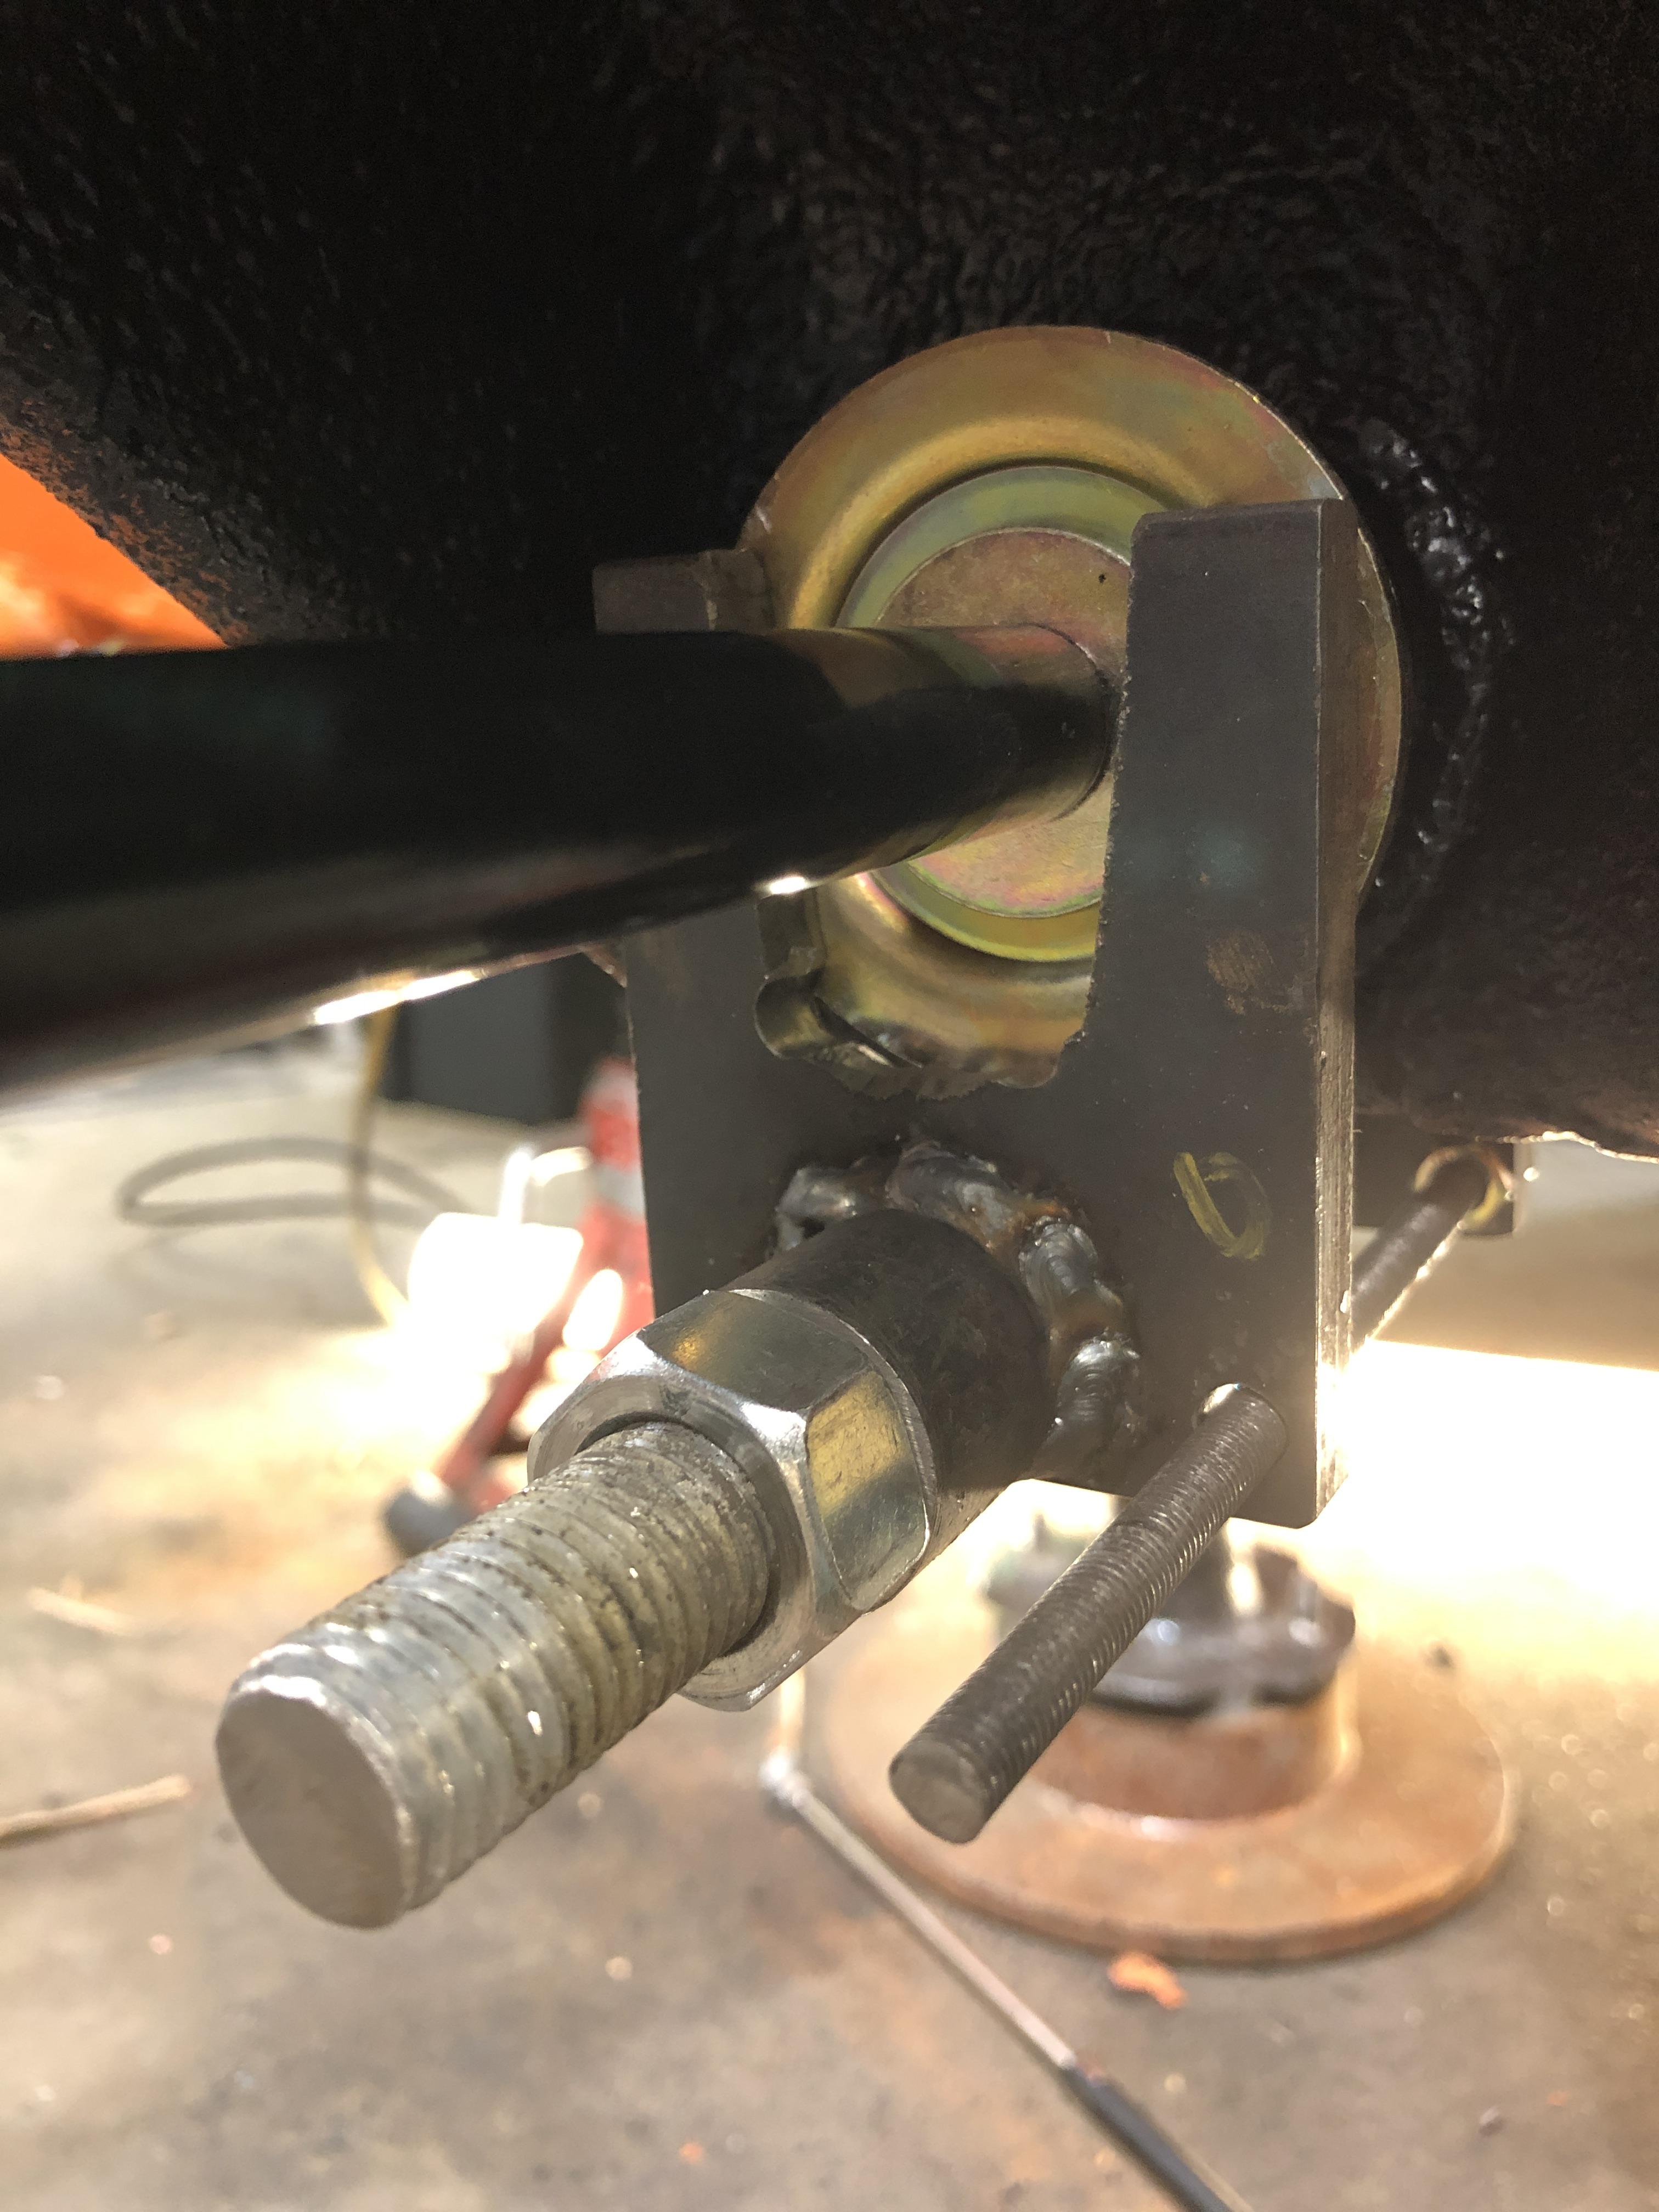
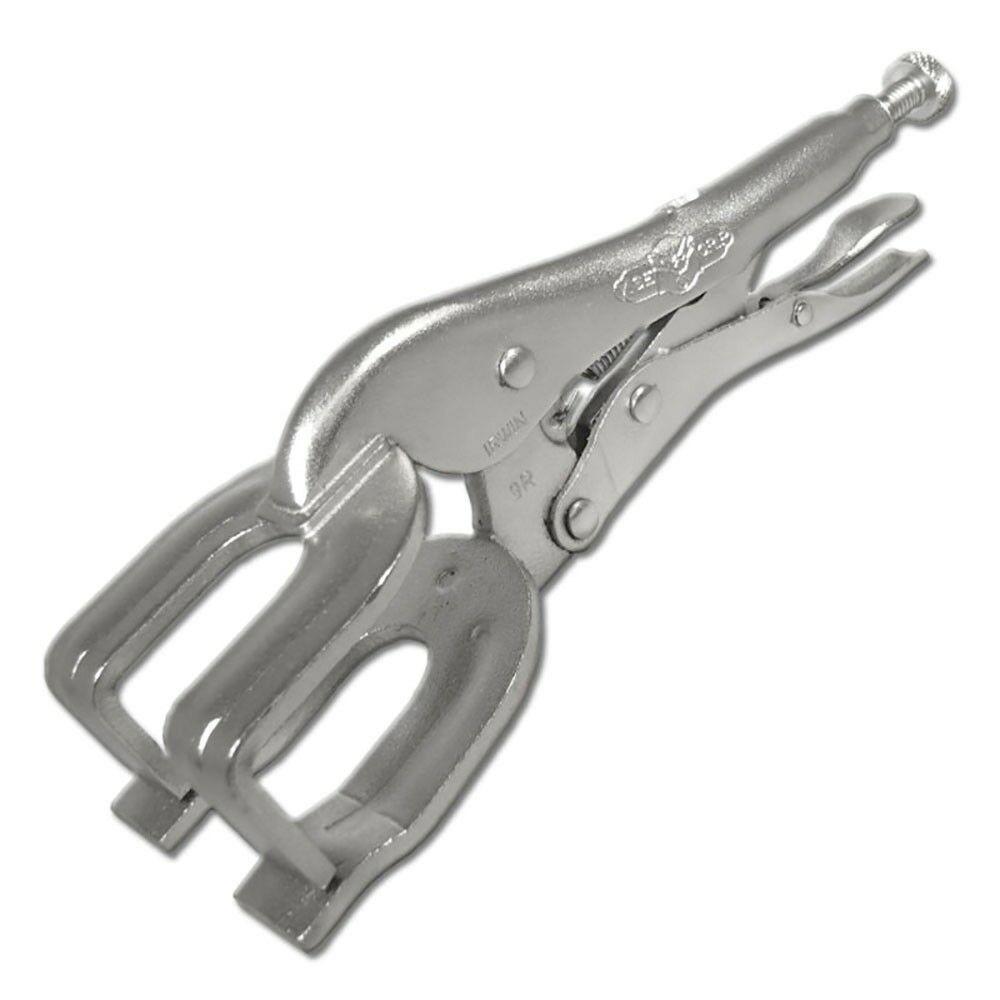
I have a drawer full of jigs and things I’ve made over the years to make things “better” but I made one today that I’ve been wanting to build for some time. When installing new stock T/C bushings, you have to compress the rubber quite a bit to get the end of the rod threads to stick out far enough to allow you start the nut. I had previously modified a special welding vice grip, but it was a struggle at best. It is now in the metal recycle bin. Here is what I built. Some 5/8 threaded rod, few nuts, some 1/4 plate steel, piece of 5/8 ID pipe (garage door spring tubing). M6 threaded rod to keep the two halves aligned. Added that after using it to do the first one. This is the vice grip tool I modified before. The jaws are always in a V shape, never parallel.
1 point
1 pointI have a drawer full of jigs and things I’ve made over the years to make things “better” but I made one today that I’ve been wanting to build for some time. When installing new stock T/C bushings, you have to compress the rubber quite a bit to get the end of the rod threads to stick out far enough to allow you start the nut. I had previously modified a special welding vice grip, but it was a struggle at best. It is now in the metal recycle bin. Here is what I built. Some 5/8 threaded rod, few nuts, some 1/4 plate steel, piece of 5/8 ID pipe (garage door spring tubing). M6 threaded rod to keep the two halves aligned. Added that after using it to do the first one. This is the vice grip tool I modified before. The jaws are always in a V shape, never parallel.


 1 point


Important Information
By using this site, you agree to our Privacy Policy and Guidelines. We have placed cookies on your device to help make this website better. You can adjust your cookie settings, otherwise we'll assume you're okay to continue.