Leaderboard
-


kats
Free Member13Points2,209Posts -


siteunseen
Free Member7Points14,904Posts -

HS30-H
Free Member6Points5,421Posts -

qz16
Free Member4Points147Posts
Popular Content
Showing content with the highest reputation on 01/16/2022 in all areas
-
5 pointsHi everyone, thank you so much for kind words for me . I am back here and I am so happy that I can communicate with you again . So many things has been changed since I posted last time , I hope everyone’s safe in this Covid-19. I don’t know what to say , I don’t know where to start to tell you about . Anyway I am doing good , I thank my friends here to recover my energy of life .Even when I was depressed badly, I didn’t forget about all of you . I was hoping I would bring a news when I become normal. Yesterday I felt for the first time in my life that I want to buy a new Z other than my S30s . But , I don’t have enough money because last month I spent my money for the 240Z which is just 10 cars older than my US blue 240Z . It is going to arrive at Yokohama next week by boat , I will let you know the details when I have got the car in my hands. Very rough condition, but I can’t ignore it because of the chassis number and blue exterior and blue interior like my HLS30-02156 . Kats

 5 points
 -
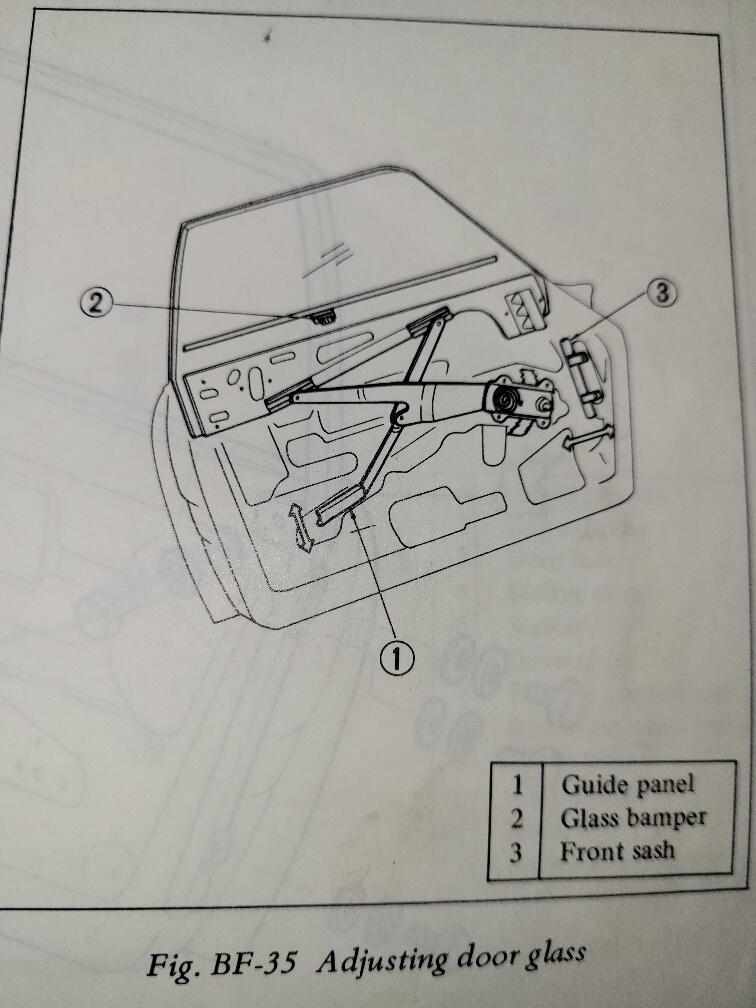
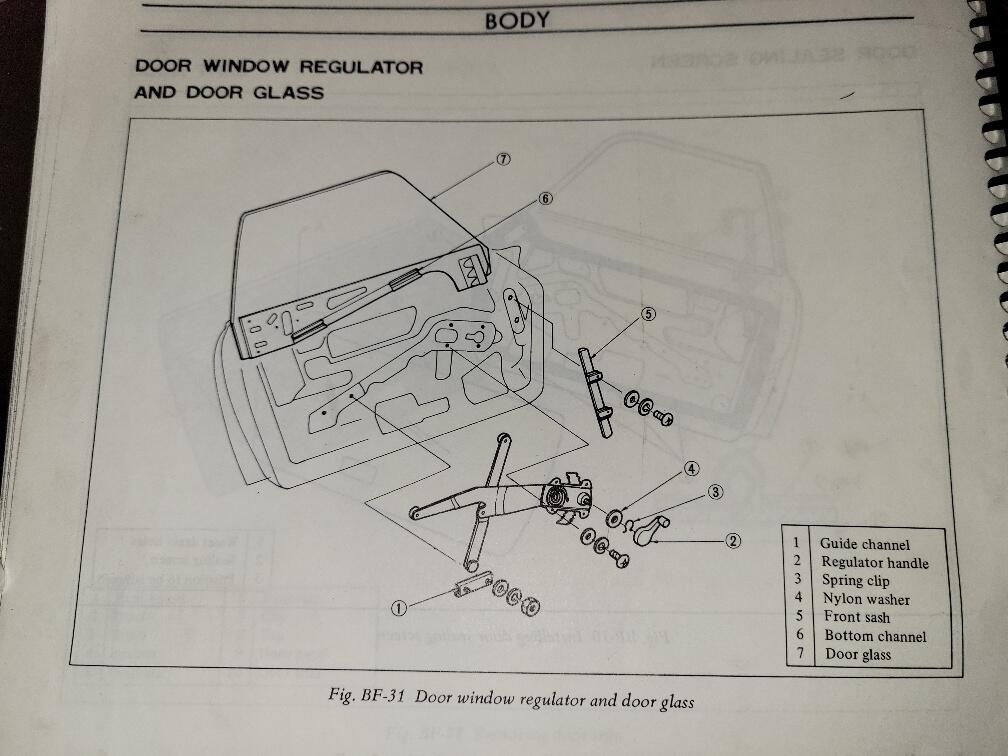
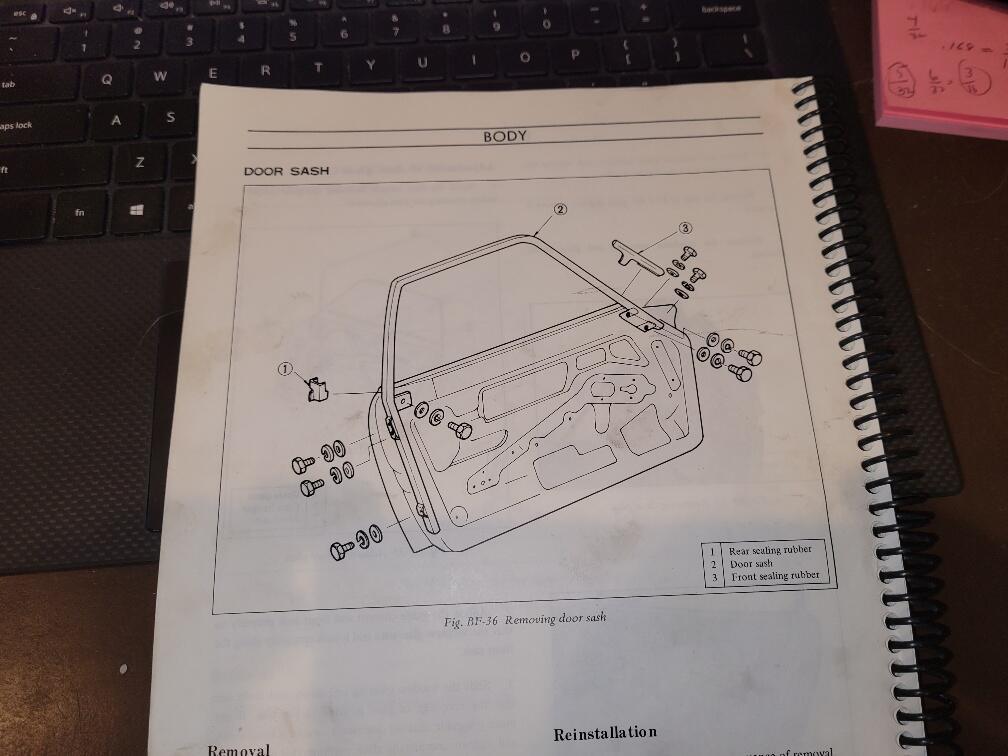
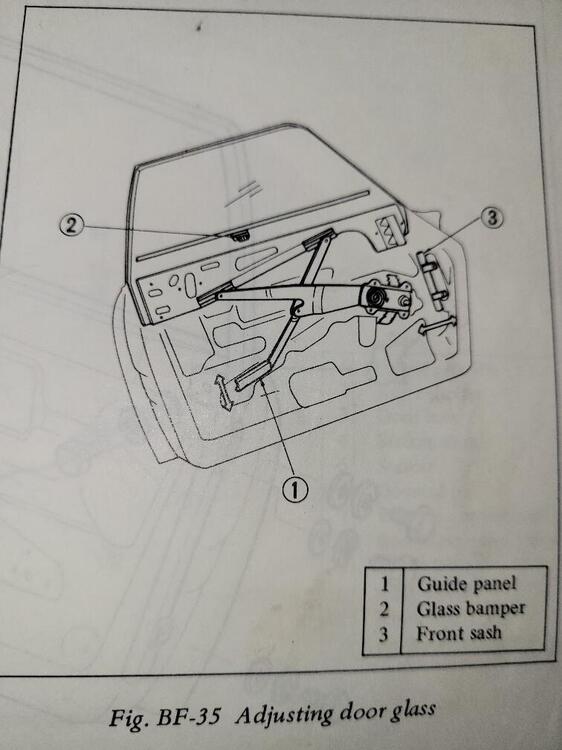
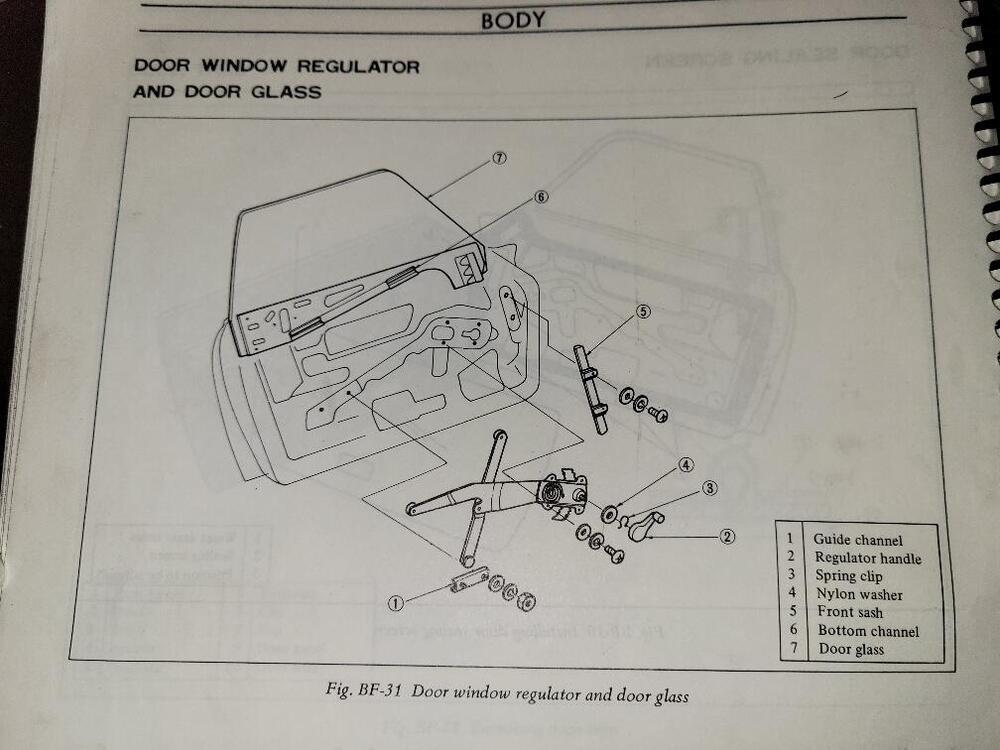
4 pointsI Have installed a few windows in British cars and this is my second opportunity with a 240Z. So, I don’t have a tremendous amount of experience, but I think this will provide a bit more detail that may help you. Outlined below is a procedure that worked well for me and I hope will help you. Please feel free to correct/improve the process for the next guy. Door Glass Install Install the outside rear view mirror. I installed insulation and sound deadener. I think this helps with noise and temperature control and it also gives the door a bit of added weight improving the feel of the door. I put white lithium grease on the rollers and channels, and on just about anything else that moved before installing anything. I installed the door locking mechanism, and all of its associated parts exterior door handle, key lock, and interior door handle. I removed the door sash (frame/channel that surrounds the glass) to make it easier. I installed the window regulator. To move the regulator I attached a vise grip to the knurled winder mechanism, be careful not to crush the grooves. At this point my troubles began. From what I read I thought that the front sash (front channel about 12 inches long) and the guide channel were supposed to be installed. I tried installing the glass by reversing what the service manual describes for removing the glass. Tilting it and sliding the front roller into its channel. I wasted hours and lost ½ a pint of blood and got nowhere. When the front roller was in the channel it would come out as I tried to install the rear roller, or the front sash guide. So, I walked away had a cup of coffee and decided to take a look at the entire mechanism. I was alone on this task so it is easy to get worn out hunched, and holding the glass, etc. Here is what I came up with and the glass was installed in less than 30 minutes. The first (6) six steps are valid and was my starting point. The front sash (approximately 12 inch long channel for the plastic slide at the front of the glass) and the guide channel (approximately 4 inch channel mid door toward the door lock) are not installed at this point. I think this would be a good time to remind you that you should install the outside rear view window before going any further. It’s painful to do it after installing the glass, don’t ask how I know that it is painful. Getting the window into the car can be tricky. The manual suggests: front first and down on an angle. If you are concerned about your paint I would protect it with at least a strip of tape on all edges of the door. Watch the outside of the window as it enters the door as there are screws (at the front tip of the window where the slide is located), that can get hung up on the door. The window sits closest to the door skin, in between the skin and the window regulator. At this point I re-installed the window sash with one screw in each or the two top corners. There are 3 rollers. Two of the rollers face the window. One faces the interior of the car. One of the two rollers that face the window will be on your left as you face the interior of the door. The 2nd roller will be on your right. The right most roller is mounted on an arm that has the third roller (facing the interior of the car) attached at the opposite end of the arm. This roller (facing the interior of the car) should be sitting down, toward the bottom of the door, before you try to install either of the other rollers. If it is not in this position it will be more difficult to position it later on because it will get hung up on the regulator and the interior door sheet metal. Seating the regulator rollers into the window channel Wind the regulator almost all the way down. Now slowly wind the regulator up and watch the rear channel, toward the door lock. I believe this step is easier if this roller enters the channel from the right side (nearest to the door hinge) of the channel. When it is close to the regulator roller slide the glass forward or back to allow the roller to enter the channel. Once the roller is in place slide the glass a bit more to insure that the roller stays in the channel. Slowly wind the regulator almost to the bottom of the door. I believe this step is easier if this 2nd roller enters its channel from the left side of the channel, nearest the door lock. Remember the third roller must be lower than the other two rollers. Watch the front channel of the glass. When it is close to the level of the regulator front roller stop and move the glass forward toward the door hinge, make sure you don’t move the glass so much that the first roller comes out of its channel. Push the roller into the channel and slide the glass toward the rear (toward the door lock) to keep the roller in the channel. To move the roller toward the channel you might try pushing down on the opposite side of the arm where the 3rd roller is located. You might also need to grab the glass and move it forward (toward the door hinge) corner up toward the top of the door. Slowly wind the regulator up about half way, when the remaining roller is accessible slide the guide channel on to the roller. Move the guide channel toward its mounting holes to get the guide studs in position. You may need to wind the regulator up or down slightly to get the guide channel studs to their mounting holes in the door. When one is in the hole place a nut on it to insure that it stays put. By winding the window up/down you should be able to manipulate the guide channel’s 2nd stud into its mounting hole. Now from the top (right side facing the door interior) push the front sash down and guide it onto the plastic window slide. Push it down and move the window to the front or rear so you can place the screws through the door and into the front sash. Tighten (finger tight) everything and using the window regulator roll the window up and down. If everything is moving smoothly then tighten everything and bandage any wounds.
 4 points
 -
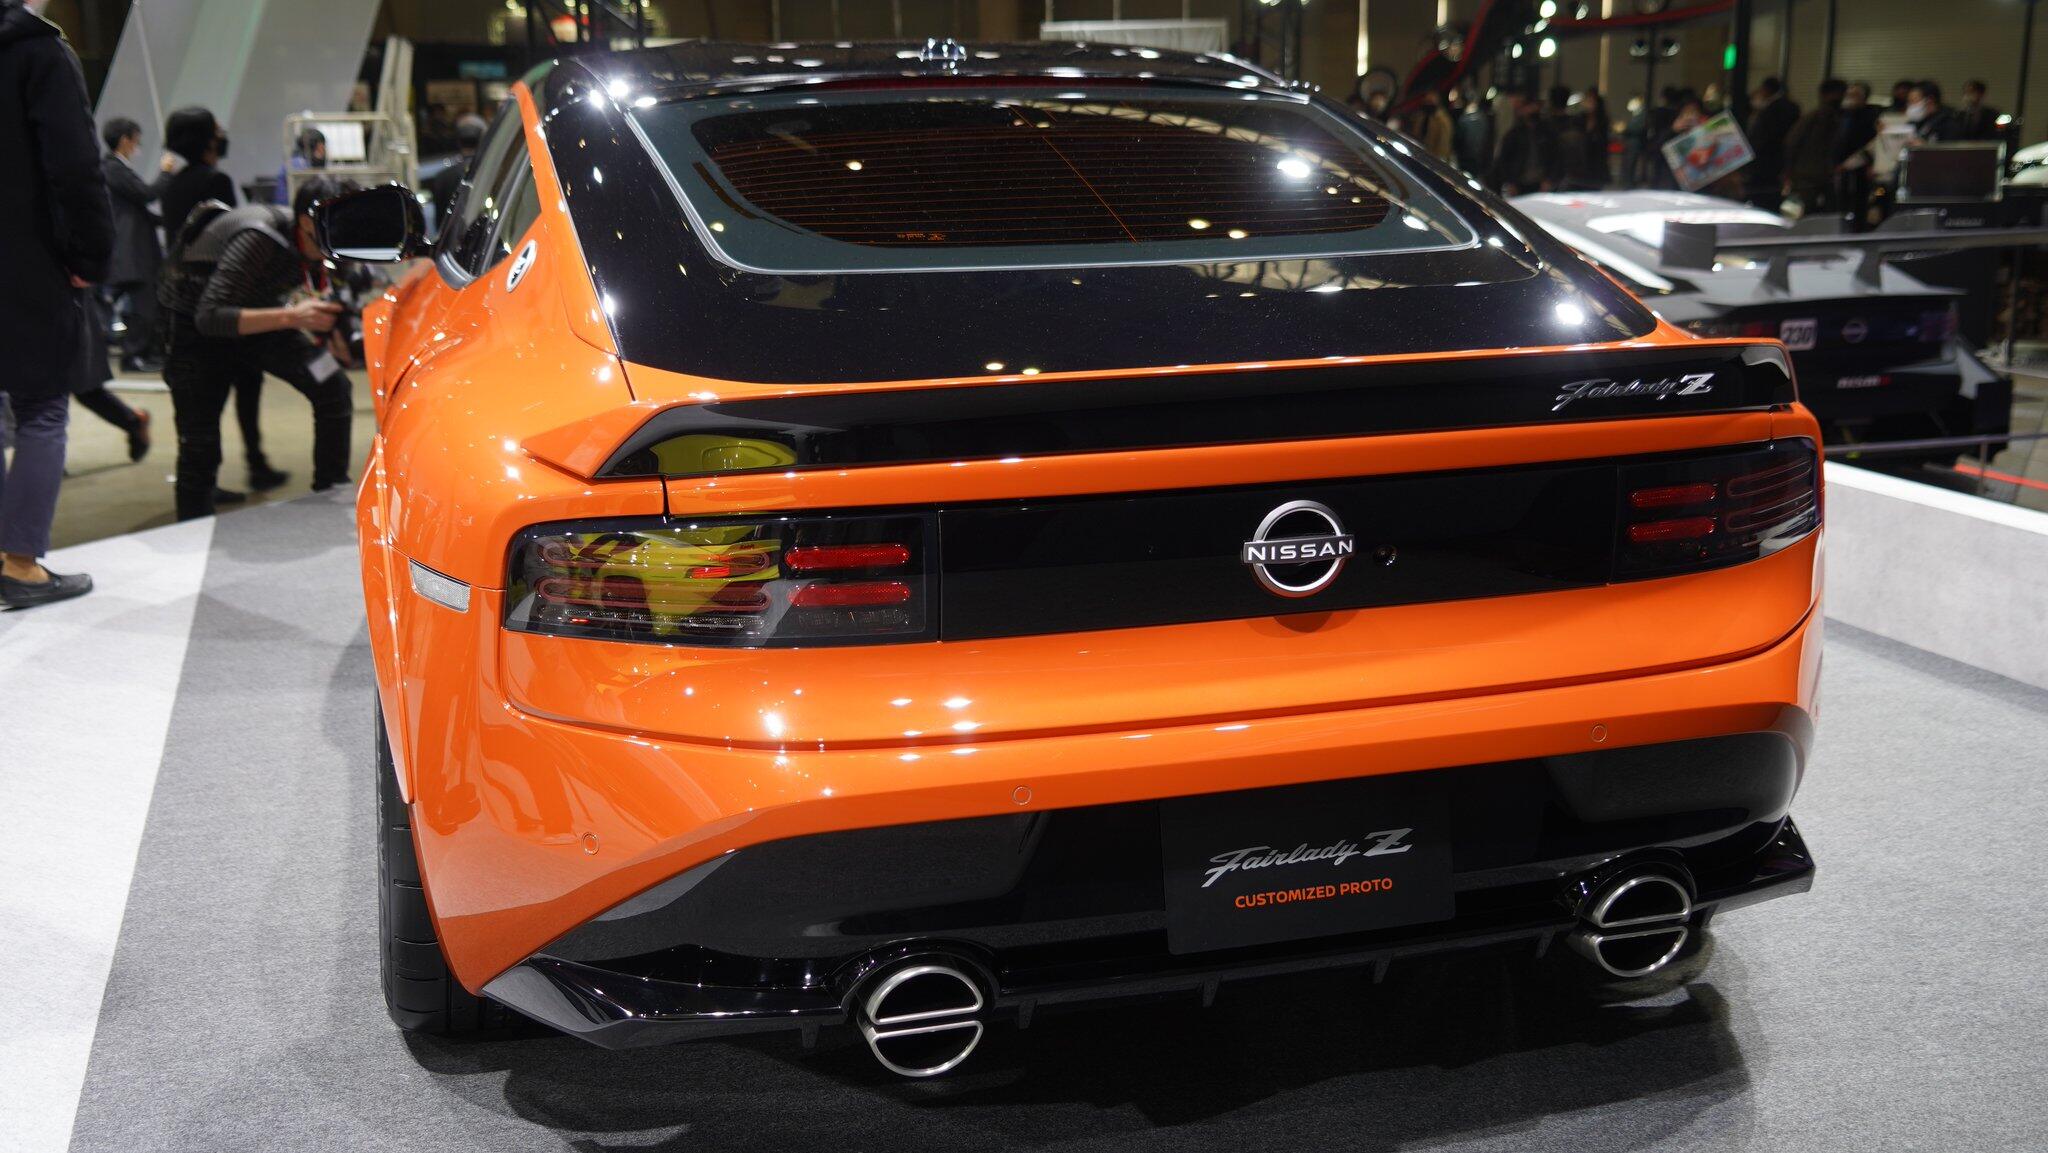
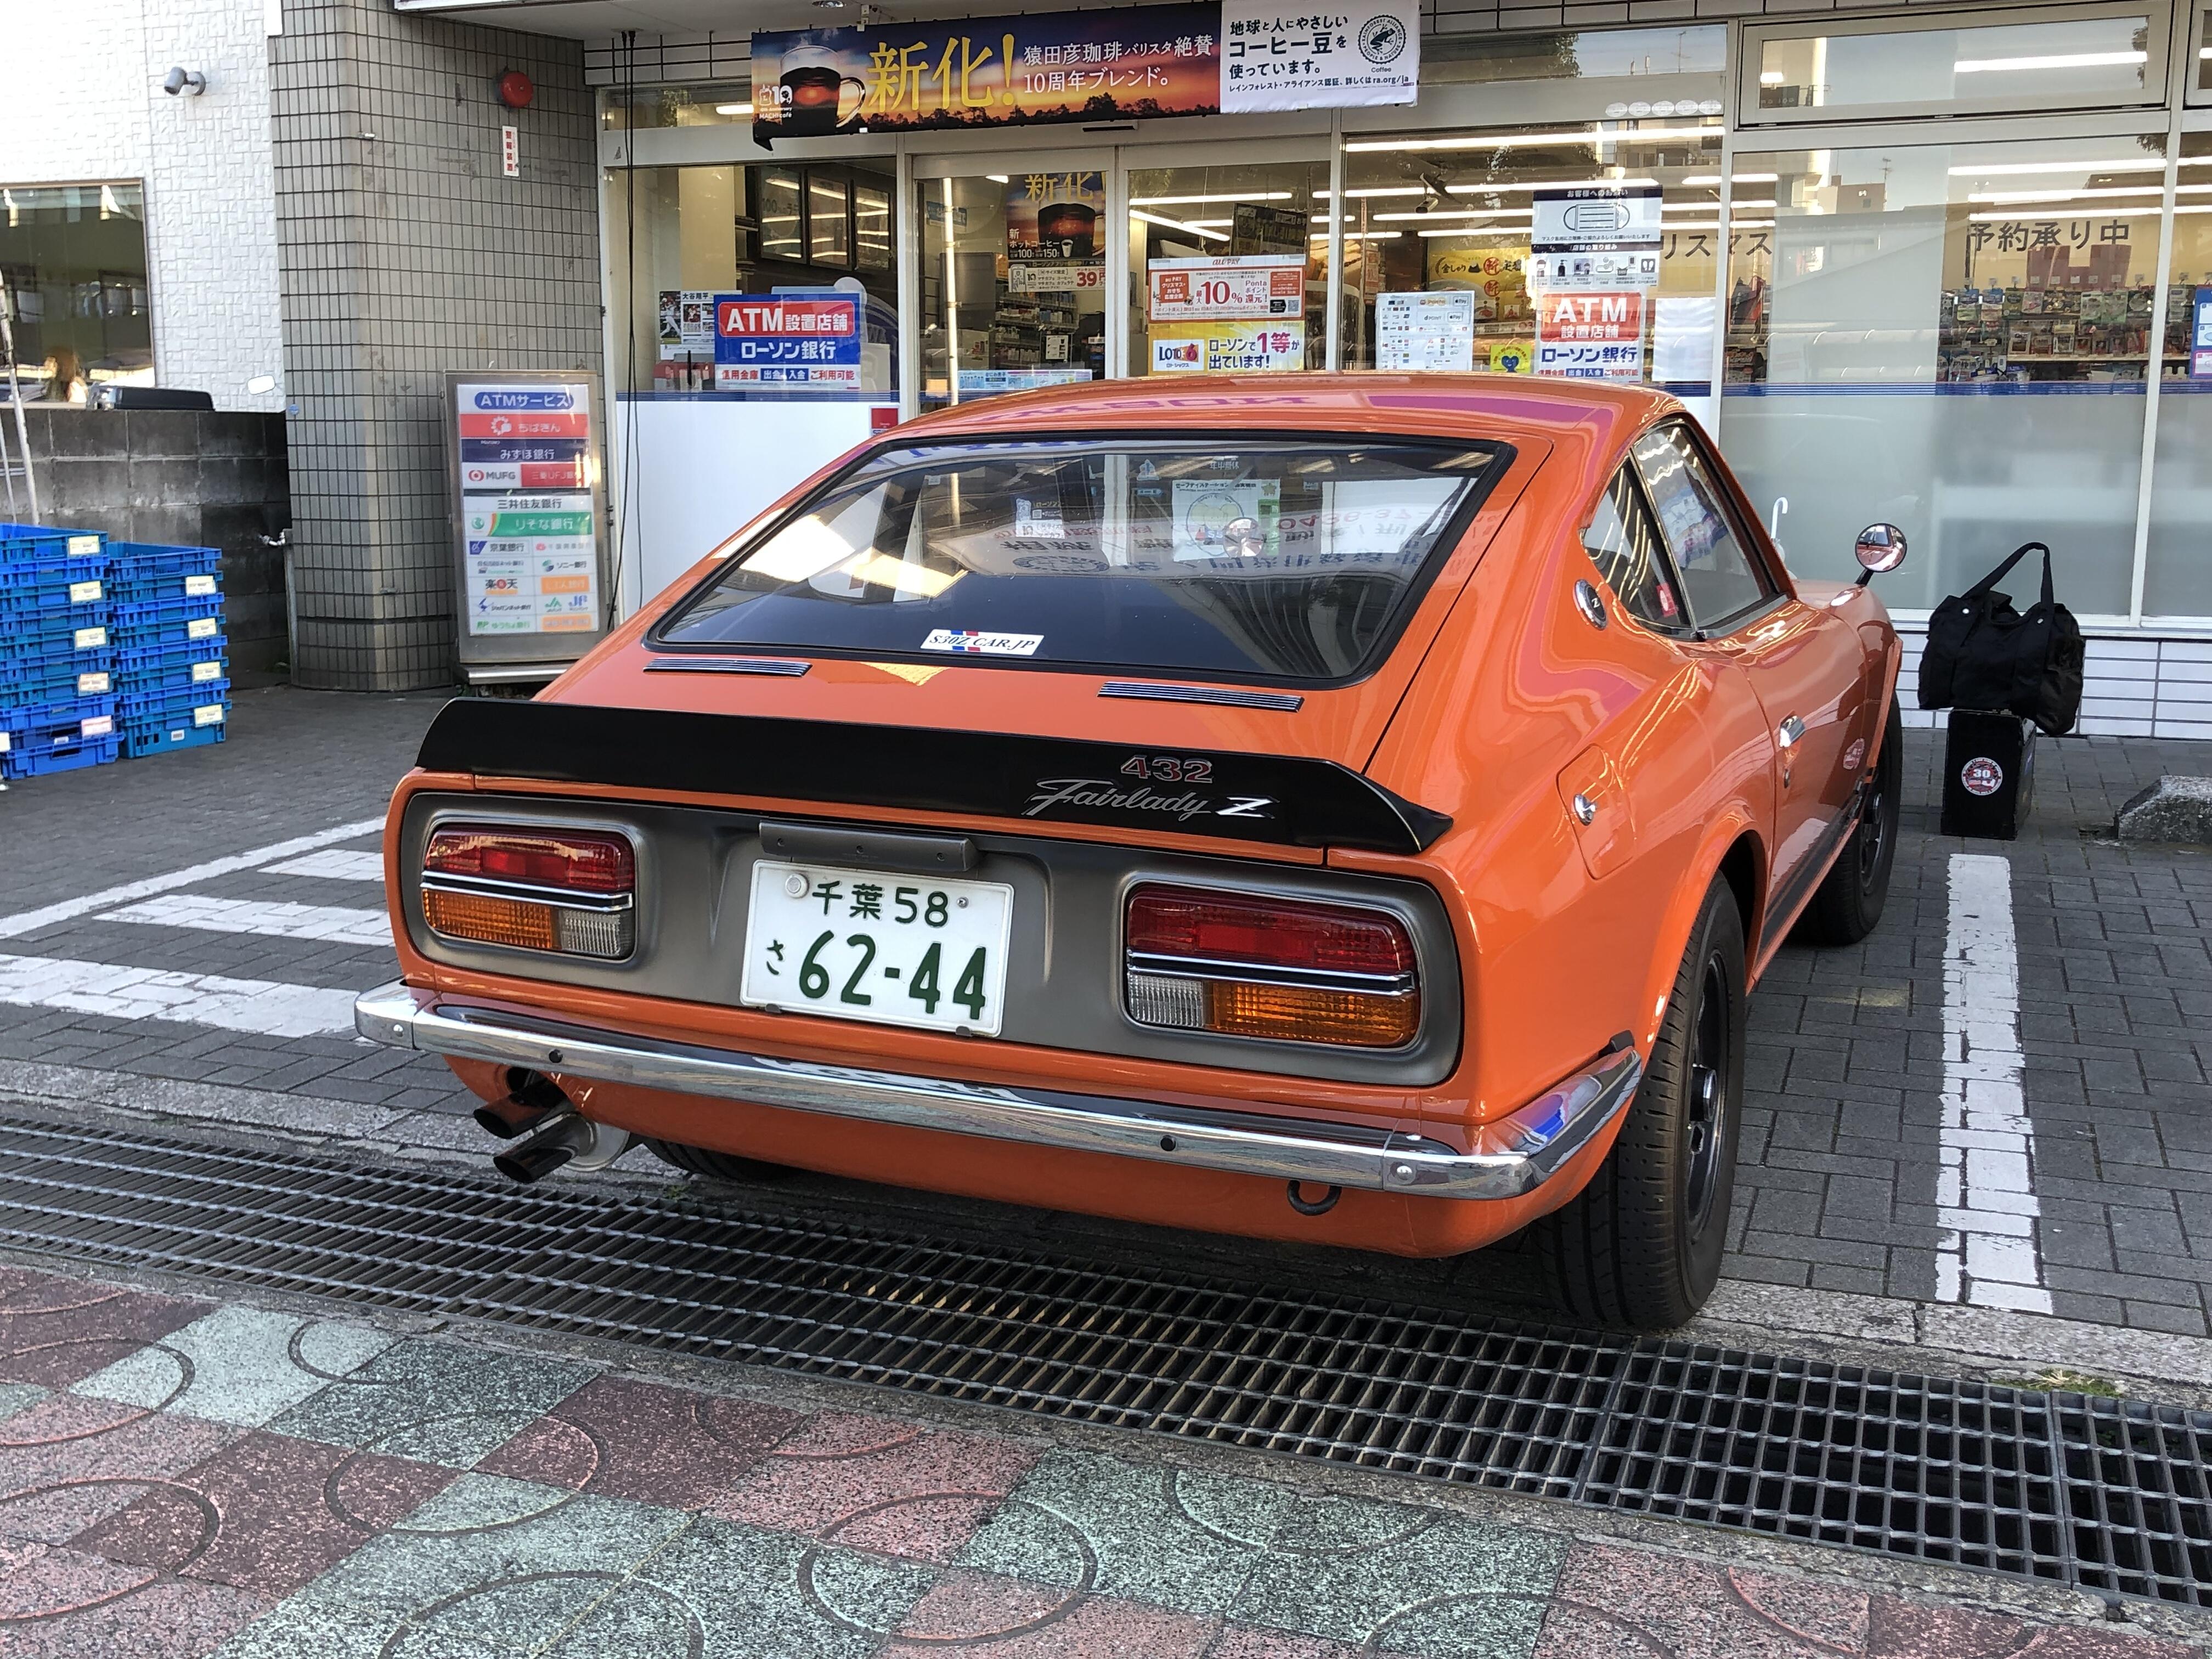
3 pointsHi Kats. I have a theory. Just a hunch, but I feel that the very high profile of Takeuchi san's PZR in recent years has been an inspiration to Nissan's design team. His car has been seen in magazines, videos, blogs, social media posts, indoor and outdoor shows, autocrosses and just generally driving around everywhere. It has even been my personal taxi service on more than one occasion. Takeuchi san is very generous with his time and his car, and many people get to see it. Takeuchi san even joined us here on classiczcars.com and shared his restoration with us. It is one of the most special variants of the S30-series Z range, but it is not locked away in a glass box. It lives! I think the styling team's inspiration for this 'Customized Proto' show car was not just any Fairlady Z432-R, but Takeuchi san's 432-R in particular.3 points
-
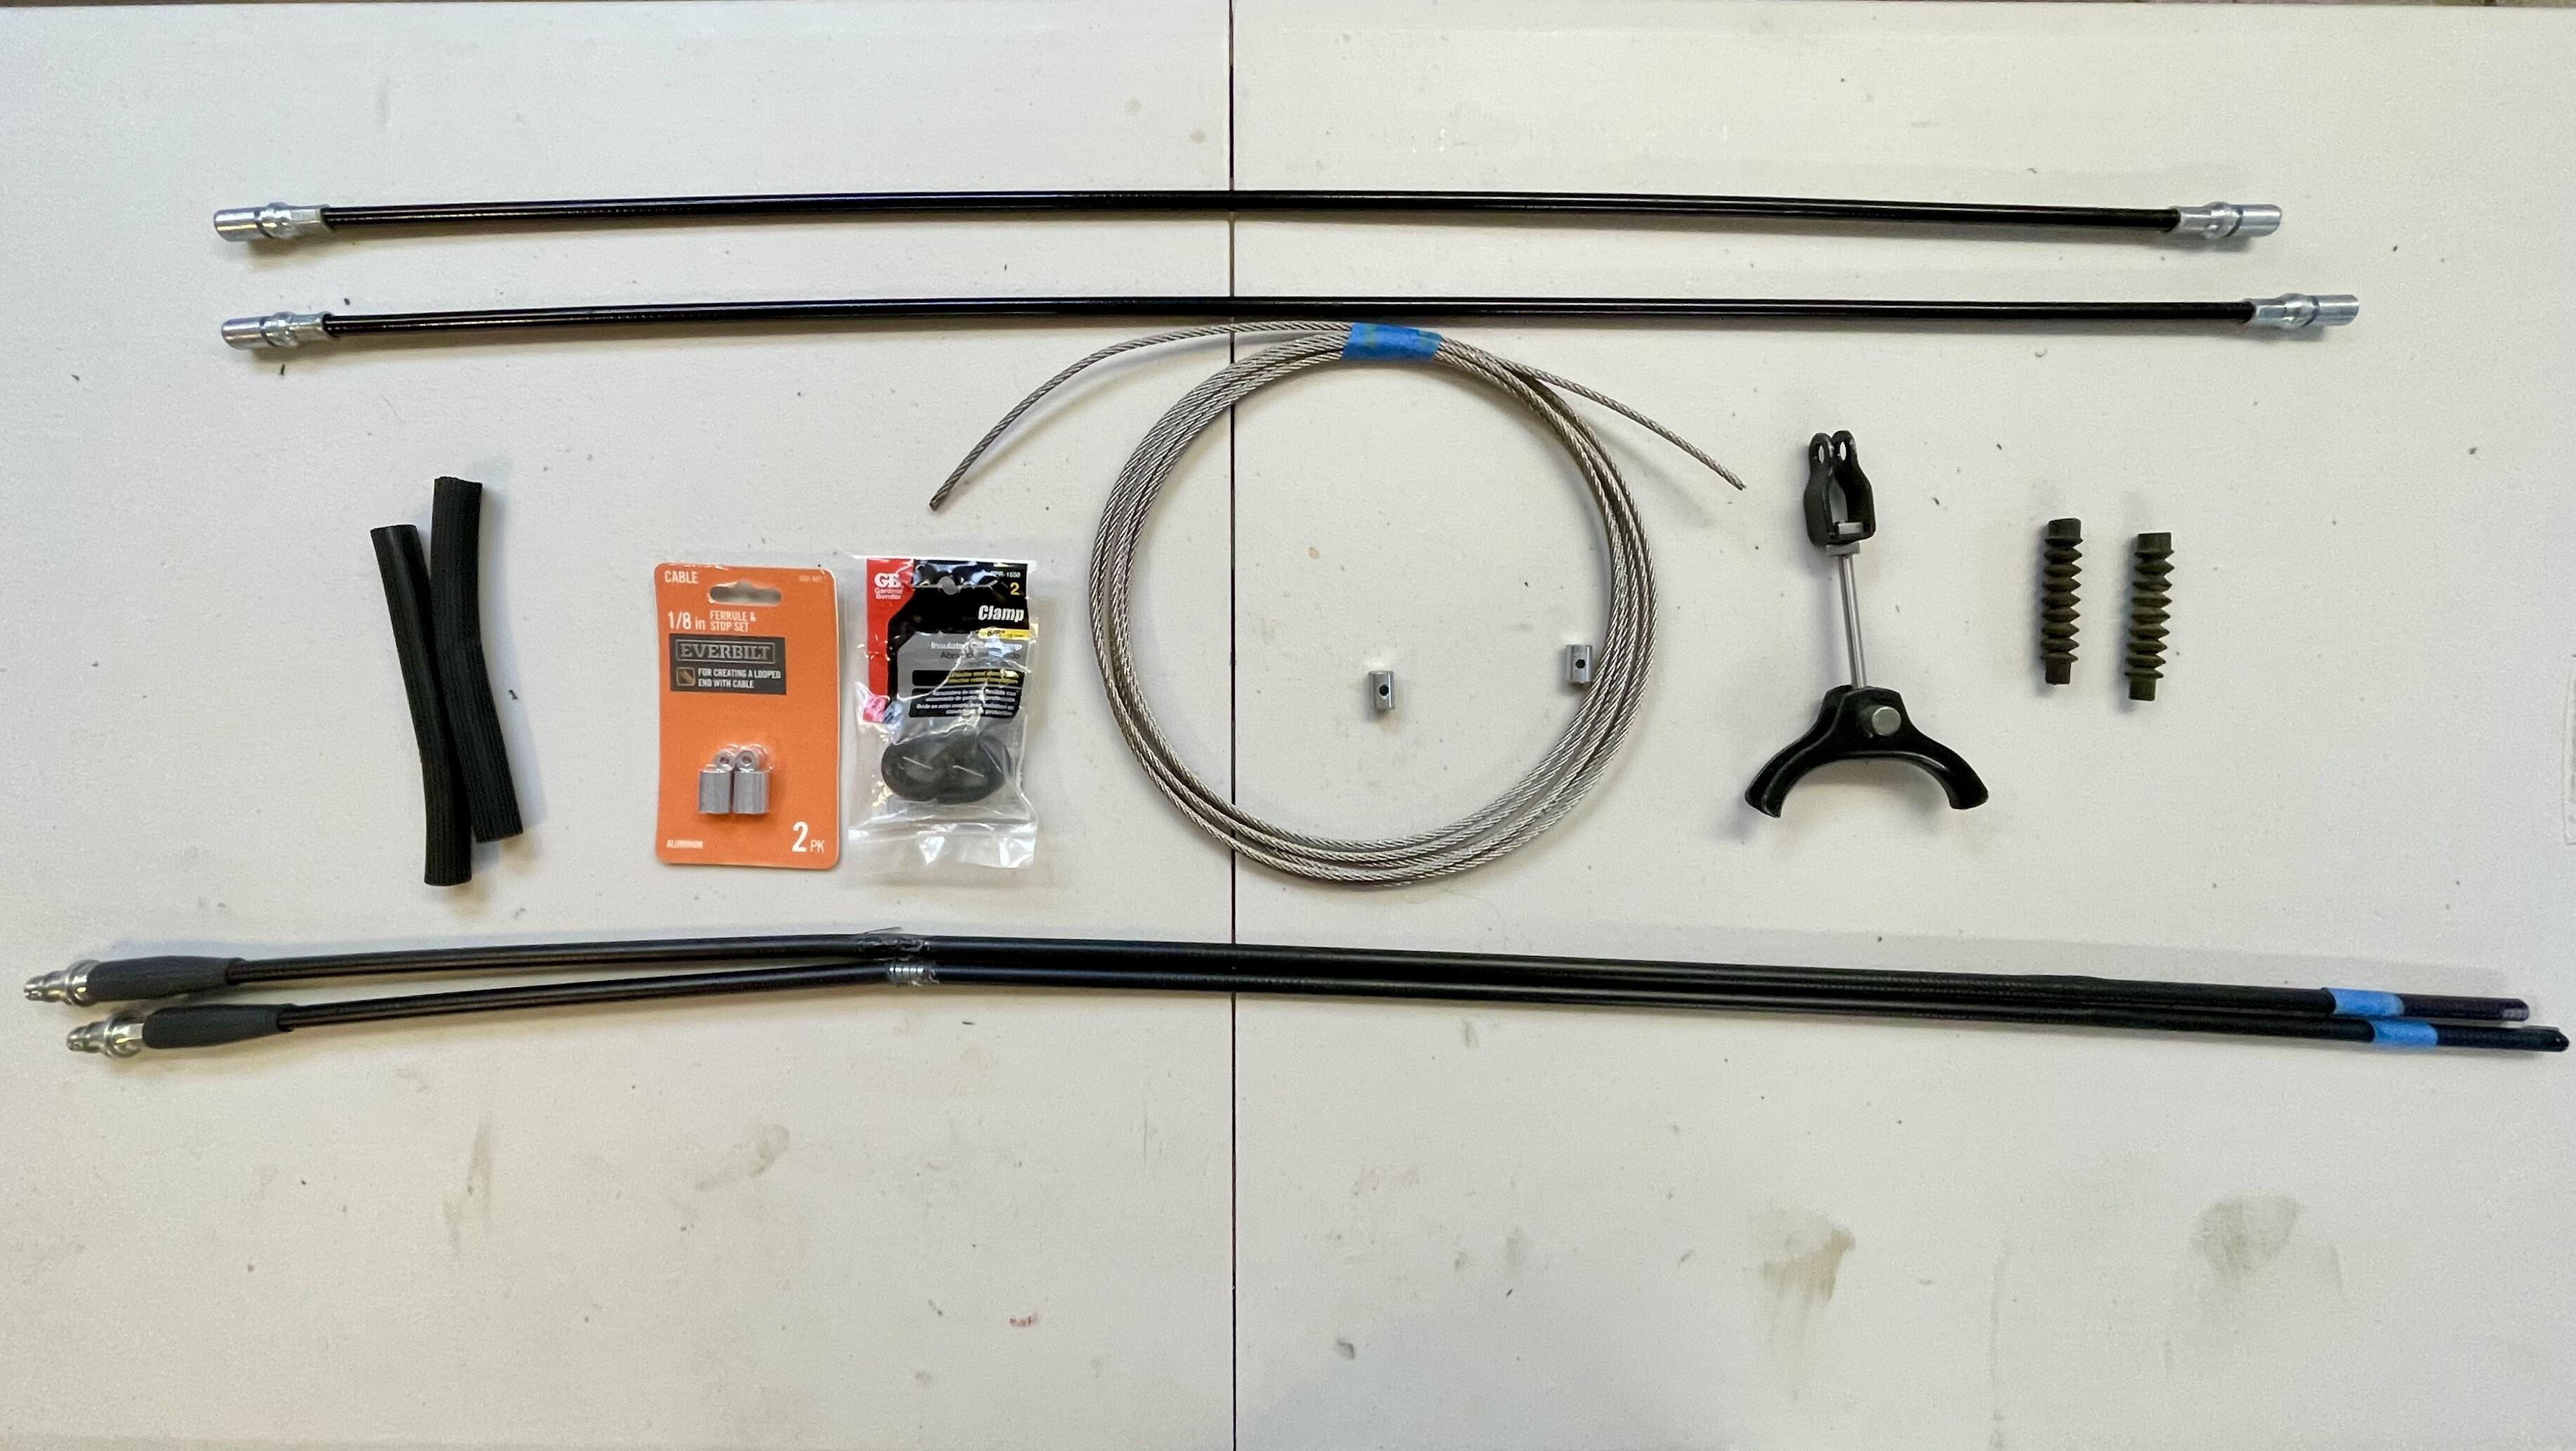
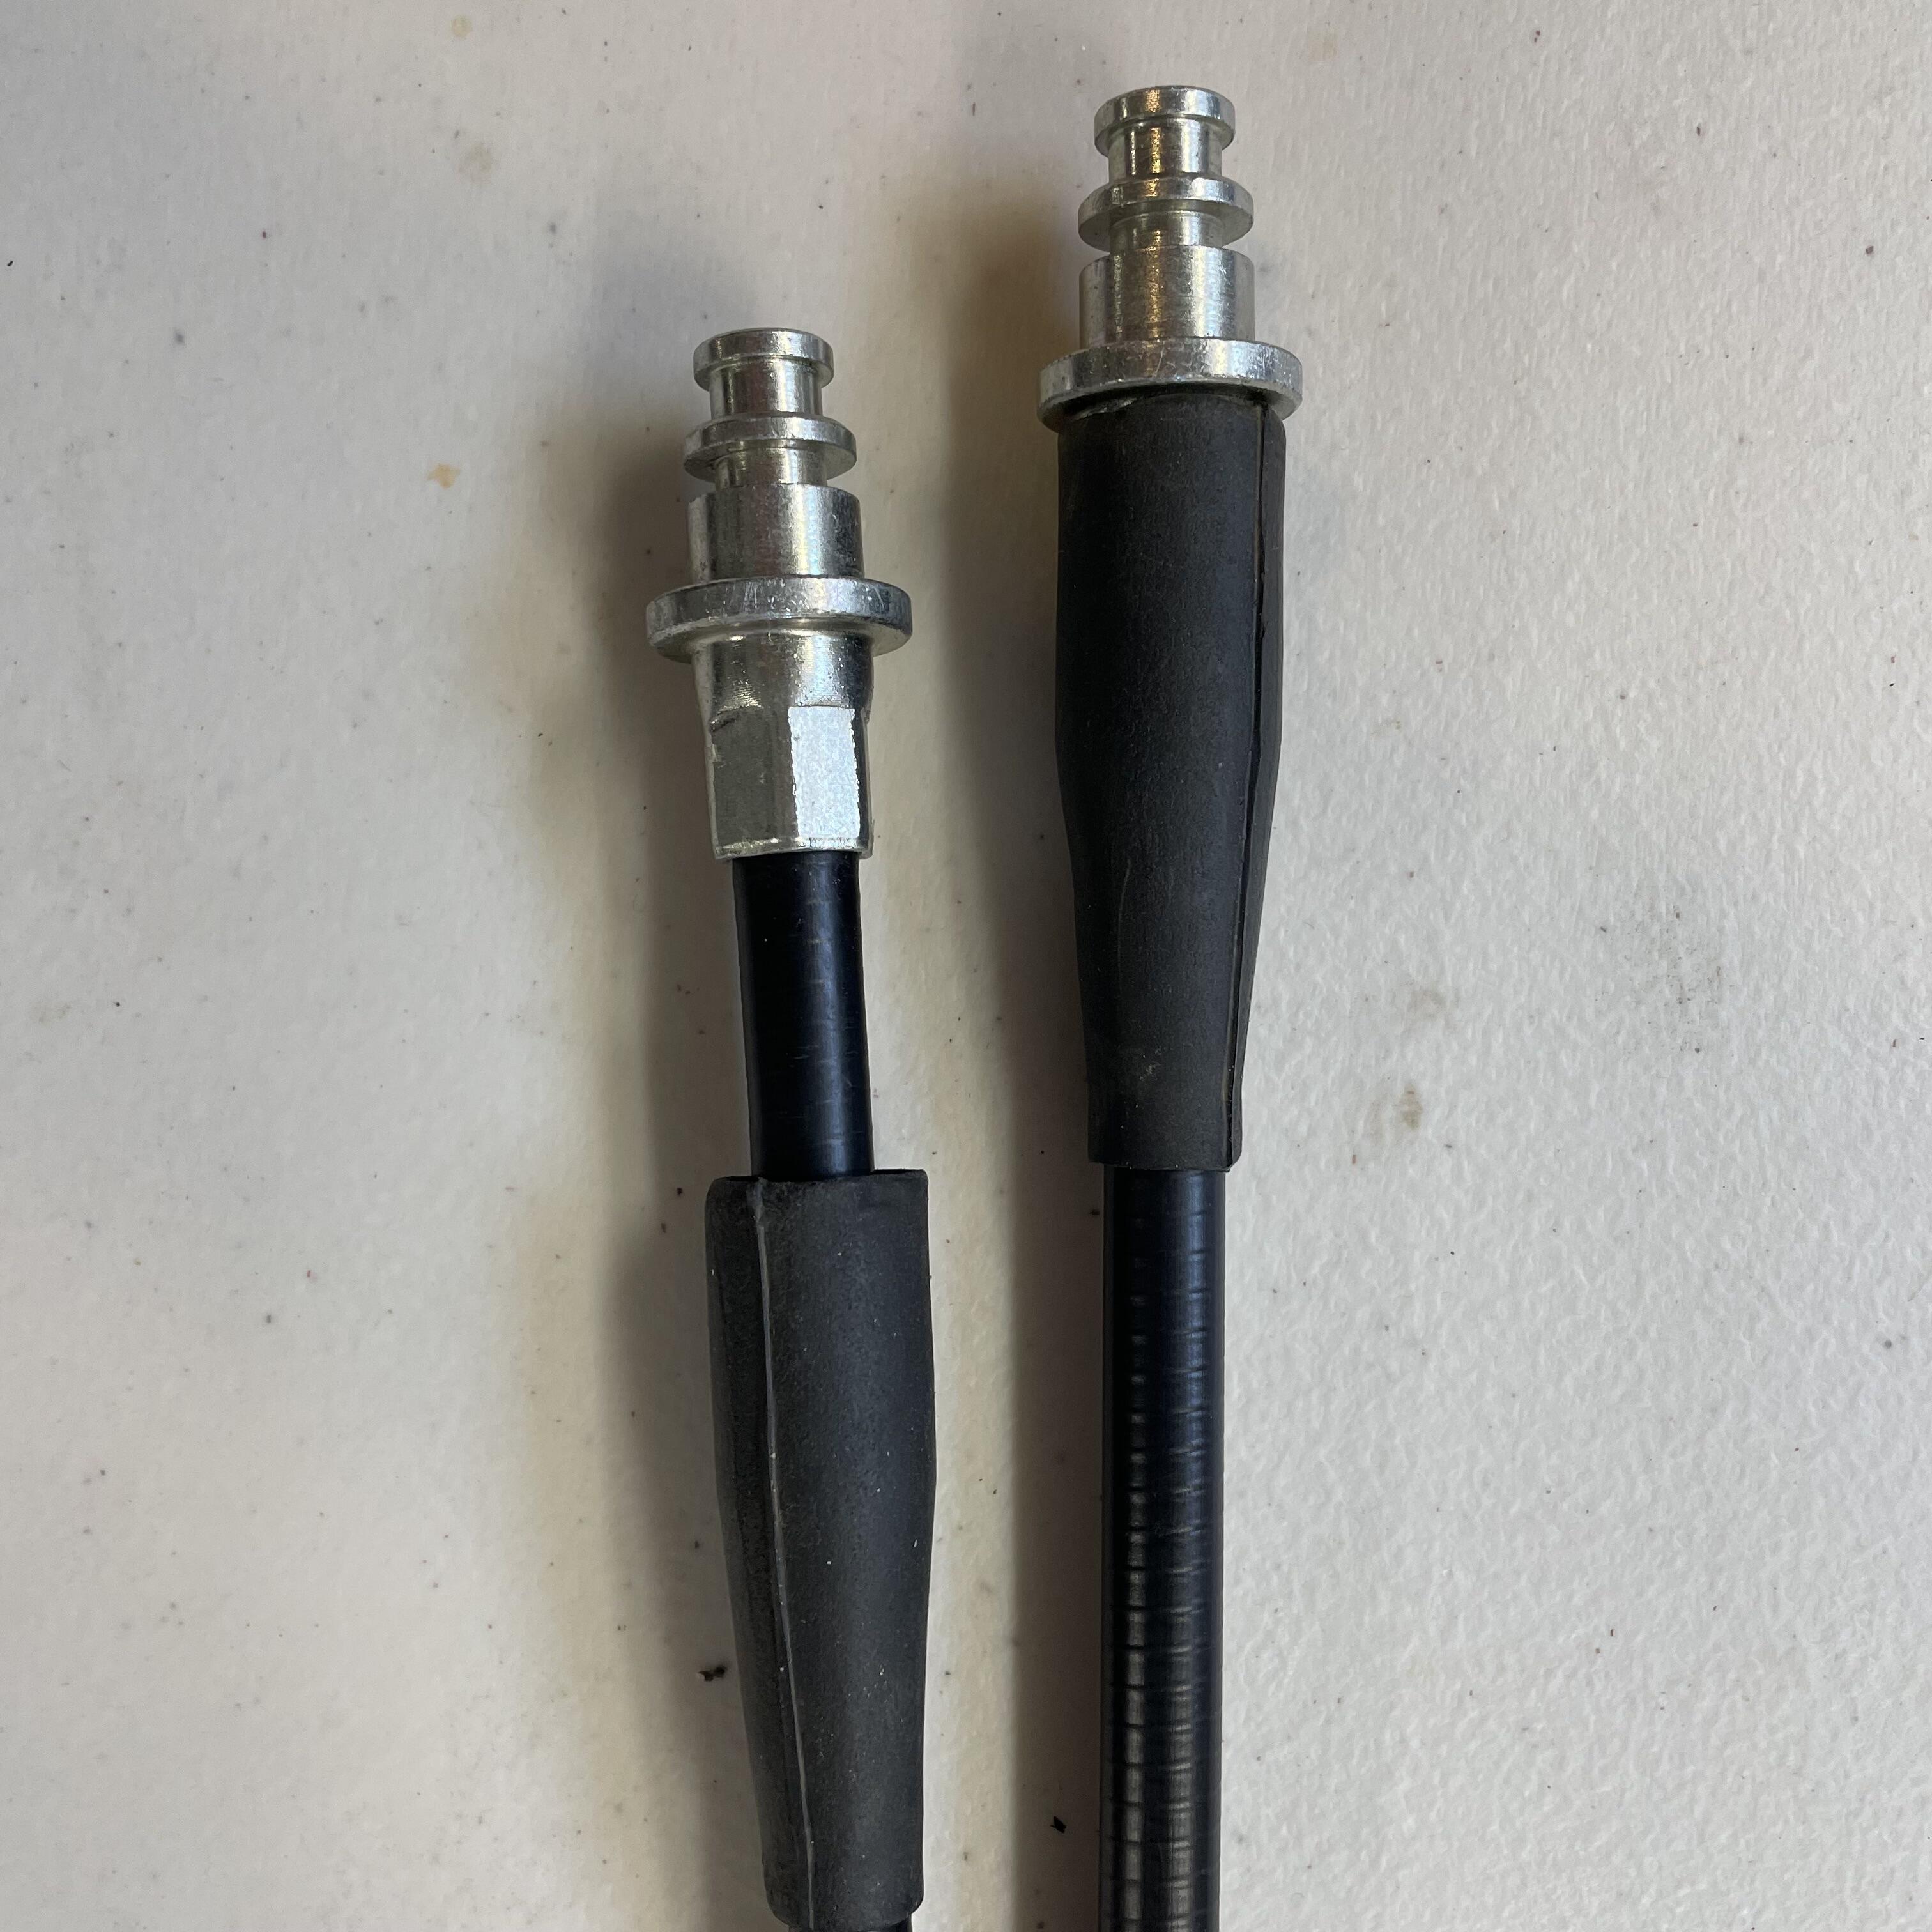
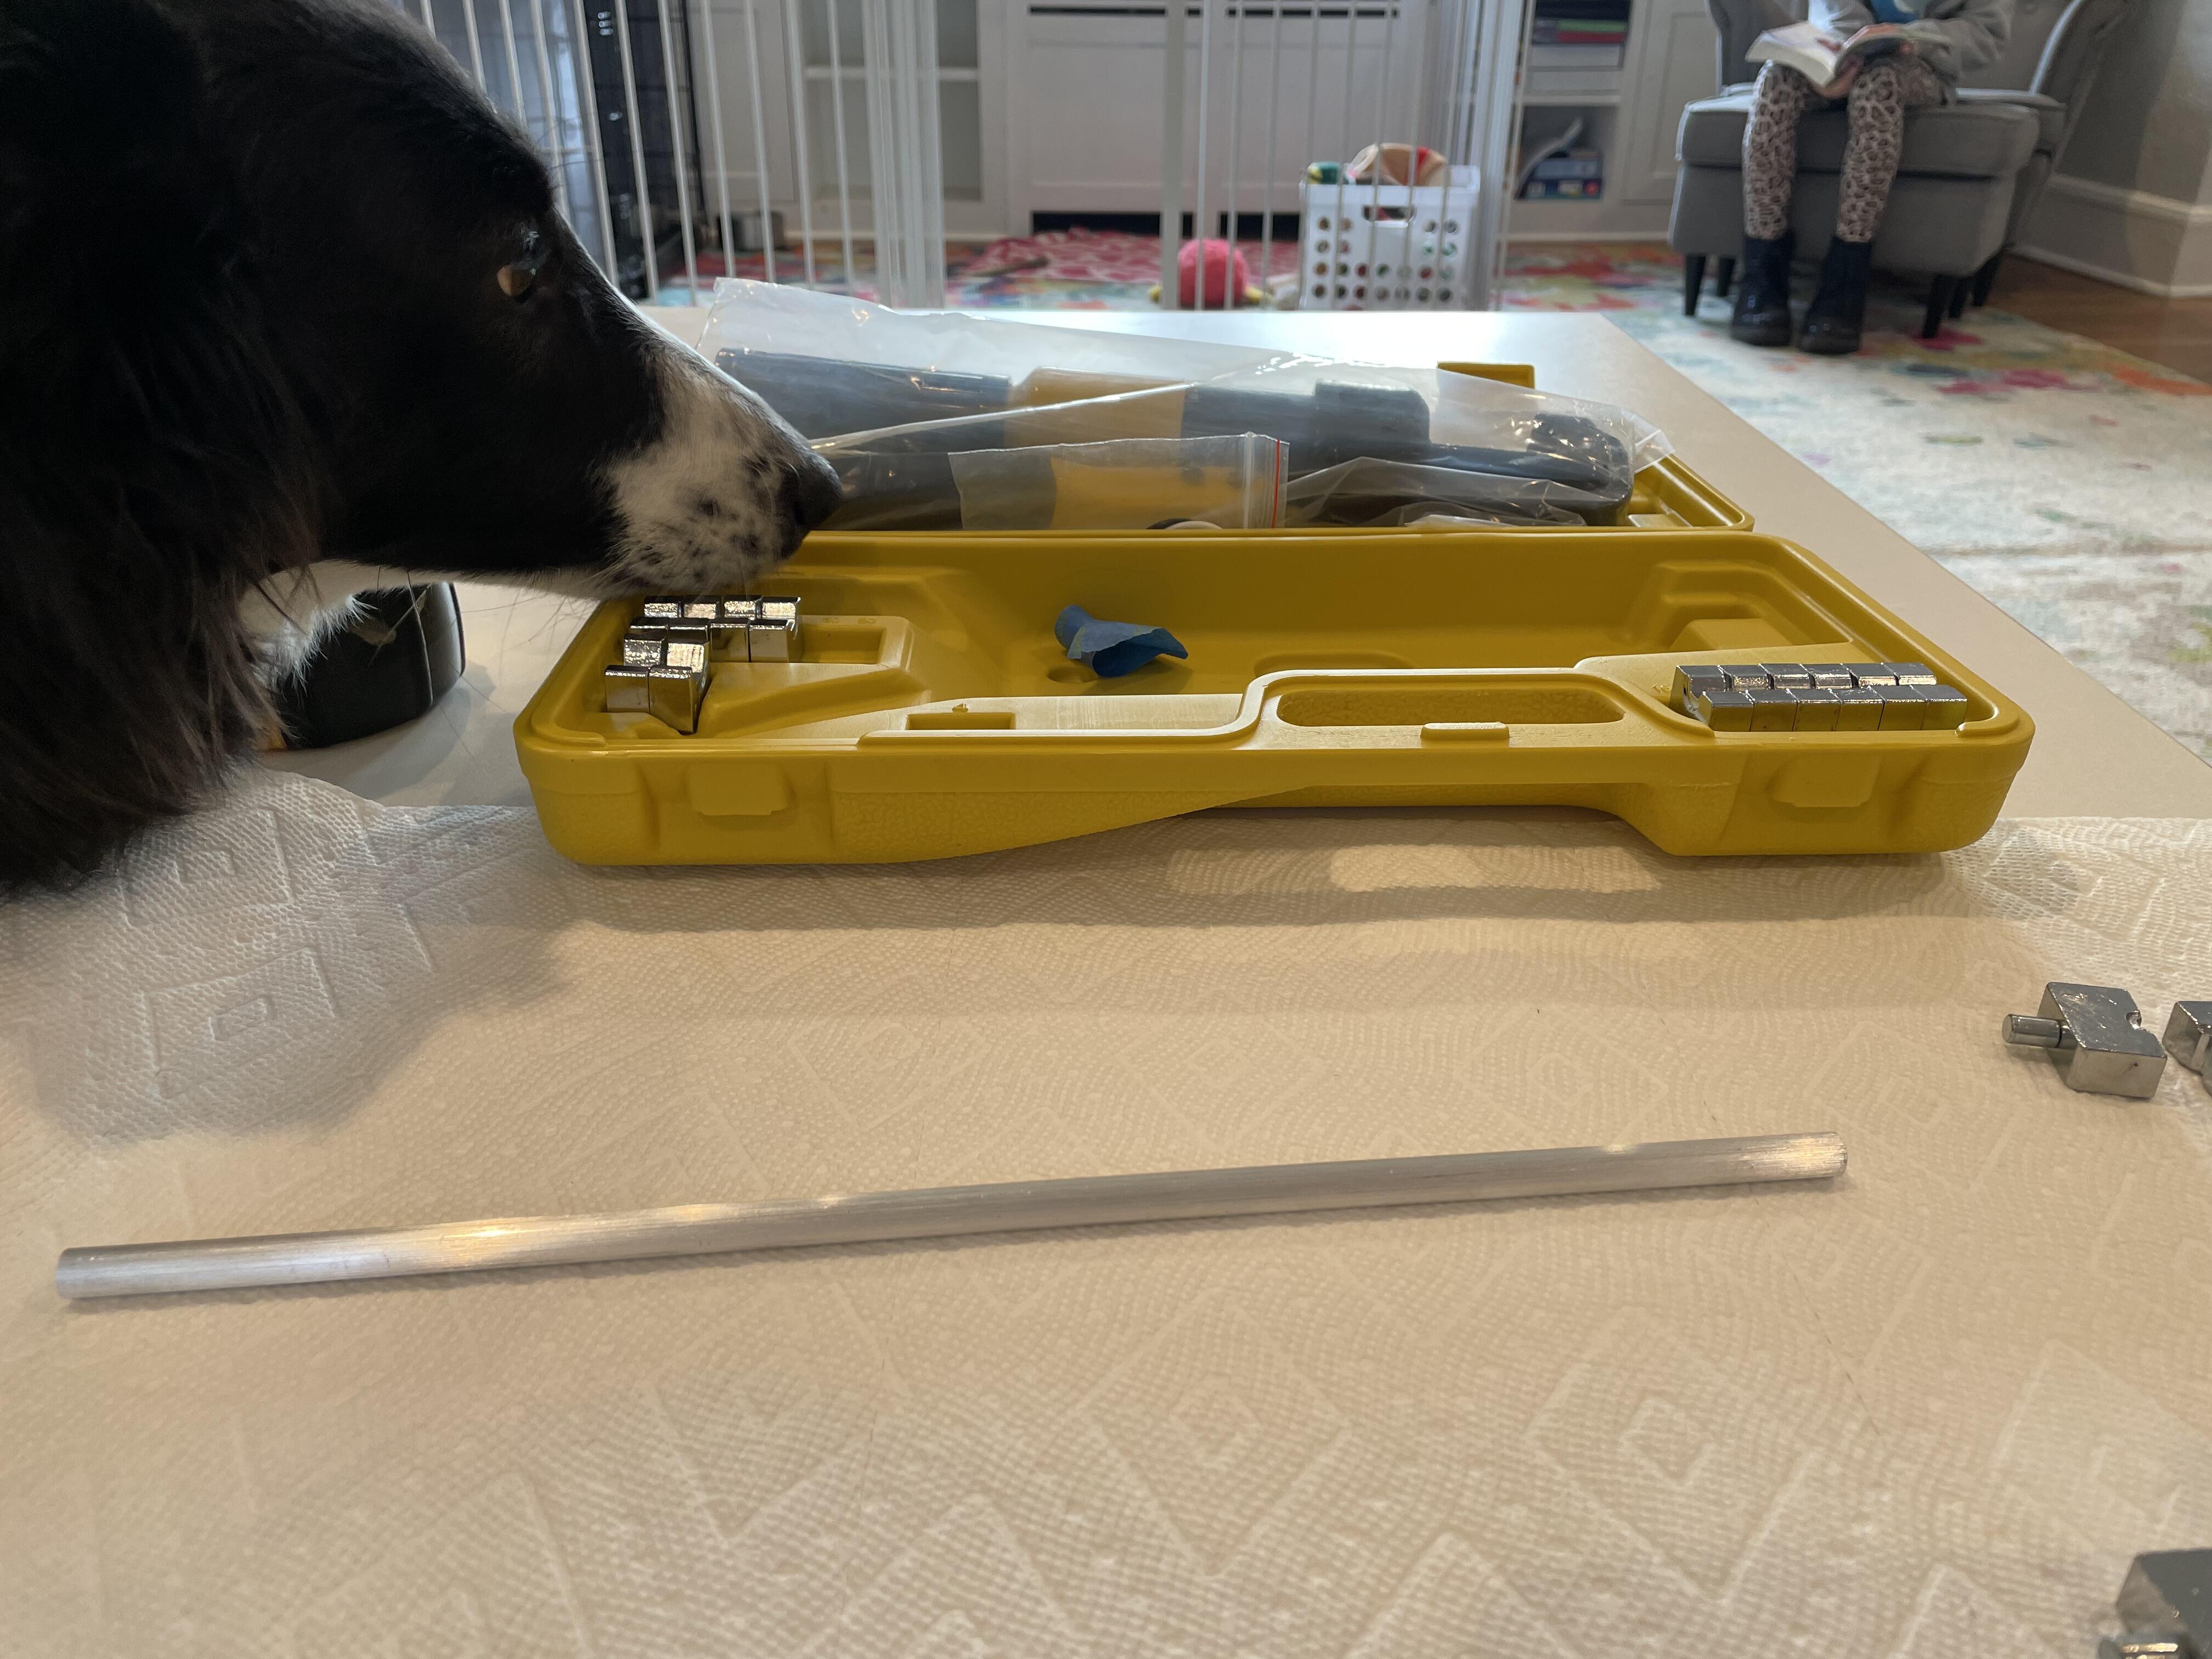
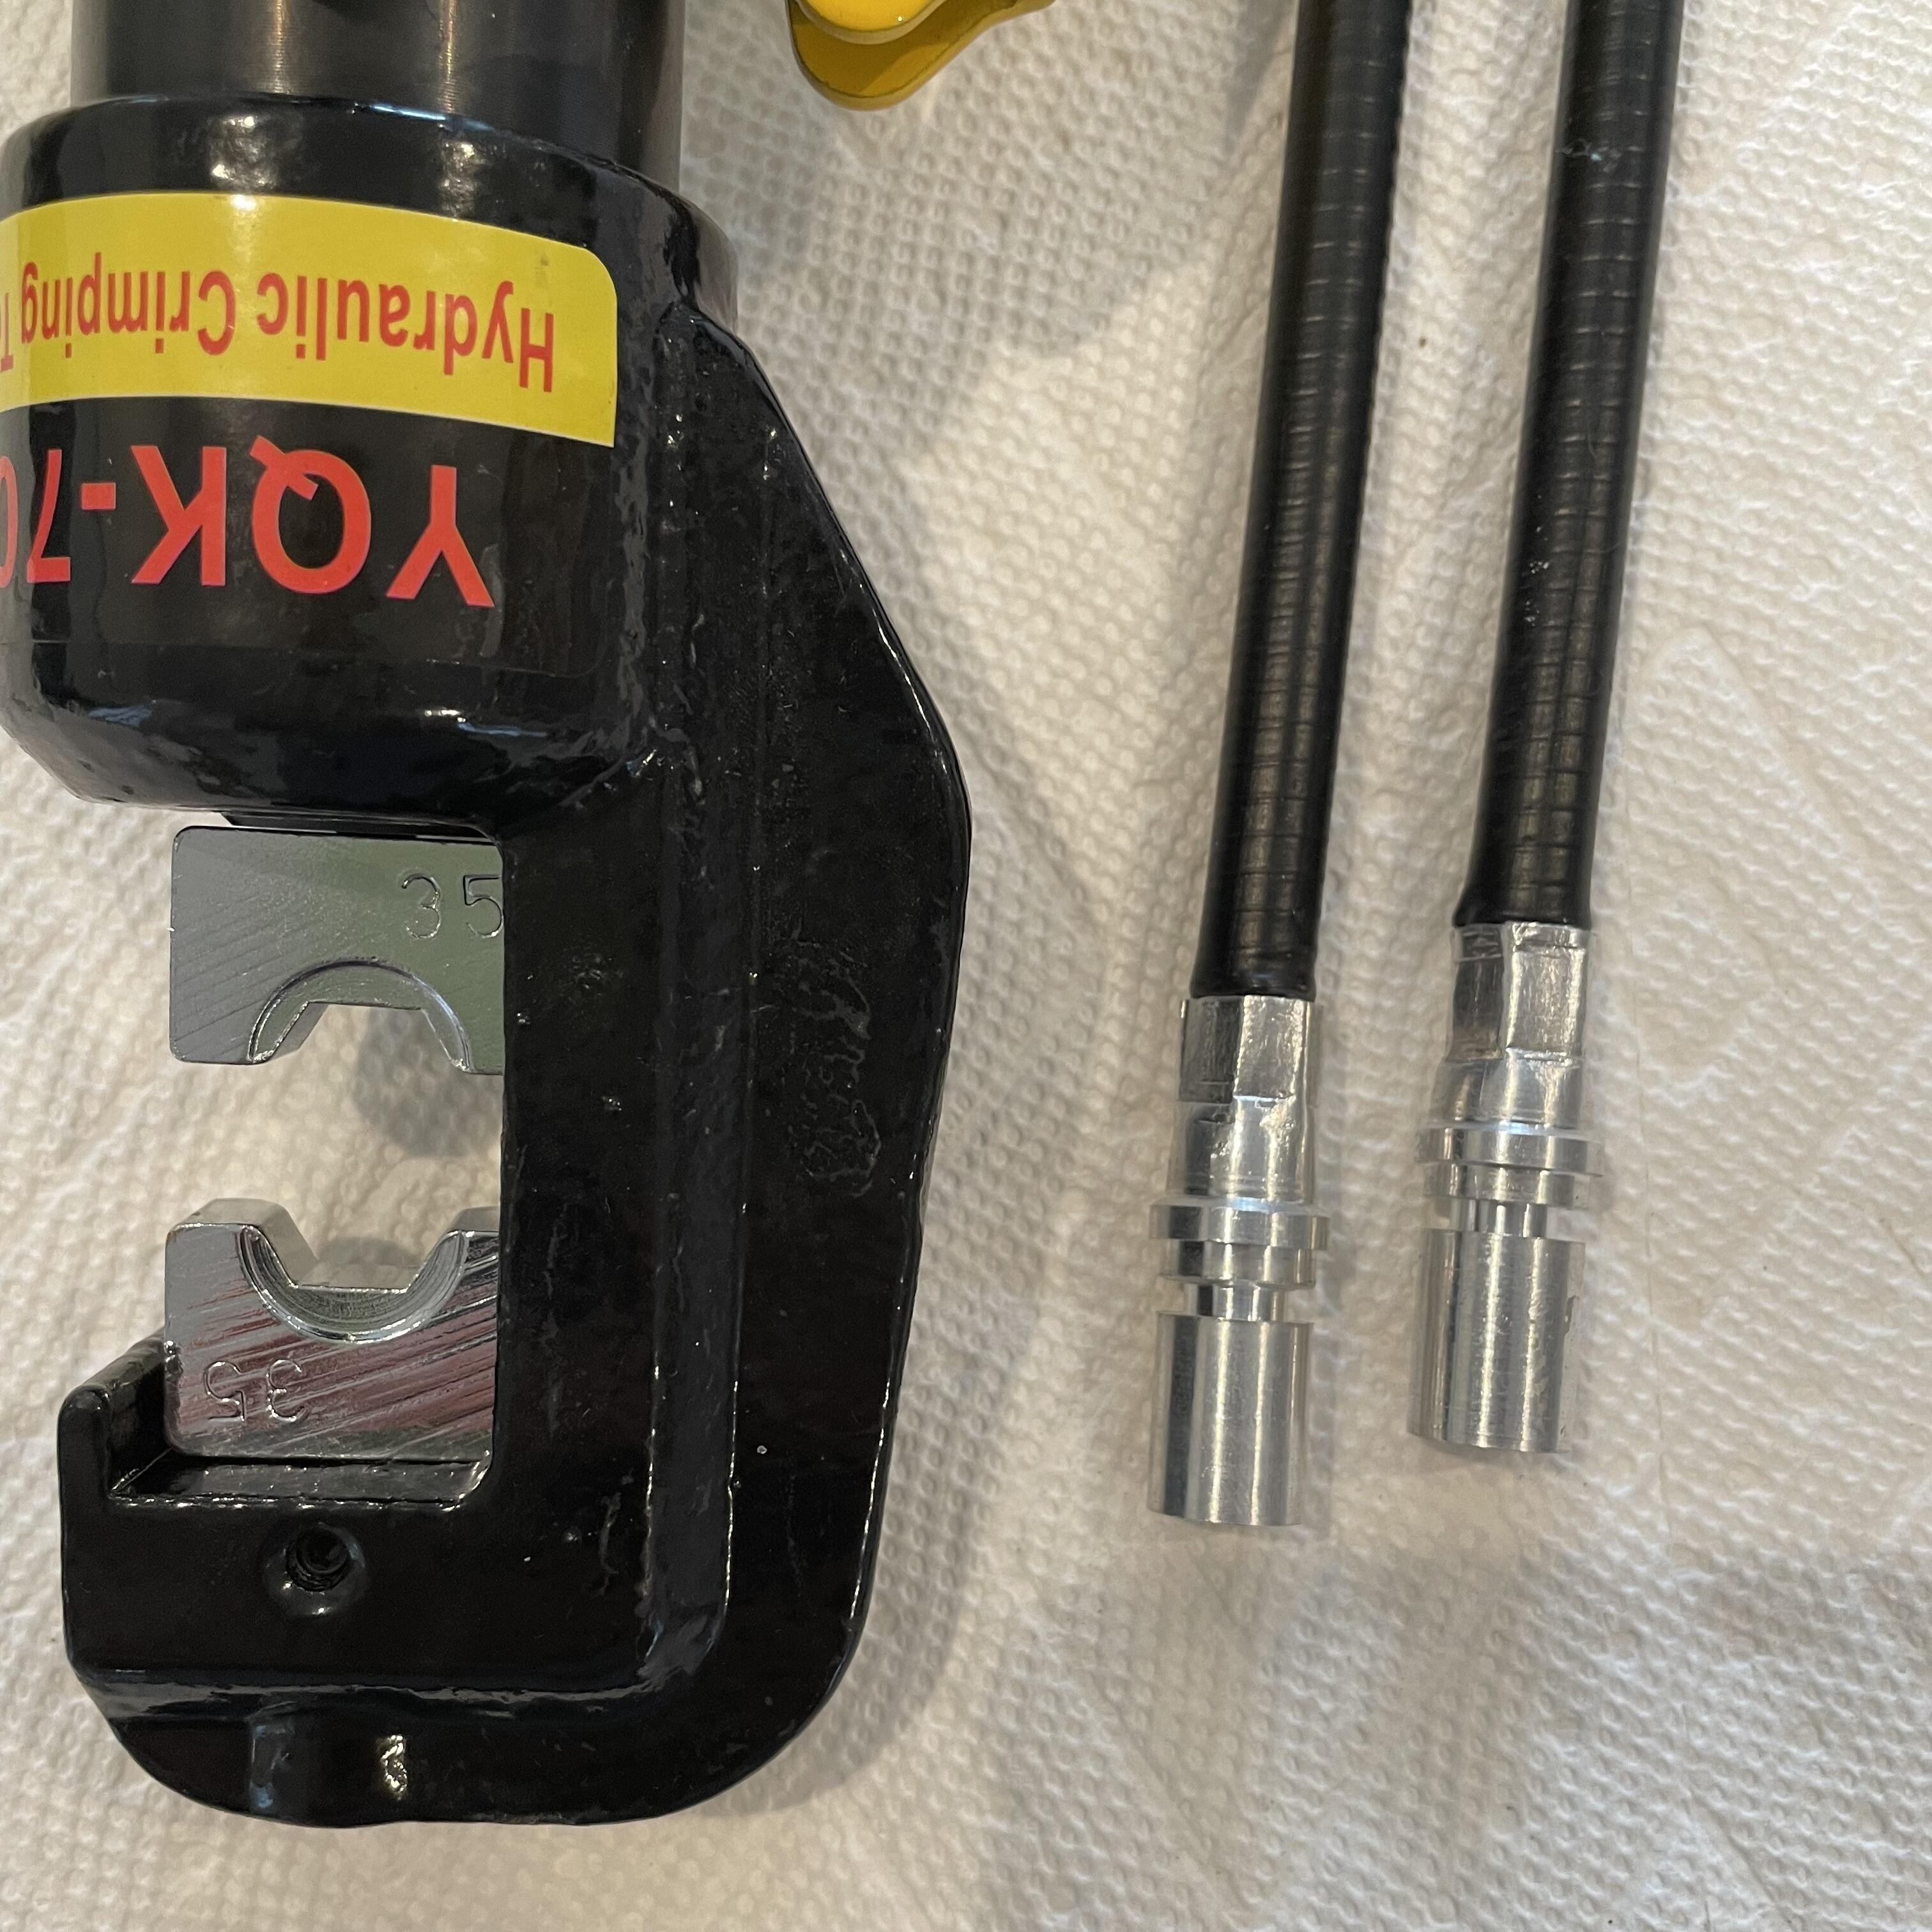
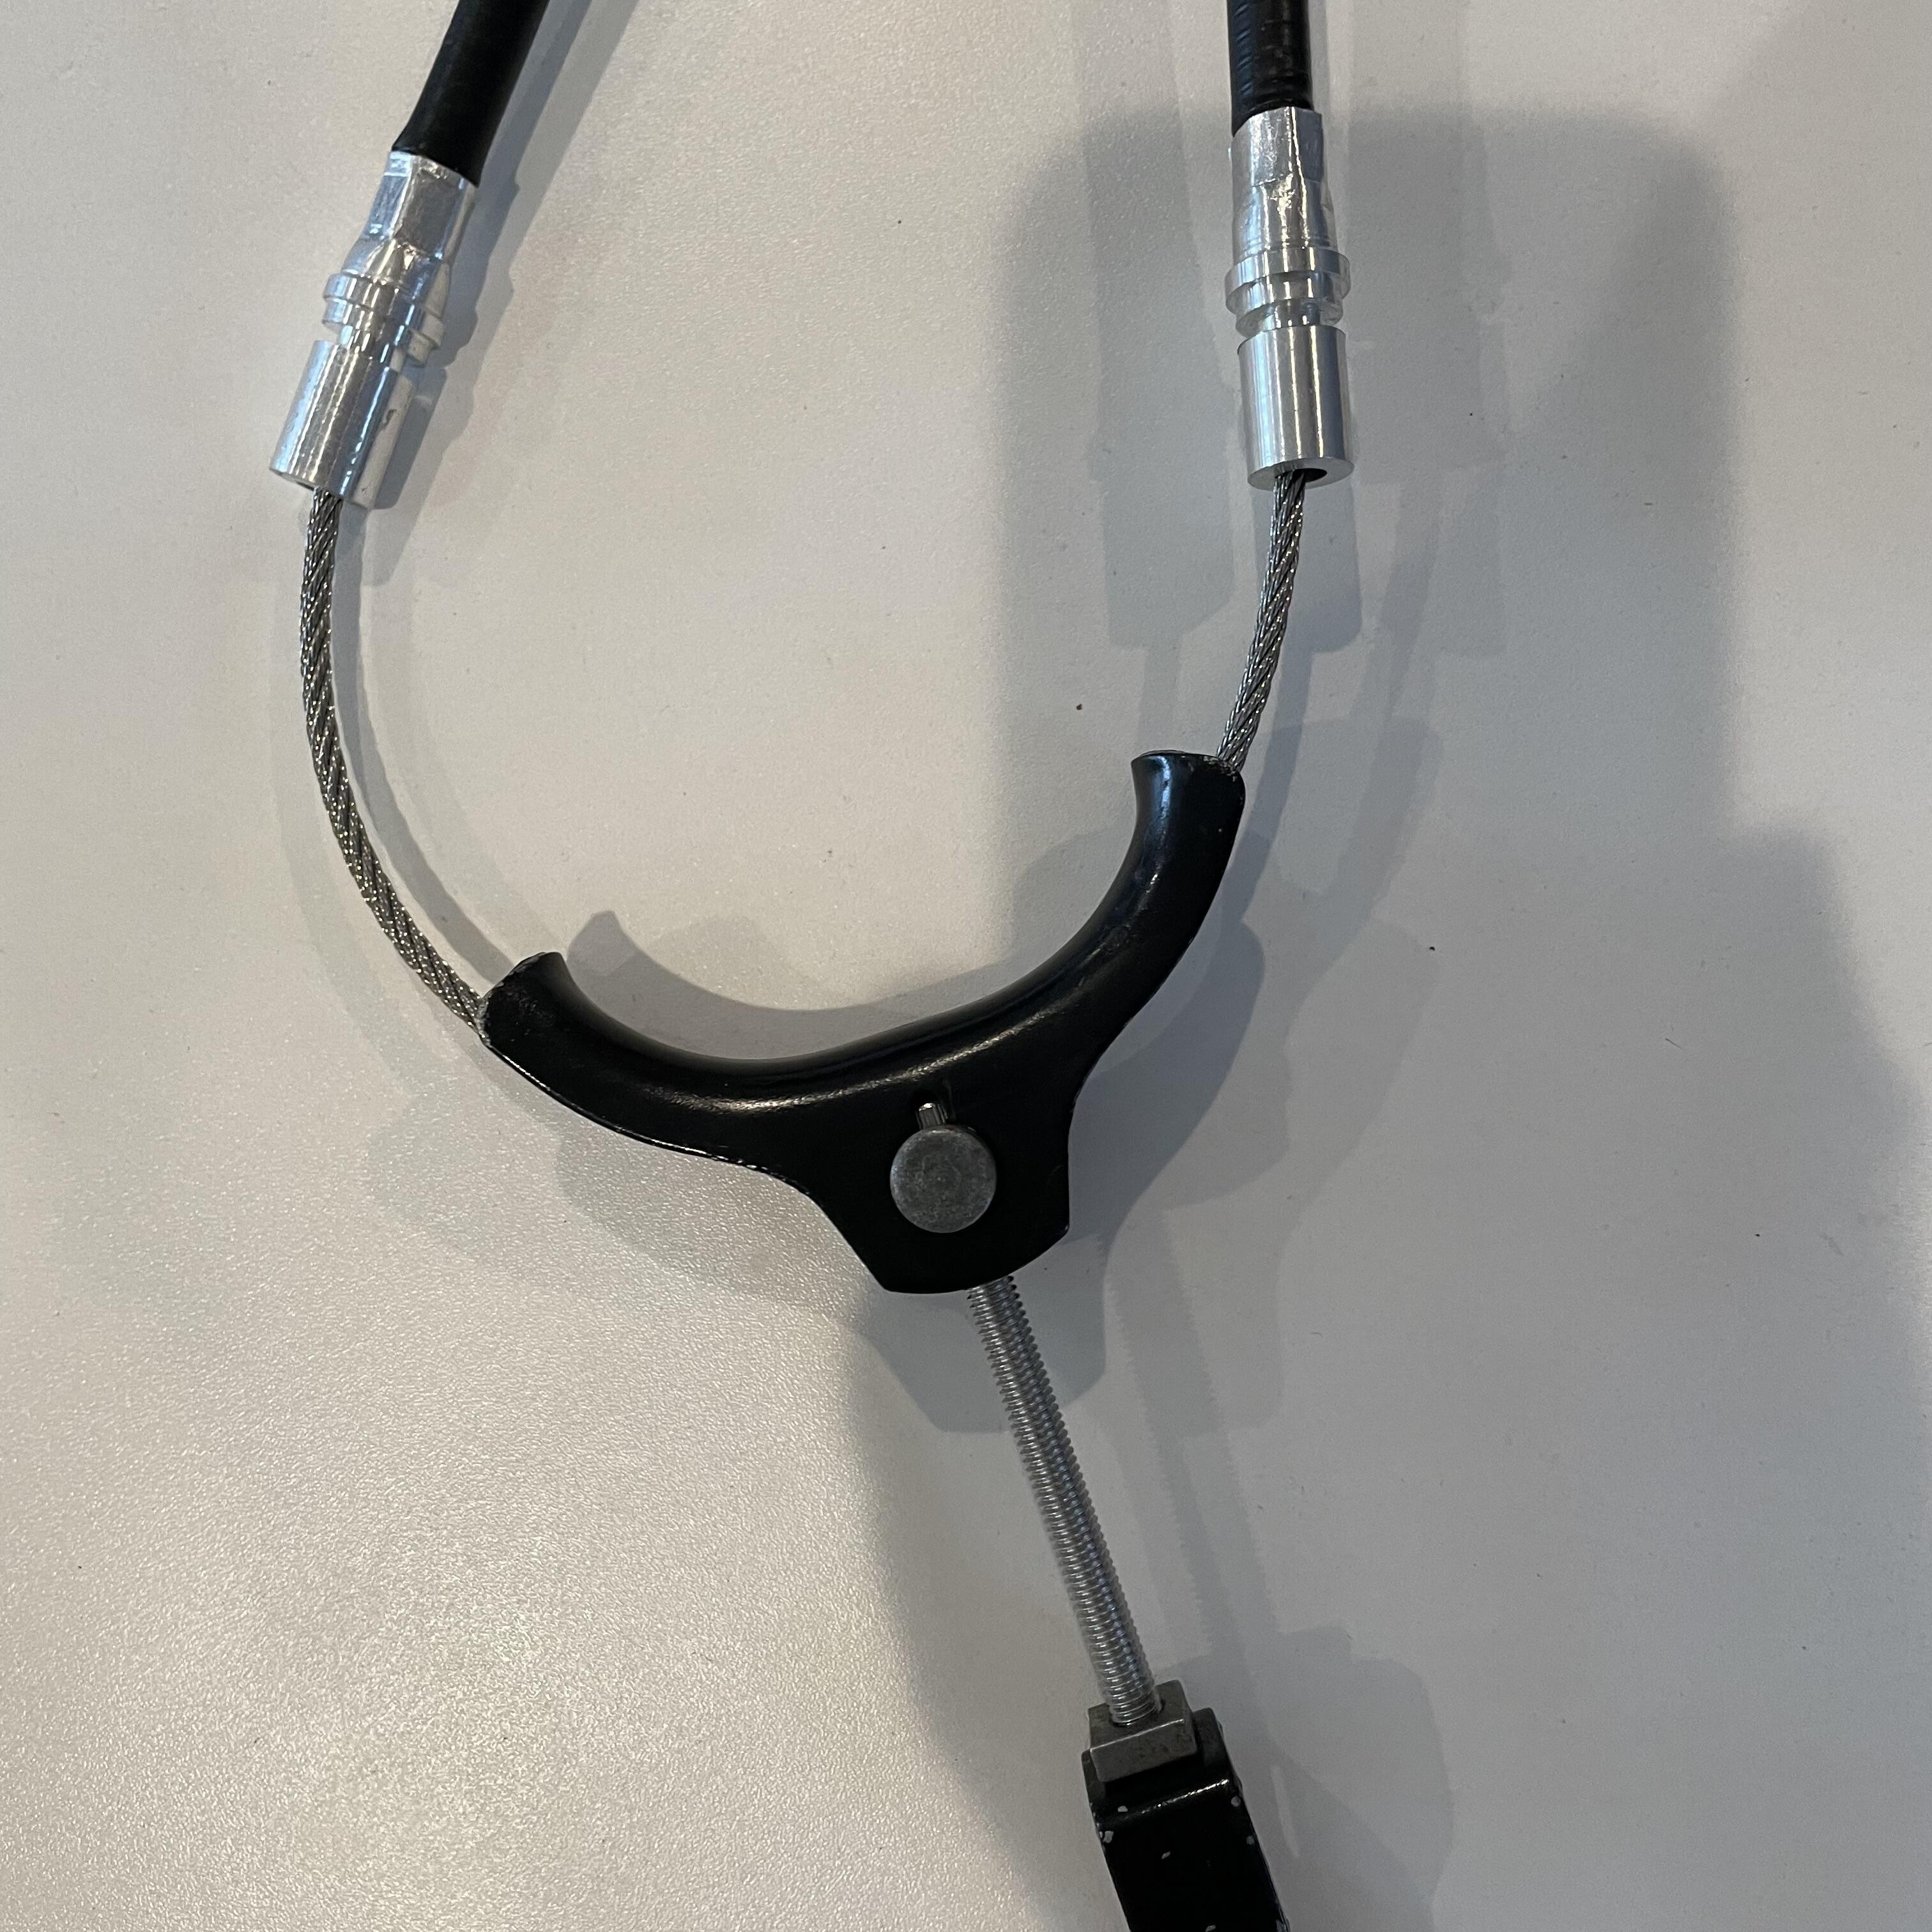
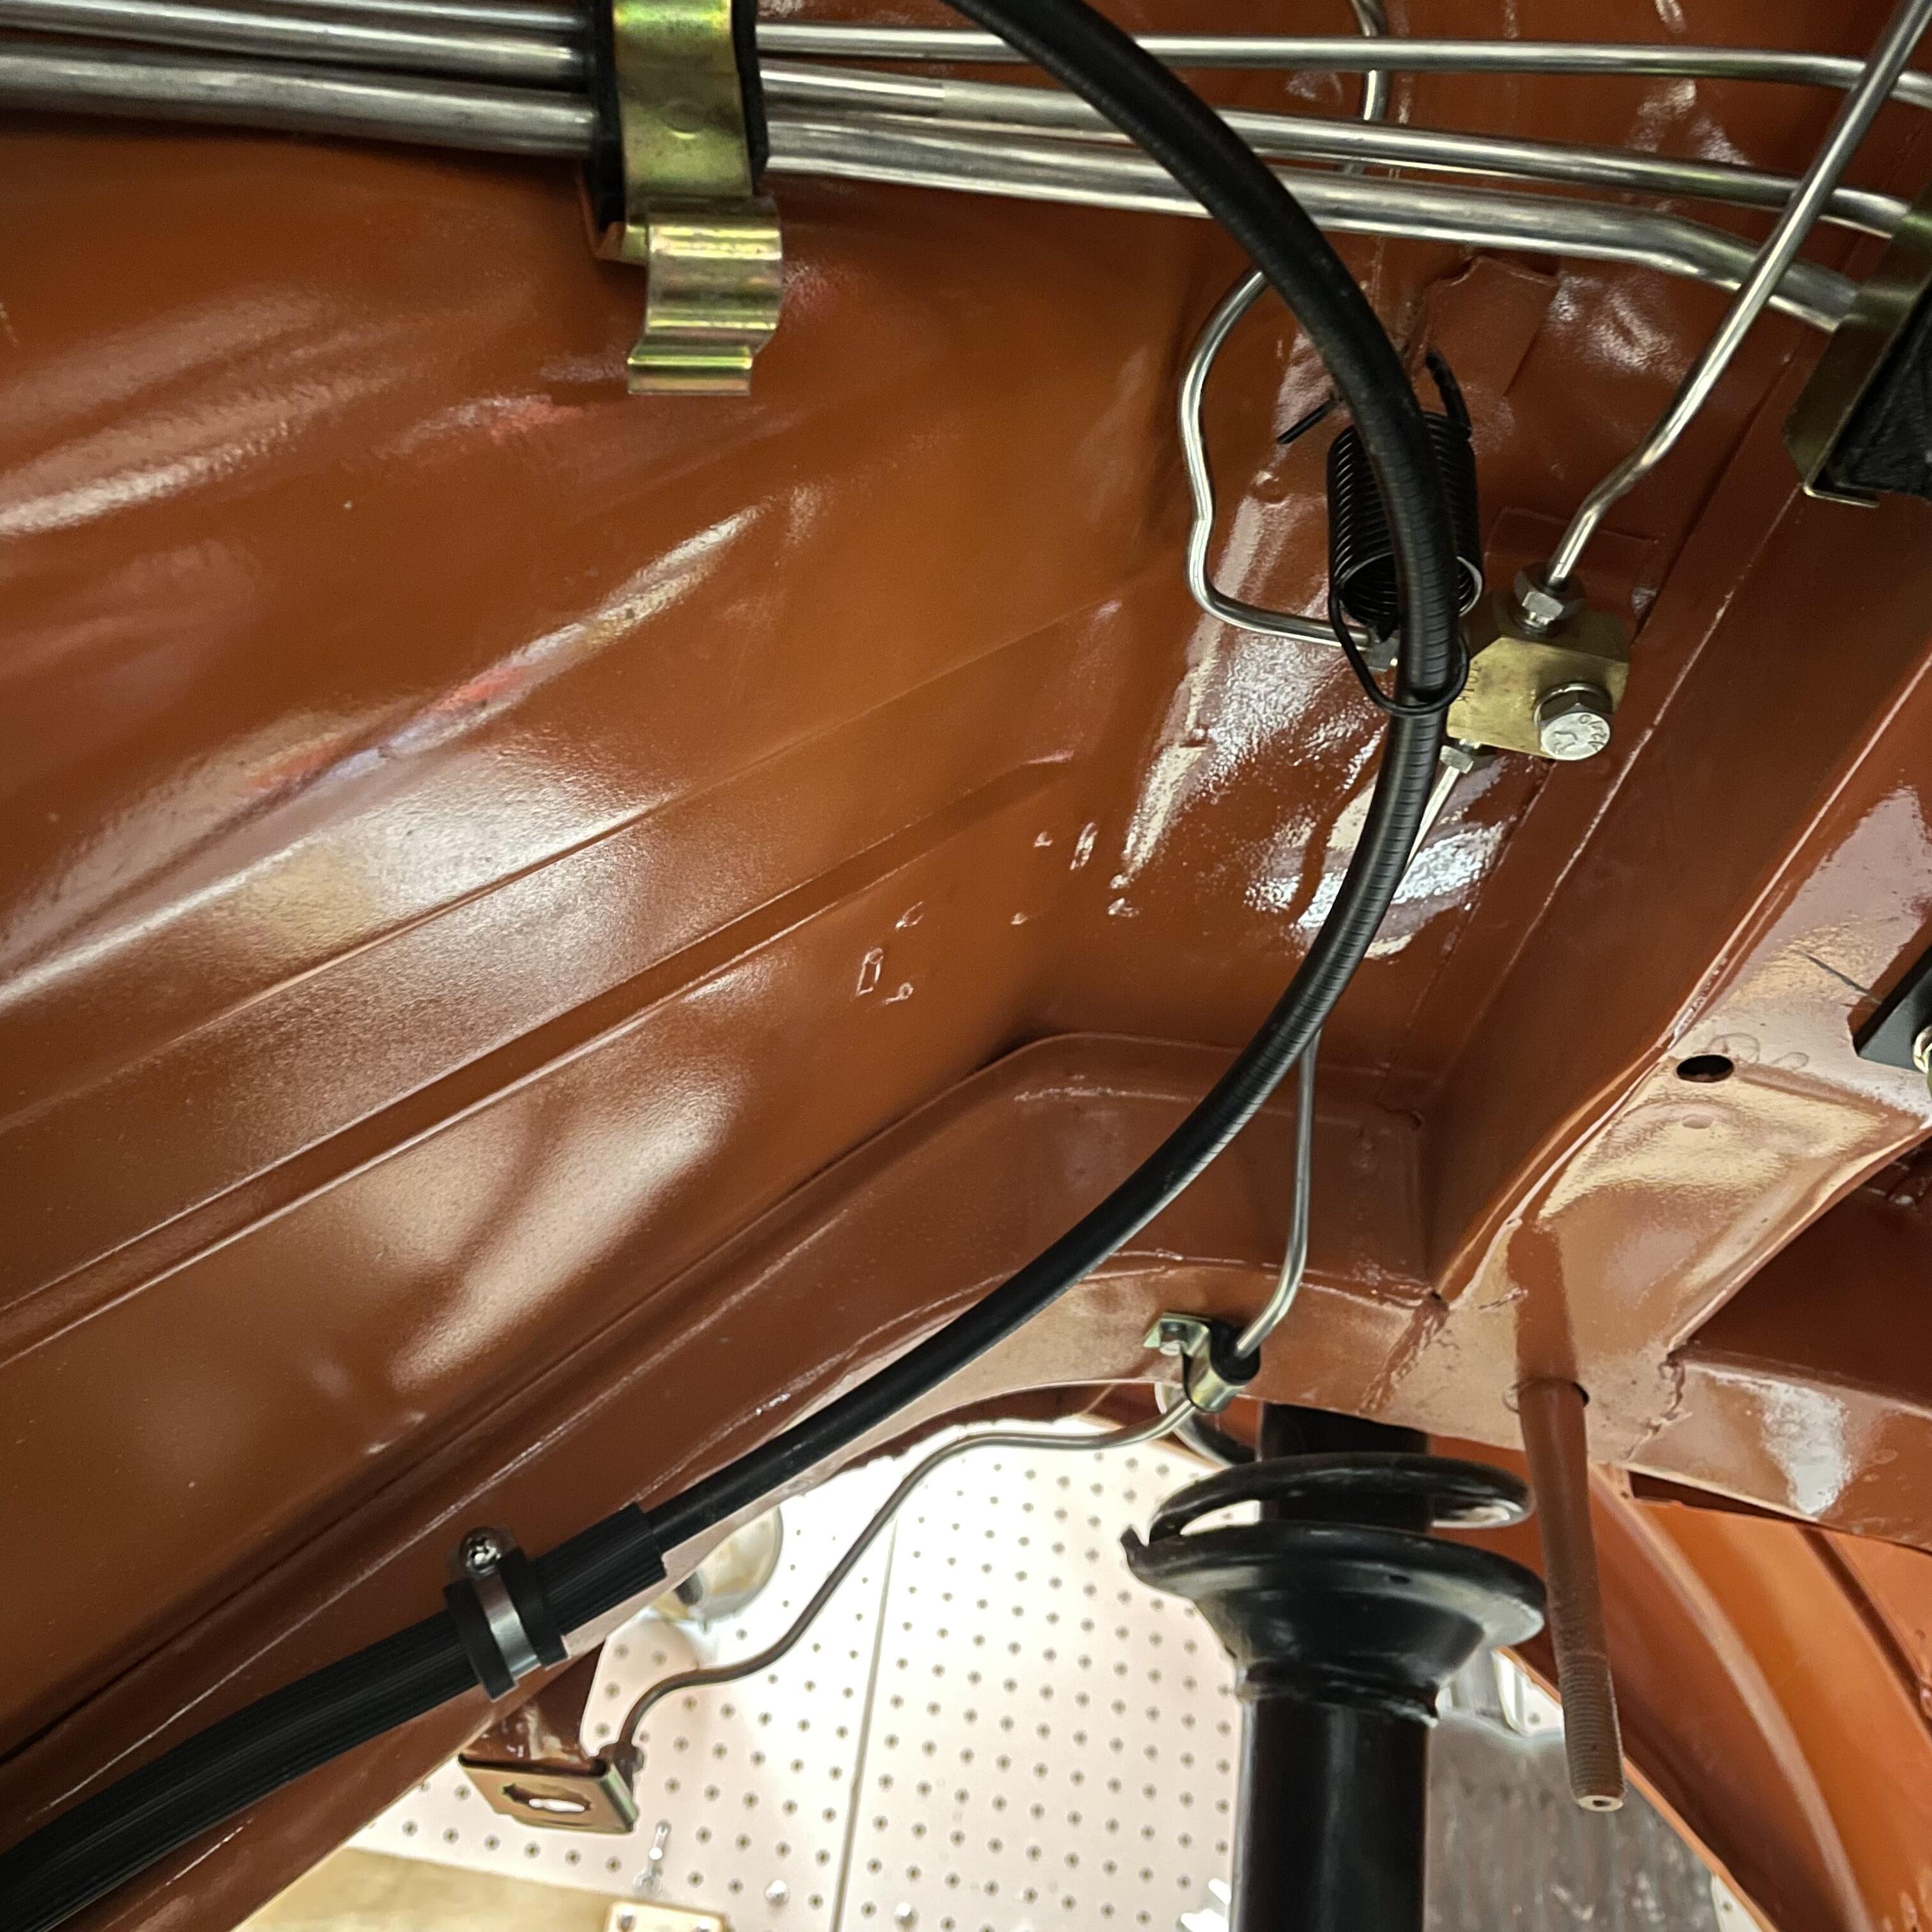
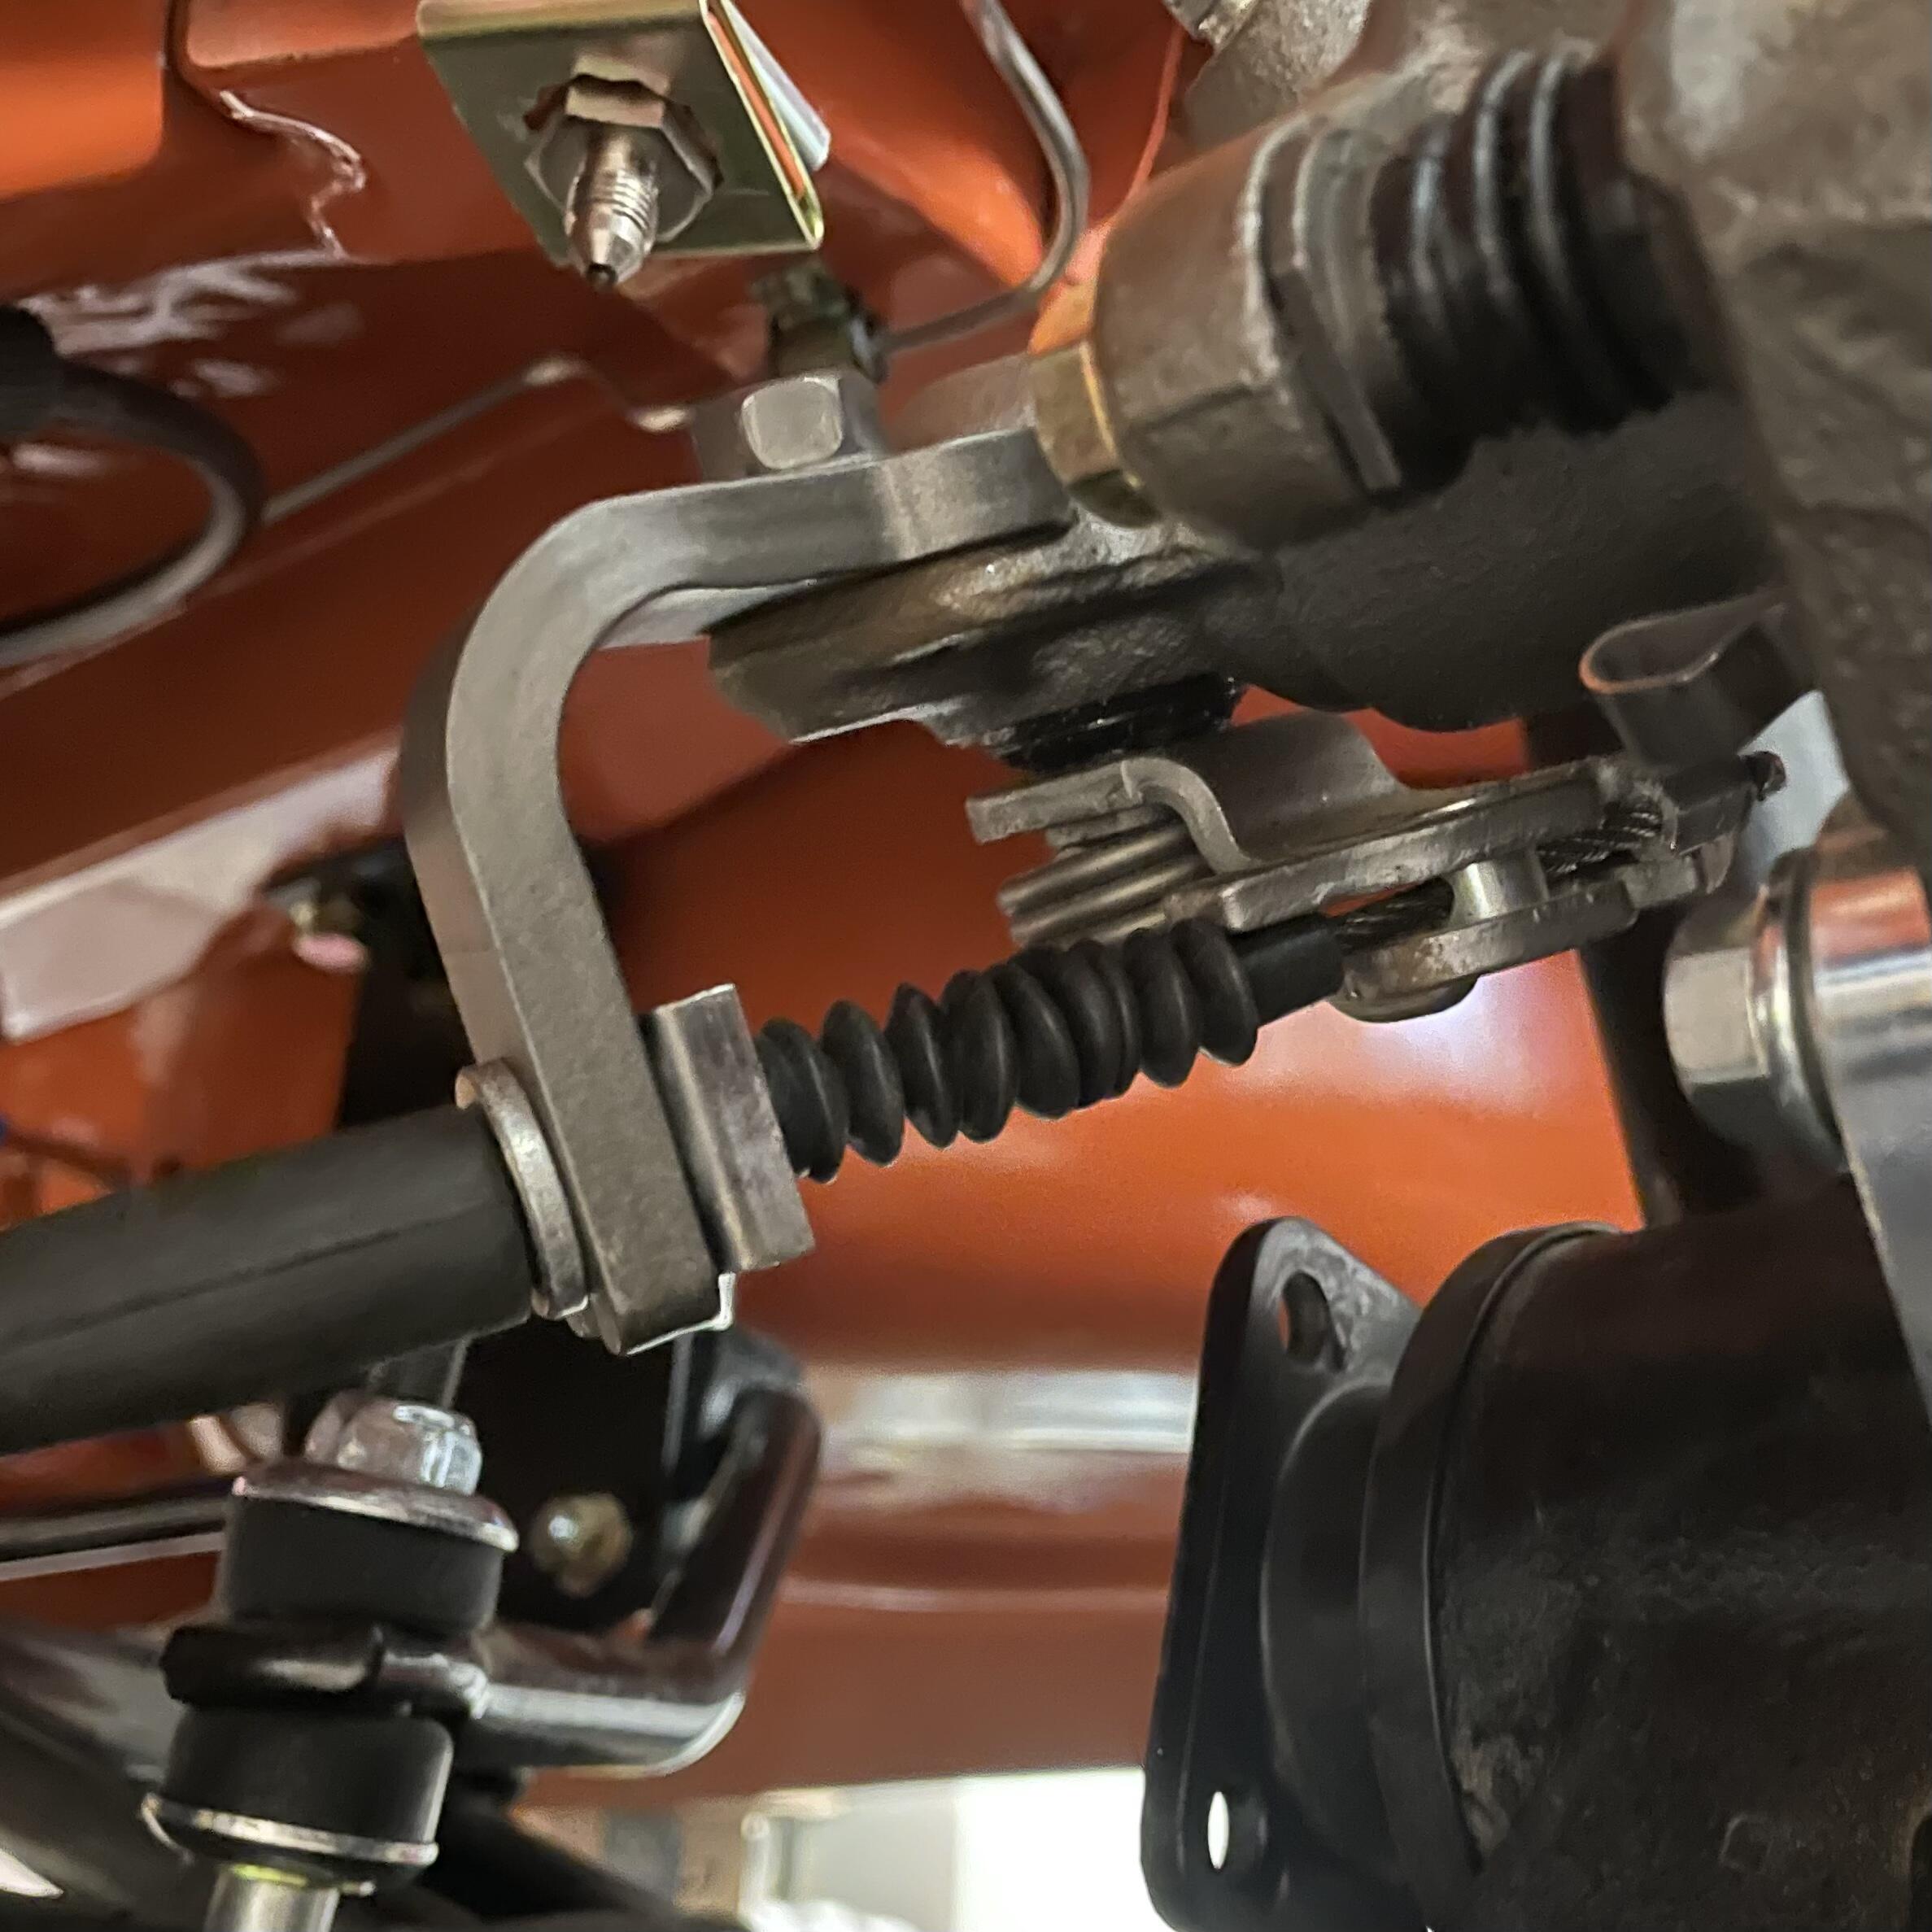
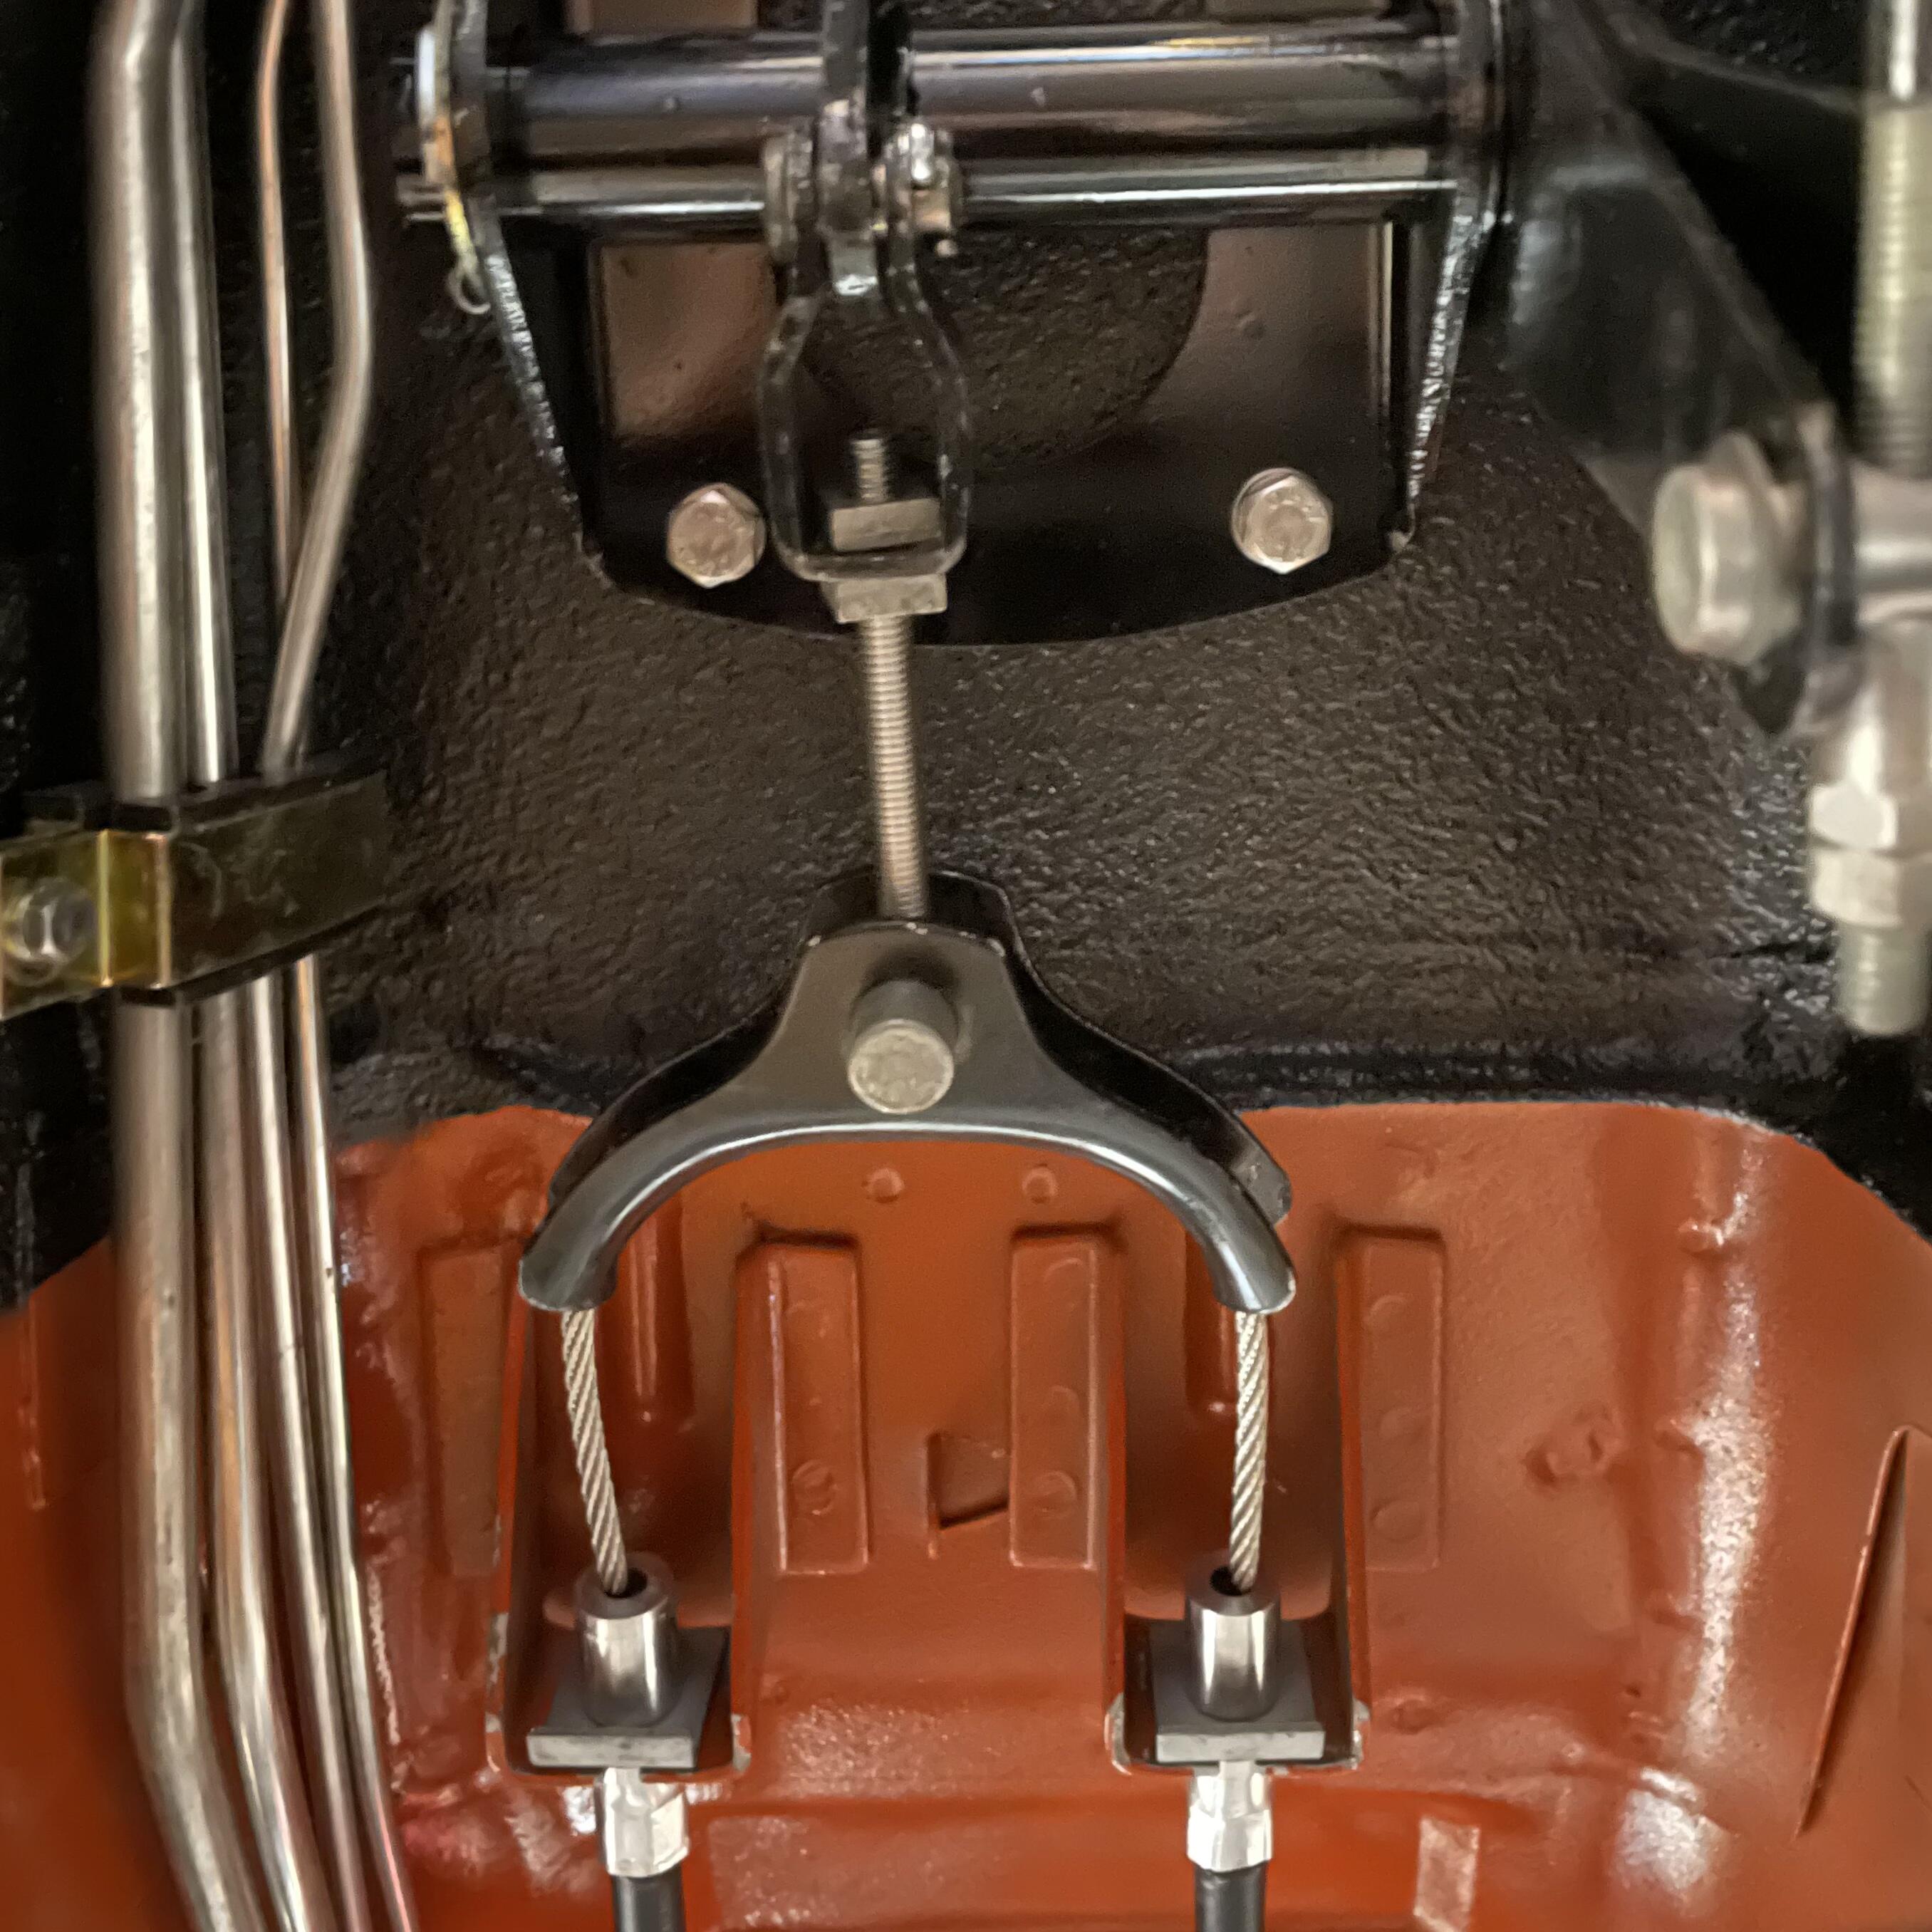
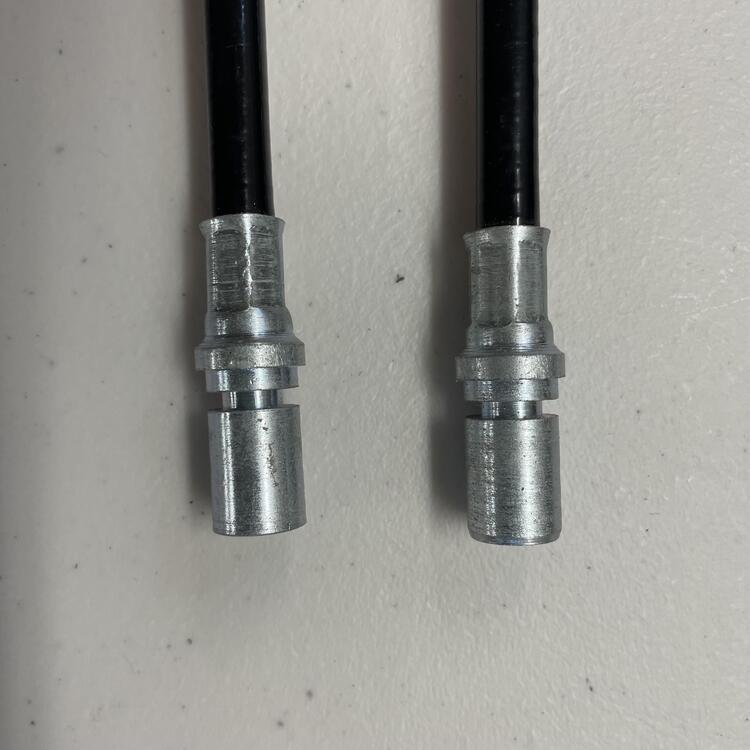
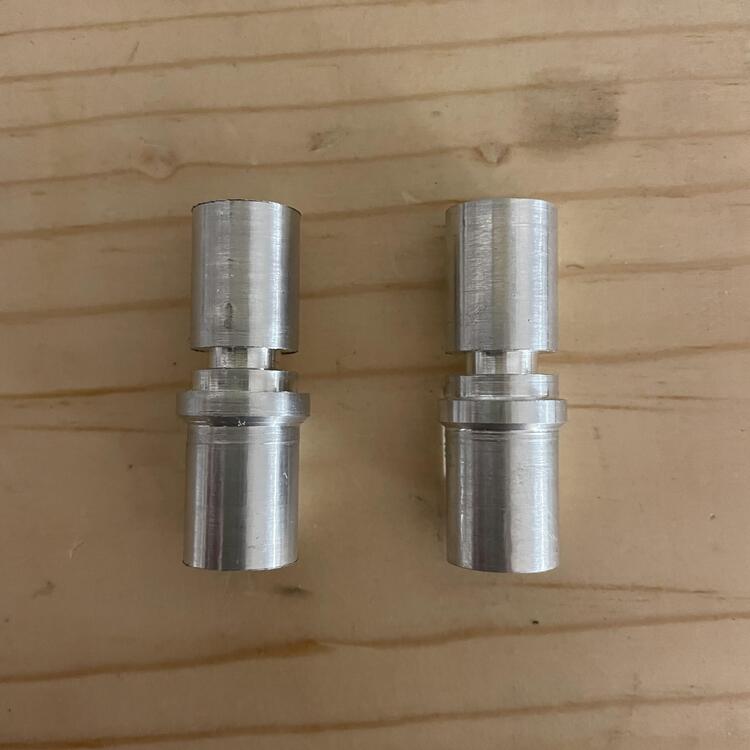
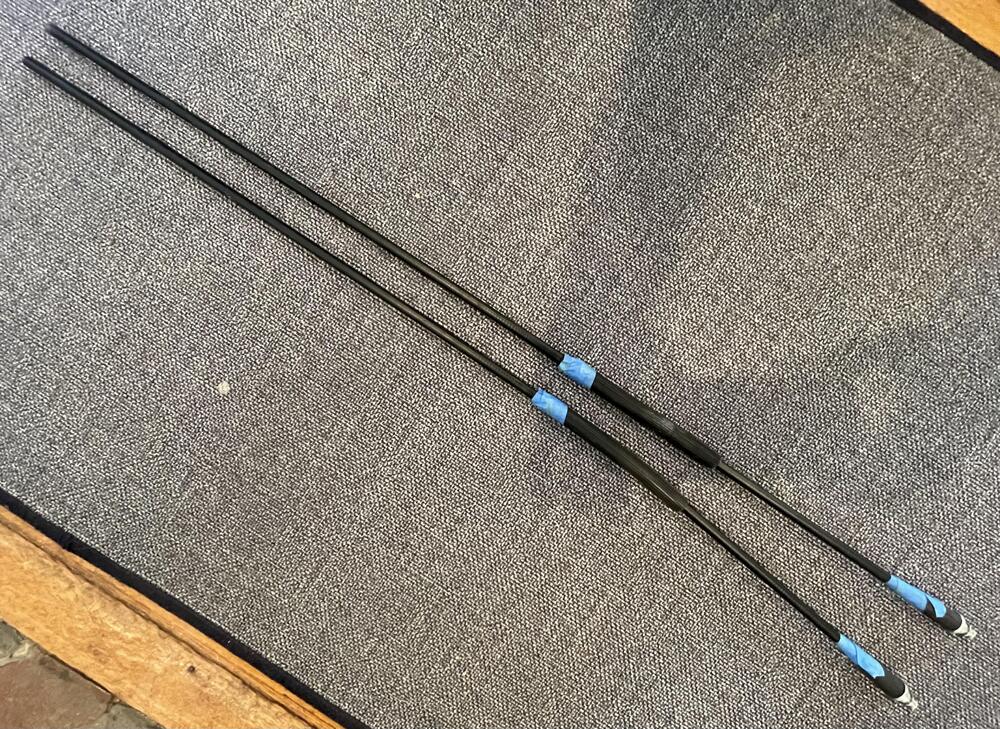
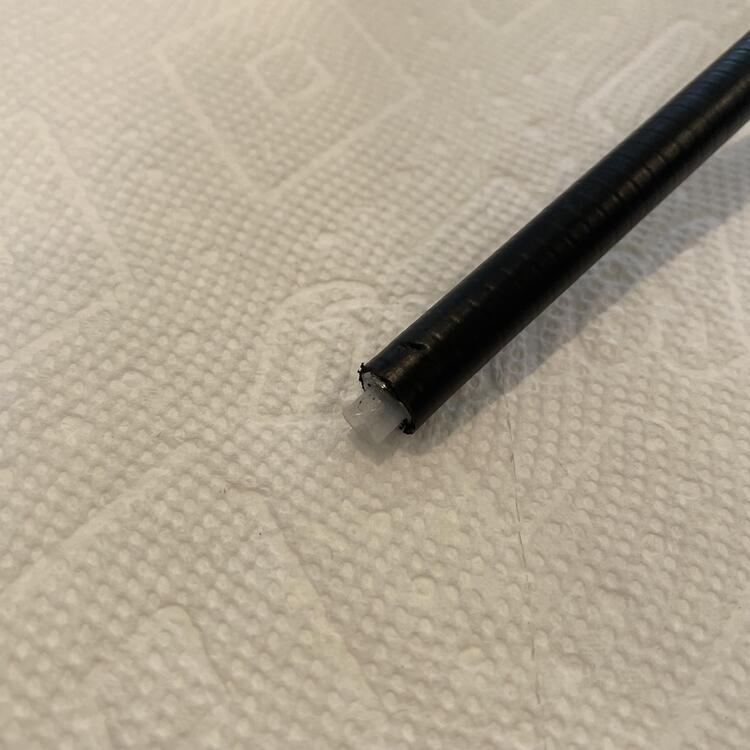
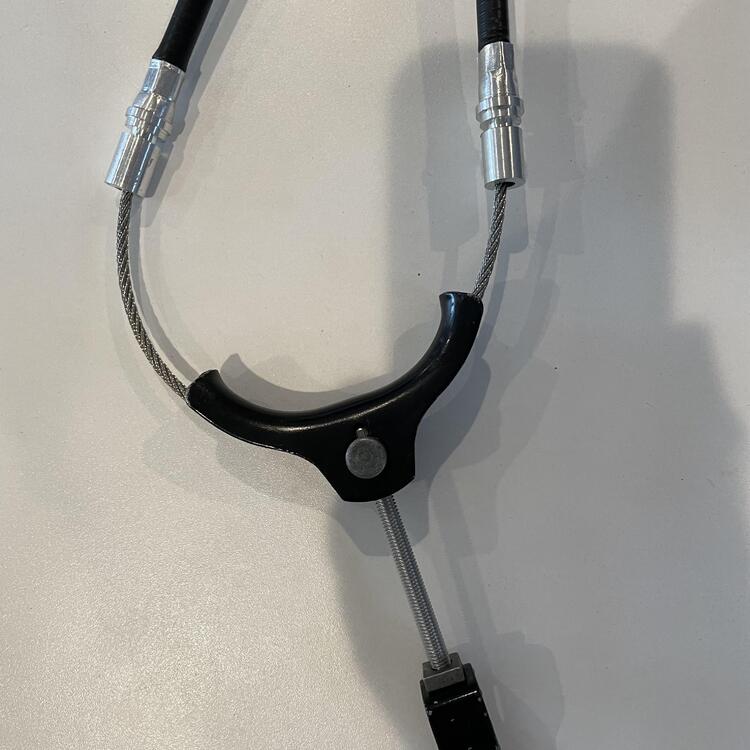
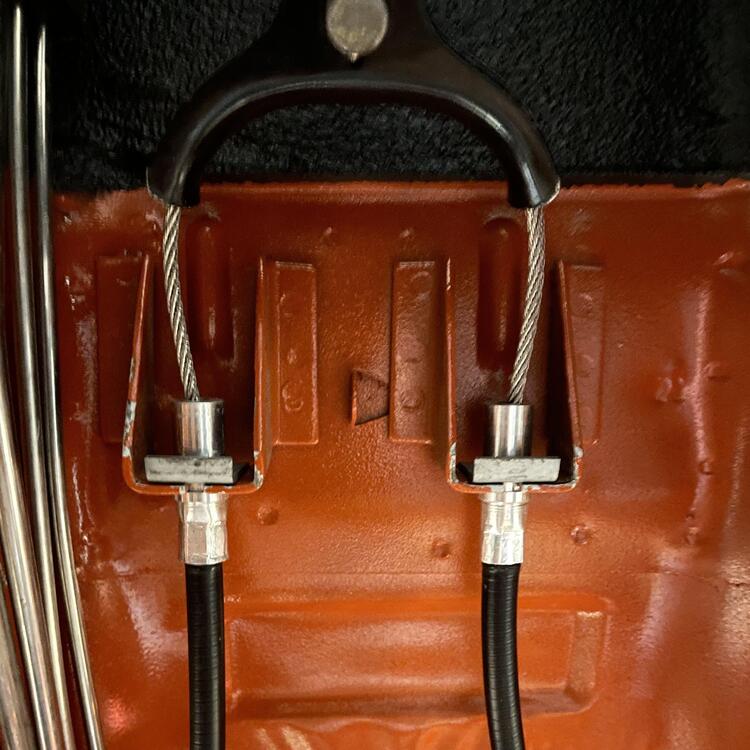
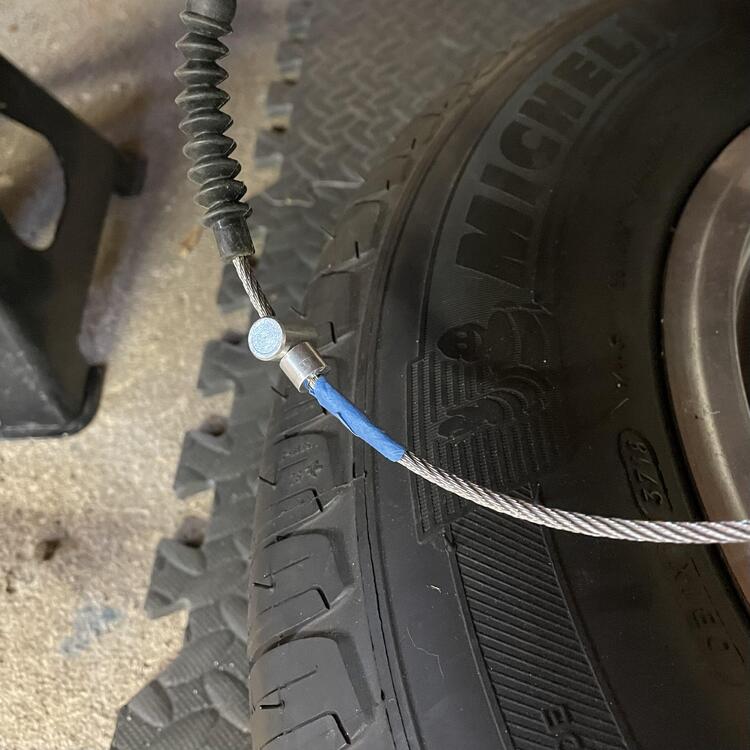
 2 pointsI just couldn’t live with the gimpy hack that I had to use to get the 240z parking brake cable to connect to my rear Maxima calipers, so I cobbled together my own assembly. This probably could have been done without totally destroying the parking brake cable I bought from Z Car Depot, but I didn’t know that at the time. Here’s a step by step of how I put this together. Someone could probably evolve this and get to a better solution that doesn’t cost as much, doesn’t produce as much waste, and is easier, but this works. If you are using 200 SX calipers I am guessing the process would be largely the same. Supplies needed: 2 x 1984 Nissan Maxima parking brake cable assemblies 1 x 1973 Datsun 240z parking brake cable assembly if you are going to try to get the fittinngs to fit, otherwise you’ll need some 5/8th inch 6061 aluminum rod (or stainless steel if you have a fantastic lathe) + all necessary measurements for the fittings that mount to the bracket on the body of the car 1 x length of 1/8th inch stainless steel cable (I went with 10 feet so I had more than enough to make mistakes) 2 x 1/8th inch cable swage ends 2 x 5/8th inch insulated Adel / cable clamps 2 x Sheet metal screws JB Weld or similar metal epoxy Tools: A swage crimper with swappable hexagonal jaws A measuring tape A micrometer A razor knife Glue Cable cutters A rotary saw A drill + bits Various screwdrivers, pliers, etc. Sequence: Step 0. Either remove your 240Z housing fittings and open them up to be crimped onto the Maxima housing or take measurements from these to have a machinist make you at least 2 sets of fittings. If you repurpose the fittings from the 240Z housing, you may find that heating them with a torch and using punches will work. Mine were ferous but I could not get them soft enough to open without tearing, so I took the machinist route. Step 1. Measure how far the cables for each cable assembly extend beyond the ends of the housings. Disassemble both housings completely. Remove extraneous housing brackets and sheaths from the Maxima housing, taking care to minimize the damage to each piece. Save all parts. Step 2. Find a suitable location for an Adel clamp to mount on either side of the 240Z body. Find a good route around the underside of the car that clears all of your running gear and suspension and allows for gradual curves, preventing kinks and binding. I opted for putting the Adel clamps on the inboard sides of the Bad Dog frame rail extensions I put on the car before the paint was done, as well as using the spring suspenders that the original 240Z housing uses. Take note of where the housing will need to be cut to mount to the under side of the transmission hump in the cable bracket and mark with blue tape or similar. Note: The Maxima housing is slightly larger in diameter than the aftermarket 240Z housing I got from Z Car Depot. Those pieces won’t just slide on, and getting a set that hasn’t been crimped yet was a fruitless endeavor, because the manufacturer didn’t feel like selling them to me. You may be able to go the other way and make the piece that fits into the Maxima caliper and fits onto the 240Z housing, but I found the 240Z housing to be too short to route well without binding and opted for trimming the Maxima housings. Step 3. As stated in Step 0, either reuse or replicate the housing ends of the 240Z cable housing. I destroyed two of mine (there are four on these housings) by trying to open up the crimped ends, which may be possible with the right tools, but I don’t have those so I abandoned this path and opted for having a local machinist replicate the ones I didn’t murder. He made me four of them (2 for failures) out of 6061 aluminum rod in exchange for a 750ml bottle of Uncle Nearest 1856 Premium Aged Whiskey. Stainless steel would be better, but these parts don’t have a ton of force on them in any direction so he and I agreed that aluminum will be just fine. Step 4. Use a rotary cutting wheel to cut the Maxima housings to the length determined during Step 2. For me this came to about 37 inches from the end of the metal part that mounts to the caliper to the cut point. The housings are sprung steel with a rubbery black plastic coating. A hack saw and file might work fine but will take a while and give you a nasty edge because of the coiled design of the tube. I know this because I tried it. Step 5. Relocate the ribbed sheath with the smaller diameter to cover the area where the other sheath was glued to the housing. This is where my finished housing will go through the Adel clamp, and I found this ribbed piece to be a good size to fill the Adel clamp without it squeezing the housing too tightly or leaving it sloppy. Step 6 (optional). Fix rubber pieces in place to aid assembly. I opted to use some flexible glue that gets along with the rubber bits to fix them in place. I wanted to reduce the opportunities for moisture to get into the cable (and this is a nice feature upgrade from the aftermarket 240Z cable I got from Z Car Depot), as well as keep things from sliding around as I test fit everything. Step 7. Reinsert the white nylon tube into the Maxima housing. Trim to be flush with the cut end of the housing. I trimmed both ends to clean it up since it was a bit worn on each end. Step 8. TEST FIT EVERYTHING NOW! Step 9. POINT OF NO RETURN - Assemble the housing pieces and crimp the 240Z housing pieces onto the Maxima cable housing. Be careful to not over crimp the 240Z piece and crush the Maxima piece. CRIMP SLOWLY! The inside of the 240Z piece is going to shrink and may need to be opened up to allow the cable to pass through if it’s squeeze too far. Check tolerances and test fit often. I rushed the first set so all my careful choosing of the best bits was for nothing as my two best ripped and ended up in the trash. Also, don’t crimp too close to the collar. That caused the tears in the first round. Note: A few observations from the machinist about the replica pieces… A. The hole that the cable goes through was hard to get the right size on his 1943 lathe because of his selection of ASE drill bits not being in small enough increments. We opted to ensure enough space for the cable by going a little too big, which allowed the white nylon tube inside the housing to escape as the cable slid back and forth. After the second try I found the crimping shrank the opening enough to keep the white nylon in the housing while allowing the cable to move freely. B. It’s tough to get the channel for the spring clip precise on an old-school lathe. CNC probably could get it closer, but we opted for too tight and filing if necessary. Because these are aluminum and the spring clips are steel, a little persuasion with a brass hammer did the job. C. The reason we made 4 and not 2 is so we could test all tolerances and choose the combination of fine tuning challenges. Since these are all hand made there were differences, so I used hand tools on the fittings and the bracket to make them fit. Step 10. Test fit again. Step 11. Put the rubber boots onto the ends of the Maxima housing. Step 12. Crimp a swage onto the end of the steel cable. Put a cylindrical bead from the Maxima on the cable, followed by one of the Maxima housings with a 240z end. Put the couple for the hand brake on, then the other Maxima housing with 240z end (flipped the opposite direction), another bead and a swage end. DO NOT CRIMP THE SECOND SWAGE END YET! BONUS PICTURE OF DOG INTERRUPTING PROCESS. Step 13. Test fit the entire assembly. Make sure the screw that connects the U-bracket to the handbrake lever is fully extended to ensure the maximum available adjustment length, but lease a few threads peaking past the nut for a smidgin of safety. Note: I replaced the OEM screw with a 70mm stainless M6 1.0 pitch hex socket cap head bolt. It fits into the assembly well. The old one was bent and this one has threads down the entire length, giving me much more room to adjust it. Any cable will stretch over time so you want something like this to maximize adjustability. Step 14. Position the bead and swage end you didn’t crimp inside the caliper lever, pull the cable taught, and mark the position of the swage end on the cable with a piece of blue tape. Step 15. Remove the assembly on the side that you just marked from the caliper and crimp the swage end where it should be. Cut the excess cable off. Note: I put a bit of JB Weld over the frayed end of the cable where I cut it, bonding it to the crimped swage end on each side of the car. This will keep moisture out and gives me just a little more insurance that it will stay on, because Garage Build. Step 16. Reassemble, tighten the bolt that joins the cable to the hand brake, and test the system. Edit: The slack you see above between the swage end and the bead disappeared once I tightened up the bolt in the u-bracket. Edit: I think I might end up putting zip ties or something on the boots that cover the black Maxima housing. The glue I used isn’t holding. I might also have used a nylon coated cable if I was doing the entire thing over again. The reason I didn’t is that I didn’t trust the swage end to stay on with that nylon creating a failure point. If it disintegrates you end up with a loose crimp, and since this was done with hand tools I just didn’t feel confident about that.


 2 points
 -
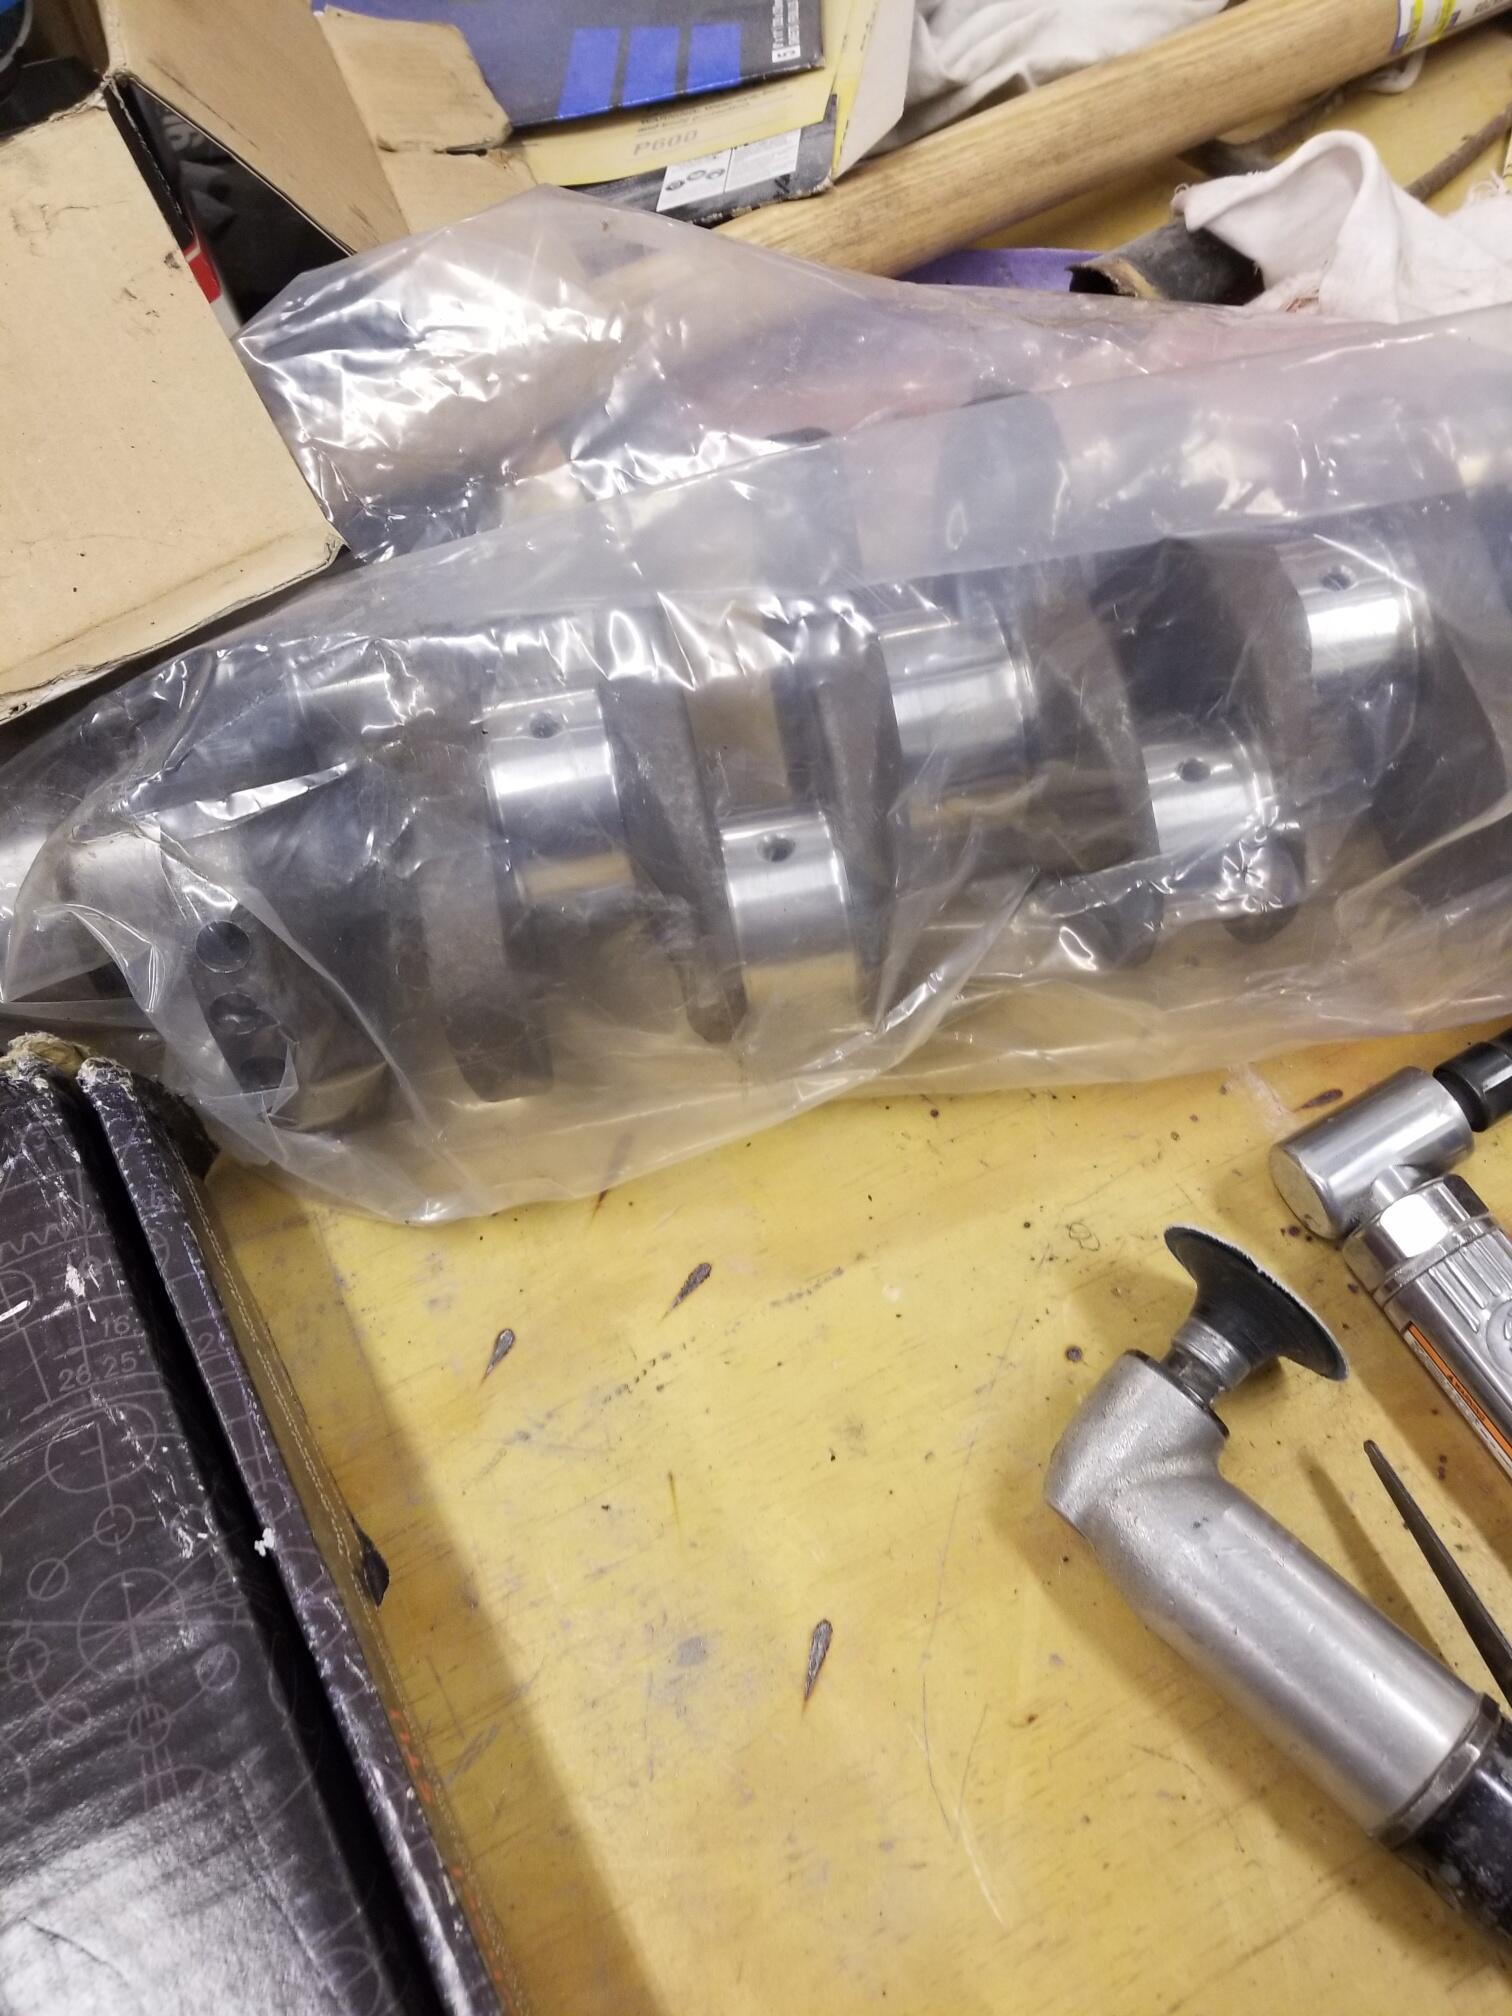
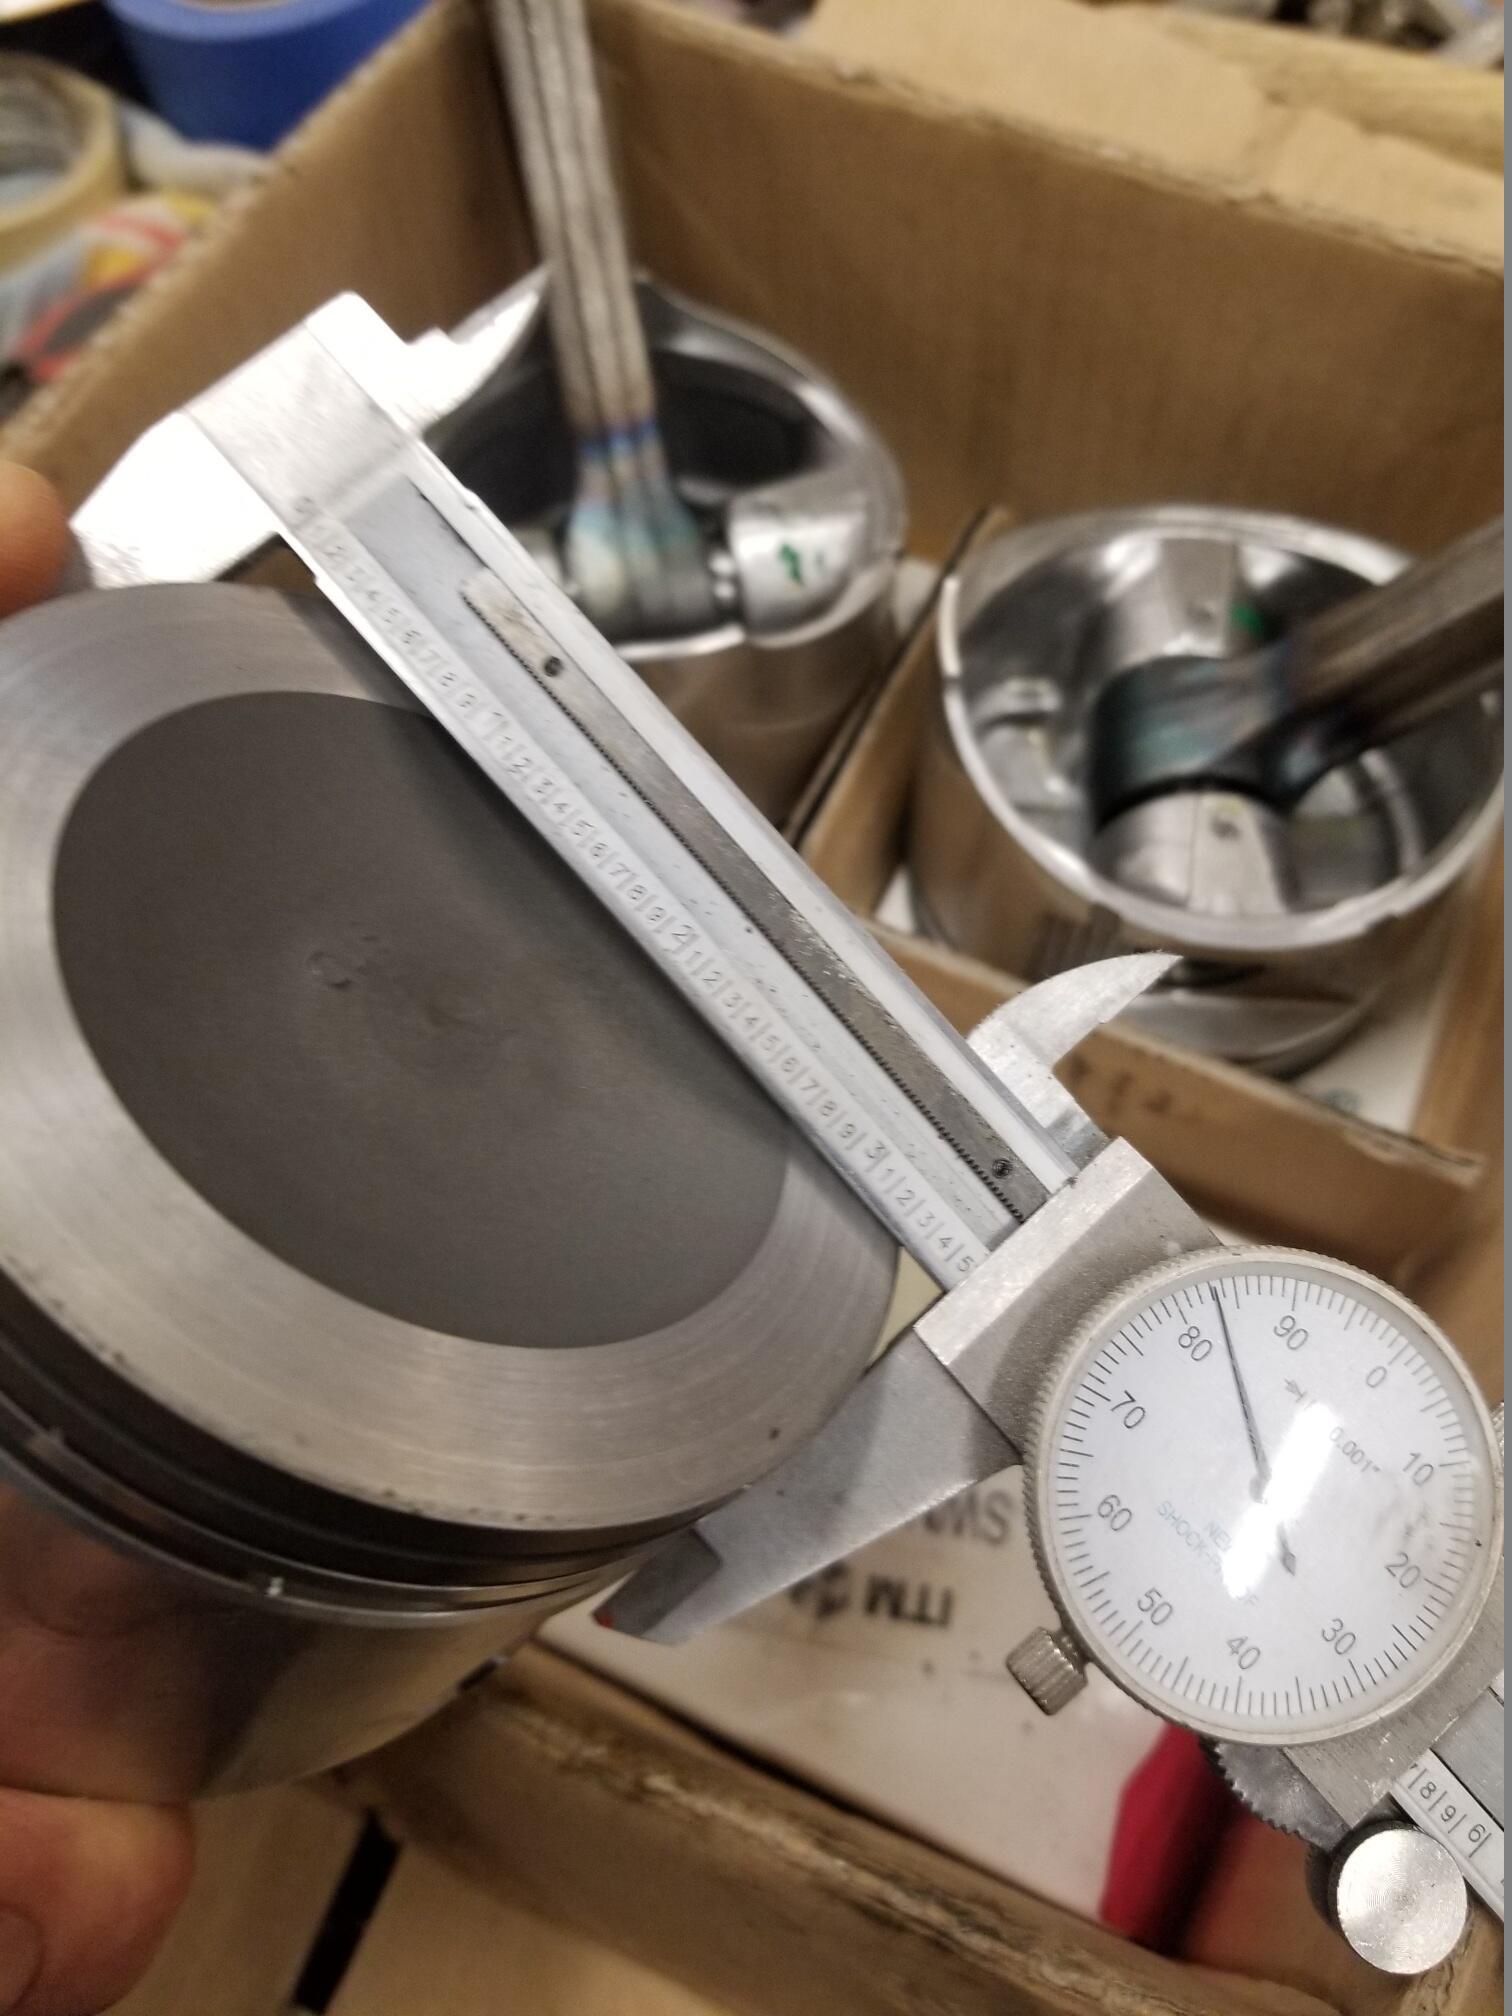
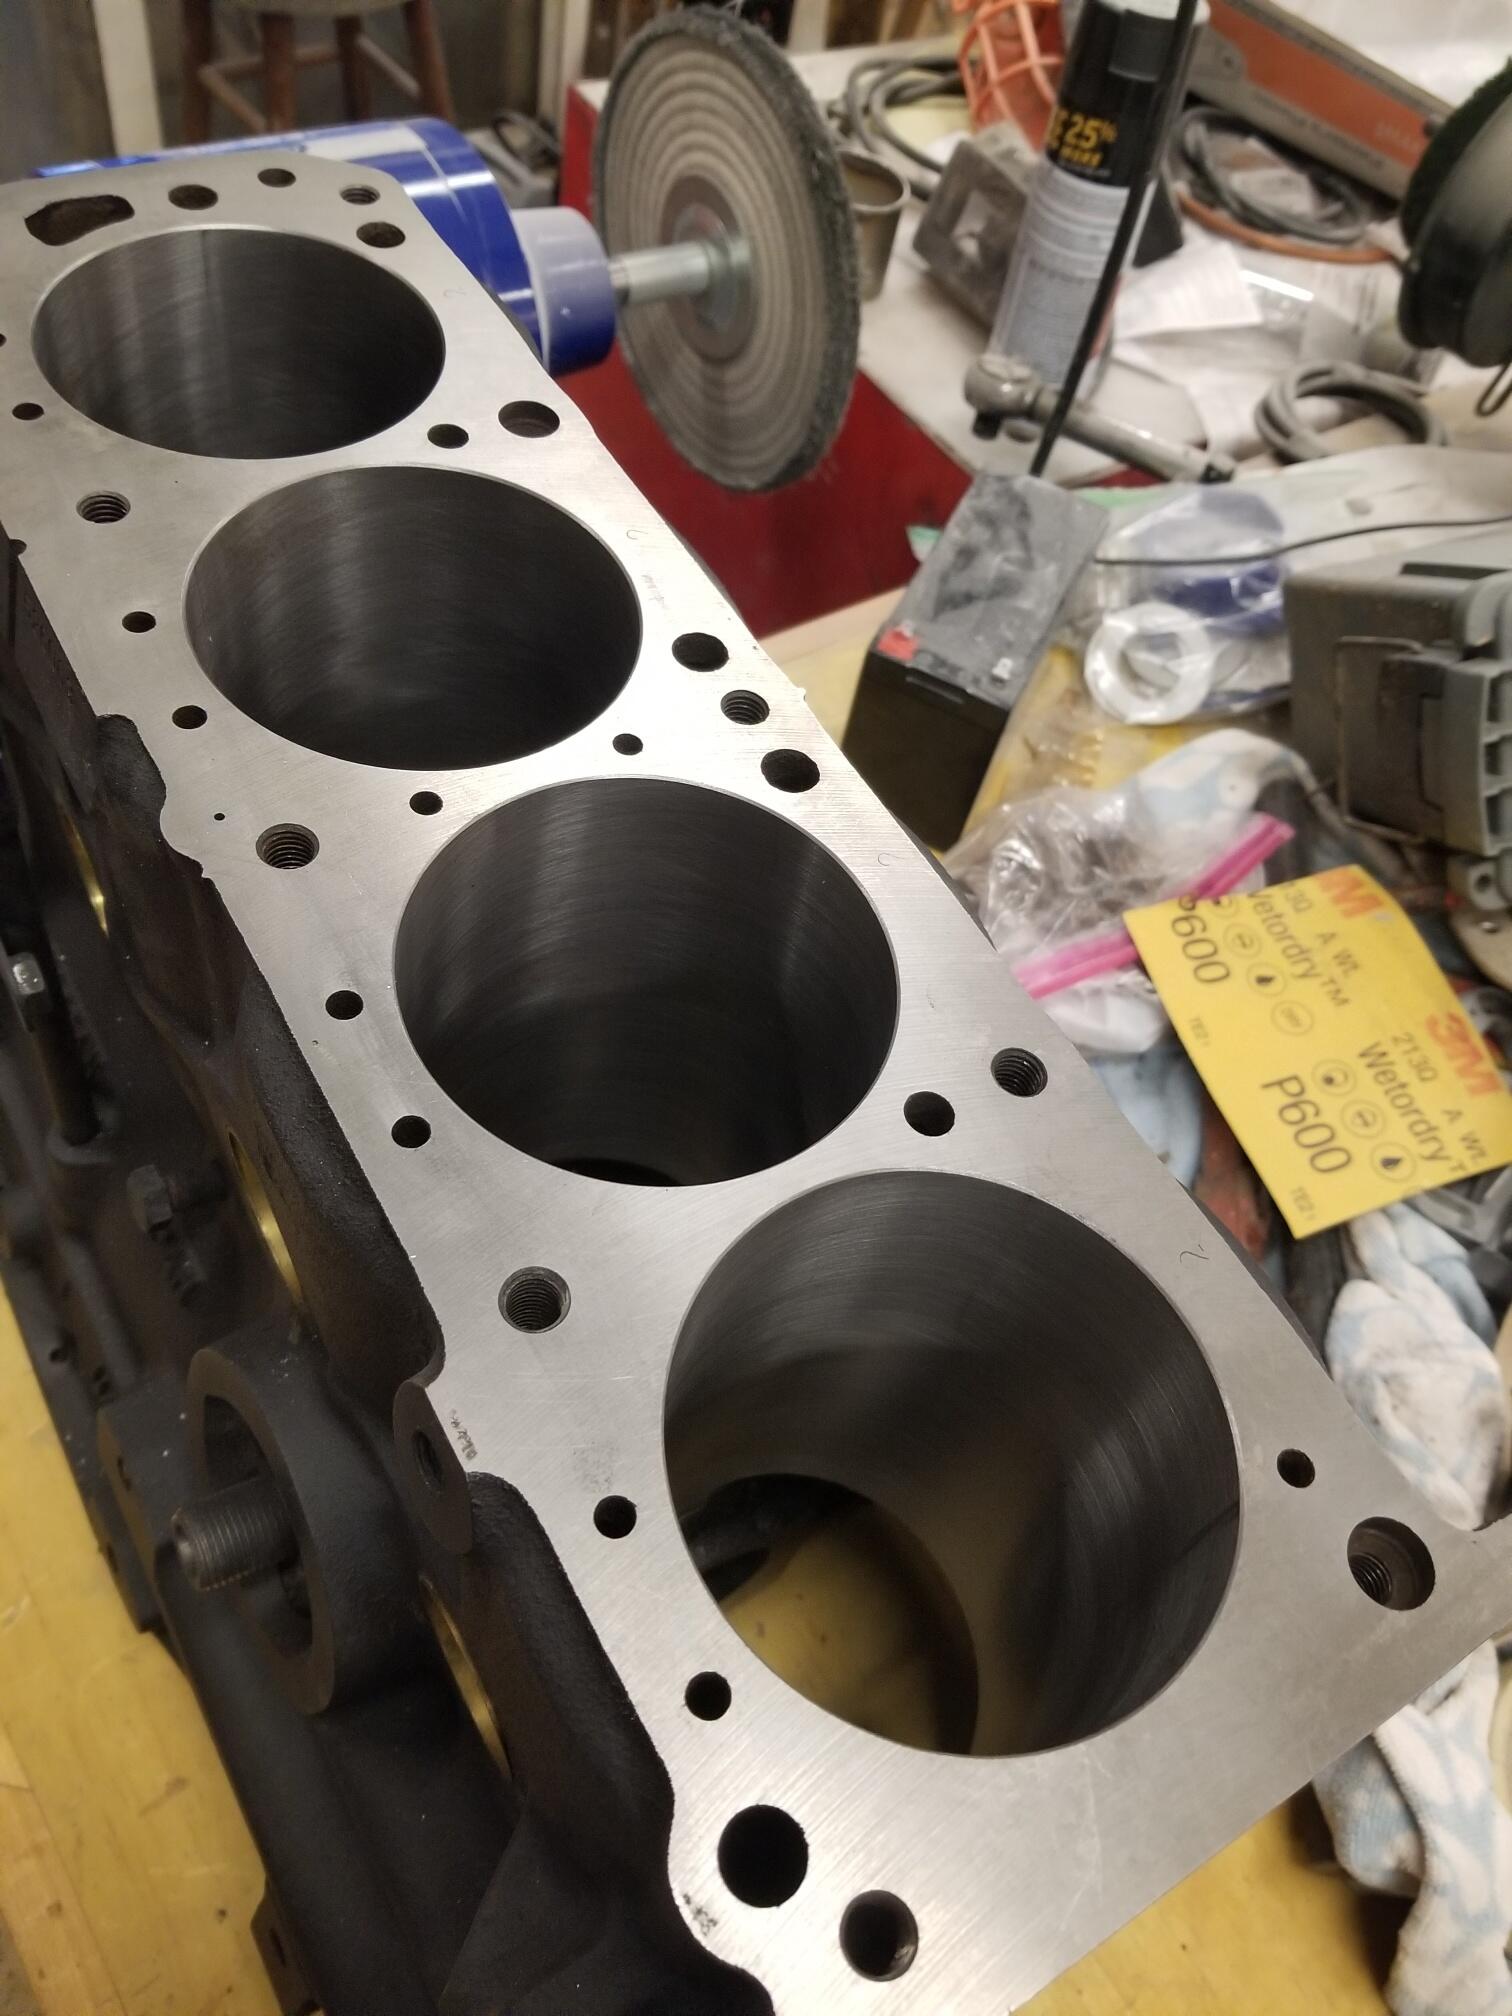
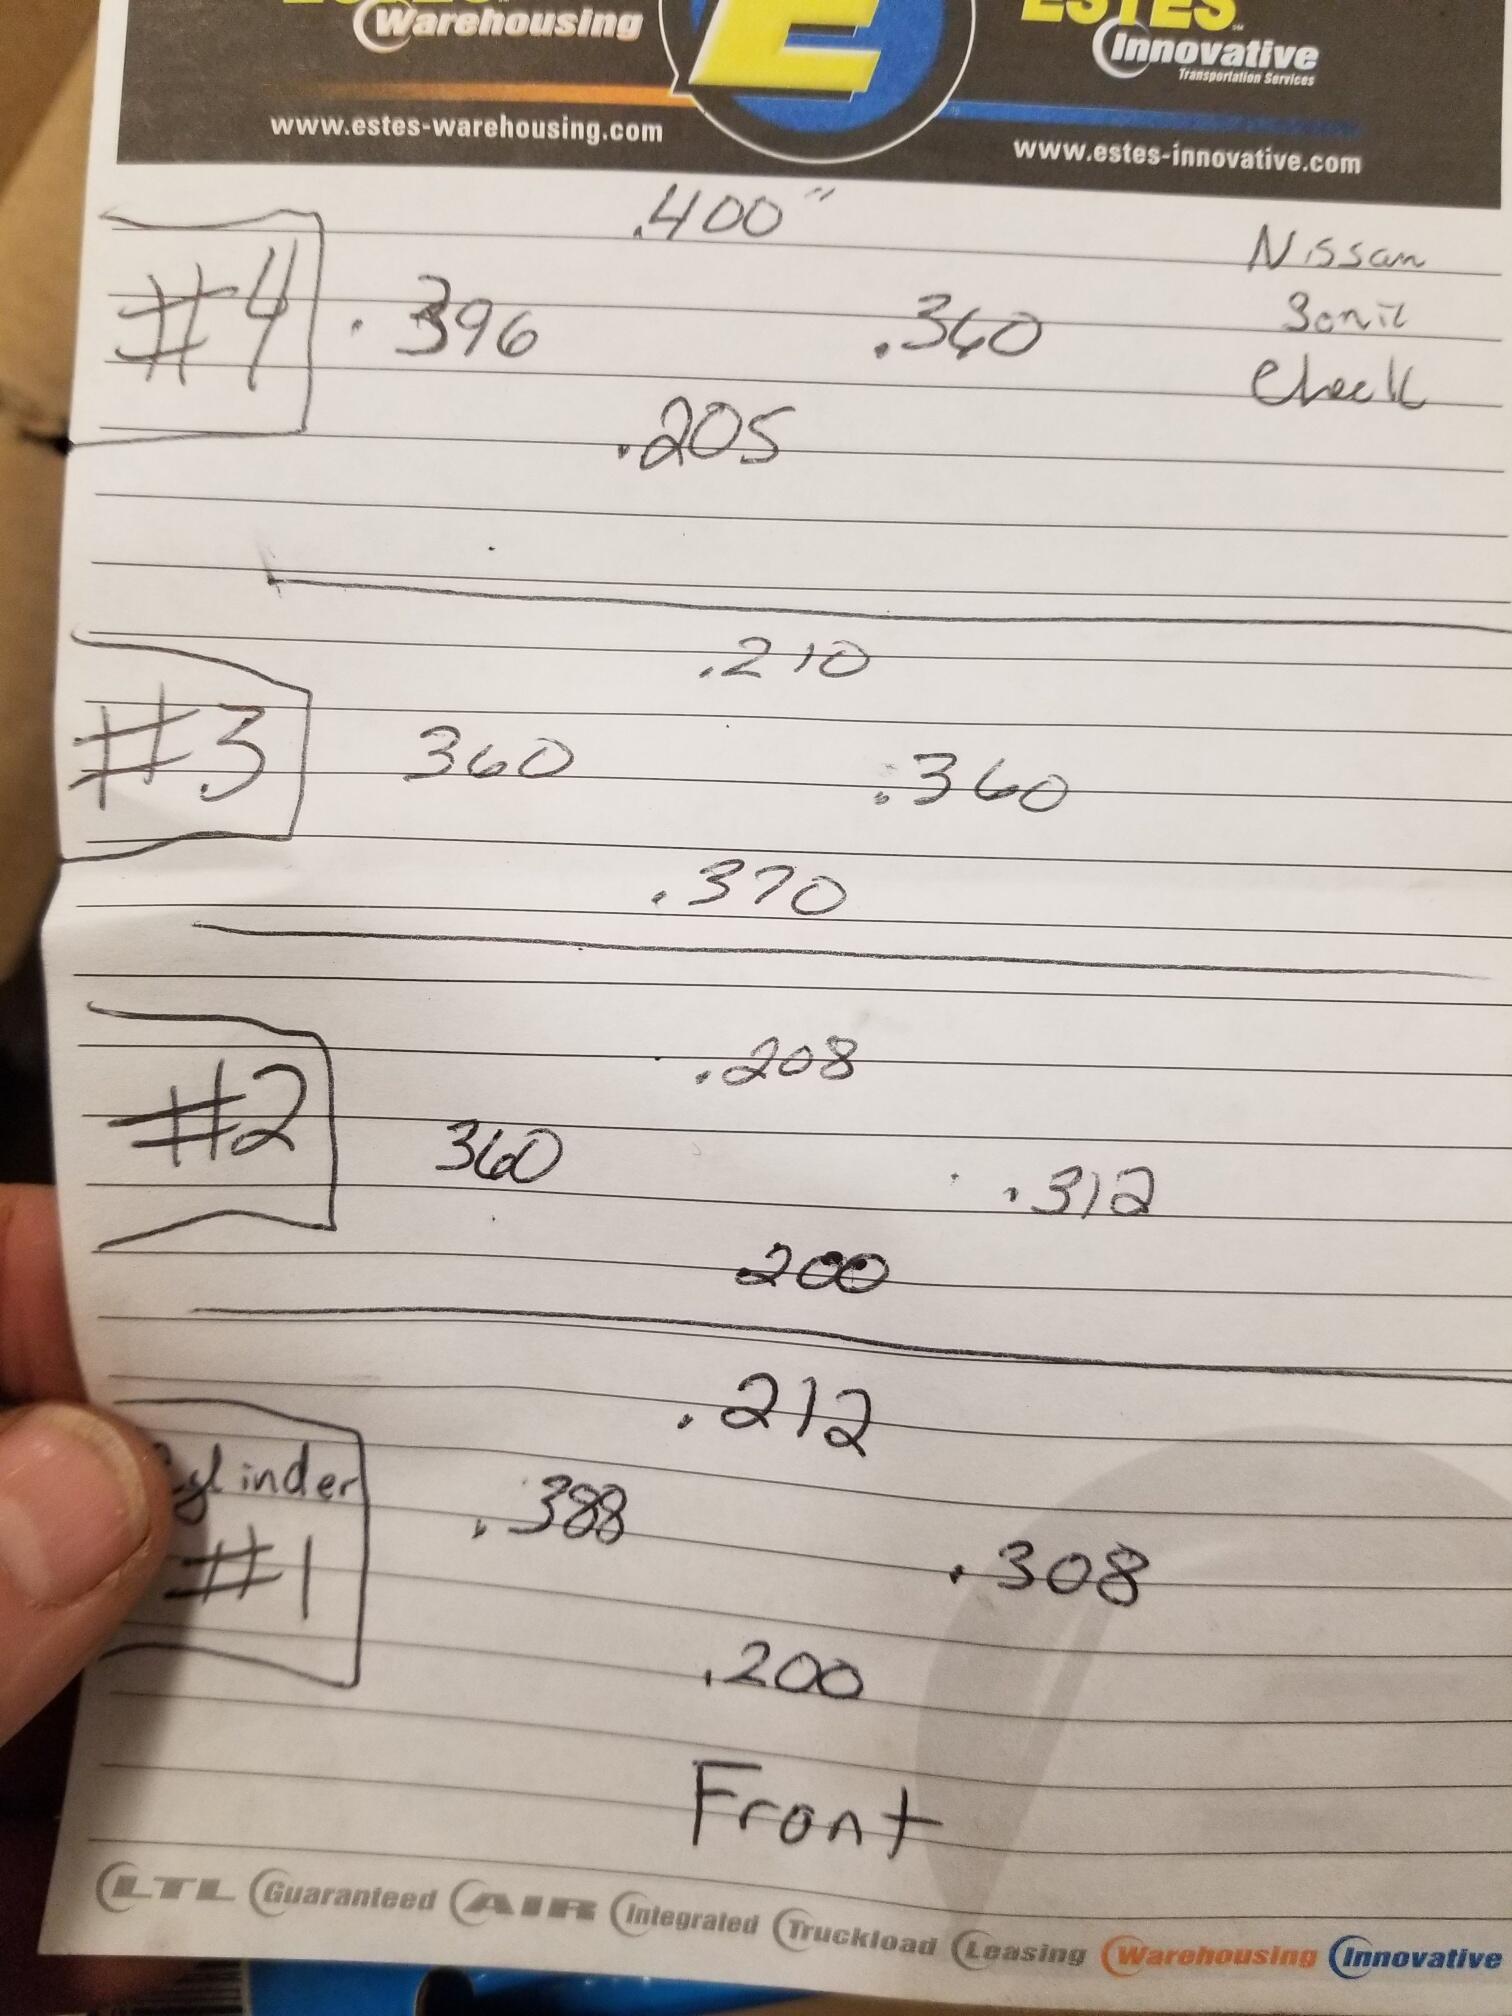
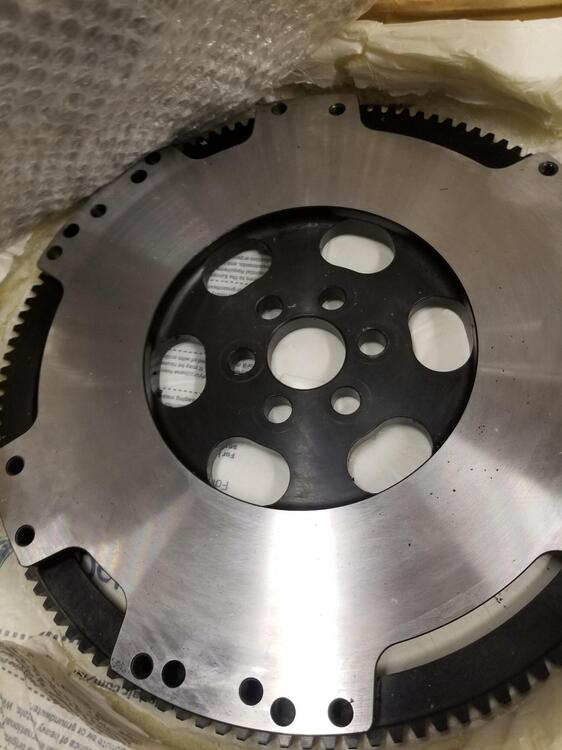
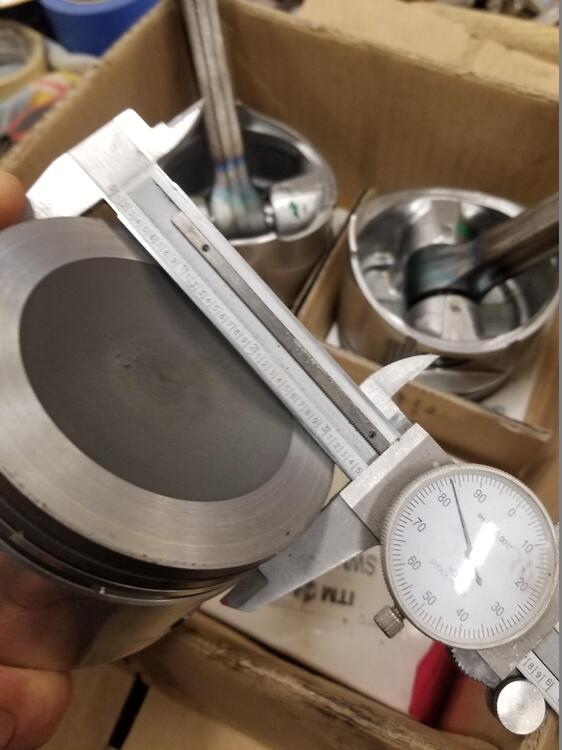
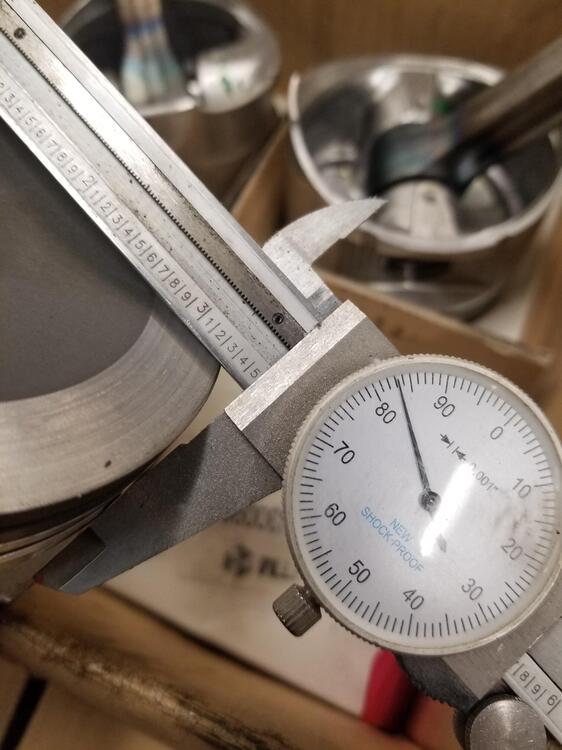
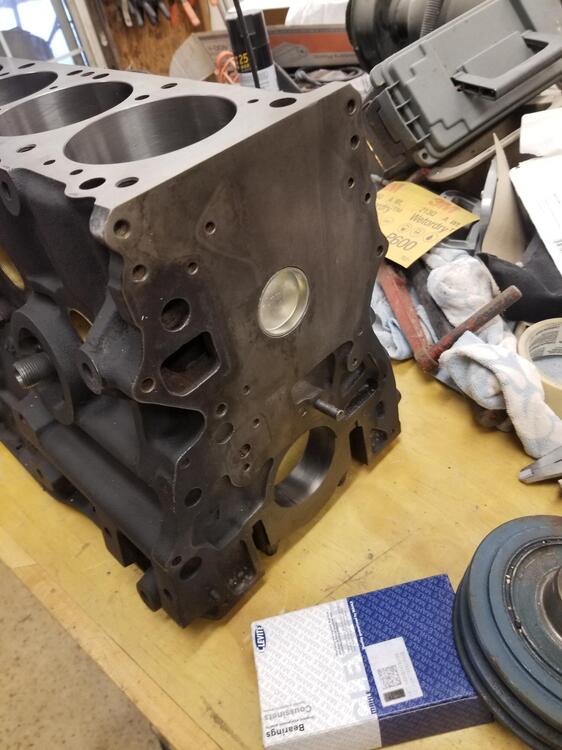
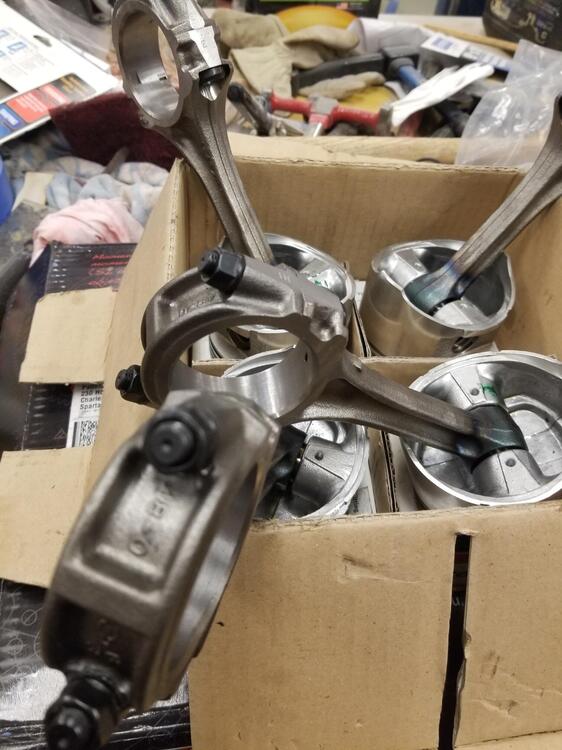
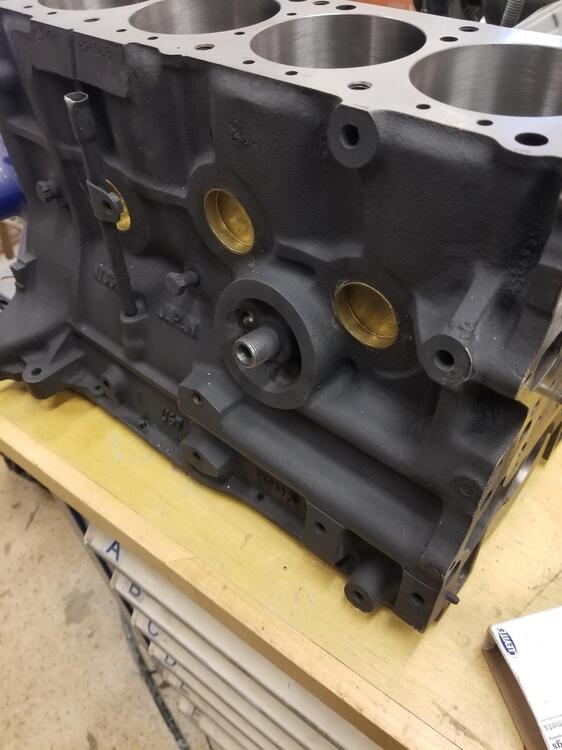
 2 pointsSo I took the block and rotating assembly to a local machine shop about the end of August. He finished it right before Christmas. I picked it up a week ago. Stock bore and stroke is 85mm x 86mm. We punched it out to 89mm. I sourced the pistons from Dave Rebello I believe they're KA's turned down They sonic checked the block after boring. I was told the minimum would be 0.0100". We are well within that. All line bored and balanced Everything has a witness mark so we can reassemble the way it was balanced Crank was turned 0.010 & 0.010 es w The challenge now is getting bearings. I have the rod bearings now but am having trouble getting the main bearings. I made another order the other day because the first order got delayed. Many places were saying end of April for bearings!! Evidently freeze plugs are hard to get too. That is why one of them is steel and not brass. Any recommendations on engine paint? Not super obsessive about true Datsun blue but would like it to be close.


 2 points
 -
2 pointsThis is so neat Katz! Thank you for sharing. Here's my guess (verb).
 2 points
 -
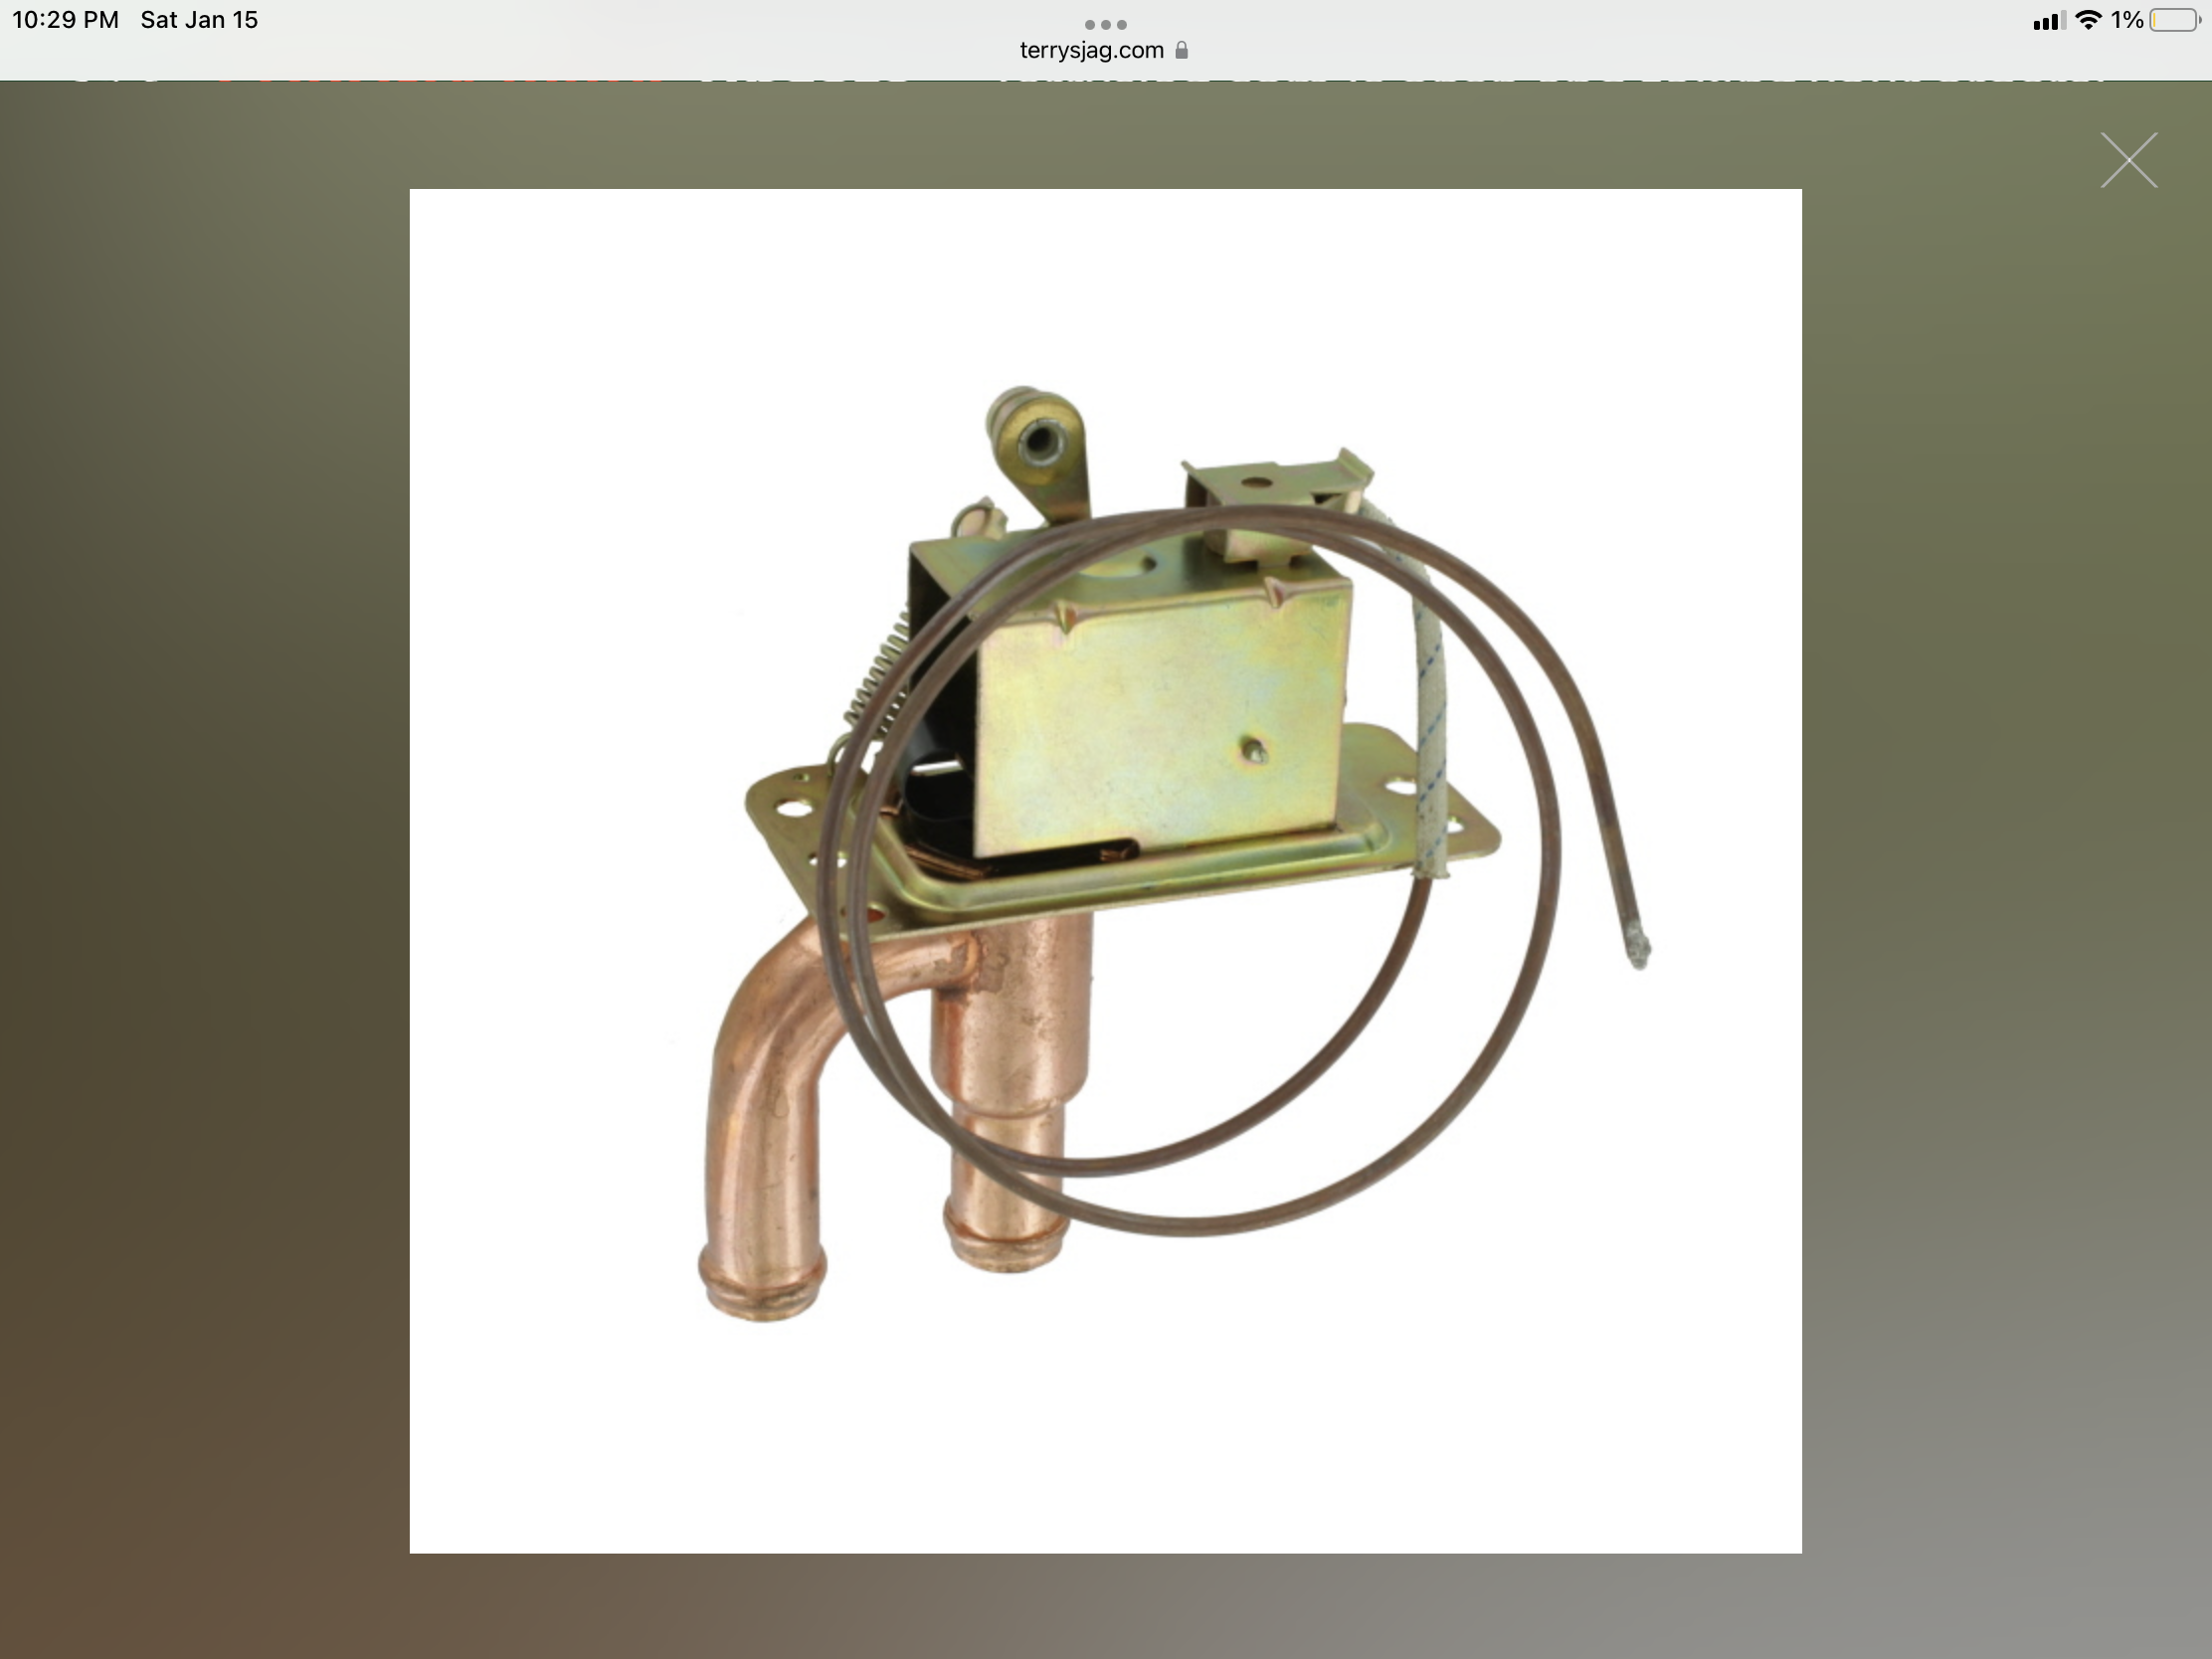
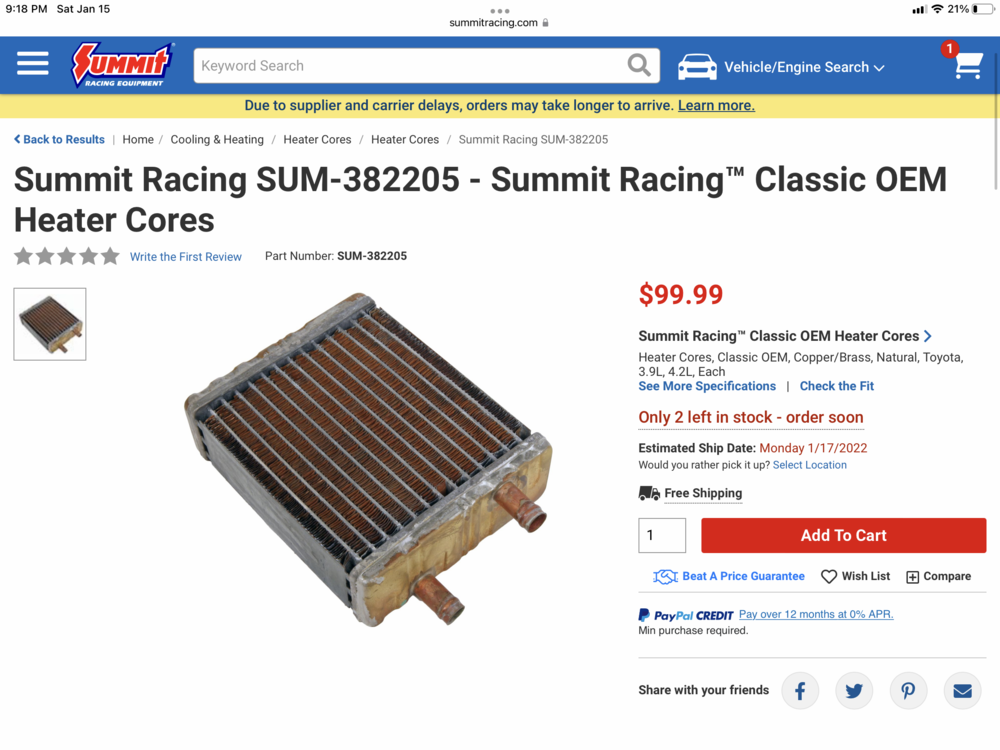
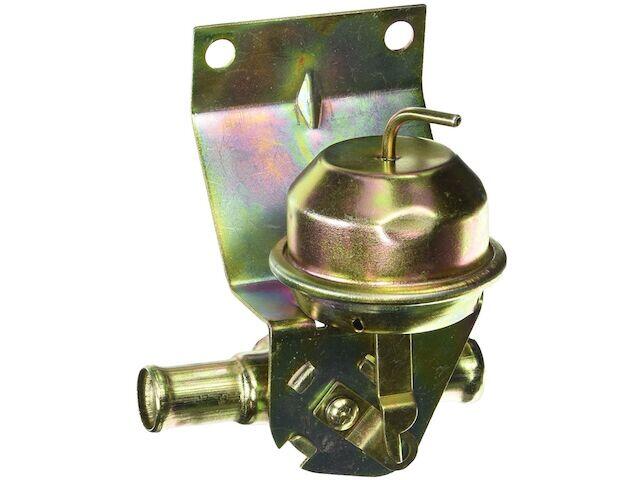
 2 pointsSo I did some research on the interwebs last night and have come to a couple conclusions. - and aftermarket or OEM heater cores that were meant for the S30 are not available. - rebuilding an old one is cost prohibitive. My quote came in at $415 plus shipping. 🤮 -stock heater control valves….none available for the 280z. You can find 240Z and 280zx , not sure if they’re compatible or what you lose if you do use them. 240Z probably more compatible than the ZX due to mounting point. So here is some good news….the dimensions of the 280z heater core is 7”x 6.75”x 3”. There is ones for cars that are almost the same size, most are 2” thick. I found several and price ranges between $40 and $120 depending on brand and copper vs aluminum. Like Captain Obvious did, you’d have to make a 1” shelf for the core to sit on or it would be banging around in there on the Pot holes all over Philly 😂. Now the heater control valve. I think I found a possible candidate for replacement with the temp control feature as in the later 280z ( ones with copper wires). A 1971-1974 Jaguar Hester control is almost identical except the spring Cntrl is on the opposite side. See pics below. I’d like someone who is more familiar look at the photo of the Jaguar one and see what you think about compatibility. The vacuum section looks similar too for the other half but the mount I’d on the wrong side. It looks like Nissan may have copied the Jaguar one or vise versa. Also the Jaguars ones are available from several retailers. Thoughts?
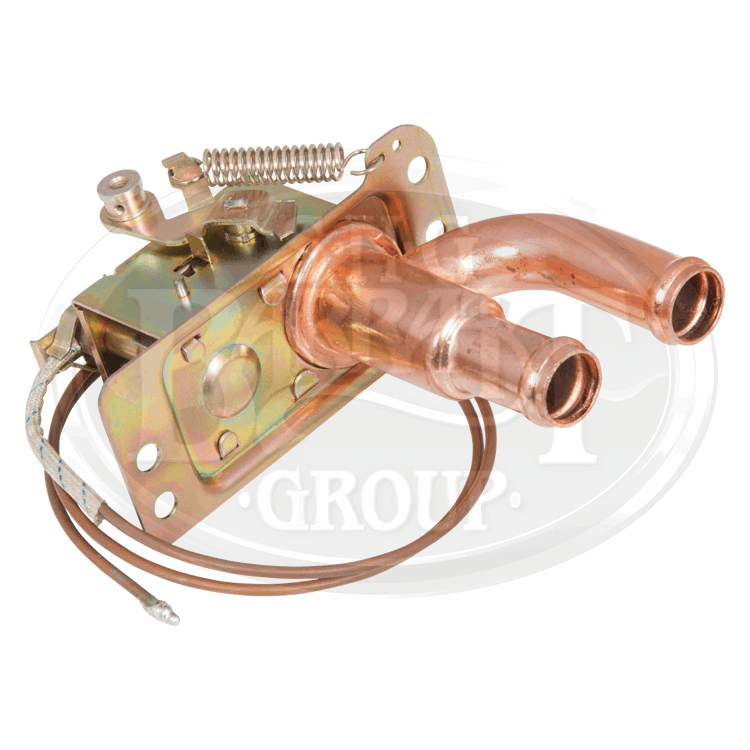

 2 points
 -
2 pointsOh, and one other thing. It has been said that Nissan are considering the possibility of making this 'Customized Proto' into a Limited-Edition model variant, and they suggested an edition of 240 cars. I think that is disappointing. I do not think the number '240' has any significance in this context. Personally, I would choose 25 as the original series production quantity necessary to homologate the 432-R into JAF and FIA Group 5 Prototype racing class (but maybe not enough to be worthwhile), 270 (although not many people would understand why...) or just 432. In any case, judging by the positive reaction, they should probably consider a much higher quantity. They'll sell!2 points
-
2 pointsHi Alan, thanks for the input, I agree with you. Some people say orange color combination came from 911 GT3 RS , or American sports car some years ago. But this orange new Z is inspired by yes , Z432-R . I talked with Takeuchi san ( owner of the Z432-R in the picture) yesterday, I asked Takeuchi san if he knew well before the new Z would be inspired his Z432-R . He said “No ! That is why I was surprised at the show , I like it ! “ Takeuchi san pointed out the orange new Z has the black side graphic stripe, but it is inverted from his Z432-R ‘s side stripe, the thin stripe went bottom for the orange new Z . Kats IMG_2579.MOV

 2 points
 -
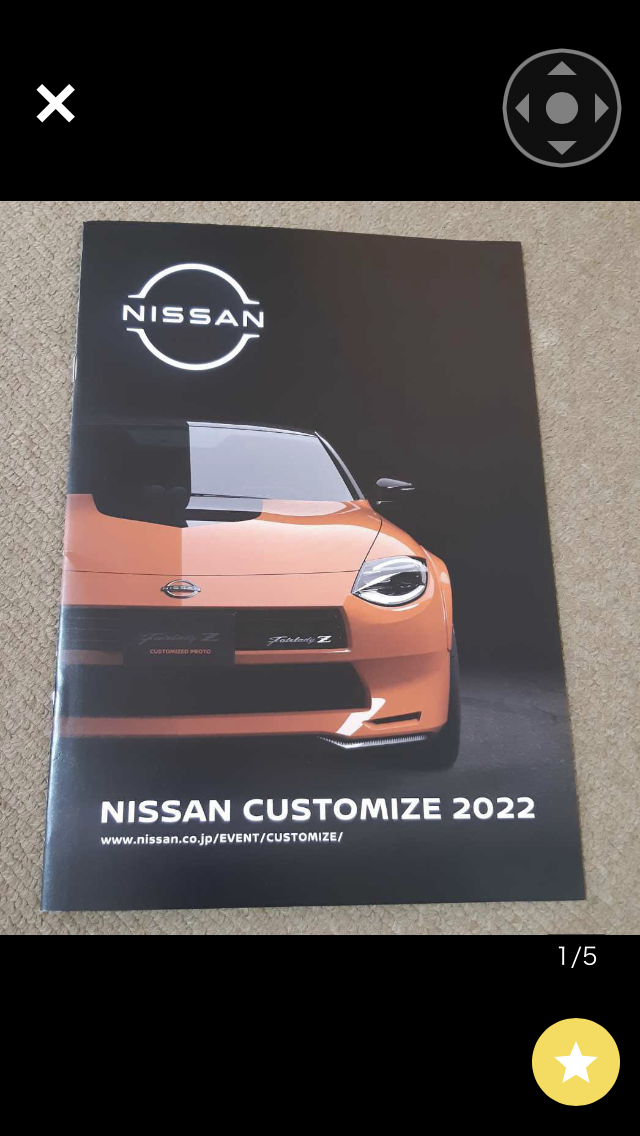
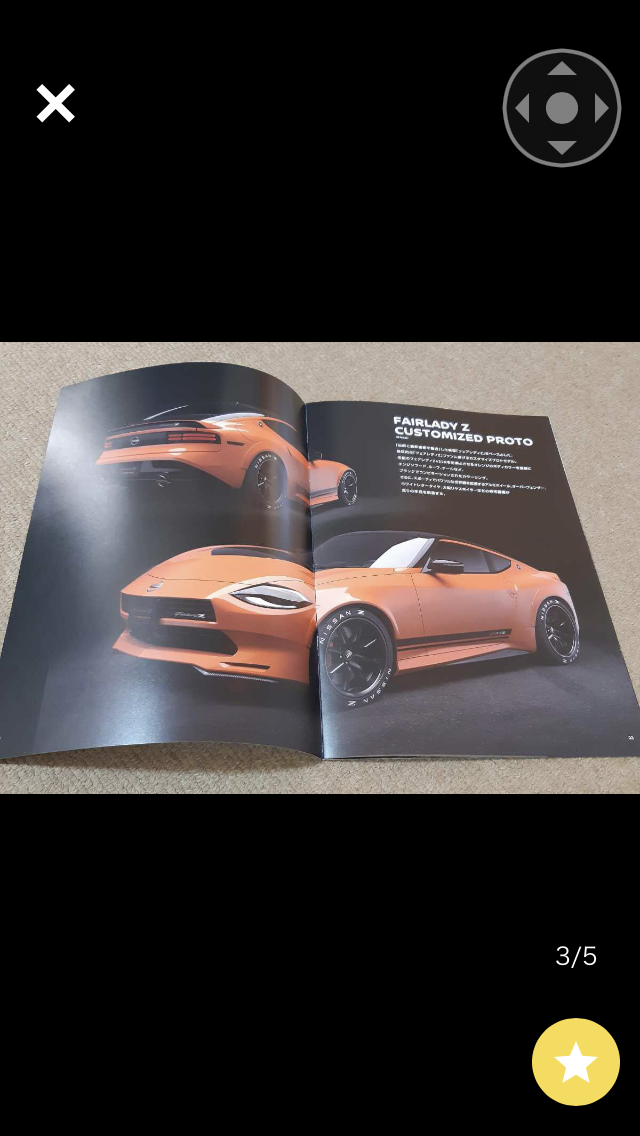
2 pointsThanks siteunseen ! The orange was surely the star of the show , it was surrounded by so many people. The rumors I have heard is , Nissan will not sell a car like this but they will sell those body kit as dealer optional parts for customers who buy the new Z . Maybe Nismo version will have another different body kit and performance . Kats

 2 points
 -
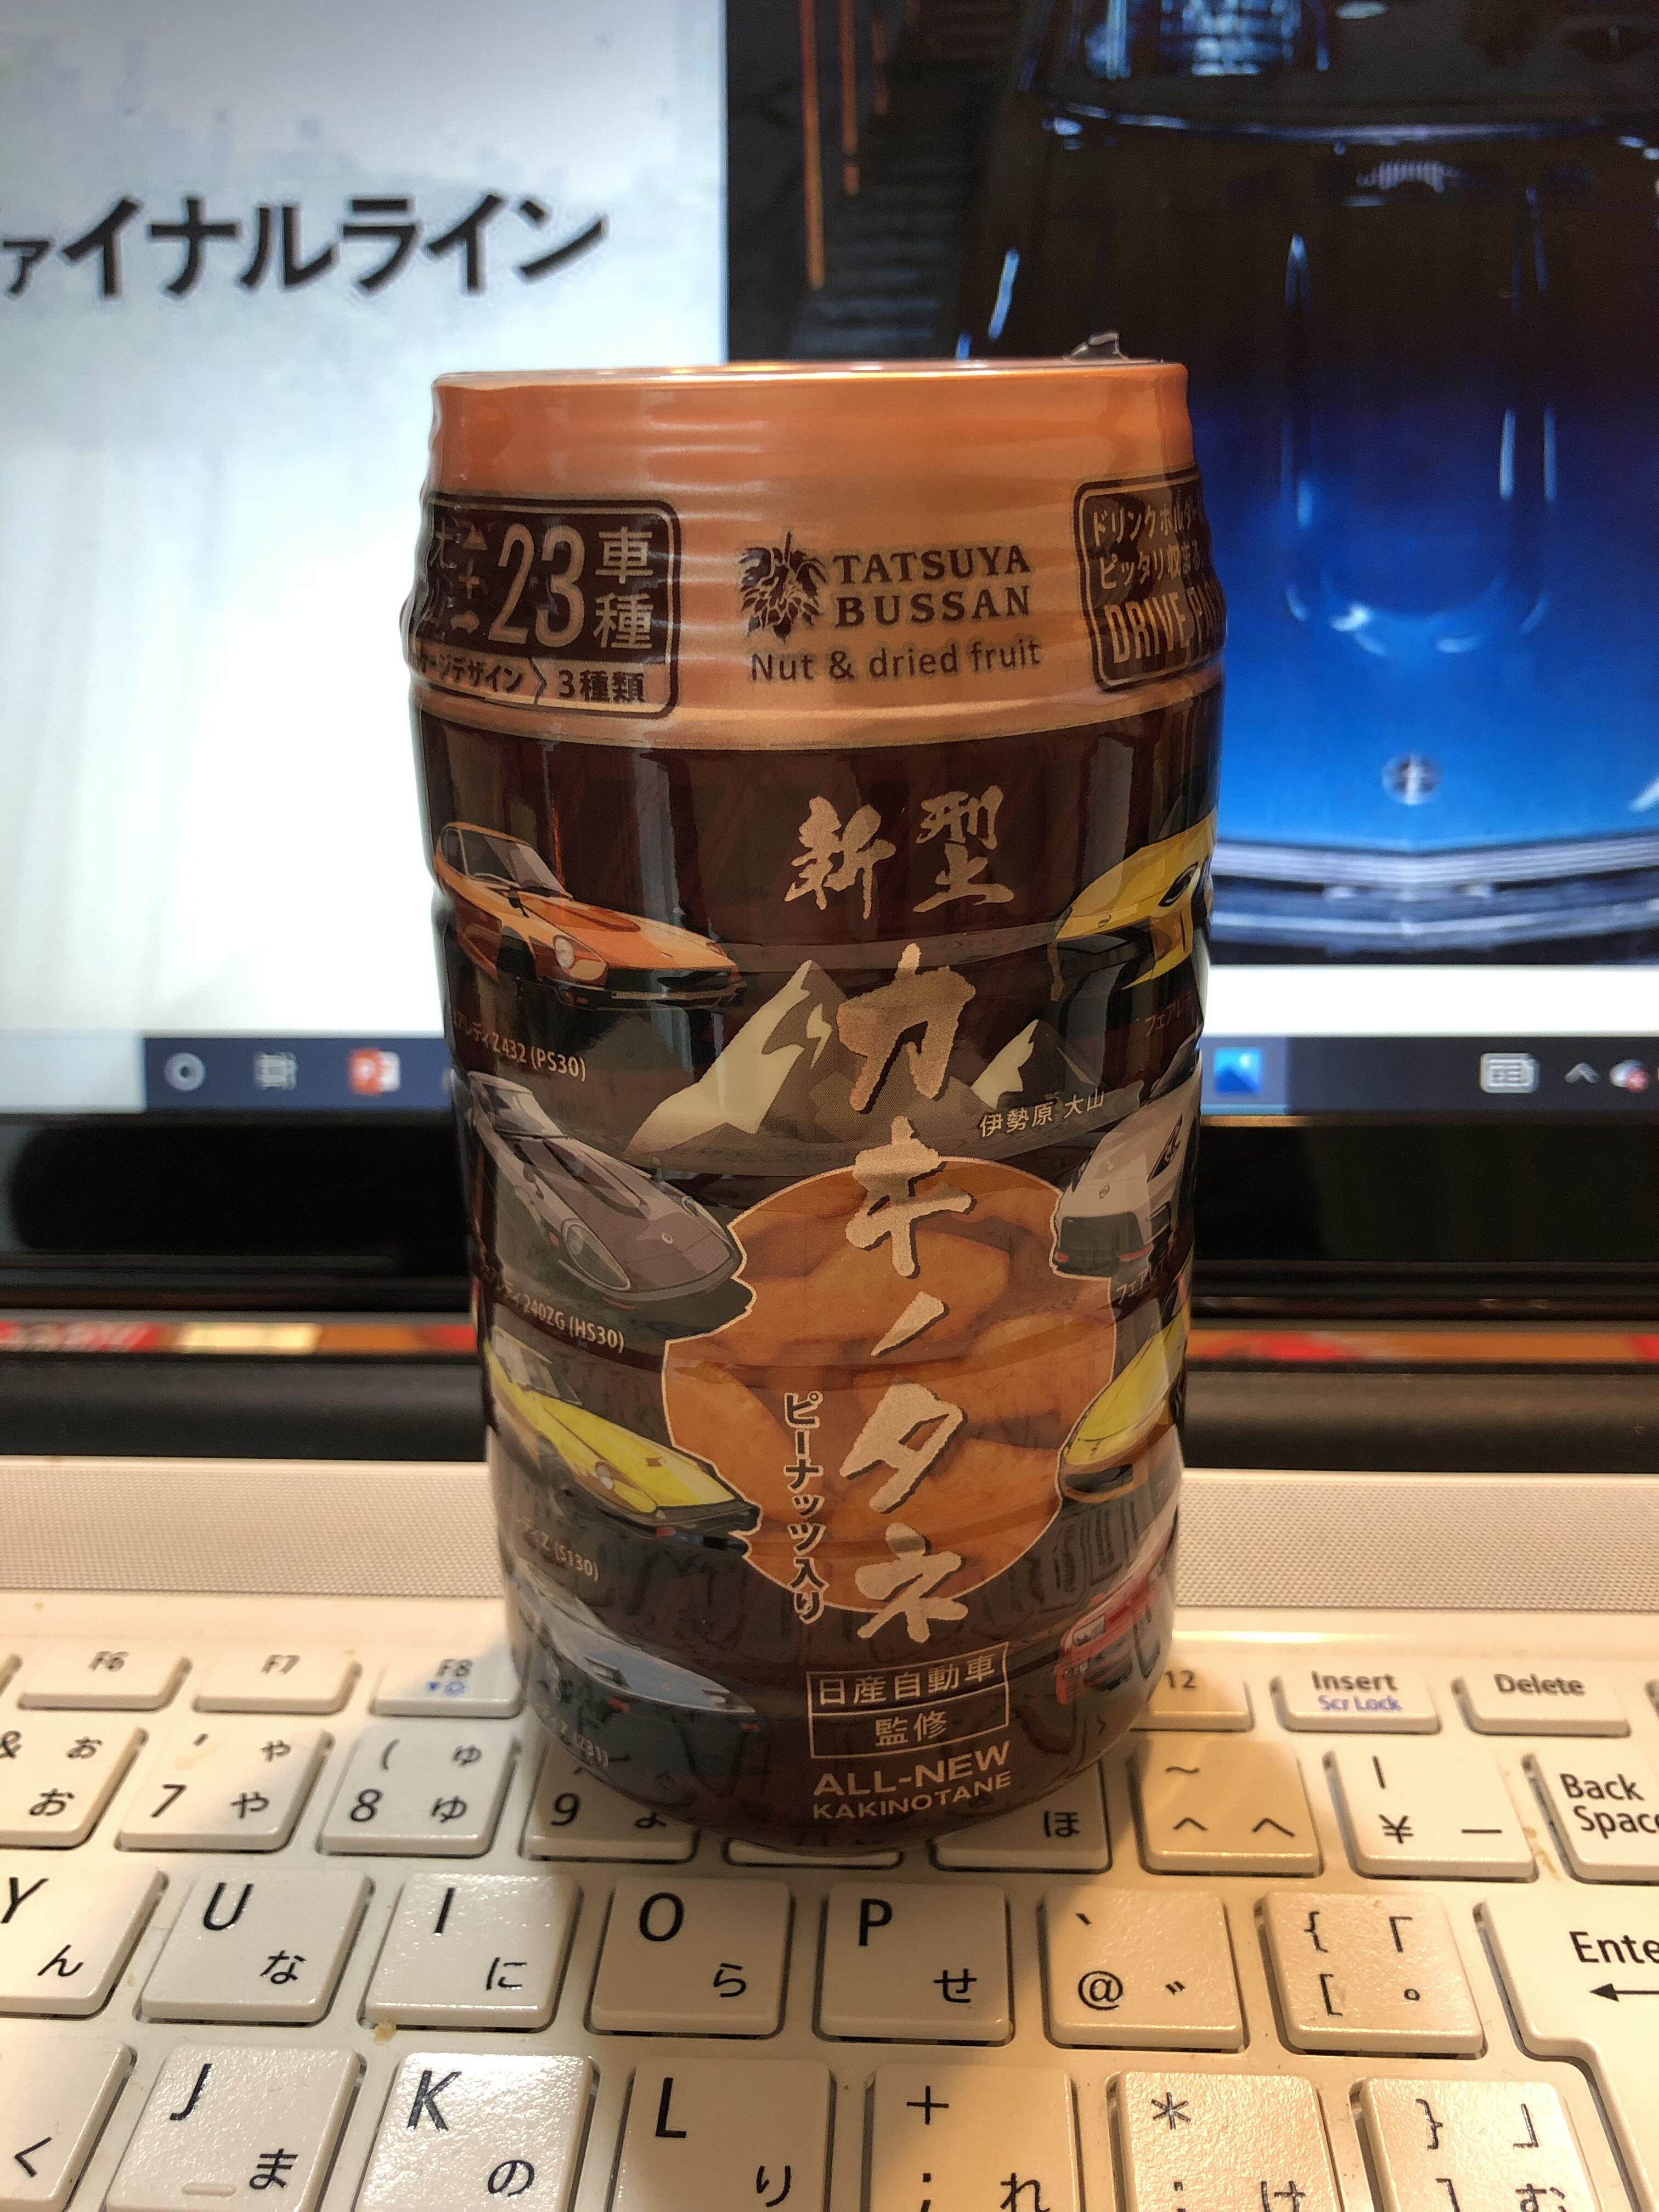
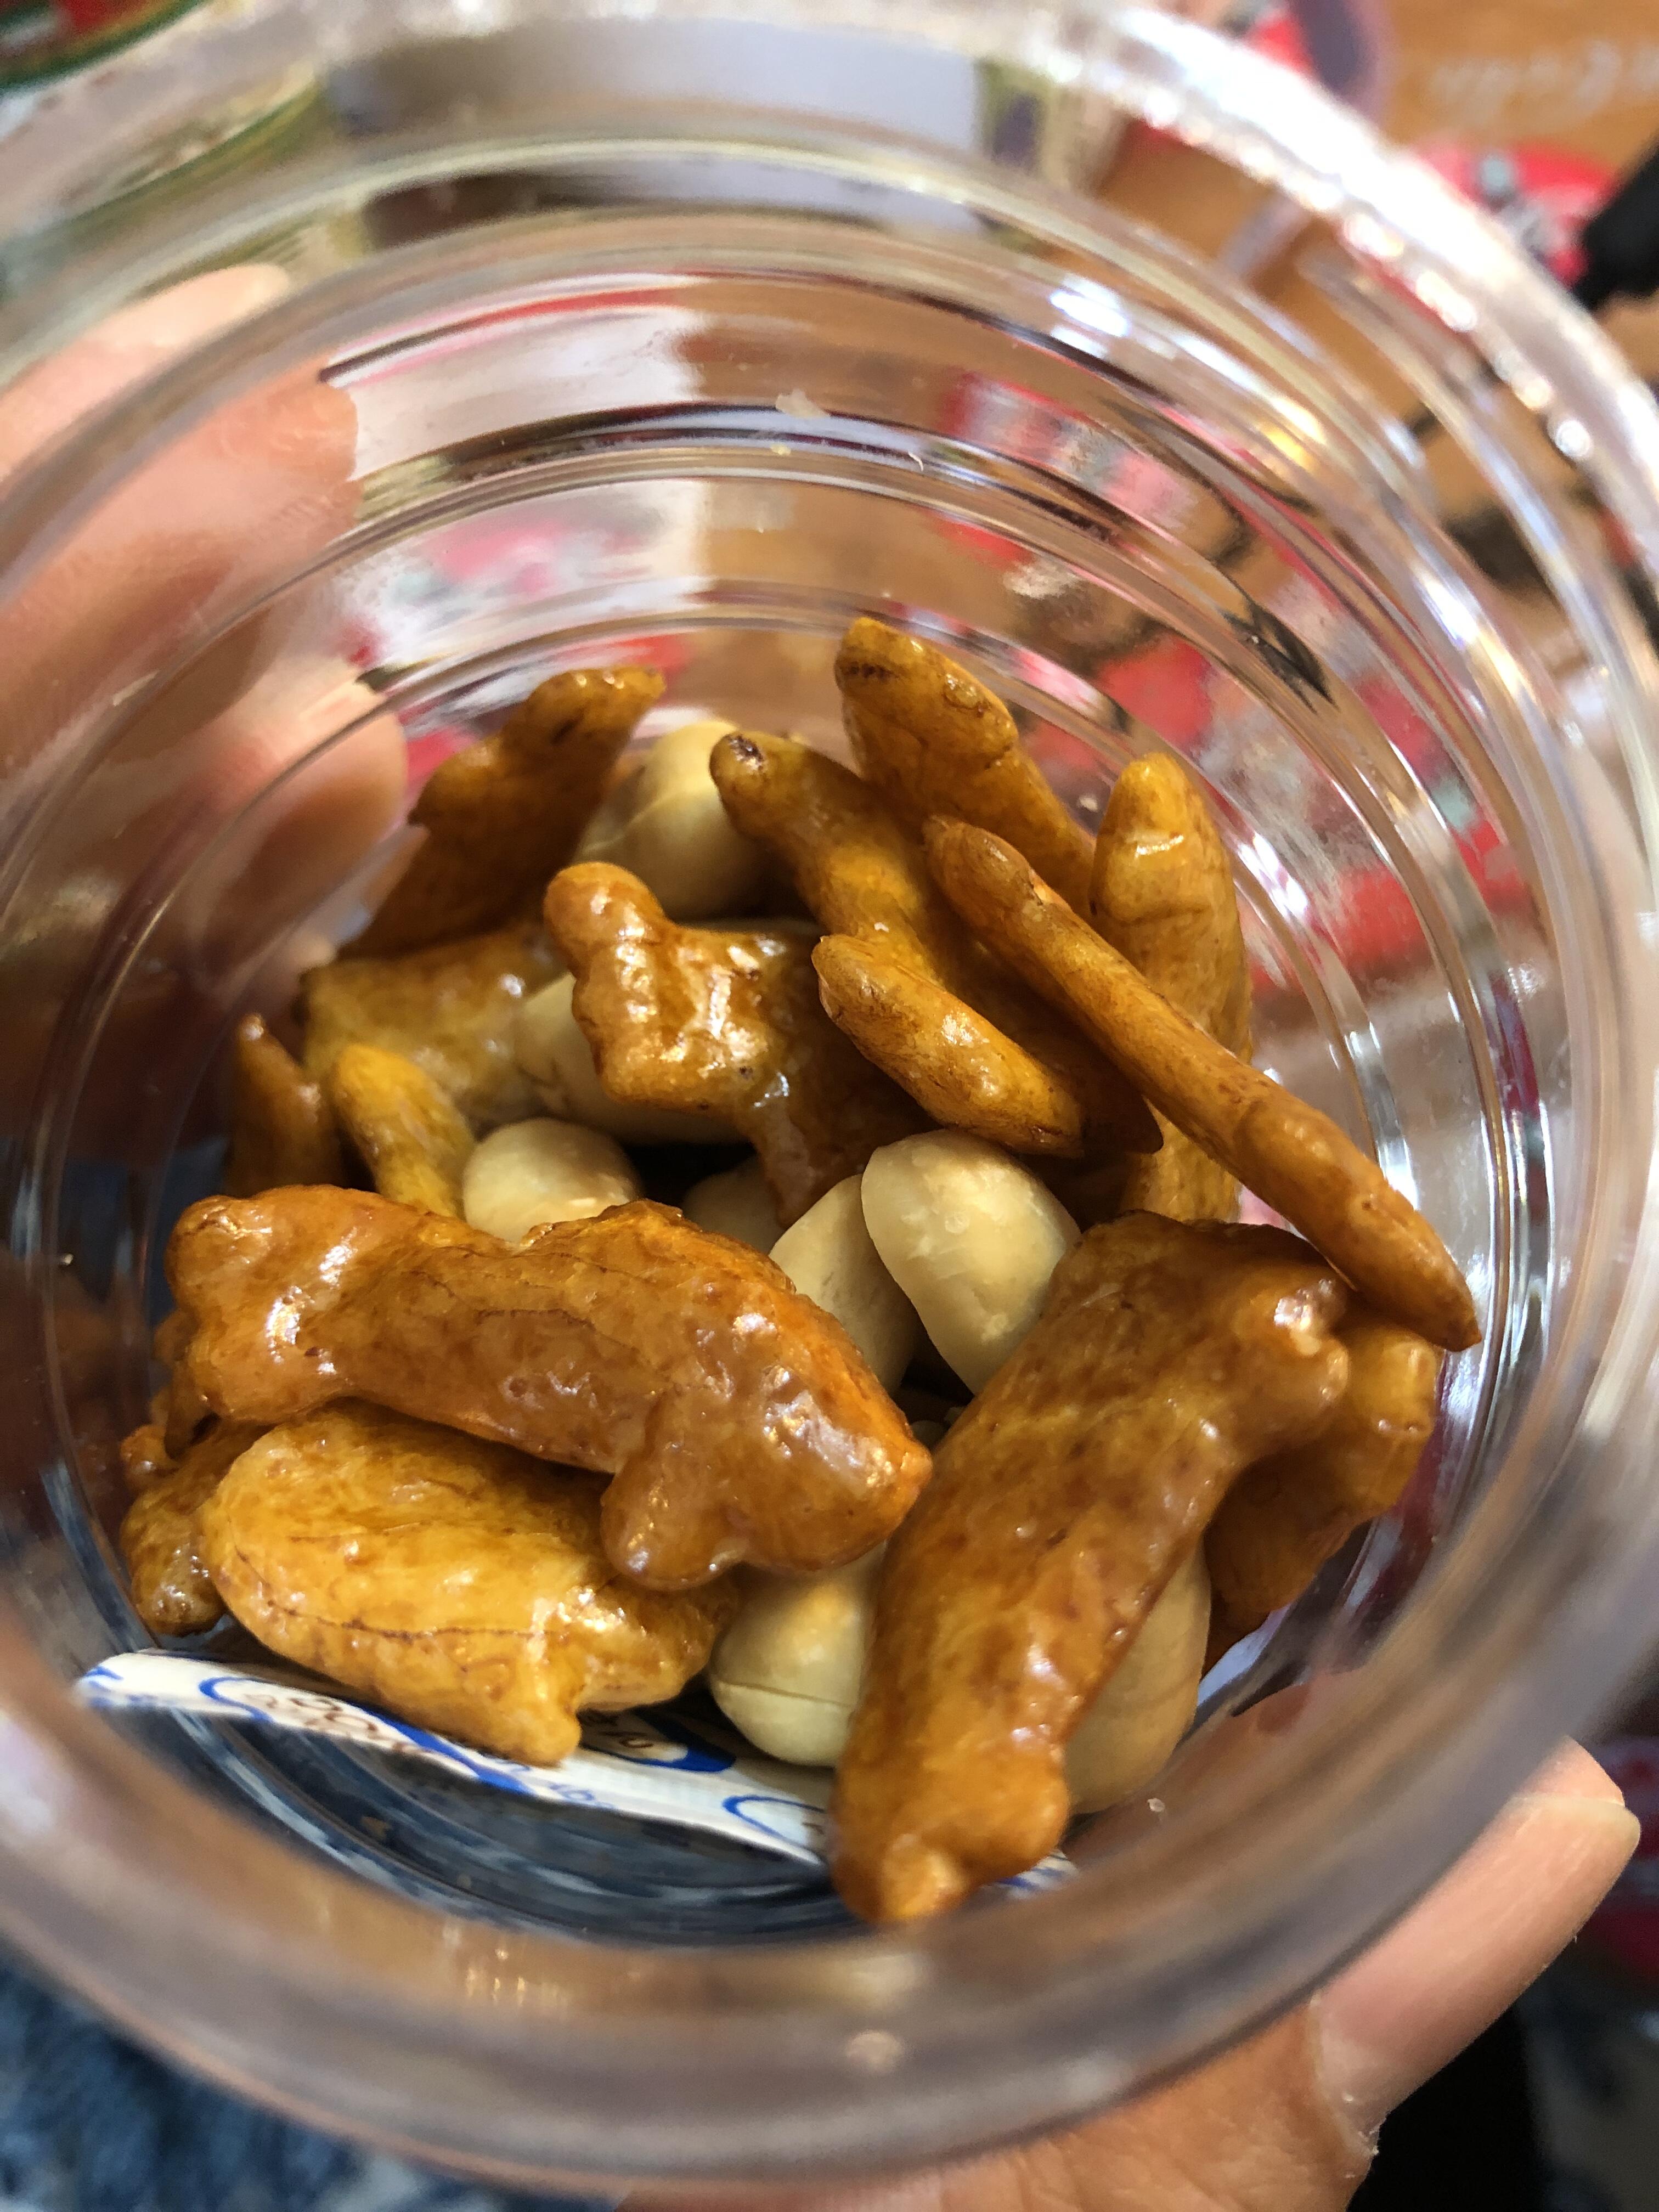
2 pointsHi Ben , your posting made me take a ride with my Z today . I visited Kyoto Nissan , a sales manager gave me a cup of rice cracker featuring car line up in Nissan . Let us know about your car anytime. Kats

 2 points
 -
 2 points
 -
2 pointsIf you have a project that requires a few days of uninterrupted time (no one will get near you) print this out or PM me your number and I'll send it via text message. When you're finished get a negative test result and resume the hustle and bustle we all live with. You're welcome!
 2 points
 -
 I have not been impressed with any of the 240Zs offered for sale by Beverly Hills Car Club. In fact, the showroom is actually closer to Skid Row in Los Angeles than Beverly Hills itself. Kind of ironic if you ask me.
 2 points
 -
 1 pointThis is what I've decided. Too many variables with these inflatable booths.1 point
 -
1 pointI think you could build one for a lot less money. Make it wide too so you'll plenty of room. Give it to your wife as a greenhouse attempt?1 point
-
 1 pointThanks! That's exactly what I was looking for. It doesn't look like the local hardware store or HD/Lowe's have the right one. Amazon has it in a 50 pack in the right material or in some of the big variety kits, but I'll end up spending $20. I guess I'll just order through zcardepot.1 point
 -
 1 pointHaha, I bought HS30 00150 in part because a friend of mine has HS30 00149 and I had seen the car a few years earlier for sale and thought gee, I'd like an early 240z in that colour! (920 Safari Gold). Im glad you got it Kats, it's a great colour combination. I bought HS30 01415 because it was 904 white and blue interior - which as you probably know is extremely rare for HS30 delivered cars. The new Z looks good in the orange. I like the brochure you posted photos of. I hope they make it a standard version (not a dealer tune up version). I think Alan is right with the early cars appreciating in value and the recent high profile 432-R sale and attention on the model it's likely to have inspired the design team). I am now hoping for a Safari Gold colour..1 point
 -
 1 pointO-ring size is 24x2.5mm (ID x Cross section). NBR or Viton material. O-1 point
 -
 Hey, if you leave the windows down they do the inside for free.1 point
 -
1 pointHi Gavin, I have same opinions with you about the current Z34 . But this time I like the way how design team “ correct “ the body line around rear fenders . I would say I want more S30 look for the front , but I now become to like it especially the orange car . Hope you will see the new Z in your local Nissan soon. Kats1 point
-
1 pointThanks Patcon ,I am also looking forward to seeing your car’s restoration complete. Kats1 point
-
 1 pointHonestly I don't really burn any oil, it may be cause i don't hit highway speeds often or anything, but i've never checked my dipstick and it said anything below full. But yea this is my current plan, it doesn't have any misfiring but I'm still planning on doing a compression test. My reasoning for not changing the oil was that I hadn't hit 3000 miles on the cycle yet, but it had been sitting on and off for a year cause I had a series of electrical issues. But thank all you guys for your advice.1 point
 -
 Watch what you say about Earl Scheib. Heck even one of their paint jobs would make my 240Z look better.1 point
 -
If you submitted a credit card number with that order, I would monitor it carefully. I have NEVER had to submit extra documentation to a vendor and to hell if I ever would. Pay a few bucks more and buy from a reputable vendor like Motorsport Auto or ZCarDepot.1 point
-
1 pointThat's an awesome Fairlady, way better than what we've seen over here. I too thank you @kats for the photos and am really glad to hear from you. We've all missed you!1 point
-
 1 pointHey Kats! Happy New Year! I like the new Z but I need a pick-up truck more than another Z.1 point
 -
1 point"3. Slave cylinder: If it leaks replace it. If you buy a new one, strip it apart and clean it before installing it. The new units often have metal shavings left over from manufacture and that can destroy the new seals."1 point
-
 1 pointI've had a brand new slave cylinder leak. Sometimes you'll find machining grit inside if you take them apart, even brand new. Quality control on aftermarket parts is just poor. Take it back and see if you can exchange for a different brand, then take it apart at home and clean it up inside before installing. I think that EuroDat has seen similar if you want to search for past posts about it. @EuroDat1 point
 -
1 pointIt's very Z432-R or PS30-SB inspired. I'm looking forward to seeing how the tuning scene takes to these cars. With twin turbos I'm expecting them to be quite a popular thing. Edit: just saw others reference the 432-R also. @katsI think your photos make me appreciate it more than another couple of earlier photos I saw. The only critique of this car I have is regarding the hip lines. Which seem to be able to be drawn back to the 350z. The original S30z is very svelte through the waistline, where as the 350z/370z are quite wide in that area. I am not sure if it's a constraint of modern cars or a design choice. But I also own an FD3S RX7 and I just feel the S30z and FD are so similar in design approach. Both have feminine lines, but at the same time are quite muscular. Perhaps I will feel different when I see the new Z in person but I think it's the 1 thing I would change if I was lead design at Nissan. I otherwise think it's a great to see Nissan finally start to embrace what was so special about the early cars after years of moving away from it.1 point
-
 1 pointKats, your posting was my bat signal to drive my Z this morning. 😎1 point
 -
1 pointHi Kats, Amazingly, despite my expectations, I actually like it too. Maybe even love it. Perhaps I have Omicron...!? Some people outside Japan will be missing the reference point, which is:
 1 point
 -
1 point
-
Probably not, but there are too many variables. Body variation and tire choice will make a huge difference. The same size tire in two different brands and/or models could be shaped very differently. Some are wider than nominal and others are narrower than nominal. Some have very square shoulders and others are more trapezoidal. Also, I say this every time it comes up. Ride height doesn't matter! The suspension goes through the same motion no matter where it starts. A lowered car just starts at a different spot in the travel. A stock height car will likely be on softer springs while a lowered car will likely be on stiffer springs, but both will take the same path. The only way to really check clearance is to remove the springs and run the suspension through full motion using a floor jack under the control arm. Unless the tires clear through full travel with the springs removed, they will rub and could either cut a sidewall or damage the fender.1 point