


Leaderboard
-

Captain Obvious
Free Member7Points9,855Posts -


kats
Free Member6Points2,209Posts -


siteunseen
Free Member3Points14,904Posts -

LewdMeat
Free Member1Points10Posts
Popular Content
Showing content with the highest reputation on 03/20/2022 in all areas
-
3 pointsMassage, yes ! I did massage for my trim ring fit well with the cover. Just for your information, here is the one which have already nuts into the case.

 3 points
 -
Been there, done that. Oil pumps are cheap. Front covers are not. There's no way you want to put a used oil pump of questionable integrity on your newly reconditioned engine. Sawzall is your friend.3 points
-
2 points
Yes, I have the 152 on my '77 too. I read about that upgrade at the very beginning. Also turbo head bolts are a reccomended update. I don't think you can buy any others now anyway, just turbos.1 point
 Kats, i was certainly thinking of the time you posted your photo years ago as I was carefully drilling holes! How nice it would have been for sets like these, with captured nuts, to be more widely available. Of note, I remember a thread where we discussed these hole positions as shown on your buckets, and that they may represent an "early" pattern version. Then some time later I recall seeing a photo of a very early car which showed the other, more common style of pattern (similar to what I'm using). Was that ever really fully decided one way or another- one pattern was "early-style", and the other "later-style"?1 point
1 pointYes. You can use brass plugs to plug those extra holes for a cleaner look and less chance of the hose cracking and pulling in air.
Kats, i was certainly thinking of the time you posted your photo years ago as I was carefully drilling holes! How nice it would have been for sets like these, with captured nuts, to be more widely available. Of note, I remember a thread where we discussed these hole positions as shown on your buckets, and that they may represent an "early" pattern version. Then some time later I recall seeing a photo of a very early car which showed the other, more common style of pattern (similar to what I'm using). Was that ever really fully decided one way or another- one pattern was "early-style", and the other "later-style"?1 point
1 pointYes. You can use brass plugs to plug those extra holes for a cleaner look and less chance of the hose cracking and pulling in air. 1 point
 Are the nuts (rivnuts?) on a metal or fiberglass headlight case?1 point
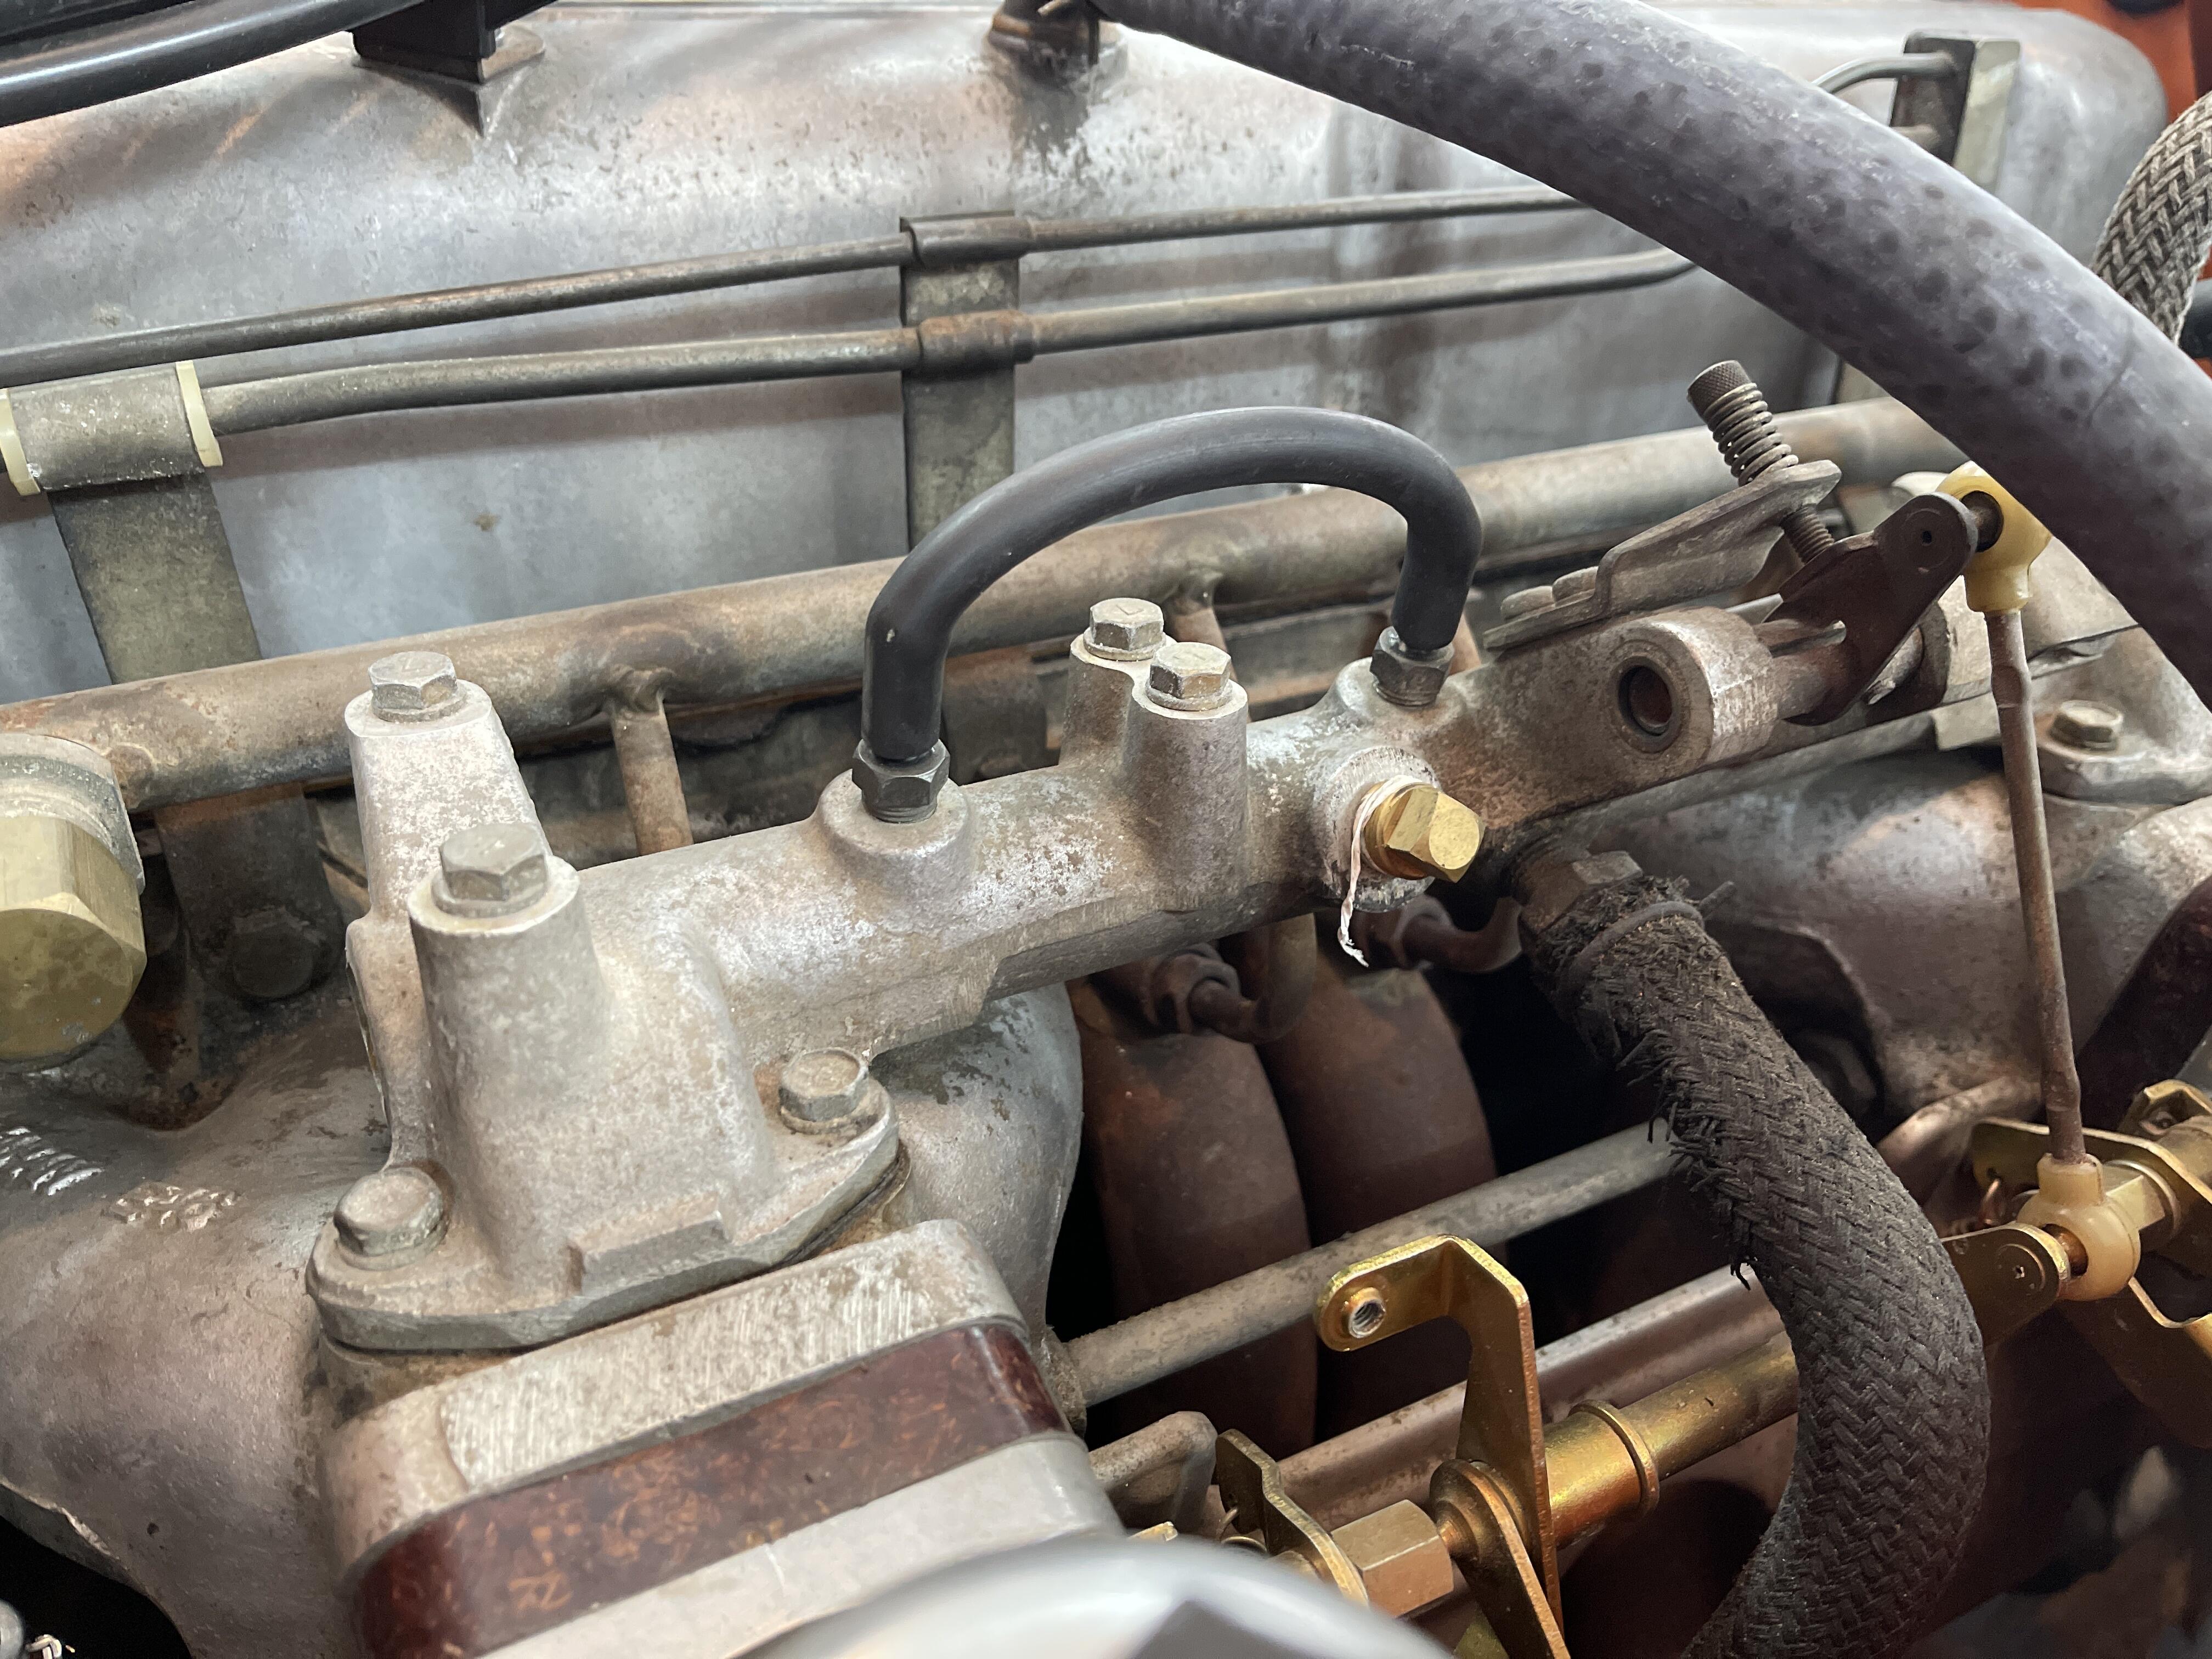
 1 pointAhh gotcha so the emissions portions was removed , hence the jumper hose ? Apreciate the help you guys rock .
 1 point
 1 pointThat side hooks up to the emissions components that normally sit on top of the balance tube where the bolts are not holding anything. Most have been removed long ago.
 1 point
 1 pointAll good suggestions and comments. I am a simple man. I like simple things. I wish this rear suspension was simple to get apart. Nothing but trouble so far as you can tell if you look closely at the picture. Heading down to my shop now to see if I can get those half shafts out, then the axel's and backing plates. Wish me luck...1 point
Haha!! True that, my friend! I lubed the bolts well with anti-sieze when I put it on. Hopefully I won't have to resort to that ever again!1 point
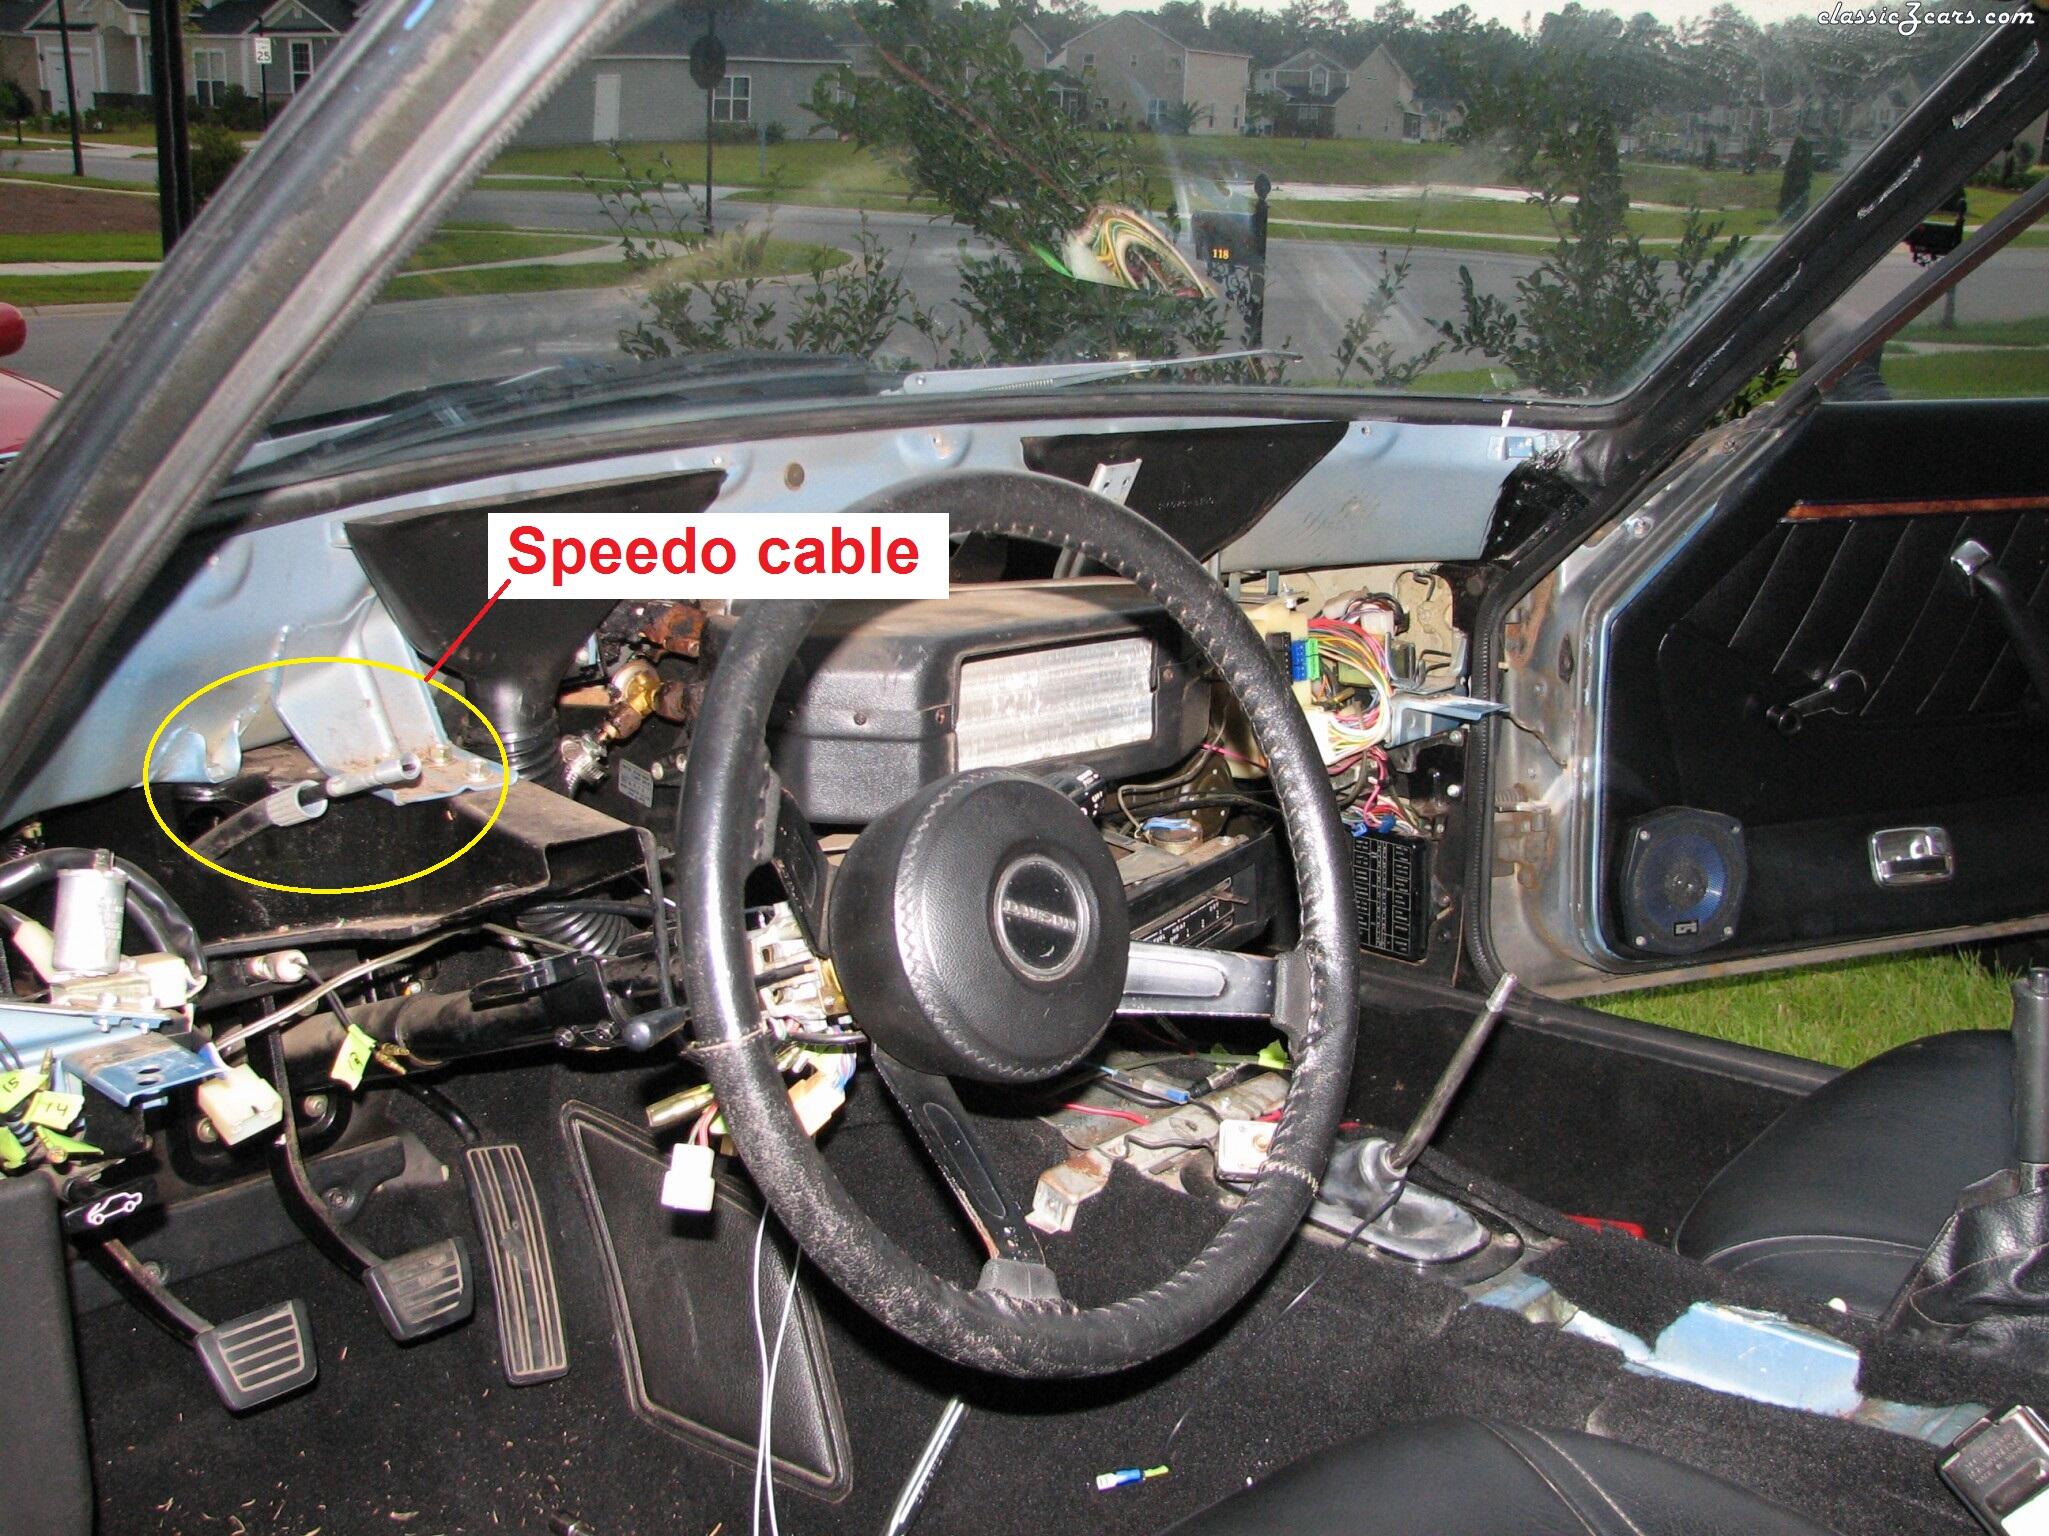
1 pointGot the dash out! It was really just the speedo cable left. Thank you so much everyone and especially Cpt. Now that I know how, pulling the dash is really extremely simple!
1 pointAll good suggestions and comments. I am a simple man. I like simple things. I wish this rear suspension was simple to get apart. Nothing but trouble so far as you can tell if you look closely at the picture. Heading down to my shop now to see if I can get those half shafts out, then the axel's and backing plates. Wish me luck...1 point
Haha!! True that, my friend! I lubed the bolts well with anti-sieze when I put it on. Hopefully I won't have to resort to that ever again!1 point
1 pointGot the dash out! It was really just the speedo cable left. Thank you so much everyone and especially Cpt. Now that I know how, pulling the dash is really extremely simple!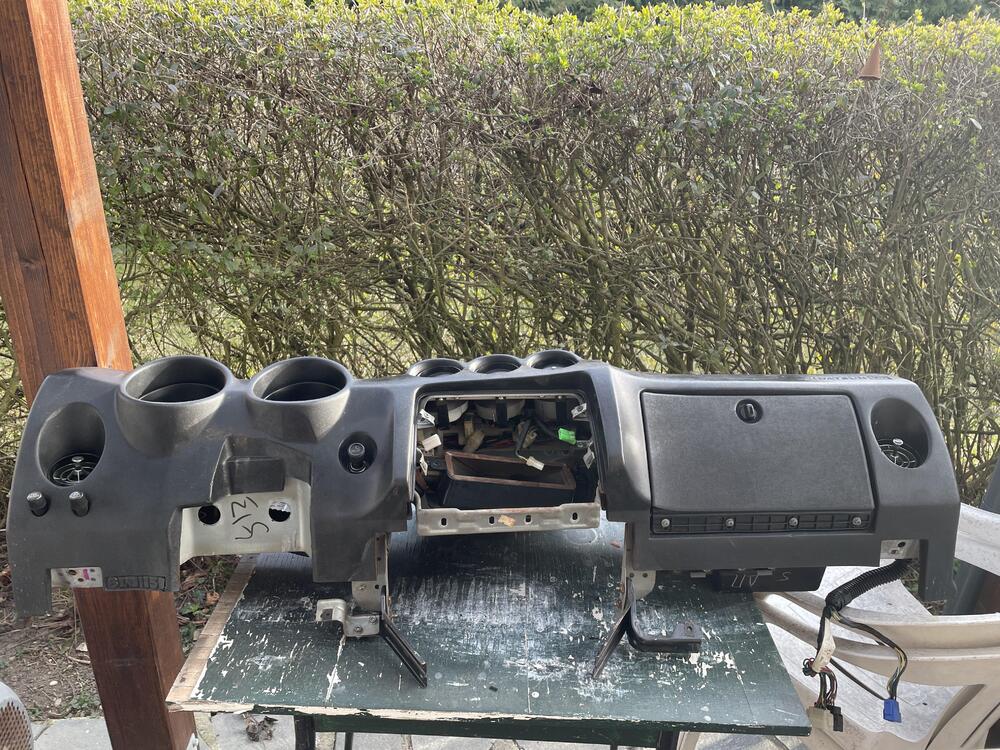 1 point
Here's two more pics. This is taken looking at the back of the speedo after the dash has been pulled out: And this is the same pic from above, but I circled the cable and threaded coupler hanging loose: Good luck!
1 point
1 pointHere's two more pics. This is taken looking at the back of the speedo after the dash has been pulled out: And this is the same pic from above, but I circled the cable and threaded coupler hanging loose: Good luck!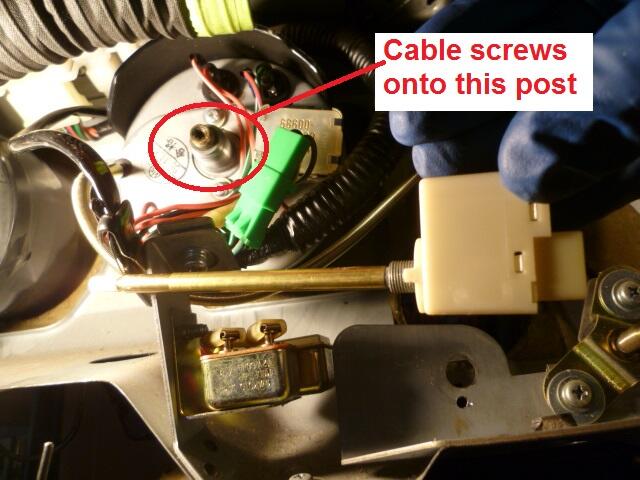
 1 point
I used the Melling 152 turbo manual transmission oil pump on mine. It stays on the high side of the gauge. Seems like it was $60 in 2016 from Advance Auto. Probably a $100 now. Found on google.com... non turbo L28 (75 to 83) model M90 = 2 gallons/minute at 491 rpm turbo L28 with automatic trans model M111 = 2 gallons/minute at 491 rpm turbo L28 with manual trans model M152 = 2.25 gallons/minute at 491 rpm1 point
1 point
I used the Melling 152 turbo manual transmission oil pump on mine. It stays on the high side of the gauge. Seems like it was $60 in 2016 from Advance Auto. Probably a $100 now. Found on google.com... non turbo L28 (75 to 83) model M90 = 2 gallons/minute at 491 rpm turbo L28 with automatic trans model M111 = 2 gallons/minute at 491 rpm turbo L28 with manual trans model M152 = 2.25 gallons/minute at 491 rpm1 point But integrity is undefined until it's off and disassembled. The dilemma.1 point
 1 pointHere are the bolts you’ll need to remove. Just did this job. All are 10 mm except the steering column. -6 near windshield under finisher. A 1/4 socket wrench with short swivel extension worked best . - there is one bolt on each side near kick panels. One next to hood release, screw upwards towards roof. And same on the passenger side - 4 (2 per side) where the dash frame bolts to trans tunnel - Speedo cable (what Captain Obvious said) - 2 x 12mm bolts holding the steering column. They help lower the column so you can get the frame clear. - your probably hanging up right around the steering column. Where those two 12mm bolt screw into. It’s a flat plate that the dash frame has to be lifted over. The dash comes out easier if you rock the bottom upwards towards tje windshield and the up and out . Don’t forget the 3 wire harness connections that going in to a panel in the passenger side firewall. Sent from my iPhone using Tapatalk1 point
 1 pointRemove the screw at the 12 o'clock position in the tach bezel and another screw under the dash at the 6 o'clock position and push it from behind (hand under the dash) until you can disconnect the tach harness. Set the tach aside. Now repeat similar procedure with the speedo removing the bezel screw and the under dash screw. Insert your hand through the empty tach opening unscrewing the speedo cable first, then push the speedo forward and loosen the small set screw holding the odometer reset cable. Finally disconnect the harness and remove the speedo altogether. Sent from my SM-N986U using Tapatalk1 point
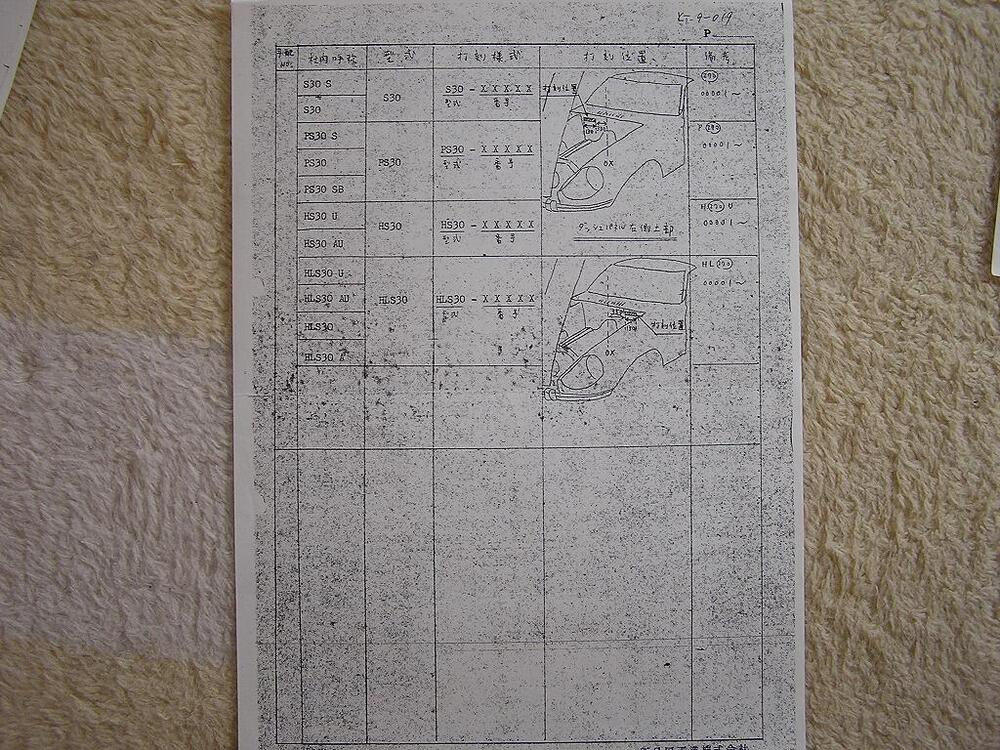
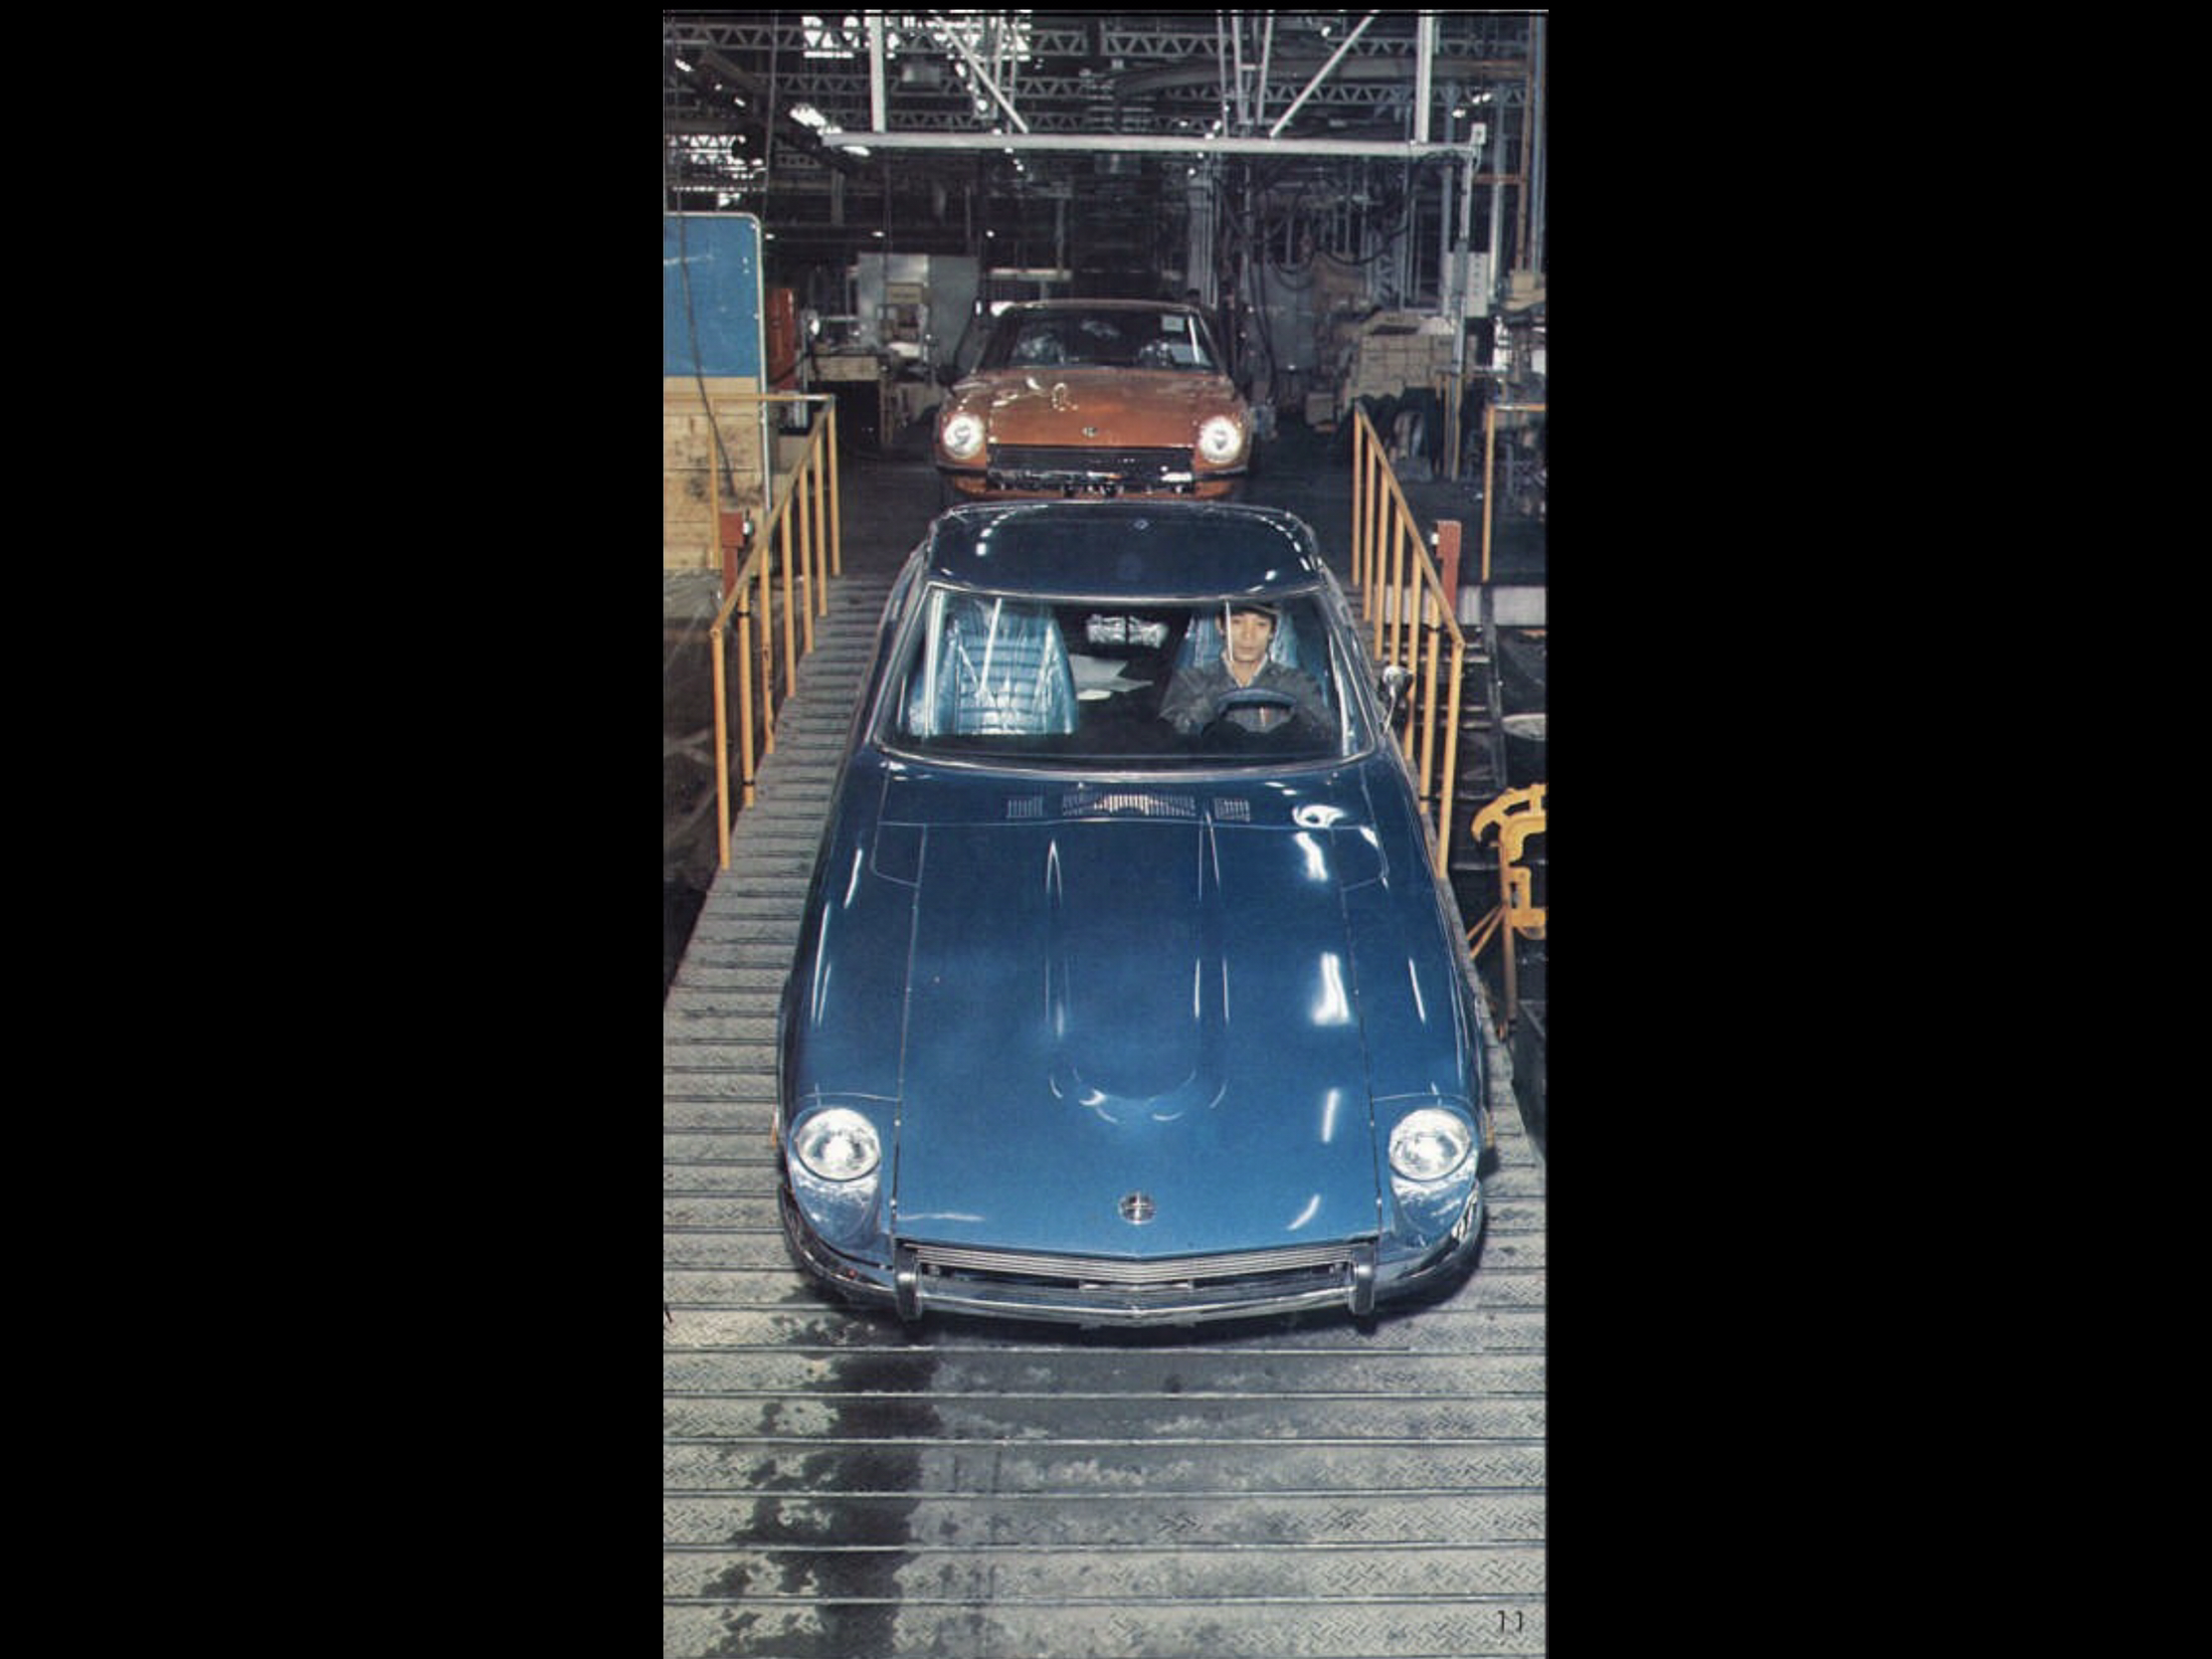
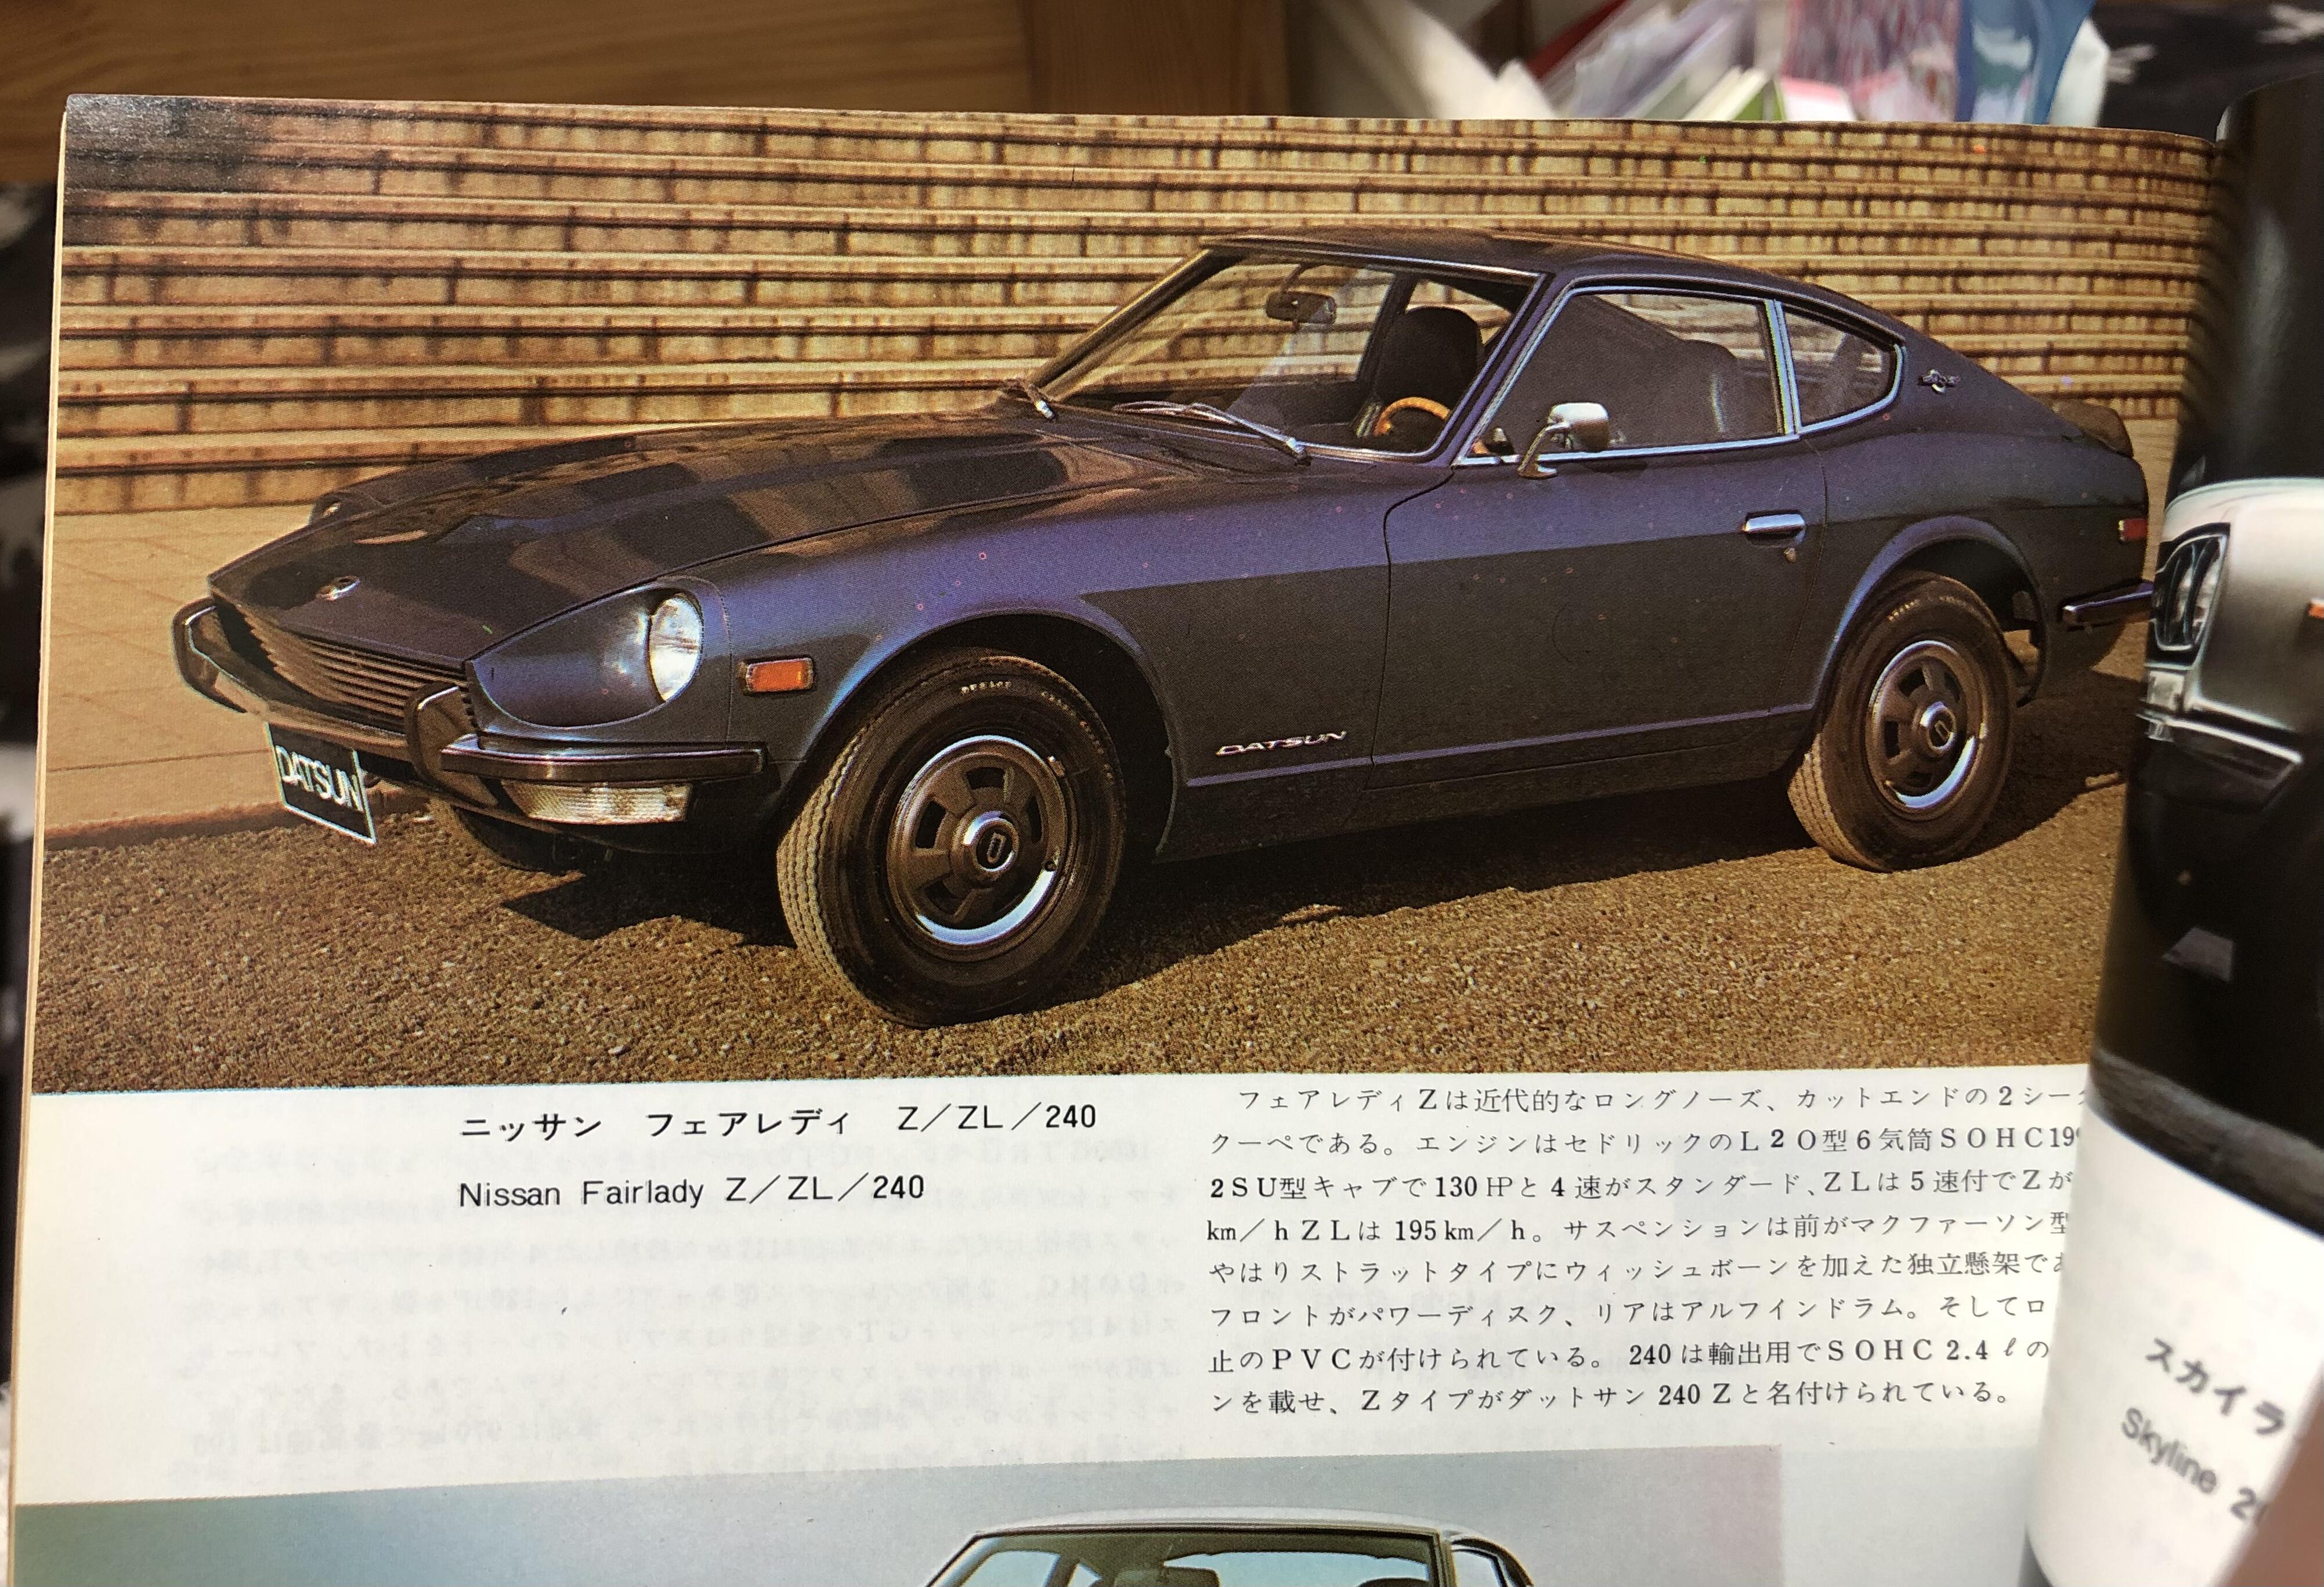
1 pointI saw someone said Nissan only made HLS30 first , like 100 or 1000 240Zs . I would like to share this with people who are interested in how they made our cars . We have a good source. Please see this picture, a blue Datsun 240Z was followed by an orange Fairlady Z-L . Nissan Shatai was able to mix all the models in the assembly lines. However there might be some batches of certain models . Especially in a painting room , same color was sprayed for some batches of cars . Engines , they might have been the same . Kats
1 pointRemove the screw at the 12 o'clock position in the tach bezel and another screw under the dash at the 6 o'clock position and push it from behind (hand under the dash) until you can disconnect the tach harness. Set the tach aside. Now repeat similar procedure with the speedo removing the bezel screw and the under dash screw. Insert your hand through the empty tach opening unscrewing the speedo cable first, then push the speedo forward and loosen the small set screw holding the odometer reset cable. Finally disconnect the harness and remove the speedo altogether. Sent from my SM-N986U using Tapatalk1 point
1 pointI saw someone said Nissan only made HLS30 first , like 100 or 1000 240Zs . I would like to share this with people who are interested in how they made our cars . We have a good source. Please see this picture, a blue Datsun 240Z was followed by an orange Fairlady Z-L . Nissan Shatai was able to mix all the models in the assembly lines. However there might be some batches of certain models . Especially in a painting room , same color was sprayed for some batches of cars . Engines , they might have been the same . Kats

 1 point
1 pointThanks Alan, seems to make sense to me. Light weight front fenders are so special. Takeuchi san and other PZR owners usually complained about people tried to put their fingers on the fender to push down and see how the metal is flexible for recovery from bending. At car show , Takeuchi san couldn’t leave his car for lunch . That is an old story I think , nowadays nobody will try to do that , everyone knows how those cars are expensive today . Kats1 point
1 point
1 point
1 pointThanks Alan, seems to make sense to me. Light weight front fenders are so special. Takeuchi san and other PZR owners usually complained about people tried to put their fingers on the fender to push down and see how the metal is flexible for recovery from bending. At car show , Takeuchi san couldn’t leave his car for lunch . That is an old story I think , nowadays nobody will try to do that , everyone knows how those cars are expensive today . Kats1 point


Important Information
By using this site, you agree to our Privacy Policy and Guidelines. We have placed cookies on your device to help make this website better. You can adjust your cookie settings, otherwise we'll assume you're okay to continue.