Leaderboard
-
Dat.240
Free Member6Points23Posts -
BoldUlysses
Free Member5Points344Posts -
jfa.series1
 Subscriber
 4Points2,730Posts
 -
inline6
Subscriber3Points1,276Posts


Popular Content
Showing content with the highest reputation on 07/11/2022 in Posts
-
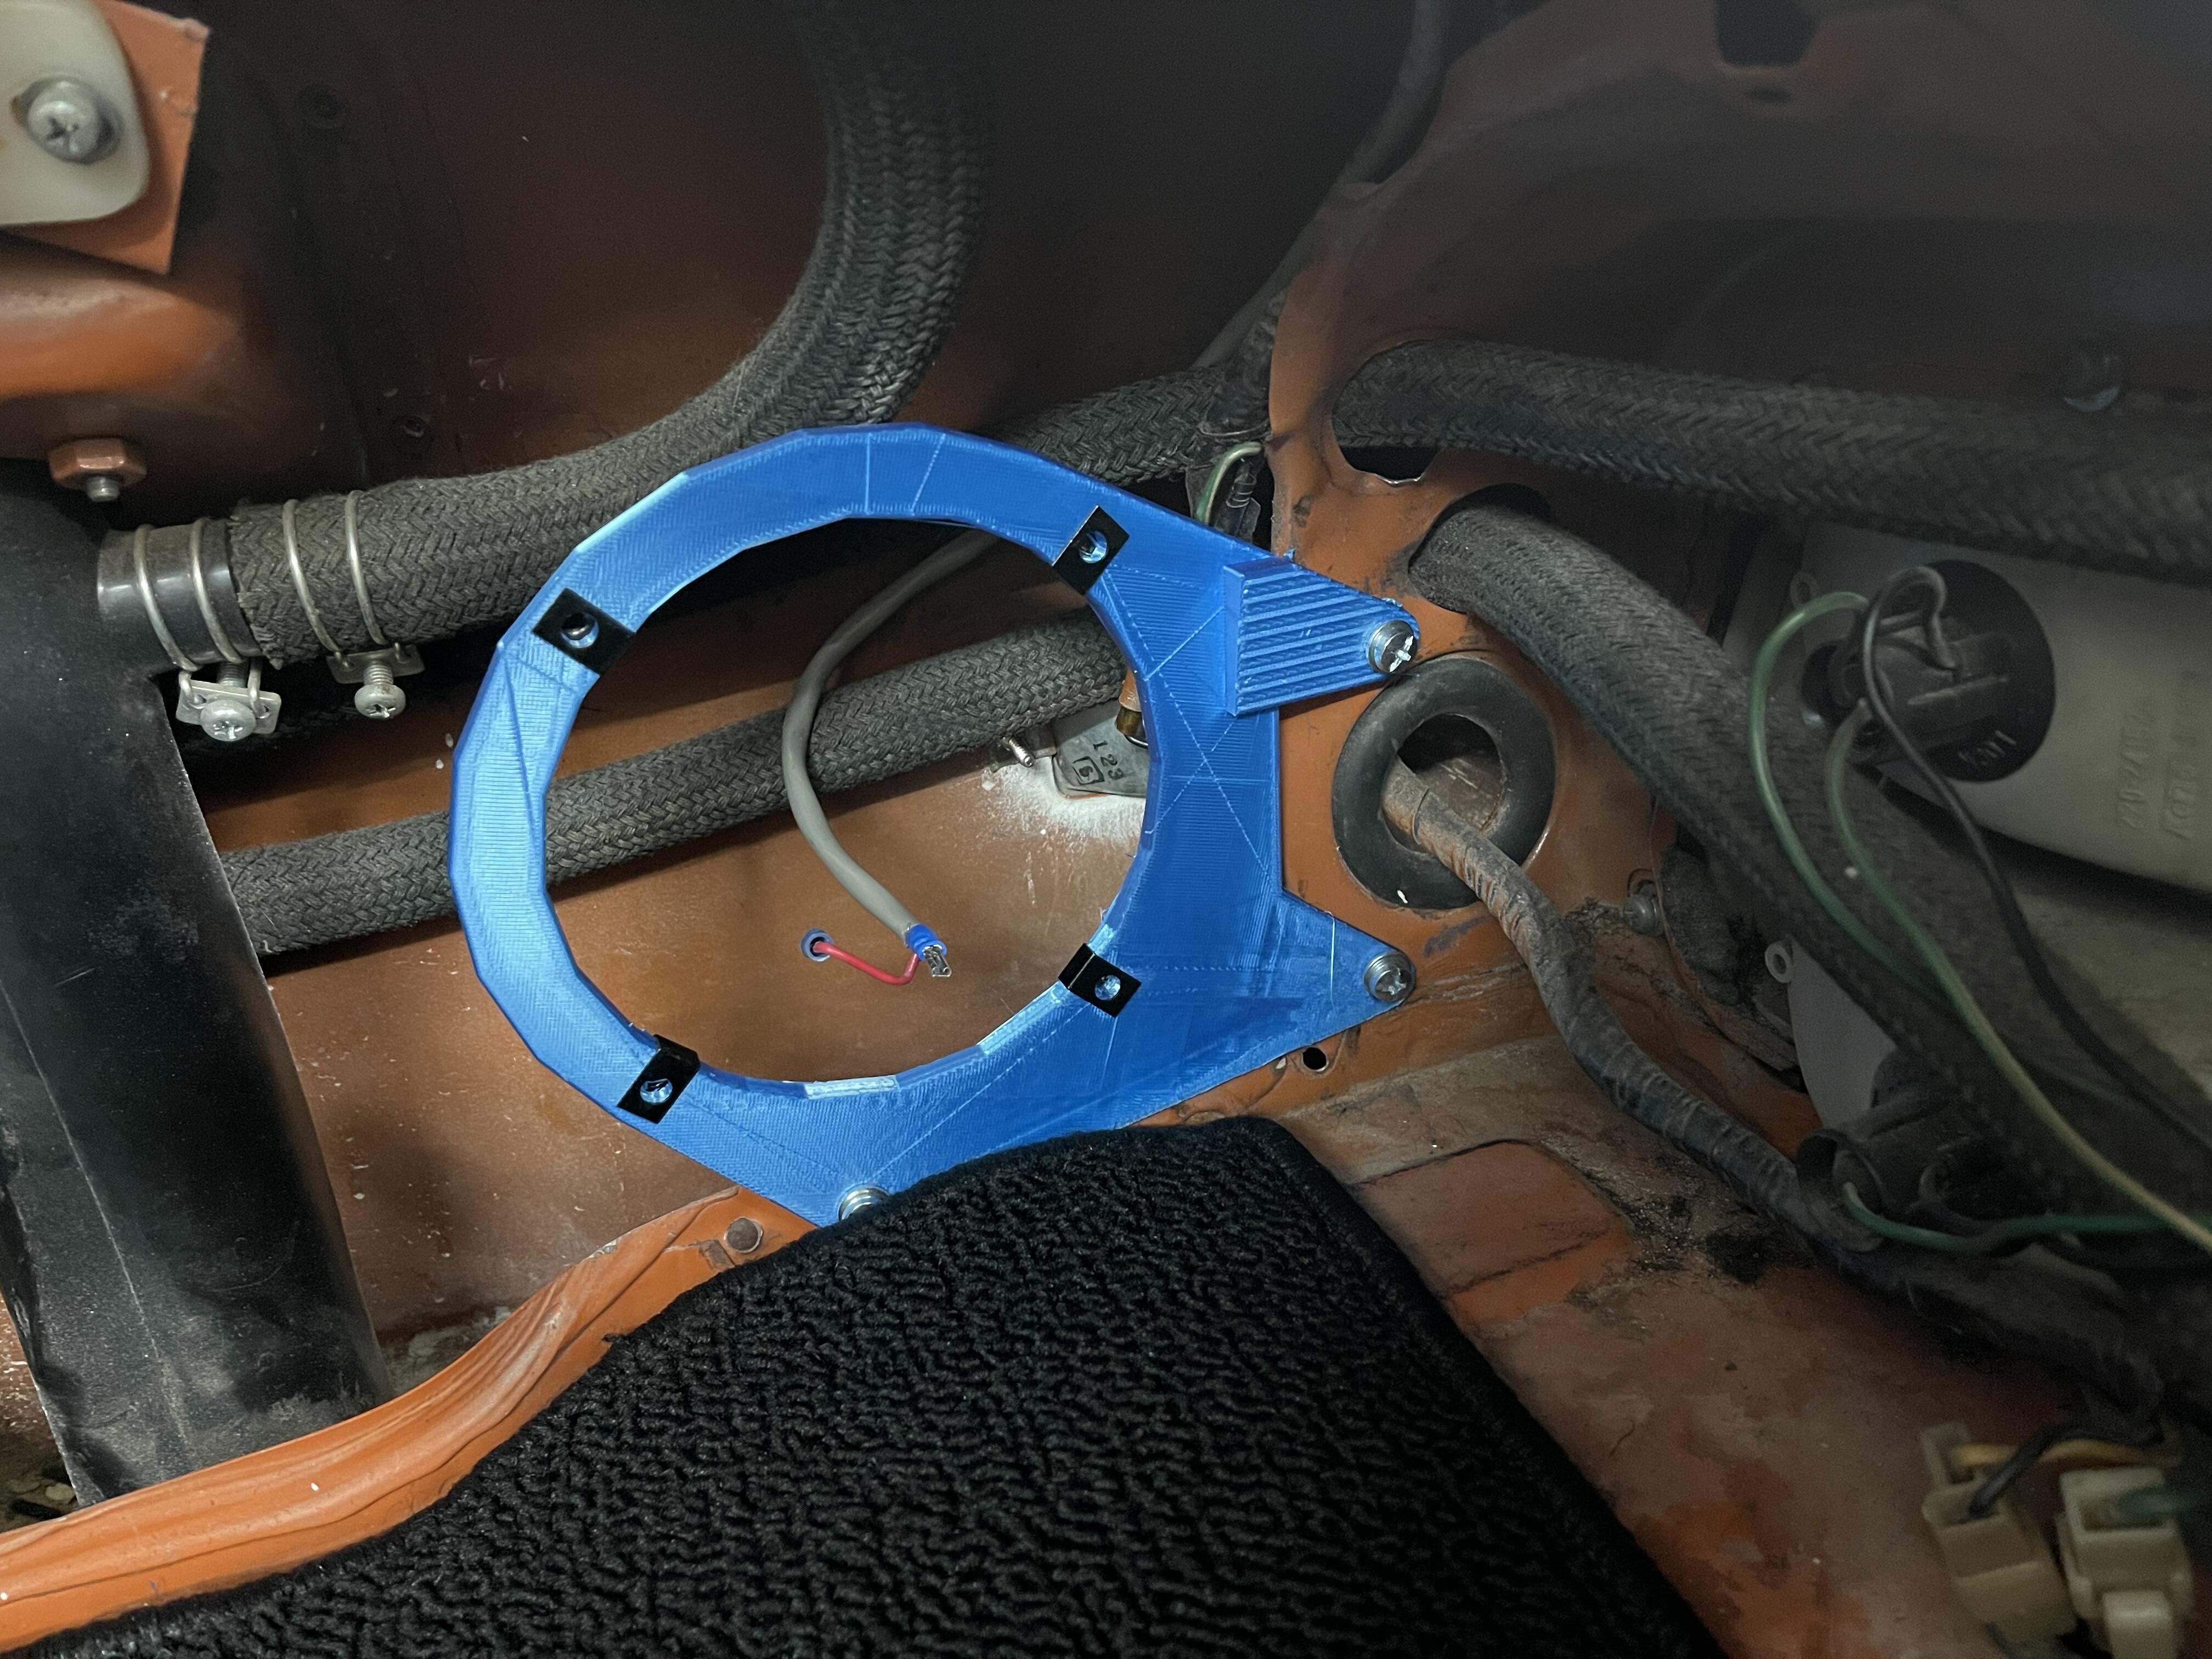
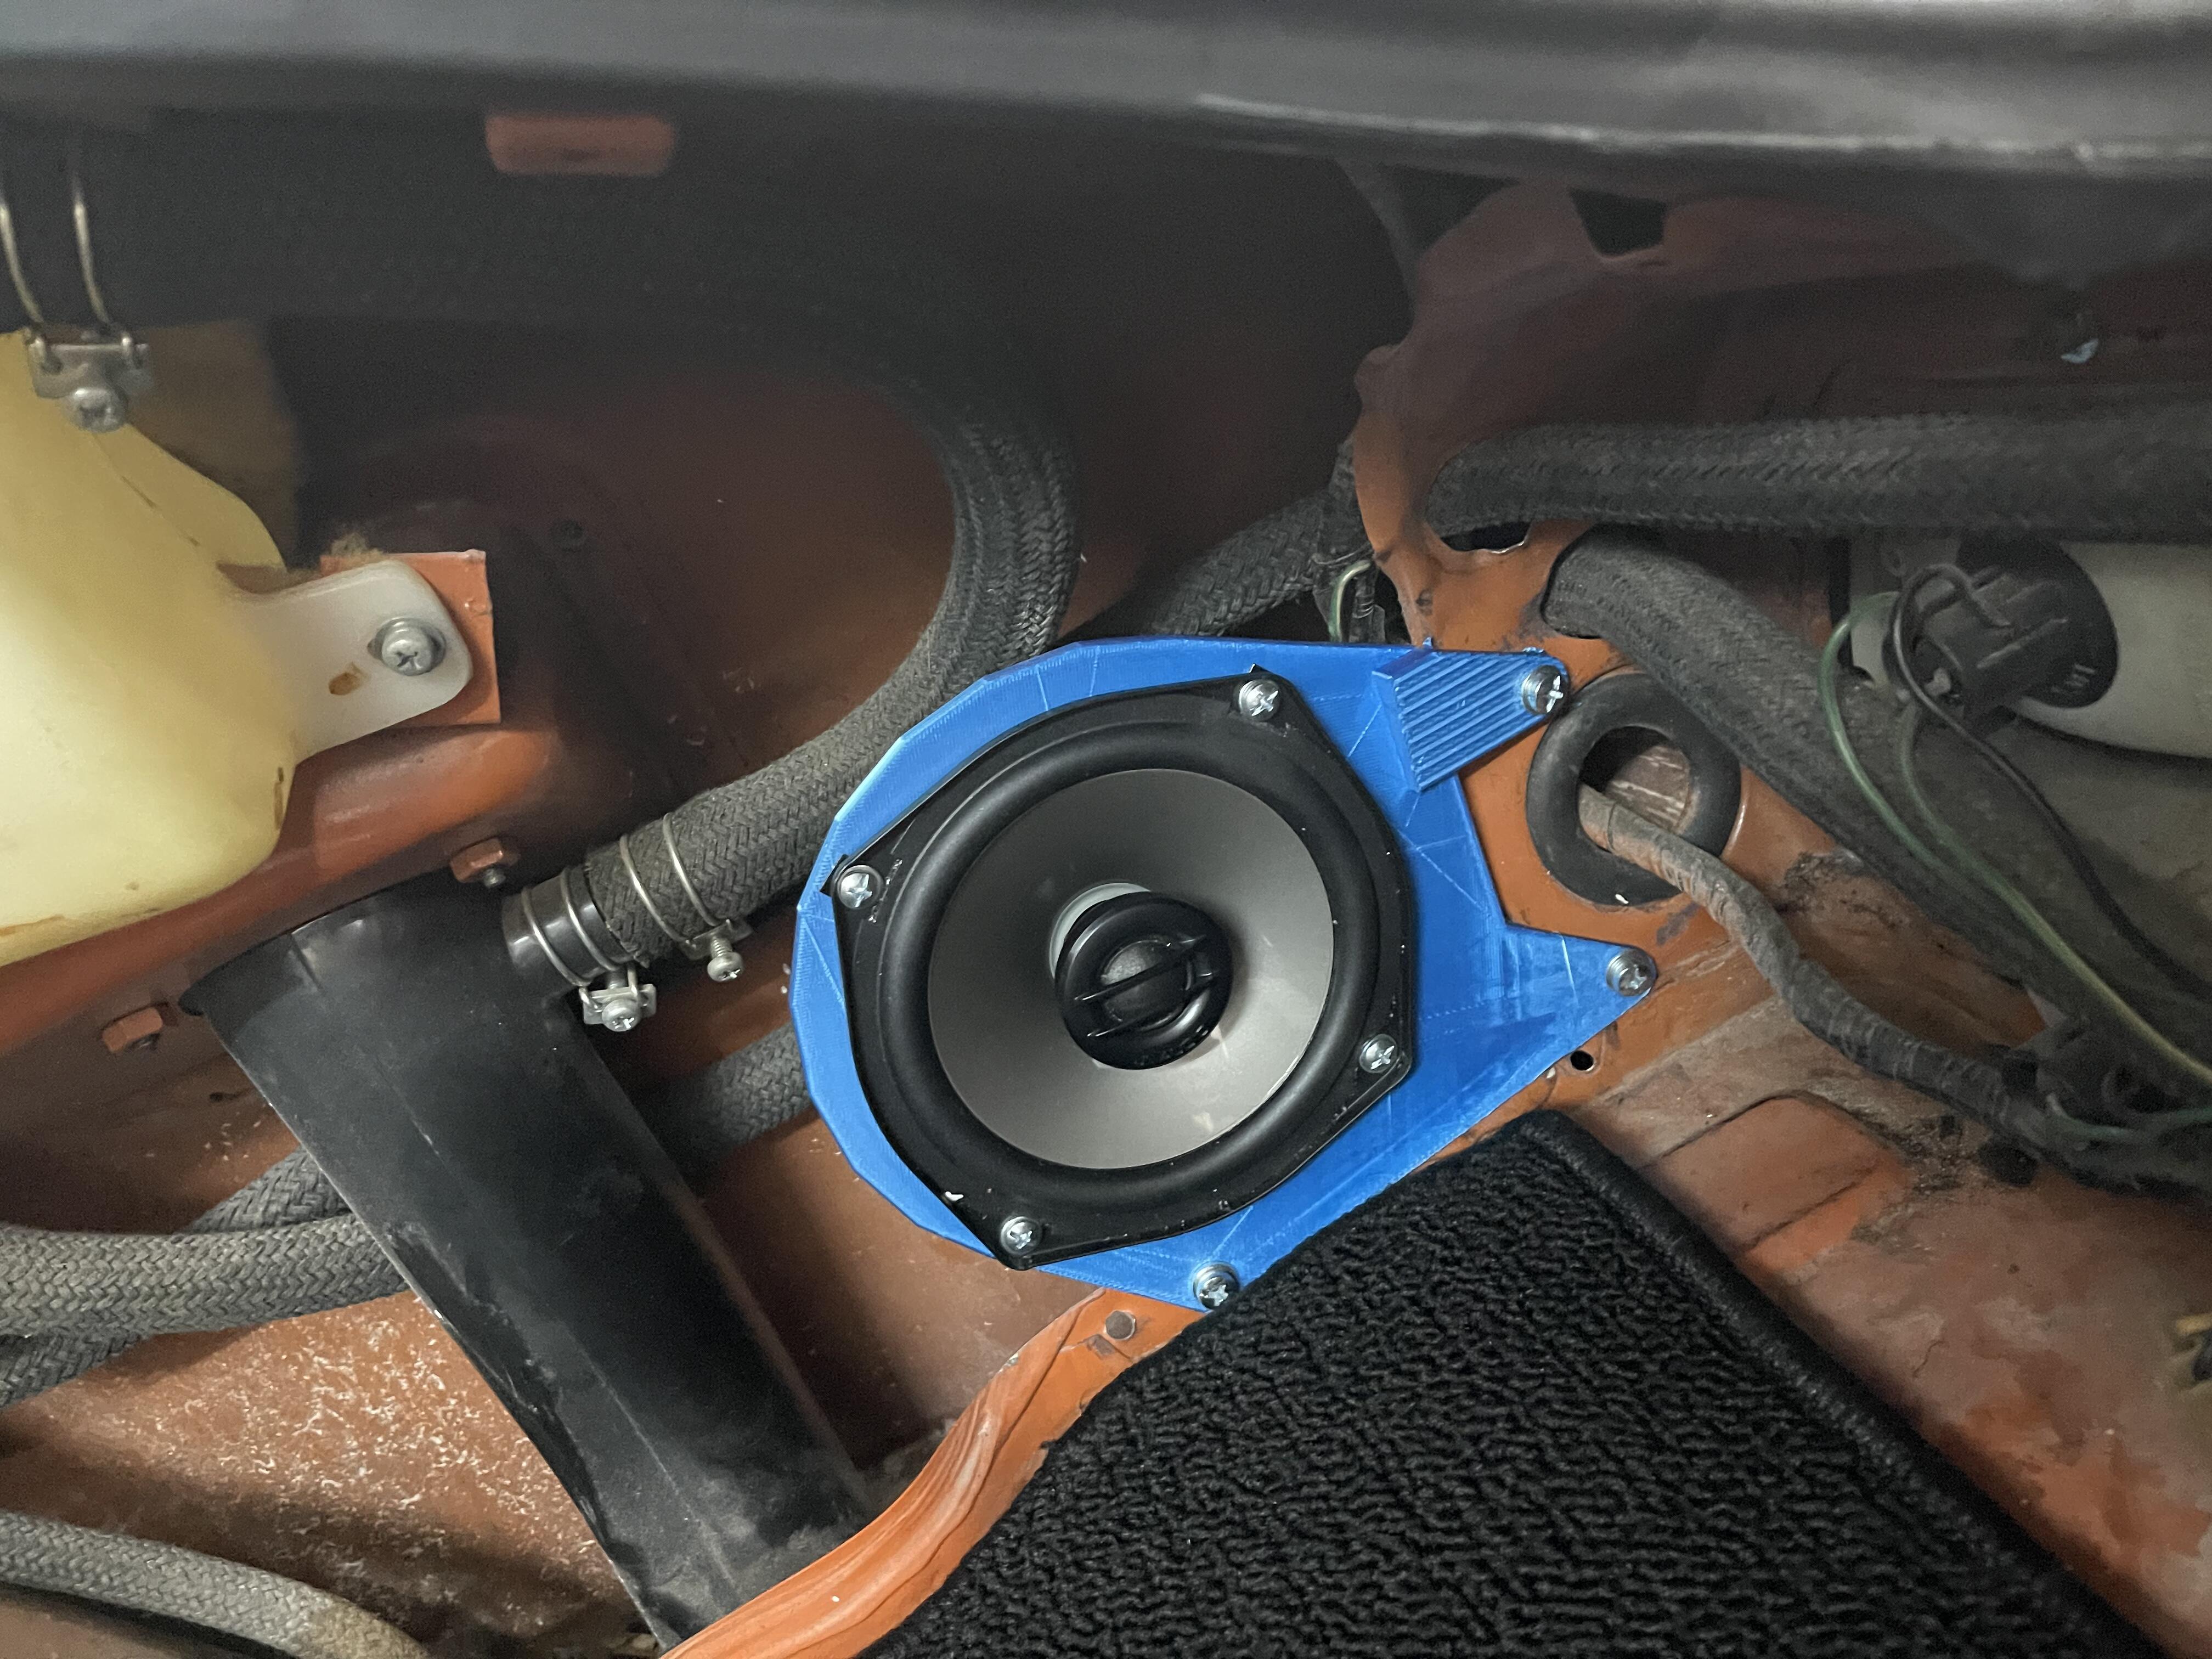
3 pointsmodeled up some brackets based off the originals , I adjusted to match 5.25 speakers. My brother was able to print them fine , passenger and drivers. Models attached below, note the model units was set incorrectly so they need to be scaled from 100% to 2540% to adjust mm to inches. Bracket.7z

 3 points
 -
Quick update: Haven't tried the Colortune yet BUT I was able to resolve the electrical/lighting issues I'd been struggling with for the past few months. See resolution here: https://www.classiczcars.com/forums/topic/67444-steering-column-connections-and-lighting-fixed/?do=findComment&comment=642232 I got the dash all buttoned up again, and drove the car around a bit with the now-operational brake lights and turn signals. I even opened it up a bit on some of the back roads. It sounds...quite nice in the 3-4K range. I have a phone mount and plan to get some in-car videos soon. In the meantime, here's another pic I took yesterday evening. Needs a good bath. Next goals: Install PerTronix ignition parts Final tune with Colortune Install choke reinforcement bracket to center tunnel Reassemble rest of interior (still missing HVAC + radio panel and center console Purchase replacement choke knob (the elusive 1972 piece) and horn pad Recondition the airbox Etc etc
 3 points
 -
2 points
-
2 pointsYeah that turned out awesome , I gotta get on that ! Sent from my iPhone using Tapatalk2 points
-
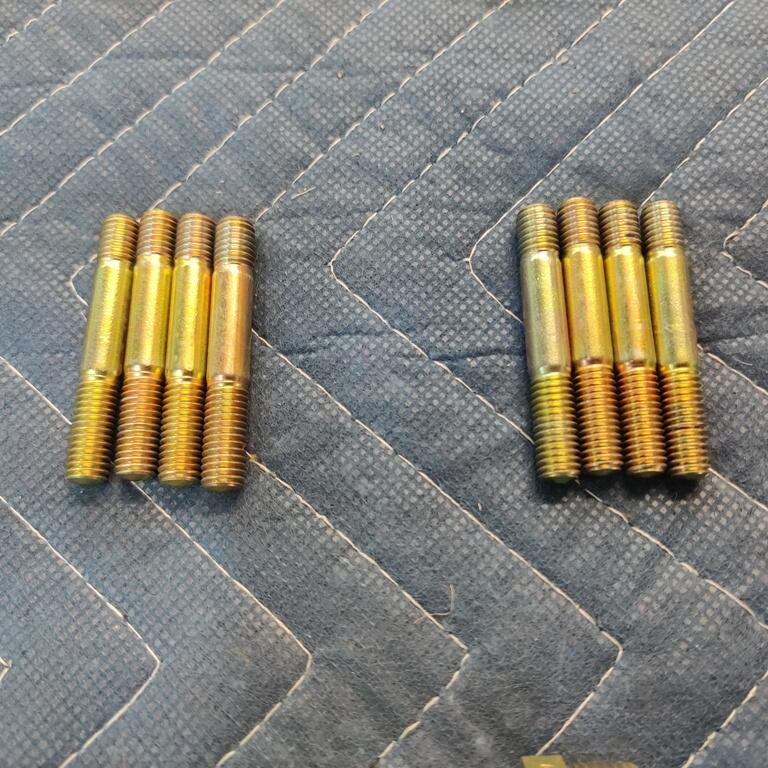
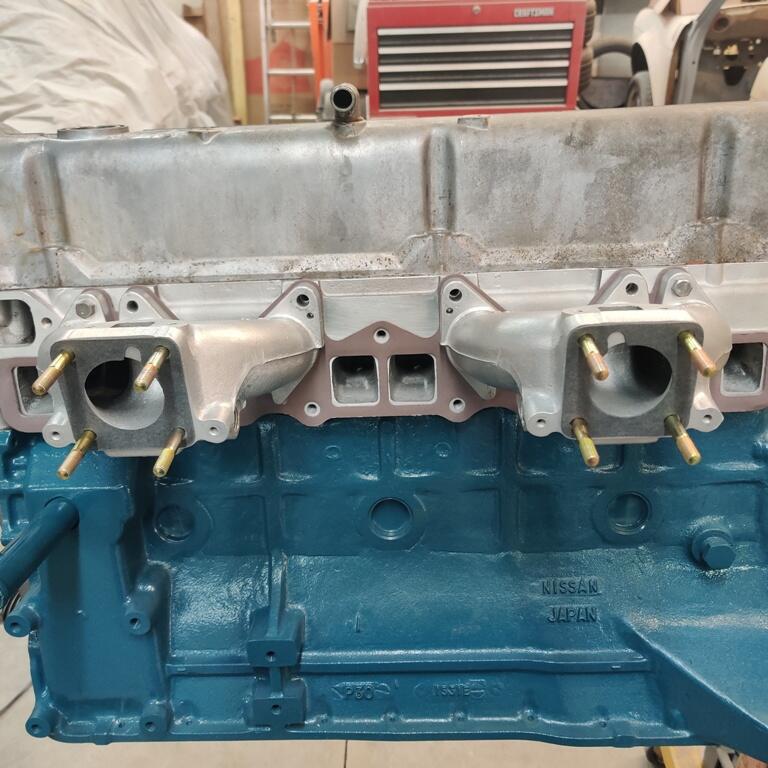
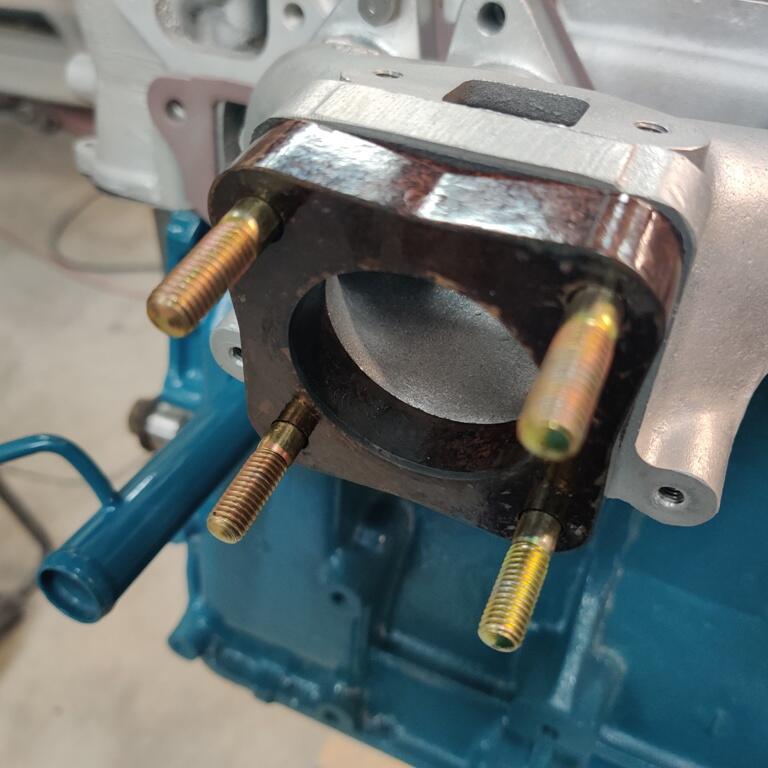
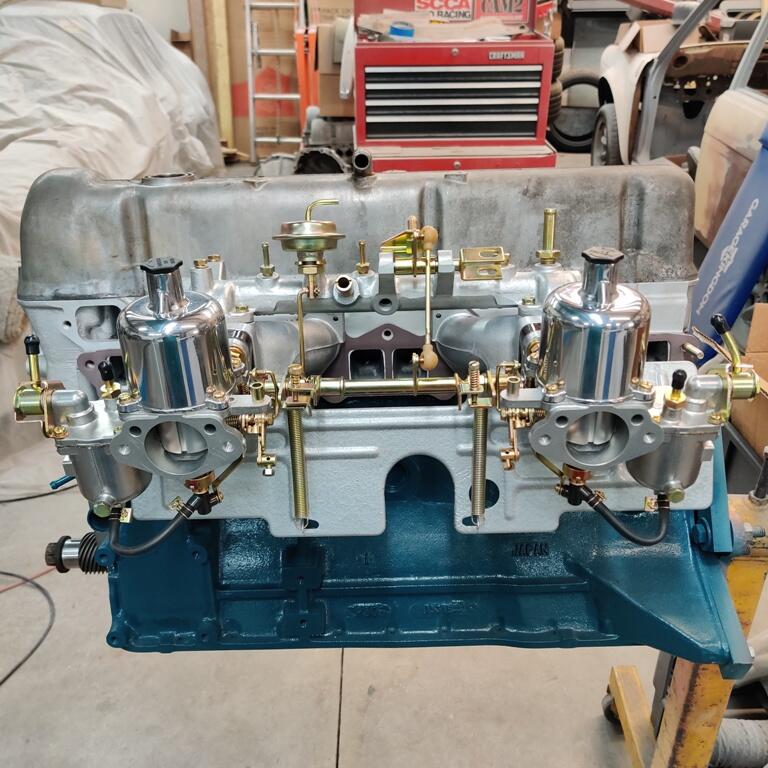
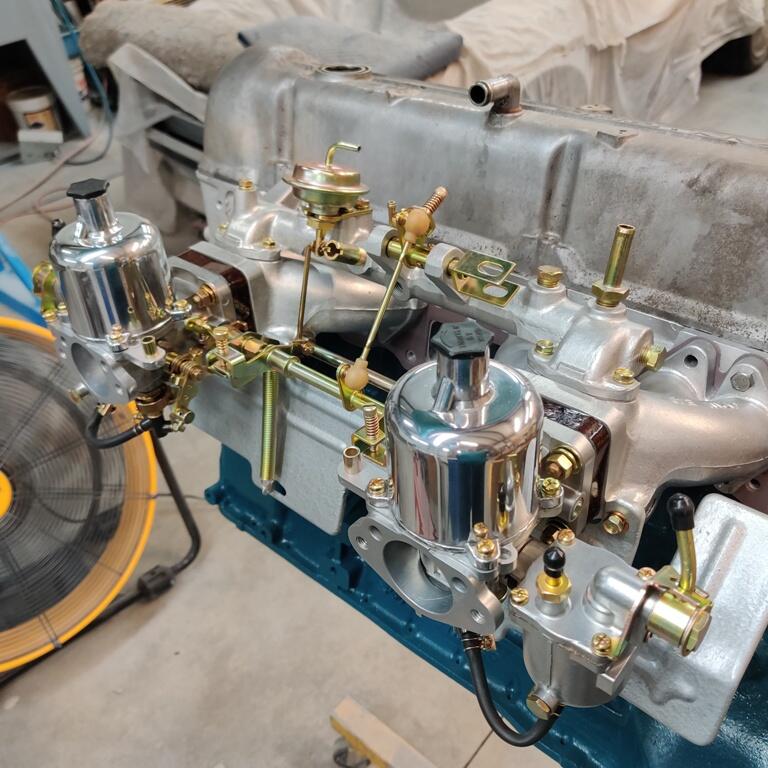
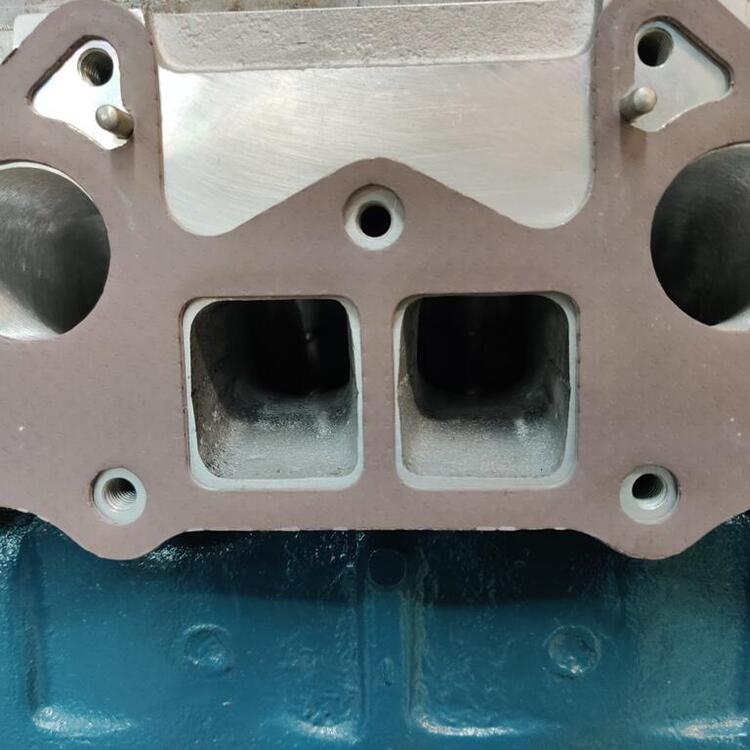
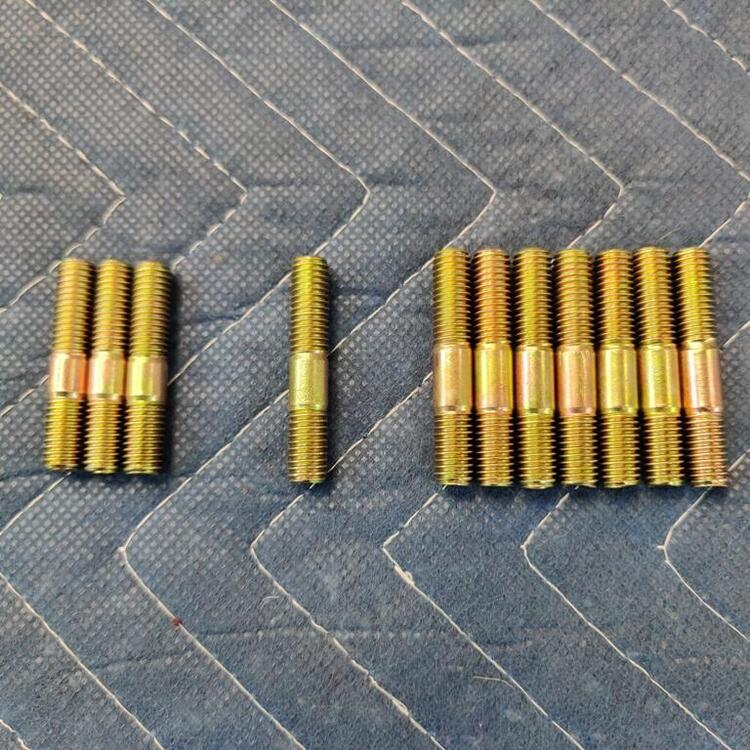
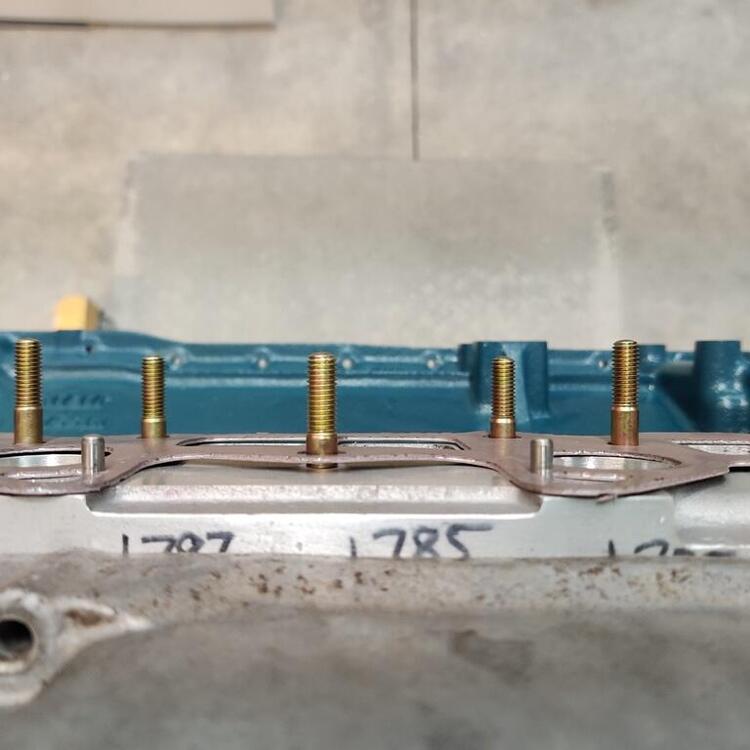
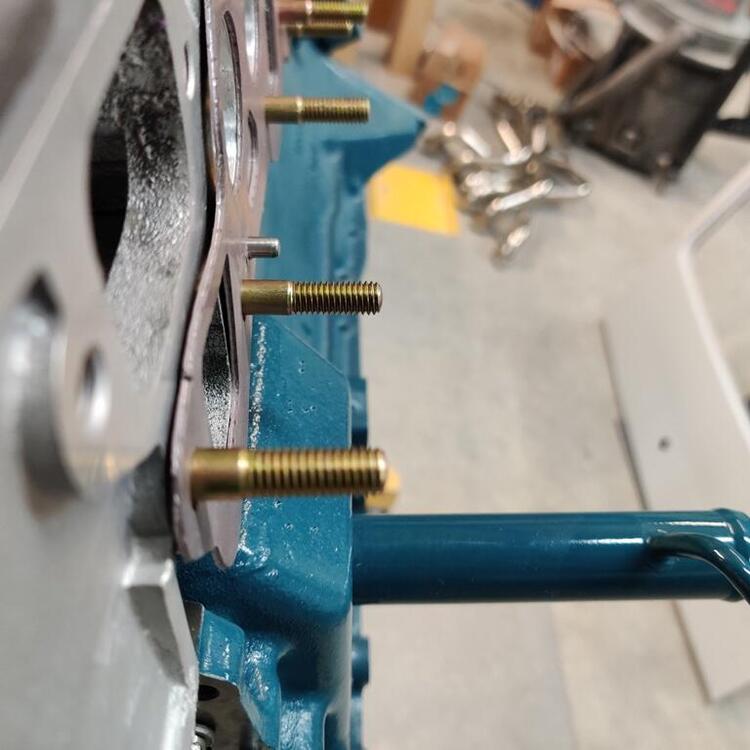
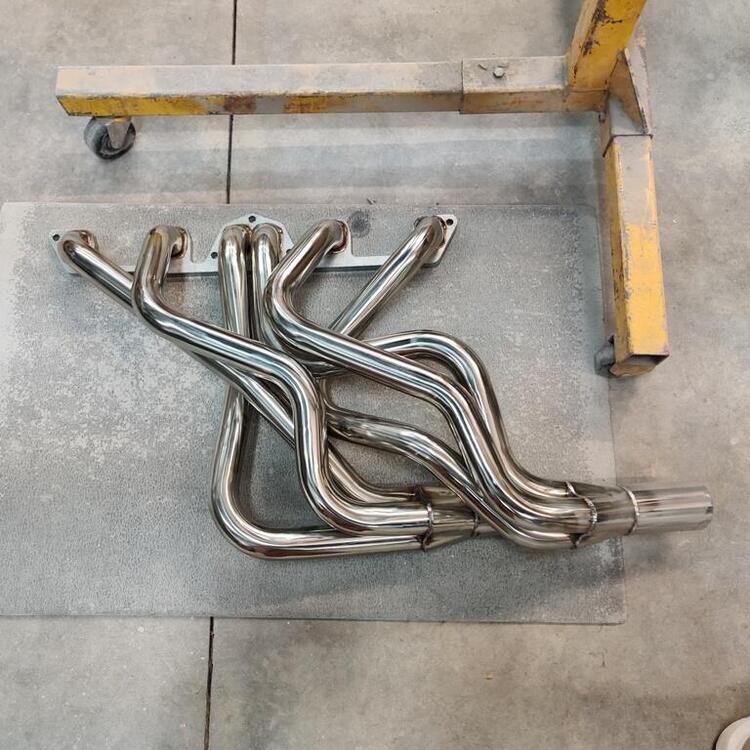
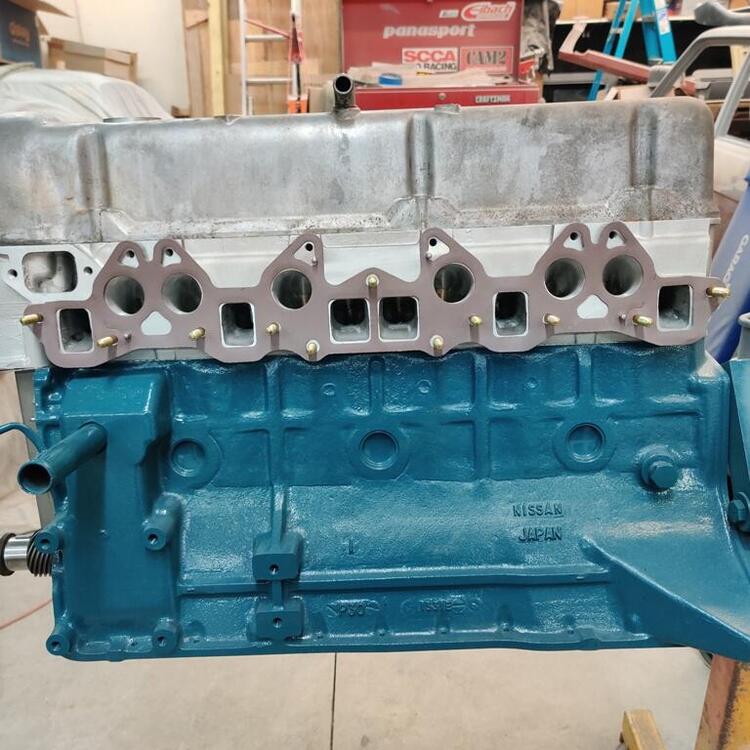
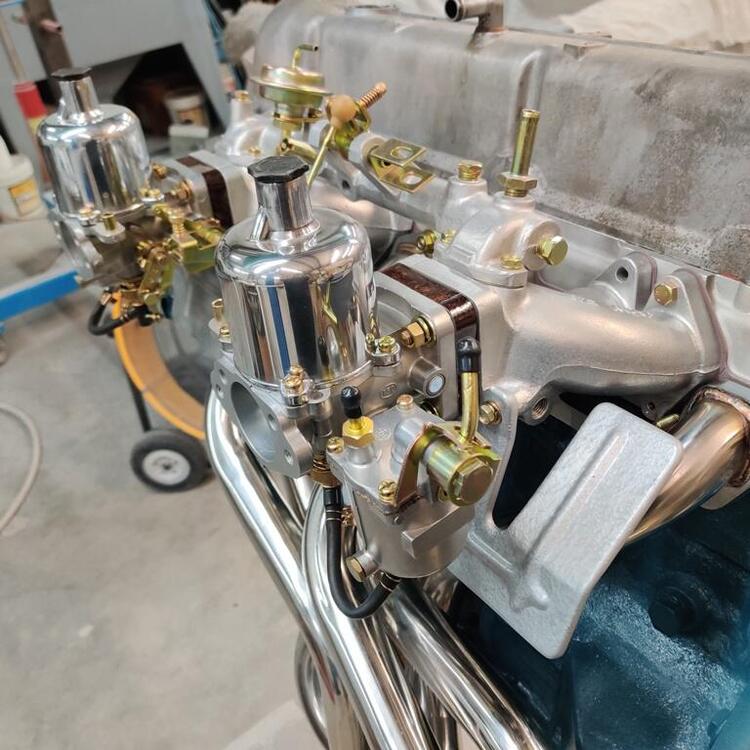
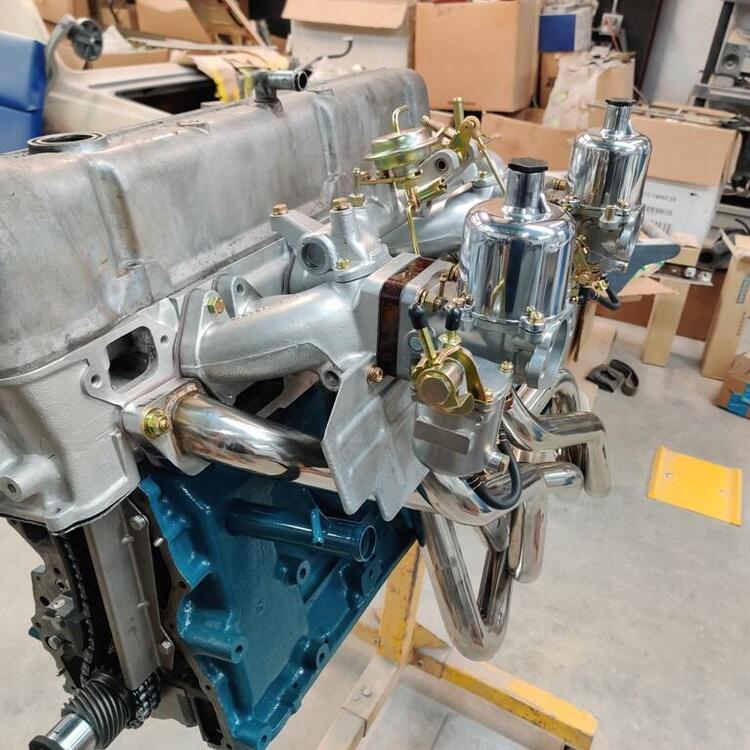
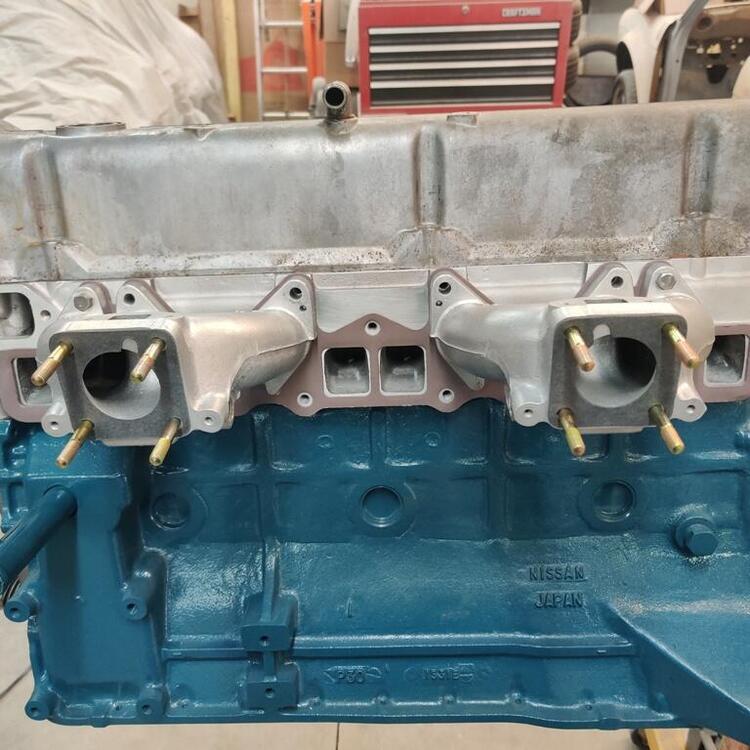
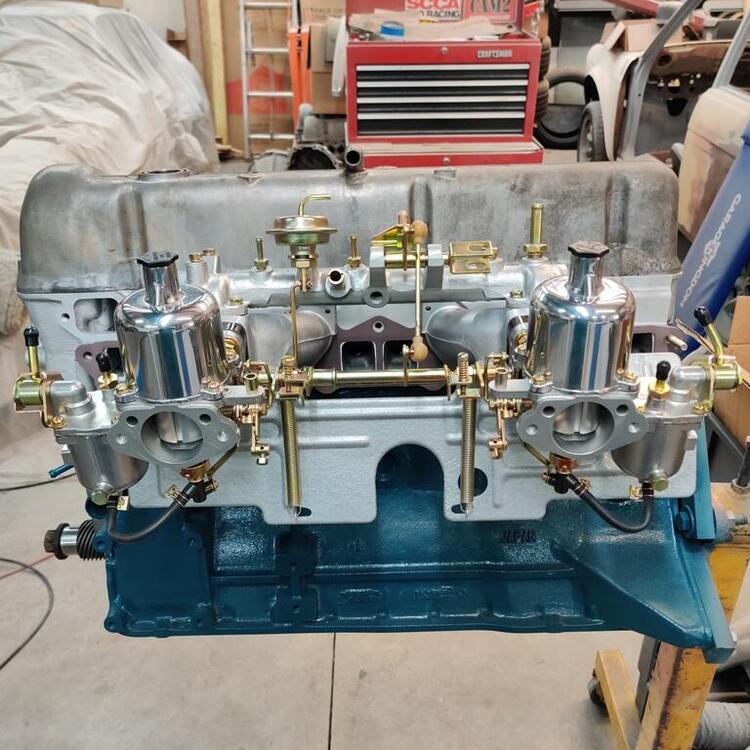
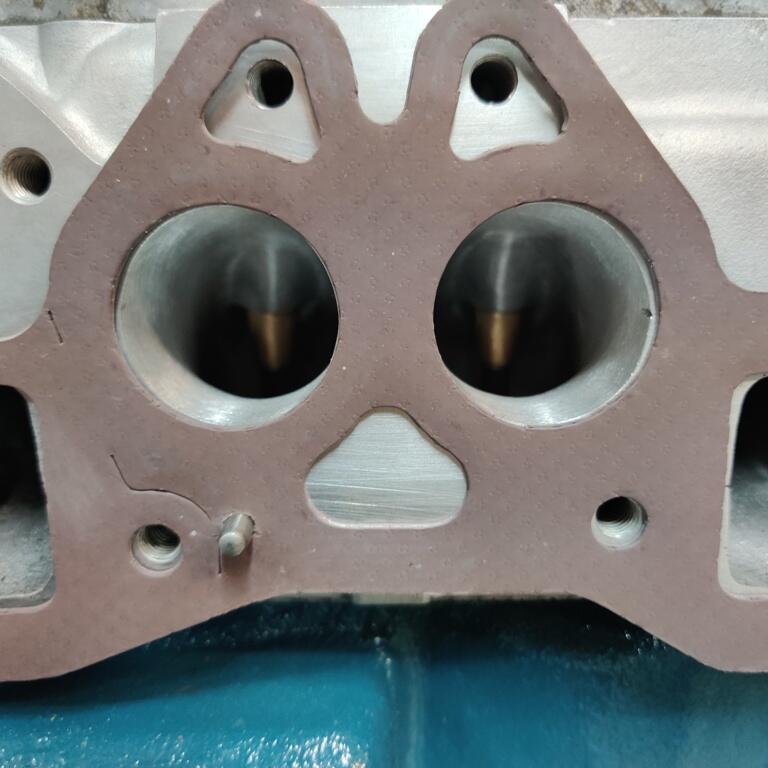
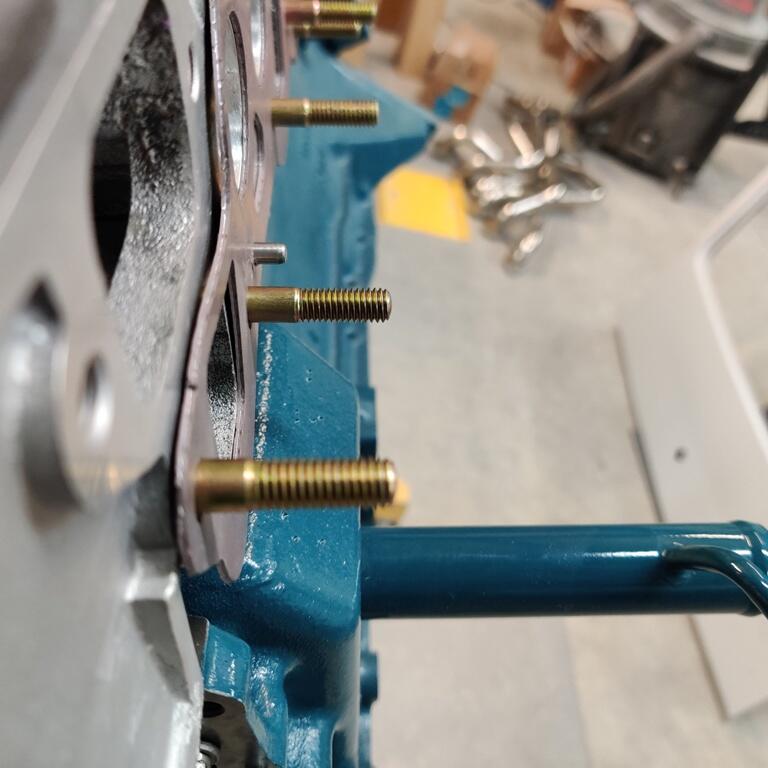
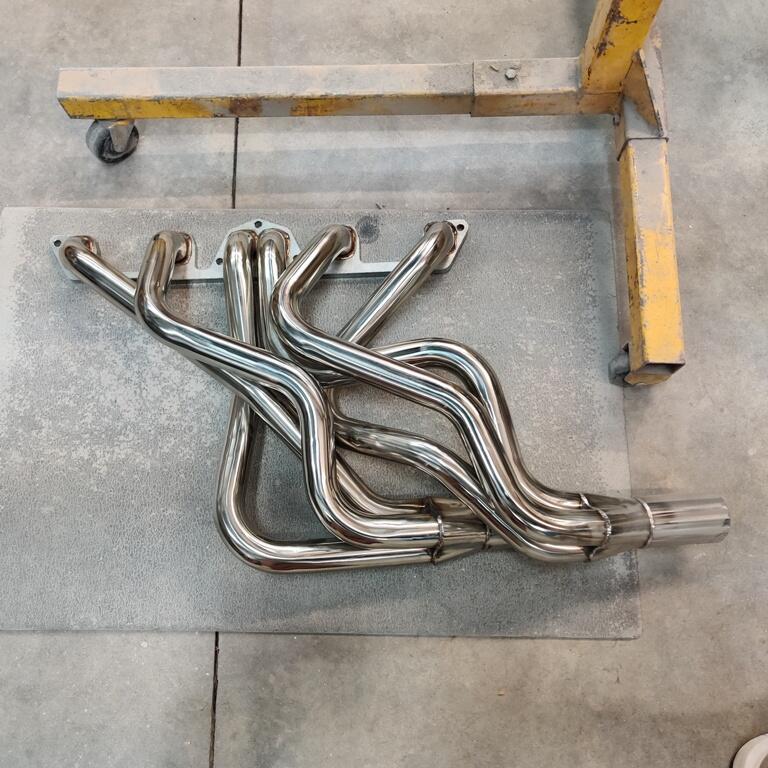
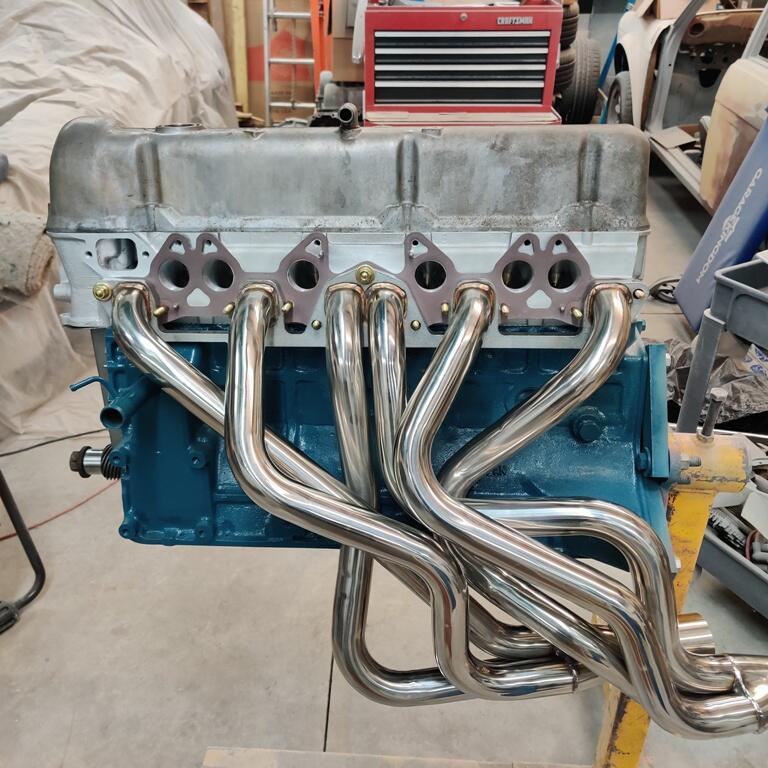
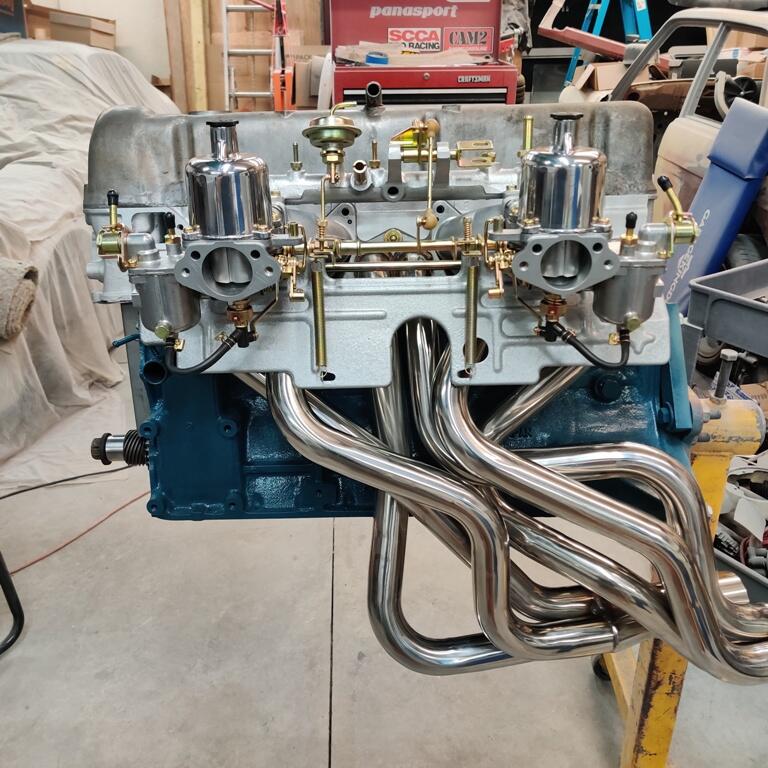
A bunch of pics today. As always, click for a larger version if you like. I like the original style intake/exhaust manifold gaskets like this one. Notice that I have alignment dowels for the intake manifolds. These positively locate its position relative to the ports and facilitate installation. I believe I mentioned before that mild porting would be done to work with the mild cam (not stock, but stock duration). Studs for manifolds shown: there are 7 of one type, 3 of another, and one odd one. I believe they go in locations as follows: 3 for the three holes closest to the 3 and 4 exhaust ports - these secure only the exhaust manifold; 6 (of the 7) for the studs that will hold the thick washers which bridge front intake to exhaust manifold; and then I put the 7th one on the back most hold which is where the rear engine hook (for hoist) goes, and the odd one, I put in the very front where the exhaust manifold secures under the thermostat housing. Instead of the stock exhaust manifold, I am using a Zstory stainless steel header: Bolting new and reconditioned parts on is ridiculously easy compared to bodywork. It is going to be very satisfying work putting this car together after I get the body back from painting.


 2 points
 -
I bought my 75 280z last year and have been chasing away years of idle sitting in a garage somewhere in Michigan untouched for the last 13 years or more. Last week I was able to get the MSA exhaust system installed, ( word of advice to anyone hiring a experienced exhaust shop to do some work. . . . Do not give them a can of spray paint ! ) I had the new downpipe ceramic coated last winter, and I cleaned and painted the muffler in VHT exhaust paint on my own in my basement last winter, of course they decided to use the 1 can of heat paint Which I supplied to " Paint The Resonator " of course, the workmen decided to repaint the whole system down pipe and muffler in silver, I don't think painting over the ceramic coating or the muffler is a problem and I repainted the muffler in VHT black, but the downpipe was in satin black, and now it's silver, but he did very nice work anyway. The system only has one pipe clamp, everything is welded together in one piece other than that, but in my limited driving of my Z I notice something that perhaps some of you might have noticed. . . . The 4 speed transmission is not all that well matched to the L28 engine, in 4th gear you run out of transmission long before you have even got the engine to break a sweat ? in 4th gear and up to 60-70 MPH the engine is at 3000 RPM and it's got a lot more to give but the transmission is ready to clock out for the day. I can see why only a few years later Datsun decided to go to a 5 speed. My car is super original, and I feel I'd like to keep it that way, I was going to replace the backup light bulbs with LED bulbs, but I took out the one in the back and it said 'Toshobia' I believe, (I might have spelled it wrong) printed on its base, The more I go over this car, I am more certain am it has only 52000 miles on it ! Since this spring I put in a new battery & new cables, I've gotten the seats fixed, and had a local shop rebuild the seats with new foam, ( makes a world of difference ) and I have been able to do some brake work, Change the oil, adjust the valves, do the exhaust and now I'm going to get the A/C working. And of course the most feared job laying dead ahead is the gas tank and it needs a new gauge sending unit installed, and drain the tank and see what it looks like inside. but I want to get in out and do what we all want, drive the car ! I bought it and had it inspected before final sale, car wasn't cheap, but it is a very solid 280Z. I did my research before I bought it, I wanted a S30 car but I also wanted fuel injection and factory A/C. It has all the original equipment even the stock AM/FM radio and power antenna and all works fine, Even the clock keeps correct time. I put in a New shift boot and E-Brake boot ( they aren't the correct color I wanted but if you have looked into shift boots, You'll see their isn't too many available ) But the car is a real; strong runner, be nice if the transmission was matched better than it is, but that was 47 years ago ? but the paint is damn near like it was when new . . . The one reason I decided on the mid-Years of the S30 in Technology, I am not afraid of high tech, but if you have a new vehicle, you know what 'High Technology' means, and unless I'm missing something, Datsun Technology left town a long, long time ago. And technology without replacement parts, is only voodoo technology without much of any answers. Very much of it simply don't exist anymore. So buying a Z31 or later 1990's car just scares the heck out of me. Some of the parts you might find, but there isn't much worse than having a super nice 1985 Z car that sits in your garage or driveway simply for want of a sensor or other electrical item. But I trudge onward. . .
.thumb.JPG.71870d3df4ddfc5938a2cda89bedcac1.JPG) 2 points
2 points -
1 pointYeah, I was thinking the same thing about the butterflys. It sounds like the front one is not closing all the way. Either due to an external linkage issue, or from an internal issue like the butterfly plate has been removed in the past and was not reinstalled correctly. And I'm not sure what manual you were looking at that recommended loosening those nuts, but it's neither necessary, nor a good idea. I'd get those tightened back up. I'm thinking it was a misinterpretation of the procedures. Something like maybe you read "loosen the linkage between the two carbs" and your interpretation was to loosen those two nuts? If that's the case, then it was a misinterpretation, and you should get those tightened back up.1 point
-
1 pointThanks, I had them off before but didn’t know that’s what I was looking for so didn’t take note. I am glad there is a way to check this without removing the carb altogether… This is the one real drawback to these sidedraft units…you can’t see down em! Much obliged.1 point
-
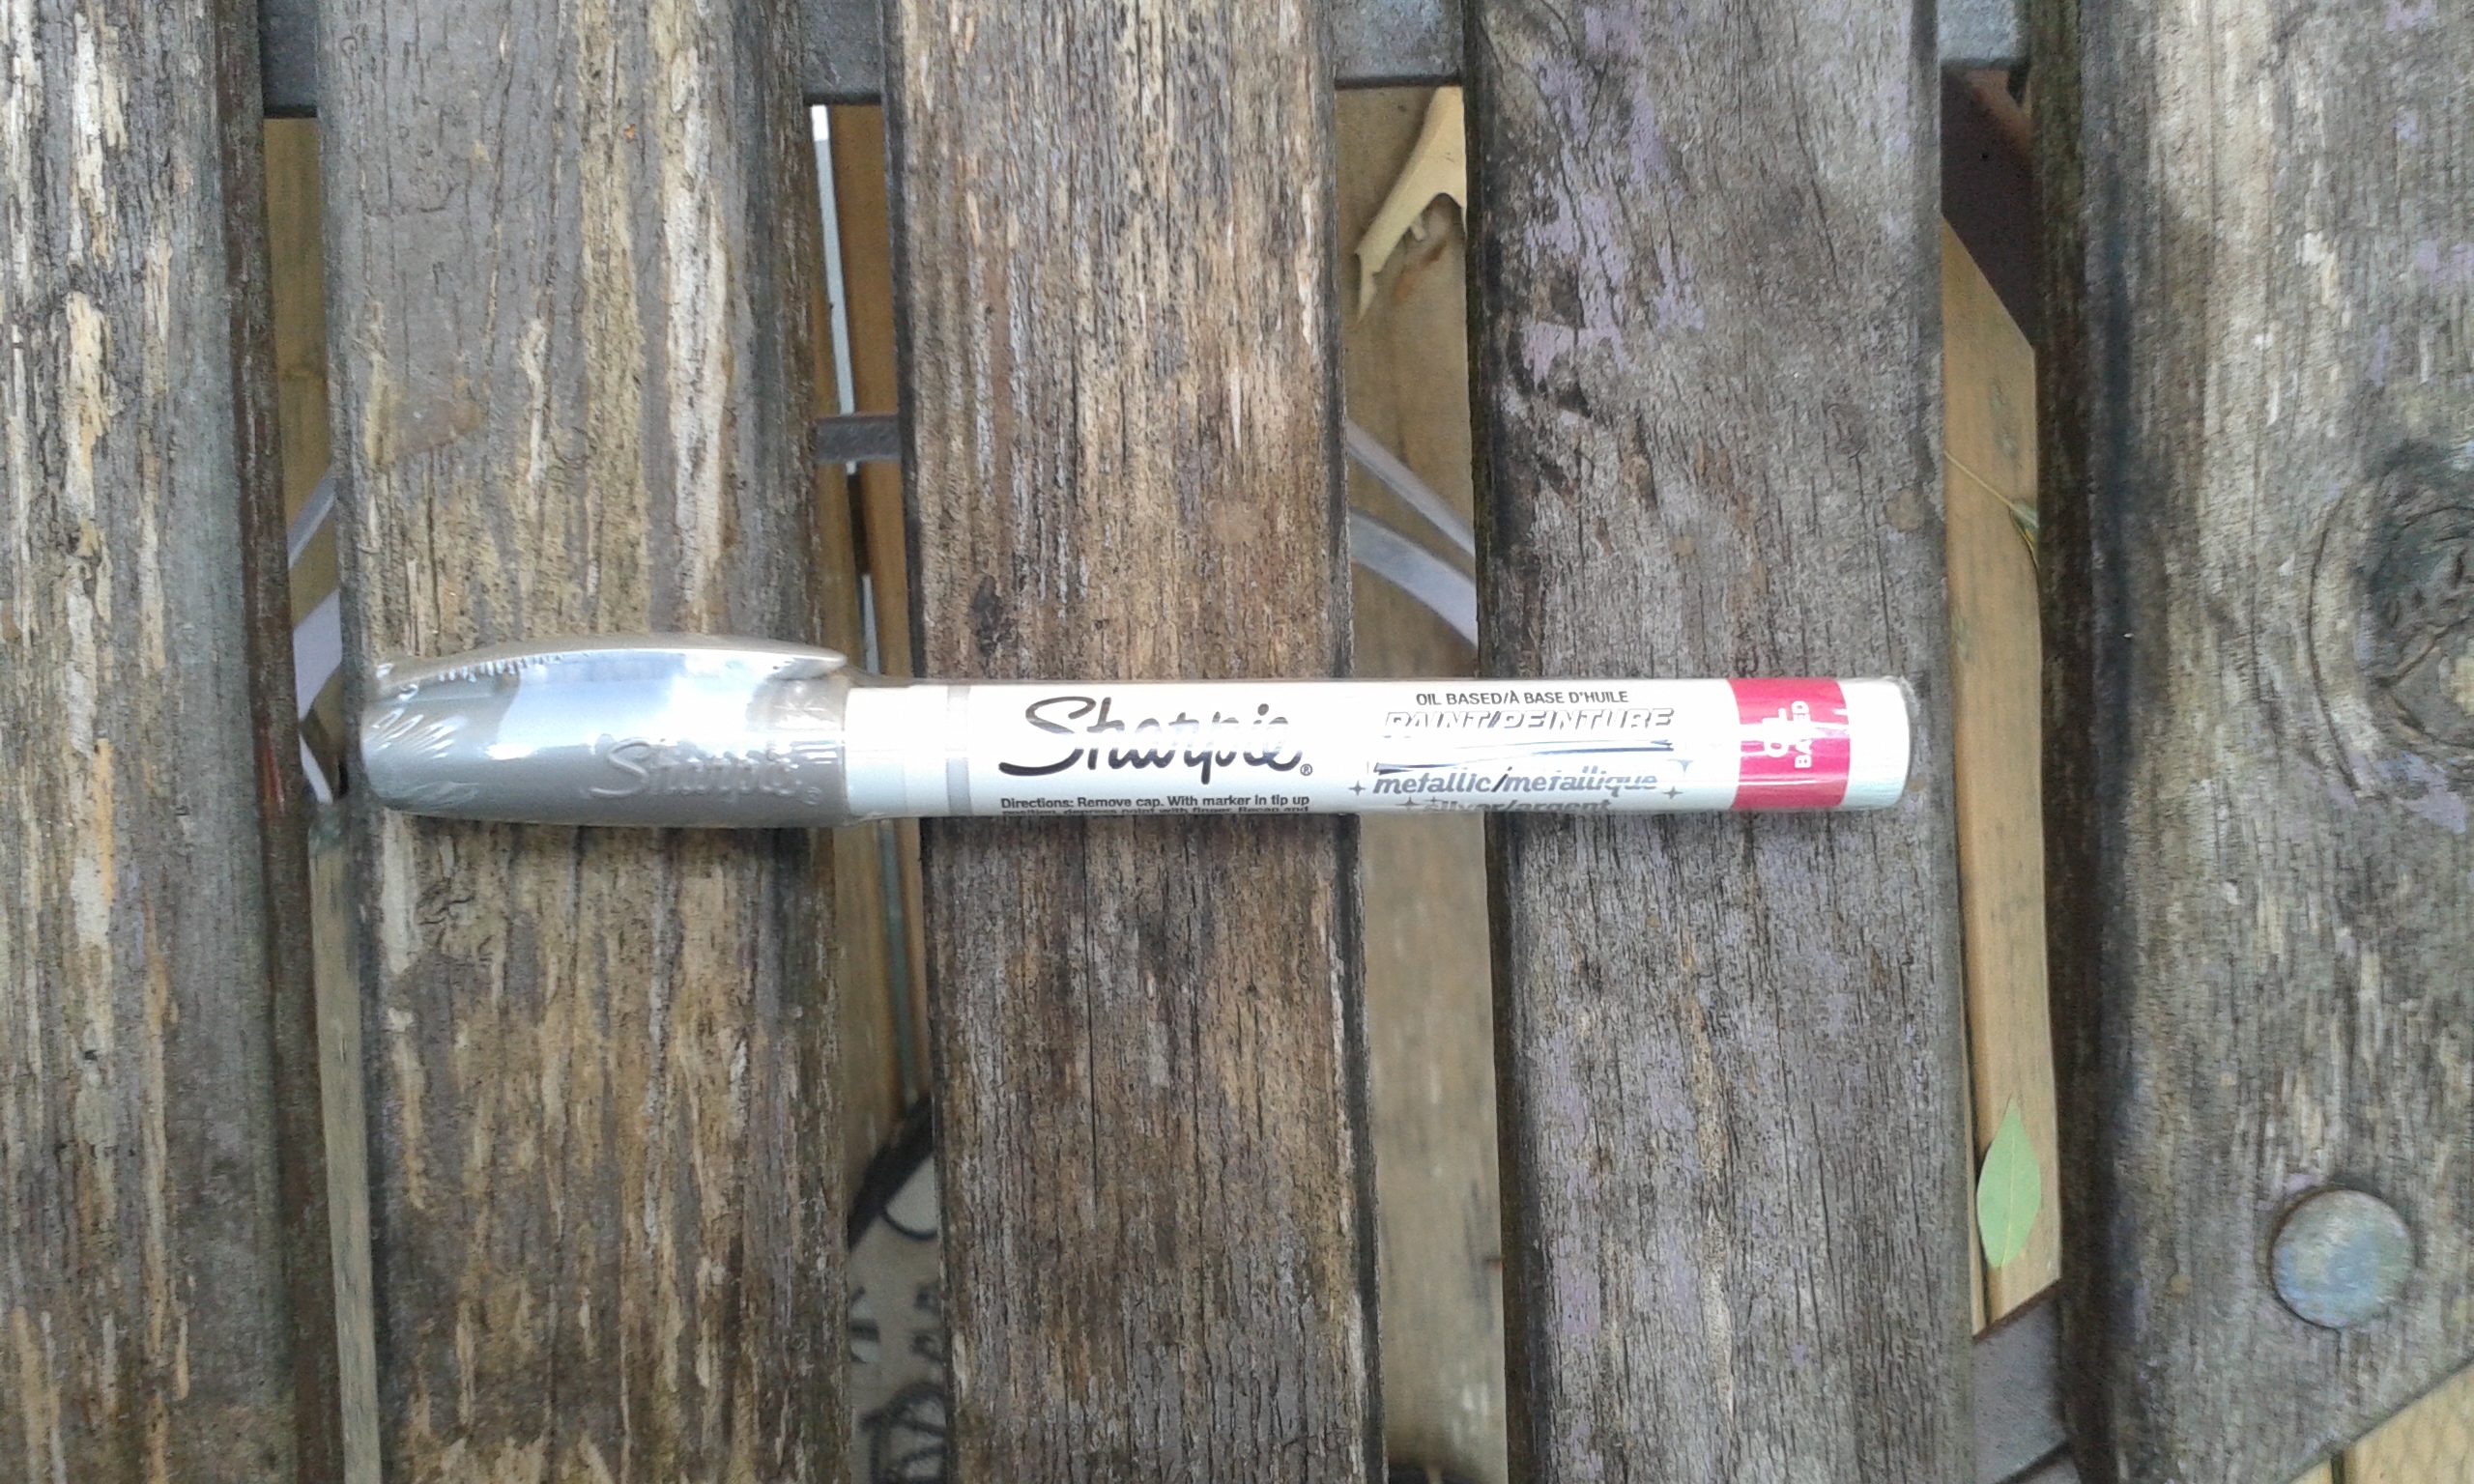
1 pointI have the 3-piece set, pretty sure it was the 2mm pen. BTW - hold on to the cap seal and put it back in place to keep the pen fresh.1 point
-
1 point
-
1 pointThat would be the Molotow Chrome Pen - been there, done that. Awesome results as in "like new"! https://www.amazon.com/Liquid-Mirror-Chrome-surface-0-7mm3pcs/dp/B09C5S25Z6/ref=sr_1_3_sspa?crid=1NR32QQPZ8KZW&keywords=molotow+liquid+chrome&qid=1657543246&sprefix=moloto%2Caps%2C103&sr=8-3-spons&psc=1&spLa=ZW5jcnlwdGVkUXVhbGlmaWVyPUEzQVZDM0dRRDAxMUlGJmVuY3J5cHRlZElkPUEwNTMxMTMzQktOMFpWMDc2QUxBJmVuY3J5cHRlZEFkSWQ9QTAwNTE5OTFXWVVVRlE5RE1QRkcmd2lkZ2V0TmFtZT1zcF9hdGYmYWN0aW9uPWNsaWNrUmVkaXJlY3QmZG9Ob3RMb2dDbGljaz10cnVl1 point
-
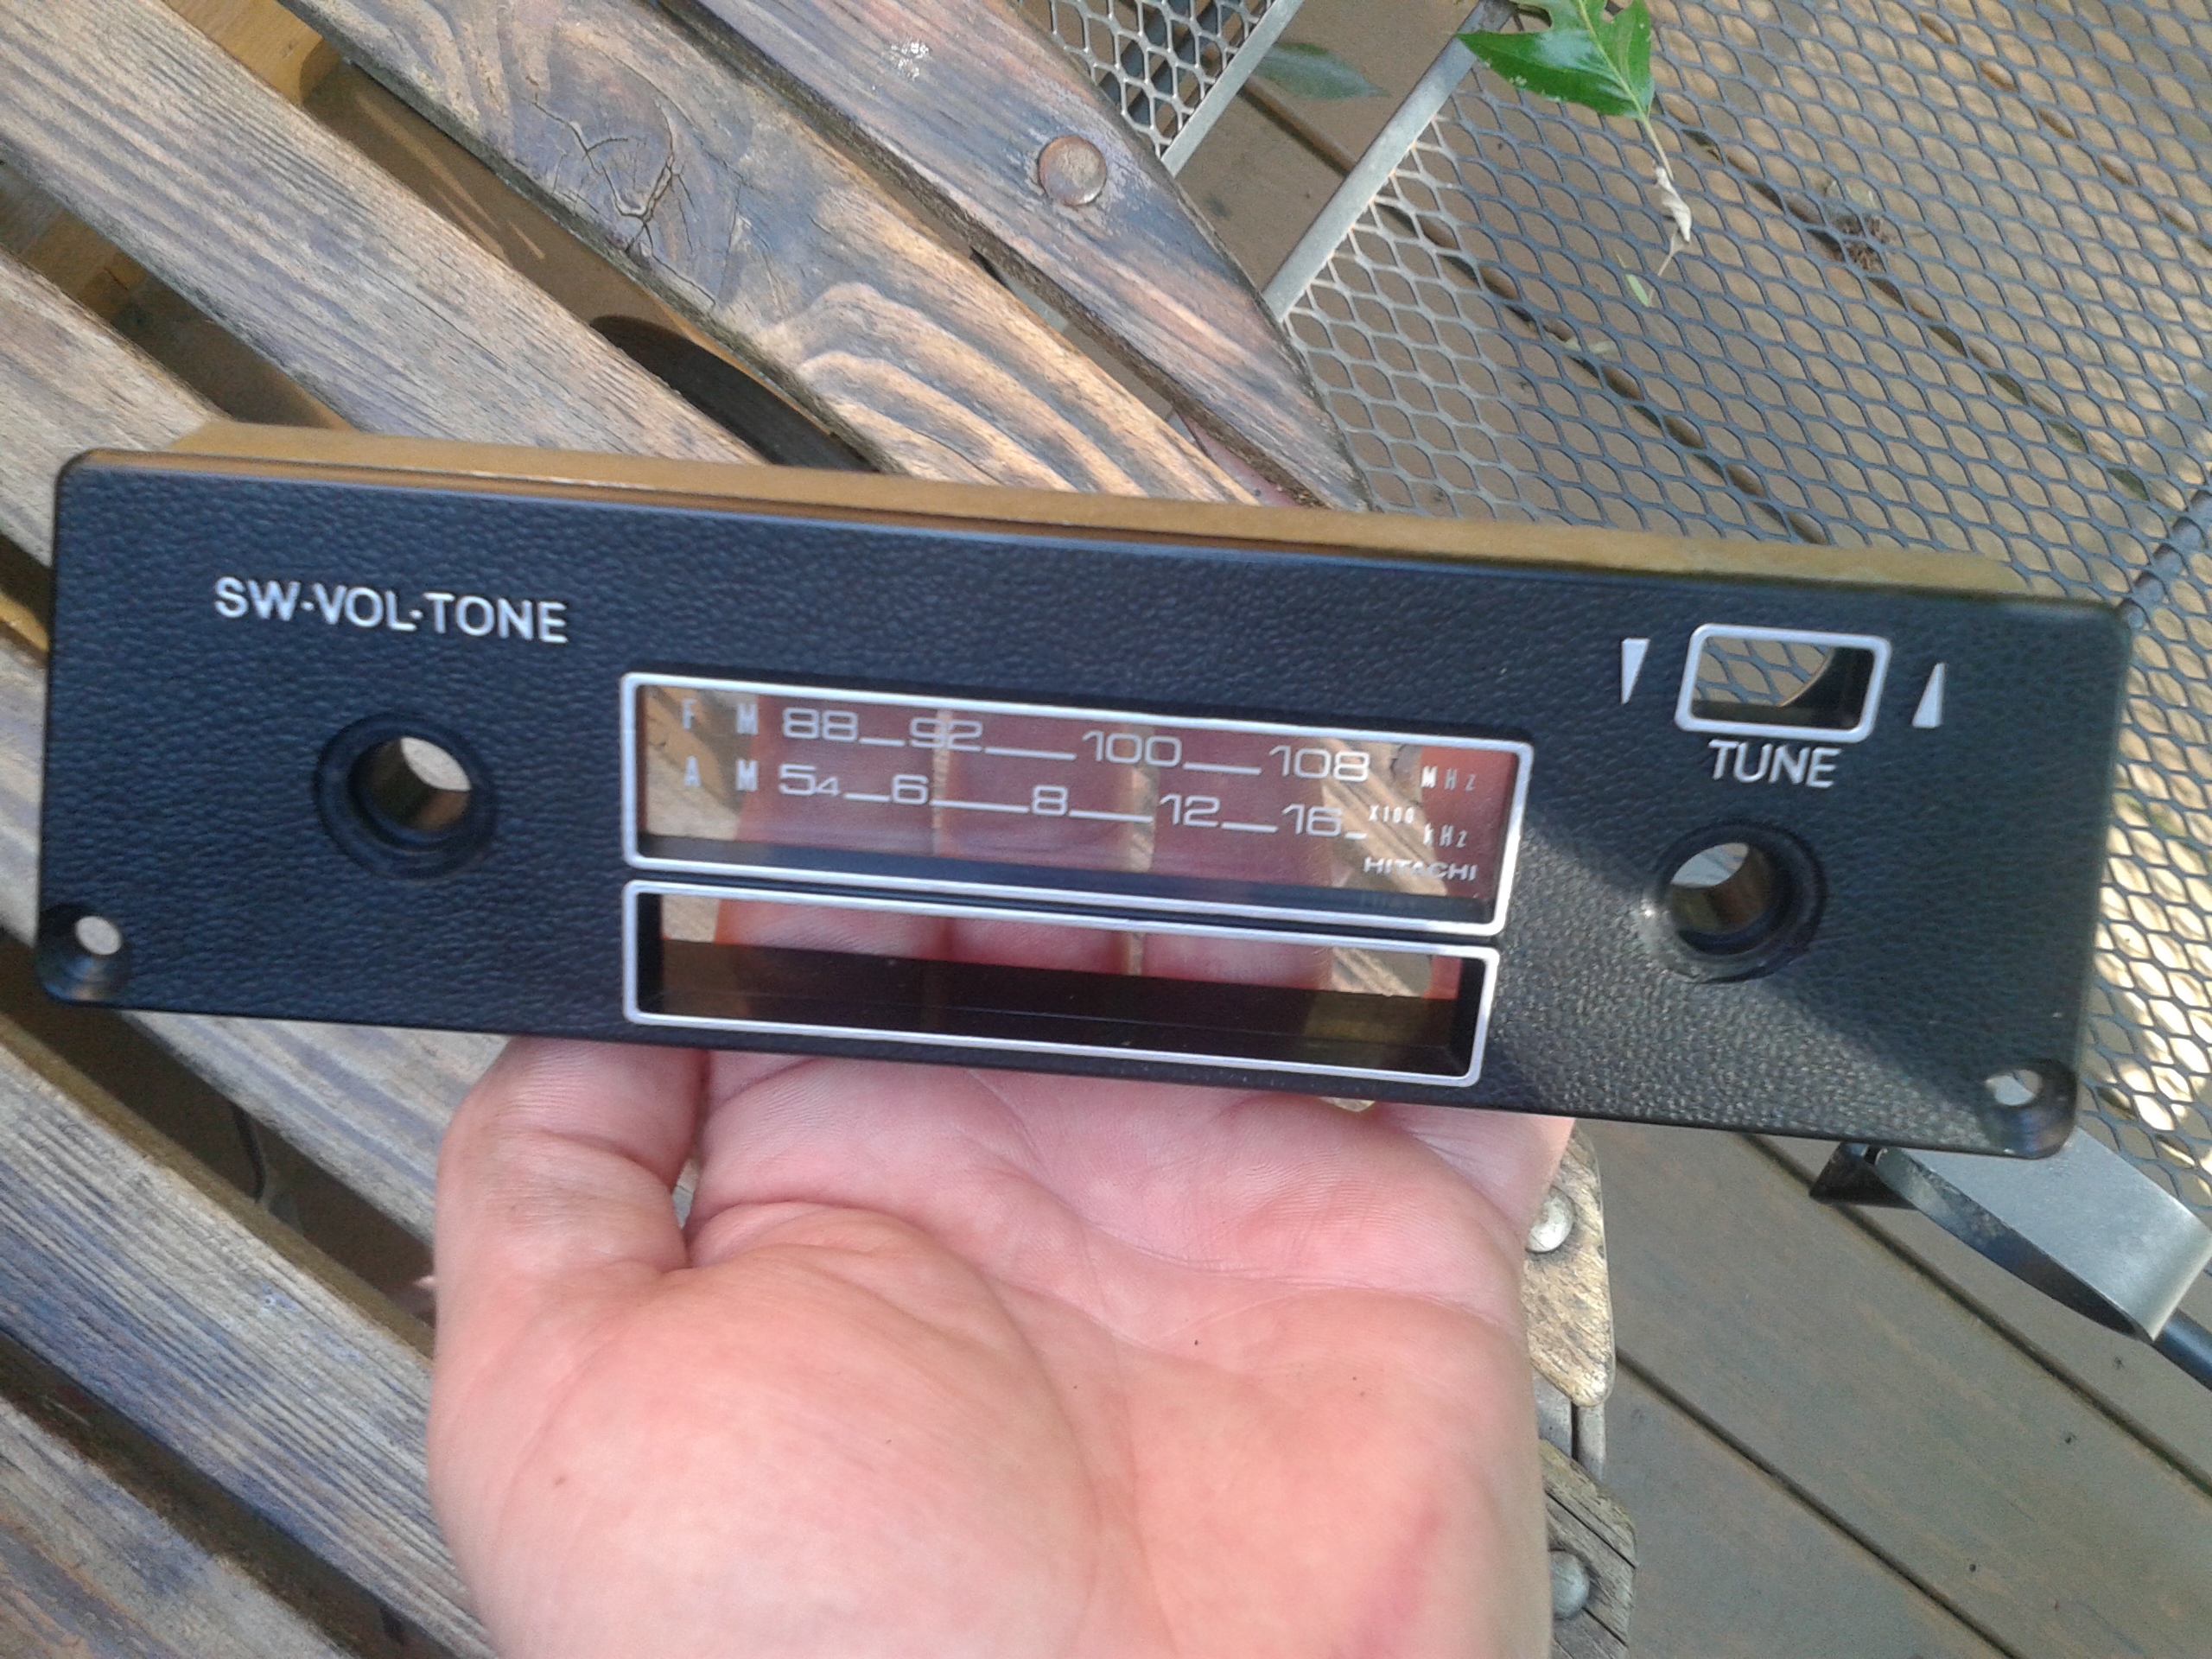
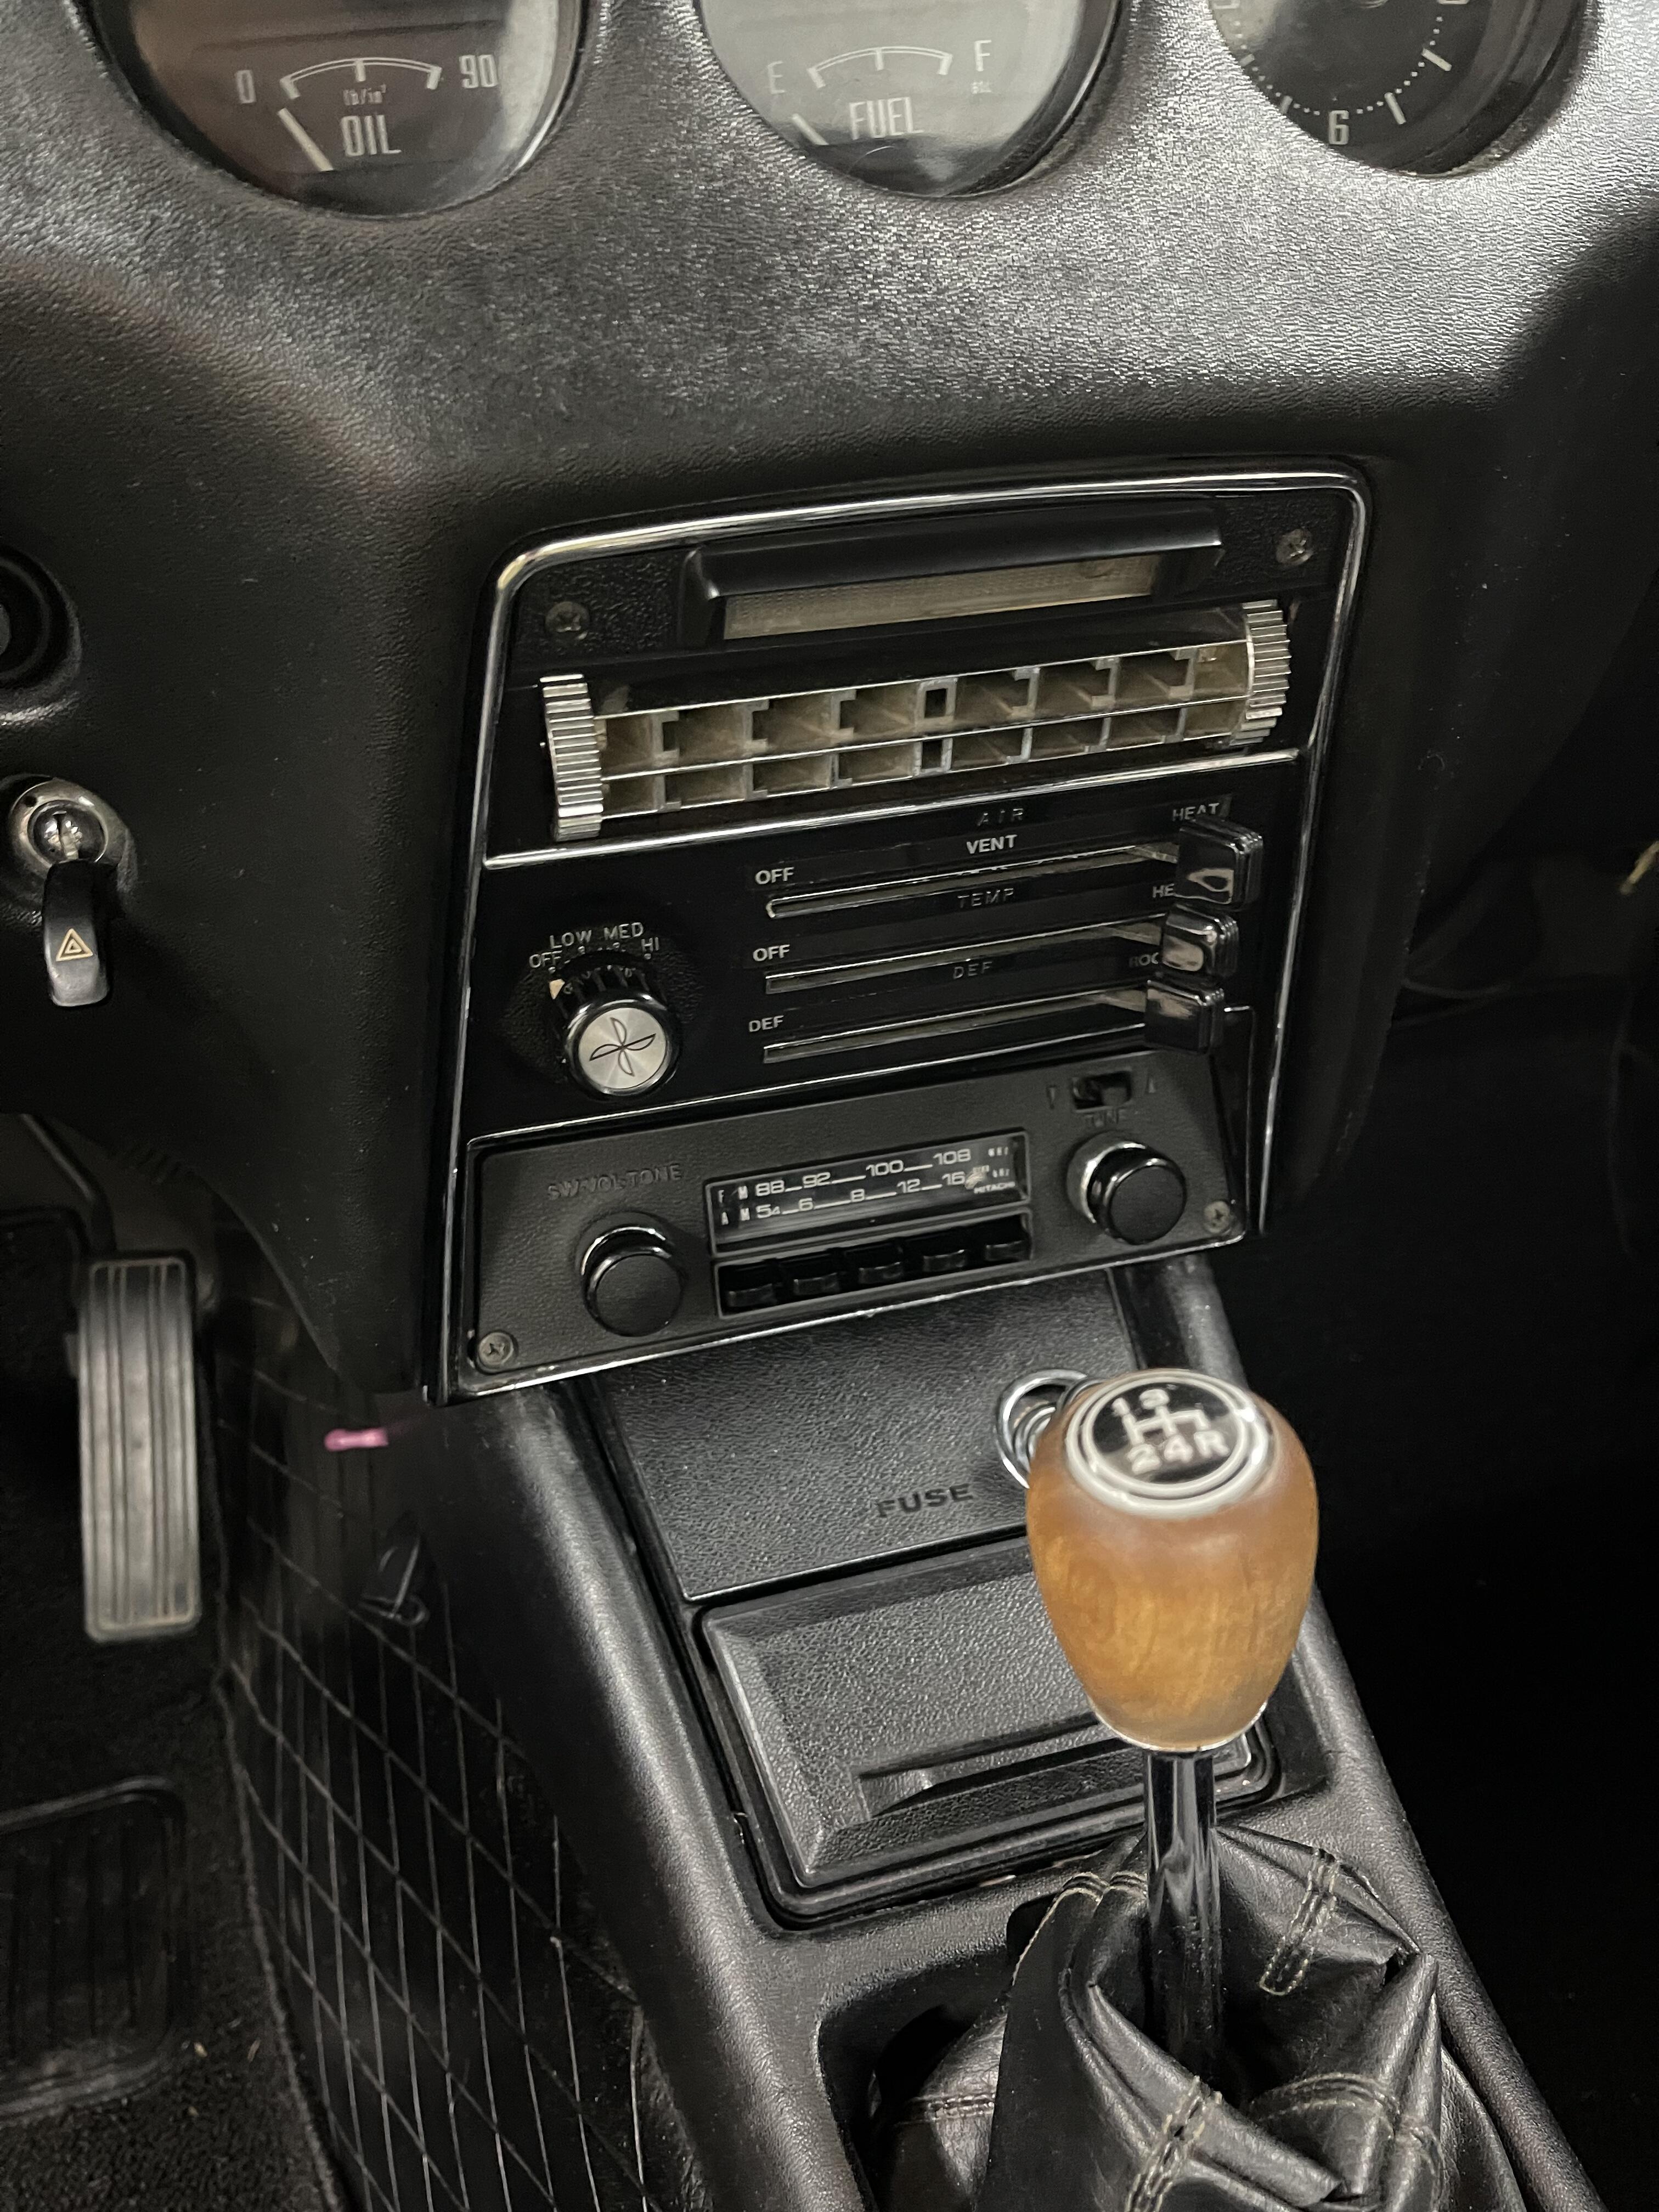
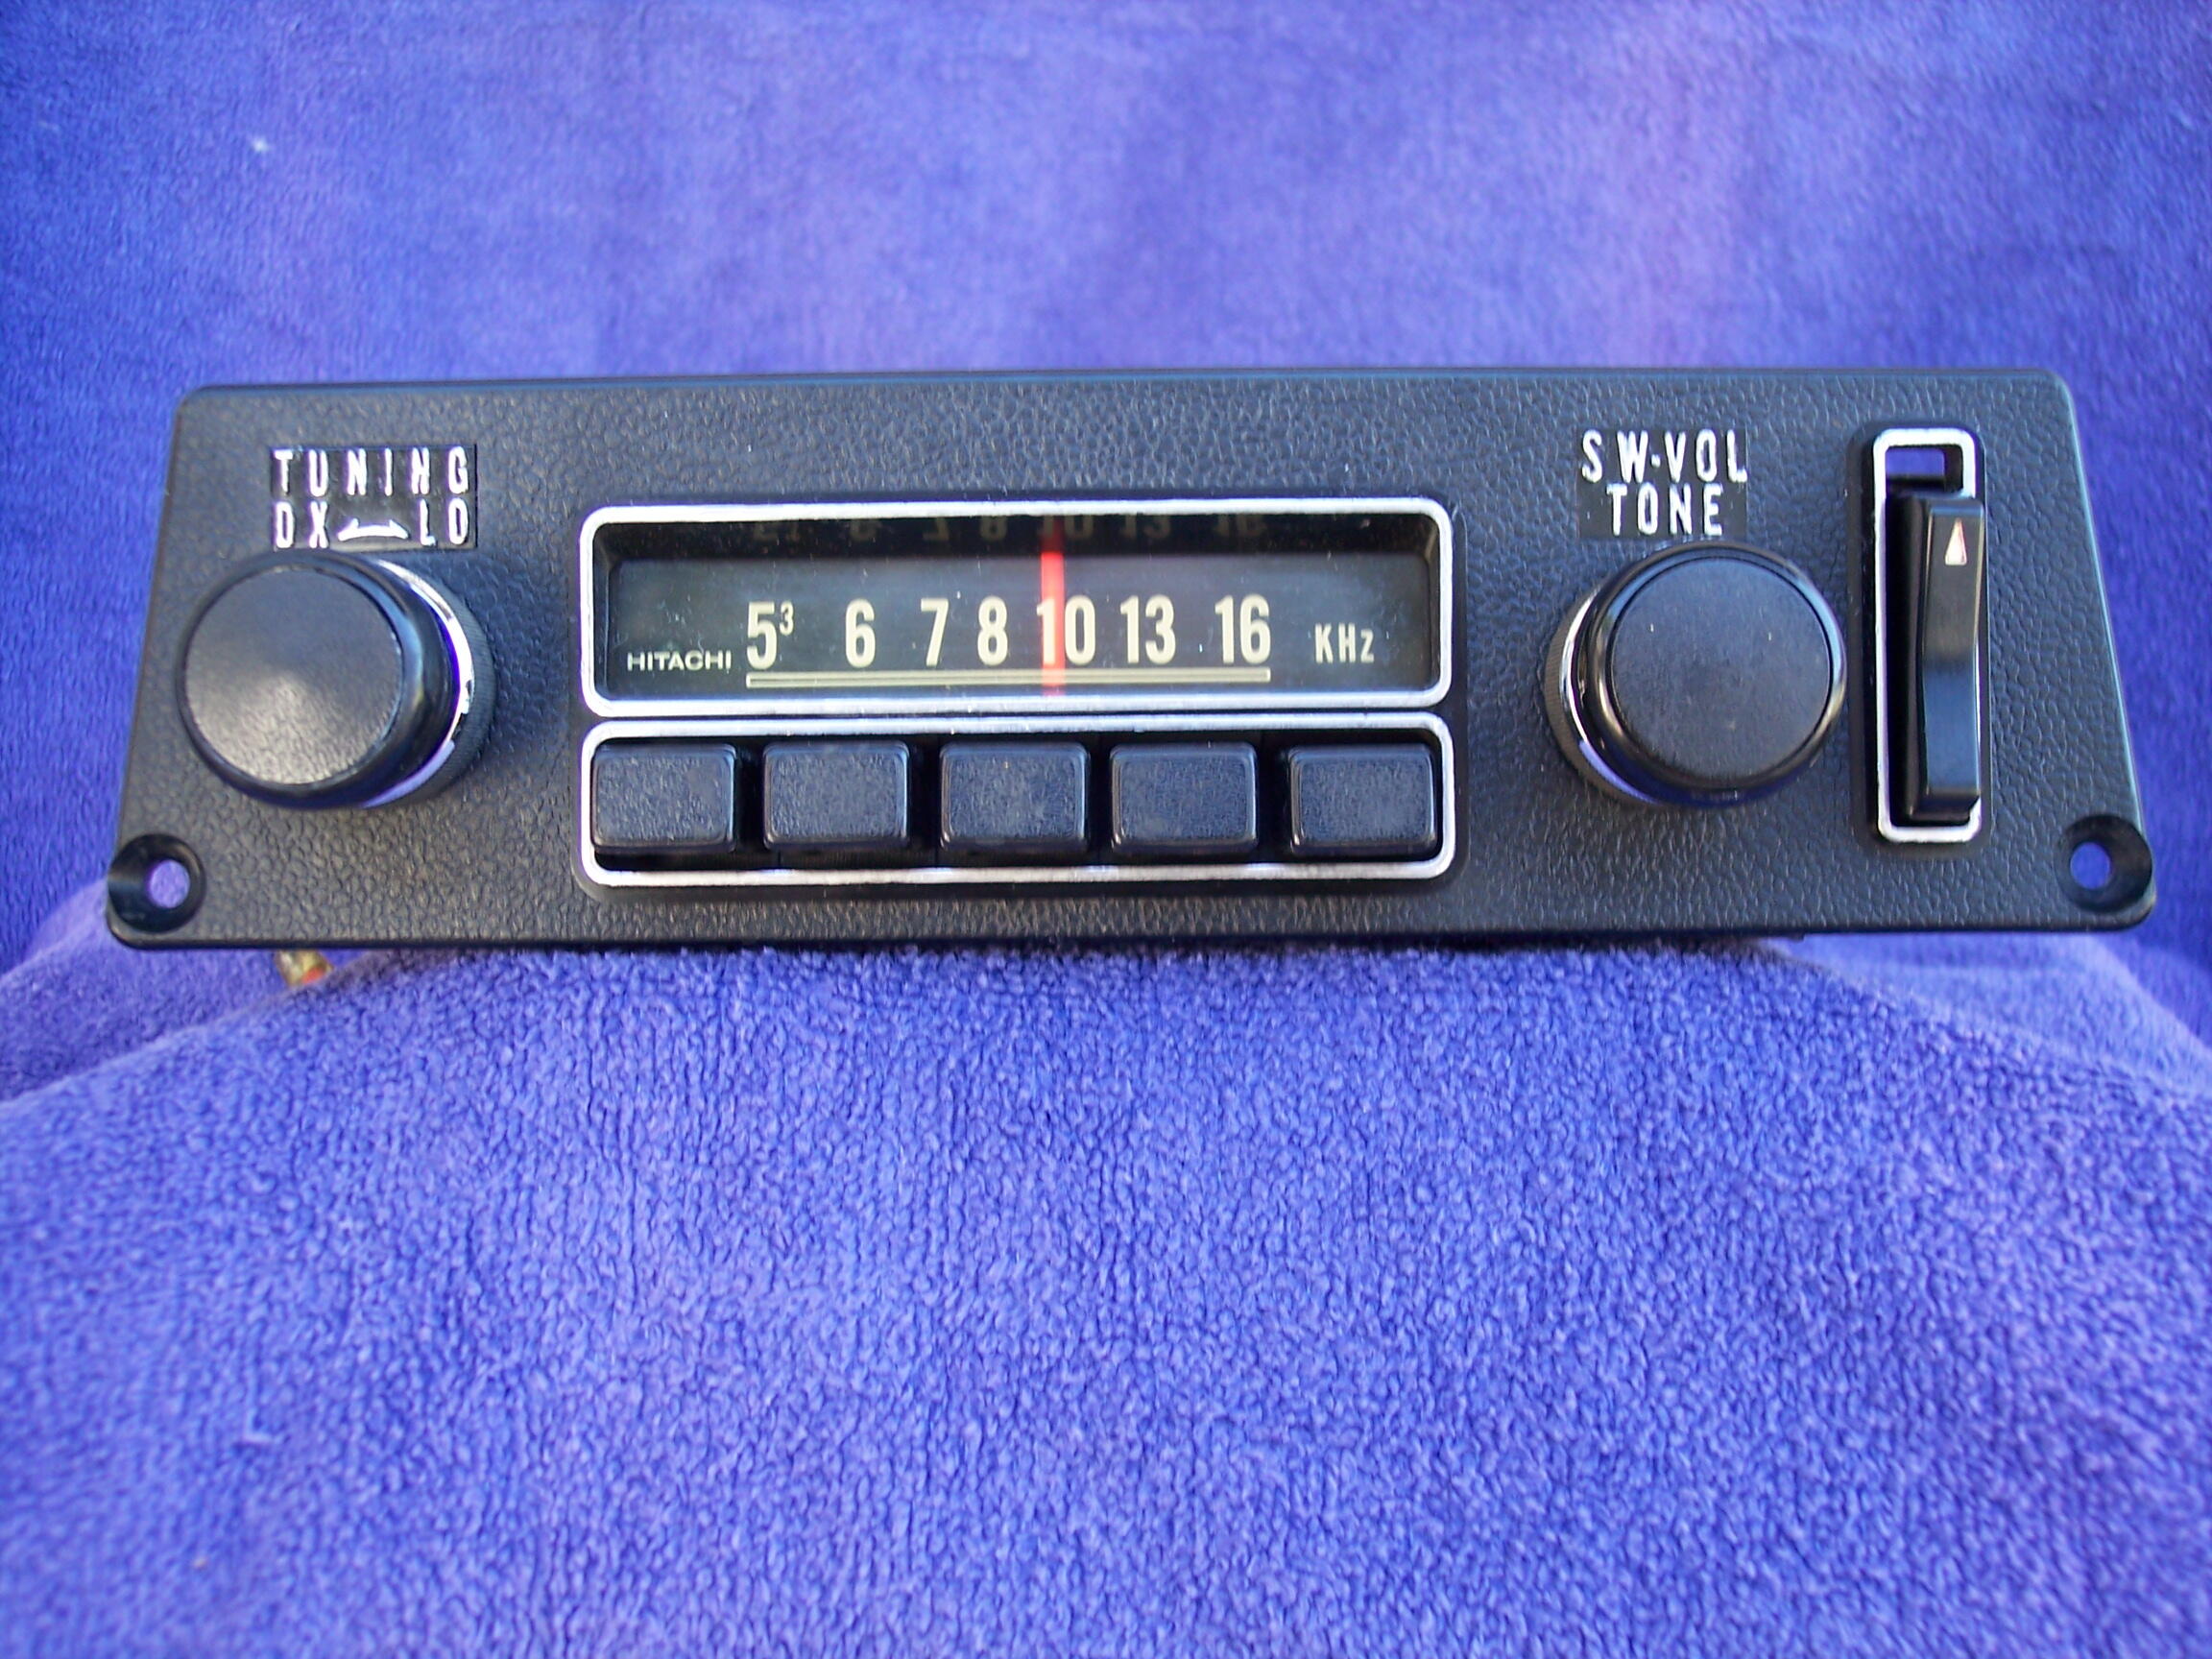
1 pointWould love to see how it turns out if you pull the trigger ! I just took @UM240 idea retro sound with original faceplate , was able to keep the original knobs with a little Teflon tape and a makeshift bracket to keep the antenna switch . Has anyone touched up the silver/chrome on the trim ? That’s my next project
 1 point
 -
1 pointJust because there is no sense in starting another thread on this, I’ll share my experience on this. It’s four door 510 door weatherstrip day (week actually) around here, and I purchased the replacement strips from Datsport in Australia. http://www.datsport.com/rubbers-510-sedan.html Part number SBO51F-14 They are perfect fit replacements for the stock items. I must note that the 510 rubbers are quite a bit different than the Z pieces. Much smaller, and too short. so stop drooling, the Datsport parts don’t fit. As to the Lowes.com garage door weatherstrip mentioned above, Lowes Canada does not carry it but Homedepot.ca does! https://www.homedepot.ca/product/m-d-building-products-2-inch-x-9-ft-premium-rubber-weather-seal-replacement-garage-door-bottom-black/1001120751 I’m working on modify one of those heavy staplers to punch right through and make installation easy. None of the staples I’ve found yet match the 10mm spacing of the stock staple legs. I’m going to try some modern 3m adhesives and see if I can make a sandwich that stays together without staples at all. There sure are lots of aftermarket rubber companies that make various “Belt moldings”, steelrubber products being only one. And lastly, if you think even new perfect fitting seals keep water out of your doors you’re a dreamer. Slow it down, sure. Much better time spent water proofing the inside bottom of your doors with yearly maintenance and added application of spray in creep and lube rust proofers and making sure the drain holes are open.1 point
-
1 point@Patcon yes I was surprised how heavy it actually was. When it was on the stands it felt pretty Light but when 4 of us lifted it, it was a struggle.1 point
-
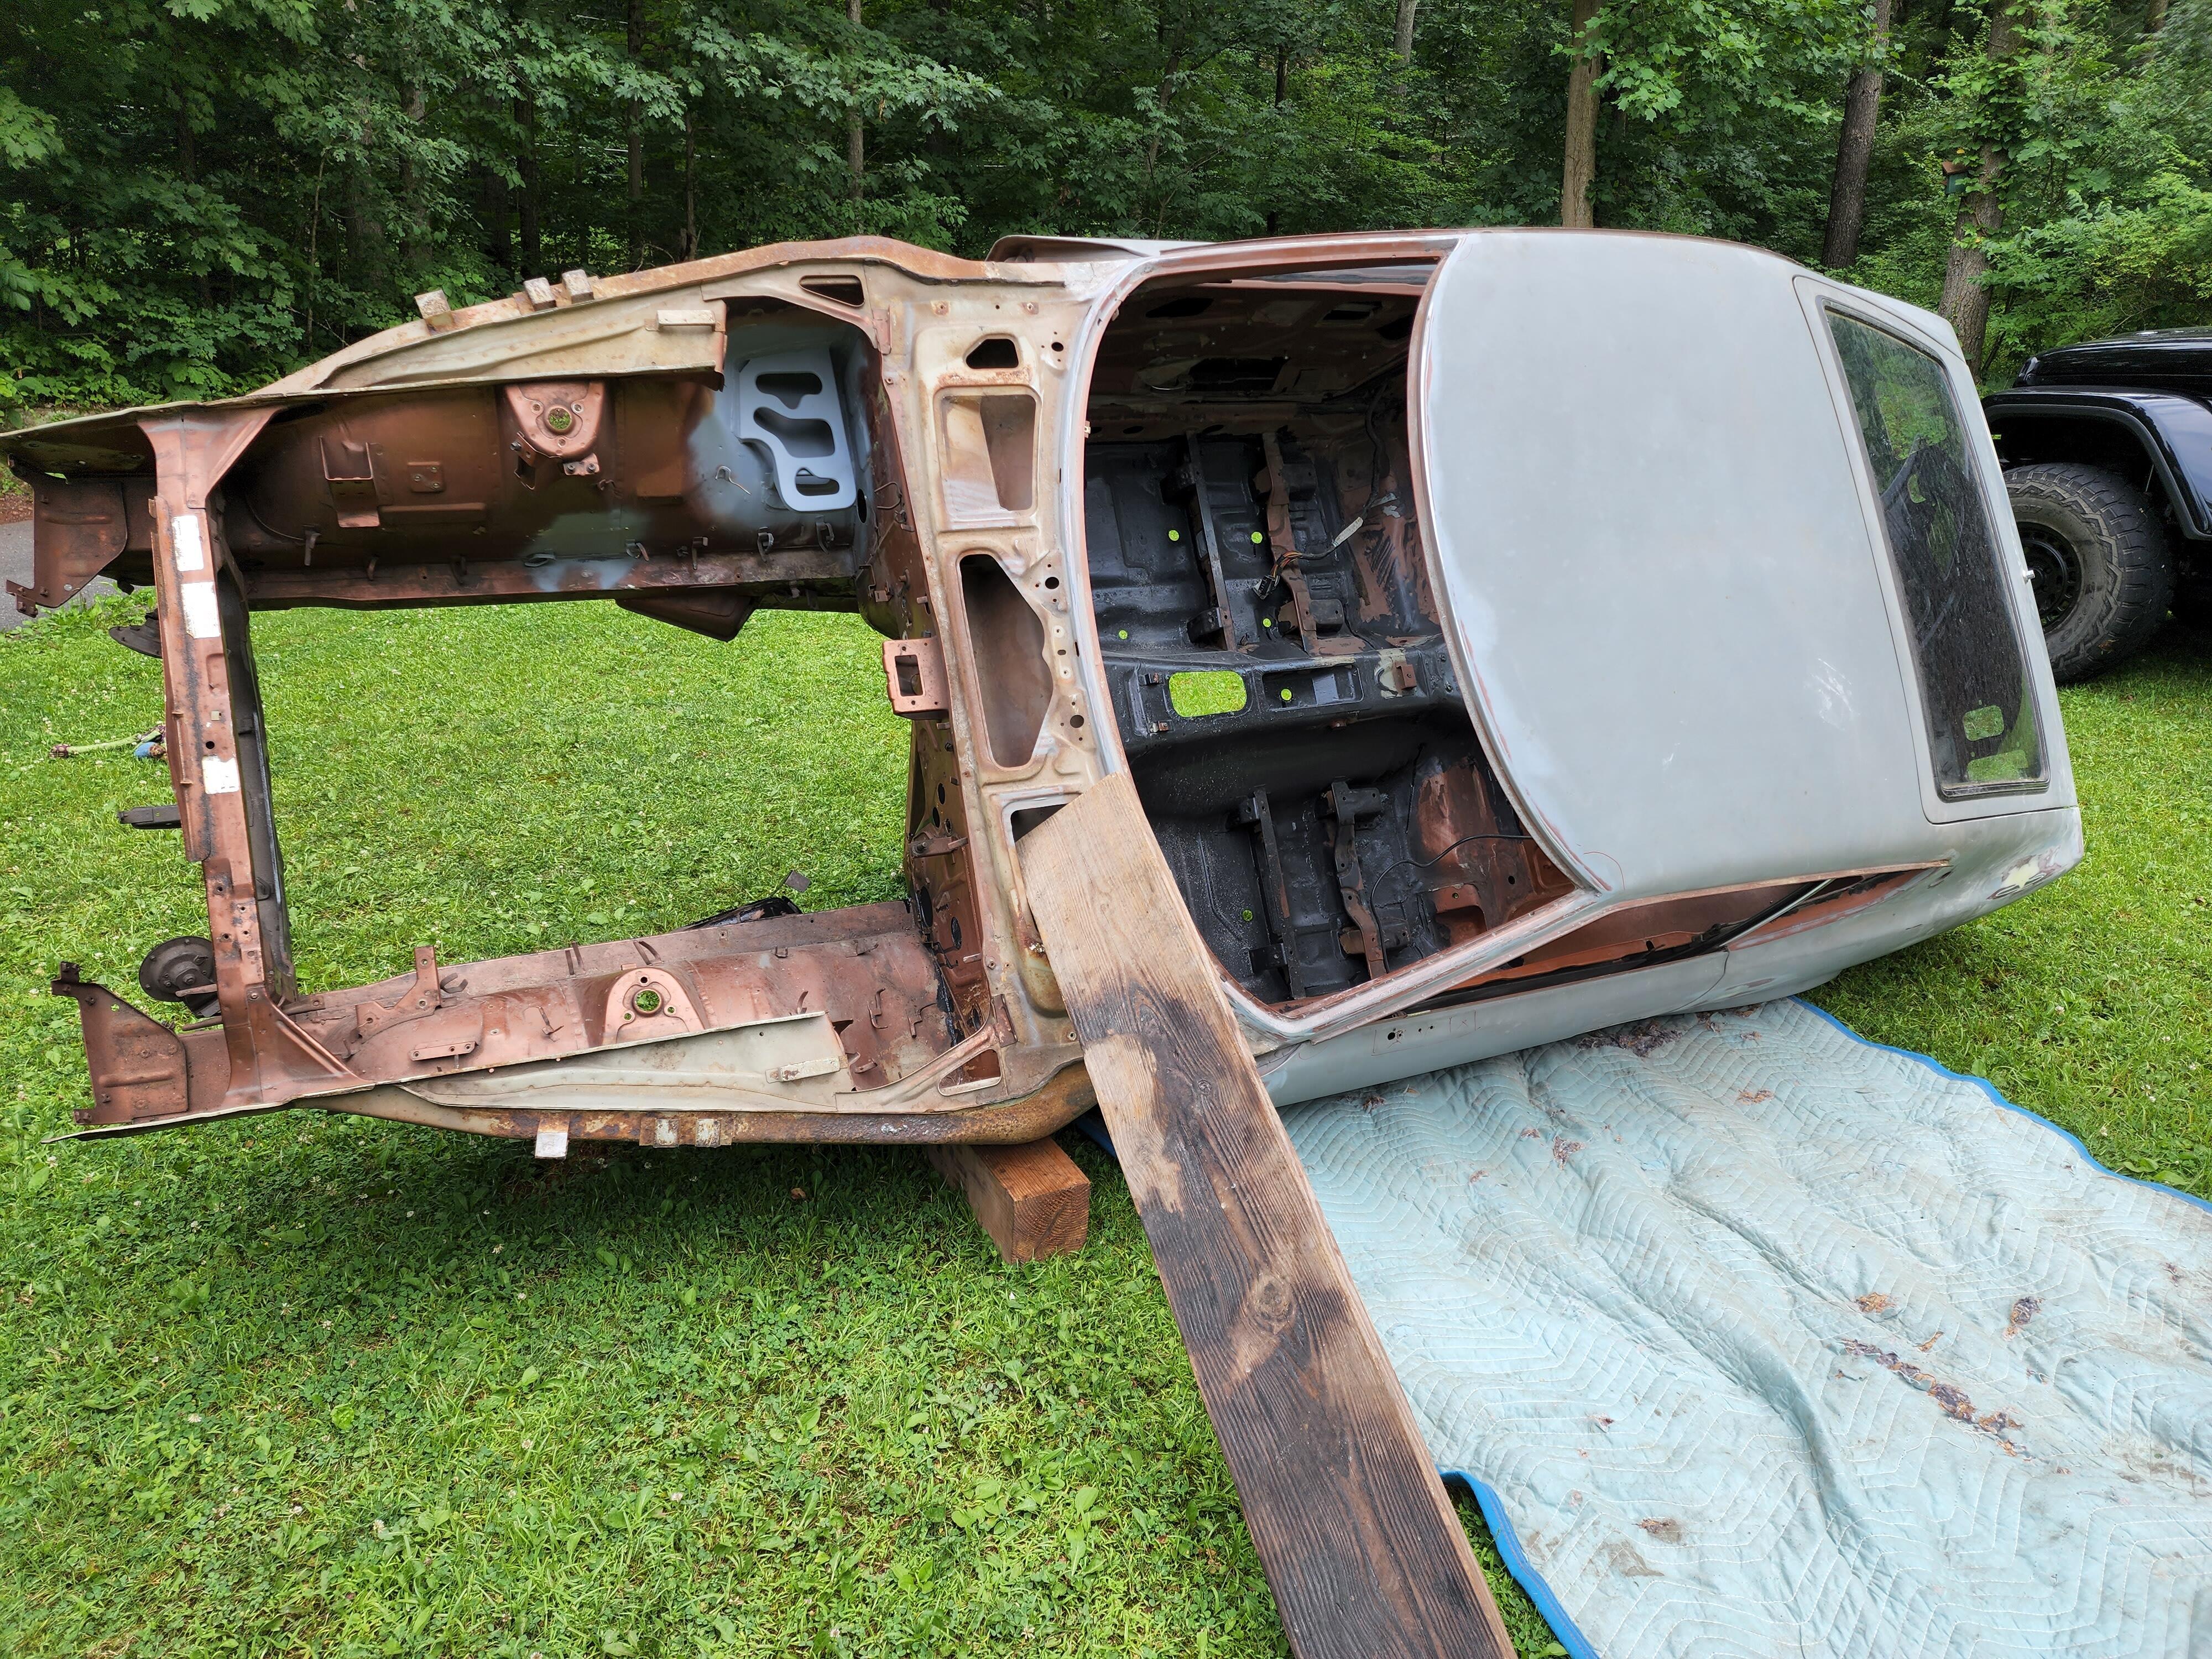
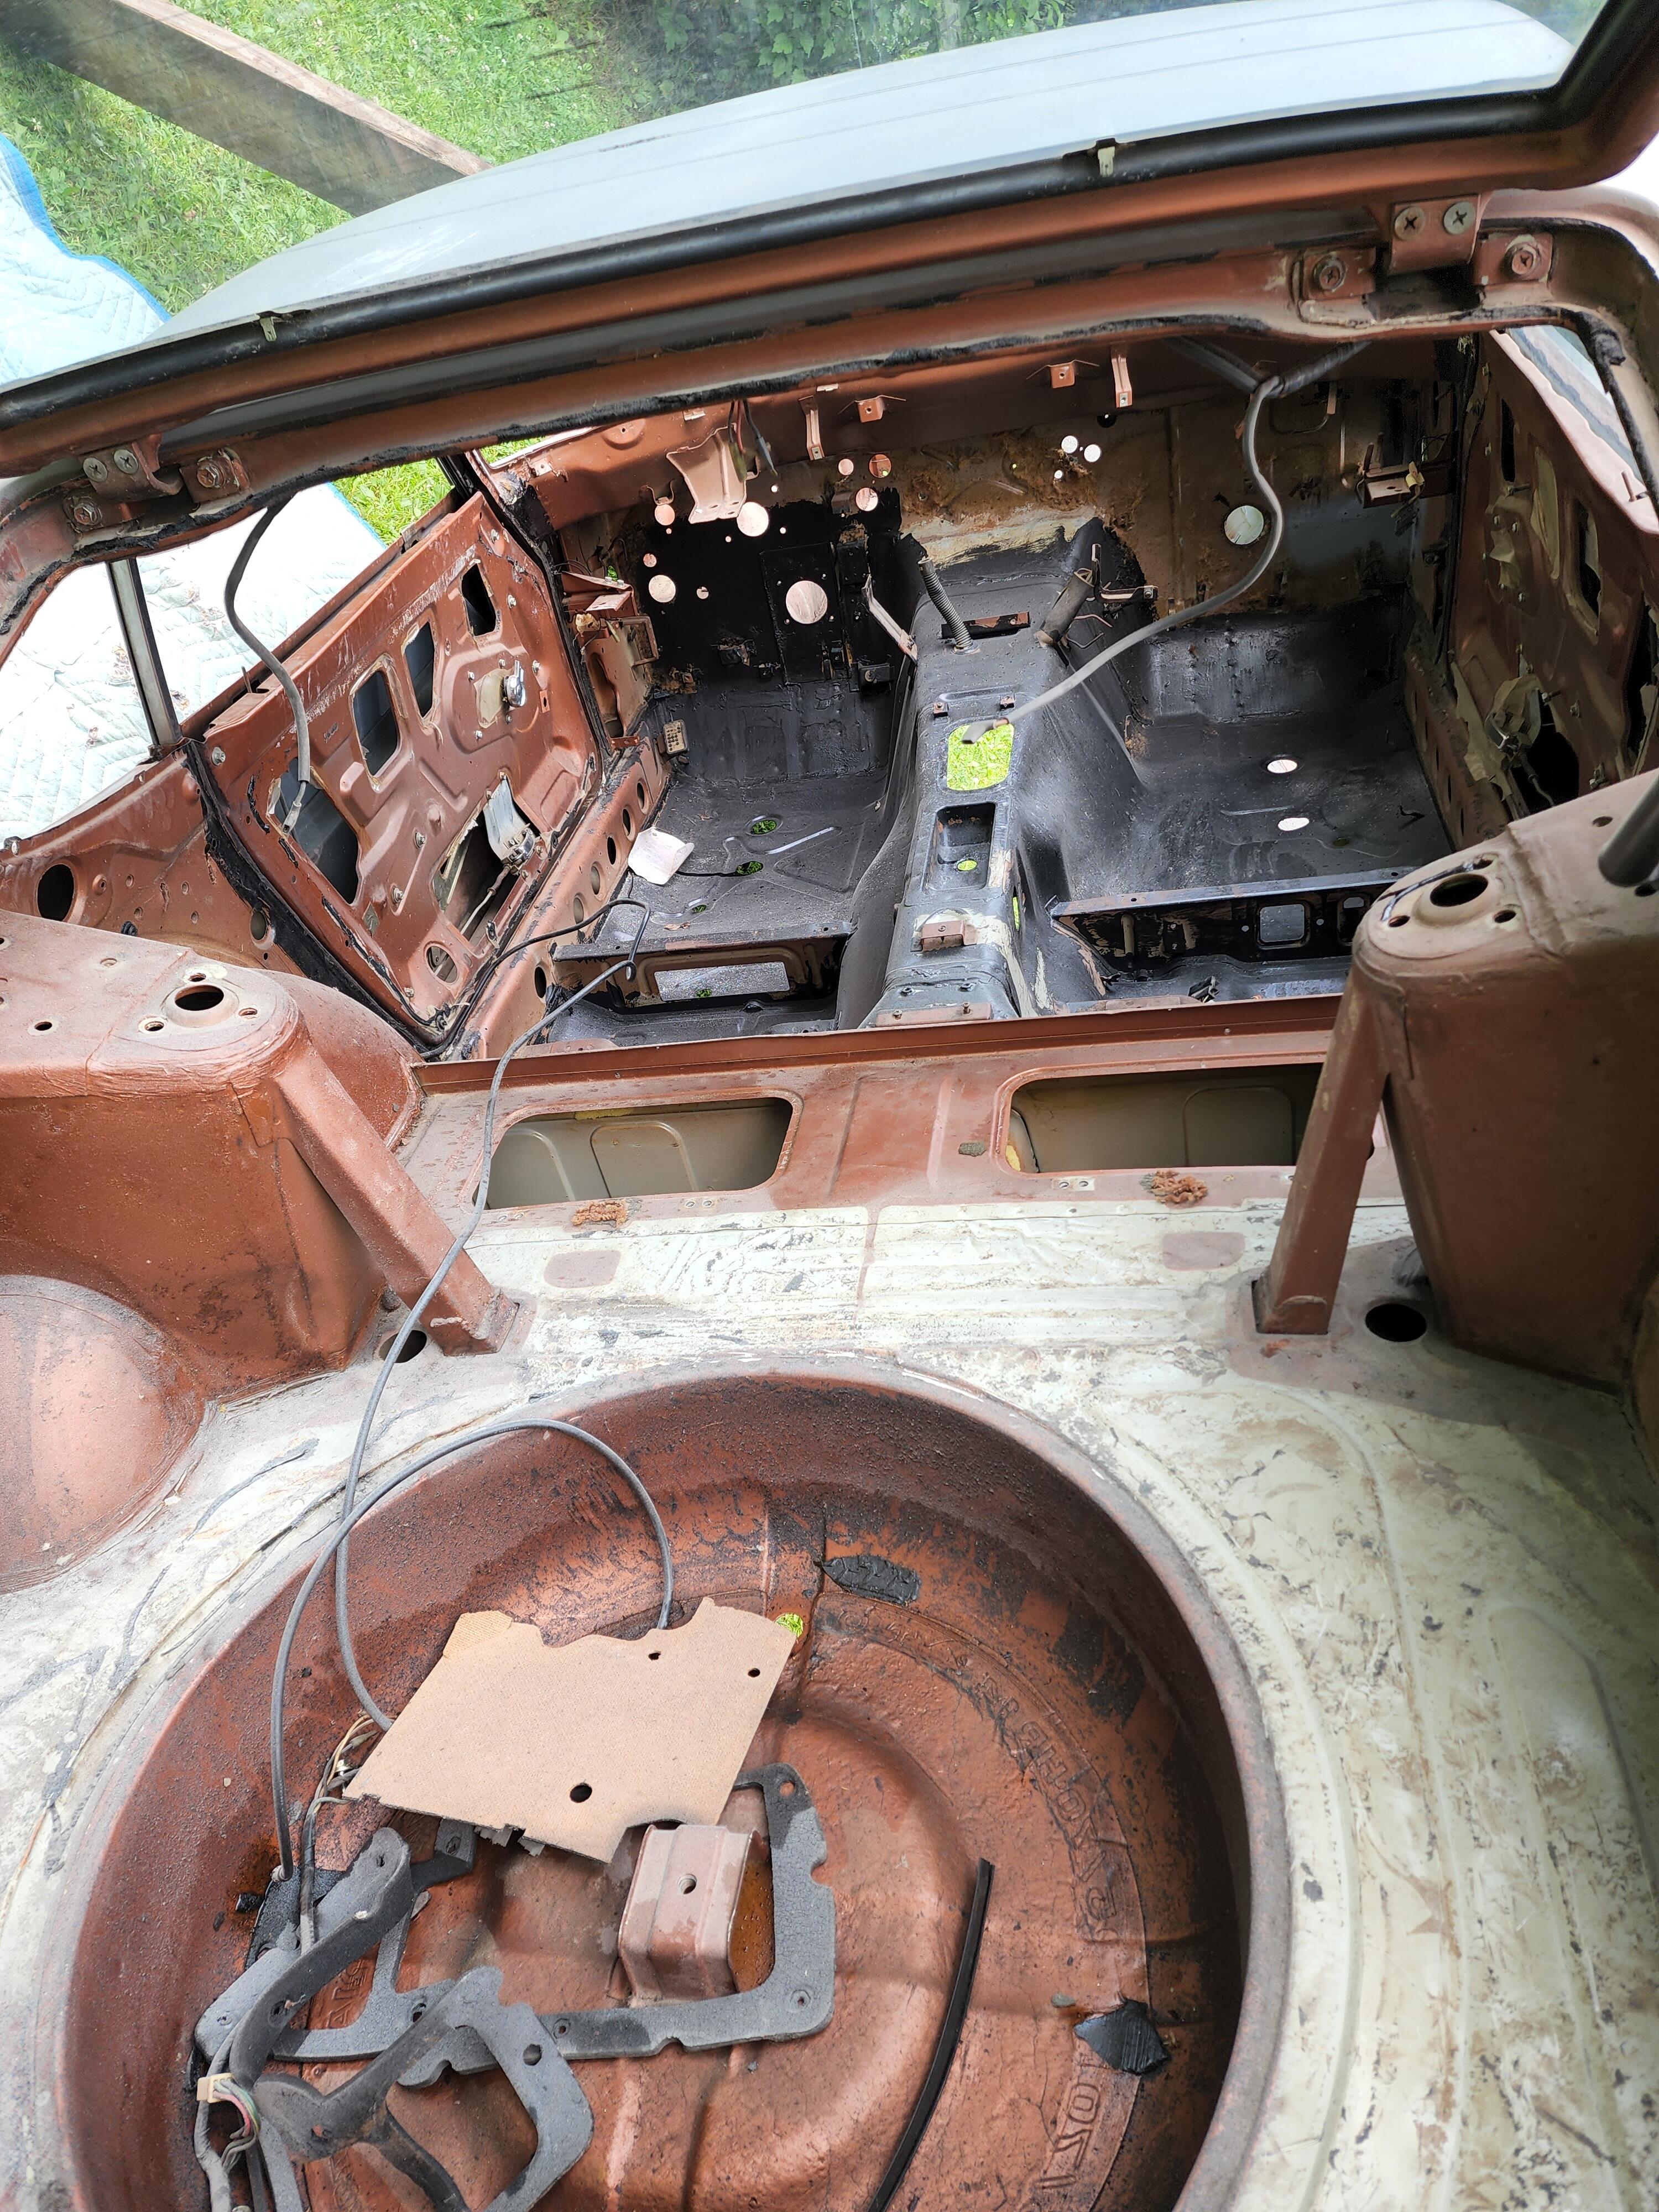
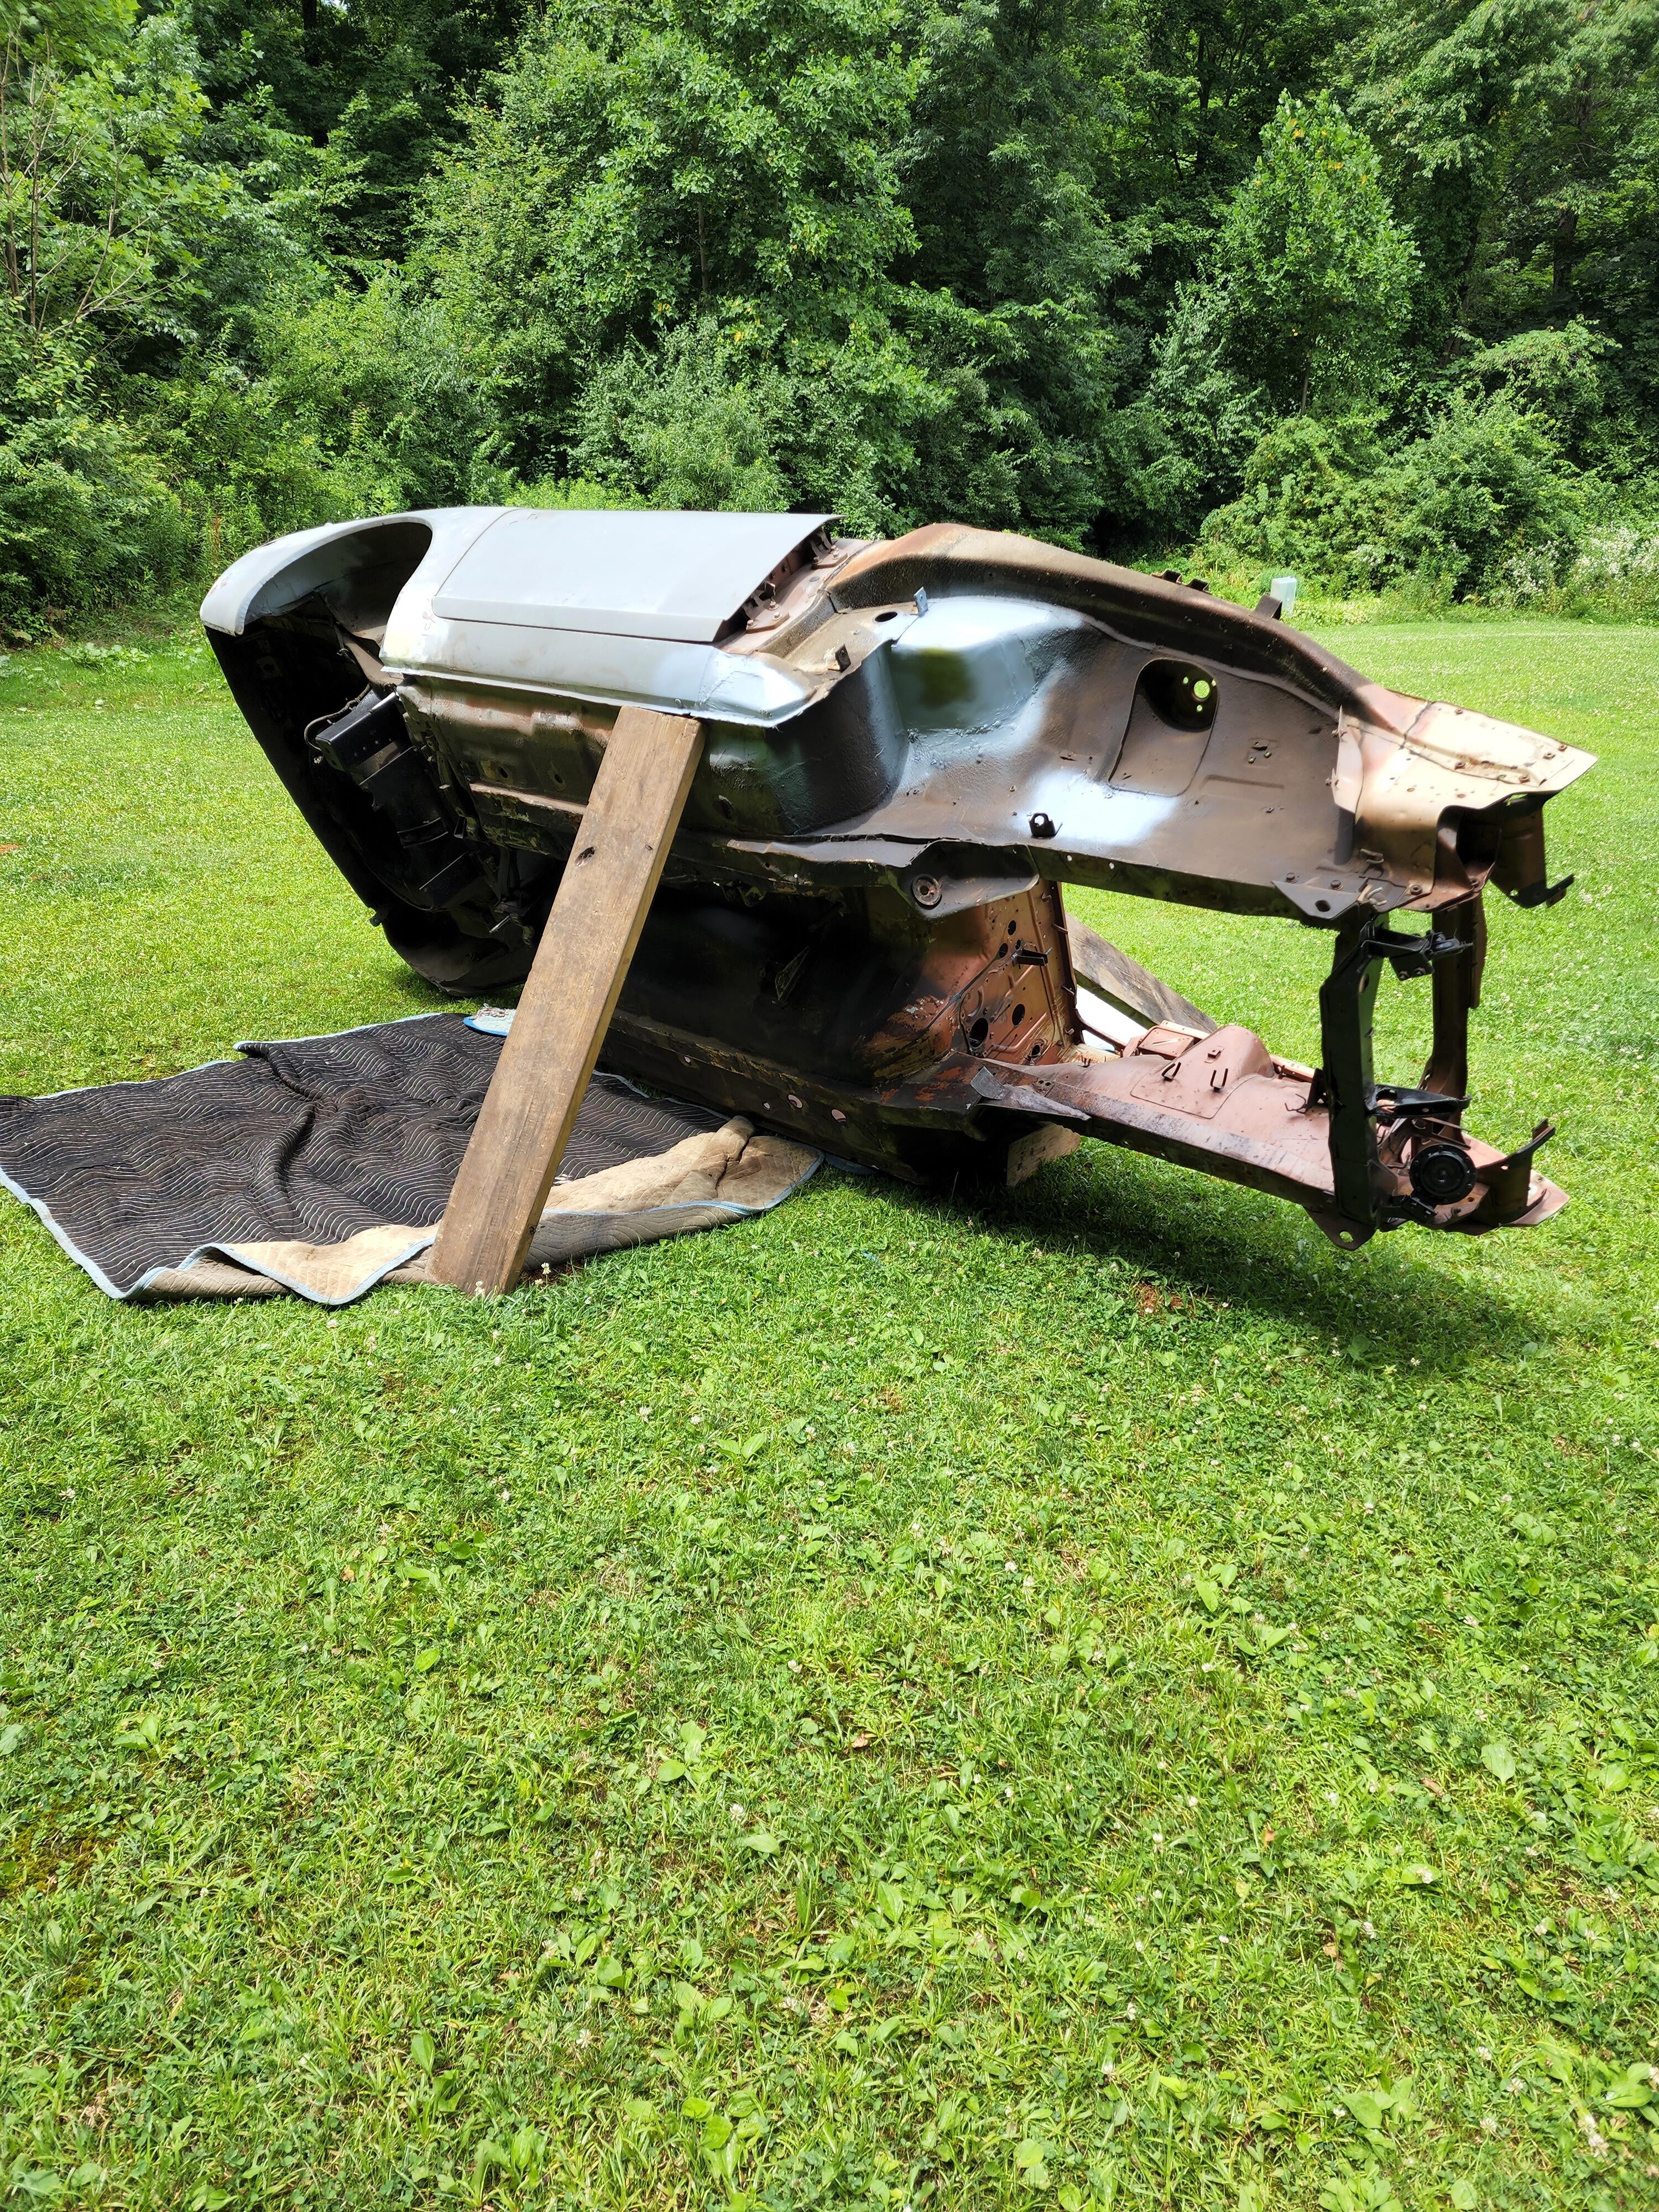
1 pointBeen a while since I updated this post but nothing fun has been happening and with work so busy with a lot of travel, I haven’t had much time to work on the z. I finished repairing and areas with rot and welded all new patches in. Applied POR15 where required. I’m now focusing on the underside to get it ready for undercoating. Should be finishing that up in the next two weeks. I’ll then be able to throw the suspension back on and have a roller… and yes, that is some fine engineering since I don’t have a rotisserie.


 1 point
 -
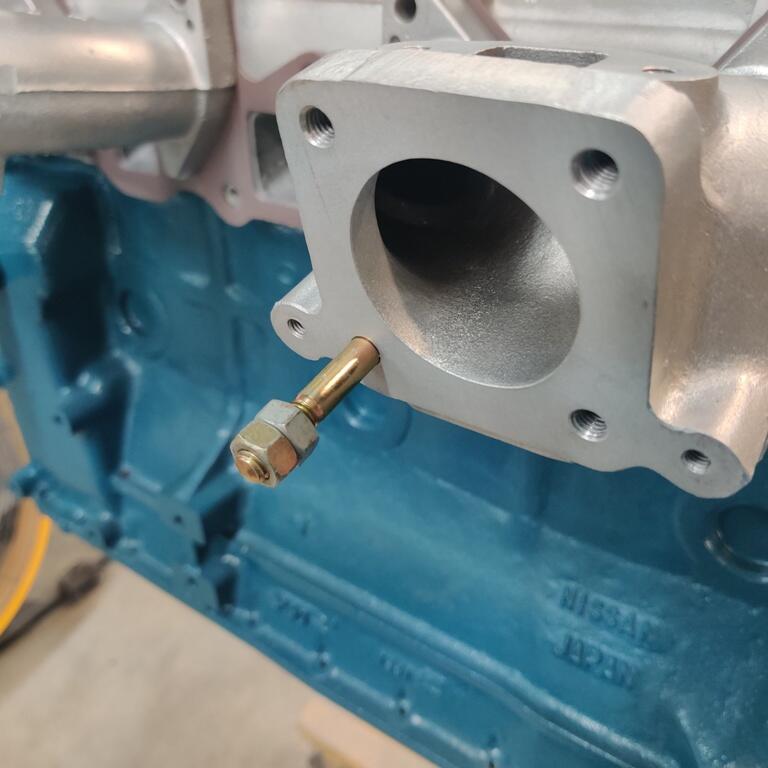
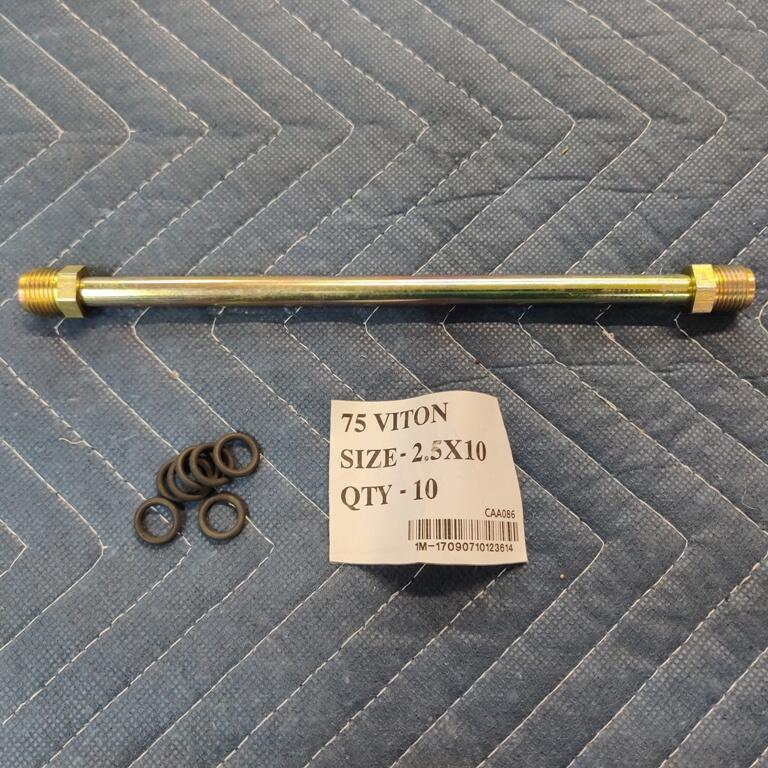
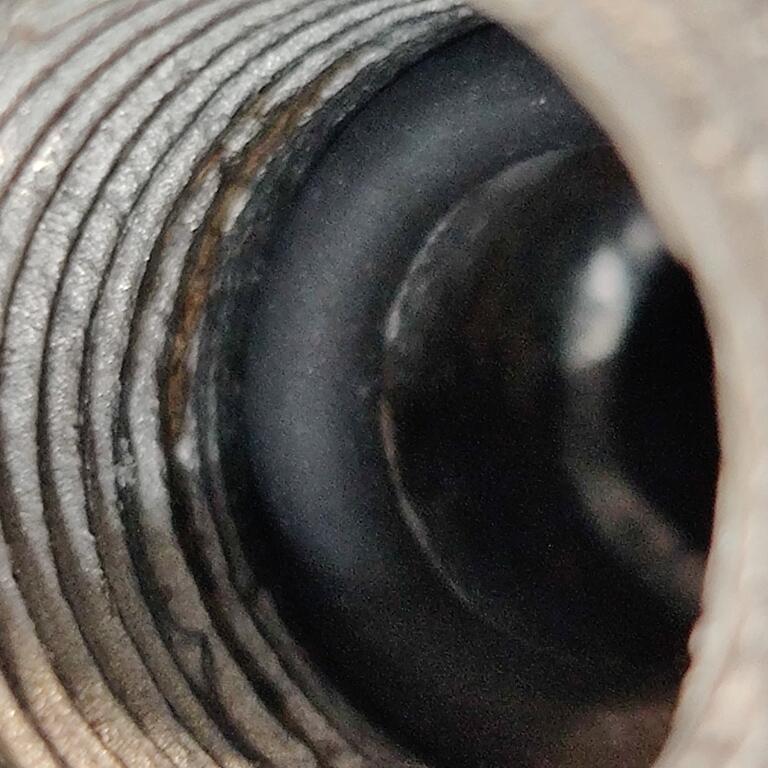
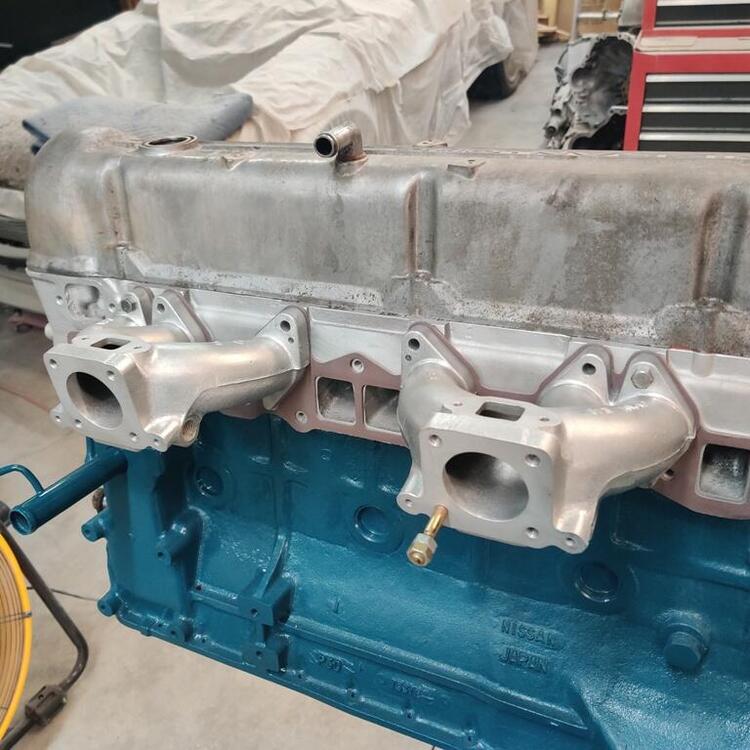
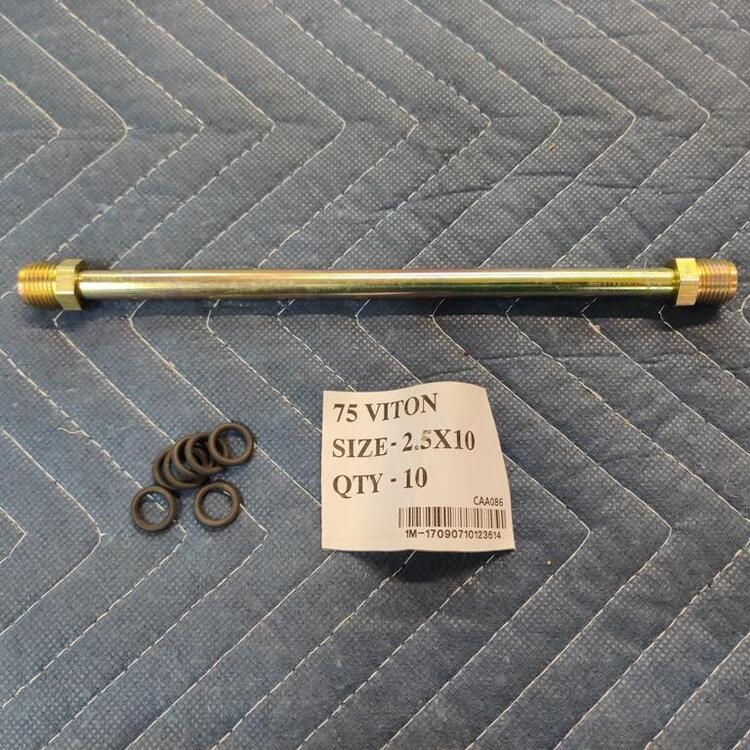
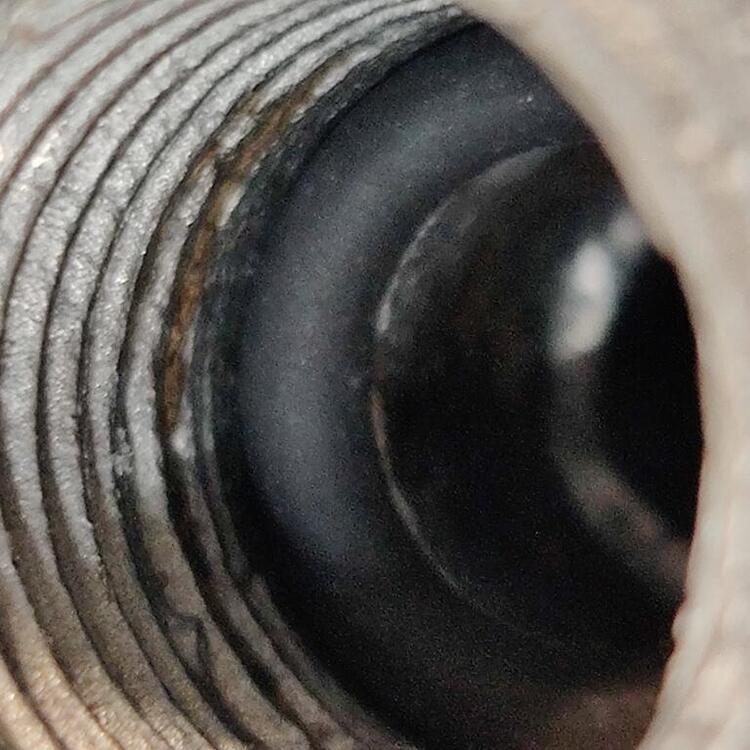
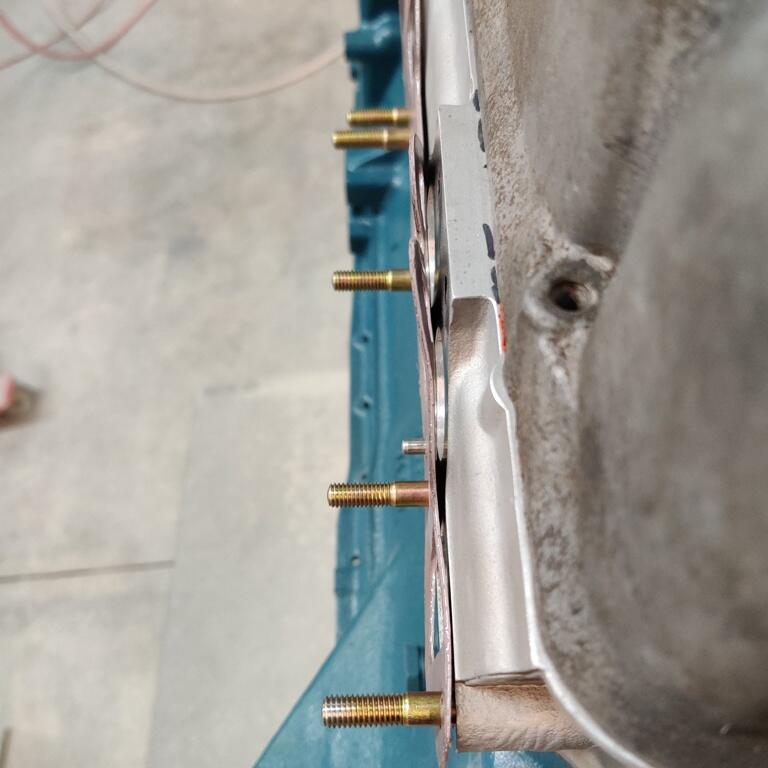
In addition to working on the doors and front fenders, making progress towards addressing the minor imperfections again today, I had some downtime waiting for 3M platinum finishing glaze (fine filler) to dry. So, I decided to pull the cover off of the engine - Ah ha! That (center pic, first row of pics, holding the manifold to the engine) is where my two intake bolts that were missing went! Unfortunately, they didn't make the trip to the plater. I am thinking there will have to be one more shipment to them for a few parts that I accidently left out. Assembly of the intake manifold. For those that do not know, studs can be installed using two nuts on the end of the stud tightened up against each other. Locked together, they won't spin and the outer one can be acted on with a wrench to wind the stud into position: Four studs in each intake manifold, gaskets and the heat insulator blocks installed. I rarely see people remove the coolant tube from the manifolds during restorations. It was a pain. I destroyed the old tube, and mangled the original fittings. But, the tube is basic, and a replacement is easily sourced. The outer diameter is 10 mm. The fittings at each end are very odd. I remember spending a lot of time searching the internet, trying to get info on them. Eventually, I figured it out. They are "Male Inverted Flair - Tube Nut - M16 Threads x 10mm Tube" The factory ones have a 19 mm size on the hex, but I couldn't find ones like that. The replacements are 16 mm hex. Additionally, what makes a water tight seal at each end of the pipe is an o-ring. Originals were hard as rocks, and crumbled. I was able to source some Viton O-rings that I am confident will work (see third pic in the row of pics below). There is an angled (chamfered) shelf that the o-ring seats against. The nut compresses against the o-ring. The chamfer forces the o-ring to push against the outer diameter of the shaft to create the water tight seal. First pic is 5.9X magnification of the o-ring in place. Second and third pics show the intake assembly. Unfortunately, the rubber fuel tubes got kinked a bit during storage. Will have to see if that resolves itself now that they are installed. I sanded the 3M glaze and applied 3 more coats of high build primer which I will sand tomorrow. Fingers crossed that I can finish the doors and fenders tomorrow.


 1 point
 -
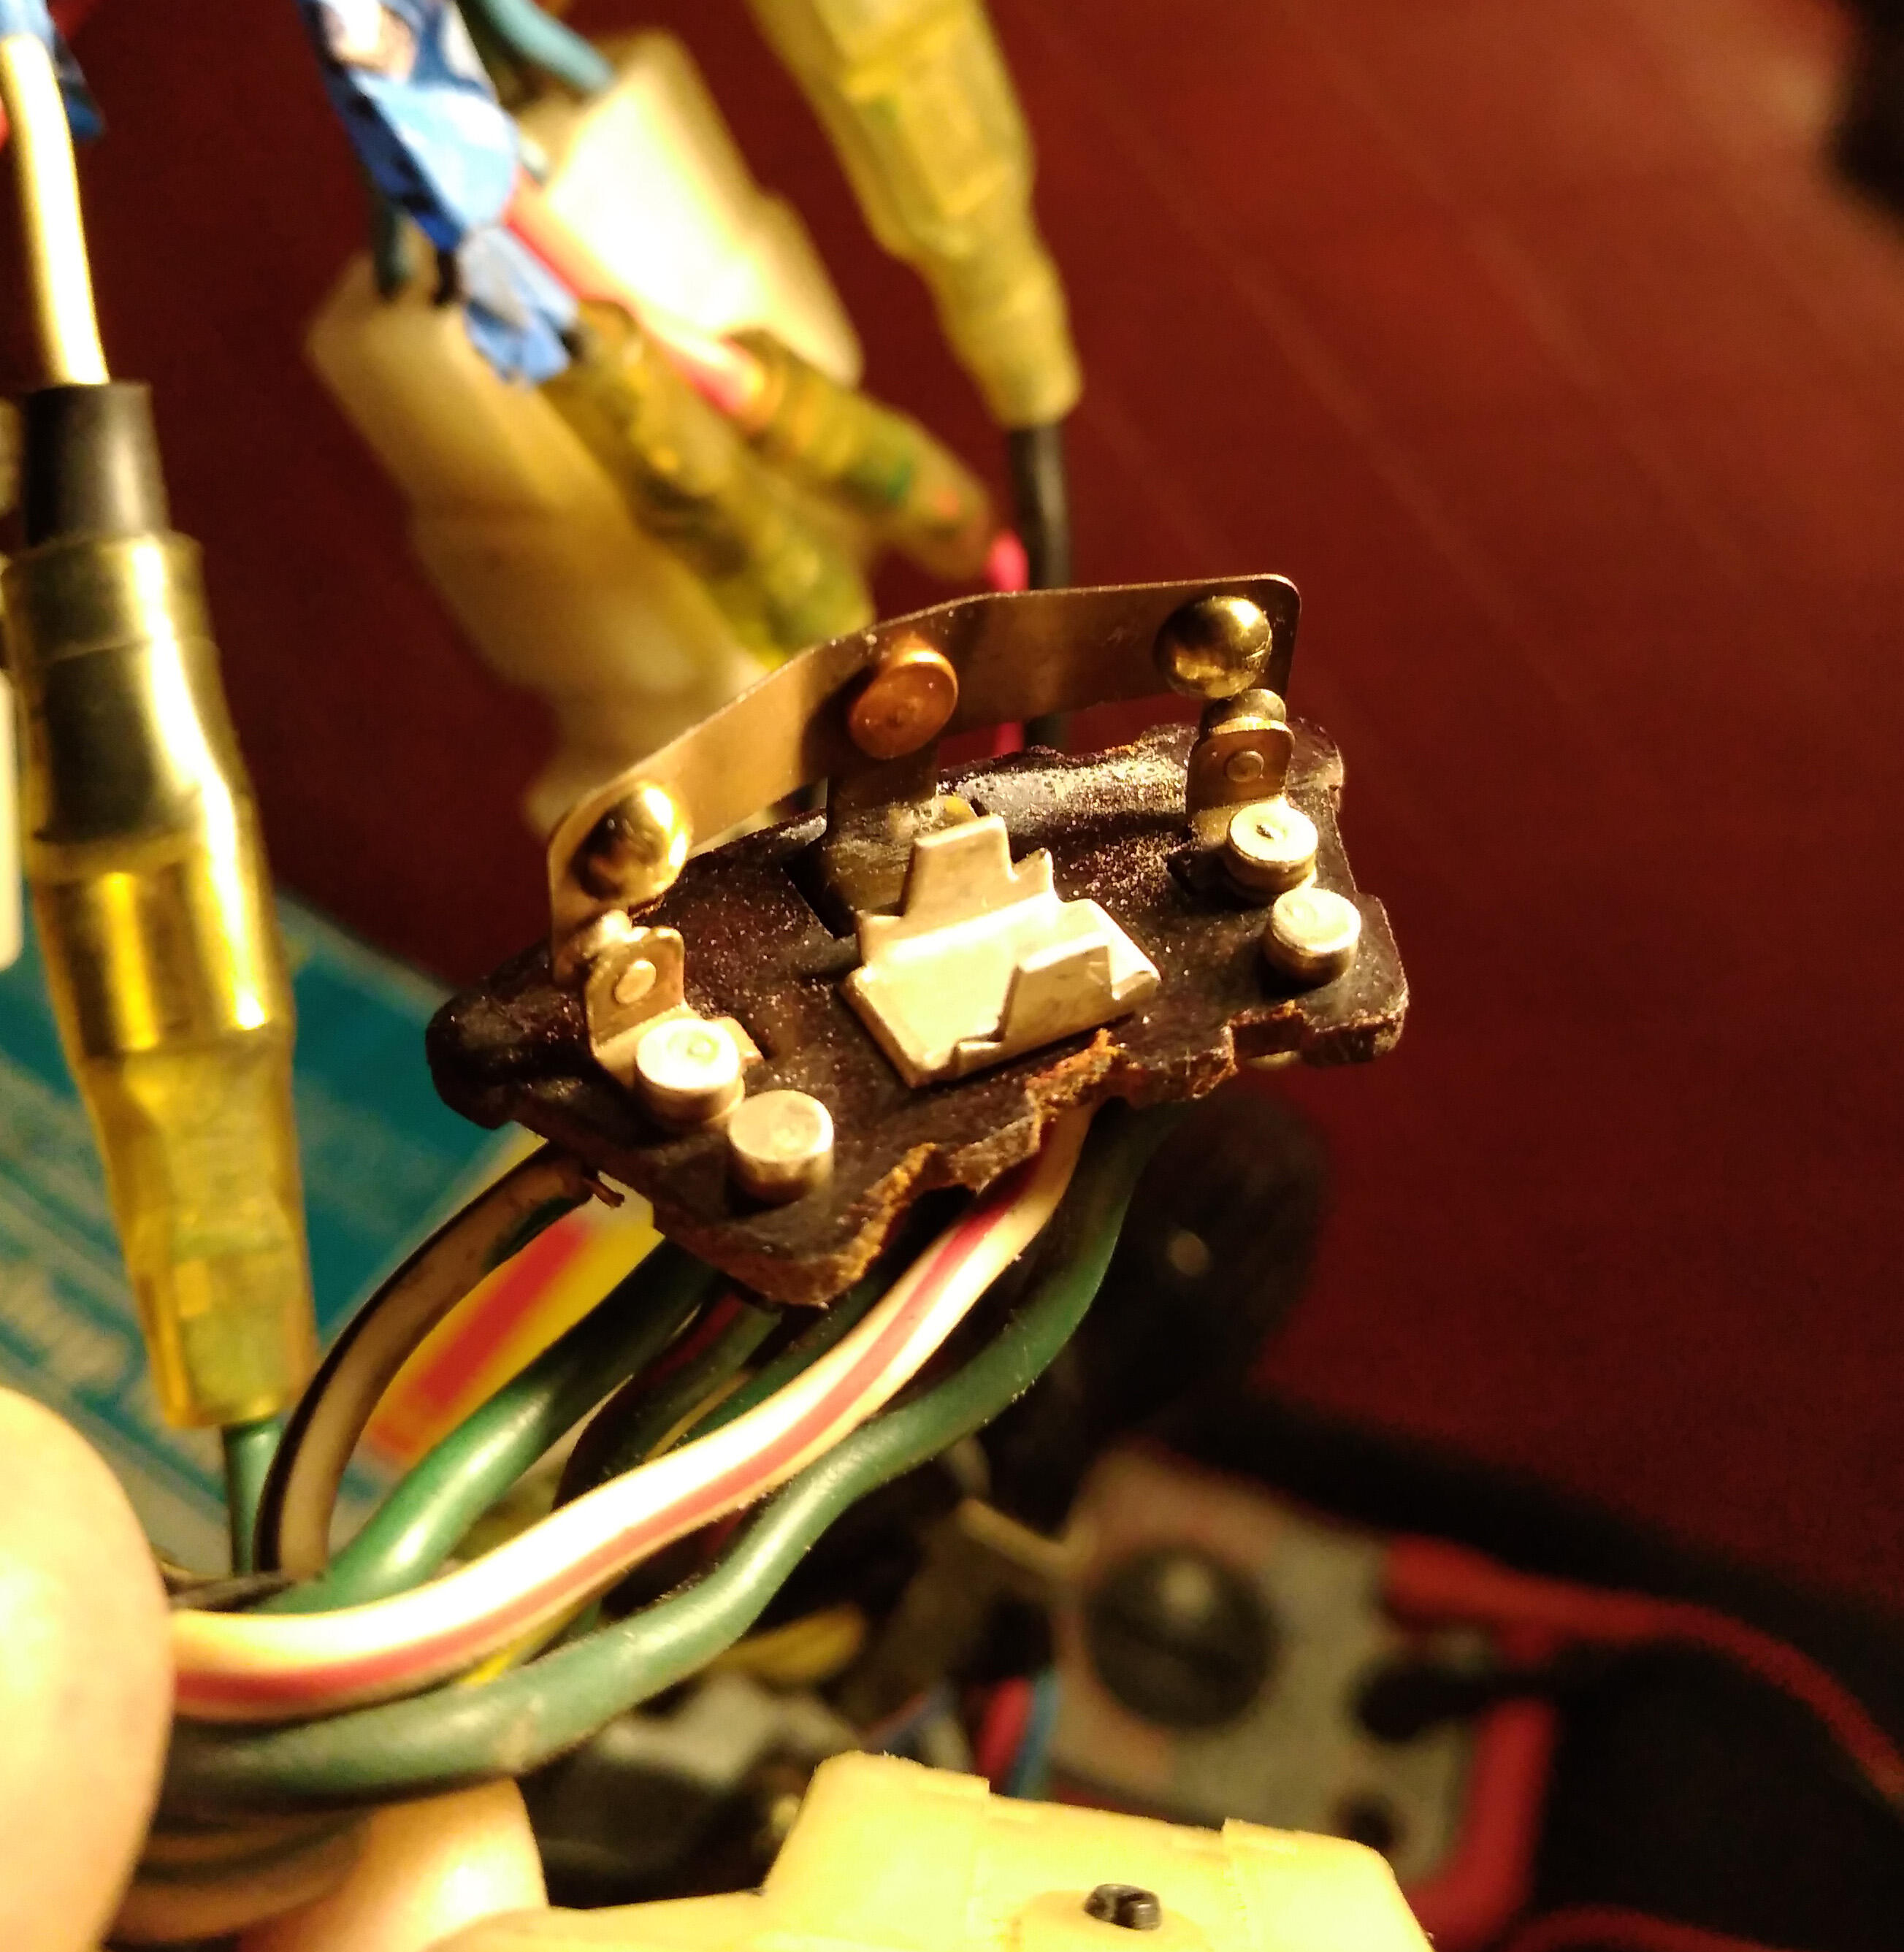
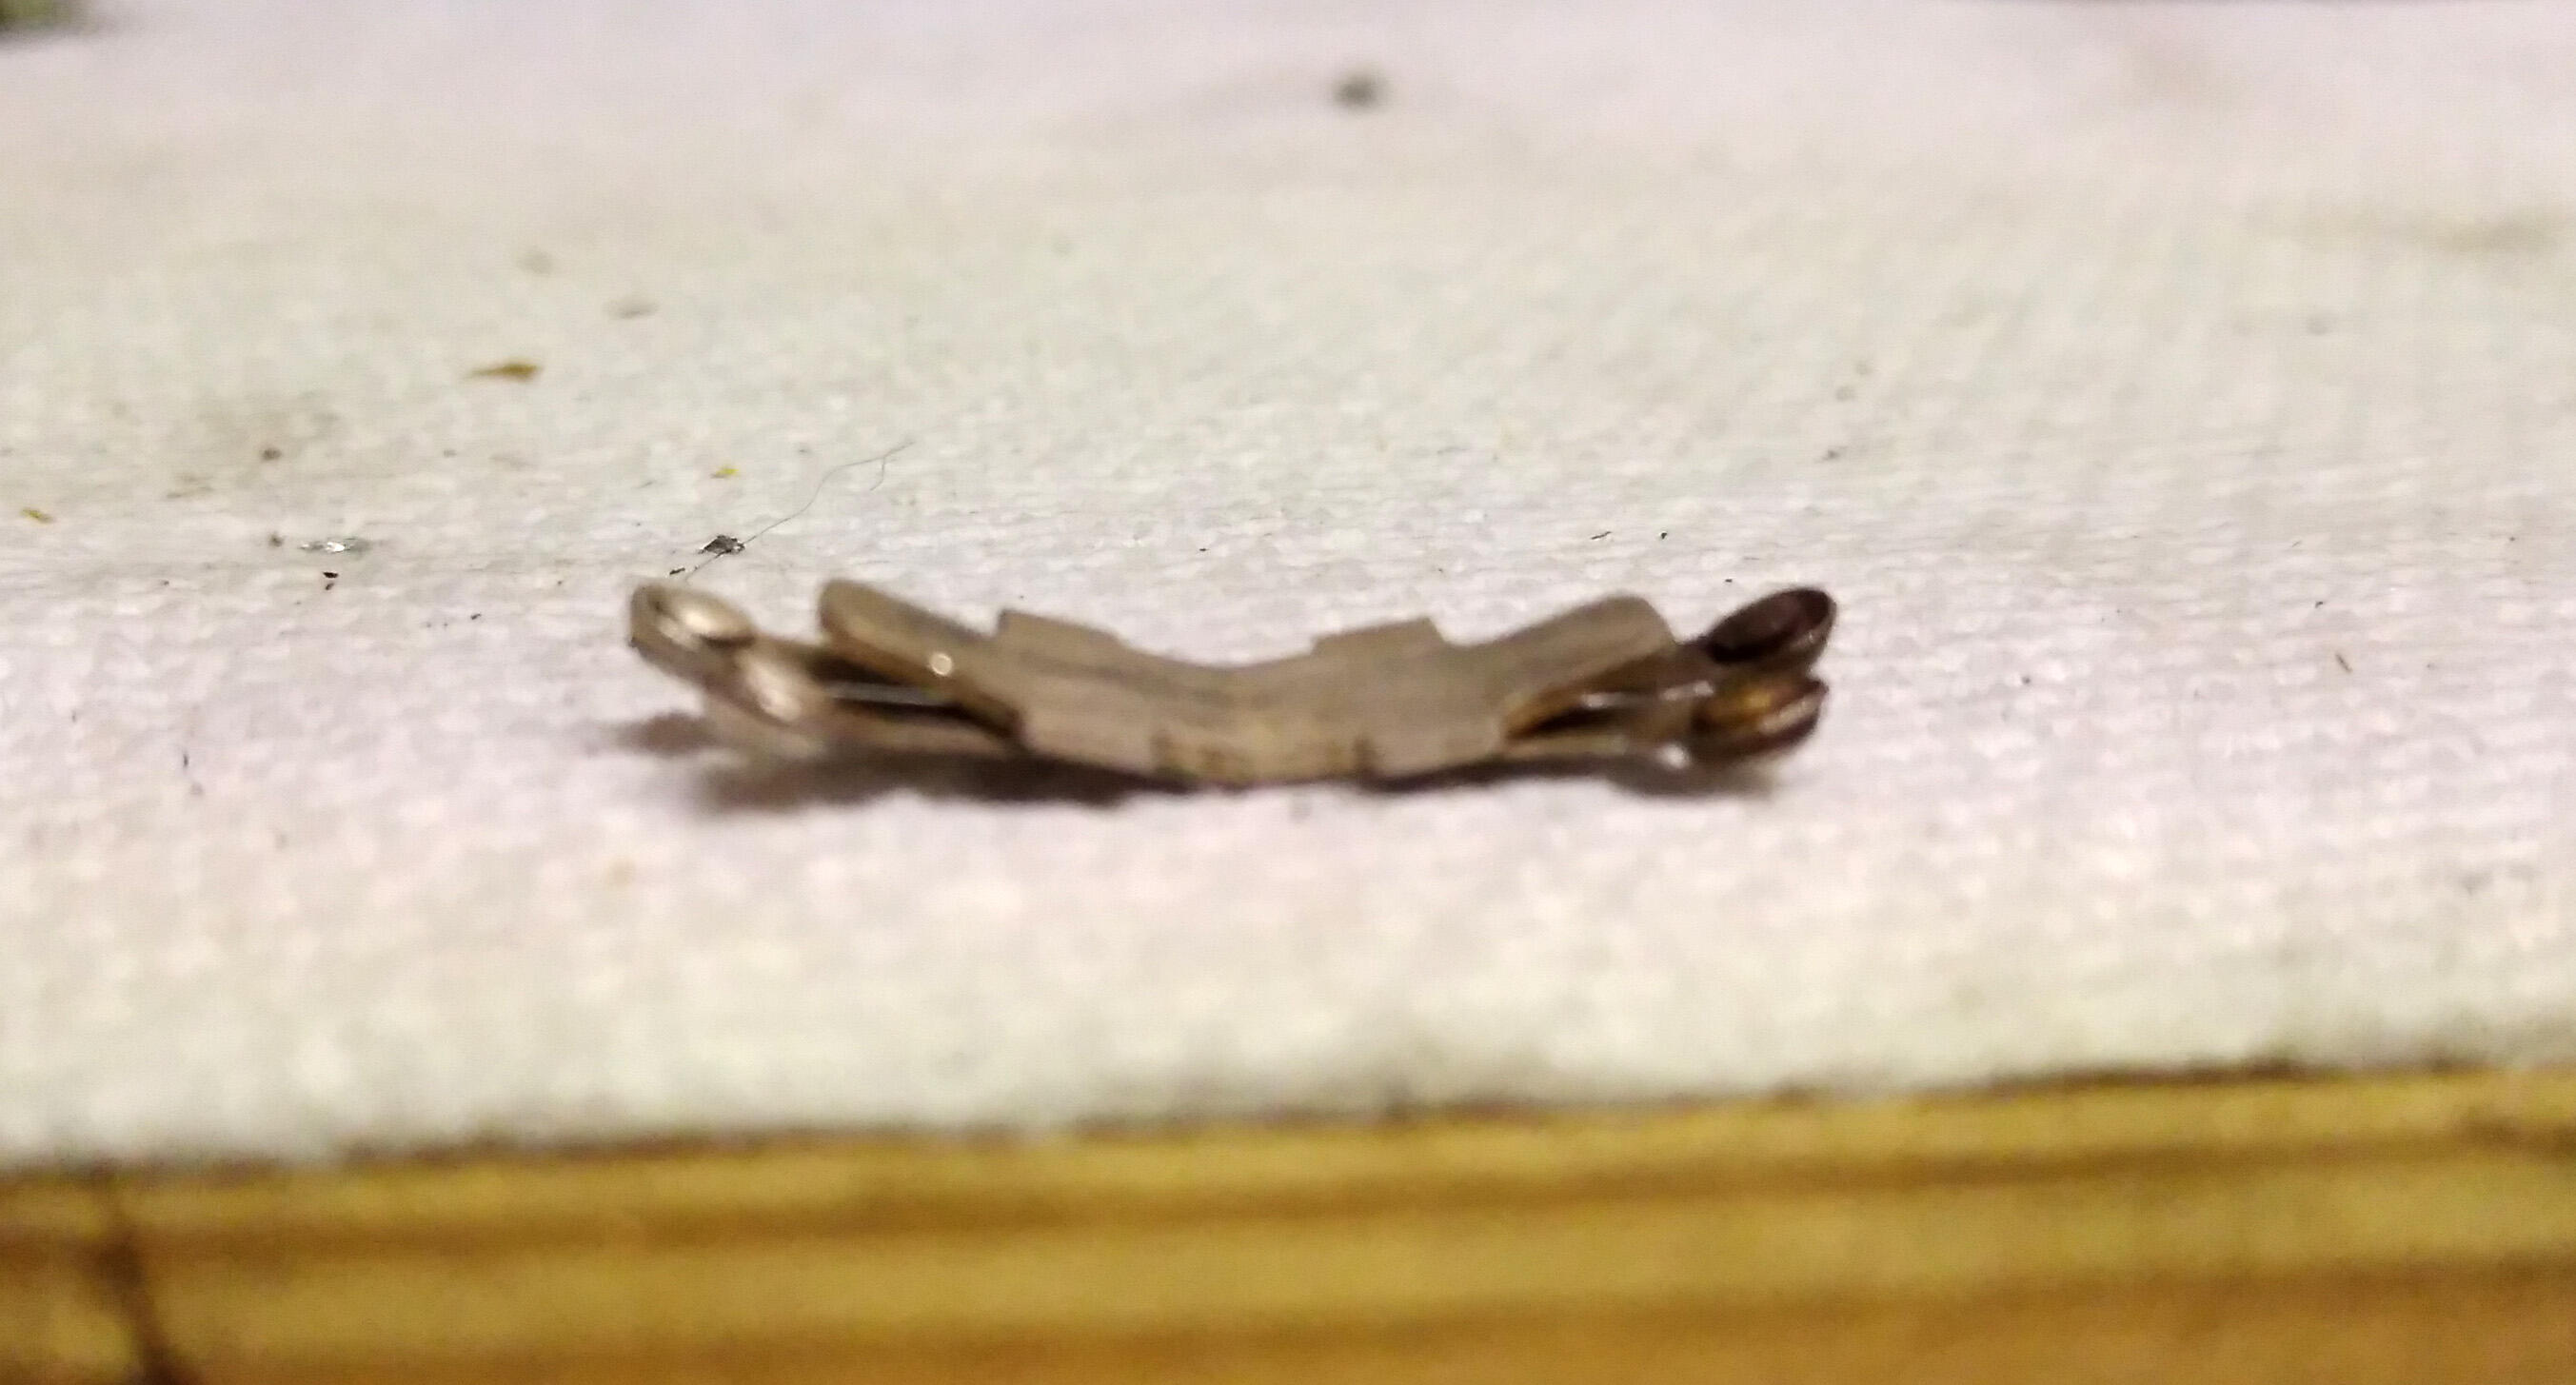
FIXED! Finally. After several months and many hours, everything works. Headlights, parking lights, hazards, brake lights and turn signals. The last two to be resolved were the brake lights and turn signals. To diagnose, I took the switch completely apart (for about the 10th time), but this time, I plugged the raw switch elements into the harness, like this: (that poor circuit board) With the rocker absent, the brake lights came on perfectly. I played around with the angle of the rocker tabs and moved it back and forth with my thumb until everything worked. Conclusion: The rocker tabs were FAR too "flat." They need to be bent upward at a fairly decent angle, like so: Reassembled everything, and it all works. Thanks to all for your help and good advice. Special shout out to Steve for his wiring diagram and input. * * * * * * To summarize, here were my issues and here how they were resolved: Uncertain about steering column wire connections: Referenced pics on the internet and consulted wiring diagrams. No parking lights, and 20A fuse was popping every time I tried to turn them on: Front left parking light wired backward. No brake lights or turn signals: A combination of cleaning out the TS and hazard switch contacts, re-soldering loose wires and bending the rocker tabs at the correct angles. Thanks again. On to the next issue, lol.

 1 point
 -
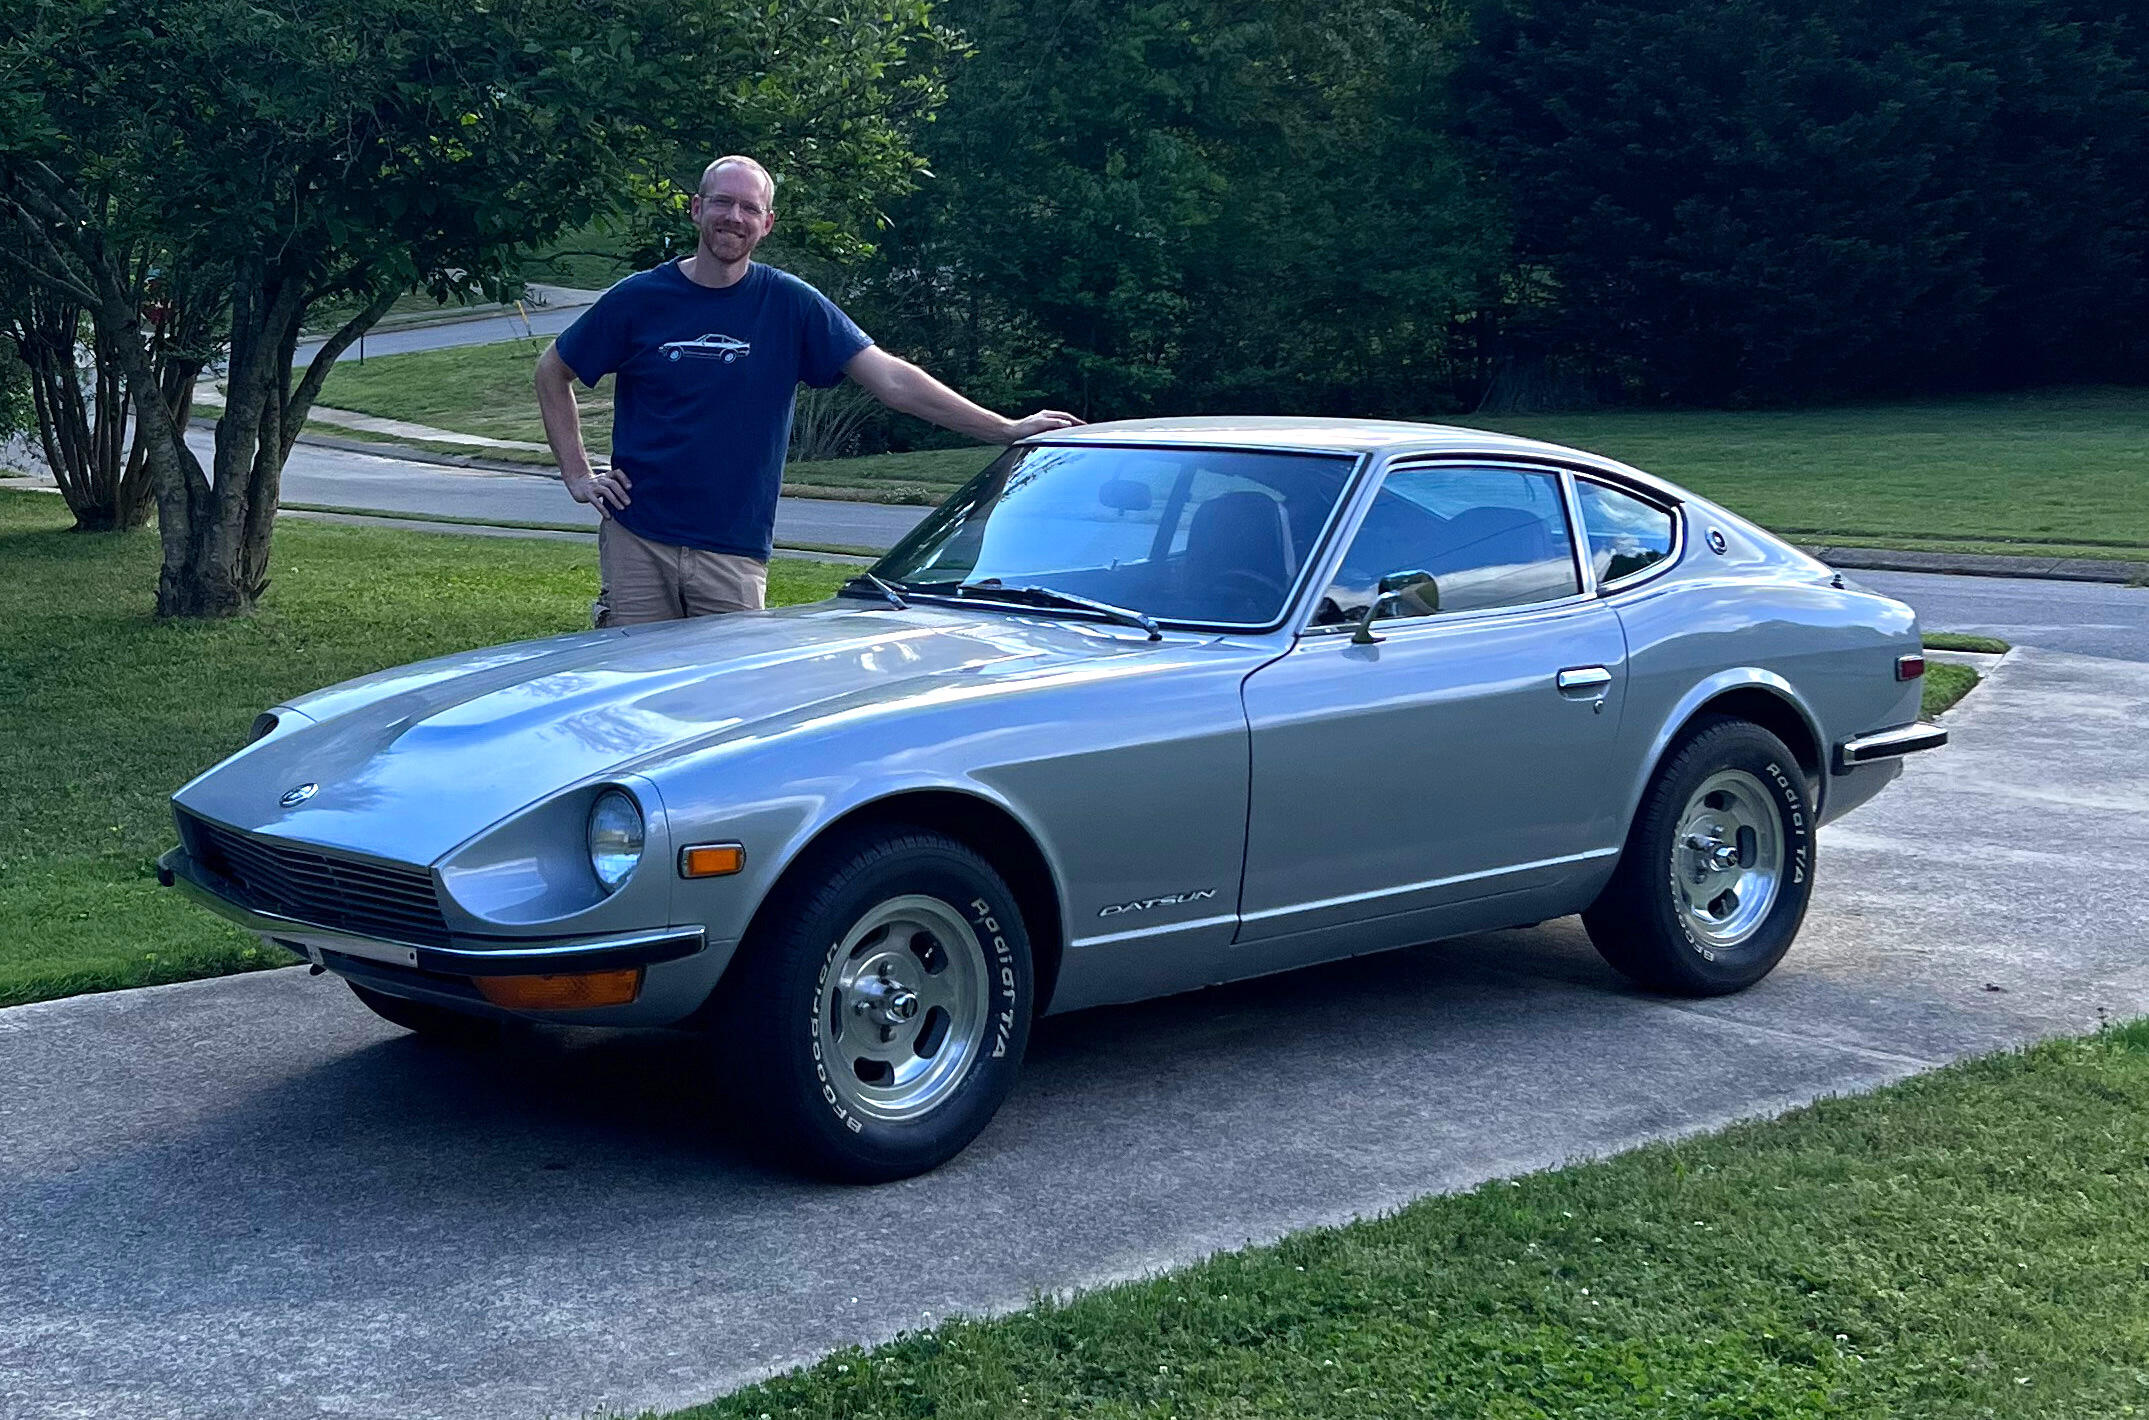
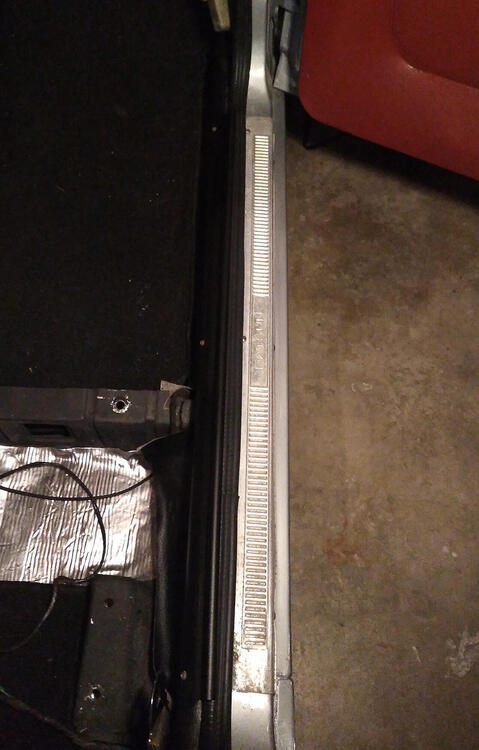
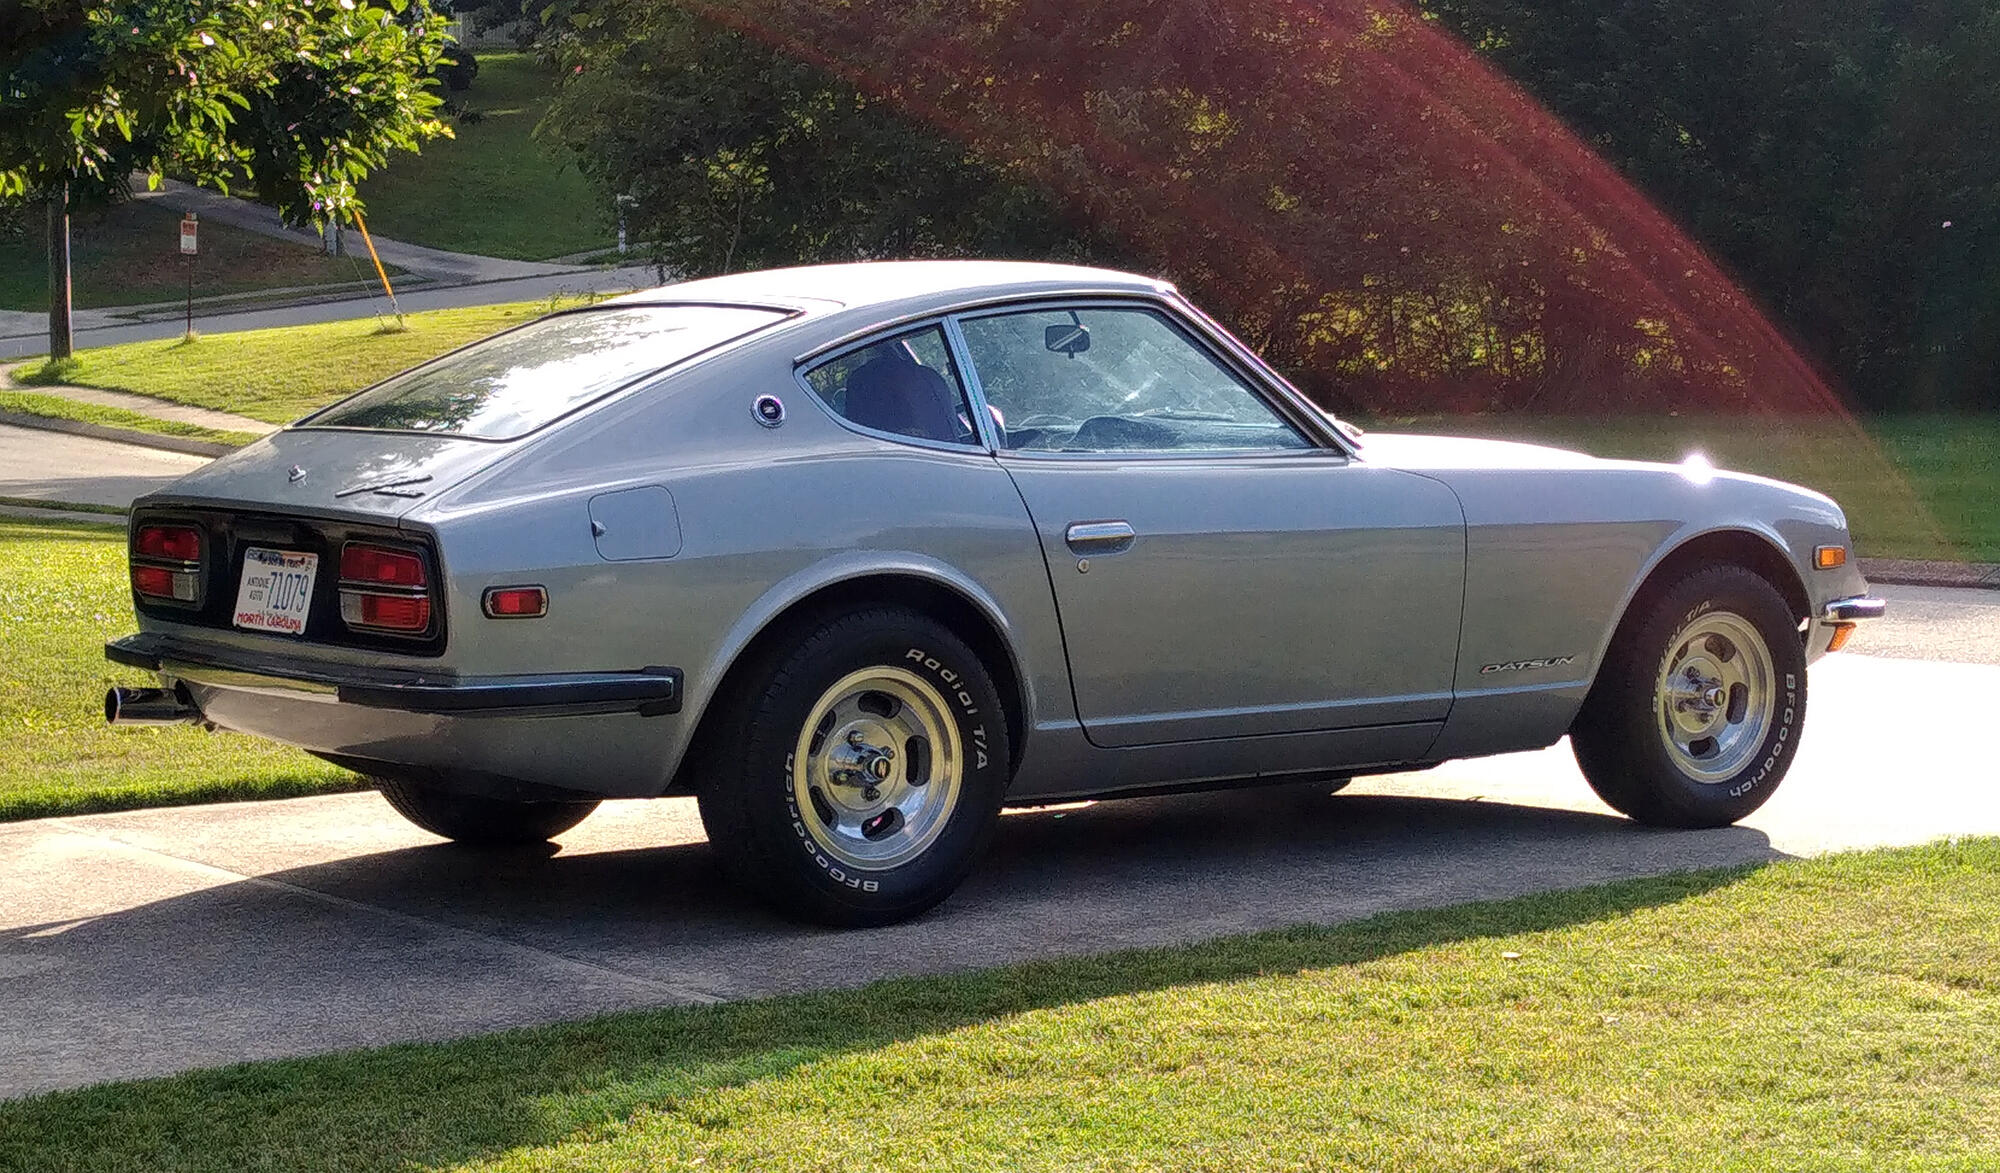
Some more progress, some with pics and some without: Seat belts bolted in. I have some M3 x 0.6 screws on order for the mechanism covers for the seats. Carpet-style dash cover added. The guy who was going to sell his crack-free dash backed out, so I'm going to have to go to Plan B (or C or D). New handbrake boot installed. Found the shift pattern emblem for the top of the shift knob, reattached. Realized I connected the wiper motor arm 180 degrees off (it's nice when the wipers go DOWN when activated), fixed. Driver's door adjusted. It took a really hard slam to shut before; it's better now, though still not as good as the passenger door, which is 100% PERFECT. Need a bit more love. Inner and outer door sills on (thread here) I did my best to clean the outers, but they still have some "patina." I'm OK with it for now. Still working through some electrical issues, as detailed in this thread. Drove it around the neighborhood last night, and it's like a different car compared to when I first got it back on the road in mid-2020: Then, it could barely make it up the (shallow) hill in front of the house, and it was misfiring all over the place, no brakes, etc etc. Now, it brakes and turns very well, and has only some slight misfiring when warmed up, all of which I'm hoping to dial out when the Colortune arrives and I get it timed perfectly. And once I get all the lighting operational, it will be fully road-worthy. So excited. Finally persuaded my wife to take a pic of me with the car. Here's your intrepid scribe next to the car that will have been in the family for a full 50 years come October:
 1 point


.JPG.cae94c1fa2c3260aa8584c69c98f39cc.JPG)