Leaderboard
-


Jeff Berk
 Subscriber
 5Points605Posts
 -

Captain Obvious
Free Member4Points9,814Posts -

xs10shl
Free Member4Points338Posts -

240ZBUILTBYME
Free Member3Points237Posts
Popular Content
Showing content with the highest reputation on 08/27/2022 in all areas
-
Although tempting to try and reverse engineering this, I think I'm going to just buy a few to keep in my tool compartment behind the seats as a just in case item.3 points
-
3 points
-
Im planning to remove the roof skin, both rear quarters, complete rear beaver/valance panel, and I will be cutting majority of the rocker panels open, not that theres much left to cut.... this way internal structures can be blasted and coated properly. Im planning to hopefully get brand new quarters from KFVJDM, i will need to get a mortgage for shipping to australia......😬3 points
-
 Thanks all, I don't mind the looks of them if I used it as an accent color, but I prob won't go through the hassle of putting them back on.. Seems serviceability wasn't in mind when they were installed 😕2 points
 -
 My options would be to drill it or use a die grinder on the rivet head.2 points
 -
 2 pointsI worked out a method to test the system for leaks back when I was having this problem. It ended up being the check valve at the fuel pump. Sounds like it could be your FPR, but new parts or rebuilt/refurbised parts can also leak. It's here in Resourses --> Knowledge Base --> Fuel system2 points
 -
I'm in. Oh, and "Two tubie slitty thingys." I dated her in high school.2 points
-
It might be handy to have a few of these on hand in case you need a fuse and don't have the correct glass fuse on hand. It will also be handy to use with a fuse buddy to track down issues with popping fuses. https://www.thingsnotable.com/
 1 point
 -
 Those rocker panel trim pieces were a dealer, or owner, installed upgrade on more than a few Zs in the 1970s. They were silver/chrome accent pieces prior to being painted your car's body color and gave the Z a bit of a lower/longer look. You might find a few rust spots under them when you take them off.1 point
 -
 Sorry but that's funny..😂 Oh well, well begun is half done. And you are making a good start to open up every nook and cravice!1 point
 -
 1 pointThank you for those pics and info guys appreciate it. Just wondering if that’s opening a big can of worms. Maybe welding a plate in there to fill the gap and call it. My buddy at work has done replacement on one before and is pretty good at body gonna see what he says trading some work. it was my dads car for 15 years. Happened to be a tow truck driver at the time and the car was towed and never got picked up got a killer deal on it. Someone put alot of time into it has a color change and they didn’t miss a spot on the paint, it’s a extremely high quality paint and for being my guess 20-25 years old it still looks amazing and a buff would bring it to near new finish problem is the door drains were clogged and it rusted out the bottoms and they need replacing, have the doors not sure on color match all painters are hacks now. I believe the whole car was been taken apart at some point and restored prolly in late 90s or early 2000s1 point
 -
 1 pointYou bet. For this one, I'm at arms reach to the shop. The shop in fact sub'd it out for the second set up to "get it done right" but I have to say I'm flying blind. Thanks again, hope to revert back with some pics of the wipe pattern early next week. Cheers!1 point
 -
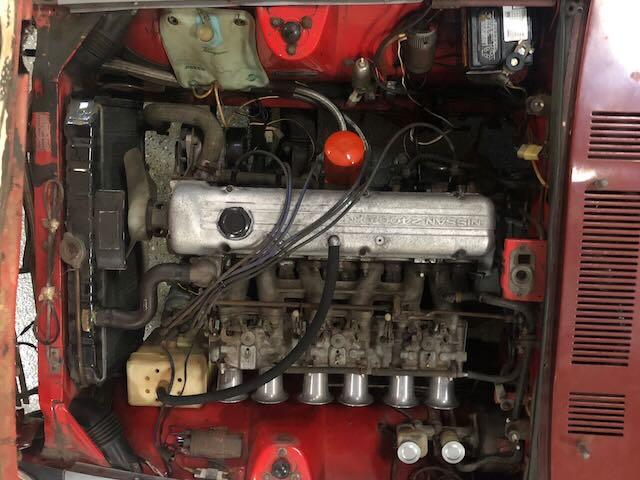
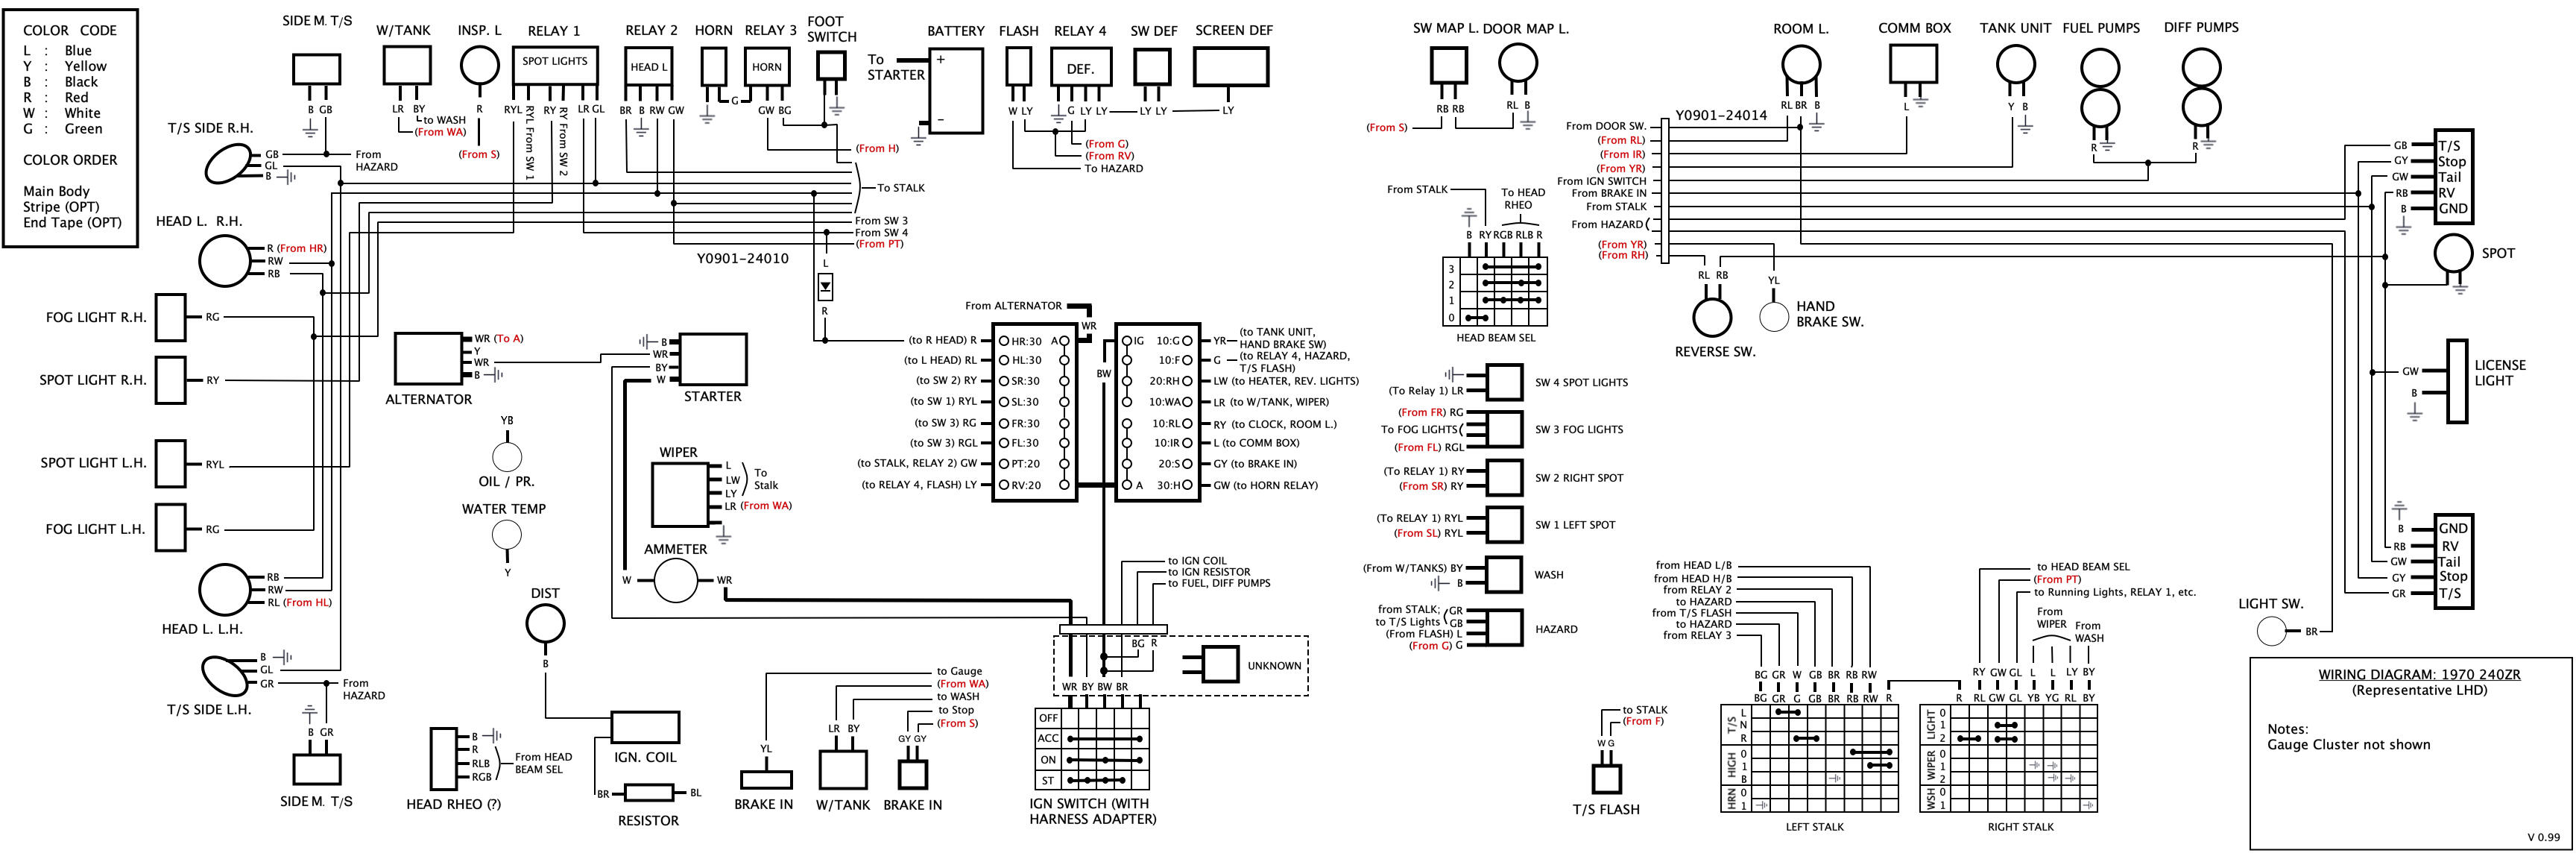
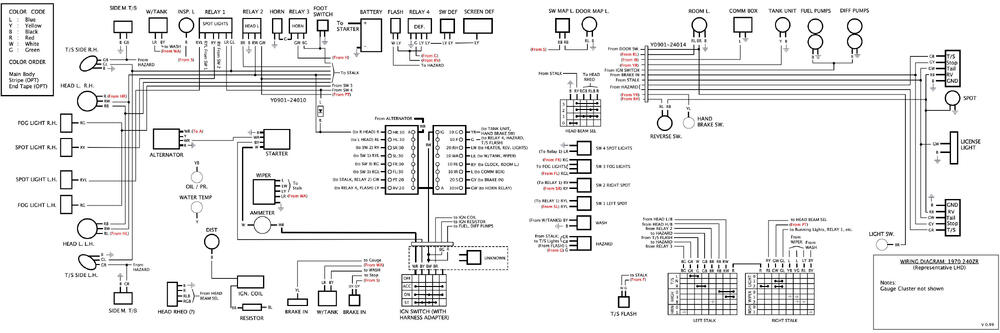
With respect to the CDI - the car currently has a special points-based distributor on it, which is the same kind as found on another Works car, and is potentially the same as an early L24 distributor, AFAIK. I've mapped out the entire wiring harness as shown below - this harness is in 2 parts (split at the fuse boxes) and has 2 Works part numbers, and date codes of 9/70 and 8/70, respectively. On the assumption that the wiring harness gets installed first, I've used this information to date the Works build as likely being 9/70 to 10/70, which would give the team about 45 days to test and ship the cars off to Monte Carlo. This particular harness contains no additional wiring to accommodate a CDI, as would appear in a Z432 with CDI of the same era. That said, there has been some private discussion about whether a CDI was used via an alternate means, as there is evidence of it's use in similar period Works cars. In the case of my car, it's use would likely be facilitated via a separately wired harness, which is no longer with the car. As to an interface to the existing harness: there is a missing 6" sub harness at the steering column that has been replaced with a later-period custom harness. This could very easily have been the junction point where a CDI could have been connected, as much of the relevant wiring would be there. This is marked as "UNKNOWN" on the wiring diagram. It should be noted that this is just pure speculation at this point. FYI, the above is my most current information, based on what I've already mapped out. It's entirely possible we may find more wiring surprises buried under the dash when we start the restoration process. Barring any revelations re: CDI, I'll likely restore it as-acquired, without it.
 1 point
 -
 1 pointI have found that subframe metal is pretty stout. I believe I have pictures of that area in my build thread. I had to take the rear panel out and pull that exact area. A good frame machine is really the tight tool for that!1 point
 -
 1 pointThere are some frame charts I've seen - take a search online and see if they give you the dimensions you need. I can take some rough measurements if you need. Just let me know. However, I think the frame chart might be your best info.1 point
 -
 1 pointIt's not exactly plug and play. I just don't like cutting factory wires if I don't have to. One could back out the BW wires out of C-2 and C-3 and put them into smaller AMP connectors. The dash harness side would go to the key source on the Pertronix. The BW on the engine harness side would go to the BW on the Pertronix. That would save running a wire all of the way from the Pertronix in the passenger footwell to the coil.1 point
 -
I just received this from the inventor/distributer: Hello Jeff, sorry for the delay The members discount is “value15”. This will save members 15% off the entire order. Thank you1 point
-
1 point
-
Because that's the sort of thing you do when you have access to a laser cutter. Haha!!1 point
-
 1 pointThis thread has made me rethink my engine restoration. I have old Nikki and Ampco fuel pumps. I believe both are the originals to 240s. After reading a bunch of threads I decided to order a NOS Nikki that according to others has all the same internals as the one for the 240. I will attempt to rebuild one of my old originals and do away with the made in china knock off.1 point
 -
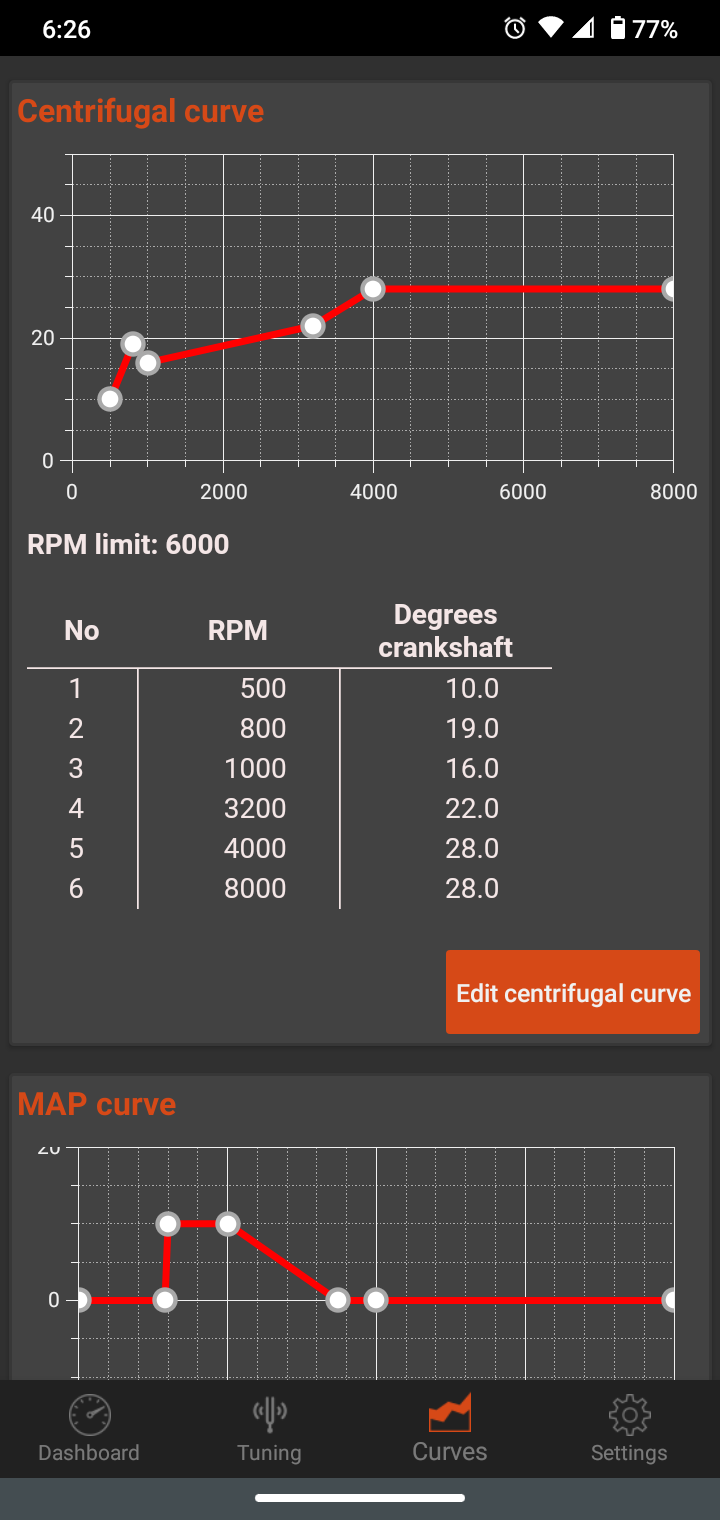
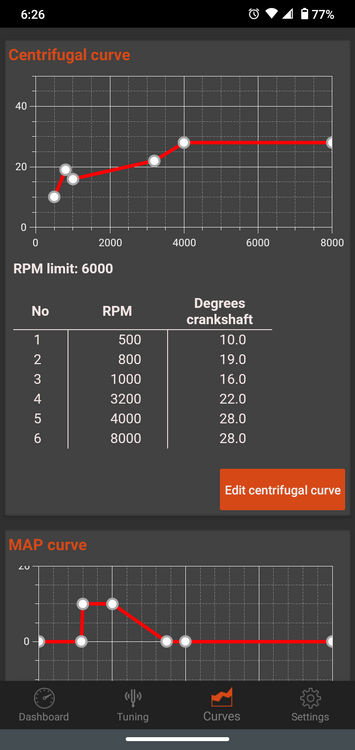
 1 pointHere is where mine is and it runs pretty smooth. It's kind of on the mild side. The engine is an F54/P79 mild cam(stage 2) shaved head with lightened pistons(Datsun Spirit stage 2)running FAST EFI. All we get here is 92 octane. It's right at 10:1 compression ratio. Seems to be a bit happier with non ethanol.
 1 point
 -
 1 pointIn my case, I tried every possible combination of things I could think of over a several year period. I deadheaded it first with the mechanical pump and then with an electric pump. Deadheading did improve it somewhat on my car, but not enough. Mine would run great for 30 minutes in a race and then start to fall on its face at high RPM and get progressively worse until it wouldn't pull at all aver about 4000 RPM. When I'd pit for fuel, it would refuse to restart and I killed several starters over a number of races. The electric pump didn't help until I dropped it down below the tank height as shown above. I also immediately opened the hood at pit-in to reduce the heat soak from the cherry red exhaust. Those two things would usually allow it to restart after refueling. When I clamped the return, it would run longer and better as long as the ambient temp wasn't really hot. In one 25 hour race, it ran like crap in the 85F daylight and then ran great from sunset until it got hot again around 10am. Lap times are normally much slower in the pitch black, but we turned our fastest laps around 3am when the temps were lowest. Ditching the fuel rail along with the other mods made my car run great even in 90+ temps in race conditions. I sold the car before I was able to do any A-B-A testing to see if I could undo any of the mods. I had a huge multi-layer heat shield plus additional bowl shields and the back of the hood was propped-up 2 inches.
 1 point
 -
 1 pointThe troubleshooting methodology you posted seems logical and I would have followed the same steps. That said, I had a similar issue my on the 1973 I owned years ago. The vapor lock issue was addressed as per the Datsun service directive, but I would find myself stranded at times. In my situation it was more of a flooding issue than vapor lock. I adjusted the floats, which seems to resolve the issue. On interesting side note: Years ago, I drove this very car to the Nissan dealership in Santa Maria, CA to purchase an OEM oil filter. Then, I got in the car would not start after much cranking. An older service technician saw me struggling and walked over. He asked me to pop the hood open and then he began removing the plug wires from the plugs and re-inserting them back on just short of being snapped into place. He then asked me to crank the car again and it started!!! I'm not sure what voodoo or magic makes this work, but I was grateful nonetheless. I had to use this technique a couple more times before eventually selling the car.1 point
 -
 1 pointThe ECU is very sensitive the its signal from the coil negative post to the pin on the harness at the ECU. You need to confirm that that path is clean and useful, as was said several times above. Could be that engine started on CSV fuel, which turns off when the engine is started, or when the valve gets hot from its internal heater. I've found also, that spark can be visible outside the cylinder, during a test, but too weak to start the engine. In my case, starting fluid would start it but it wouldn't light up on gasoline. You might also have a giant vacuum leak. "Nothing" doesn't tell much. No spark, no change in timing, no engine start....? The answer often lies in the tiny details. The FSM Electrical chapter probably shows where all of the relays and fuses are.1 point