Leaderboard
-
.JPG.cfcada9cf1c1b502df3f5f2f2ca3ff36.JPG)

SteveJ
Free Member13Points9,574Posts -


siteunseen
Free Member6Points14,905Posts -


SpeedRoo
Free Member6Points295Posts -

inline6
 Subscriber
 6Points1,237Posts
Popular Content
Showing content with the highest reputation on 01/16/2023 in all areas
-
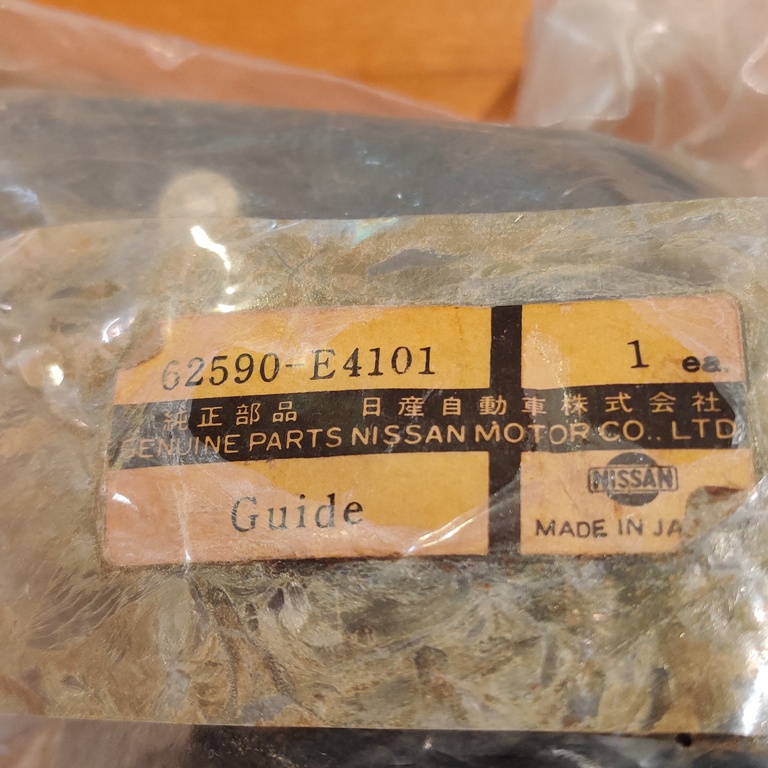
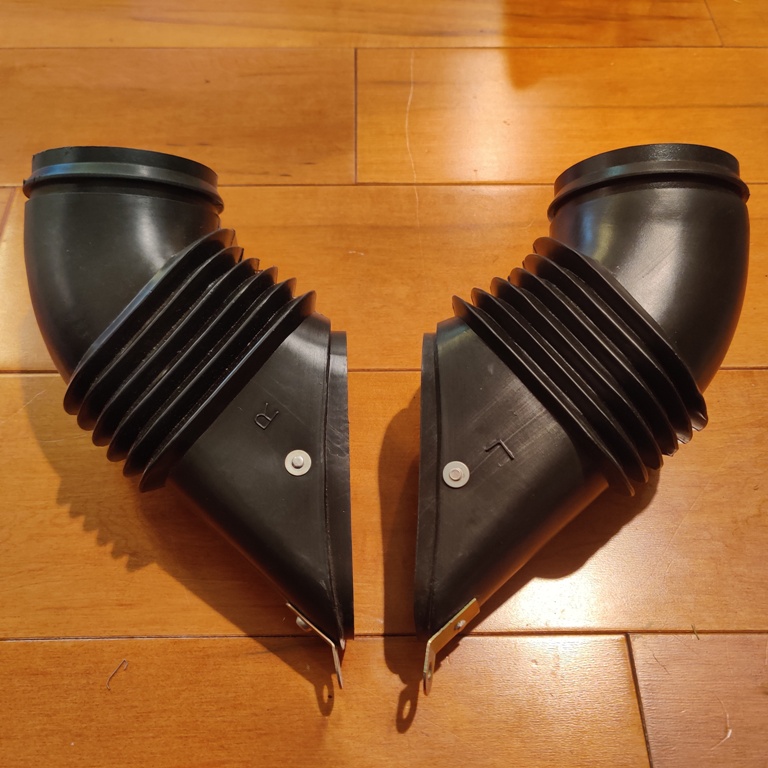
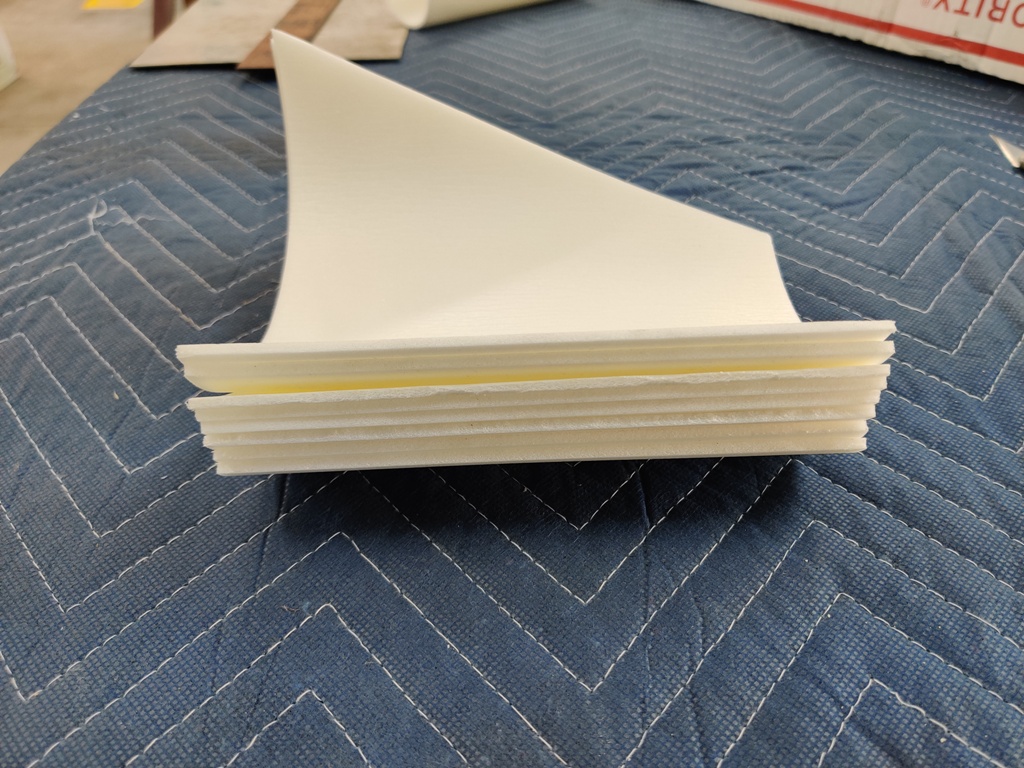
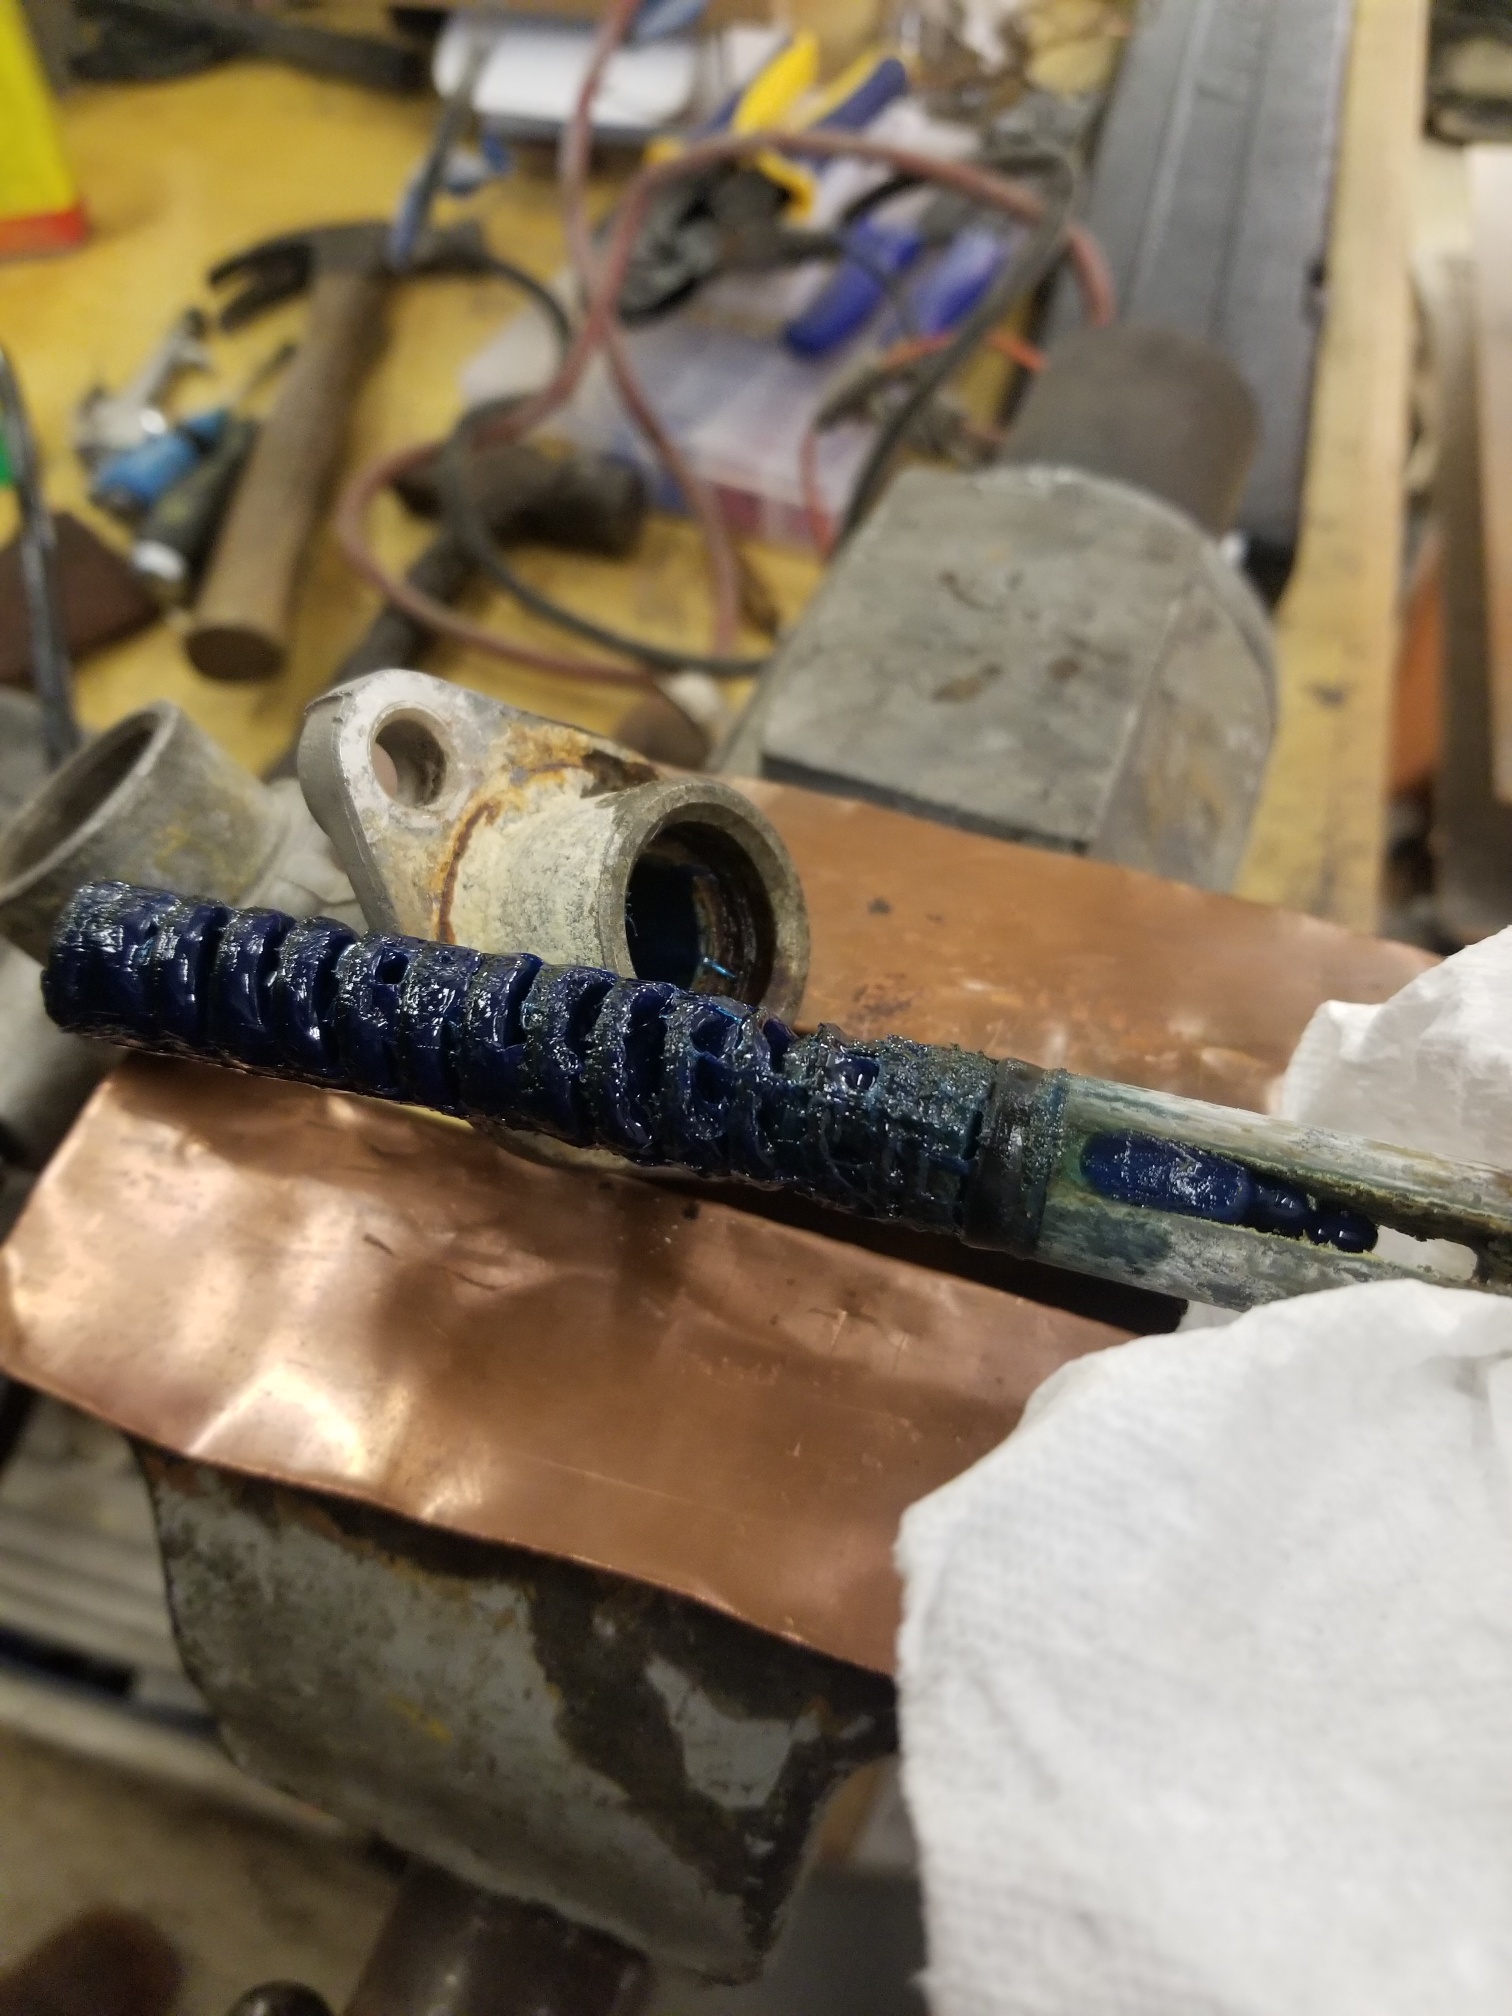
Just an update on the reproduction Yazaki plug leads, Thanks to Mike @zspert and @CanTechZexcellent drawings, along with a set of NOS 1971 Yazaki coil leads from Kuwait of all places, I have finished up the CAD drawings and produced some rubber pieces for testing of fit and function. In the meantime I'm sourcing the correct 7mm carbon core leads. I'll be trialing a set on my 1970 240Z this week before I screen print the original markings onto the leads in yellow as originally done. The plan is to offer a limited run of 1969 and 1970 sets initially, both those years used the same rubber connector boots and yellow markings. Once I've sourced one of the angled boots for #6 lead on the 1971, 1972 and 1973 240Z I'll offer those as well which have the white markings. Apologies for taking so long to get this sorted but sourcing original parts to replicate was the main stumbling block. Initial cost estimate is around USD$250 for a set of reproduction leads. They will be made here in the USA not outsourced to China! Interested owners so far include @hiyabrad @Zup @VaCat33 @26th-Z @240dkw @inline6 Feel free to add any comments.5 points
-
The owner of the collection, Randy Jaffe, is a great guy to hang out with. Getting to turn wrenches on a Z and hang out with a great Z friend is a kick arse way to spend the day. The only thing that could have made it better is calling the wife to look for a part you need, and not only does she find it, she delivers it. Wait! That happened, too! That makes it a SUPER kick arse day!4 points
-
3 pointsA couple of discontinued, NOS parts in my hoard for the car I am restoring:
 3 points
 -
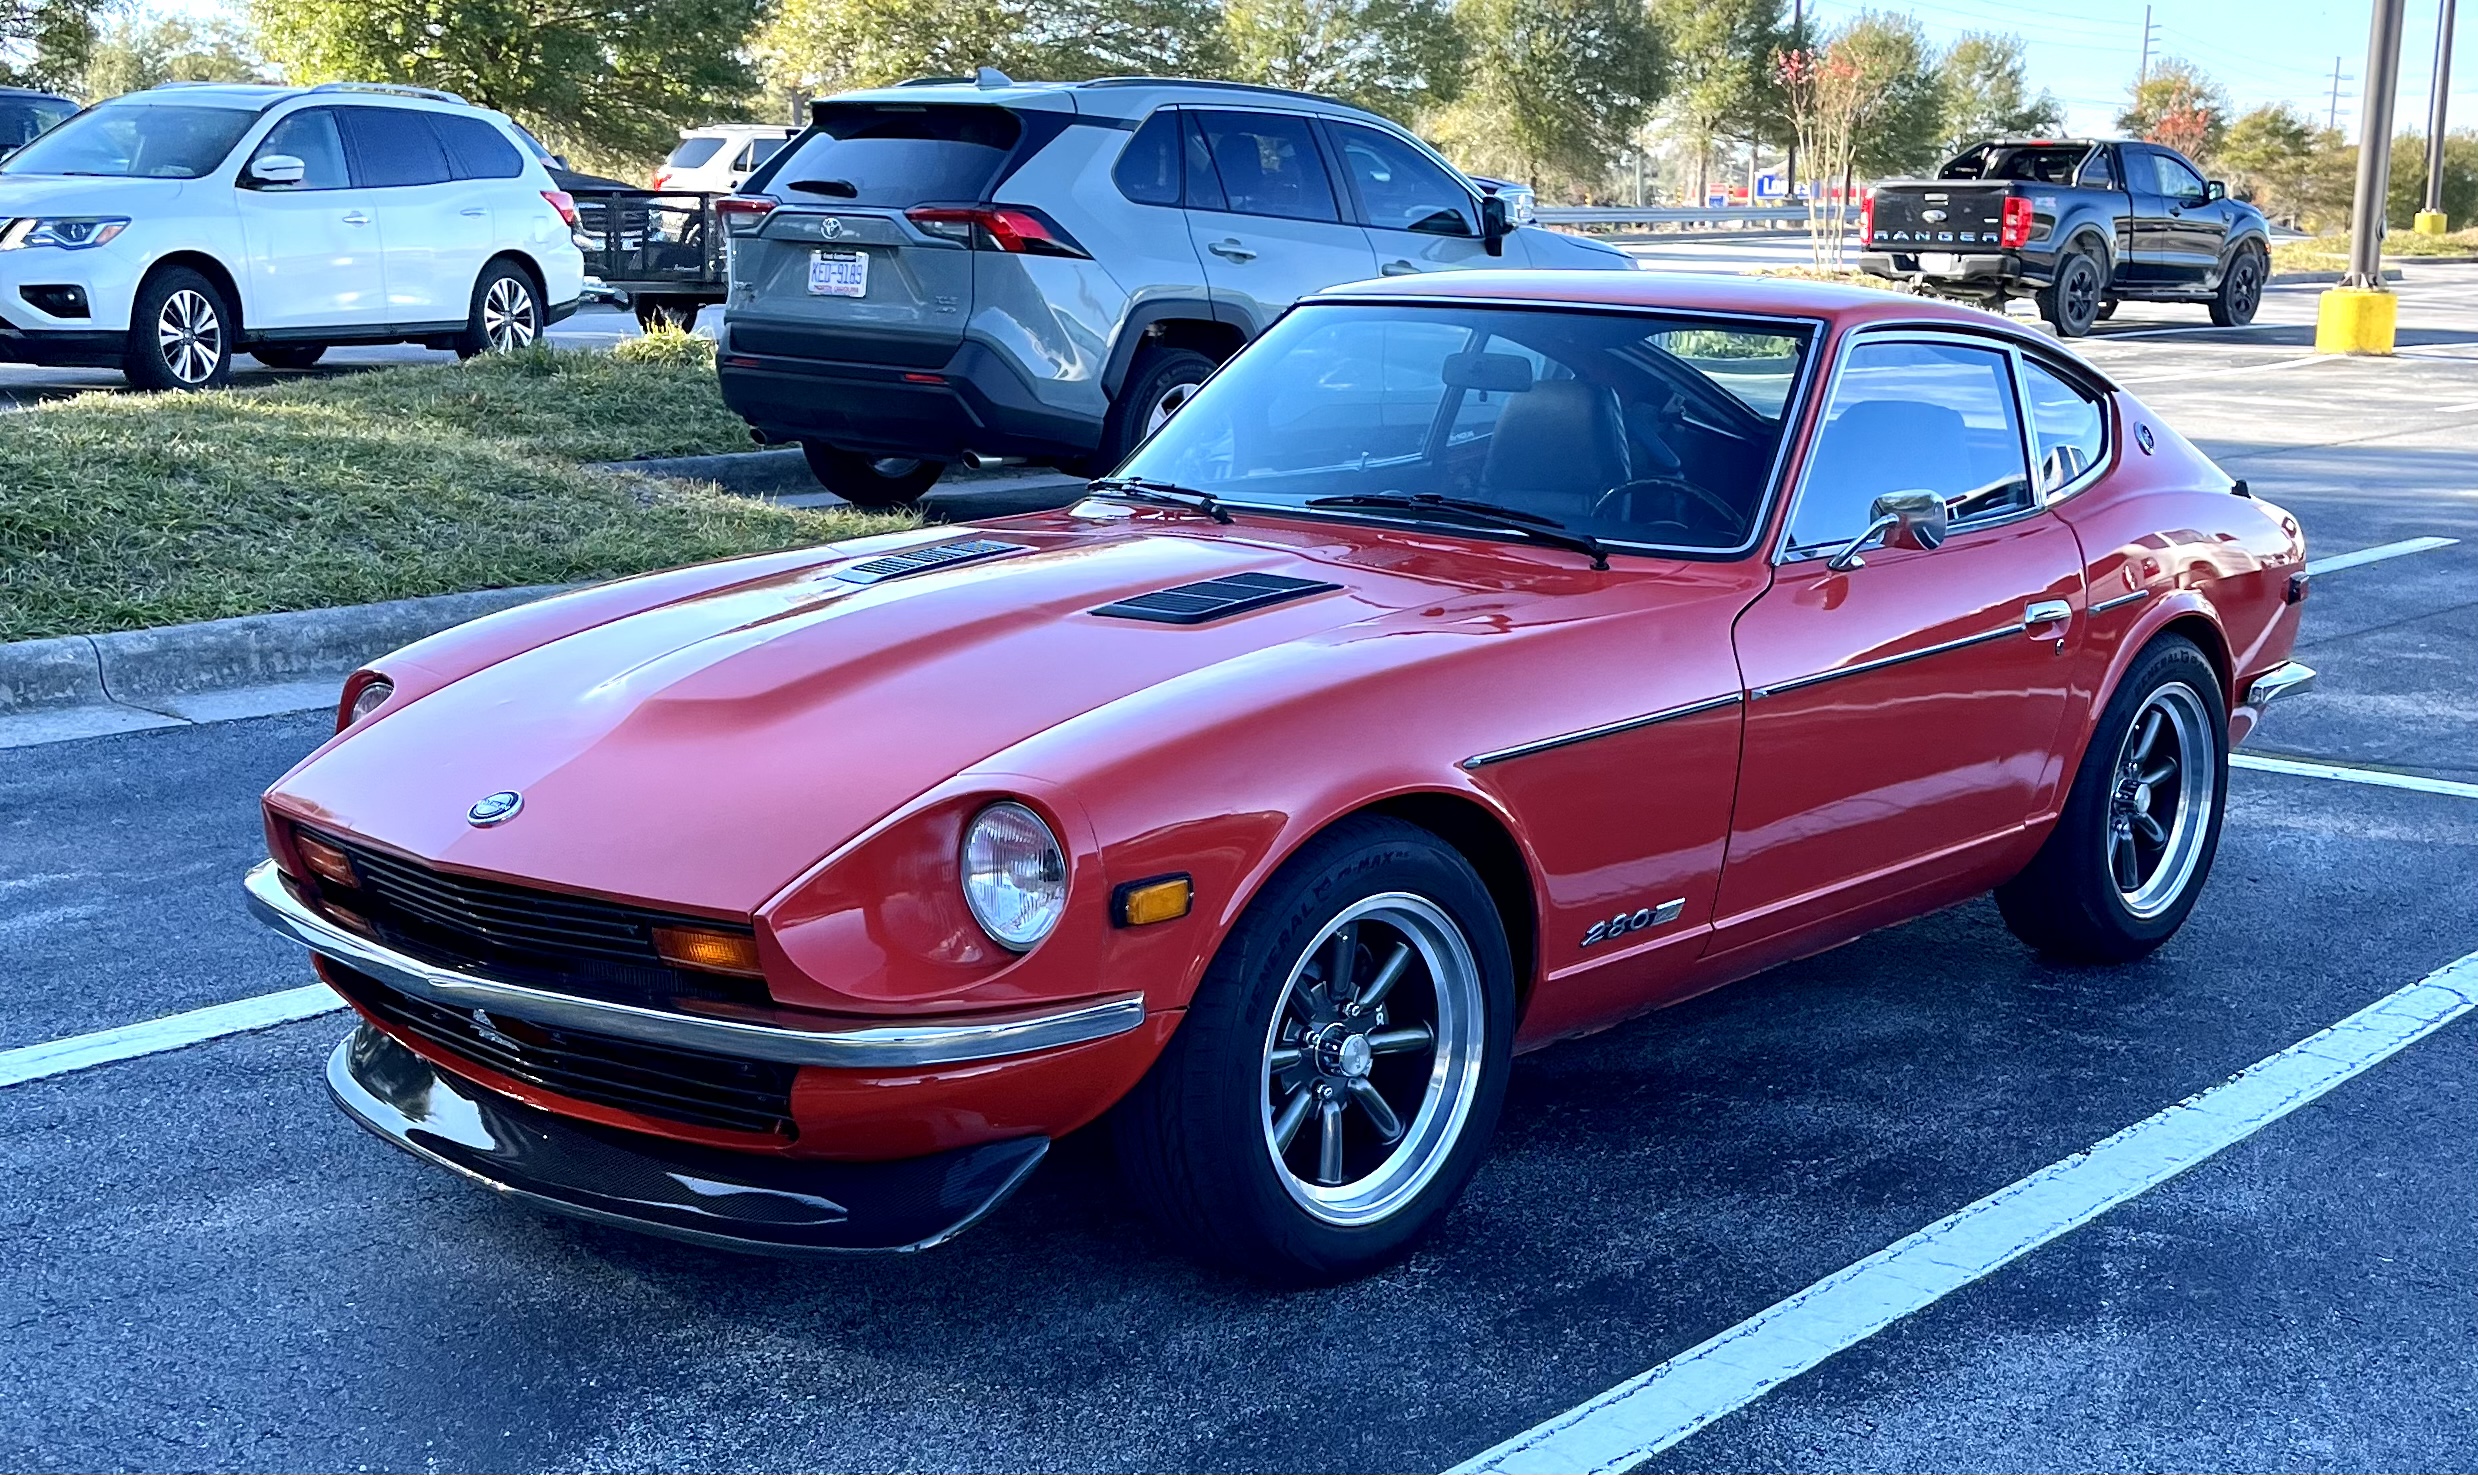
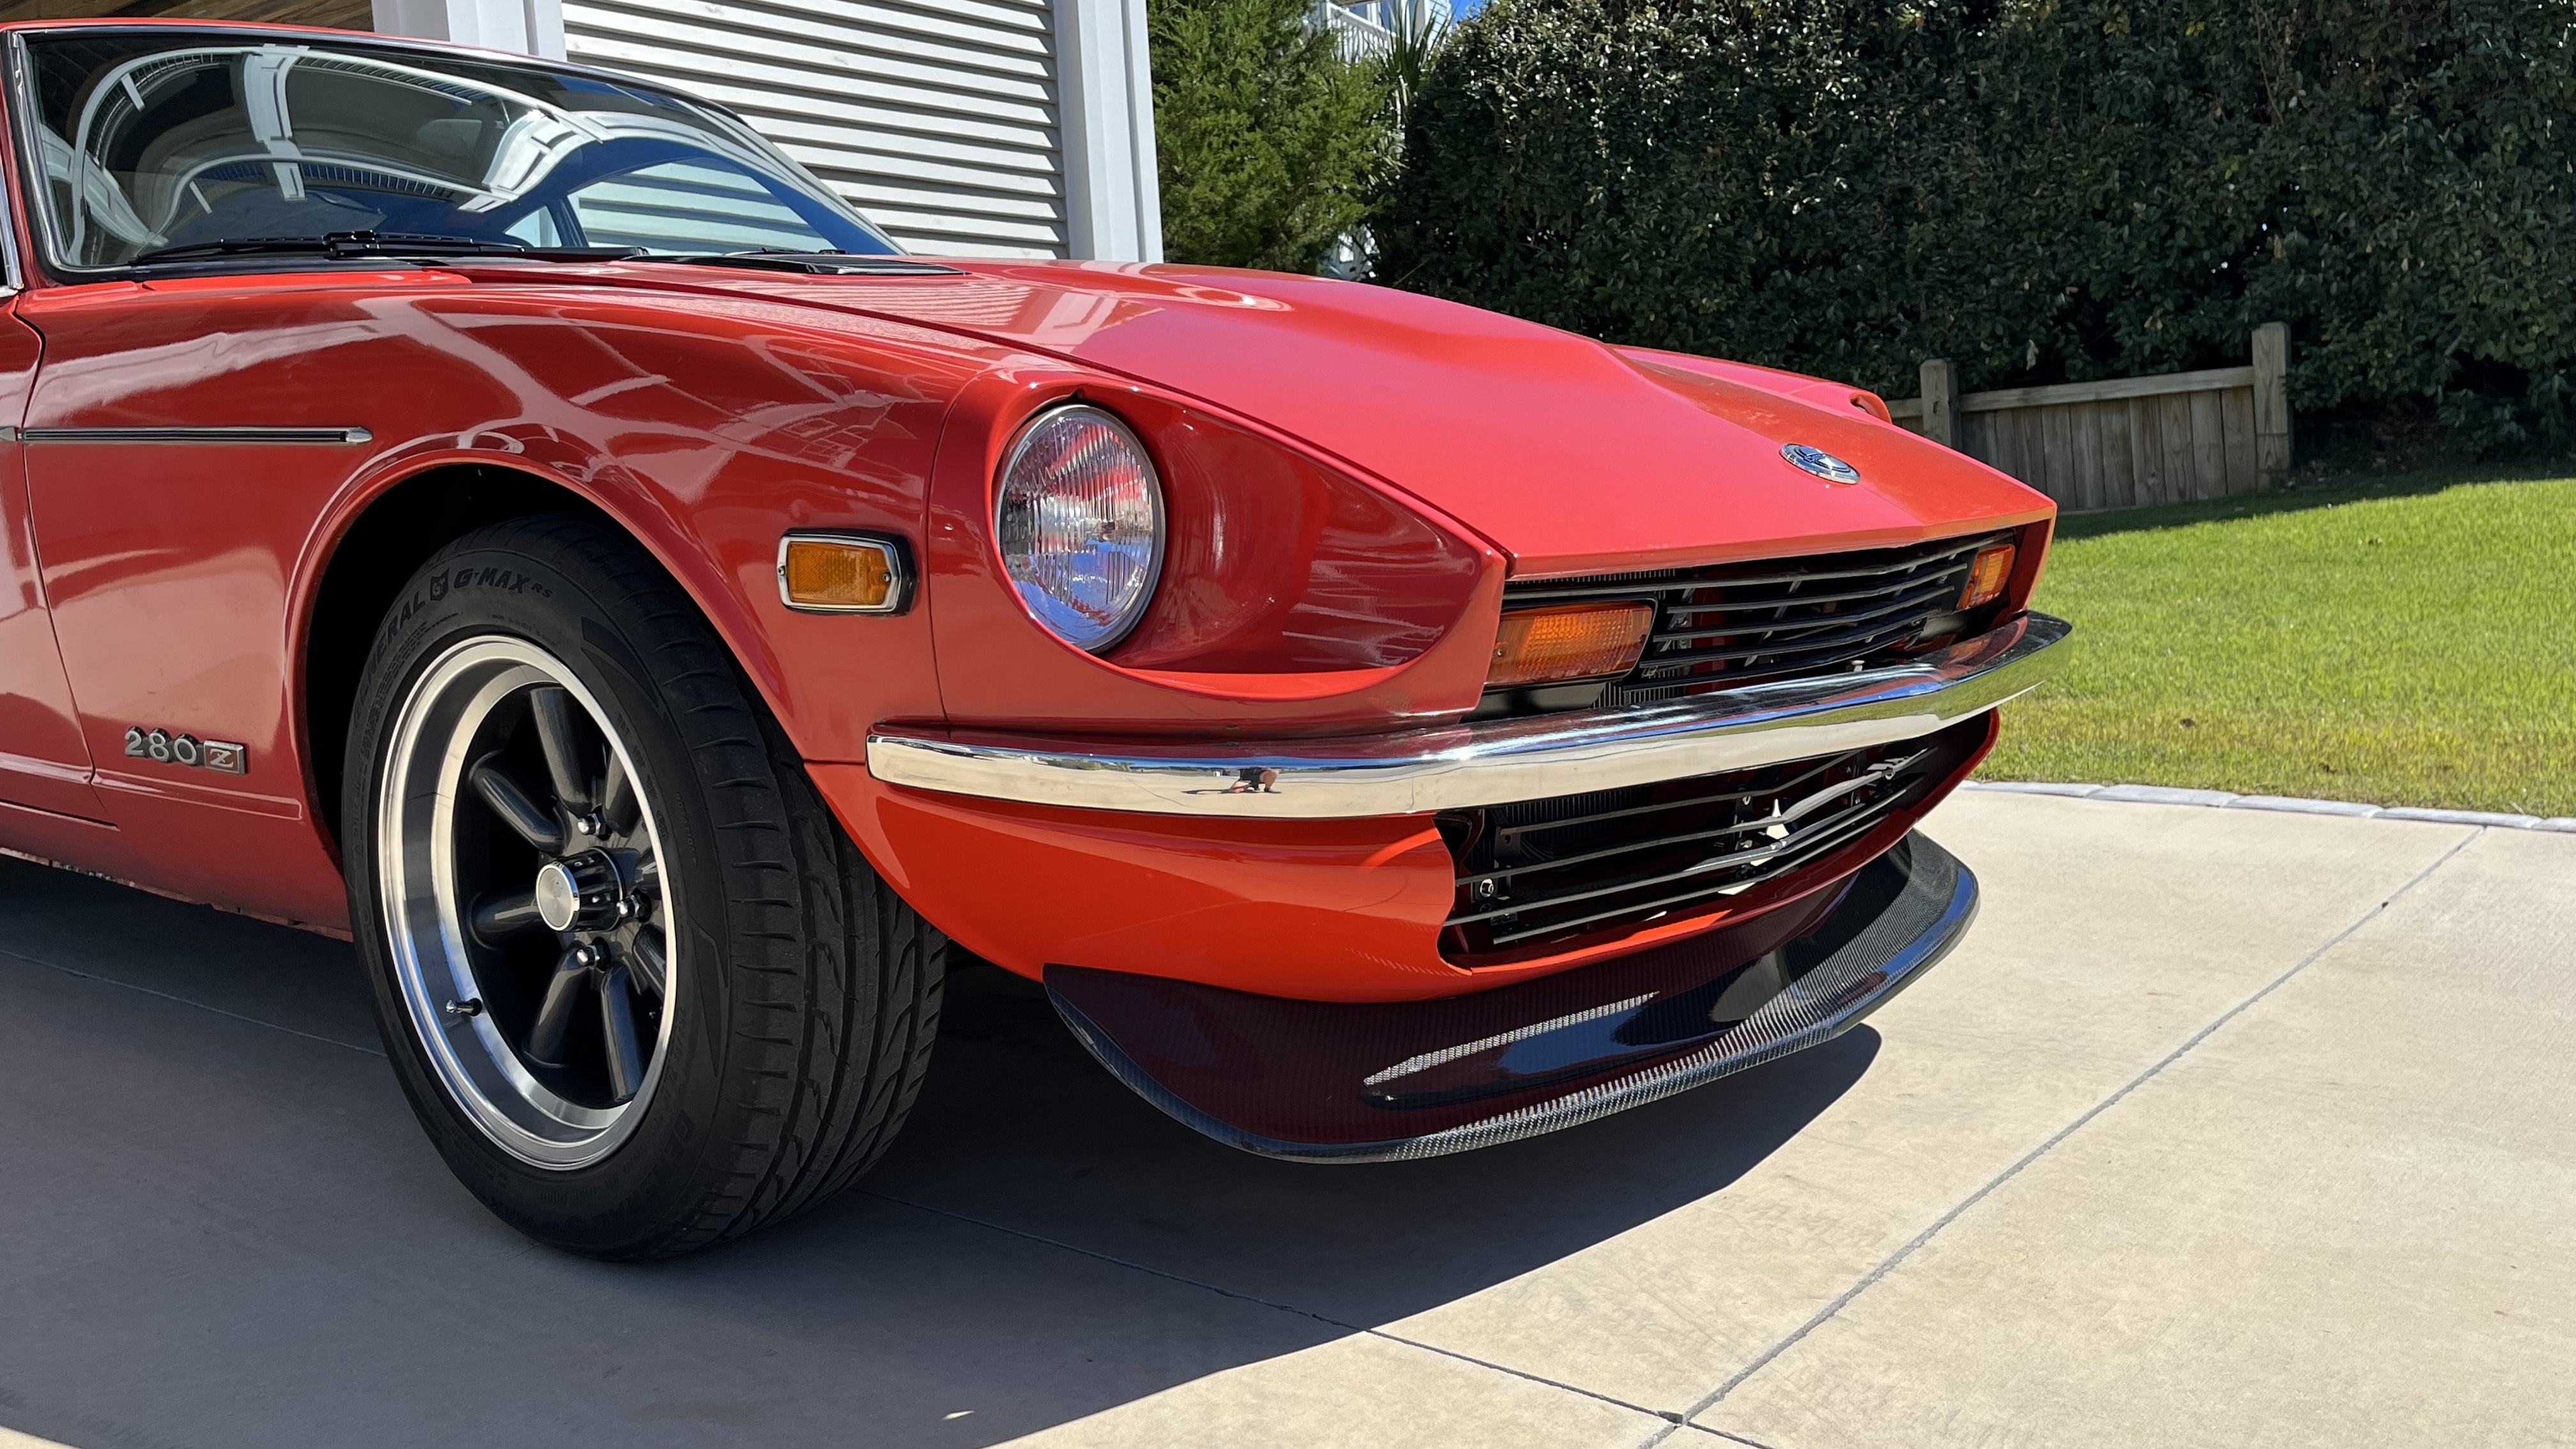
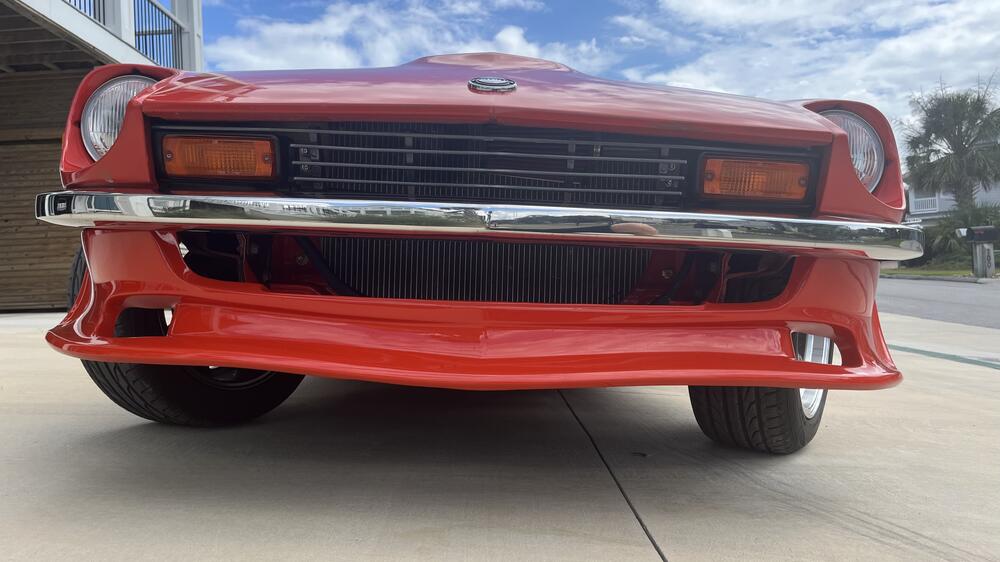
 Yarb, It appears the one you want is going to be a hard find. I used my skills to try and locate you one but no luck, in fiberglass. Here’s what I found on the inter-webs. Here is the Xenon 3124 which is the style you want but not made of fiberglass. https://shop.teamxenon.com/collections/air-dams/products/3124 Here is are fiberglass ones without ducts you want. https://overboost.com/modelodrive-frp-salt-air-dam-front-lip-valance-datsun-240z-s30-1970-1973-modelodrive_120293/ https://rspeccarbon.com/collections/datsun-s30/products/front-airdam-s30 Here is a ducted 240z style air dam with round ducts. https://www.ebay.com/itm/122396634572?chn=ps&mkevt=1&mkcid=28&srsltid=AeTuncr0dyf9bb_AtPcW3CoRTGZD-6l3hPuE6U6cWGIgU2zyV_QSmMLPiRc Finally, here is a guy with a 240z and an extra MSA Type 1 Air dam for sale in Olympia Wa. Doesn’t say if it’s fiberglass or Urethane, you’re gonna have to call him. My recommendation is buy the Urethane, it ban be reinforced with aluminum strips and then braced to the existing mount center mount point on the car. I already mocked up this bracket but then I decide to go a different direction and on my front. You can see a slight wave in my urethane xenon and that bothered me. I think I got a bad one, seems hit or miss but your don’t have a lot of options. I’m happy with the new look but everyone has different tastes. I like vanilla ice cream my wife hates it. I still thinks she’s great. Good luck Goose. Here are some pics of my MSA air dam vs the stock front valance with a carbon fiber lower lip. Both look good to me but I prefer the stock front valance. I was able to fill in the lower grill area by using an extra lower stock grill and attaching it to the original one.


 3 points
 -
 3 pointsThanks Bud! Yeah, I'm OK, but honestly have been better. I got covid at Thanksgiving and am still working out a couple kinks. Still. Hoping 2023 is better than the end of 2022.3 points
 -
2 points
-
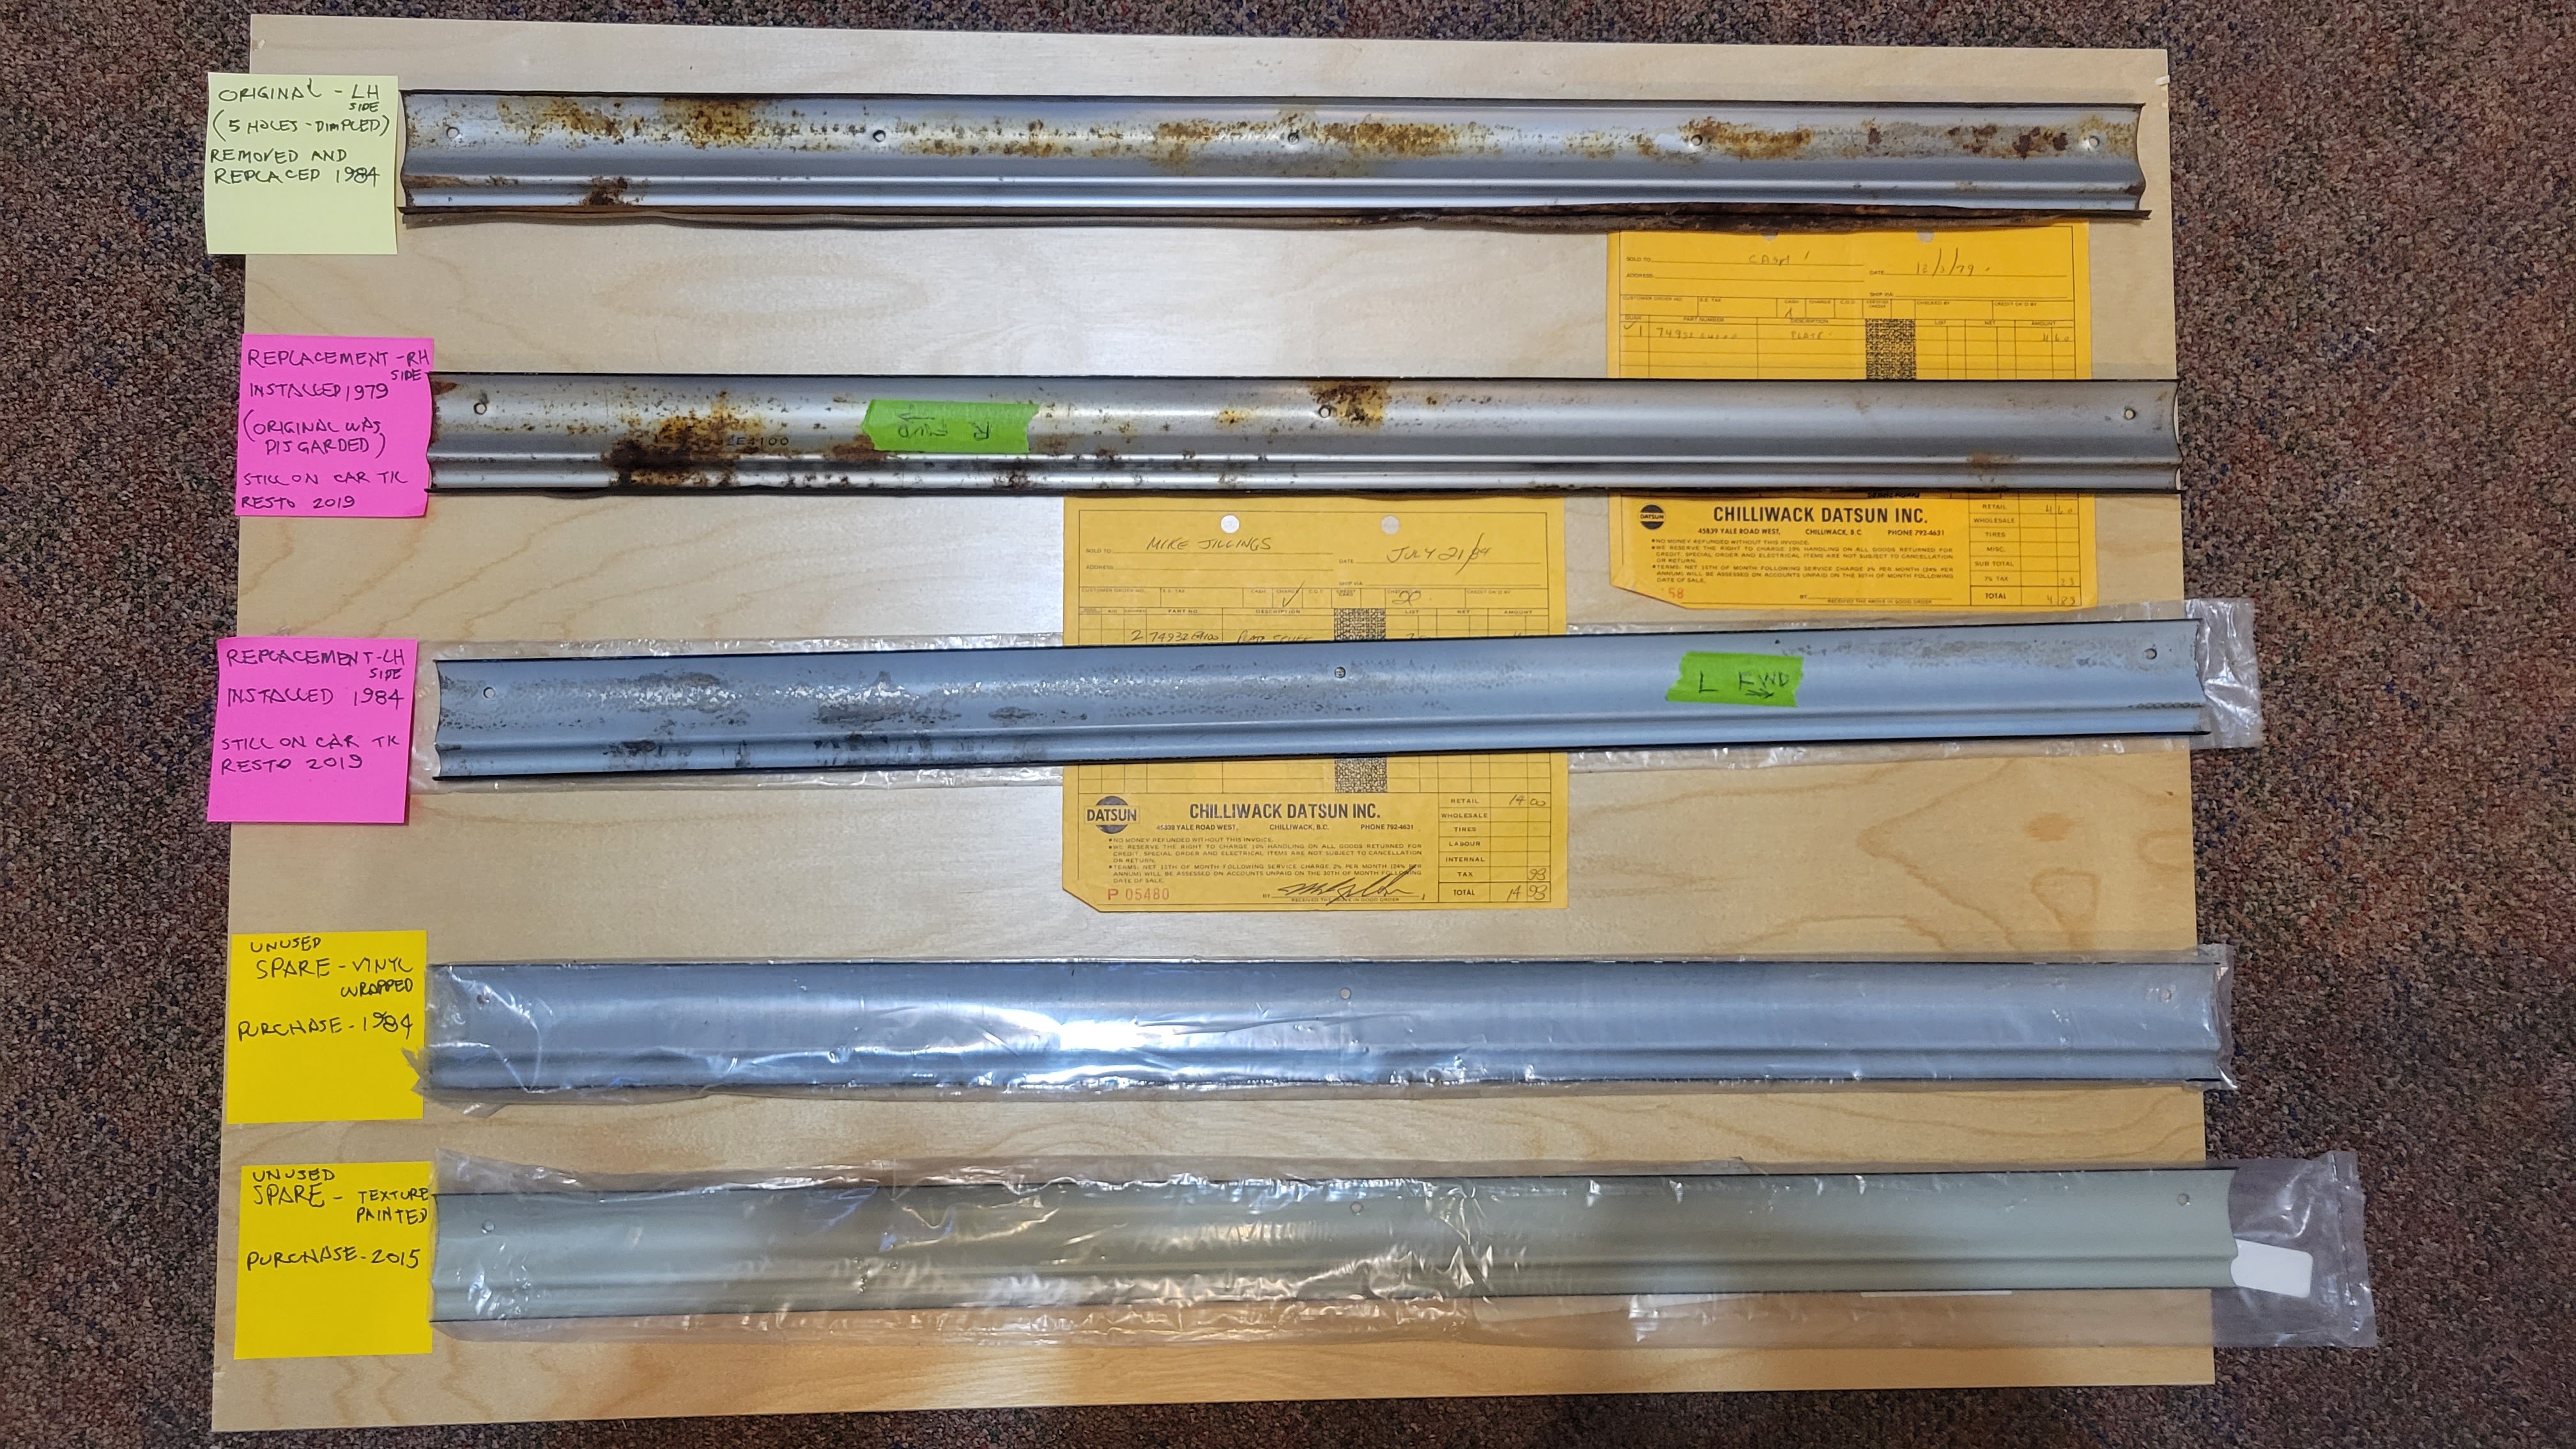
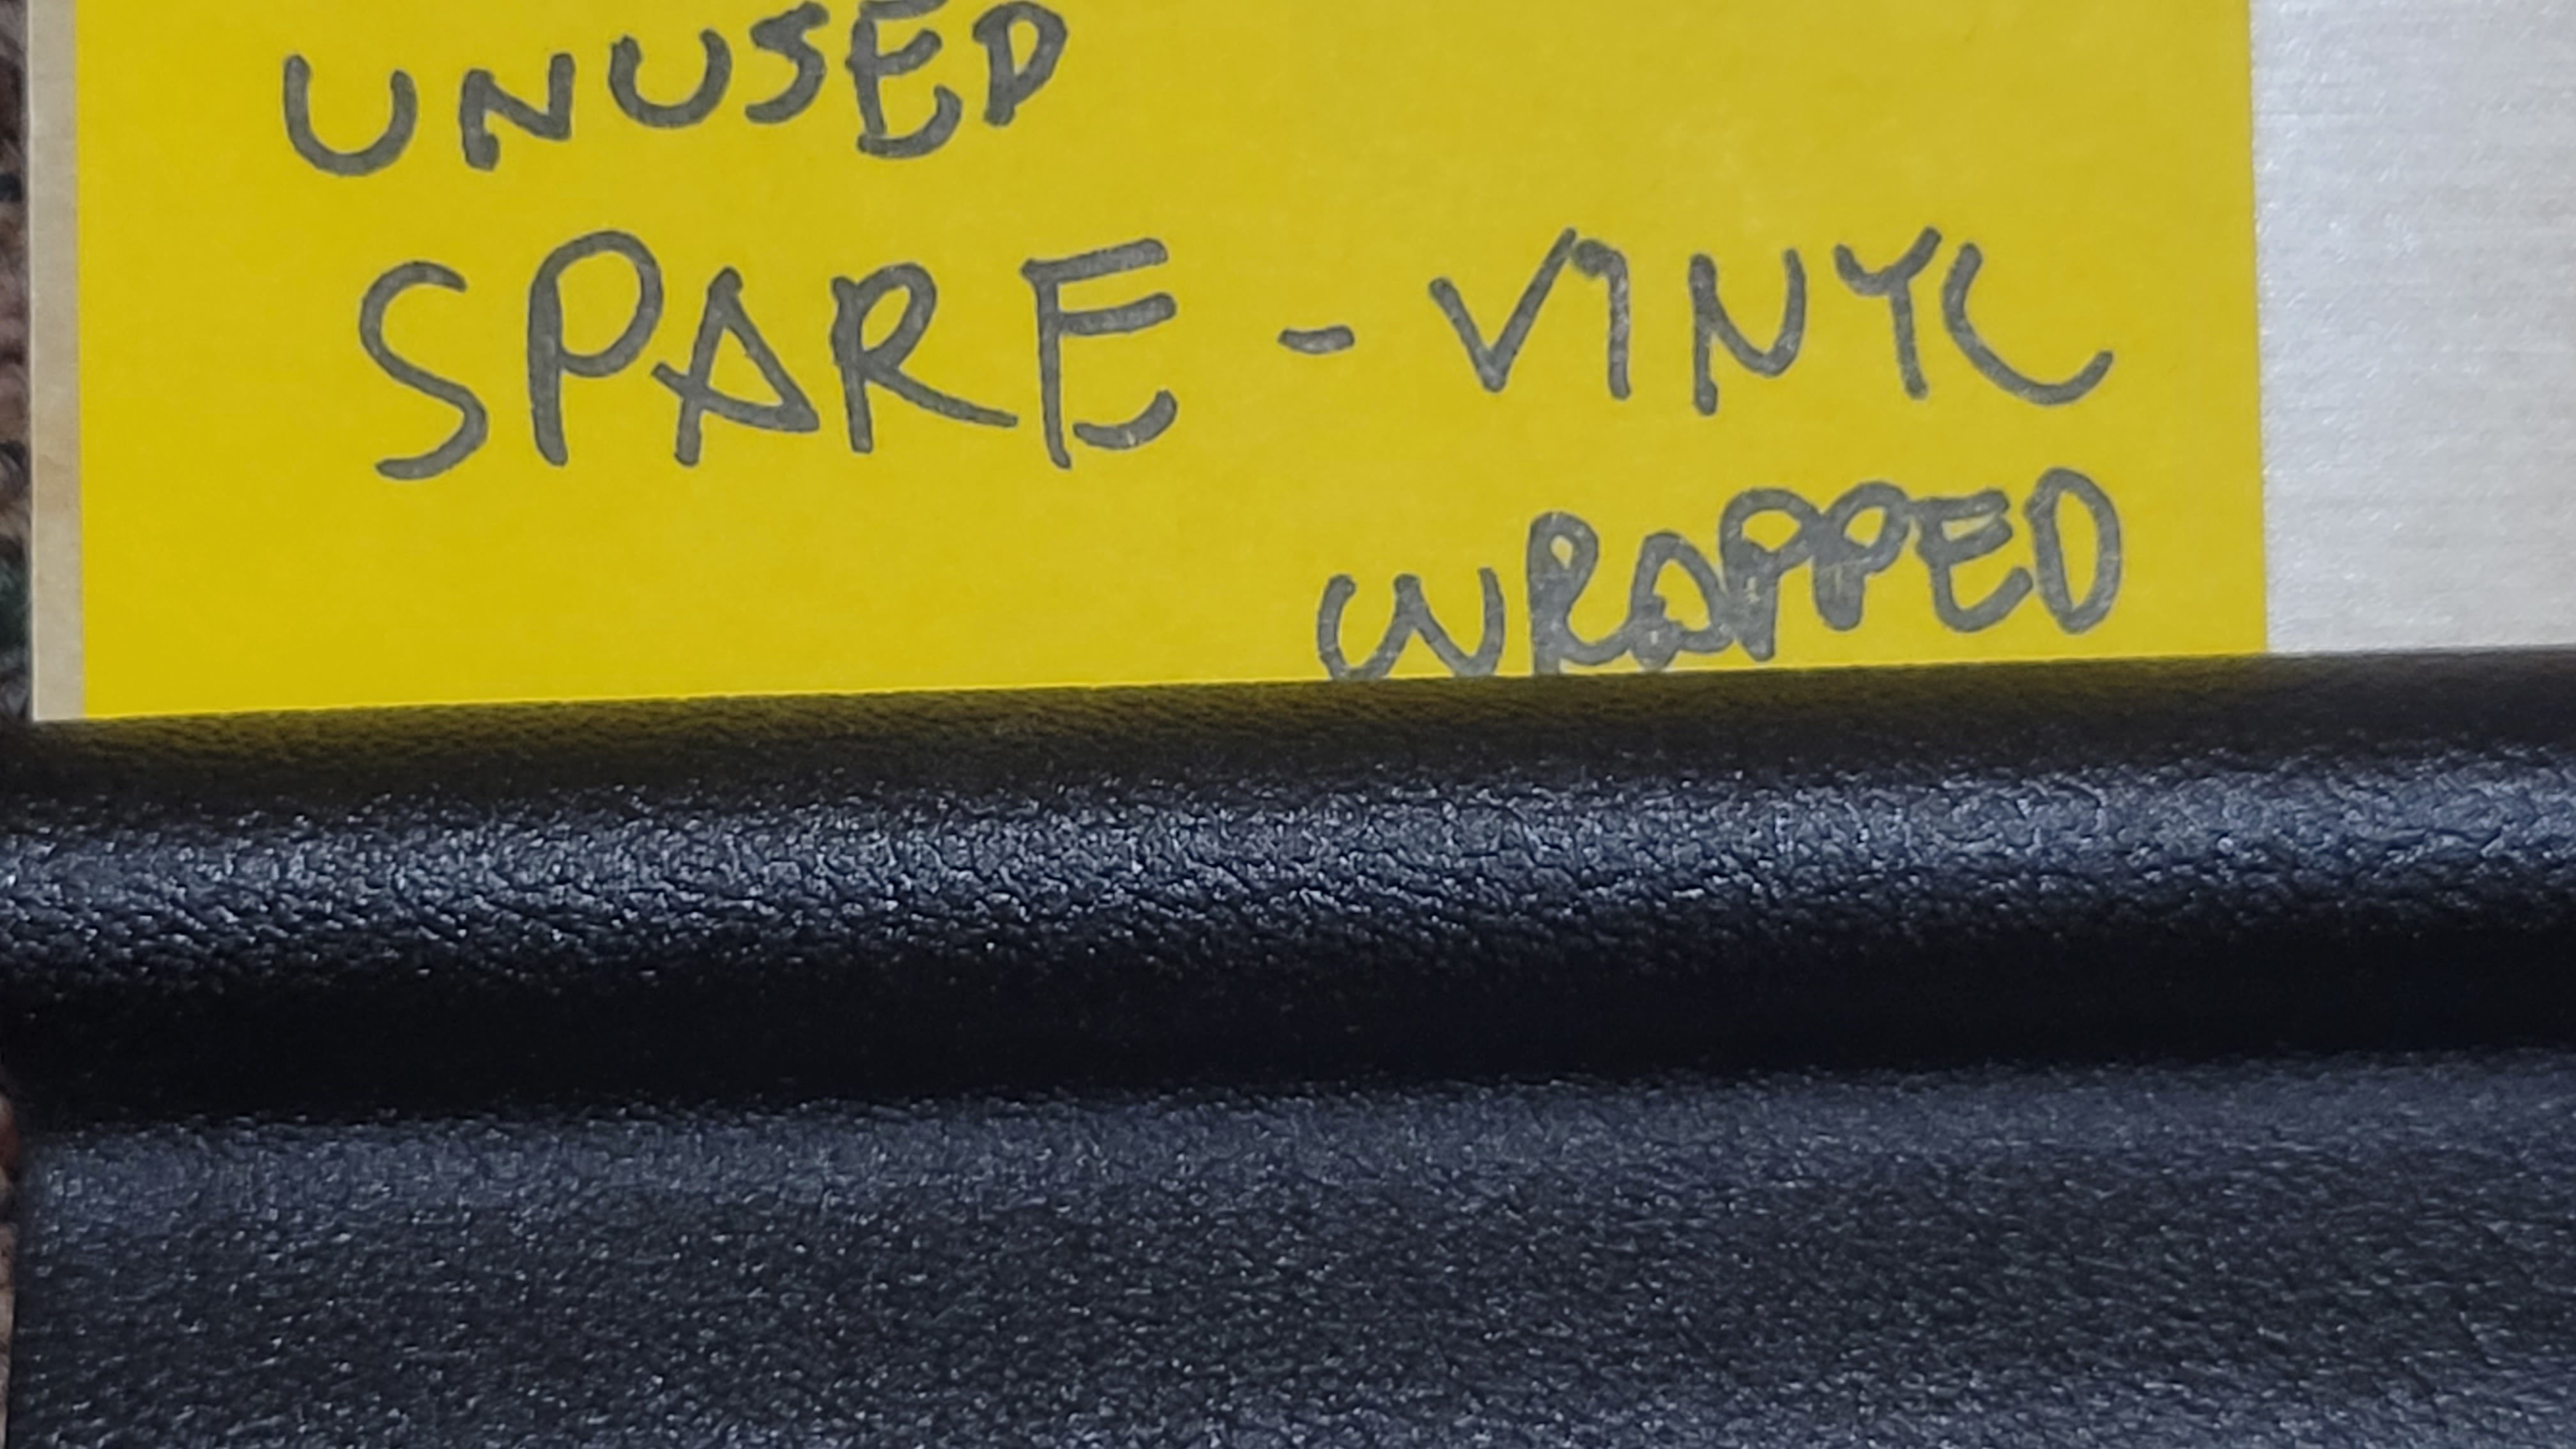
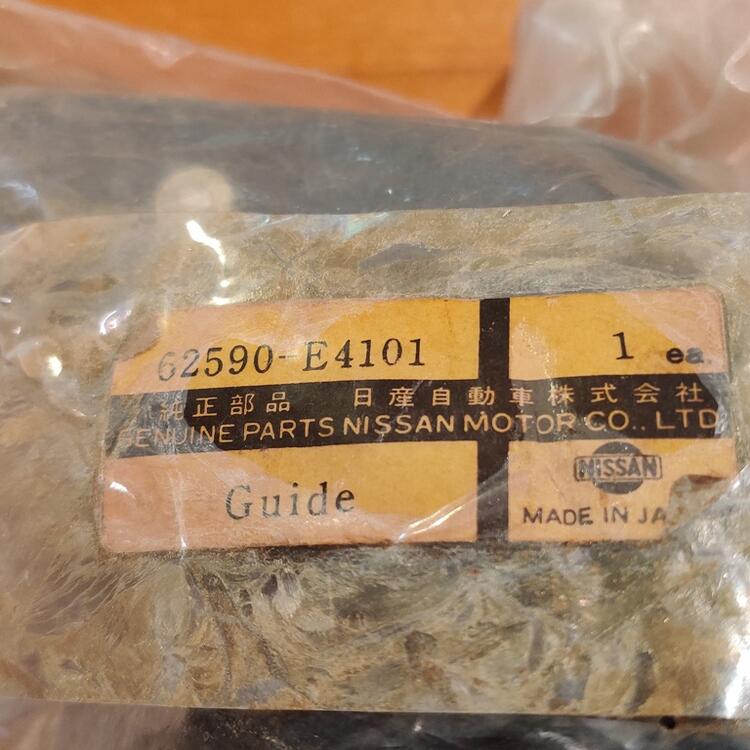
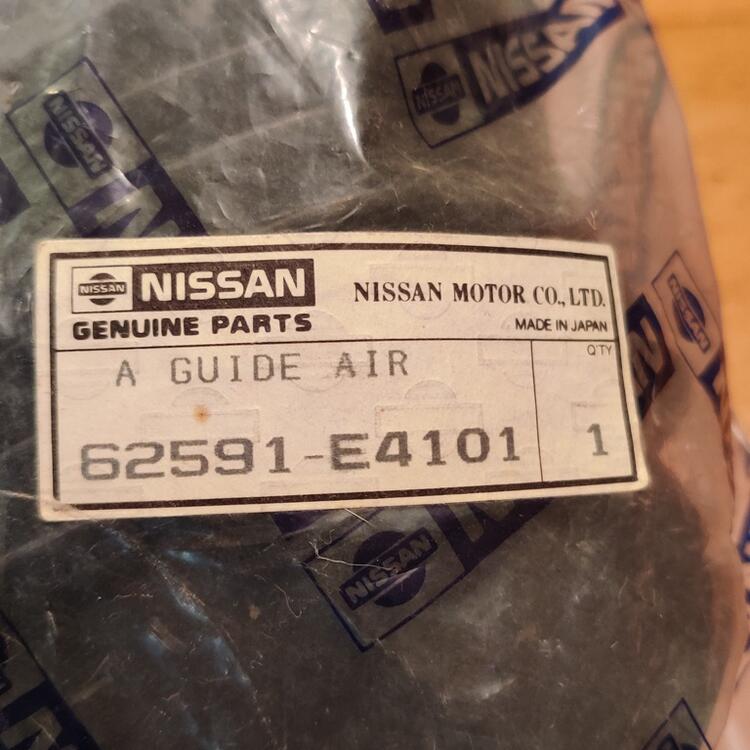
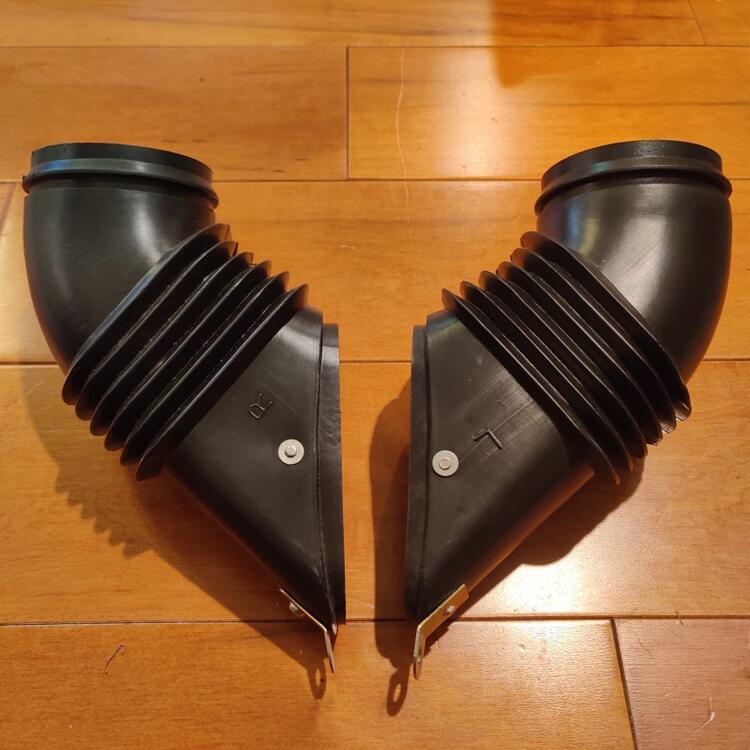
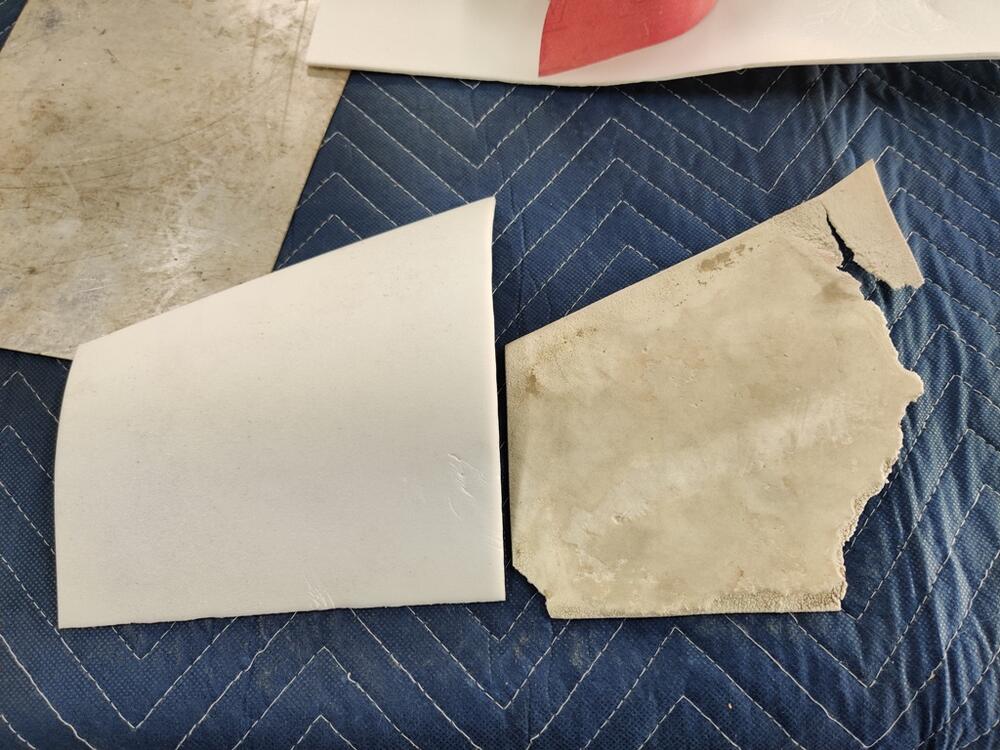
 2 pointsHere is my "hoard" of part number 74932 E4100 scuff plates, that cover the rocker panel vinyl and hold down the weather stripping. There is an interesting evolution of this part. The early version had 5 holes. and later versions have 3 holes. My 7/70 car originally had the 5 holes ones but when I bought my first replacement in 1979 it was the three hole type, as were the two I purchased in 1984. Also it seems that sometime after 1984 Nissan changed to a texture painted finish instead of the original texture vinyl wrapping. I have one of the new painted ones that I purchased in 2015. Below I have included closeup pictures of both to show the difference in finish and texture. Top side: Bottom side: Close up of finish/texture of the early vinyl wrapped design: Close up of finish/texture of the later texture painted design:


 2 points
 -
 2 points
 -
2 points
-
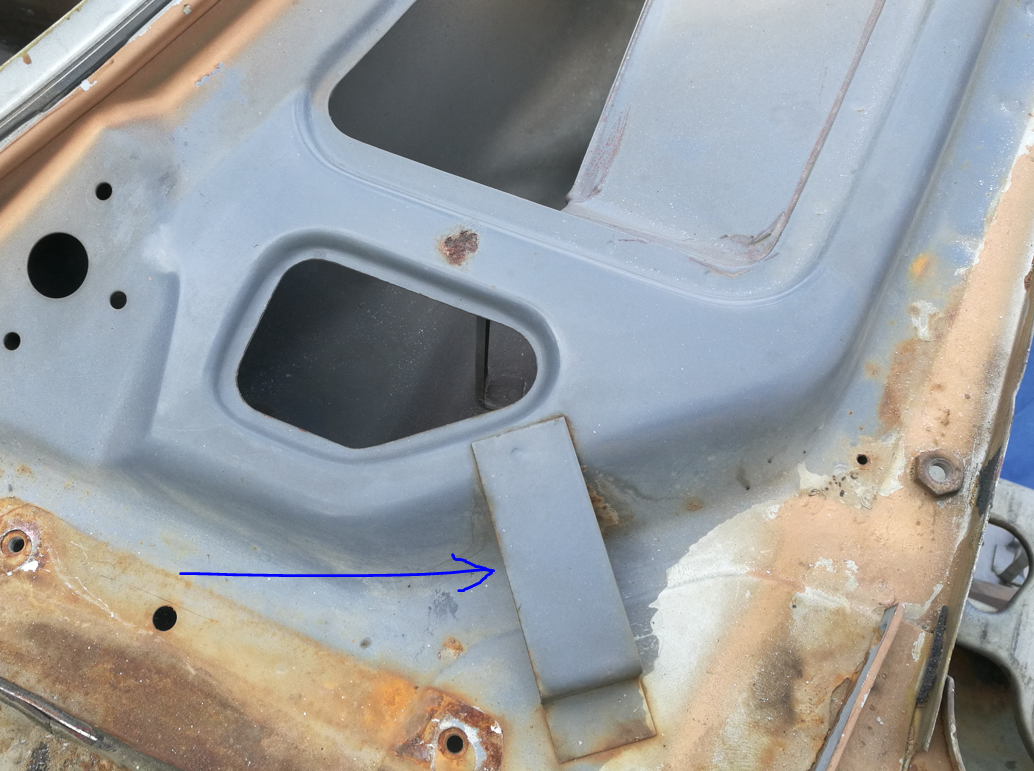
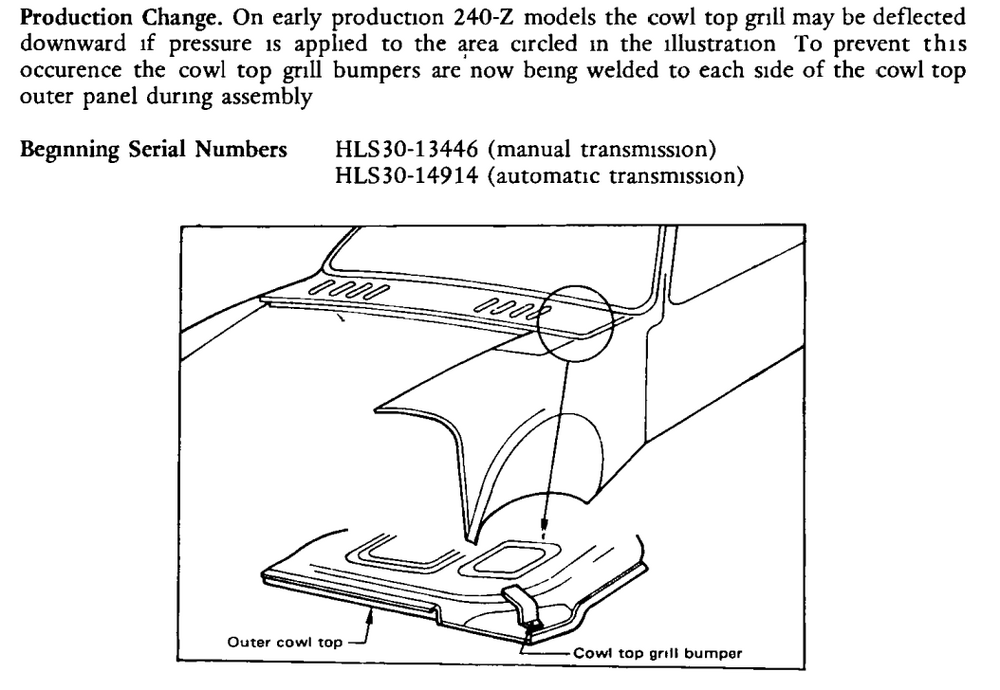
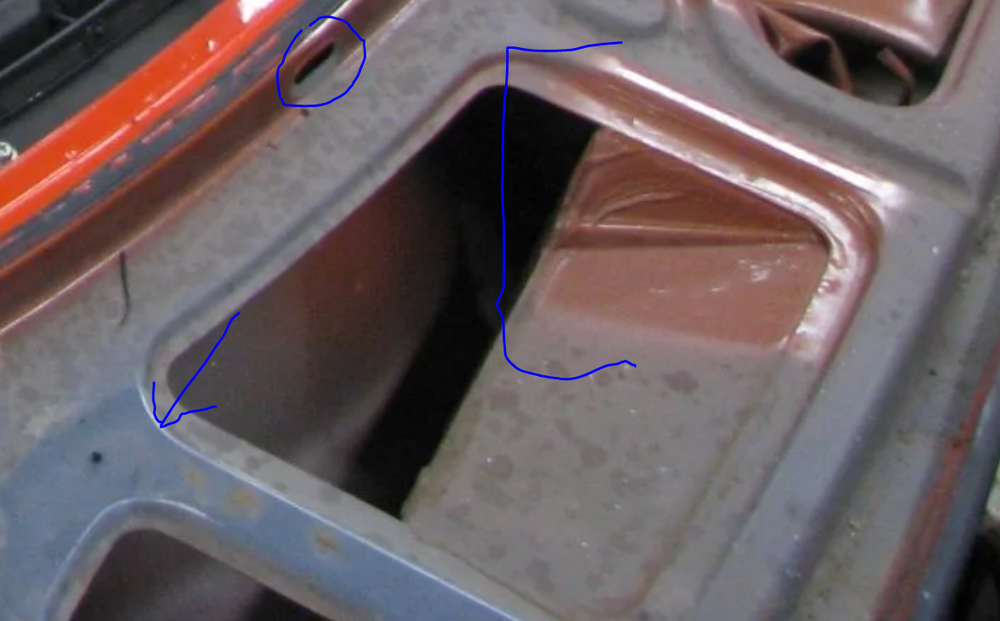
Yes, the cowl panel sheet metal moves around quite a bit. My car has this reinforcement plate added - see technical bulletin info: This replacement padding used in conjunction with the now properly shaped cowl panel gave this thin body panel some support. That helped make the bodywork easier. I found a paint color that is similar to the original primer (or is it primer?) used at the factory. I plan on spraying this to cover all the areas inside the cowl - all that is underneath the cowl panel. It is currently covered in the light grey Glasurit primer. But, I don't want to leave anything in grey primer because, to my knowledge, the primer absorbs water. Which begs the question, is that grey used by the factory a primer, or a color coat? Seems like Z's of many colors have this grey used as a coat over top of the red oxide, and then followed by the final color coats. Anyway, I do not want the cowl panel removed from the car when sprayed. I want it in place on the car. As can be seen from this picture of https://bringatrailer.com/listing/1972-datsun-240z-264/, these cars were painted at the factory with the cowl panel "in place". The grey can be seen here. Note the lack of color below the slot the cowl panel slips into, and the over spray area through the cowl slats. This is one of the OCD things (of many) that I want done. So, the inside of the cowl will be this color: Maybe that is a bit more blue - I dunno. I am partially colorblind, so I did my best.


 2 points
 -
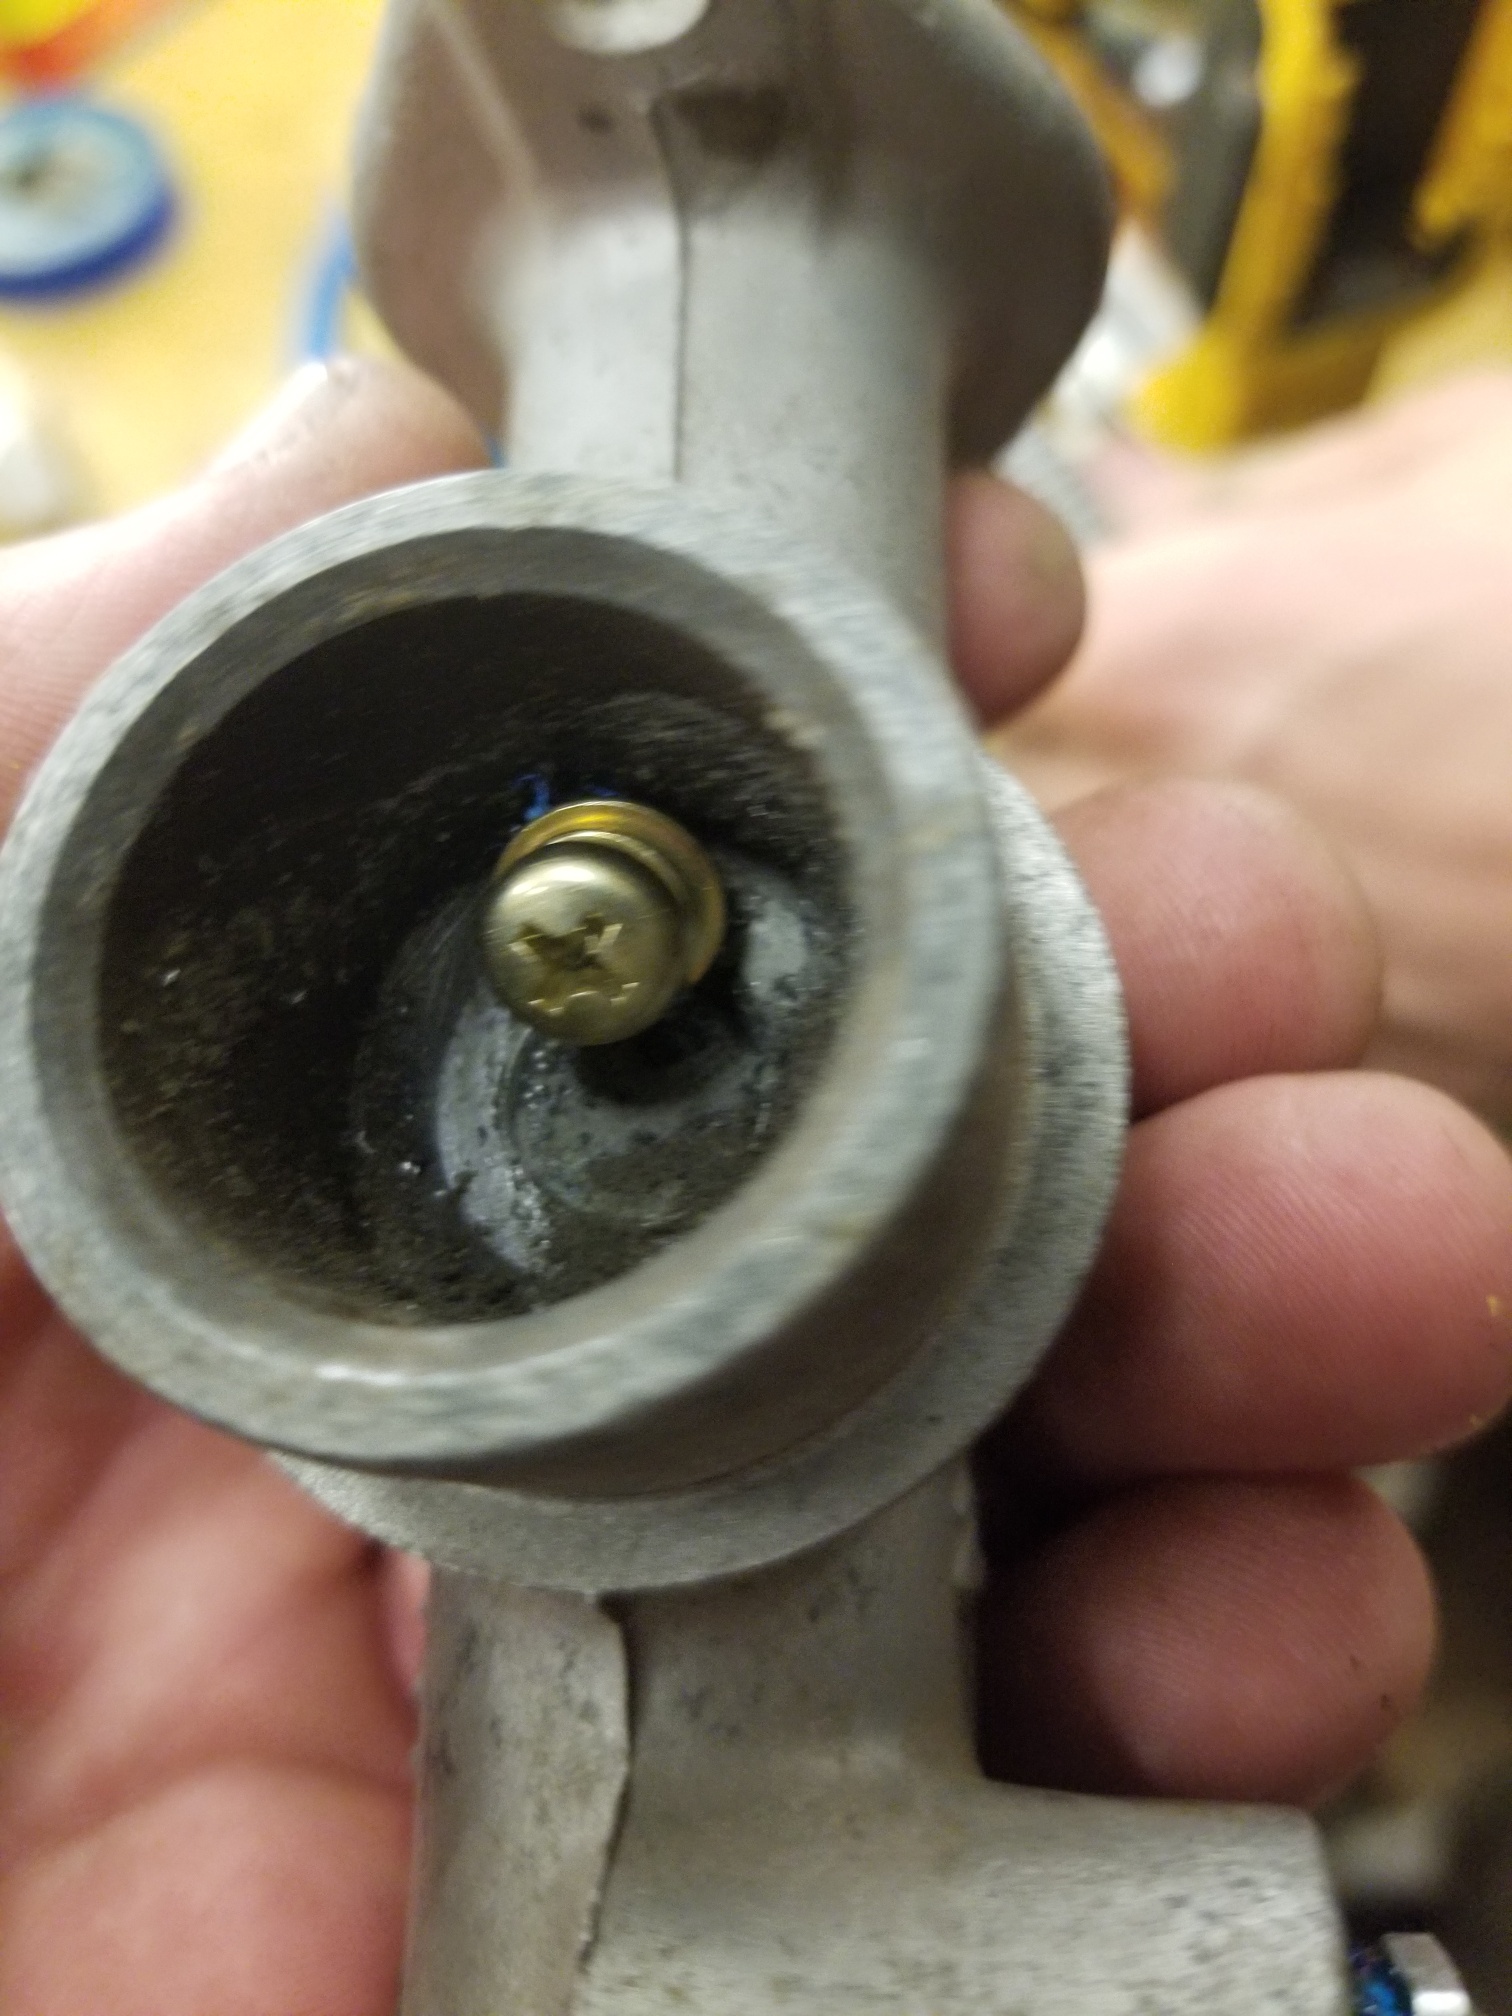
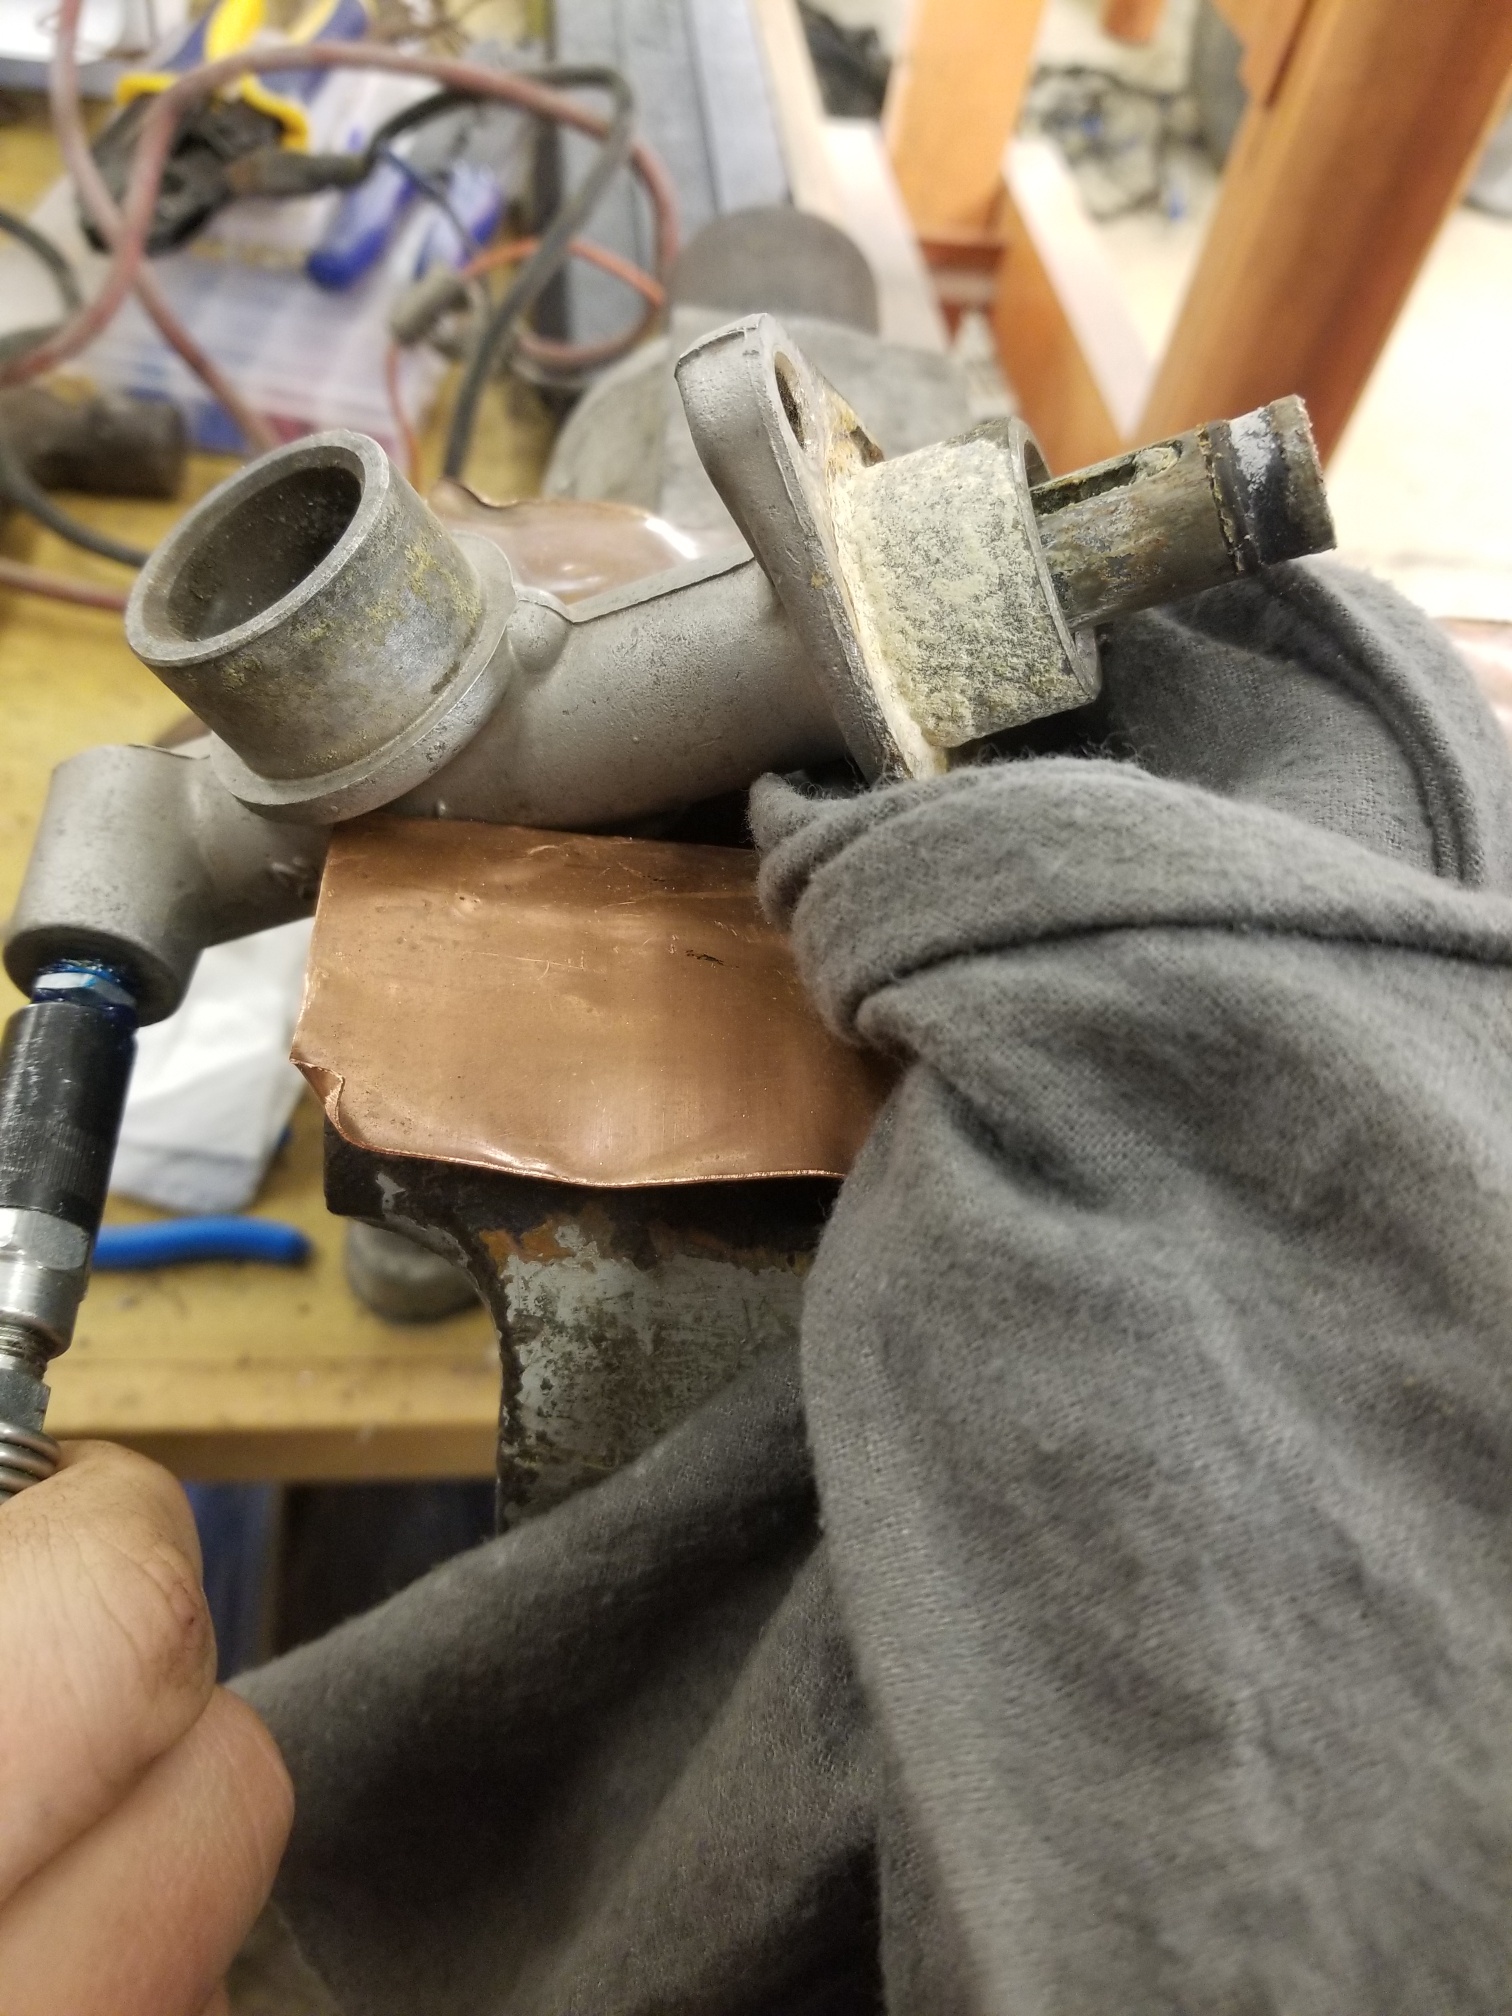
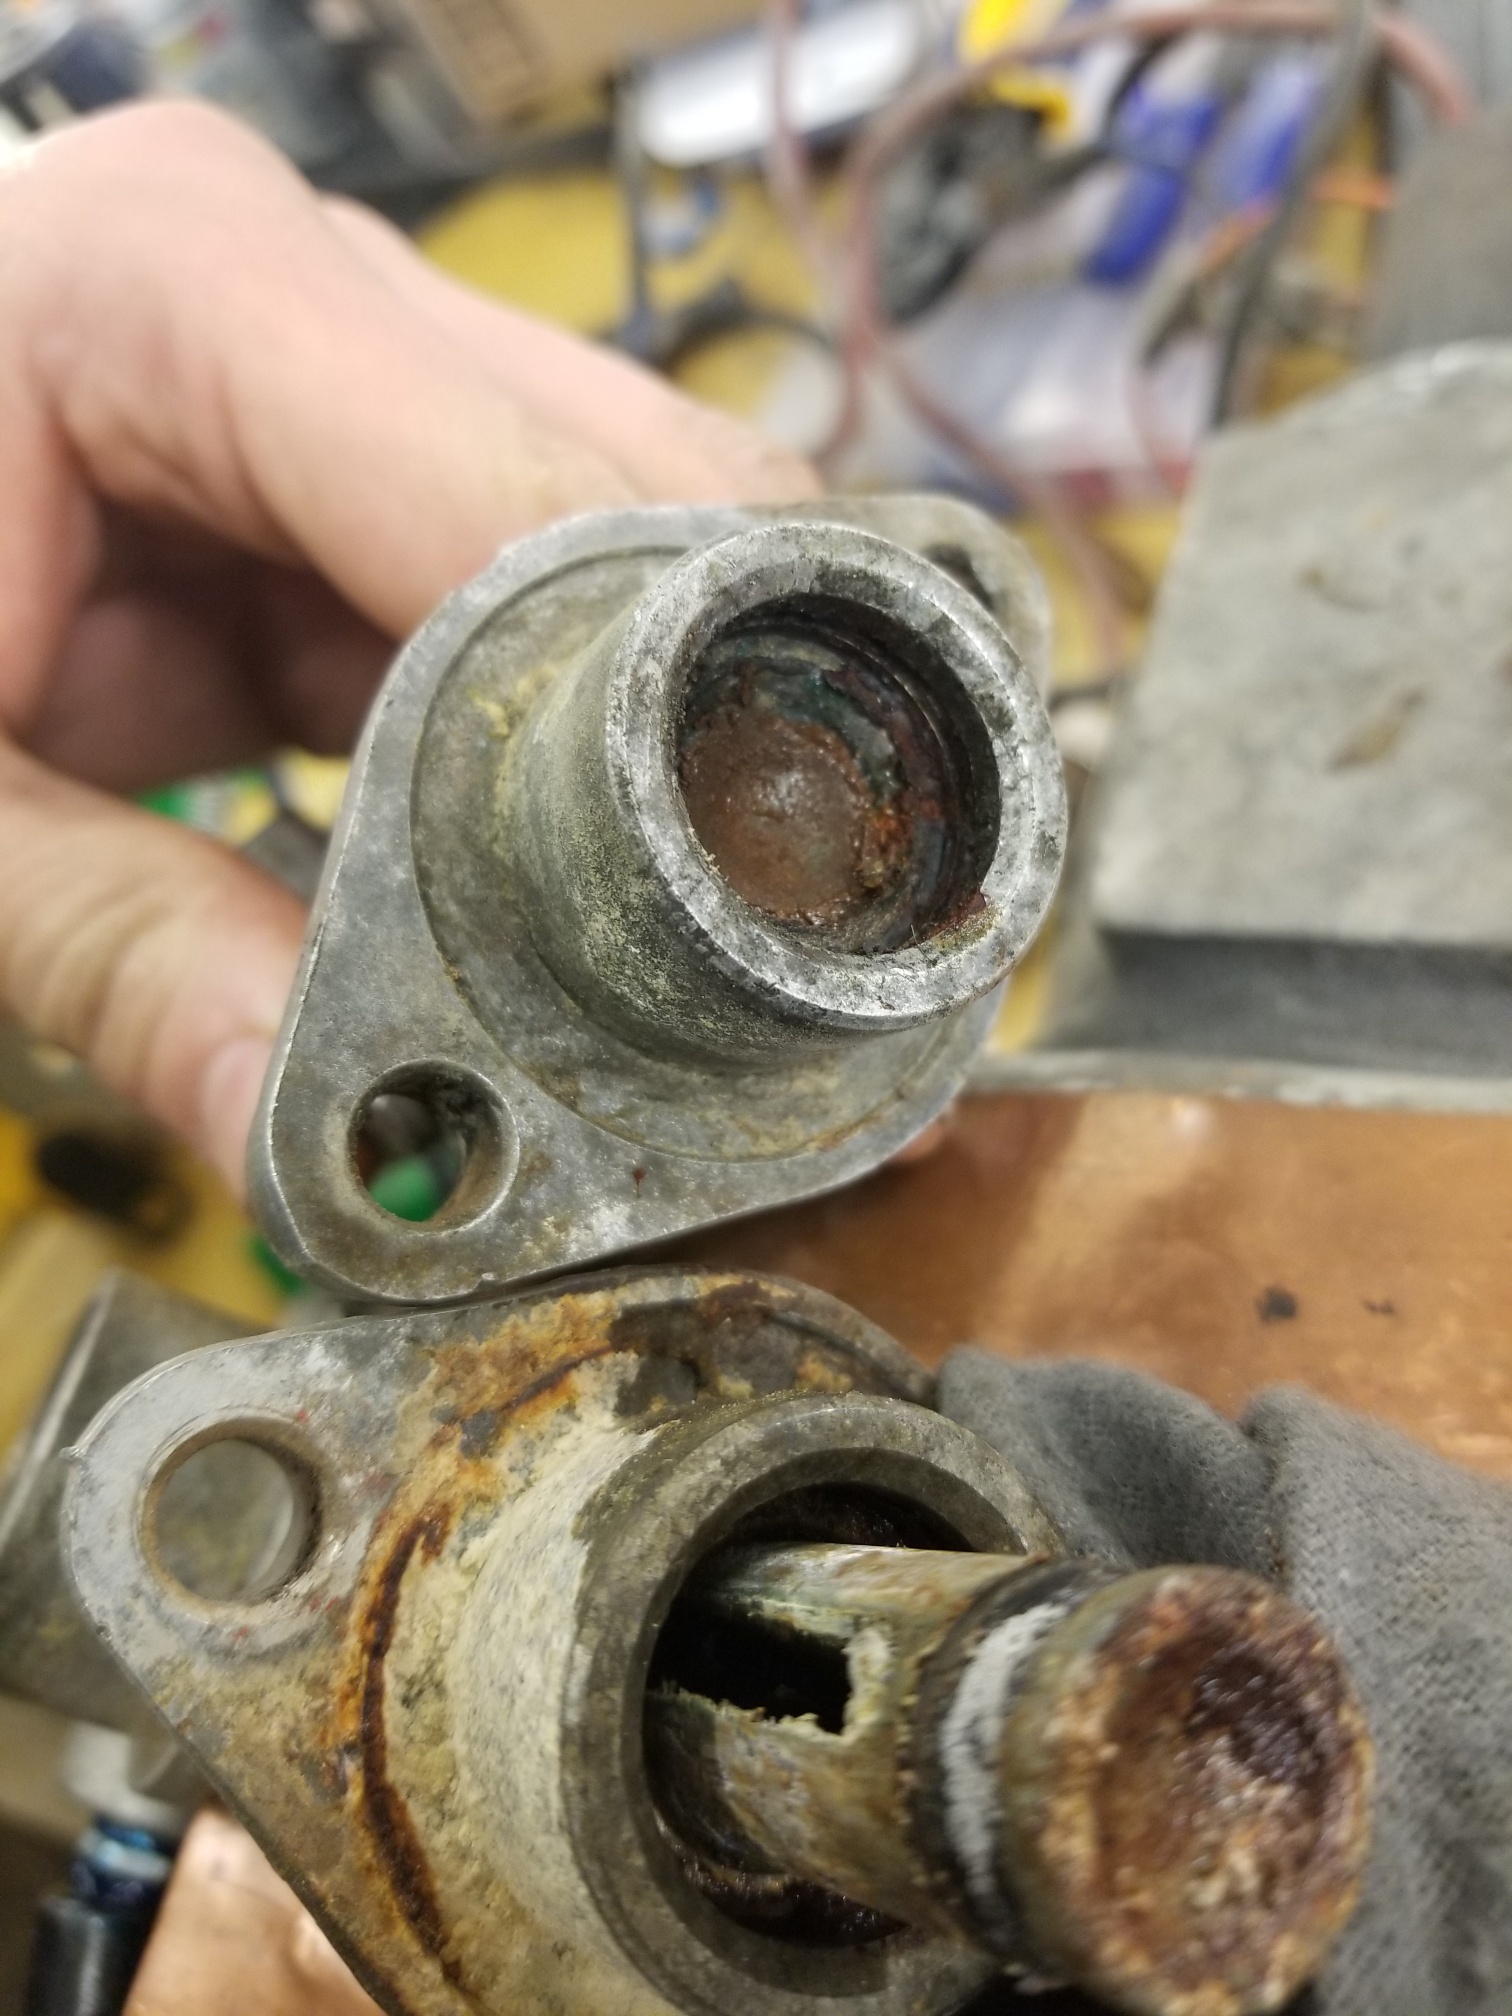
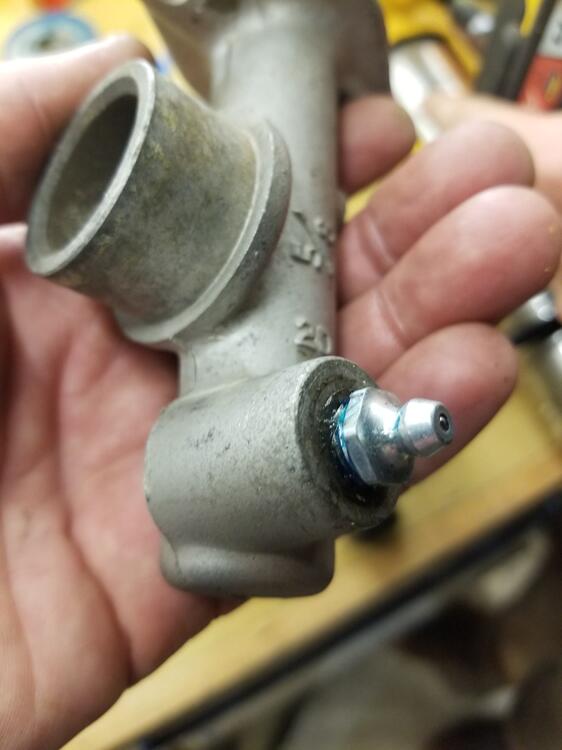
 2 pointsI tried to work on clutch masters a while back. I got stumped because I couldn't get any of them apart. They were properly stuck. Then I thought about using a grease gun but I had to figure out to connect it. It turns out that Cody had a M10x1.0 grease zerk in his stuff Then I had to trim off the bottom screw that retains the piston so I could close up the bottom hole but not trap the piston. That's one hole closed but you have to block the reservoir hole too. So we decided to tap it to M5x.8 and put a screw with a little teflon tape You need to be really CAREFUL using pressurized grease!! You can get pin injected and that means getting filleted at the ER...


 2 points
 -
2 pointsIf you want/need to replace the boots, here's a source: https://www.amazon.com/gp/product/B012T3YU2Y2 points
-
 2 pointsI've used mineral spirits to soften the rubber and wintergreen oil to keep the rubber soft. However, I just googled "rubber softener" and found that many are using silicone spray. Soak the rubber piece in silicone spray (it contains a plasticizer), seal it in a baggy for 3 - 7 days and voila, refreshed rubber. It's worth a try.2 points
 -
@jalexquijano there's information in here that may help your 240's vapor lock problem you've struggled with. The added length of hose is a fantastic idea I think. Whether it works is your's. Do not assume it's a fix for YOUR car. Just a hopeful solution or at least helpful to your car. You're reading the same thing we all are so what to do with the information is totally on YOU. Edit. I know you have round tops and a 72 year model so please save your time telling that. Read between the lines and hopefully you'll find something useful.2 points
-
Okay, it wasn't my Z, but I installed a fresh set of Z Therapy carbs on a 72 for a friend.2 points
-
@hiyabrad have put you in the database for 1 set of 1969 and 1 set of 1970.1 point
-
 1 pointWell, it's a nice thought ('23' being significant to Nissan...) but the tank will have been made in a different Nissan-related facility and then trucked - most likely as part of a batch of similar parts - to the Nissan Shatai factory in Hiratsuka. I very much doubt that would have been possible on the same day that the car was 'finished'. I'd say a few days, maybe a week or so, more likely? Most of the component parts on these cars usually seem to show production date/QC check stamps within a few weeks to a couple of months before the completion of the car.1 point
 -
 1 point
 -
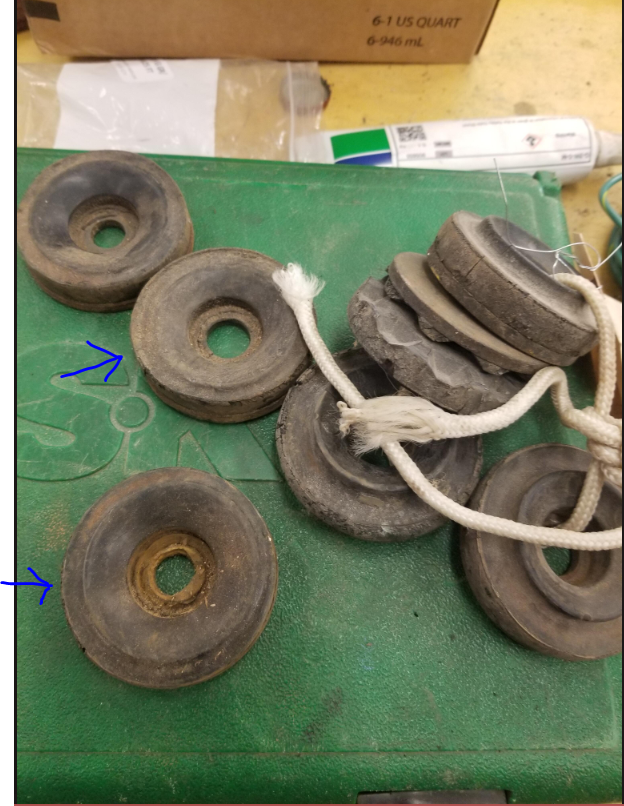
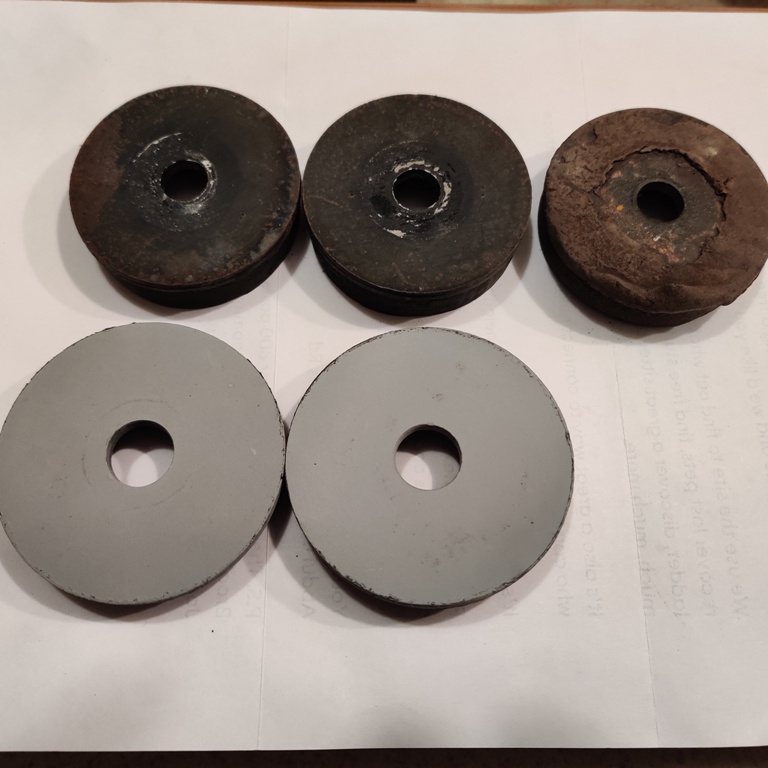
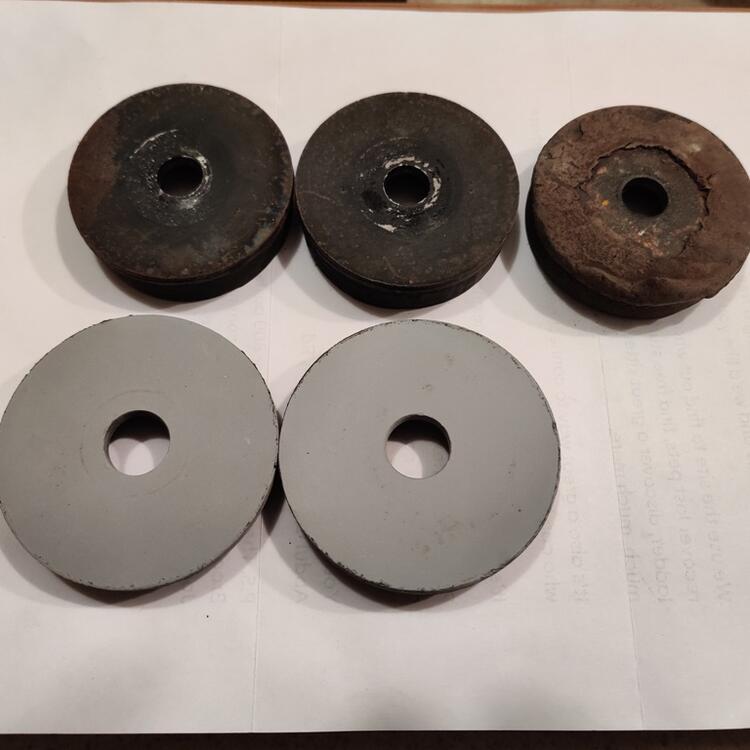
I believe these two (blue arrows) are the right ones. The upper ones have larger diameter holes than the lower ones. The one in the top left corner of your pic clearly has a smaller diameter hole. Can you measure the diameter of the hole in those 3? If those two with the blue arrows have the large hole, they are what I need. Doesn't matter if they are hard. Here are the ones I currently have. The third one I found with parts that came with my car is another lower one. The ones in grey primer are the serrated ones.

 1 point
 -
1 pointI was looking at the engine bay harness. My PO evidently hacked it up. Not surprising since one headlight fuse was melted out of the fuse box. I may need to source one... @SteveJ @Terrapin Z1 point
-
1 pointI don't even know what to say. This should be ripe with all sorts of great comments, but I'm in analysis/paralysis.1 point
-
1 pointCouple comments... First, the Obvious one. That's a master cylinder, not a slave. Second... Be real careful about burrs kicked up into the cylinder bore as a result of the tapping operation. If there's a burr in the area swept by the cup seal, it'll chew it up right quick!1 point
-
1 pointI have used these without problems. As for the spades without crimpers, I'm sure you could find some if you searched more, such as this: https://www.amazon.com/PONFY-Connector-Assortment-Insulating-Electrical Vintage Connections has a lot of bullets, too, and I have plenty in my collection. Keep in mind that what you see at Cycle Terminal and Vintage Connections might have been produced at the same plant as the ones I linked from Amazon.1 point
-
1 pointFor the bullets: https://www.amazon.com/gp/product/B073GM7WST/ Rings: https://www.amazon.com/gp/product/B08QHZXZ3S Spade: https://www.amazon.com/gp/product/B07VKCCN121 point
-
1 pointI have boiled parts in water with some wintergreen oil. I had so so results. Better but not super pliable. I am open to ideas. It would be nice to find a way to soften up some of these pieces so I didn't have to replace them all.1 point
-
1 point
-
 1 point
 -
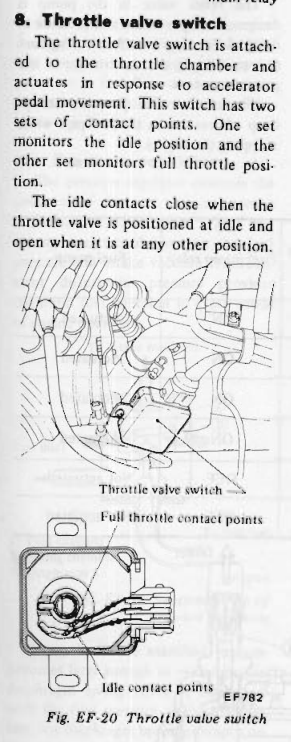
What is the tachometer needle doing when it's smoking and running poorly? Does it match what you hear from the engine? 800 RPM is pretty low. Might be the ignition module going bad. That will usually show signs on the tachometer needle. Could also be the throttle valve switch (aka TPS). Might be stuck on full throttle. 27% extra fuel. Also could be running rich if the fuel pressure regulator diaphragm is cracked. Remove the vacuum hose to the FPR and see if is wet inside. It should be dry. Page EF-15.
 1 point
 -
Reference I guess. I do not have one on my 240 but the 280 does. It was cheapest at Jegs when I bought that one, free shipping also if I remember correctly. I like the one I have. It had flex and made noise at high speed but I figured out how to reinforce the backside with the OE lip and it worked out great. 280 now, no history with a 240 air dam.
 1 point
 -
1 point
-
0 points