Jump to content
Email logins are now active ×

Leaderboard

Popular Content

Showing content with the highest reputation on 12/02/2024 in all areas

  1. Jims? @S30Driver @Zup This is great opportunity for you guys to visit and give advice. This is in your neck of the woods.
    3 points
  2. You can tell where it's leaking from the leakdown test, you don't need to tear in to it. That's the basic point of a leakdown test. Figure things out before tearing apart. It might not need anything. Could just be dry rings. Good luck.
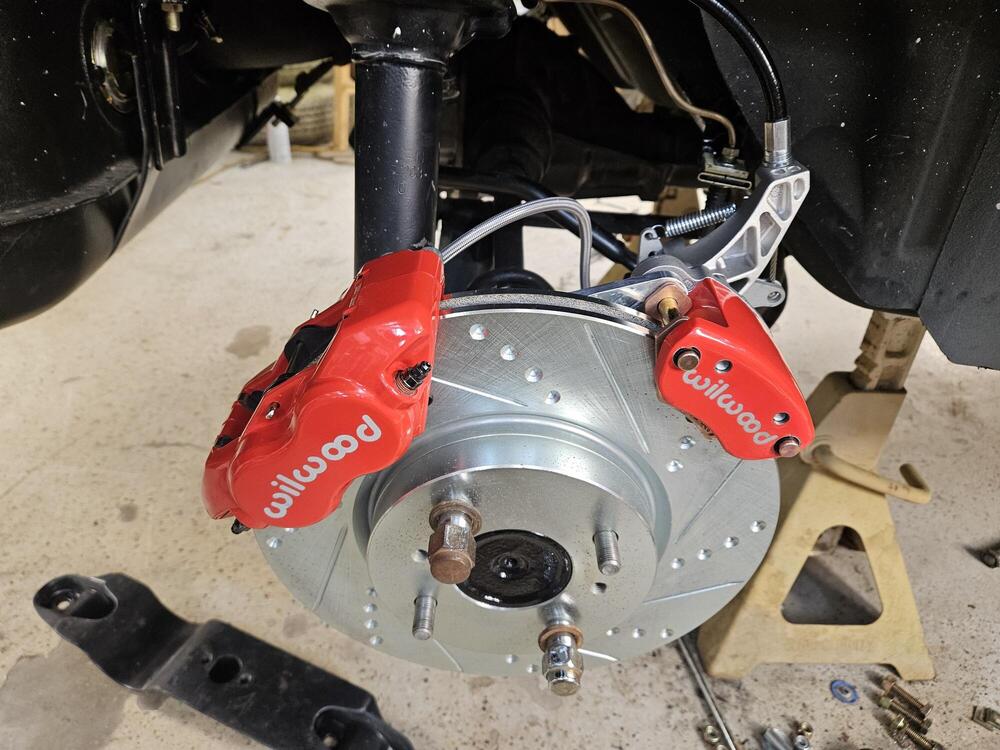
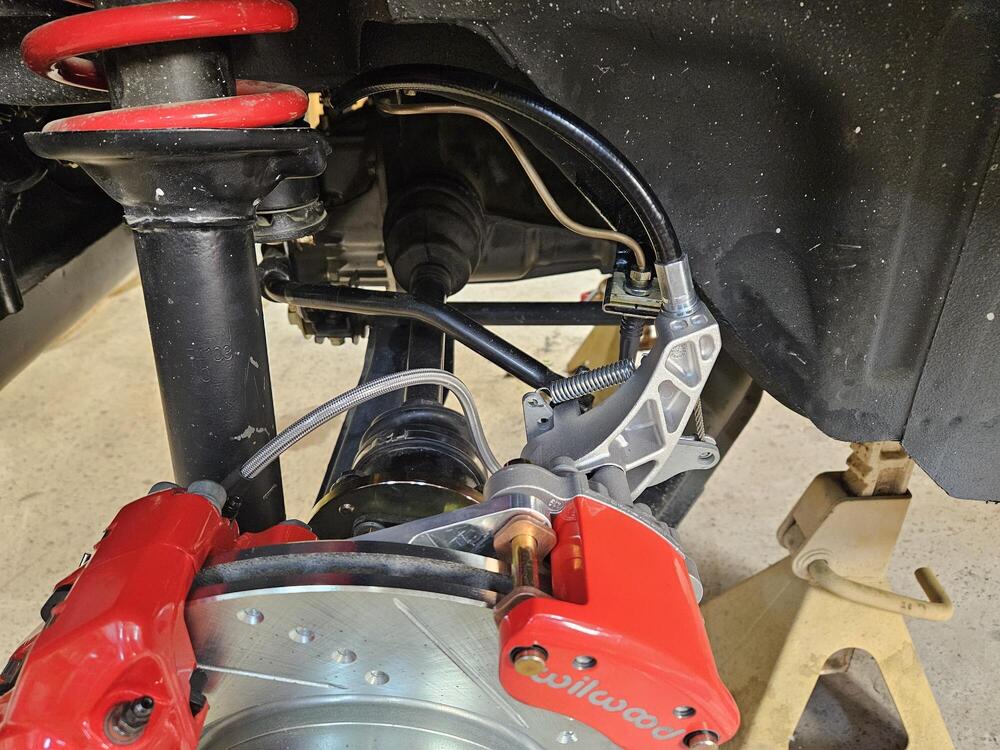
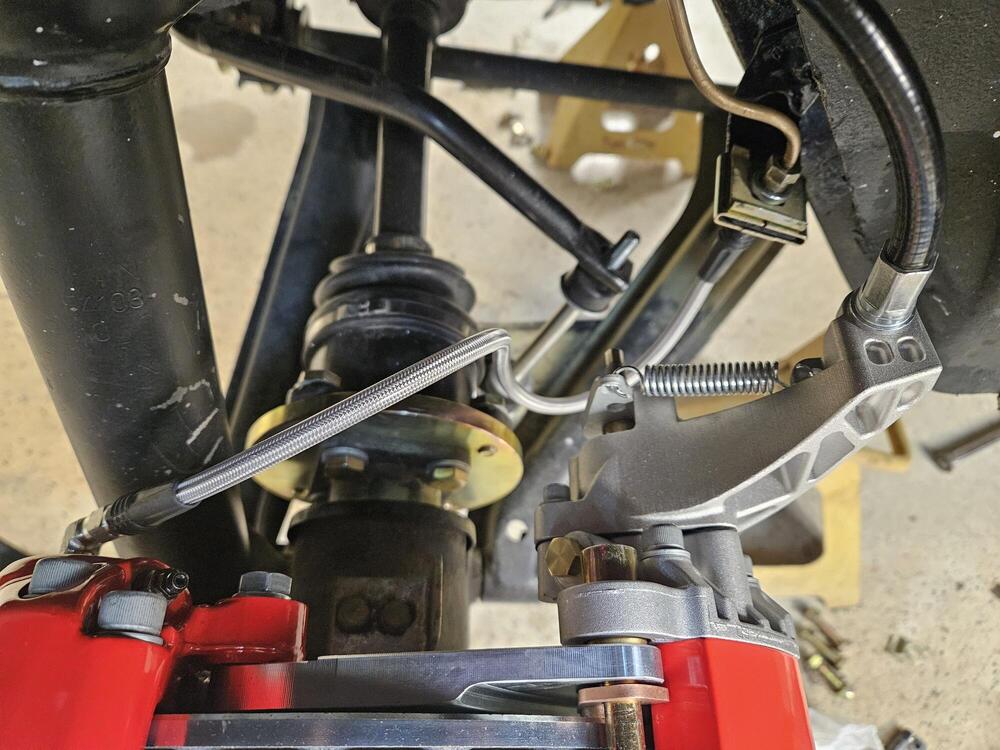
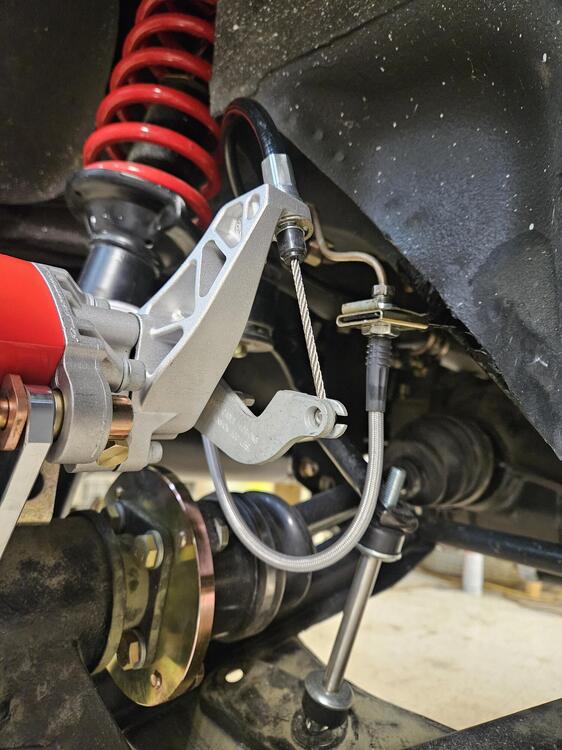
    3 points
  3. In case the Jims don't respond, I also posted in the Ozarks Z Club group on Facebook to see if they know of someone near you.
    2 points
  4. I'd start with a valve adjustment then a dry compression test followed by a wet compression test.
    2 points
  5. Green (12VDC+) and green/yellow are for the brake warning light. Red and red/white are for the high beam indicator. (Right headlight circuit). Green/white is 12VDC+ for gauge lights. Red/blue goes to the rheostat (dimmer). Green/red (Yellow in the dash harness) goes to the BCDD cut solenoid. Black is ground.
    2 points
  6. I heard a lot of "stock brakes are just fine - even if you autocross!" when I first got my 260Z on the road (2008). Then I signed up for a NASA weekend at Firebird Raceway here in Phoenix. My stock brakes were done before the first day ended. (ya, ya, I did need to learn better brake management...) . That prompted my first front brake upgrade: Stock rotors with Toyota 4-piston calipers. Hardly noticed the difference. Small improvement. Disappointed, I then went to the vented front rotor / Toyota wide 4-piston caliper. BIG improvement. Then I installed better friction, more $$ than ceramic, but LARGE improvement with Porterfield pads and shoes. The Porterfields (like many sport or race frictions) were better than stock "cold" (around town) and got really grippy once you got some heat in them. Loved that setup cuz: A. I daily drive. In Phoenix. Not quite as bad as SoCal, but close. 2. Not many people realize how much mountain driving you can do in Arizona - and I do as much as I can. My 260Z Turbo is an uphill beast - the torque of this engine is awesome. But what goes up must come down. My first curvy hilly trip, I came back into Tortilla Flat with a huge smile because my brakes were better at the bottom of the hill than at the top and believe me I used them both ways. My fronts just met end-of-life and I had to replace the pads and rotors after 10 years of driving on them. But, ya, still using my Brembo drums in the rear.
    1 point
  7. There's a member map on this forum that shows people close to you. I know we have 2 Jims in Arkansas that live and breathe these cars. I'm on my phone and not much help at the moment but can find them tomorrow morning and tag them, maybe they'll respond? Haven't seen any post from them recently though but there still around lurking like Bigfoot. I did what I think is the best way to get a good dependable car. Set a budget and rebuild/replace all you can. Cost me around $5,000 for my '72 but I did a lot of the work myself. I wouldn't be affraid to drive it across the country. Edit: Steve tagged the guys I am speaking of.
    1 point
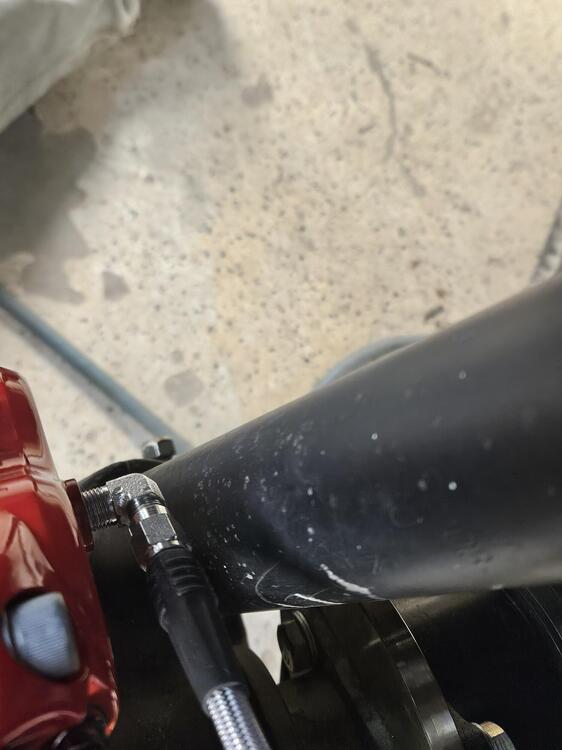
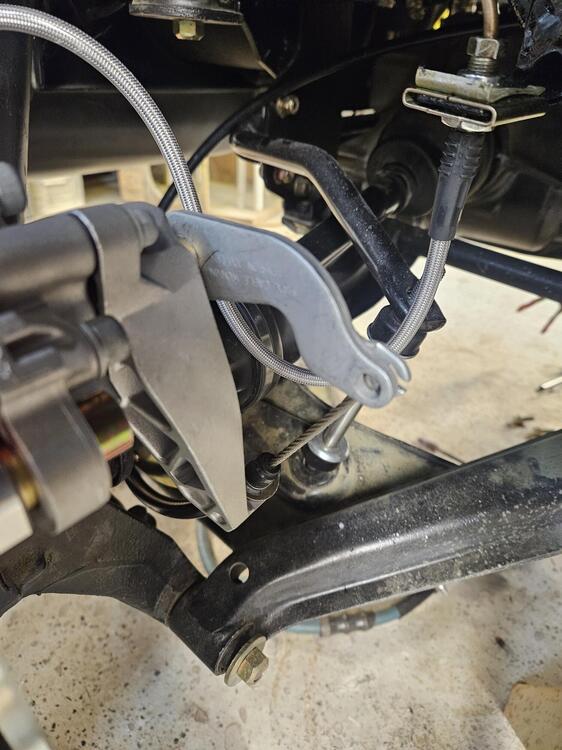
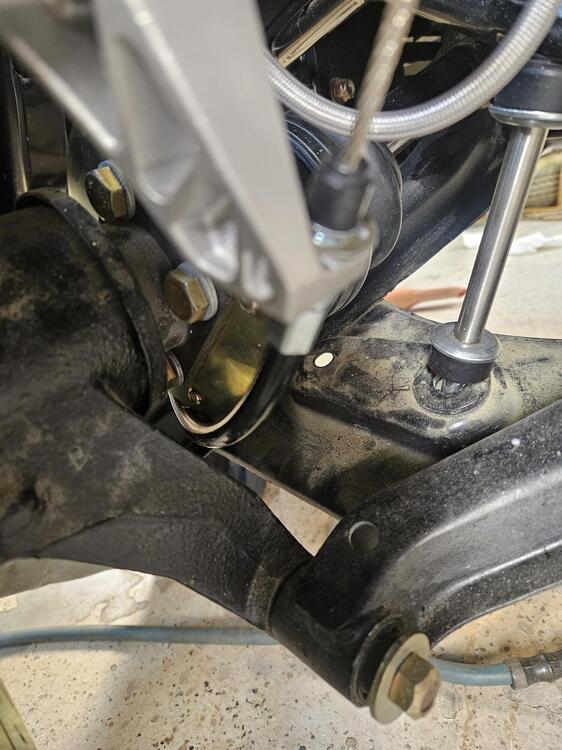
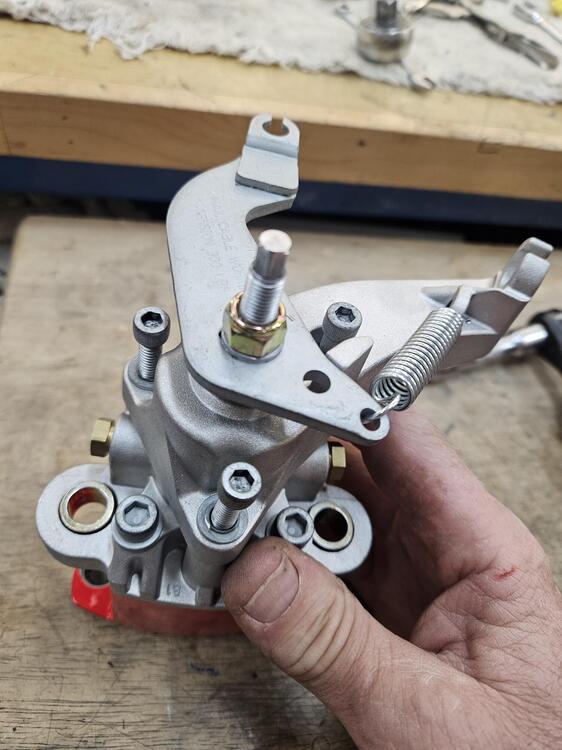
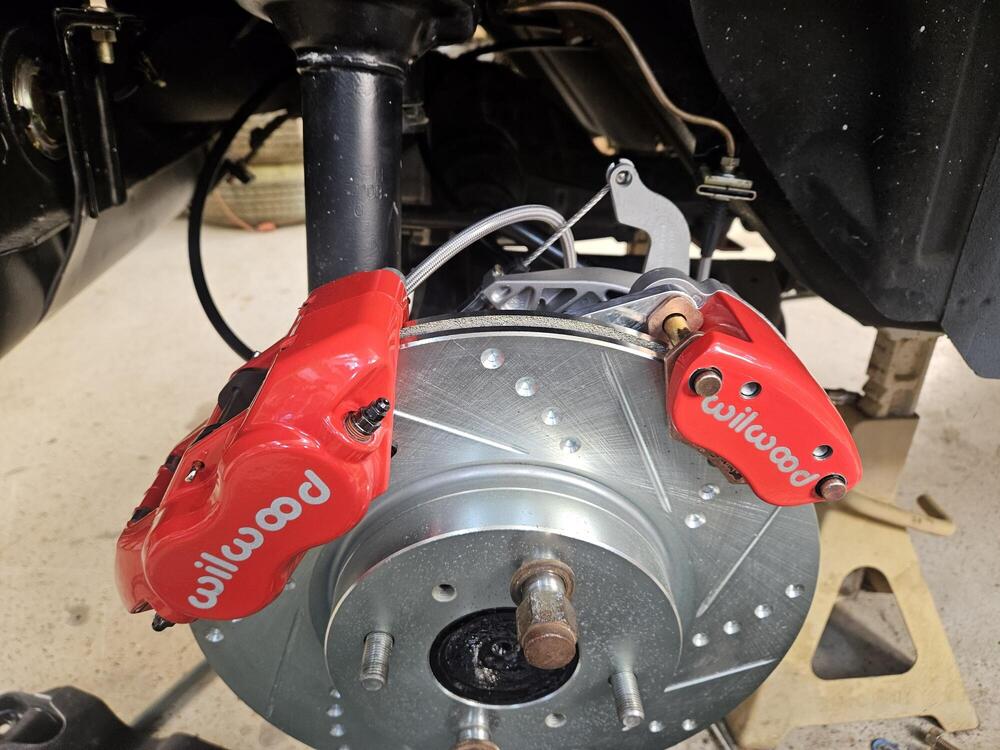
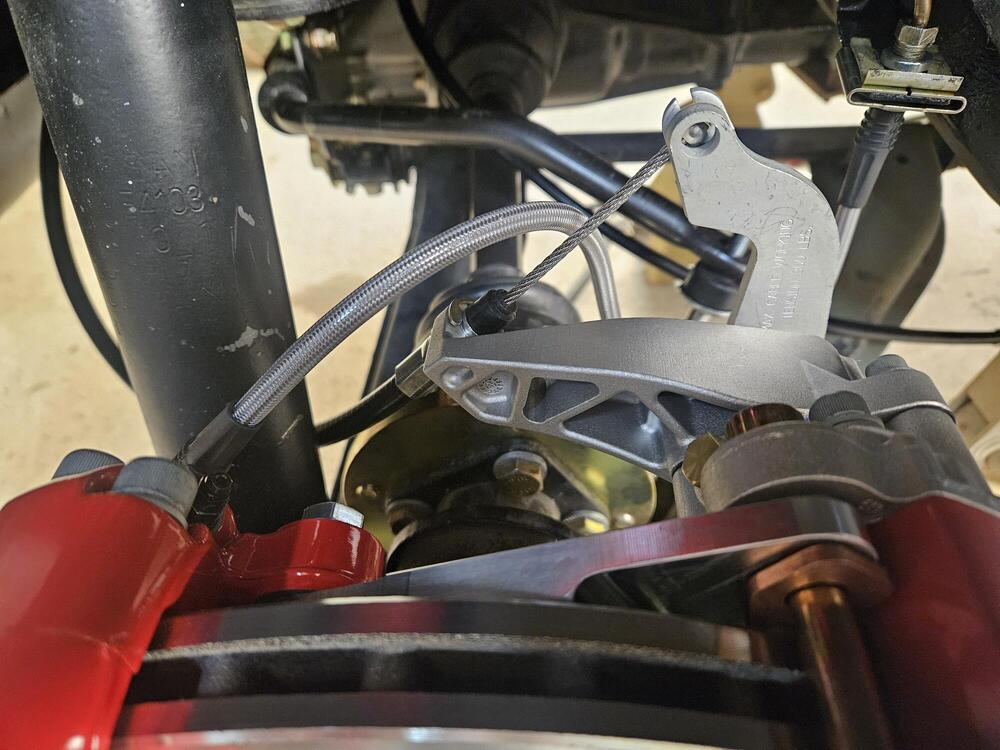
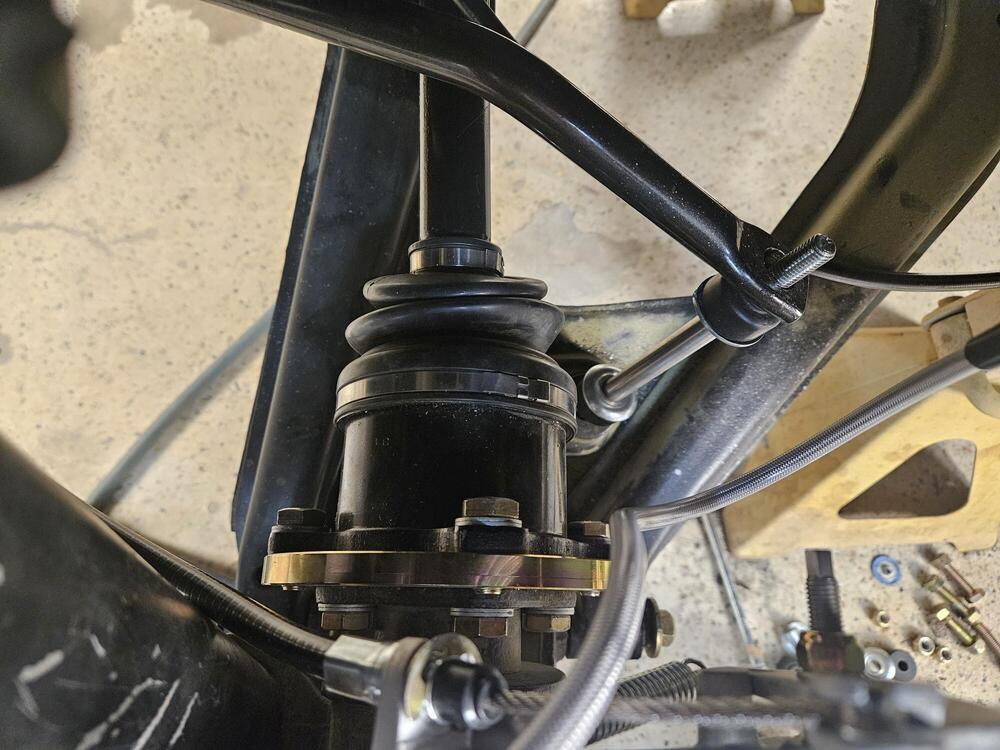
  8. When the caliper is installed, it is very close to the strut. I didn't remember that Wheee had used a very similar setup or I would have cribbed off of what he did. He mentions in his build thread that attaching the lines to the calipers before mounting them would be best because of lack of space. The hardest part of the whole job is finding the right orientation for the parking brakes and routing the cable I started with this orientation But the cable was touching my CV axle adapter plates. It might work with the factory halfshafts... So the MC4 is indexable at 120 degree intervals If you loosen these three screws the back can be turned to another position. Be careful to get the thin rubber seal back in the right place before reattaching it. So each caliper had 3 position and the calipers are handed. So there are six possible orientations available. So then I tried this orientation I liked it pretty well until I realized this is at full droop and when the suspension gets loaded the cable is going to get pinched by the underside of the car. The cable really needs to be more horizontal... So then I set it up like this... The strut is minimally in the way, but it seems to work and disengage properly. I believe this is the same orientation that Wheee used. It is easier to get the cable into the caliper first before mounting it to the adapter plate. I am going to work on some brake line brackets to make sure the hydraulic line doesn't rub on anything. I crossed the cables under the car with the left feeding the right side, and the right feeding the left. I ran them above the differential and through the mustache bar to loop around from the rear. Hope this helps...
    1 point
  9. I am sure I will build a motor at some point and may go turbo at some point. It will probably have 300-350HP at some point in the future. We have some great mountain roads near us and the stock brakes don't like those long twisty downhill sections. They would always get hot and smell. These should stay nice and cool no matter how hard I push! 😉
    1 point
  10. 30mm long. Round pan head philips (JIS?)
    1 point
  11. During my recent work at the front fender areas, i realized that the corner where the headlight buckets go on the driver side must have had a hit at some point and the panel was slightly bent backwards: I started to enjoy bearing metal panels with a hammer recently, so i got myself a proper hammer and dolly and started to hammer it straight. Worked out pretty well and i'm happy i didn't have to pay a bodyshop for another 30minutes of work. While doing bodywork anyway, i thought it's time to test-fit the rear bumper. I didn't want to mess up my NOS bumper mounts (i'll save them for the final assembly). I realized that my old ones were pretty messed up. A bit of hammering and bending and things started to look usable Then i recut the threads because the bolts wouldn't fit with the thic coat of primer that ended up in the holes: And last but not least i put some rust-converter on the straightened brackets and installed them on the rear. But i forgot to take photos of that. Then i got a bunch of panels in questionable condition from germany. What is special about those front lower valances you ask? Three of them are specific for European spec cars, with the additional mounting points for the euro-spec front spoiler: Here you can see them with my (very wobbly) front lip: I once had a NOS one, but it seems i sold it a while ago (back then i thought i'd go for the xenon front bumper anyway). and now i hate myself for it. Luckily one of the corner valances seemed to be half-NOS. It still had the original protective black primer and sticker on it, but it also had a bit of rust and remaints of a front bumper that was once attached to it. BTW: those EU-spec corner valances have a closed hole for the turn signals (we got the ones mounted on top of the front bumper) and again holes at the bottom for the front lip: Well. it took me a few minutes to get those rusty old bolts out, but now i have again a complete (albait the center part is not very fresh) set of EU-spec lower valances. Oh and a sea-freight pallette with some nice parts left the Port in Japan last week. so i hope in a few weeks i can show you some nice parts... And then, recently i iwas at a very nice S30 related event in the netherlands (more about that very soon). And there i got some nice gifts. Read more about it here: https://www.jdmjunkies.ch/wordpress/2024-10-26/240z-some-gifts-from-the-netherlands/
    1 point


  • Forum Statistics

    • Total Topics
      66.3k
    • Total Posts
      663.5k
  • Gallery Statistics

    • Images
      39.6k
    • Comments
      14.4k
    • Albums
      643

    Latest Image
    By ea6driver,
  • Blog Statistics

    • Total Blogs
      167
    • Total Entries
      251
  • Download Statistics

    • Files
      132
    • Comments
      31
    • Reviews
      9

    Latest File
    By NissanMaster

    10    0

  • Vehicles Statistics

    • Total Vehicles
      849
    • Submitters
      663
    • Total Images
      2,955
    • Comments
      35
    • Total Views
      1,295,988

    Mike
    Latest Vehicle
    BMW Z4 By Mike
×
×
  • Create New...

Important Information

By using this site, you agree to our Privacy Policy and Guidelines. We have placed cookies on your device to help make this website better. You can adjust your cookie settings, otherwise we'll assume you're okay to continue.