Leaderboard
-
nowak1981
 Subscriber
 4Points16Posts
 -

siteunseen
Free Member4Points15,112Posts -
conedodger
Free Member3Points12,491Posts -

Zed Head
Free Member3Points19,211Posts


Popular Content
Showing content with the highest reputation on 02/07/2025 in all areas
-
4 pointshah, I'm excited and bummed at the same time. Since I don't know a lot about this car, I was hoping for a good original car to have as a baseline and then slowly work my way up as a learn more about what makes it tick, but I'm pretty decent at problem solving once I have a good working knowledge. All this chat has me really motivated to work on it more, and I really appreciate you guys with your conversation and information. Its been a long time since I have found a good forum to socialize. I'm looking forward to learning more and hopefully I can eventually contribute to the community.4 points
-
Being lazy and not having read the entire thread, I have a suggestion that perhaps has not been tried yet. Replace the spade connector on the end of the BY wire at the starter. It may “look” just fine, you may have even cleaned and tightened the metal contact. I had one where there was only one strand of wire still crimped under the terminal tangs and that strand (like the rest) were filthy and corroded. No way to get enough current flowing to engage the starter solenoid. Snip, strip, scrape any corrostion off of the bare wire, crimp a new 1/4 FM terminal, stuff it on the starter terminal.2 points
-
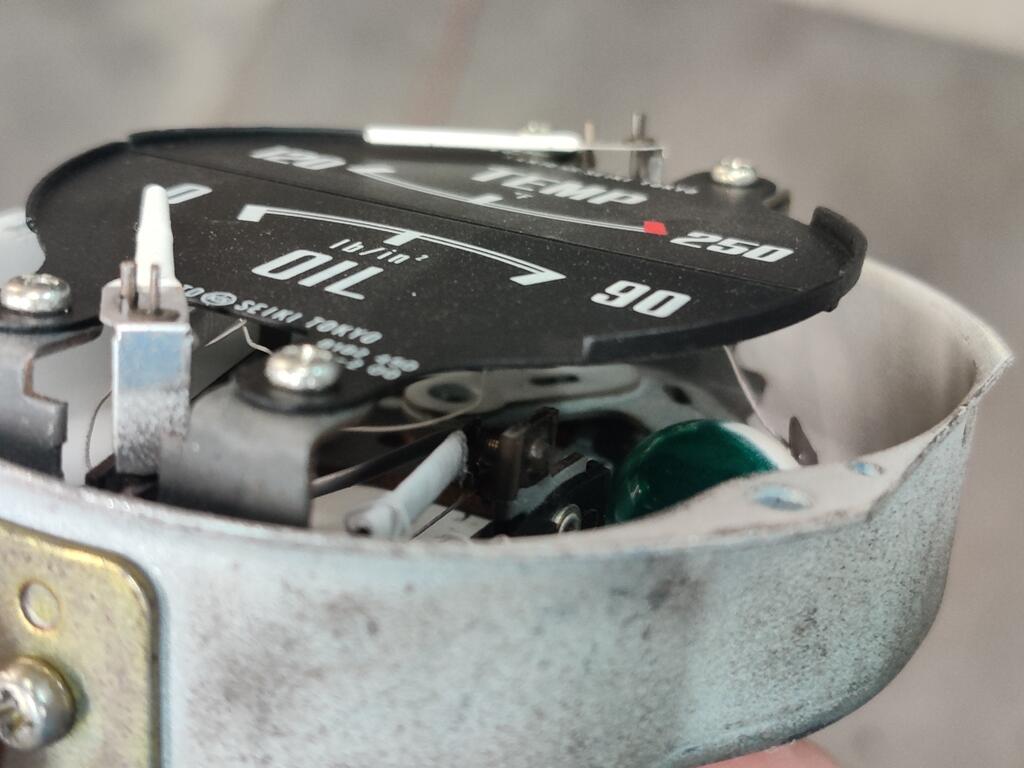
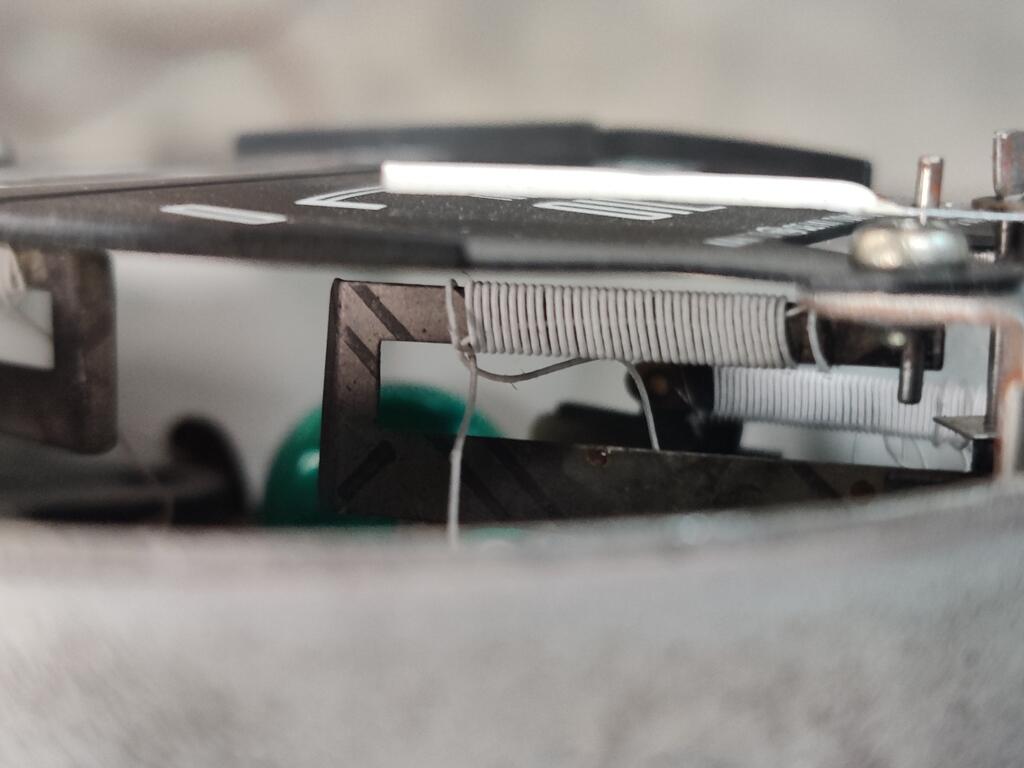
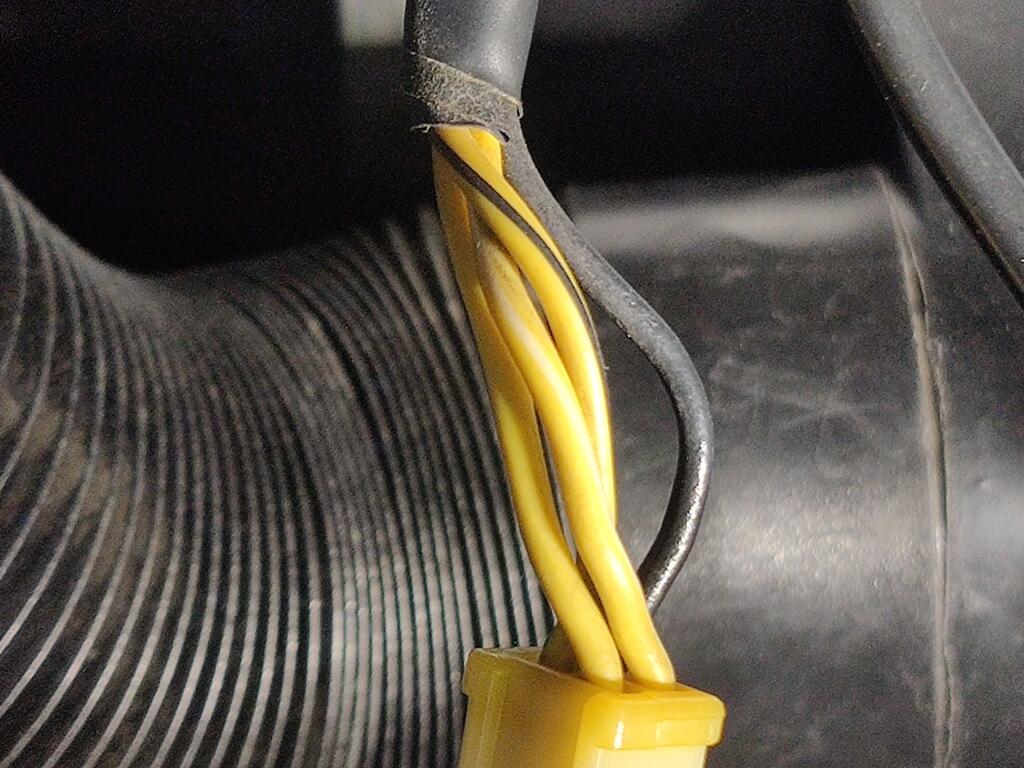
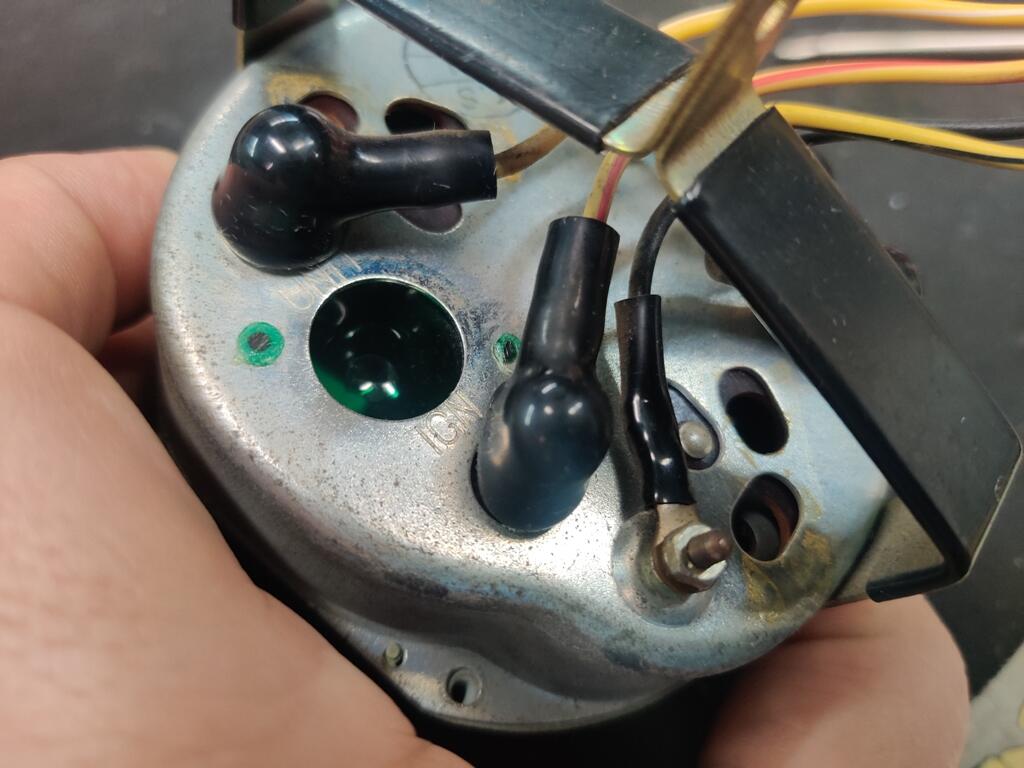
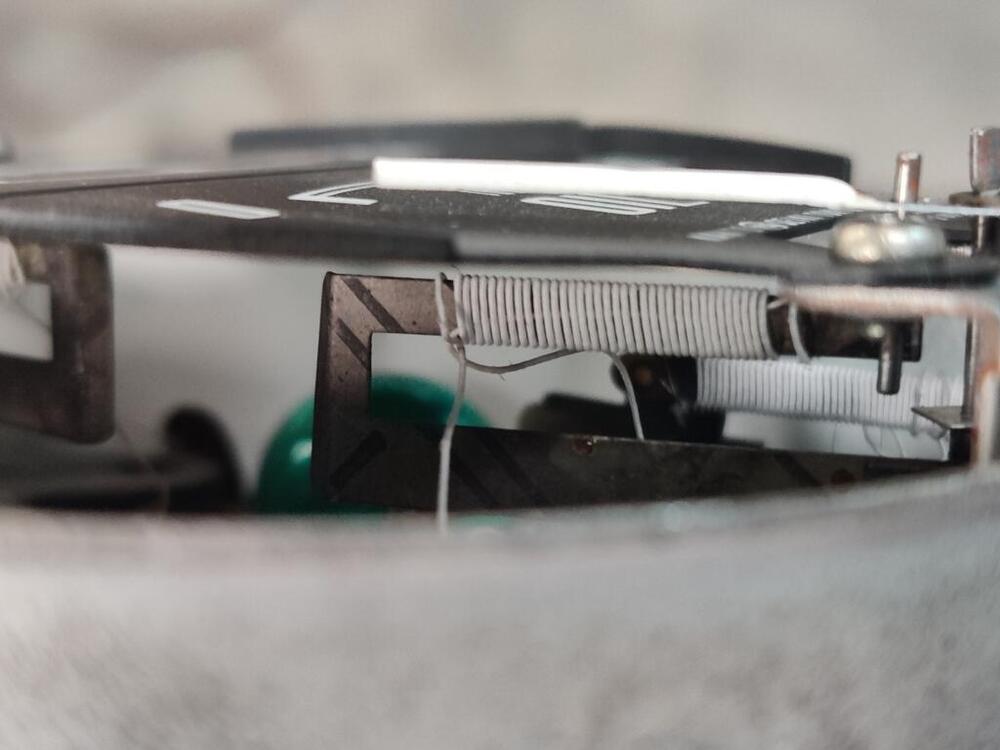
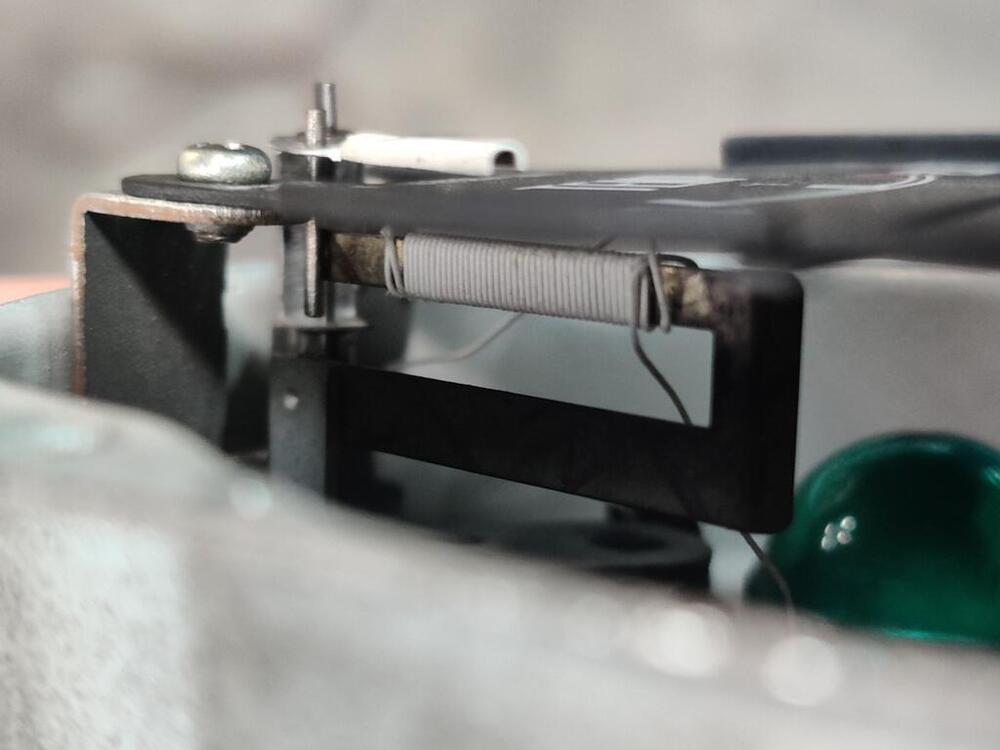
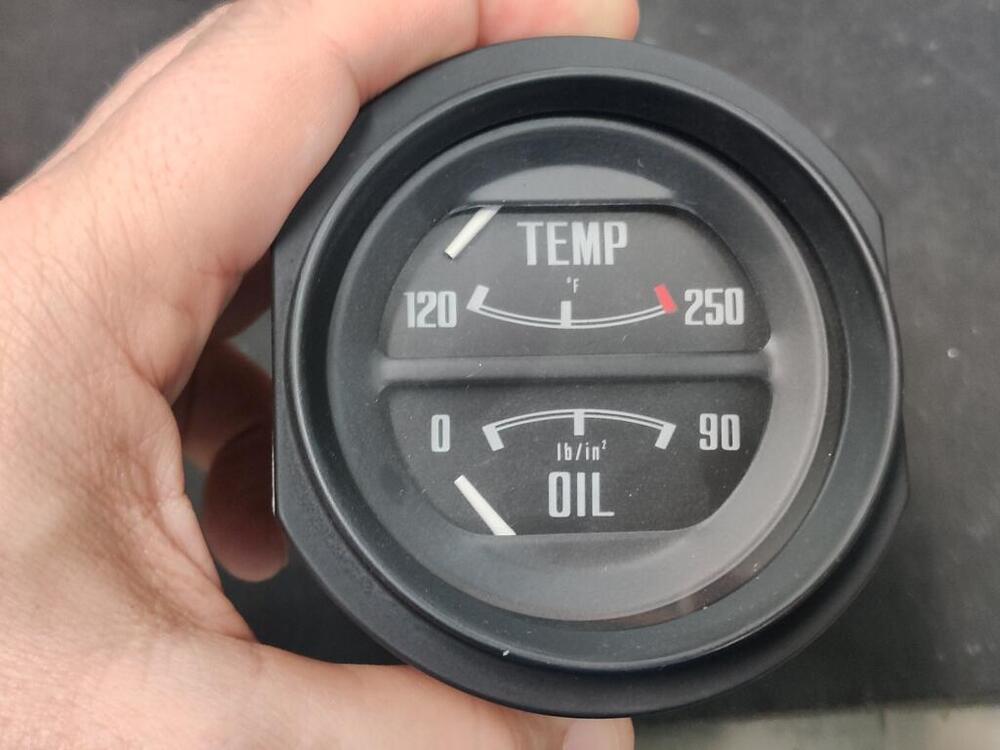
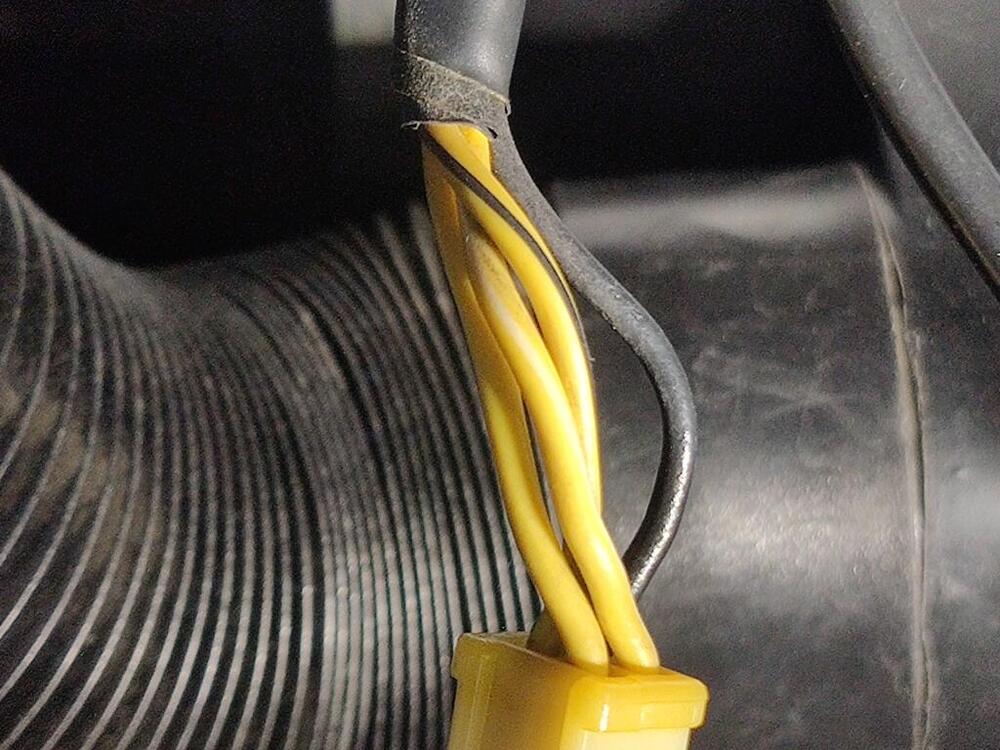
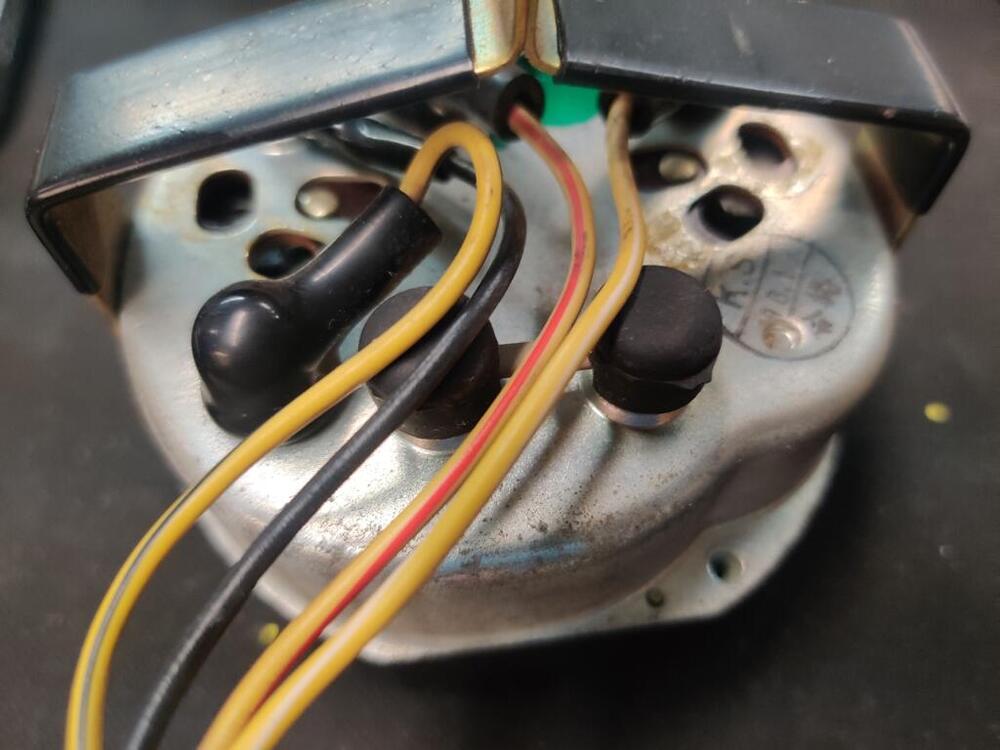
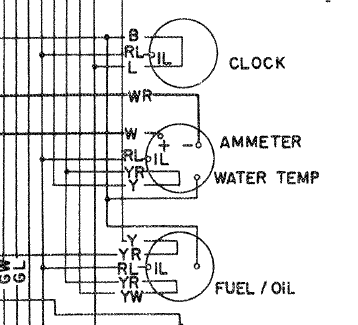
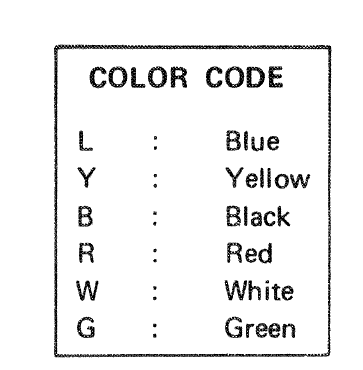
2 pointsDash harness wires: gauge wires: Inside gauge: Connections on gauge: Static needle positions: I didn't see the white strip before. I just glanced at the factory 1971 workshop manual and got the color codes: Funny how that has the ammeter and water temp in one gauge and the fuel and oil in the other! I was able to bench test just briefly yesterday. I pegged the gauge successfully. But, I couldn't juggle heating the temp sensor and getting a laser temp reading and seeing the needle position all at once. I am thinking about putting the sensor in a pot of boiling water to control the temp while connecting the body of the temp switch and ground of the gauge to a negative terminal of a battery... and the yellow/white wire to the positive terminal of a battery. I am thinking that will give me a fairly steady state for the heat, and I can also measure the resistance of the temp switch at the same time. Where the needle sits at that point will, in theory, be 212 degrees or thereabout. Then, I can add the "pot" that I bought for adjusting the resistance. I note that the gauge itself has some resistance as well. I will check that again and put what I find here.


 2 points
 -
The stud pattern on the jenvey 40 and 45 itbs is the same as the 40/45 dcoe carbs. Thats the point. The itbs come in 3 lengths I think, and I suppose it is possible that the longest ones might be too long. You should be able to measure it up on your car.2 points
-
You bought vales and guides already, as seen in the pictures you posted. You replaced the Far 311 cam with a street able Schneider. What all was changed with the new cam? There is a lot more to that than just swapping out the actual cam. With your new parts already bought and paid for just go ahead and take the leap. Have the head rebuilt, new valve seals that will not interfere with your cam's lobes. Make sure all valves are cut the same and seating properly. Don't get in hurry finding a cylinder head rebuilder. Find one that is recommended by mechanics or even better some machine shops. You've got time now moving to Spain and getting settled. Make a plan and budget. Don't waste time or money.2 points
-
I did... I would install it loose and then when you like how it fits tighten everything up. I used exhaust paste. I don't think I would do that again unless I had a leak! I haven't found anything that will dissolve the exhaust paste. I think a paint stripper with MEK would be necessary or a chisel. And chisels and prett SS exhaust don't mix. So hopefully I don't have to take it apart anytime soon. I made my hanger pieces after I had the exhaust in the way I wanted it. The tabs on the muffler help to get it oriented the right way. Check the exhaust tip and make sure it is correct. I had to tweak mine so the bevel cut looked correct and plumb1 point
-
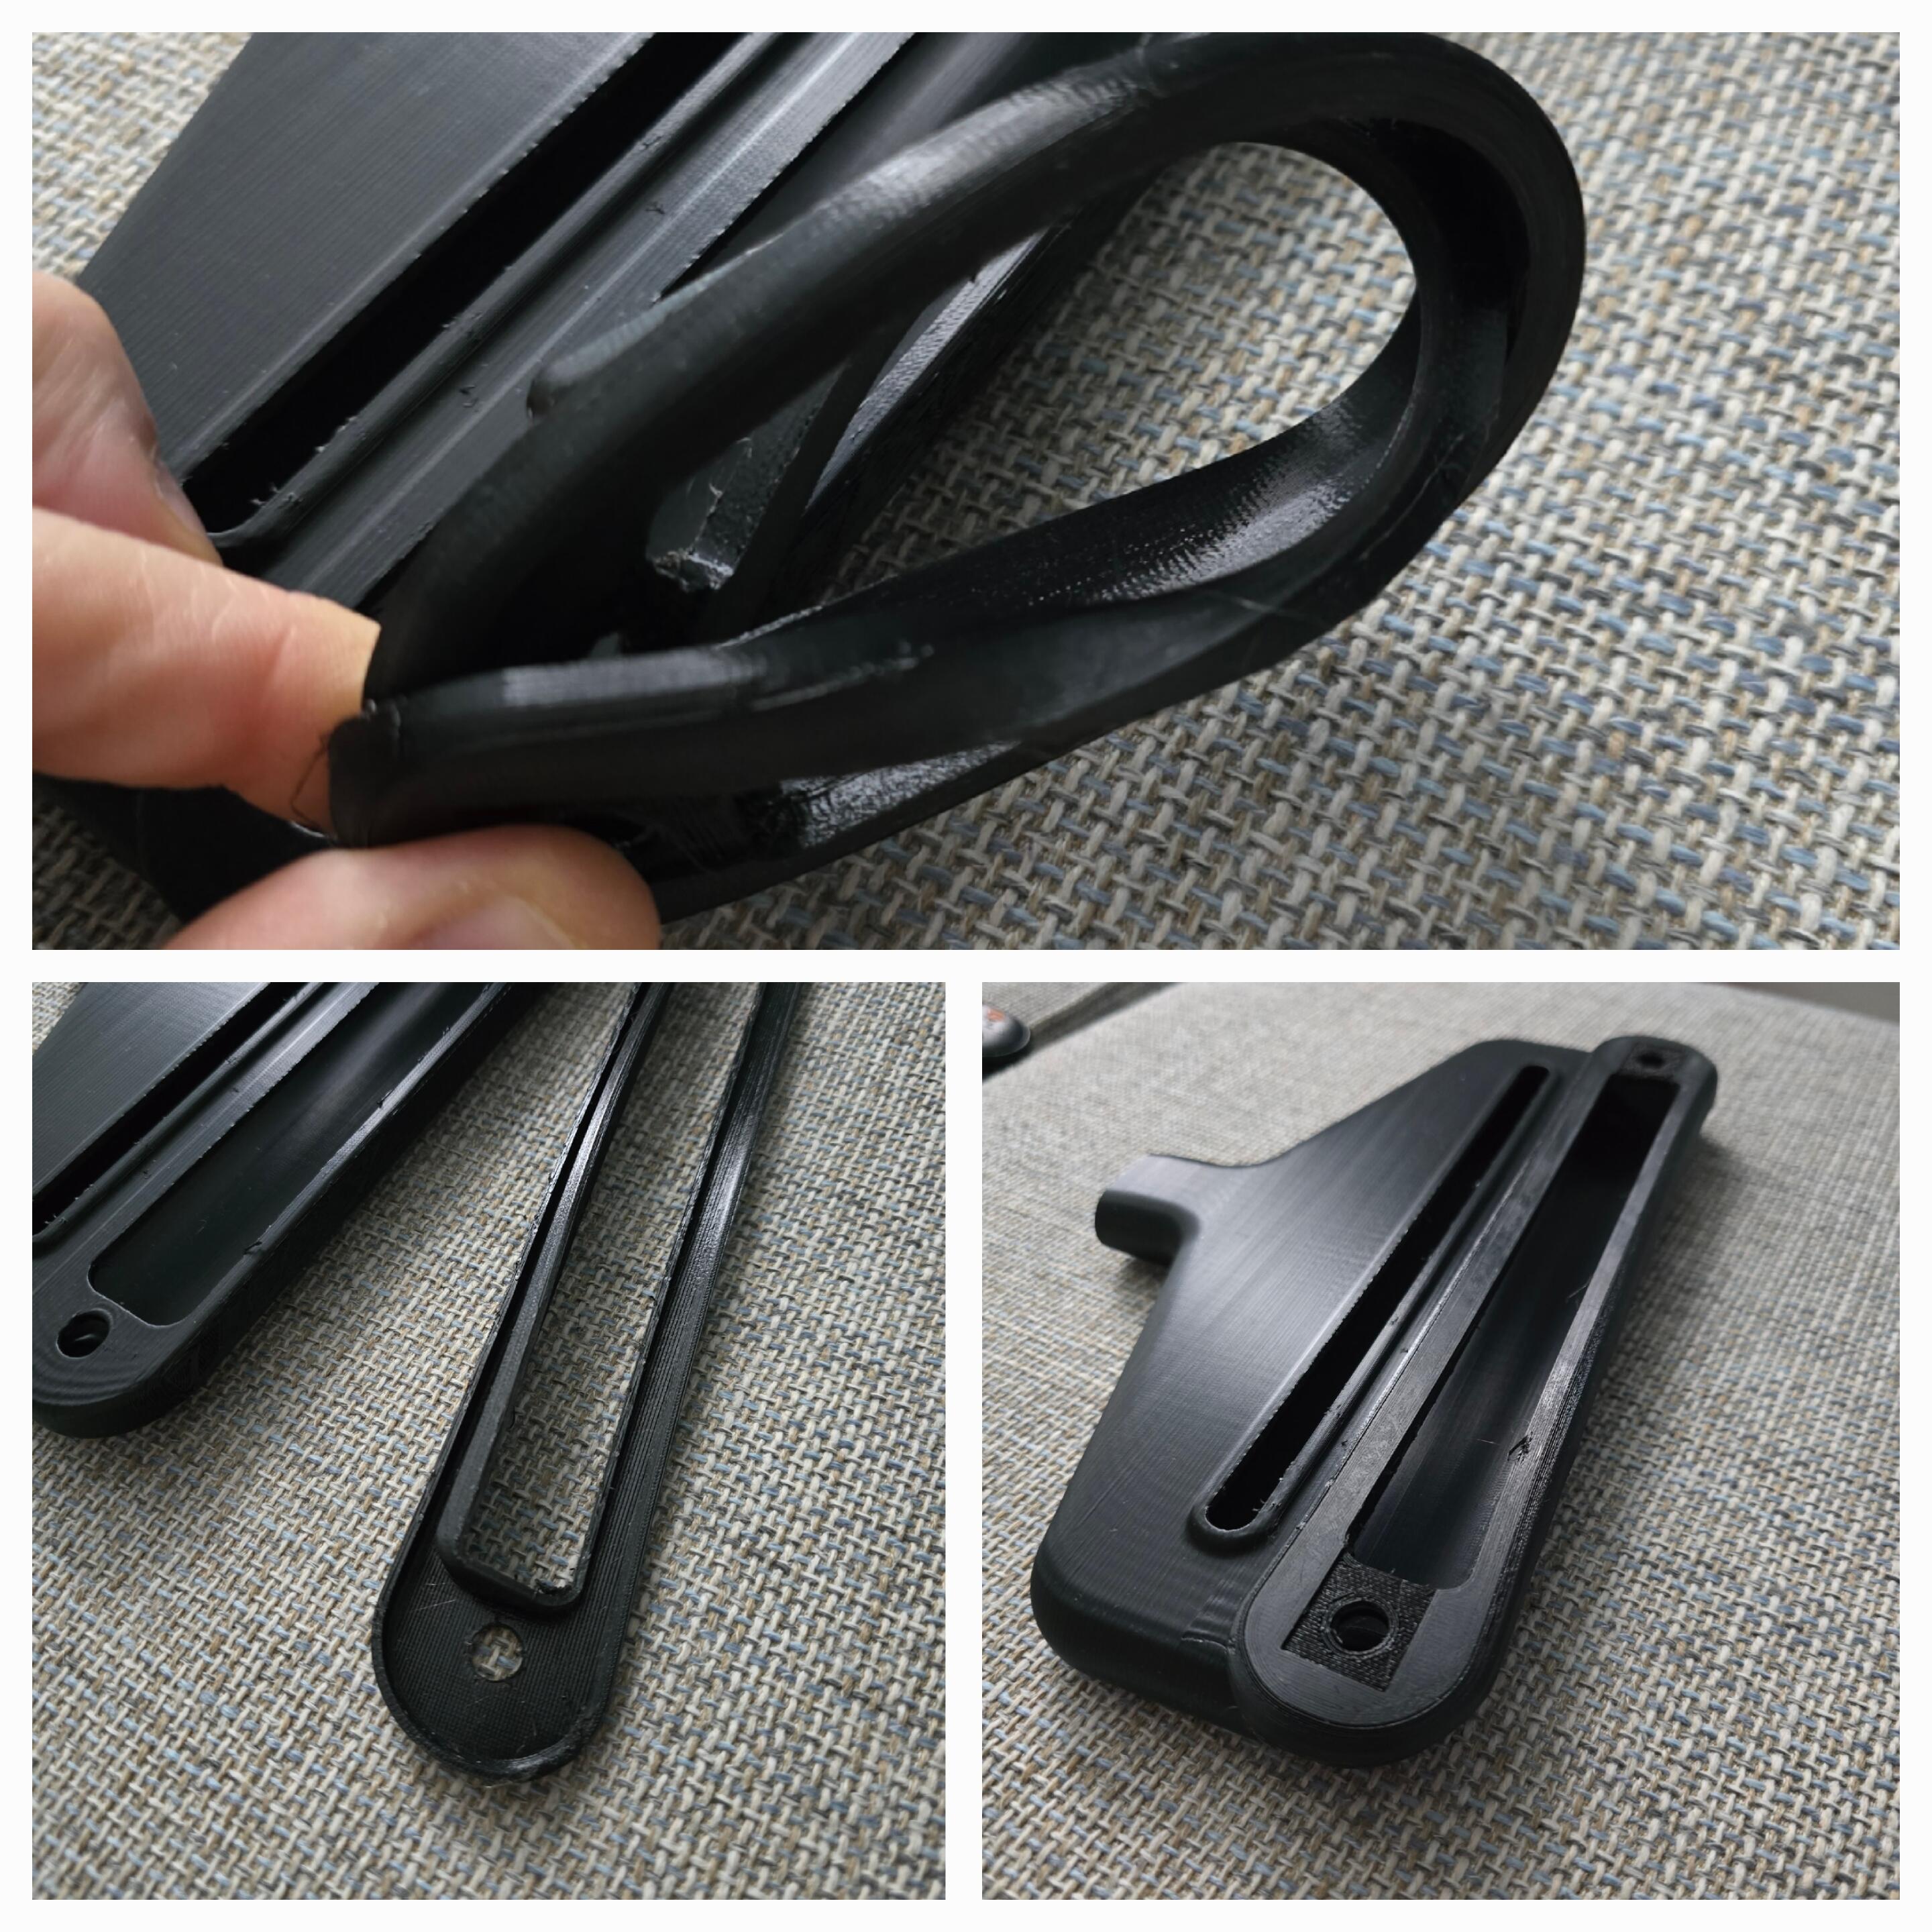
The built in tool and parts shelf.
 1 point
 -
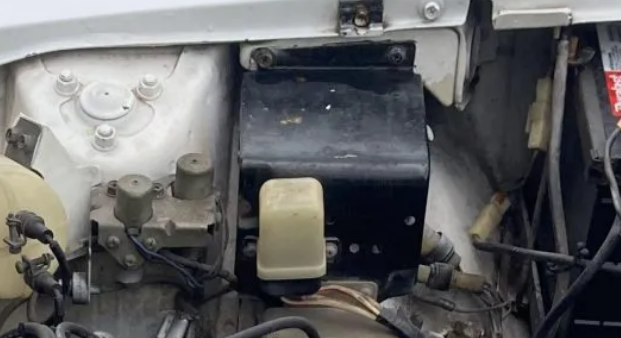
1 pointMy '77 had an N47 head and a '79 ZX motor I bought had an N47 head. I think it's a 1979 280ZX motor. The cut head temp sensor, the fuel rail fan are what I'm judging by. That xenon page has some mistakes on the head dates. The '75 and '76 came with an N42 block and an N42 cylinder head, great running combo from the factory. I'm pretty sure the first ZX, the 1979, came with an N42 block? You will play hell finding an N42 cylinder head. That's the one before they did the EGR N47 head. N42s are a lot simpler and cleaner looking. You can pull the motor and transmission together and start working on rebuilding the motor. When you get frustrated or run out of parts/money then go to the interior and body work. 2 years is a good timeline or at least that's what it took me by myself. Have fun, you seem to have a good mindset going to work on your Z. Know when to walk away for a few days is the lesson I learned. https://datsunzgarage.us/heads/1 point
-
1 pointOops. Still, check the hoses. My fuel injector hoses were also age cracked and ended up shooting tiny streams of gasoline. Made it all the way to the sidewalk when I opened the hood. Another lucky break, I smelled it in the city before I got on the highway. You have a bunch of small odds and ends in front of you. Have fun.1 point
-
1 pointThat would be the cylinder head temperature sensor. That deepens the mystery. It was used in 1980 on the P79 and P90 heads but I don't think the Z car N47 heads got it. That might be a Maxima N47 head. A popular compression ratio "upgrade" for the L28's. @madkaw knows. If you look on the driver's side by the engine mount you might be able to see the block casting number. It should be N42 or F54. I was going to mention the fuel hoses. Make sure that they are all high pressure EFI hose. I'm pretty sure that that glass filter is not rated for 36 psi. Check the rubber hose in the back from the fuel pump also. My car had low pressure hose when I got it and it split while I was driving. Luckily a UPS drive saw the fuel spilling and flagged me down.1 point
-
1 pointGet some boxes and zip-lock baggies to put everything in, label what it is with a Sharpie. Take pictures of everything, you won't regret it. This is the best book by far to get if your like me and need to read about the cars before rebuilding. It covers mainly the drivetrain, engine and transmission. Here's the thread on "waking the sleeping beast" that Carl Beck wrote up. It's for a 240 but worth a read as a lot of it overlaps with the 280. Post #8... The book you need to read about 3 times before you ever even start disassembly. https://www.amazon.com/Rebuild-Your-Nissan-Datsun-Engine/dp/1931128030
 1 point
 -
1 pointNo worries - I appreciate any ideas to get this fixed. I installed the hoses/gauge/zip tied it to the windshield wiper last night so if I get home early enough, I'll take it out for some answers.1 point
-
So Zedhead posted a good pic of the starter relay earlier... it's up in the engine compartment in front of the battery. If you disconnect the starter relay and short the two black/yellow contacts together (on the car side of the harness), it will take both the starter relay and the transmission inhibitor switch completely out of the starting circuit. In other words... With the two B/Y wires shorted together, when you turn the key to START, the starter should spin even with the transmission in drive. If it still fails to crank even with that jumper in place, then it's something other than the starter relay or the transmission interlock.1 point
-
1 point
-
Indeed. I've been on a steady decline in quality since 2002... The E8700 Console-mounted Fog Lamp Switch was a rarely-specced showroom option part in Japan, and only available for a relatively short period (roughly early October 1971 through late August 1973) after which the design changed completely. I see the part number quoted also on the relevant R-DRIVE Export factory parts list, but the only illustration is the (equally rare) earlier type dash-mounted E4100 NILES two pin 'flip' type fog switch. There is not even a drawing of the E8700 type. The March 1974 update of the R-DRIVE Export factory parts list gives the following part numbers: *25370-E4100 COMP-SWITCH FOG LAMP - up to 08-71 (Note: this is the dash-mounted NILES two pin 'flip' switch). *25370-E8700 COMP-SWITCH FOG LAMP - from 09-71 (Note: This is the console-mounted Droid you are looking for...). *25370-E8701 COMP-SWITCH FOG LAMP - from 07-73 up to 08-73 (Note: The fog lamp switch that burns twice as bright burns out a month later...). *25370-N3400 COMP-SWITCH FOG LAMP - from 08-73 (Note: This is not the Droid you are looking for...). To be honest I've never really sought out an E8700 type switch as I never needed one, but it seems that they are rather elusive. I've got several of the equally elusive E4100 type but I don't recall even seeing a photo of the E8700 type in Japanese market factory literature. The only pictorial reference I have is the factory parts list drawing I posted in the 2002 thread. So, can't help, not won't help.1 point