kinfish
Free Member
-
Joined
-
Last visited
Everything posted by kinfish
-

 34 years, 4 months old with original paint & 175,000 miles
 -
If it was a 396 Chevelle he must have missed a shift or had a really lousy running engine. I also thought this was going to be a crunch story via your introduction. But it is good that this event made your day and boosted your spirits.
-
Attaboy to Alan Pugh's suggestion. It is great to hear that some readers follow troubleshooting suggestions precisely and when they do they find the root cause of the problem. Without the reaction disc in place you were consuming pedal travel just to make contact with the master cylinder piston, assuming the rod was adjusted properly with disc in place.
-
Did you take the detail measurements as suggested in previous post? Adjusting the rod to max length is a shotgun approach and will not lead you to a solution that will fix the problem, especially if you forgot to bleed the system after removing the master cylinder. Your "rod" may be too long or too short and it will never yield the desired gap dimension.
-
Great personalized license plate. At first I thought it was a '72 Z. When time comes to replace, add a space so it jumps out "7T_240Z".
-
If you have mixed components you may have created a problem. Prime suspect is the adjustable rod between the brake booster and the master cylinder. In the free state it needs to be set so that it is .010 to .040 loose. If there is a big gap, you are consuming brake pedal movement just to get the rod to touch the piston in the master cylinder. Decreased movement of the piston could mean no brakes. You need to take accurate measurements with a depth micrometer to calculate what length the rod should be set at. The next headache is that there are at least two different rods depending on model year. They are different lengths. Make sure you have one that can be adjusted to achieve the desired gap.
-
From the looks of your suspension components your Z has a severe case of Northern New Jersey rust probably aggravated by that wonderful corrosive, road salt. The rear spindle pins is the #1 hardest job on the Z and your rust problem might jack it up another couple of notches. Best path is to remove the pins with that spindle pin remover tool. Start soaking them with PB Blaster every day to help destroy any rust bonds. The bolt for the front suspension is probably rusted in place. Same tip ..... use PB Blaster.
-
I immobilized the strut assy using a short piece of 2"x10" cutout for the 4-lug mount, secured with lug nuts and attached 8' long 2"x4" to same. On other end used 1/2" breaker bar with 6' long pipe over same for leverage. Get somebody to stand on 2x4 and then jolt the pipe with arm power. Comes loose right away.
-
Did you remeber to reinstall the rotor?
-
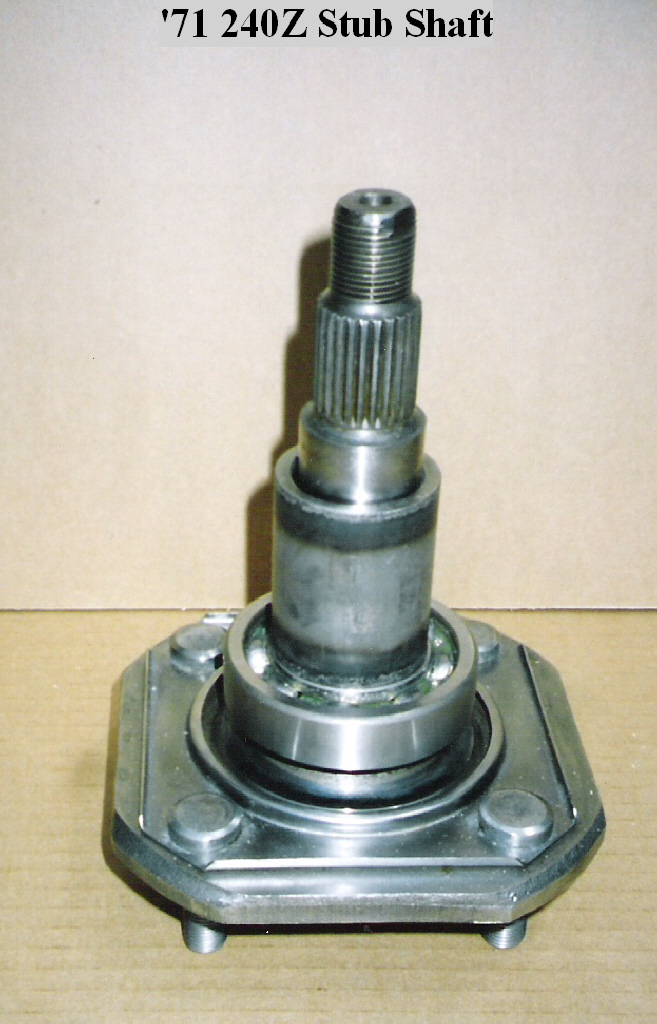
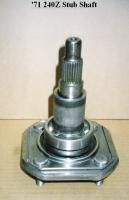
Here my right rear axle stub shaft after installing new outer bearing:
-
Rear axle nut with self locking feature is p/n 43262-W1200. Paid $4.16 each from Midwest Z before she went out of business last year. Recommend you use dremel to cut away the crimped part of the nut before trying to untorque. Will reduce amount of breakaway torque required and also minimize risk of damaging threads on stub axle. You will need a good 27 mm socket for the nut which was probably installed with over 200 ft-lbs of torque.
-
The "A" style transmissions used in the Series I 240's are inherently sloppy with age due to poor design. That is one reasons they upgraded to the "B" style which uses the nylon bushings shown in the "sblake01" response. I found that the problem is caused by wear of the fork, not the pin which is held in place by that tiny snapring. I also replaced the rubber bushings holding the shift lever but it did nothing to reduce sloppyness. I decided to live with it!
-
The piece or pieces have airfoil shapes that appear to have fractured from the rest of the airfoil or root (cannot assess the size of the pieces from photo)., If they are large they may have been from a pump impellar. Anti-seize compounds do not cause head bolts to become loose. It is critical to insure the mating threads on the bolts and block are clean and free of burrs so you don't consume spec torque trying to overcome friction. You should chase the treads on the block with the proper size tap prior to assembly. The compound is used to minimize corrosion which can lead to excessive breakaway torques and possibly fracture of the bolt. When the final increment of spec torque is applied it creates a preload in the bolt which is the mechanism that prevents the bolt from becoming loose during operating conditions. If your problem was a leak at the head interface, several scenarios may be culprits: 1) If the bolts were original you should have replaced them with the later turbo head bolts which are improved material and have higher final torque (nominal of 55 ft-lbs). 2) Your bolts may have sustained permanent elongation since the last head removal. They eventually yield after many cycles of time and temperature. When they yield you lose preload and eventually they will become loose in a worst case. 3) Your torque wrench is out-of-calibration. 4) You consumed a portion of the desired spec torque overcoming friction due to dirty or burred threads. This causes preload to be less than optimum. 5) You should torque the head in increments per the sequence in factory manual and do it only when it is bone cold. 6) You should retorque the head after running engine for several hours since head gaskets compress and you may lose preload. Did you comply with these guidelines on the last head install? I would keep looking for other sources of leaks before you give up and throw it back together.
-
Before you took the head off did you check the torque (in tightening direction) of all the head bolts? Any less than spec? Did you inspect the head gasket for signs of water leakage from coolant passages into the cylinders? Is the photo showing 3 views of one piece or 3 views of 3 pieces? Is your pump impellar intact? Pieces look too hefty to be from impellar?
-
 Those ports in a stock manifold are pipe threads. But they are not standard NPT sizes due to thread count. They are BSPT (British Std Pipe Thread). I ordered fittings made by Parker Fittings via a local hydraulic store. Many different shapes and materials available. Stay away from brass.
 -
The wheels shown in last picture look like Appliance Aluminum Mags. Common aftermarket buy for 240Z's in the early 70's. They are 14" dia, 7" width. Your lead in statement says they are 16" dia ...... what gives?
-
The rod between the brake booster and master cylinder interface should be adjustable and set so there is a small gap (.000 to .032) in the free state. If the gap is too big you will be consuming brake pedal movement to close the gap before the pistion in the master cylinder starts moving. Result is less than optimum brake system I replaced the brake booster on my '71 240Z and the new rod was significantly longer than my original rod and could not be adjusted to achieve the desired gap. I fixed the issue by using the original rod with new booster.
-
I experienced the same problem mating the MSA Earl's SST clutch hose to the slave cylinder. The original 34 year old hose is not a tapered pipe thread. It is sealed by using a copper gasket between the hose flange and the machined face of the slave cylinder. I achieved the original design intent of the system by decreasing length of the threads on the Earl's hose from .683 to .456. Simply cut it off with a hacksaw and carefully deburred. Purchased a new copper flat washer with 10 mm ID and put it together. Doesn't leak and clutch works fine. LanceM may be right about the "inverted flare" fitting but aesthetically it looks funny with those threads exposed after seating.
-
I suspect you forgot to use locktite on those bolts that hold the guides to the block? Practice makes perfect! Do it before it comes loose and causes lotsa damage. Good luck.
-
If you are using the Energy suspension kit, the poly bushings installed on the inner side of the control arm create a tight fit with the mating hub (make sure the flange of the bushing is fully seated against the control arm face). I measured mating parts and found .050 tight. My solution was to reduce bushing flange thickness from .128 to .103 so the fit was line-on-line. Use sandpaper to reduce the flange size .... best to do this with the sandpaper on a flat surface and rotate bushing in circular fashion.
-
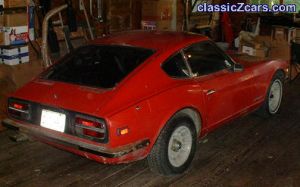 Wow ...... a garage with a wood floor. Been eons since I saw one of those. My 240Z is also a '71 mfg'ed in Dec,'70. A series I doesn't look the same with a vented hood ..... go back to original. Do you have much rust on that Series I hatch?
 -
Also check the integrity of the rubber gaskets for the tail lites.
-
The 2-piece fiberglass fan shroud from a '77 Z will not fit your 240Z if equipped with the original radiator. The MSA shroud one-piece shroud does fit but it is marginal at the top where the radiator guard is located. I got mine securely mounted after some mods to the fiberglass in this area.
-
Have you checked the adjustment of the rod between the brake booster and the master cylinder? If there is a big gap between the end of the rod and the piston in the master cylinder some of the brake pedal engagement will be used to take up the gap. Best method is to take detailed measurements to insure there is only a slight gap (.050) between the two after assembly. Be careful not to set the rod too long whereby the piston in the master cylinder has started to move after final assy. I experienced similar problem when installing new master cylinder and new brake booster. Later model boosters/master cylinders used adjusting rods of different length. I wound up using my original rod (as del'd from factory) with the new booster. After setting rod correctly, brakes work great.
-
Dave & Will, Great initiative for this lighting enhancement effort for our 240 Z's! I was totally impressed with the quality, design and installation instructions of the headlight harness I purchased from Dave. I would be interested in purchasing any type kit you invent for LED updgrade to dash lites, map lite, tail lites, side markers. Either individual kits or one kit for all the items. I have confidence you guys will get it right and the selling price will be reasonable.