
kinfish
Community Member
-
Joined
-
Last visited
Everything posted by kinfish
-
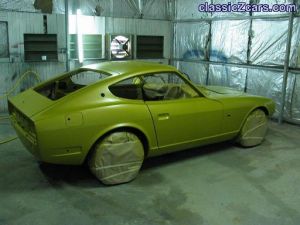 Very unique color. Should look terrific when done!
 -
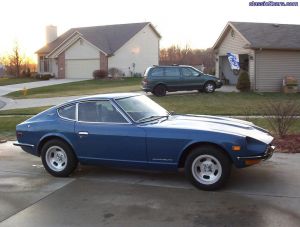 Looks just like '71 right down to wheels. What is your VIN# and mfg date?
 -
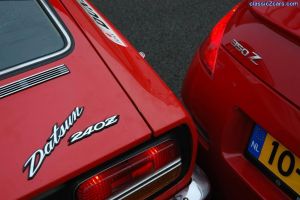
Will that gal with the "Z" on her fanny be there to autograph each car? If so, your response may increase dramatically!
-
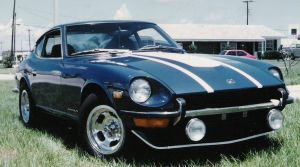
 Ouch! Looks like Series I 240Z? Other car has license outside US? Where did snafu happen?
 -
 1971 240Z Delivered Jan 1971! Photo taken sometime in 1971 after adding stripes and BRE spoiler
 -
Reduce the flange thickness of the outer bushings by sanding using about 100 grit paper. Best method is to sand by hand ..... put sand paper on flat surface, hold bushing in hand and rotate in circular motion. Measure twice, cut once so you don't make them too thin. OEM sleeves in link for outer bushings must be removed. I measured them as 1.060 ID and the bushing OD is larger. Easiest method is to very carefully make two cuts, about .375 apart in OEM sleeve using hacksaw. Take your time so you don't cut into parent material of the link. Cut about 90% thru thickness of sleeve. Take punch and hammer the center section between the cuts and it will roll up as you proceed down the width of the sleeve. Towards the end the sleeve will pop out of the link. Another tip: check the fit of the new spindle pin to the Energy sleeve in kit. The ones in my kit were deviated and the pin would not fit. Diametrical fit should be about .005 loose. The Energy factory in Calif sent me replacement sleeves at no cost.
-
I agree that polyurethane bushings (energy suspension kit) installed on the inner side of the control arm create a tight fit with the mating hub. I measured mating parts and found .050 tight. However, I don't think it is good idea to use tool to spread control arm to make it go together. My solution was to reduce bushing flange thickness from .128 to .103 so the fit was line-on-line.
-
Why not put the Z in one of the 3 garage stalls that those houses seem to have.
-
Have you purchased the car or is the seller doing the work in preparation to get it running so you will buy it? The fuel crud problem is because the car sat for an extended period of time without running it. If you have lotsa varnish buildup in the tank and lines I would expect the SU carbs to have similar problems ...... stuck floats/shutoff valves will be the next issue to address once you get fuel to the carbs. If you do get it running, you will probably find the brakes don't work or are marginal for driving on the street. Corrosion in the brake cyclinders is common problem that will need to be fixed and maybe master cylinder replaced.
-
Check out the '72 240Z just posted by "SOCAZ". This car has been restored and pictures look like he did outstanding job. The $7,900 price is reasonable, if not a bargain. Much better investment than the $3,500 Z that you looked at which could cost you another $5,000 to make it safe and reliable and that assumes you do the work yourself.
-
If that red Z is located in West Palm Beach at a corner house bordering a lake it is same one I looked at back in Oct. The owner claims it has only 38,000 miles but its condition indicates otherwise. It apparently was stored outside for many years and is victim of rain and humidity. Too much rust and other problems for the $3500 he was asking. It obviously hasn't been run for years. Engine may need major surgery before you get it running again. I was turned off when seller said it was supposed to be advertised at $4500 but got printed as $3500. He also said he had a buyer who was going to pay $4000 but had yet the delivered the cash. Don't mean to deflate your spirit but if you are serious give him a lo-ball offer and plan to spend some bucks to make it safe and somewhat reliable to drive.
-
If you are using the E31 head and mating to an original 2400 cc block you have a potential interference problem if exhaust valves are increased from the stock 33 mm dia to the later engine 35 mm dia. Adding a high lift cam aggravates the problem. Can be made compatible by notching the contact point on the rim of the block. Not sure what happens with the larger intake valves? I upgraded my 2400 cc engine with MSA Schneider cam kit which is designed with internal oiling via holes in the cam lobes. Only mod required is to trash the external oil manifold and cover the two supply holes for same with block off plates.
-
I agree with Ed ...... constant noise increasing with speed sounds like worn out wheel bearing. There is an inner and outer on each axle. Once you have stub axle pulled replace both bearings. Spindle pins is worst job on a Z; replacing stub axle bearings is a close 2nd.
-
I distance pieces are clearly marked A, B or C on the outer surface. However, I don't think the hub housing is marked since it is only one of two pieces that contribute stack up tolerances to achieve optimum bearing alignment. The other is the stub shaft. The only way to determine which length to use is to take very accurate measurements of the hub and the stub shaft coupled with the bearings to be used. Cannot do it with a yardstick. Only other option is trial and error using the 2 distance pieces other than the one currently installed ...... risky and time consuming.
-
The distance pieces are used to compensate for machining tolerances in the hub and mating stub shaft. Goal is to achieve optimum alignment between the inner and outer races after assy. Note that 0.2 mm increment is only .008 inch. Selection is based on stack up measurements on hub and stub shaft. If you pulled bearings and distance piece from one assy and installed them in another assy, you could have created mismatch as "Bambikiller 240" alluded to in above post.
-
As "Bambikiller 240" noted the distance piece is critical part of the assembly. It is also very important to insure the inner and outer bearings are fully seated. I had the outer bearing pressed on to the stub shaft in a machine shop. The inner bearing should be frozen and hub heated to insure the OD race seats properly. The final step involves freezing the stub shaft with outer bearing in place to facilitate installation of same into hub. If you used brute force for assembly it is likely something is not seated or cocked ......... result is binding.
-
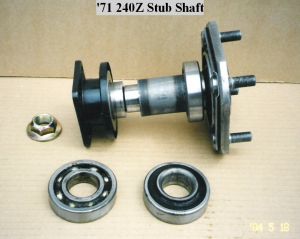 Pulled to replace noisy outer bearing. 2nd hardest job on Z next to spindle pins.
 -
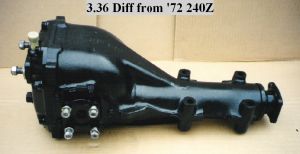 Used 3.36 Differetial from '72 240Z
 -
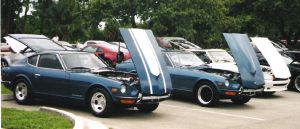 Aug,'04 Event in Lake Worth, Fl
 -
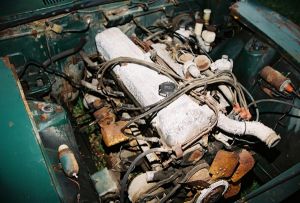 Yuk ...... an advance case of oxidation enduring the elements. Is the nametag readable on the passenger side strut tower? You will be challenged with time & $'s to make this one a sister to #26.
 -
MSA exhaust systems are not bolt on systems as advertised in their catalogue. The pipes on my 2.5 inch system would not even fit together and had to be resized. One of the pipes was trashed since the bends were not even close to make it fit properly. Your system may sound nice but you are doomed to catastropic failure with the pipes hanging that close to the ground. It is cheaper and better to have a reputable muffler shop bend aluminized pipes to connect between the header/manifold and the muffler.
-
Great post. Did same repair on my horn button 2 years ago except it had about 5 radial cracks and never would stay on. The plastic tie wrap along the inner circumference fixed it ....... hasn't fallen off since.
-
The crush tubes (inner sleeves) from my Energy Suspension kit were 1.826 inch long with .642 ID. New Nissan spindle pins have .628 OD. Hence the fit between the 2 pieces is .016 diametrically loose. If your fit is really 1mm (about .040 diametrically) I would call manufacturer to determine if your parts are non-conforming to specs.
-
Looks like you removed the old rubber bushing and the center sleeve but left the outer thin wall sleeve in the transverse link (outer bushing locations). If you have a micrometer make some checks of the ID bore of the link and the OD surface of the polyurethane bushing. Fit should be about line-on-line .... that is not tight and not loose. You will probably find that the thickness of the thin outer sleeve (X2) accounts for the difference. Solution is to remove the outer sleeve at both locations on the transverse link. Best way is to carefully cut two grooves in the sleeve lengthwise spaced about 3/8 inch apart. Use hacksaw and cut thru 90% of the thickness so you don't cut into link and create a new problem. Take your time and stop to check depth of cut on each side so you don't screw up. Next step is to use punch and hammer that piece of material until it starts to roll up and out other side. Sleeve will fall out when done. :cheeky:
-
That fitting and similar one in the intake manifold have "BSPT" threads (British Standard Pipe Thread). There is a slight differance in thread counts from NPT and hence are not interchangeable to purists. Plugs are available and made by Parker fittings ....... can be ordered thru speciality stores dealing in hydraulic hoses.