Galaxybj
Member
-
Joined
-
Last visited
Everything posted by Galaxybj
-
-
My garage has: 1971 240Z - Silver 1971 240Z - Gold (Originally silver - 1st owner repainted gold) 2004 Subaru Outback Driveway has: 2002 GMC Duramax Crewcab 4x4 1968 C10 Chevrolet pu
-
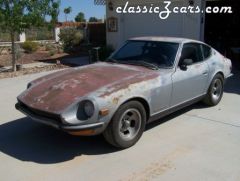
In case anyone is interested, I created a photo album for HLS30-30855. Will add photos as I get time to do more exploration/investigation.
-
I just used Chariot Transport to move my '71Z from Clearwater, Florida to Rio rancho, N.M. They were very good - quick reply with estimate, quick on scheduling pickup, and right on with their eta for delivery. The driver contacted us when he was within 1 day of arrival and when he got stuck in traffic and would be delayed. http://chariottransport.com/
-
Thought I would bring an update on this wonderful happening. The car was picked up from Carl yesterday morning and should be here this weekend. Carl had good news and bad news as he tinkered on her over the past couple weeks. Got the carbs cleaned and the car running, but very rough and apparently a "strange" clunking sound. Brake and clutch master cylinders had to be disassembled and cleaned due to the rubber inside the caps melting over the years. Carpets are shot, seats need reupholstered, spare tire is missing, and the air cleaner was painted black. Once she is here I can go over her with a fine tooth comb to get reacquainted and inventory what my next steps will be. I will get delivery pictures and post some when I get the opportunity. Thank you very much once again to Carl, Doc, Carl Jr., and all others involved with "MY" Z returning home. Carl - Bet your white Z is soooo happy to see her leave so it got its rightful spot in the garage back :-)
-
I ran into that the other day and I had to use a small needle nose pliers to pull the connector up out of the rubber boot, then slide the connector on the stub. Putting the rubber boot back over the connector is a bit difficult. Might try wd40 or something to make it slick.
-
I thought about that this morning, but thought I would wait until all arrangements were finalized - no jinxes needed.:nervous:
-
My response: I am totally amazed that this Z was found. I want to thank Carl, Bill, Doc, Carl Jr, and anyone else that had a hand in this discovery/recovery. When Carl asked if I could verify the serial number I wondered why. Then a photo of the front marker light and headlight bucket told me why. I could not believe it!! I figured it might be sitting in the Pasco, Wa wrecking yard or someones yard. I actually am amazed at the condition after 24 years of other peoples possession. Yes, she requires a lot of work, but it will be well worth it. This is an incredible happening - Shows what friends are all about. Guess I owe you big time Carl. :classic:
-
It is a daily driver - but I do like to have a good handling car. My first '71 had the full BRE setup under it
-
Quick question - I got a set of sway bars to mount (I believe MSA) - but the rear bar is the type that requires drilling holes in the floor - any thoughts on this setup?
-
http://albuquerque.craigslist.org/pts/694165201.html He has miscellaneous parts for 240 and 260 to include a 74 260 parts car (Sept 73 production). I recall someone looking for some butterscotch interior pieces and their are some here. Name and phone number are in the ad.
-
When I ran into this on my '71 I was given the suggestion to set the number 1 and 6 cylinder to bottom and stuff nylon rope, as much as you can, into number 1 and 6, then turn it over using a breaker bar and socket on the crank bolt. Worked for me after trying all the wedges, scrapers, etc.
-
Well, the machine shop looked at the head - first thing noticed was the surface was not "glass" smooth, felt like a real fine file, the grooves running across the head which would give small channels for the water to seep to the outside - no I had not noticed that. When they went to surface it they discovered it had "high" opposite corners. They had to take .005 to get it flat and smooth. My lesson here - check items purchased off eBay closely. It was rebuilt so I figured it was all good to go. Thank you all for your input/suggestions. Good group here. Should get her back on the road next week - after a relaxing long weekend.
-
Okay, removed the head tonight - question concerning Felpro head gaskets - do you use a sealer or not when installing? I did not when I installed this one - don't recall if it was felpro's instructions or something I read. The manuals, both Datsun and Haynes, says to use a sealer. So did I goof up? Still taking the head in tomorrow to be checked. Will let ya know the verdict from them.
-
Yes, the block was surfaced. I left it sit over night and no more water came out, but I am a "rather be safe than sorry" type of guy so I'll take it apart (ugh!!) tonight or tomorrow and take the head in to be checked. I'll also order a new head gasket, most likely from Datsun, err Nissan .
-
Actually the settings were from my Haynes manual, except for the sequence, which I used the sequence in the Datsun engine manual. The seep is a lot slower than it was, but never the less it is there. So, when I pull the head back off, 1) recommendation on a head gasket brand and installation, 2) What should I look for when I remove the head? Thank you in advance for information. -Bill-
-
Haven't installed the plugs yet. I pulled the head bolts and I had the correct lengths in the correct holes. I reinstalled them, torqued them in the sequence and settings in the Datsun shop manual - ending with the final torque of 60 ft lbs. I have added the water to the radiator and will go back out to check it.
-
Bob, thank you for the reply. VERY frustrating! Started with having one heck of a time getting the original head off. It is a continuous slow seep, not running. Water will sit on the ledge above where the engine number is stamped before getting anough to drip down the side of the block. Further forward on the same side little drops of water will show up. No water leaking from any of the water lines. The block was surfaced when I had it in for boring. The head is a rebuilt I got off eBay a year ago. I never thought about having it checked for straightness - I figured it was done as it has shims under the cam towers. I am going to check to make sure I have the head bolts in the right spot. The Haynes manual shows the passenger side all short and I am almost certain I followed it to a "T", but........ Also, I do not see any water in the cylinders -Bill-
-
I double checked the head bolt torque and they are as they should be. I am using the turbo head bolts. The head gasket was one I got from Napa. Any better one recommended?
-
Well, here I am ready to fire her up for the first time in 1 1/2 years. Finally got the engine together. Filled the radiator and while under the car checking out things I noticed a little drop of water. I looked and found there is water seeping between the head and block just above where the engine number is stamped in the block. There was also some weeping just forward of there too. I was very careful in the installation, but something is amiss. Any ideas? I Know I will have to pull the head back off, but what should I look for? The head is a rebuilt E30. Thanks in advance for your input. (I thought I had seen this problem in the forums, but couldn't find it by searching tonight.)
-
rpm's were ~7200 at this speed. Also, I am sure it was a surprise to the driver of the Corvette whose front bumper was even with my rear bumper when we had to back out of it.:classic:
-
Info: 1971 240Z with a .85 5th gear, 4.44 lsd (equals 3.77 overall gearing in 5th), calibrated speedometer (an adapter built by a speedometer speciality shop), balanced engine, DeLong camshaft installed by FAR Performance, additional distributor and carbeurator work by FAR Performance, 6 to 1 headers w/2" exhaust. Lowered with BRE springs, front BRE spook and a long straightaway equaled 141mph. (summer of 1973) Did it once and never attempted it again - fun experience, but..............
-
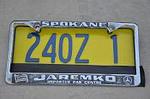
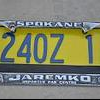
Talk about being a lucky individual! When it is meant to be it happens. I would give most anything to find my first Z - HLS30-30855. Bought her new in Spokane and 13 years later sold her in Kennewick, Washington. If I remember correctly she had about 70,000 miles on her when I sold her off the showroom floor of the Datsun, err, Nisssan Dealer. What a beauty she was......
-
Part number for the 4.44 limited slip differential is 38300-A0200. I had that in my first '71 Z, as well as the 5 speed with the standard ratio. Have fun building your car. The SCCA specs for C Production would have been whatever the rules were concerning modifications to the body, suspension, engine, and the rest of the drive train.
-
I have an original of the 2 sided brochure from 1969. A bit rough on the edges, but..... The hood, fender, and pillar emblems are superimposed on the red car. No "D's" on the hub caps neither. In the pictures there is no antenna because it had no radio. Also no clock in the pictures (It does list them under the standard equipment). But I would have given those up for the 5 speed and triple solexes. 175 hp at 6800, 10.5 compression. As for a 1970 Fairlady ad, I don't have one, but I do have an early 1971 ad I picked up in Okinawa. Shows the 3 models available: Z, Z-L, and 432 It is in Japanese. Has the round pillar emblem and the air vents on the rear hatch.