


beandip
Free Member
-
Joined
-
Last visited
Everything posted by beandip
-
 The vacuum advance port on the carb is ported vacuum not the same if you connect to the engine vacuum. The vacuum advance is to give the engine some advance coming off idle or when the RPM are low. As soon as the engine speed increases the centrifugal advance takes over. I agree with the others , being one tooth off. Have you been working on the oil pump by chance ? I ask because the Dist. drive comes from the oil pump . Obviously your timing is way off. I am running a ZX dist. and 16* advance with the vacuum advance disconnected. I pull 22 inches of vacuum at idle. I don't know what engine or head you have and the amount of advance you can run can be different with the different shapes of the combustion chamber. Arne tells me his engine pings with a setting around 10* I believe. I am using a P-79 head that has been milled some but the chamber shape is much different between these two heads. Gary
 -
This is going to be a great day. this will kick off the season for us out here on the LEFT coast. Finely getting some sunny weather . Join us if you are in the area . GaryROFL
-
North West Z is having a cruise this coming Saturday the 15th it's Armed Forces Day and we are going to the Coast, via some great back roads , fun with a Z. We are gathering in North Planes Oregon right off of Hwy 26 and the North Planes/Glenco exit at 9:00. Our destination for lunch is a great Pub on the Columbia River out on a the Pier. Driving time will be about 4 hrs plus what ever time it takes for pictures and comfort stops. We will end up on Old Cornelius Rd at a great pub that we can gather out on the Patio , weather permitting. Make it if you can. Gary:classic:
-
I found that if you use a Shop Vac and put a length of nylon stocking or panty hose in the inlet of the hose to act like a filter. Then use a length of heater hose and duct tape it to the end of the Shop vac hose,it acts like a crevice tool. This will allow you to get into the small spaces. I found several pins from the past owners this way. Gary
-
I agree totally with Scanlon. One thing to stress, use rubber gloves and long sleeved shirts when doing this. Also have some lacquer thinner close at hand , just encase you happen to get some on your skin. POR will begin to cure on you skin almost immediately , so if you wait for a few minutes to remove it , you may find you will have two options. Sand paper or just wait until it wears off. The siphon gun Scanlon posted is exactly the one I use . I tied a 2 oz. fishing weight to the hose so the tubeing stays in the paint can. No need to thin the paint. You need to use the cleaning and preparation as directed by the paint Co. and be absolutely sure there is NO moisture in or on the metal that is to be coated. Moisture will cause the POR paint to foam and this will leave voids that moisture can travel. When properly applied and cured , I know of no better product for protecting metal from rust. This stuff is hard and at the same time flexible. It penetrates into the voids and seals. I have no dog in the fight here . Just a vary satisfied user of the product. Be sure to use in a well vented area ! This stuff has some nasty chemicals in it. Especially when spraying it on. Gary
-
You mentioned in your first posting that there were two 260s in the Bone yard. They should have what you need. Good luck, Gary
-
welcome to the group! One thing about this web site is that there is a huge amount of information that is stored . Just go to the search and ask away. I have been a member here for over 8 years and have used it many times. Almost everything you want to know is there. If not we are here to help. There is always someone that has done what you need to know here. If not we will send you to the people you need. The thing that is your worst enemy is RUST. When looking at a Z to buy, open the hood. Look under the battery area and the frame rail there also. Pull up the carpet in the foot well on both driver and passenger sides. Expose the metal there as well as you can. Check out from under the car in the same areas for holes in the floor that have been patched improperly. Open the rear hatch , the sill or flat area is another likely location for rust. Have a look in the spare tire well also. If you see bubbles in the paint down low either ahead or just to the rear of the doors. That is rust coming through from the back side. This will get you started when looking. Surface rust is not what I am talking of. But if it is heavy or flaking, look closer . Replacing panels and frame sections is a vary expensive problem. The best of luck in your quest. Gary:classic:
-
I received a video about 2 or 3 weeks ago, showing just what you are talking of. It showed a 350X and 300ZX TT as well as other Z cars in a drag race . I remember the commentary that they were surprised the 300 pulled away from the 350 toward the end of the run. This could have been from Top Gear. Gary
-
Welcome to the site, there is a ton of information on tap here. If you have any projects coming up we are hear to advise and help. Congratulations on your Z Gary
-
check to see if you have fuel flowing. You said it has gas but is it being pumped to the engine. There is a difference. Also there should be pressure to feed the injectors. Check the fuel filters and it just would be good to just replace them then you will know there good. Since you have spark as you said , I would start with filters . The next thing would be to attach a timing light and see what it shows you when you spin the engine. this is all just basic stuff. Let us know what you find . Gary
apparently you haven't ever adjusted your valves. The remote starter is a major improvement when doing the valves.
I simply use a plastic bottle with a magnet attached to it so I can attach it close to the wheel I am working on. I use a length of vinyl tubing that will just fit over the nipple of the wheel cylinder bleeder. I put a little brake fluid in the bottle, just enough to cover the end of the tubing so air cannot enter. I just open the nipple on the cylinder and then push on the brake peddle. You can push it down and let it up because no air can flow back into the tubing. I usually pump the brake peddle four times then refill the master. When no bubbles are seen in the tubing and or if the fluid is clear if you are just flushing things . Close the nipple and go to the next wheel. Simple easy to make . Actually I bought one at Harbor Freight for a couple of bucks and it works great. It has a small bottle though but it is large enough to bleed one wheel usually. I flush my brake fluid every other year just to keep the moisture out . Much cheaper than new cylinders. I used to do brake work for a living years ago and used the pressure bleeders , they are quick and do a good job. This little system works just as good , but is some what slower and a whole lot less costly. Gary
There is a vent hose that runs from the pan to the underside of the intake manifold. Where it attaches to the intake there is a PVC valve. It could be stuck . I cleaned mine with a small amount of gas in a soup can to dissolve any gunk. Just check it by sucking on one end and it should not allow flow but drawing from the other end it will. If it doesn't seal buy a new one. It is basicly a check valve. This draws gases from the crank case and they are burned by the engine. If it is stuck the engine will build sludge. this could be the cause of the smoke that you are seeing. Gary
For what it's worth, I also installed Dave's head light upgrade way back when he first built them about '03 or '04. Top quality. I also am using the tail light upgrade as well. And for that matter the connectors that cause the front marker lights to blink along with the turn signals. Again I recommend all of his offerings. I put my starter on a relay which is vary simple, and this is vary much worth the effort. Any time I can take the load off of the aging original harness I do so. I just remembered I also used Dave's adapter for a internal regulated Alternator. If I thought for second that his upgraded harness were not of high quality and trouble free, I wouldn't have them on my Z. My 2 cts. Gary:)
If you have a air compressor and a Harbor Freight in the area buy a siphon gun I bought mine for about $8.00 I used a length of vinyl hose that I just stuck in the can of POR and the ''gun'' blew the paint all through the rockers and in any cavity . Because there is no cup with paint you can turn the gun side wise or upside down if needed. I attached a lead weight to the hose to keep it from falling out of the can. When done just flush out with lacquer thinner to clean the gun. Gary
Sounds like there is several things that are shot. That much play that you have said. DON'T drive at speed! Take the car to a alignment shop and have them look at what all is going on. With the car on the ground , grasp the front tire at the 3 and 9 position and see if you can move the tire by pushing inward on one side and pulling outward on the other at the same time. If there is movement then the suspension is in need. Could be tie rods or steering rack. movement from top to bottom indicates ball joints. Gary:ermm:
dclamm, you about covered it. Other than what you did , you can brake the aluminum drum and take it off in bits.
just slip the bump stop onto the shaft of the insert pointy end up.
Welcome to the group. If the Z has been setting for the 10 years that you say. Have you started the engine yet. Hope not if you didn't drain the oil and change filter. Most likely you will find rust in the gas tank , but maybe you are lucky. In any case do change the two gas filters. The 73 has a electric fuel pump back by the gas tank and a in line filter between the pump and the tank. And the one up front by the alternator across from the mechanic fuel pump. Remove the valve cover and pour oil all over the valve train. Remove the spark plugs and put about a teaspoon full of ATF in each cylinder. DO NOT turn the engine with the starter yet. Use a large socket and ratchet or break over bar and turn it off the nut on the end of the Crank Shaft. These engines when setting have two valves open and the cylinders are subject to the atmosphere. Sometimes a valve stem will rust and when you turn over the engine it will stick in the open position . If you are spinning the engine on the starter or you do get it to fire off. With a valve stuck open you will bend the valve and can punch a hole in a piston. So take your time in doing this stuff and save your self a lot of headache and cash. Let us know how you are doing , and congradulations on your Z. Gary
It could vary well be carbon build up and or bad gas. Or timing as you said. But with the carbs out of tune... I lean more toward the carbon. Sort of a non issue if you cannot drive the car. I think I would tackle this issue first. Gazza
The fit between the two is the same. Have him get you the heater control panel also just to be safe. The dash it's self is the same dimension and all, and so are the gages. Just get as complete parts as you can. Gary
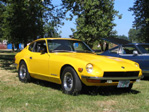
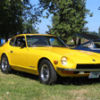
Do you want original red or a brighter red? One of our members painted her Z a red from Ferrari and it is a show stopper. Another is guard read. Reds and or Yellows can be tricky . I have seen many of each of them that miss the mark in my opinion. I went with Ford's Screaming Yellow, before yellow became as popular as it is now. I think that now, between the two, I would go with the Ferrari Red . Yellow as much as I do like it , is a more trendy color. Red is classic and always popular. When I was trying to decide what color to go with , I went to the PPG web site and looked at the color popularity chart, for the different countries. At the time Silver was the most popular in Europe, Blue in the USA and Yellow in Australia. Yellow was way down the list in the USA. Since Yellow had been on my mind , and I rather stand out than blend in. I started looking at Yellow cars, in parking lots. Much better than looking at a paint chip. Ford came out with my yellow on the Mustang Cobra in '04 for the '05 model year and that nailed it for me. In my opinion , paint your Z the color that YOU like the best. You are the one that has to live with it . We shot two stage and I am sooo glad I did. Gary
I suggest that you send a PM to Carl Beck he also lives in Florida and can be of a great deal of help. He also has a website Zhome and is a member here . Perhaps he will see this thread and post . If you use the search function on this web site you will find a great depth of information. All the best Gary
The starter used on that engine is far stronger that any on a Z. Just thought I would mention it.
Important Information
By using this site, you agree to our Privacy Policy and Guidelines. We have placed cookies on your device to help make this website better. You can adjust your cookie settings, otherwise we'll assume you're okay to continue.