zKars
 Subscriber
-
Joined
-
Last visited
Everything posted by zKars
-
 The wrap is a very very thin poly sheet that conforms exactly to the body. I can only imagine that any flaws will show right through. If you want to hide imperfections I think the only way to do that with a wrap is to use a very busy pattern. I'm thinking plaid.....
 -
This issue of bypassing the heater has come up many times. The correct way is to BLOCK/PLUG the heater hose connections at the head and lower rad hose fitting at the front. Do NOT just join these inlets/outlets effectively short circuiting the rad and putting hot water at the back of the head. I know it is super tempting to just connect the front and back heater hose fittings with a nice piece of hose as you don't have to find two big bolts or equivalent to use as plugs, but DO IT. It will save your engine or at the very least prolong its life. That said, if you have to do it as an emergency on the road when you heater core or valve suddenly blows, do the jumper hose/short circuit thing, and get home safe, its not an instantaneous damage thing, but remember to fix it right SOON.
-
This is the stuff I bought. 2 Rolls Factory Electrical Non Adheasive Wiring Harness Friction Tape M | eBay Decent price and good seller. The tape is made by Elliot tape. Michigan Tapes | Adhesive Tapes | Adhesives | Detroit Michigan | Auburn Hills This product page will give you a good idea of the various types of tapes that are available and their intended usage It does not have adhesive, it sticks to itself once wrapped. Electrical tape and its adhesive turns into a gooy mess after a while, and is definitely not the correct product for harness wrapping. The ET stuff feels and works like the stock Datsun harness wrap as far as I can tell.
-
Just to clarify why it won't work, the AAR is an air bypass to the throttle blade, which affects (increases) idle speed when the engine is cold, but ALL air going to the engine must pass throught the AFM or it cannot set the fuel mix correctly. That little filter will pull air from atmosphere that cannot pass through the AFM.
-
All L24/L26/L28 flywheels bolt to the crank, but not all clutches bolt to all flywheels. 225mm clutches use 6 mount bolts, 240mm use 9 bolts, in a different pattern. Sorry, the clutch pack has to match which ever flywheel you decide to use. Only the Fidenza aluminum flywheel is drilled for both diameter clutches.
-
The simplest way to essentially defeat all this is to rewire the distributor so that the "advance" point contact goes directly to the "-" side of the coil, and remove the "retard" wire from the distributor. This essentially puts you back to a simple one-point distributor. Unplug and discard the relay. Frankly either set of points can be used, you choose. Just set your timing after you're done. Hey, this leaves you with a "spare" set of points! If one set burns up on the road, just connect the wire to the other contact and carry on! (with either + or - 10 degrees advance initial....)
-
While these are excellent and well tested methods to diagnose very common ignition problem areas, I would preceed these checks by a simple check (immediately after failure) to see if you have spark or not. Just pull the high tension lead from the center of the distributor and hold the metal contact in the boot about 1/8-1/4" away from a clean bolt head (shock tower nut is my favorite). Crank the engine and see if you get a nice regular blue-ish spark. If its absent, weak or erratic, proceed with the above checks. If you do have spark, then checking ignition components falls down the list of "what to look for" quite a bit... I agree that in all likely hood the issue is spark related given that the fuel pump is running. Mind you only a fuel pressure check can really tell that story with any reliability. Gunked plugged up fuel systems have been all over the forum lately too.... Good luck in your troubleshooting.
-
The shop lightening will have an effect on the preceived color. Get it out in the sun before you start wondering about correct shades. Might have to wait until next spring for sun though....
-
To expand on Tlorber's comments about using an adhesive, which I think is about the only hope you have of making an invisible repair, there are some pretty agressive and strong bonding agents out there now. No need to weld I would think. Epoxies are one option, but do a bit of goggling about bonding body panels and look at the line of 3M products.
-
Help. Weak... Have turkey poisoning... Apparently cranberry sauce and gravy are NOT antidotes... Please save me...
-
The only way anyone has the right to poke fun at someone elses mistakes, is if they have a degree from the university of doing silly things. As anyone who has worked with me knows, I have a PhD from there.
-
The best solution to the points setting issue is get rid of the points. There are several reluctor based distributors available, from later ZX dizzys that bolt right in to Pertronix aftermarket and even uber fancy fully programmable ones from 123IgnitionUSA. Points are SO last century....
-
You're going to feel silly when you pull that rubber protector off the threads... The two threaded holes in the crossmember were used for an optional weight that was hung off the crossmember to counteract vibration. Nothing for you to do.
-
I'm not positive, but I'm willing to bet its a 4 x 0.7 mm machine screw. Can't go look at the moment but can confirm tonight. The part number is 08310-40612 if that helps you find some at the dealer or similar
-
My favorite part (always) is when they drive away smiling from ear to ear, or maybe when I listen to the sweet exhaust note fading into the distance, with their foot in it 'cause they can't resist... Glad to help you keep the dream alive.
-
Sorry, didn't make my joke/point clear enough. Those who want their car "just like it came from the factory" would not accept rebuilt Z therapy carbs if they had the choice of real, period correct, unused, brand new SU's. Even if they ran noticibly worse... Just wouldn't be right...
-
Better running, undoubtly. But they are not "right".....
-
oh baby... any close up shots of its under belly?
-
Pretty sure you mean "Chevette" springs. Pretty much the same car, right?
-
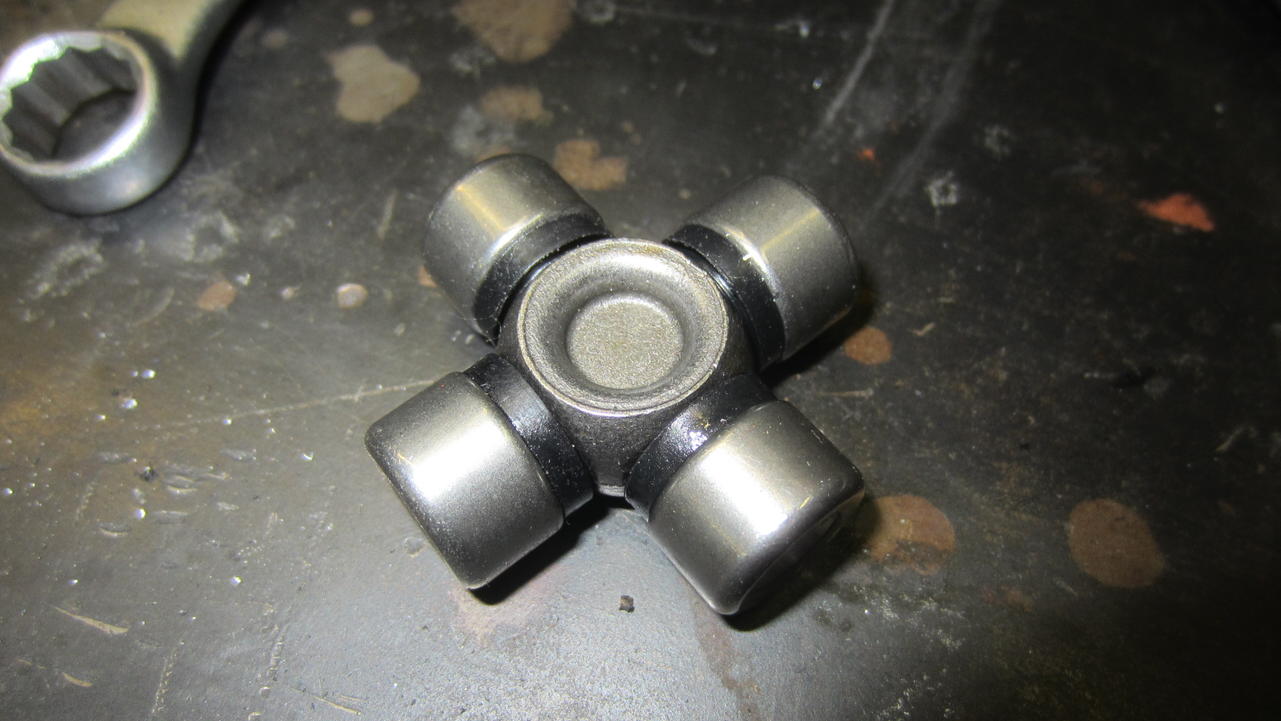
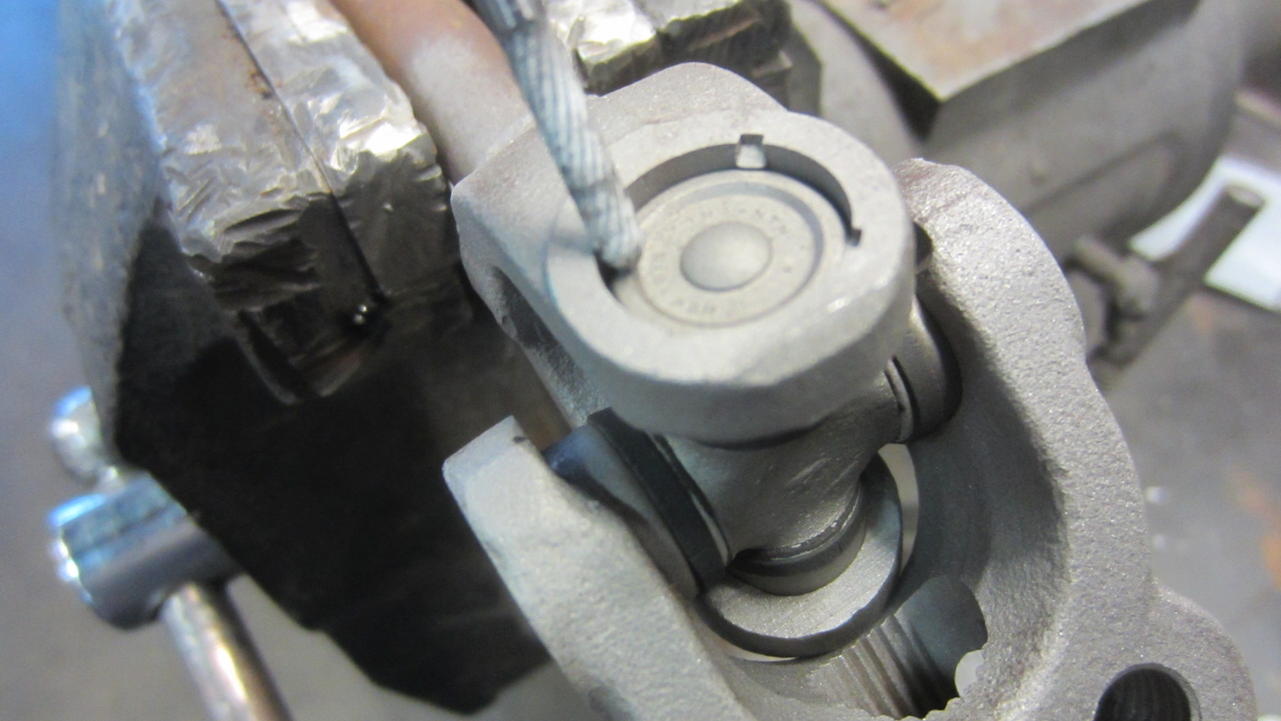
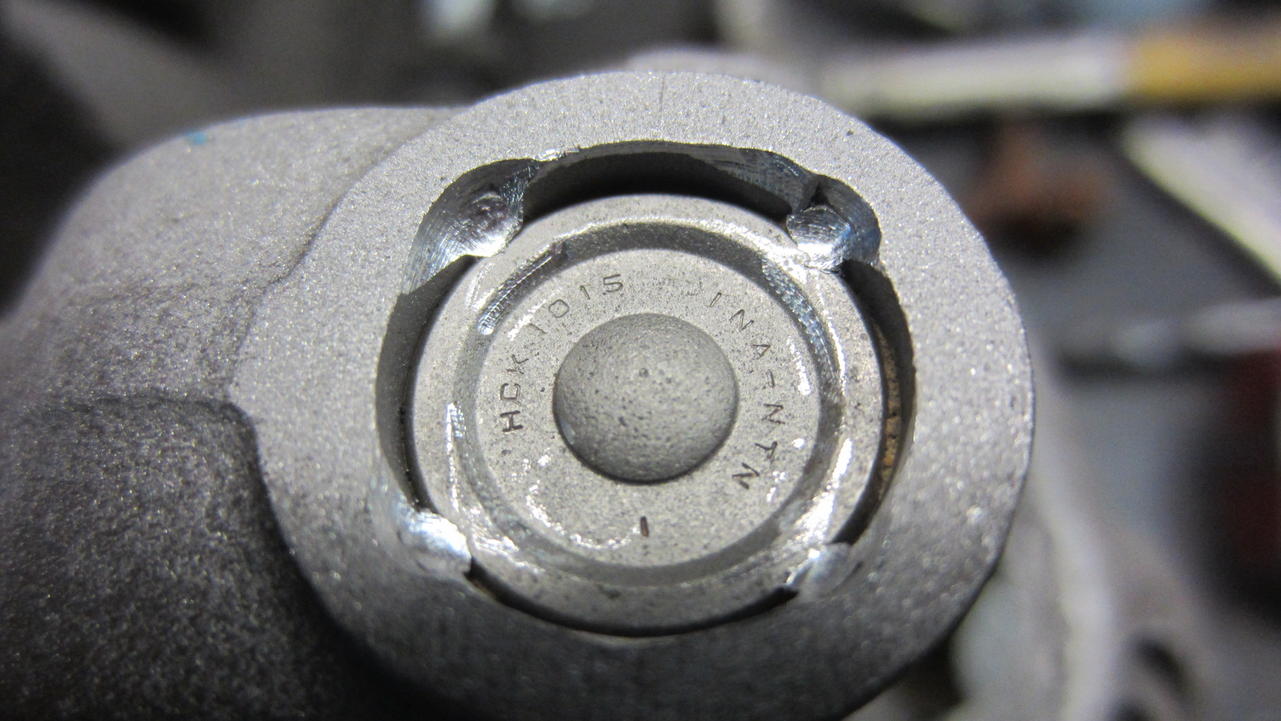
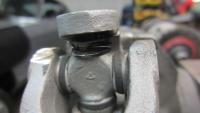
I'm Baaaaaack.. Something came in the mail yesterday. It's a lovely 15x40mm u-joint. I believe we have a staked u-joint replacement option. Way to find a good one CanTechZ! I've confirmed the cap OD is nearly identical to the stockers. I have not yet done the actual replacement on a real live specimen (some one elses Z keeps getting in the way...) , but have started the process. Truth #1. You cannot disassemble the yokes without distroying the u-joint. You can't drive the caps inward far enough to get press the opposite one out far enough to grab it to remove it. Good thing there is enough room to cut right through the yoke legs with a 4 1/2" cut off wheel. Once the yoke center section is gone, just pound the caps through to the middle to remove them. Begin by cleaning the cap area very well (sand blasted in the pictures) then dremeling off the little peened in ears with a small carbide rotary bit. Remove the yoke by cutting through the legs with a cut off wheel. Clean up the staked areas to ensure no protusion into the cap bore. Put new yoke in, pound in new caps from the outside. Put steering shaft back in car. About the only fly in the ointment at this point is how to retain the caps in the ujoint. There is no provision for clips of any sort, and the 40mm length puts the cap pretty flush with the yoke face (I think, have not done this yet), not sunk like the stockers with room for staking -Spot weld cap to yoke body. -Fill whatever small depression exists at the cap with epoxy? -drill and thread a hole in the side of the yoke (x 4) for a small set screw? -put head in sand and assume these will never work their way out in your lifetime? Please add to the list of brilliance I know you are all capable of.


-
I apologise for my careless use of grade information. The head of the stock bolt has a "9" on it. I believe this is equivalent to ISO grade 10.9 as John mentions. Look for this designation on the bolt head if you go to buy a metric bolt from a supplier. These are important bolts, don't skimp on the quality.
-
30 mm is the length. 12x1.25 is correct. Grade 9. They are special Nissan bolts with a shoulder that fits the steering knuckle tightly.
-
Incredible! The pictures do not do them justice. I can imagine the sparkle of the facets in the sunlight. Power them up and bask in their radiance for 15 min. Get that last bit of tanning in before winter sets in.
-
There is a spring washer and cotter pin in that connection. The end of the J hook should be a nice fit through the holes in the U shaped hole too to remove as much chance for motion. Also evaluate all the ball joints from pedal to that J hook too.
-
This threaed has some help for you I hope that shows the changes in the slave cylinders. http://www.classiczcars.com/forums/wheels-tires-brakes-s30/32084-rear-wheel-cylinder-question-difference-between-left-right.html You are faced with bending your current lines or creating new ones.