zKars
 Subscriber
-
Posts
3,742 -
Joined
-
Last visited
-
Days Won
107
Content Type
Profiles
Knowledge Base
Zcar Wiki
Forums
Gallery
Events
Downloads
Store
Blogs
Collections
Classifieds
Everything posted by zKars
-
Is there a hex nut at the base of the knob? There may be a locking nut on there that has to be loosened first. If not then I'm betting the knob is not stock, and since the threads where not right, someone PO glued it on... No easy way to get that off... Worst comes to worst, remove the shifter shaft from the tranny, (remove console and rubber boots, you'll see how to get it off, its just a pin) get a new shifter and knob. Hopefully the current knob will pass through the leather boot on the console and make this easier. Good luck!
-
Just sounds like you don't have a properly functioning cold enrichment (choke) system. The simple fact that it runs better after its warm fits that diagnosis. You have SU's on that beast, don't you? If not, let us know what type of fuel system you have. To check fuel pressure, just put a gauge in the line after the reg and before the carbs and see what its doing during startup and while running. Carb systems don't typically keep much in the way of pressure, but rely on what's in the float bowl to get you started, then by the time that's used up, the pump should be adding fuel to the bowls if there wasn't any residual pressure. Let us know what you find
-
Carl, if the front of your glass angles up and forward and the back of your glass goes straight up then your glass must have elastic properties that most of us don't have on our cars. The entire door glass advances from back to front as the window is raised, so if you had both rollers, they both need to be angled in the same orientation. The rollars are a convex barrel shape and have one point of contact with the glass, so using them on the "wrong" side still works surprisingly well. 77-78 door glass rides in a pair of curved rigid channels in a totally different way from earlier glass. As a result they may not need the guide rollers as much for support. The fiche does not show a date range for their use, so they likely are used on all years. If your door has the cutouts where they fit, then they are likely designed to use them regardless of year.
-
Getting all that rust sealed is critical or you're just band-aiding and all your work you're doing now will soon be wasted when the rust comes back again. Short of sand blasting with a flexible hose held under the tray to completely strip it, there is no way you will clean it properly without removing it. If the underside of the tray is nasty, then the areas between the tray flanges and fenderwell at the spot weld areas are also nasty, which you can't get to without removing the tray (spot weld drilling). I know its hard to judge just how bad this is, but I've seen too many that were far worse than externally visible, including what happens below the tray into the frame rail and firewall. Until you've thoroughly stripped the area, its not possible tell the true extent of the damage. Its better and easier with everything out to fix this properly now than later. Been there done that. I've erred too many times with this issue on the side of "oh its just surface rust" that came back to bite me. Sorry for taking the hard line on this, but "do it right" has to win in this case. You're car is too nice to just patch over the rust.
-
Great advice jfa! Those phillips headed bolts are no treat to remove the if they haven't been out for a while. Vise grips may be necessary. Replace them with hex head bolts for next time (5 x 0.8mm 15-20 mm long bolts) I've even gone as far as replacing the top two bolts with studs (cut head off of two 5x0.8mm bolts) so its easy to hang the assembly on them to help get the lower two bolts aligned. Something about a dark awkward space and old eyes.... Says alot about how often I take my car apart too... Or the quality of the H4 bulbs I buy... Always seem to be changing them in Hotel parking lots on long trips....
-
Delta Cams (deltacam.com) does rocker re-surfacing very reasonably. Not sure about shim suppliers.
-
76 doors do NOT fit on 77-78 cars. The latches are totally different. They are the same shape, hinges mount, but it can't mate up with your striker. When you go see it, you'll notice the difference. There were several recent posts about this read them again. Just past thru Vernal last week on our way back from zcon. Felt at home in nice oil patch business everywhere driven town... No place to stay, all hotels were booked, had to carry on up to Rock Springs Wy. Patch must be doing well!
-
I'm using 6x1.00 mm bolts with integrated washers. They are about 15mm long.
-
Thats right, 280 no, 280zx yes. The O2 Bung on the turbo is not on the exhaust manifold, but on the cast iron down pipe which is immediately after the turbo. The turbo is bolted to a 4 bolt flange cast into the exhaust manifold, which is nothing like a 240-280 manifold other than at the head flange. Using a 81 and up NA exhaust manifold would give you the 02 outlet on the manifold. That said, 02 weld on bungs are available at any speed shop or online. Weld it into your header collector, or if you go stock, put it in the exhaust pipe right when all the down pipes finally end up as one pipe just past the Y. Cast iron manifold on a mostly stock engine is just fine, and much quieter in the engine bay and cabin, if that's your thing. Good luck.
-
81-83 280zx turbo's have an O2 bung in the cast iron down pipe out of the turbo. I think starting in 80 or 81 the NA engines had one too. The 81 FSM EF-43 shows its location.
-
BSPT. There was a semi recent discussion about this and the source for adapters. Some, including me, would argue no "need" for correct adapters. I ran an 1/8 NPT tap into the oil sender port, added my NPT "T" (using an oil pressure safety switch along side sender) and never looked back. Stock oil sender threads happily and leak free into NPT as well. I've had mine this way for years and years with 0 leaks. Same for the water temp ports on the thermostat housing, except 1/4 or 3/8 NPT depending..
-
I've hauled a Z or two on a U-haul trailer. None had spooks, but the approach angle seemed pretty low. Jack up the trailer hitch as much as you can to lower the tail. In the worst case, nothing says you can't back it on the trailer! Might be best from the prevent rock spray on the pretty front end point of view. Happy hauling!
-

Innermost Shifter Boot - Any Clamps Holding In Place?
zKars replied to Captain Obvious's topic in Engine & Drivetrain
No clamps. There is a lip on the trans that it fits over. Fun to install, an exercise in strong finger manipulation and stretching in an awkward spot. -
Differences between 2+2 and 2 seater suspension
zKars replied to theczechone's topic in Suspension & Steering
Chuck is correct. Same same. There is no left and right, same part, just flipped. -
Still have the push rod length too long me thinks. Might want to check out this thread on Hybridz. http://forums.hybridz.org/index.php/topic/102754-a-one-inch-diameter-brake-master-cylinder-for-the-s30-z-cars/ It has a section on properly setting the length of the push rod. At the bottom of post #1 is a link that contains an excellent article on the subject. Definitely worth reading. Other than that its the master itself that may be bad.
-
Tired of tuning,tweaking,torqueing,wrenching---JUST DRIVE!
zKars replied to madkaw's topic in Open Discussions
Nice. Now I REALLY want to work all afternoon.... -
http://www.vintageconnections.com/ Click on the "Place an order" link, then scroll down to "section 2". I believe you need their3.8 mm barrel connector part SS2. Get their RTL crimping tool as well. Great qualiy and reasonably priced at $39.
-
"got to tour the design studios and maybe take a guess at what the new 240z might look like...." Holy $hit batman!!!
-
This requires taking the water pump off, but defintely needs to be checked. The condition of the cavity on the front cover where the pump vanes fit is critical to the pump efficiency. If there is any wear from a previously loose water pump vanes rubbing or cavitation damage to that area (looks like poc marks) the pump is simply not putting out the volume it needs to. Was the cause of my issues some years ago.
-
The FSM for a 73 can be found at xenons30.com under the reference link. Haynes diagrams are rarely complete and representative of all teh changes. Every year the electrical changed in a significant way. Looking at the "Body Electrical" document, Page BE-2 that manual has a diagram of all the "stuff" in the engine bay. Sounds like that relay is #18, the Throttle opener relay, Manual trans only. The six wire relay on your other car might be an automatic, ie part #17, seat belt relay. BE-5 has the whole schematic, it looks like the BW wire goes directly to the ignition switch, and as such if the relay of blown, may be cause of your problem. Check all the fuses and the fusible link. Try removing/unplugging the relay and see if that helps. Its not critical to operation. In any event, it can very likely be replaced with a standard Bosch type relay. Its a simple two terminal coil and two terminal switch function. Unfortunately the schematic does not have the wire colors other than the BW and GB so it will take a bit of sleuthing. Good luck Oh and what does it do? Seems a speedo sensor turns on this relay, which accuates a vacuum device which likely opens the "throttle" more.. Don't ask me why... I bet its emmision related.
-
Excellent sleuthing Blue! You can either spray glue various grades of sand paper to it or use this system of abrasive particles as the lapping media like these http://www.leevalley.com/en/wood/page.aspx?p=33017&cat=1,43072 I wonder just how flat that granite really is?
-
Can't see this as any issue at all. Relocate away.
-
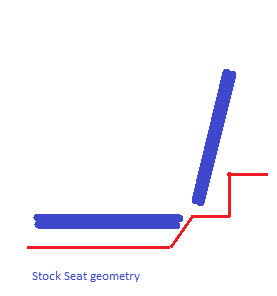
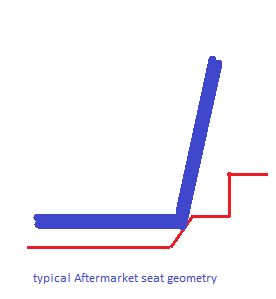
Most" seats will "fit" but will you like the limitations of how it can be mounted? The gross restrictions are the width at the shoulder with a large bolster, that to hit the door, or for a 280, that lump in the trans tunnel for the cat on the drivers side. Other than that, most "go in", but.... Height is a function of the method you select to mount the seat. Lower is better (and harder to accomplish with sliders that work), but what constantly catches people is the ability to move their lovely new seat back far enough once mounted. That 3-4 " riser bump from the floor up to the short flat area behind the seat typically prevents most seats from moving back as far the stockers. The stock seat-backs start high enough off the floor and are positioned back from the end of seat base, so that they can nestle above that bump and allow the seat back to move almost to the luggage riser with the seat base still in the floor area just touching the bump. Most aftermarket seats can't do this as the back and base connect low and at the same point. This traps the seat back AHEAD of the bump and leaves way too little room to the steering wheel and/or pedals for anyone over about 5-10. I'm dealing with this now with some Corbeau's. Not fun. If you mount them high enough to get them back enough, then you're typically much too high for head clearance. Tough call. Carefully inspect the seat back/base joining geometry on your stock seats and compare to what you're putting in before committing. Most aftermarket ones I've seen are all pretty much the same.


-
Here's hoping these are not remanufactured hydraulics with old problems left inside. Don't forget your copper crush washer on the slave to hose connection! There's one in the box, isn't there? You can always use the old one if need be, shame if its not new.
-
First ground the connector on the yellow lead that connects to the sender and see if you dash gauge pegs at max pressure. (key in RUN position, engine not running). If it does, then the gauge is fine, sender is suspect. If not, look for electrical stuff. Try the fuses first. Also check wire crimp on the barrel connector for the sender on that yellow wire. May be broke off or just about broke inside the clear boot that you can't see. I see you did the ground thing, points toward gauge power issues. Oil going everywhere with cam cover off means you have some oil pressure. No need to panic yet.