zKars
 Subscriber
-
Posts
3,742 -
Joined
-
Last visited
-
Days Won
107
Content Type
Profiles
Knowledge Base
Zcar Wiki
Forums
Gallery
Events
Downloads
Store
Blogs
Collections
Classifieds
Everything posted by zKars
-
AH yes, the old 280 passenger side rats nest connector corrosion problem. Likely the result of past coolant leaks and maybe water seapage from above (windshield and cowl) that have soaked them resulting in your "current" mess. (sorry for the pun) Sadly, the round pin 280 connector styles do not seem to have a replacement source. vintageconnections.com has many of the earlier 240 style connectors and pins, but for 280's you best bet may be a new new(er) wiring harness. Put an advert in here for someone wrecking a same-year car that has these harnesses in better shape. Each year has its little differences, you generally can't swap around. Using any other style of connector (thyere are many, Weatherpac, Deutch etc) is tedious as you have to splice every wire and keep track of everything. Do-able, but not by everyone. If its a say 10-20 wires, I might be tempted to do a slightly better job of exactly what you've done and do a careful cut/solder/shrink splice new wire to "jumper" out the bad connections altogether. Do them one at time for ease and safety. Clean the rest as best you can. Products like "DeOxit" are much better at removing corrosion than the run of the mill alcohol based electrical connector cleaners you can get at Radio shack and those sort of place. Good luck
-
That's a nice shot if you're trying to INSTALL the gland nut Blue. Stop confusing the poor guy!! They can be a real pain in the you-know. Clean the area, pore the penetrating fluid to it, (not WD 40) and wait a day or two. Keep it wet with fluid. Try not to bugger up the skinny hex lip of the gland nut. I've had to weld a 1x1 box bar to the nut and put the whole thing in a very large vise and use a very long breaker bar to get them apart. Don't use too much heat, shocks like to explode when you do that for some reason.... Mind you it will get it apart....
-
While I hate the argument that goes "well I've been doing it that way for years and its worked just fine" due to the obvious "one off" bad statistical implication, but I gotta say, I've never used these fancy self locking nuts on any manifold I've ever had the pleasure to fondle, just regular nuts and split locks, and never ever had one come loose, maybe just need re-torquing after the first run/heat cycle. While it is a good idea to use self locking nuts, and may in fact be the Nissan intended "right" way, I'de hardly suggest that going with regular hardware as being any significant risk. Maybe my engines run with less vibration than some of you-all's ... Maybe my opinions are clouded by the fact that taking these self locking nuts on and off requires a wrench the entire way for every single one, and since some of them are hard to get to for an old man, ones that spin on and off easy are my preference. Maybe also the frequency with which I do this to my and other cars also has a bearing on my opinion and the statistical chance that they have enough time in place in vibrate loose....
-
The 78 AFM does NOT have the fuel pump contacts inside. Pins 39 and 36 should be either absent on the AFM connector or not hooked up internally if there. Now, your wiring harness that plugs into the AFM may not have the mating pins since there is no wiring in the car that uses these pins, which is actually the good news, since ANY late 74-78 AFM will work on a 78 since your 78 wiring will ignore the fuel switch if its in the AFM. The opposite is of course not true, you CANNOT use a 78 AFM on late 74-77 since they REQUIRE the fuel cut switch. And yes all AFM's are counter weighted....
-
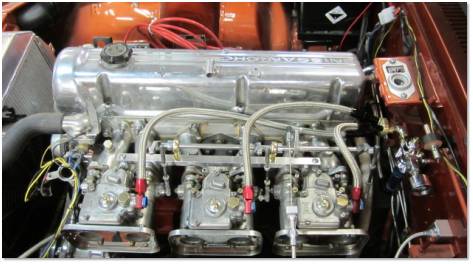
I have a solution for your mis-aligned cannon mounting holes. Remove the rod ends. Mount a 1/2" thick by 3/4" wide aluminum bar to the the manifold using those holes with bolts. Drill and tap new holes in the bar to mount the rod ends. Plan the layout of the rods, linkage etc carefully. Aside from solving the mis-alignment issue, it makes it possible to remove the linkage bar without having to pull the manifold, since normally the rod can only be inserted with the manifold above the engine bay. I've done this on my car and the latest one I'm working on, pictures attached. Makes servicing and playing different actuation games simple. (note my snazzy cable throttle). You can always weld up the one mis-aligned manifold hole and re-drill and tap it in the right place too. Relax, enjoy the break. Go see a good movie.

-
2+2 clutch friction surfaces are 240mm, all others are 225mm. Do not intermix flywheel and clutches naturally. 240mm plates have 9 bolts, 225 have only 6. If you get a complete kit, flywheel and clutch, they will fit any z, no matter the size. Spines are the same, crank bolts and pilot bushing are the same. Beware of different installed pressure plate finger heights though! The finger height off the pressure plate (where throw out bearing touches) + throwout bearing thickness + throwout bearing collar height must be a constant, so a fatter clutch pack than what you have with the same sleeve will leave less room for motion and may not release. With all the different manufactures out there, be careful! Best to stick with your stock size if you don't have access to different collars to "play".. There are many posts about the various collars that are out there and which trans/clutch flywheel that match, but I have yet to hear or see (or measure myself, lazy...) the magic total height that the pair must add up to. All the A, and B Nissan trans require the same total height, its just a matter of which clutch + which collar adds up to that height, within some tolerance You may also find 240mm clutches have a heavier pedal. Again, depends on the manufacturer and the state of your hydraulics! But yeah, cheap is right. I'm betting those "new" flywheels may not be sourced from Nissan.... Just a guess.
-
One could just go and buy such apparently "magical" out of round self locking nuts and use them with the stud of your choice avoiding the dealership. I believe they are just run of the mill conical self locking nuts. Their tips are staked, deforming the end of the conical nut. The entire nut is not "out of round". A favorite supplier of mine is Bel Metric. They have them with and without flanges in either the usual 8x1.25 or 10x1.25 if you use a larger stud. https://www.belmetric.com/metric-nuts-top-lock-flange-nuts-c-3_54.html?zenid=5pqdalupf8j63msv7pldqra8f6
-
73's in North Am had the pull hazard knob. Some reg. or requirement came in to have it lit up with the dash lights I suspect.
-

Leak at water inlet fitting surface to timing cover.
zKars replied to 240260280z's topic in Engine & Drivetrain
water inlet/lower rad hose fitting on spark plug side, yes? Sure its coming from around the bolt? no way its the rad hose or heater hose? The bolt holes are blind in the front cover, so if not the rad hose or heater hose clamp, that inlet fitting may be cracked. -
Zed head is dead right. Use a 5/16 or 8mm punch and whack it HARD with a BIG hammer from the end that broke off at the threads. Heat it up as hot as you can with whatever torch you can get ahold of first. Do NOT be gentle.
-
The slave cylinder ends needs/uses a copper crush washer rather than usual compression/flare brake sealing arrangement. I did use a brake line once, had to shorten the male threads on the slave end so it didn't bottom, and get a generic copper washer to make the seal, but it worked fine. There is an official correct SS clutch line available to do this properly.
-
Take the valve out, blow through the end that screws into the cap, push on the valve end with your finger until you start to blow through. Learn on/off threshold position by experimenting with finger. You can also blow into the fuel inlet pipe too with a piece of tubing attached with the thing still assembled and press the valve with your finger until you hear and feel it open. Then you can see better where the tip position is when it opens.
-
Whoa! A lesson in reading without assumptions. This topic has been covered before so naturally I assumed.... Bad zKars..... Too small? Did you take the sleeves out and these bushings are designed for sleeves in? Wrong bushing? Now I'm confused..
-
No mystery here. You have to remove the thin inner steel liner tube that was part of the stock rubber bushing before you get the correct "remaining" ID. Hack saw two slots in it, collapse it inward. Same method needed on the rear outer control arm bushings when you do them too.
-
I thinks its do-able with certain "custom" touches required. The control panels are different, and if the 280 heater box has the vacuum operated components then it will be tougher yet, as the 240 is totally push cable operated. Early 280 boxes are cable operated too, its the later ones with AC that vacuum actuated. The heater core outlets have different orientations requiring the 280 hot water valve and its plumbing/hoses, and it relys on a throught the fire wall nipple thing that 240's don't have. Get all the parts you can for that. The center air outlet plumbing from the air box is different, but similar, again because of the differences in the heater control panel. Using some old 240 parts there may be required to mate them up. The blower motor and housing under the passenger side is pretty identical. The FSM's and the fiche show pretty good pictures of both as to air handling hose differences. Space under the dash is pretty much the same, should "physically fit" back there. Only one real way to tell. Try it.
-
There are no stock alloys prior to the "iron cross" wheels that come out in '78. Just steelies and three kinds of hub caps depending on year. Any alloys were dealer supplied. Might of come from the show room with them, but not from Japan! At least in North America. There are several excellent wheel experts who will likely chime in any second about the origins yours, but they are not "stock".
-
I'll pull my bracket off and send it to you rather than have you resort to "him"!! Really, the plastic bottle isn't shiny enough for my engine bay anymore anyway so you can have the bracket!
-
If you guys want to replace your HCV with something a bit more modern and perhaps more controllable, Vintage Air sells their servo controlled valve as a separate item. http://vintageair.com/catalog11/pg74wc.pdf There is also some other cool stuff on that page.
-
Fiber damage from dampening may not be reversible.... Being from GA, his is likely damp already
-
The clutch slave plumbing bracket absence indicates that chassis was likely a automatic originally. Not a required item, but should fab up something similar to prevent flexing of the hardline at that connection point. The flat top carbs on 73 have a slightly different pivot as you found and the mating bracket that pivots is correspondingly different but does the same job, other than that same-same, nothing important. Only body difference other than internal strengthening in the doors and such is the front bumper mounts on a 73 are much larger and different and attach differently. 72 don't have the same frame holes to mout the 73 brackets, and the ends of the 72 brackets won't mount to the 73 bumpers, different position and spacing of the two holes. 73 does have the same holes to mount 72 brackets, so use the 72 bumpers if you can. Look better, fit closer. Nothing a little fab can't fix. The wiring harnesses are quite different, at least in the connector plugs under the pass. dash.
-
And now you need advice on taking the liner out. Two methods. Out the front, which if not done "just right" will cause harm to that fragile piece of rotting, soft, (checking to see where your from...), yup, soggy, cardboard. Some claim you can collapse it inward and remove it without harm. So far, I've never done it without harm. The other, from the back, requires removing the heater fan and the air handling box it attaches to. One cable, 3 screws and one connector for the fan, then 3 bolts holding air handling box to the fire wall. Your call.
-
Take out the glove box liner. Please put some details of your z in your signature line so we can be more helpful and targeted with the advice. Thanks!
-
74.5 260 and up to 76 280 door panels "fit" with the mentioned cavets for arm rest mounting. Also the mounting holes in the harboard for the retainer clips are meant for the round plastic pop in style rather than the steel ones, so it difficult to get the steel ones, which press over one edge of the hole is specific orientation to line up correctly, but it can work. The over all dimensions are identical. As mentioned, stay AWAY from the later 77-78 panels. They have different lock button hole location on the top as you know, and the rear edge angle is quite different, so they don't fit worth crap. The chrome trim strips are different, so do both sides if you can. There's a pair for sale over on hybrid right now. http://forums.hybridz.org/index.php/topic/107494-door-panels-19745-1976-style-for-260z-280z/ Be quick about getting them if you're serious!!!! Jim
-
I had to know the sizing to get quick google hits. Not easy to find these are....
-
Tie rod end threads are 14mm x1.5mm thread. A little googling found me this. http://www.hrpworld.com/index.cfm?form_prod_id=6123&action=product