zKars
 Subscriber
-
Posts
3,743 -
Joined
-
Last visited
-
Days Won
107
Content Type
Profiles
Knowledge Base
Zcar Wiki
Forums
Gallery
Events
Downloads
Store
Blogs
Collections
Classifieds
Everything posted by zKars
-
How about that tin plate that's trapped against the flange by the wheel studs? Is it deformed around the circular raised center portion? It's a close fit in there, it's kind of a dust shield. Grasping at straws now, everything looks right.
-
Just a maybe, did you put the outer bearing on the right way? The collar that sticks out goes toward the wheel flange. Maybe the inner bearing is not seated straight?
-
Sounds to me like you acted correctly to do all you could to keep the damage to a minimum. None of this was your fault at all, instead it was a skillfully executed set of maneuvers that may have saved someone's life. If she u-turned in front of you, that puts the drivers door right in line with your rather large truck. What transpired from your quick reactions and commitment to making the best of a bad situation rather than closing your eyes and slamming on the brakes, is dang near heroic. I call that a pretty good day.
-
No. The brake lines are all female flare fittings. No clue why Amazon claims these work. Get them from Raymond at Apexbrakes.com. Can't beat the price and the quality is great. Also a Canadian supplier
-
First verify that the oil pressure is in fact low by installing a mechanical oil pressure gauge in the port where the stock sender is located. The stock gauge should not be trusted. Normal idle oil pressure can be as low as 10-15 psi and should top out around 60 psi above 3000 RPM. Oil pressure is determined primarily by bearing clearances. If the clearance is too large, then the pressure can drop. This normally happens with an old engine. No excuse with a new one.
-
Start by disconnecting the washer motor, and testing if the fuse blows or not. If not, the fault is in the washer motor. If it still blows, the problem is between the washer button and the connectors to the washer motor
-
As if by magic, this in in my news feed. I love the internet. http://driving.ca/auto-news/news/brake-troubles-can-start-very-early
-
You guys are likely right. All those metal shavings that showed up while I drilled through the "plastic" were likely just my imagination.
-
Spindle lock pin deformation is the #1 cause of stuck pins followed closely by corrosion. Heat the housing up as much as you can with ever heat source you can muster. MAP gas on a propane torch is barely adequate but all most will have. Heat at 350F for 30 minutes then cool the cookies on a baking rack..... Wait, wrong recipe... John Coffey's favorite method of removal was a high quality air chisel with a point on it to drive them right out, run by a large air hose and adequate supply. I get about 75% removal rate with the conventional puller. BTW, hybridz has had a spindle pin removal tool loaner program going for years.
-
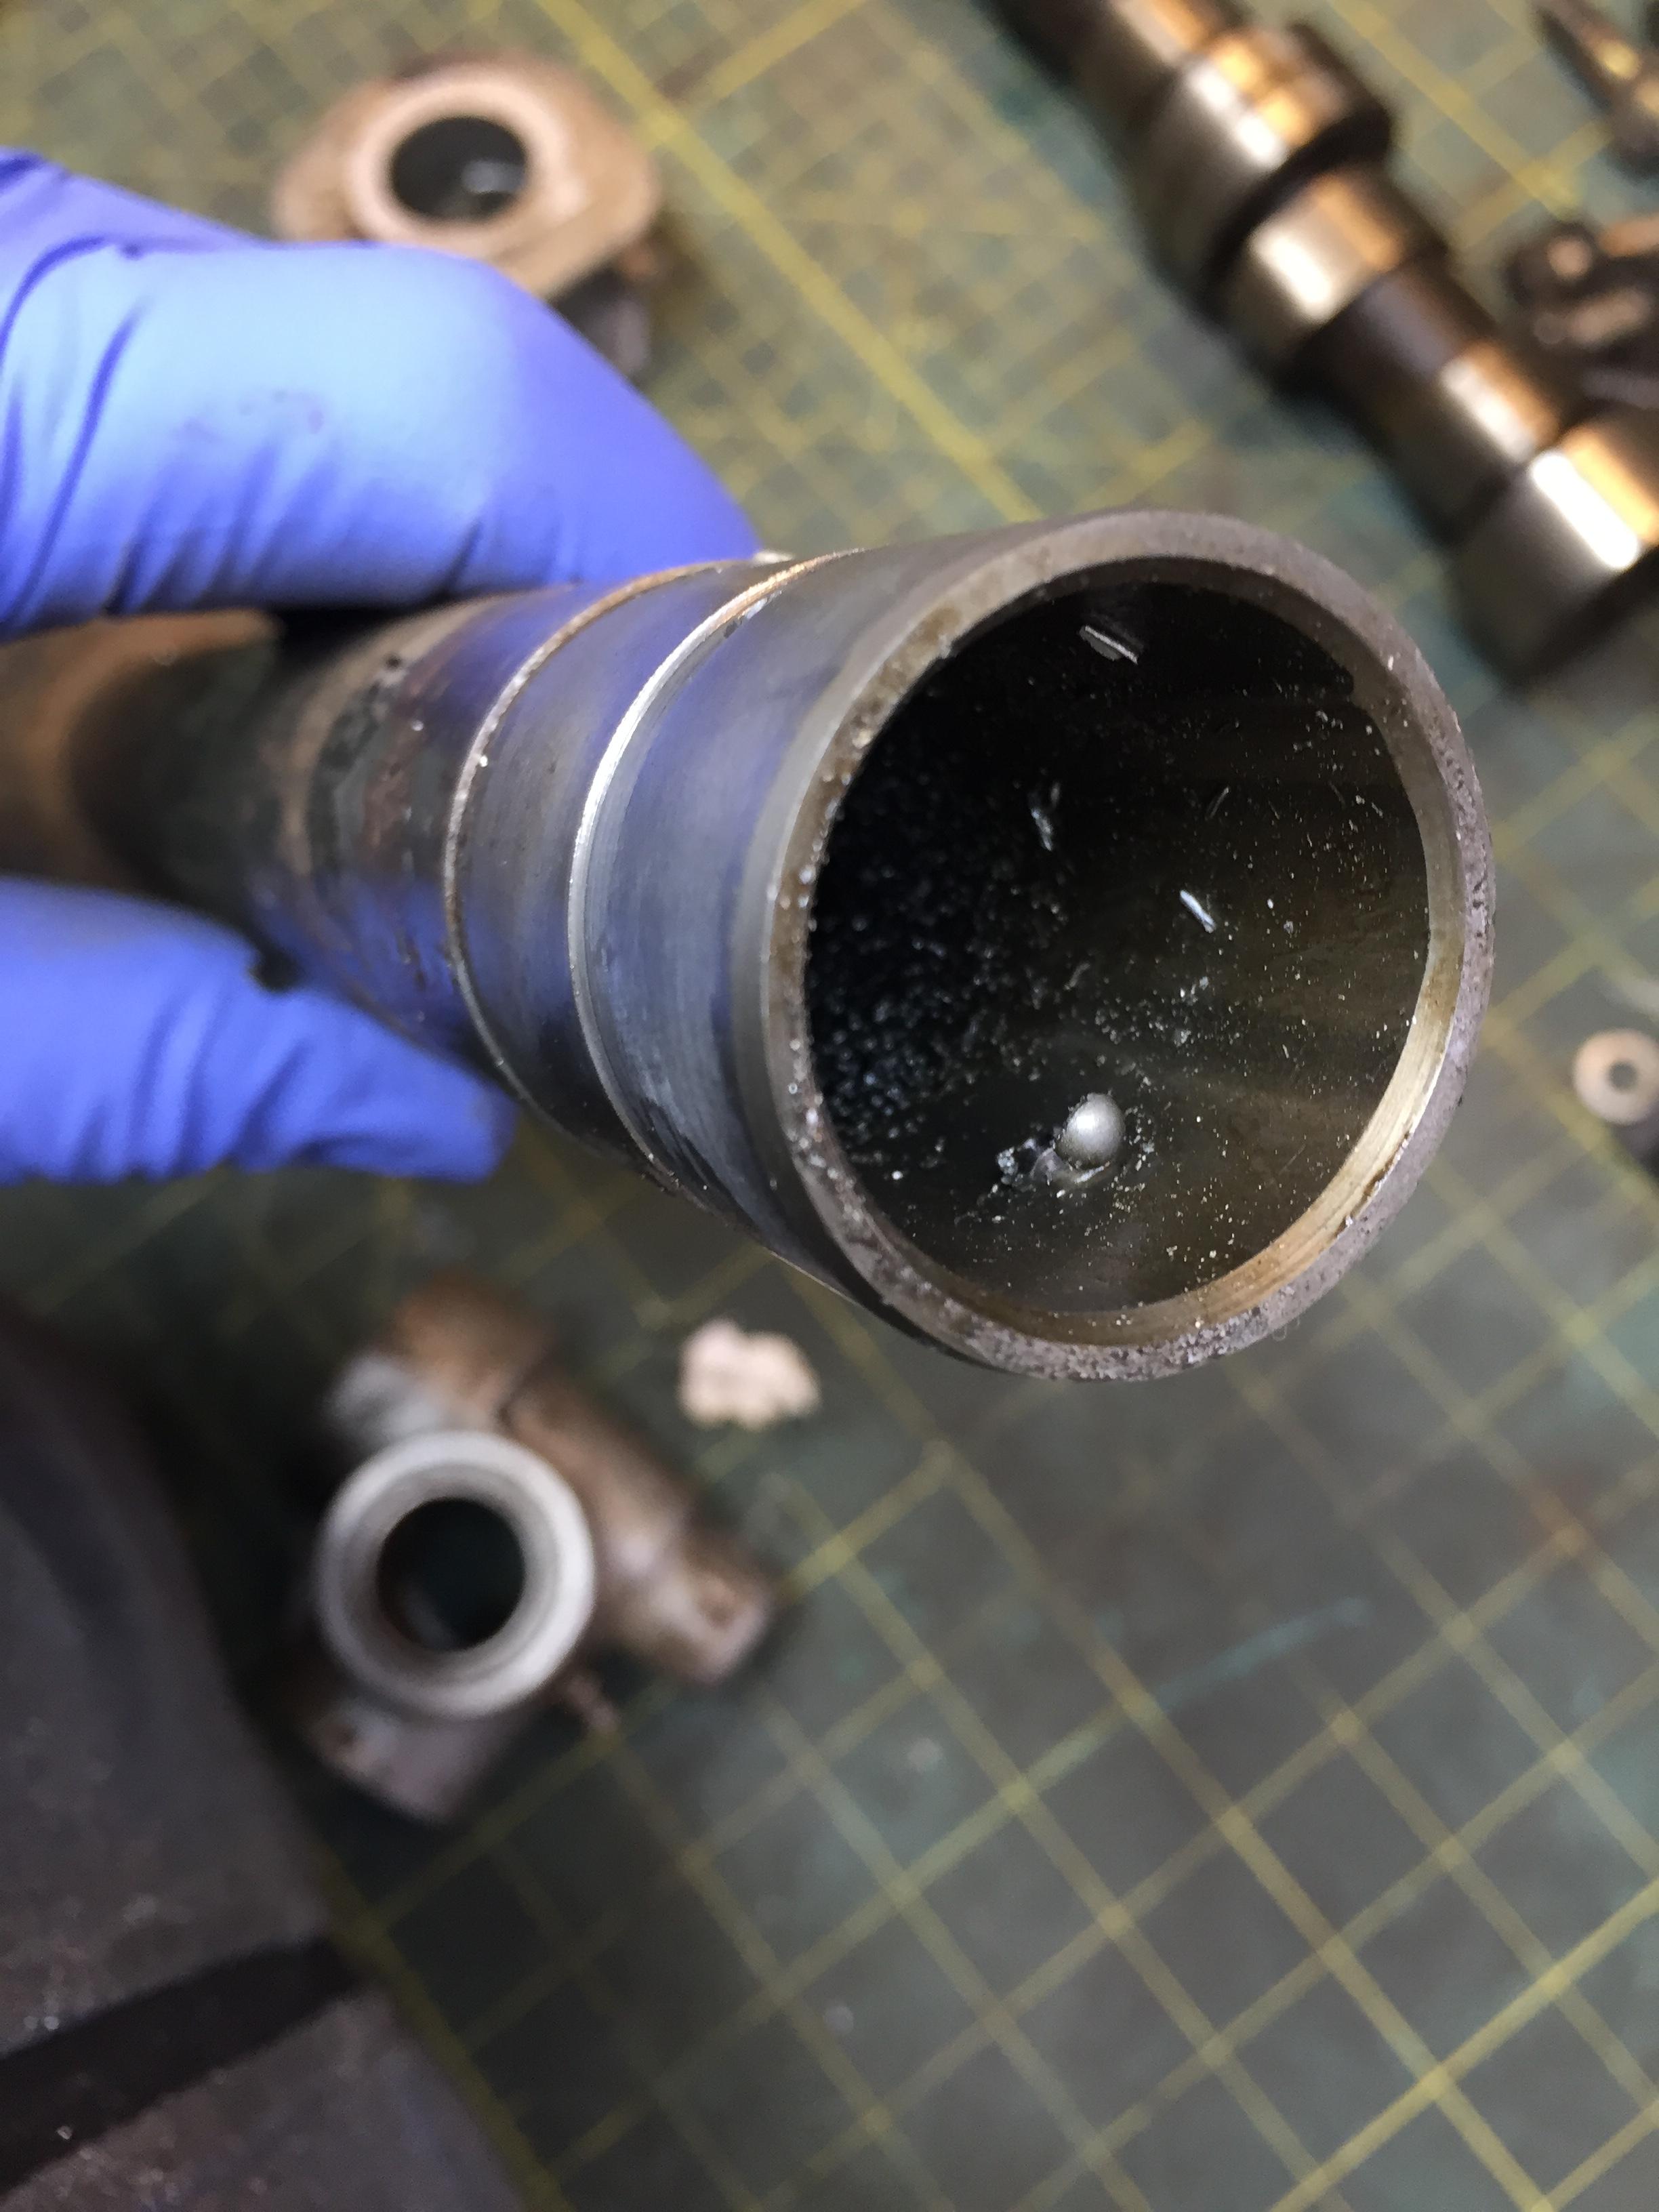
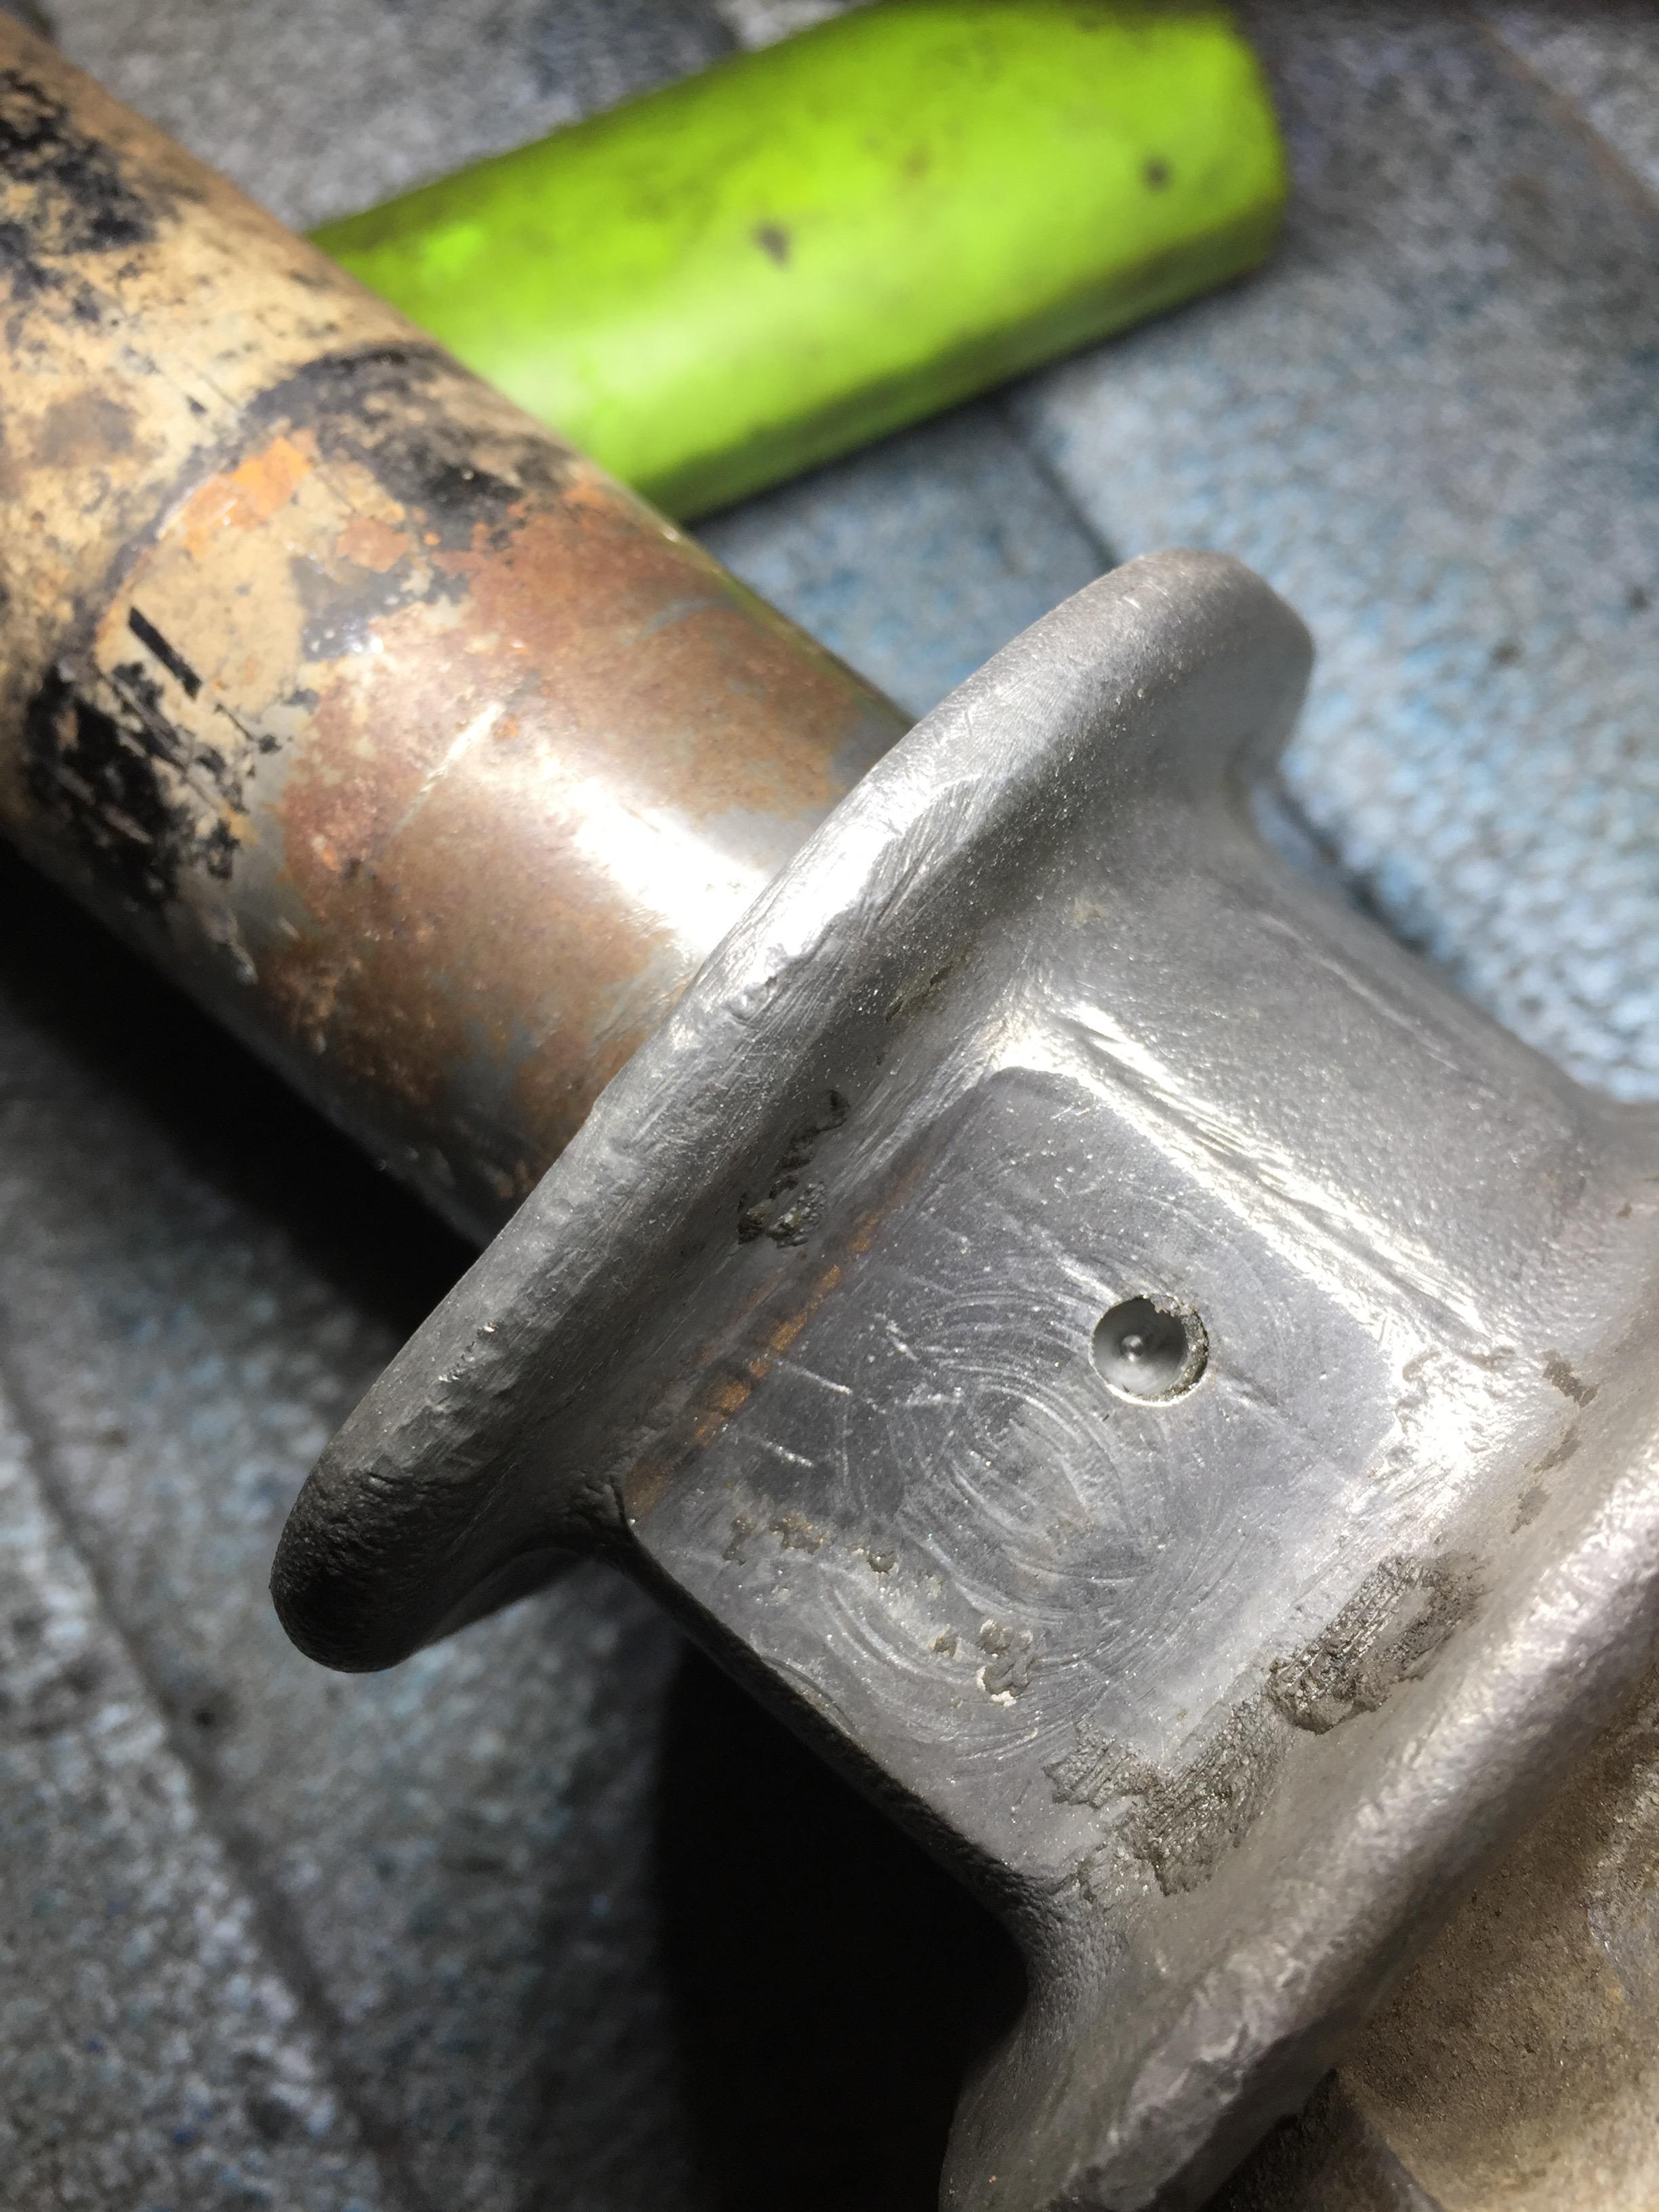
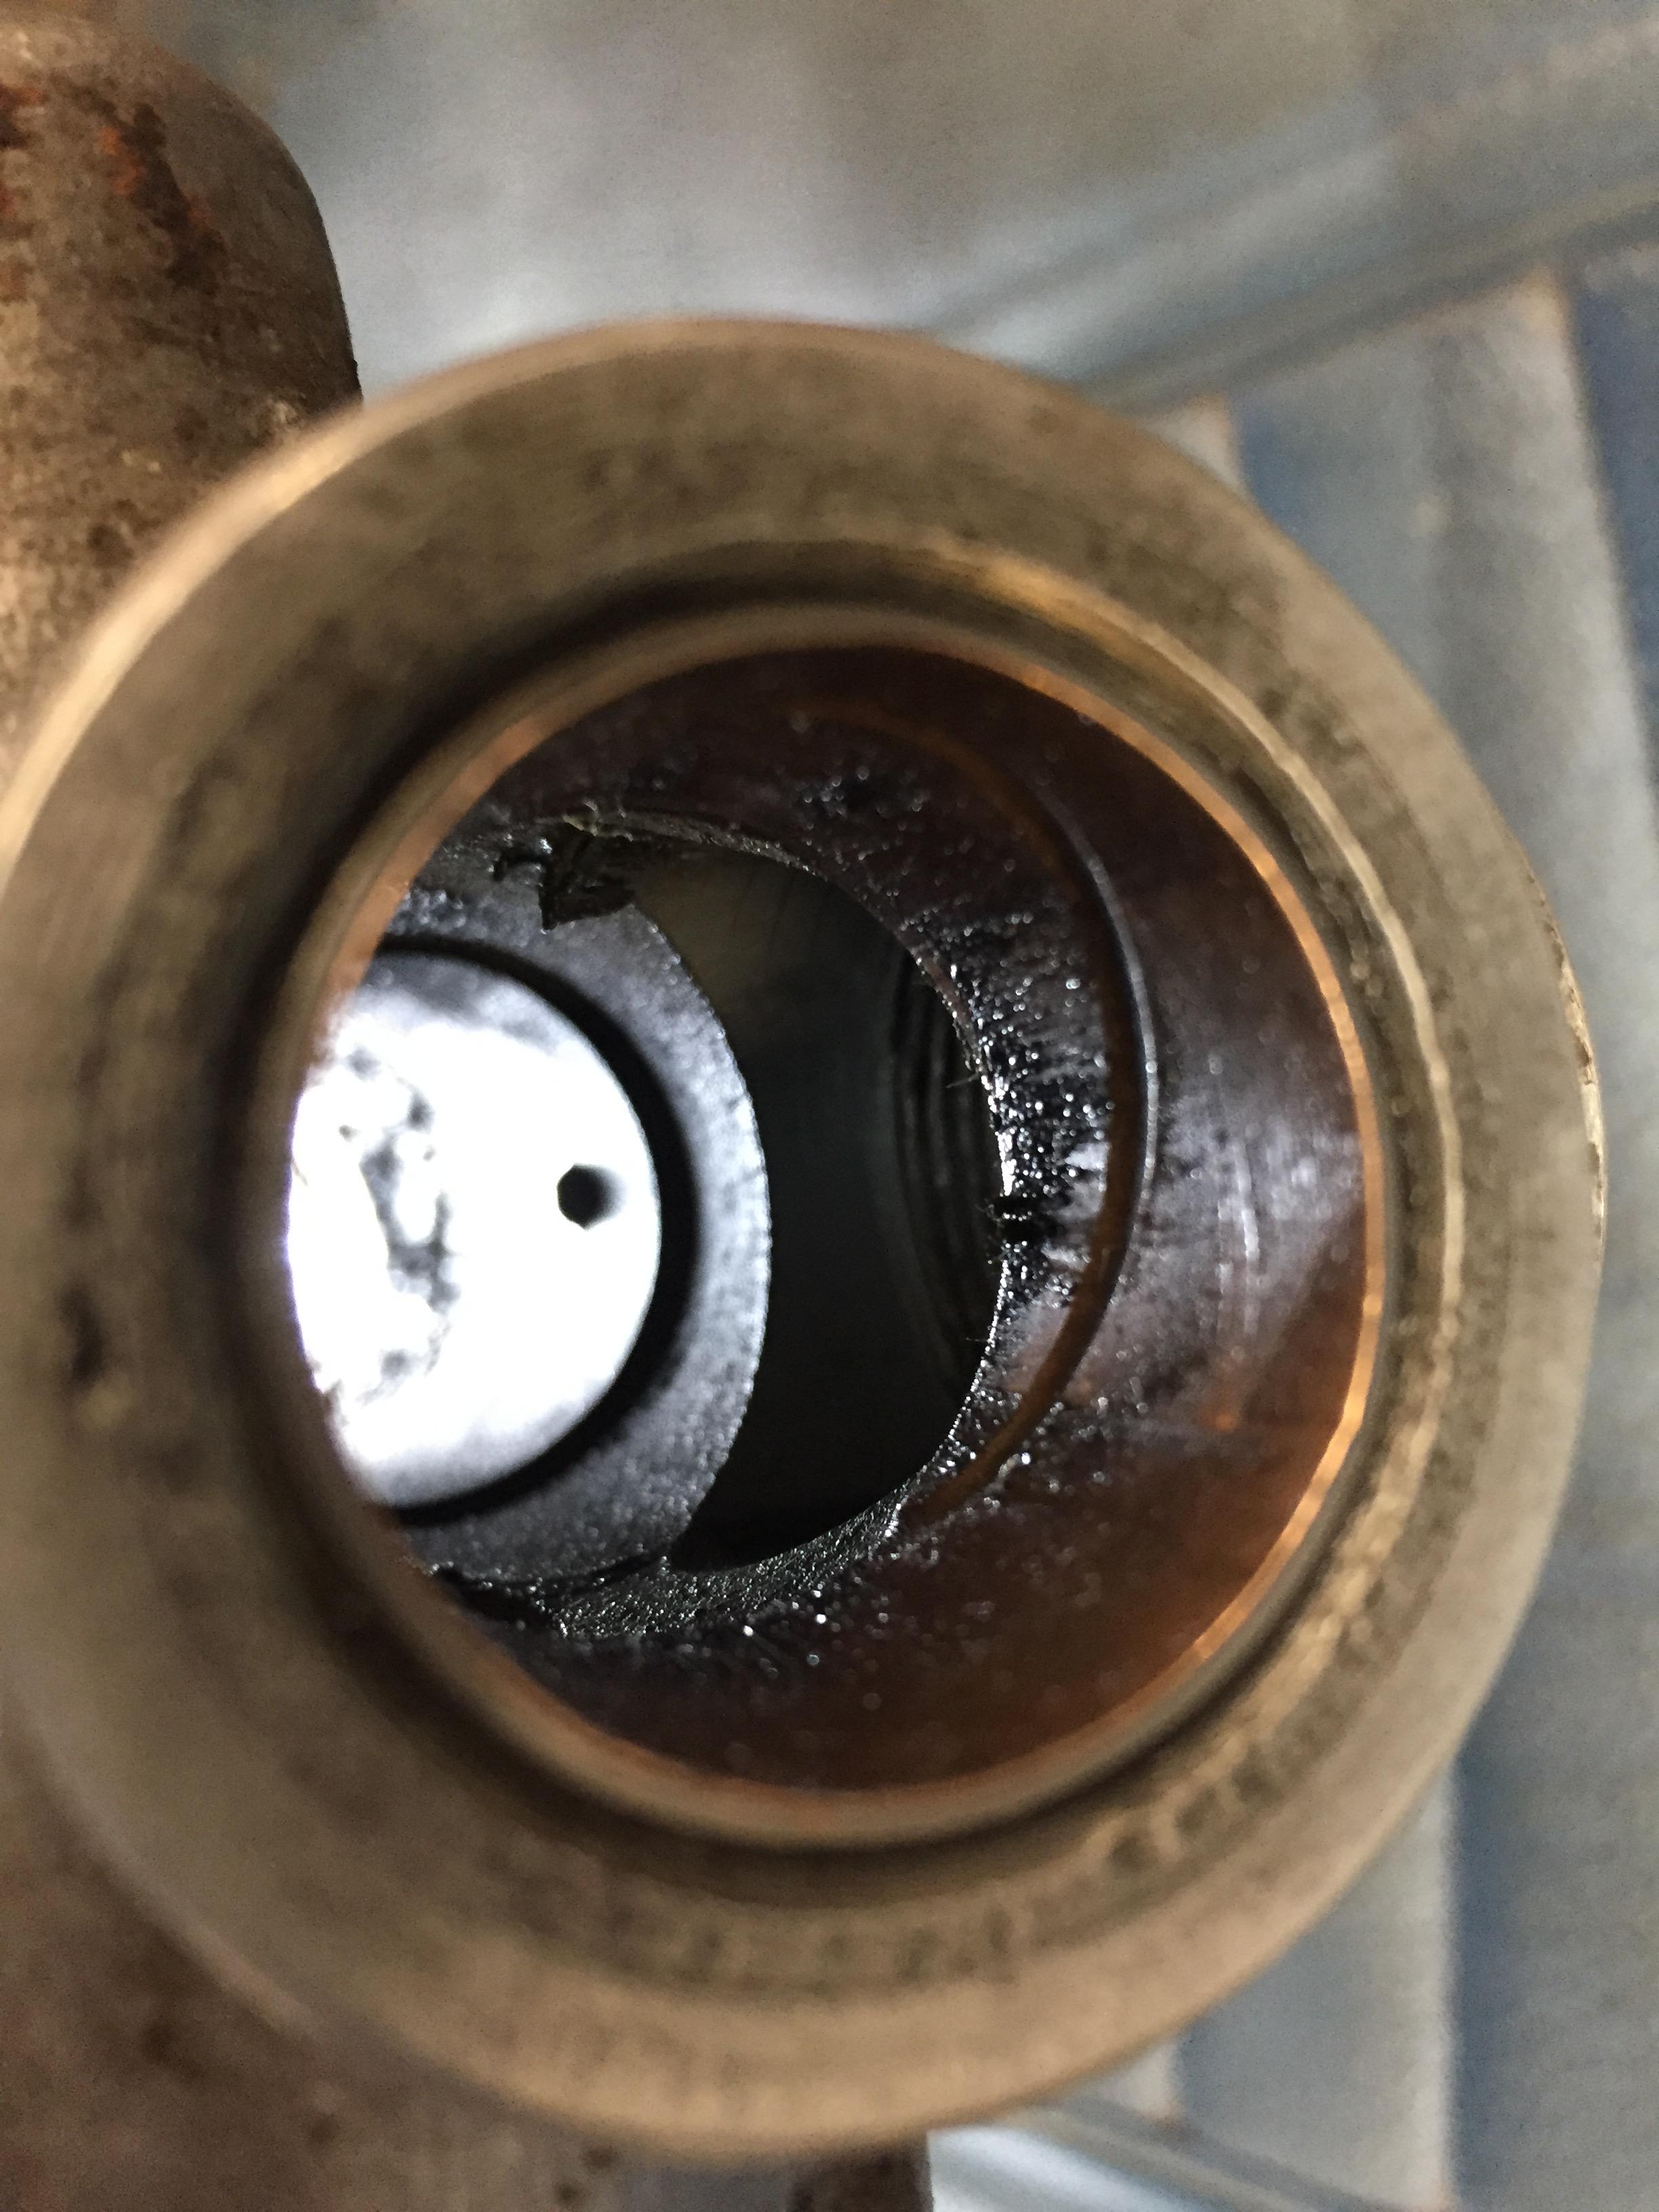
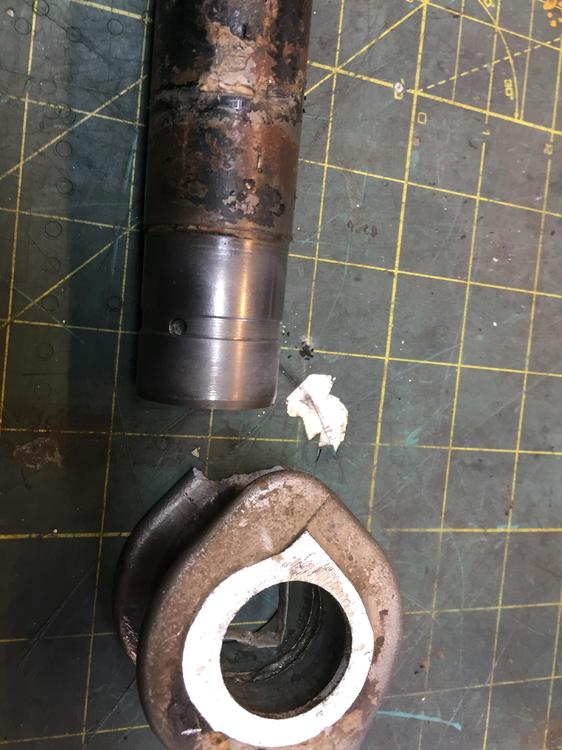
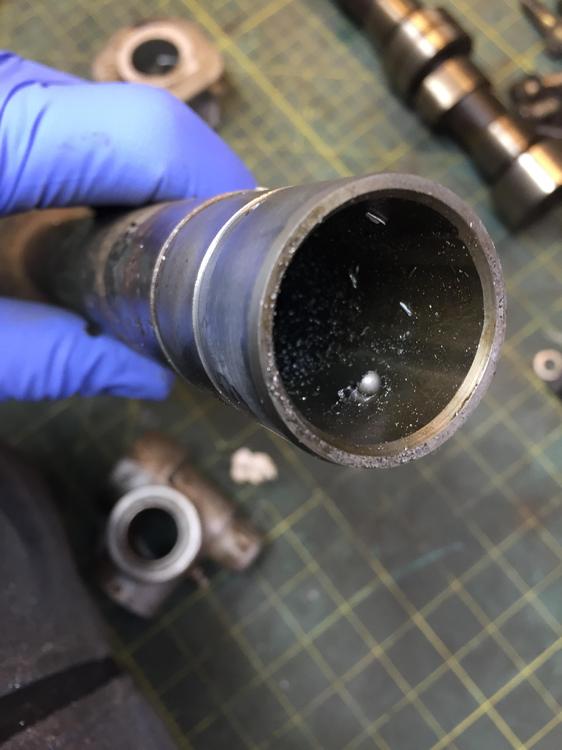
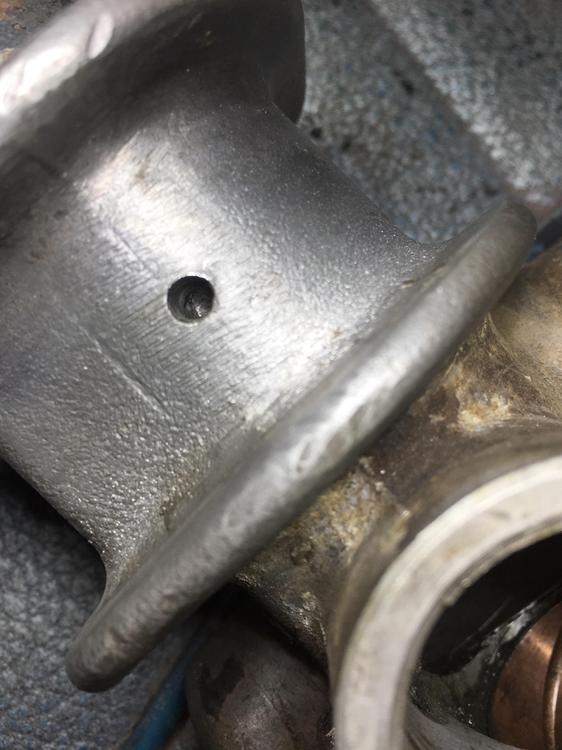
No such luck Mark, I survived. Stay put. I was repairing a broken bottom right corner of a L20B front cover. Welding (torch brasing actually) aluminum is fun. I had to build up new metal then file it back into shape. The busted out corner was long gone. PO had just put a large blob of RTV in the hole.... Sheesh Ok, I hacked it off just between the flange and the pinion housing. This is past where the end of the steel inner tube seats in the aluminum. Then I couldn't resist trying to separate the aluminum housing off of the steel tube. I drilled out the remaining metal in the two holes and heated the housing. Had the MAP torch out from doing the front cover repair. It came right off. A point of note here, as I was heating the aluminum housing to expand it, molten plastic stuff began boiling out of the two holes. Well after it came apart (easy, quite loose), it was apparent where that molten plastic came from. Both the steel tube and the inside of the housing have a groove, that was filled with that plastic stuff. Here is the picture with the remains of it in the groove after I picked at it. Here is the groove on the steel part. This leaves me a bit perplexed. I drilled through metal for sure in both holes to get to the ID. But to fill that groove with plastic, you would have to have the outer hole open to the OD and groove of the steel tube to fill it. So maybe the groove space is injection filled, then some metal is pressed in to the holes lock the two metal together. I think the plastic is a moisture seal between the two. I would have just used a dang o-ring.... The aluminum housing was not a tight fit onto the steel tube. I can tap it back on now that it's off with just a little effort. It would definitely rely on the pin/metal in those holes to prevent rotation. And here is the remains of the metal pin/plug after I drilled it out. So I suppose for Mark's Powder coating melted plastic, there may be a moisture path in or grease path out if the plastic filled groove is not full anymore. Just a little silicon at the housing/tube junction might prevent anything from going either way. No rotation prevention is likely comprimised though.
-
What time do you people get up in the morning? Just had coffee, have to go grocery shopping, then we'll see what happens with the bandsaw. Hopefully the rack is all that gets cuts off.....
-
First thing tomorrow I'll open that sucker up like a cod fish. All in the name of science, right? And I'll keep pounding one of the holes and see what I get out.
-
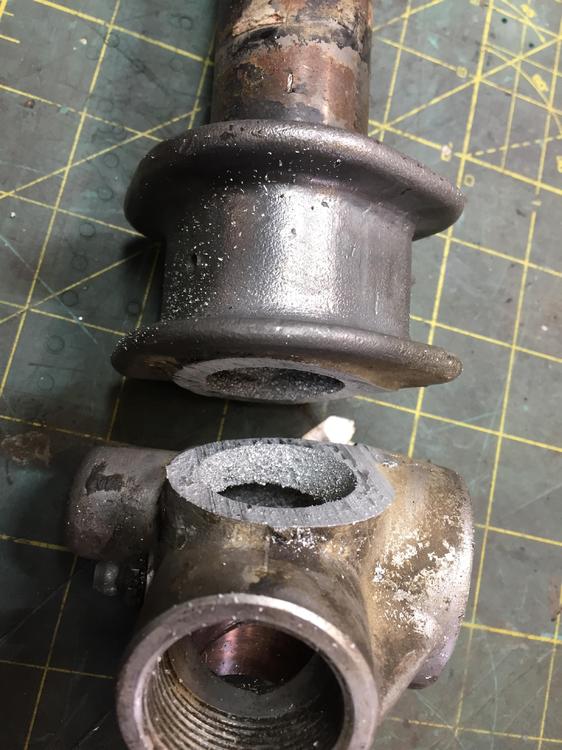
Yes, the 240 racks I have are aluminum. Later ones are steel, the ones with the bearing in the end of the pinion. I don't think it's a pin. Given the bulge I see on the inside I'm guessing some kind of maybe hot rivet that is soft when inserted? I have not had the time to look further at this, got other irons in the fire. That housing was a spare I had scavenged some inner tie rods from. I was about to band saw the thing in half just in front of those pins so I could see in there better. Usec racks I am not short of, and now that we've got a supplier of new racks, their value has fallen some. Anybody need a spare?
-
That could work! Beats trying to long-distance-file or sticking a long ended die grinder in there. It's a spare anyway.
-
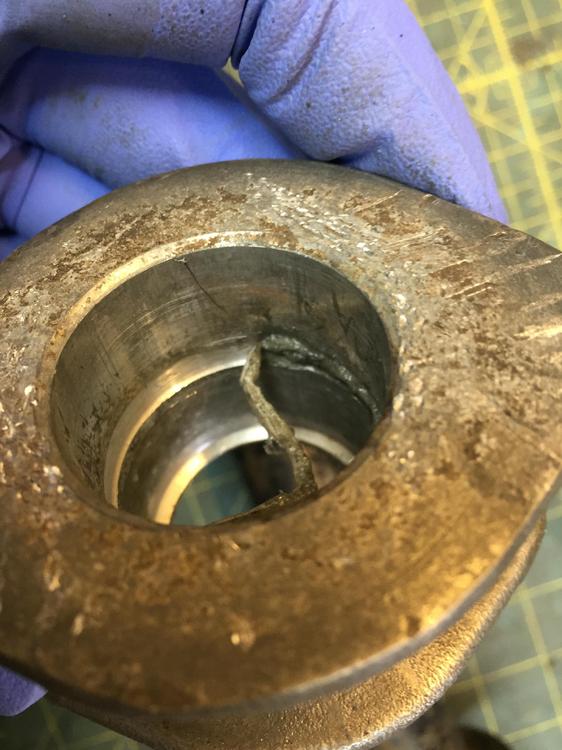
I found a few spare minutes to indulge the OCD in all of us. Mystery solved. I have a single disassembled 240 rack housing. It has the two plastic plugs. I drilled one out, and found that the plastic only goes in about a 1/8". Then I hit metal. Same for the other plug. Well if you look at the construction of the thing, you have the steel round main housing, and the aluminum pinion housing (with drivers side bushing flange) casting that is "Attached" to the steel housing. If you look in from the end, you can see the steel center inside the aluminum part. What do you suppose keeps them together and prevents the two from rotating? Well friction for sure, but those two holes have steel pins in them that lock the two together. The plastic just fills the remaining hole to the surface of the bushing housing. To prove the pin theory, I used an 1/8 punch and whacked one of the holes until something emerged into the ID of the bore. It was not easy to move. I'm not convinced its a pin, but something emerges from the hole into the ID. Here ya go. You may notice a little dimple sticking into the bore at 3:00 o'clock. This is from my punching. It sure as the heck isn't plastic. So I don't really think the kind of plastic is important. Nor is filling the hole at all. Fill if you feel you must. If you drilled right through, I think you might want to put something back in there to keep the two parts from wanting to part ways or rotate. Any ideas on pushing that knubbn back in? Rack ain't going back in with that thing sticking out like that....


-
Yeesh indeed. The only thing that is changed is the use of vintage air's generic laser cut Sanden compressor bracket to ease that part of the fab and my new found love for EZ-Clip AC hose fittings so I can make my own hoses more easily. The hoses are also smaller and have a tighter bend radius. Still pricey'r than generic crimp hose and fittings but worth it.
-
For reference, installation of a vintage air system in a 240/280 takes from 50-70 hours to do it properly. Remember, you have to remove the dash, fabricate mountings for all the components, wire and duct run and adapt everything. Custom hose and fittings, drains, etc etc etc. Yes the fresh air vent ducting is a challenge. Full basic Vintage air components are ~$1000 USD. I'd love to know who would do all that including the hardware for $2K.... Not any where near here
-
Z therapy carbs are "Signed" and dated inscribed on the throttle blades, engine side. Once you get them cleaned up it will be more obvious.
-
It goes straight down. Its the vacumm port for the dizzy advance. Pretty tiny hole, but it should be right there in the bore BEFORE the throttle blade for ported vacuum
-
Well I can definitely supply the bolt and washer, and at the very least a stock bushing. I have to look and see if I have a spare poly bushing, If I do, that's coming as well. Please send me a PM and we'll arrange shipping details. Slightly late Xmas present, K?
-
ChickenDude, you seen the actual fiche images through the native viewer. Is the quality of what is on the fiche themselves crap so that no matter how much you magnify it it can't get better, or do think the scans we work with were just not done at high enough resolution? I see the carpartsmanual images are at least twice as good as the fiche CD scans so there should be something I have tracked down a set of NOS fiche, I think. Haven't seen them yet but I think there is hope.
-
Imagine if you could click on any number on those pictures and then be hot linked to the part number(s), item listing and details, or the opposite. Maybe search all the parts suppliers web sites that might have that part number to get availability and pricing. Click on a bolt and get a picture of a real one, it's size and torque specs. Let your mind imagine what's possible..... It's so much more than supplying a picture to look at.....
-
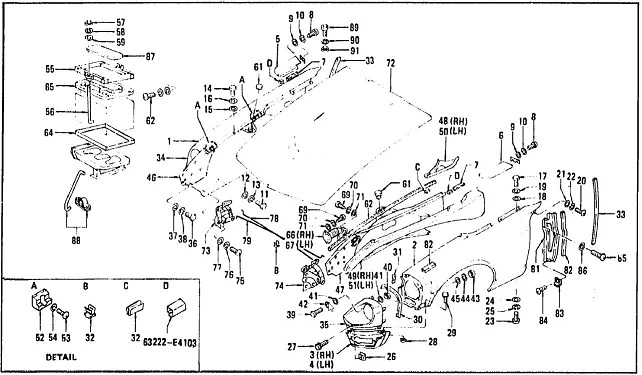
Hey gang So I'm working on a little project (don't enough irons in the fire....) and was wanting to bounce some ideas off a few of you So the blow up parts pictures in the clubs parts fiche CD pdfs are, as we all know, well, pretty poor quality. So poor that reading the numbers is often impossible. carpartsmanual's version of the fiche is better, but still not perfect. carpartsmanual on the left, same pic from the fiche CD's. Not the worst one I can assure you. I want to get a set of these pictures that is better quality. One idea would be to have the fiche re-digitized at higher resolution. Another would be to perhaps make a project where someone with the Nissan FAST program can extract better quality pictures. There are 256 such pictures (from carpartsmanual), so the project is not huge, just not trivial. Looking for other ideas and suggestions. Put it out there. If I can get what I'm thinking of doing, working, it will be worth the effort to get better pictures, trust me. Let's try not to make this about finding out what I'm working on, just on getting better pictures.

-
Yeah that right side sure looks like a 240 bushing on a 280 rack.....
-
I'd love to try some solid bushings and remove ALL play. Gimme dat road feel!