


zKars
 Subscriber
-
Joined
-
Last visited
Everything posted by zKars
-
 I believe the un-mentioned issue so far is moisture. Have you routinely drained the water from the bleed valve? If you look at the tank you will like find a "Best before" date like on your milk. Compressed air cylinders have a safe working life limit as well. 27 years is likely stretching that a bit, but I think I have milk in the basement fridge that might be that old.....
 -
Just an update regarding carsteering.com racks. And I love to make posts in really old threads..... Checked today and Car Steering is still listing racks for the 280 as having 10+ in stock. Price is $260 + shipping. 240 racks are out of stock. 280 racks are same just need the right bushings for wider flange on the Left side. https://www.carsteering.com/buynow/1976/Nissan/280Z/Rack_and_Pinion/80-70087_AN Don't forget that Techotoy now makes all new steering racks for S30 https://technotoytuning.com/nissan/240z/ultimate-steering-rack-240z $695 list. $895 with their tie rod ends
-
I'm not exactly close but I can scrape one up for you if you can't find one closer
-
Arrow on the insolator goes forward. Good find, most don’t notice. As to the cross member, put it on which ever way fits once the trans in in the car. Is the center hole in line with two holes that mount it to the car? If so, then it doesn’t matter which way around. If the little dimples line up with the tips of the bolts on the isolator mount, all the better
-
Yeah, now says $12.88. No clue where I got the $29 from. Could have sworn that the first price I saw. the older I get the more I’m amazed at my mind. Usually not in a good way. Anyway, hope this helps all of us Transmission builders. Enjoy
-
The left hand threaded main shaft nut on the FS5W71B transmissions has been NLA for a while. Smome member here had some made, but guess what? They are back in stock at Transmission Parts Distributors. Just got an email today. Bit pricey, $29 USD..... ouch.... https://www.transmissionpartsdistributors.com/fs5w71-transmission-nut-for-main-shaft-left-hand-thread-fits-datsun-nissan-81-nis-204/
 Been busy continuing the conversion, shoveling snow and taking care of family matters. All is going well, will continue this discussion shortly. thanks for the kind words everyone.
My fingers are tired. I’m going back to wiring up MegaSquirt to my fancy EFI sensors and injectors. More later.
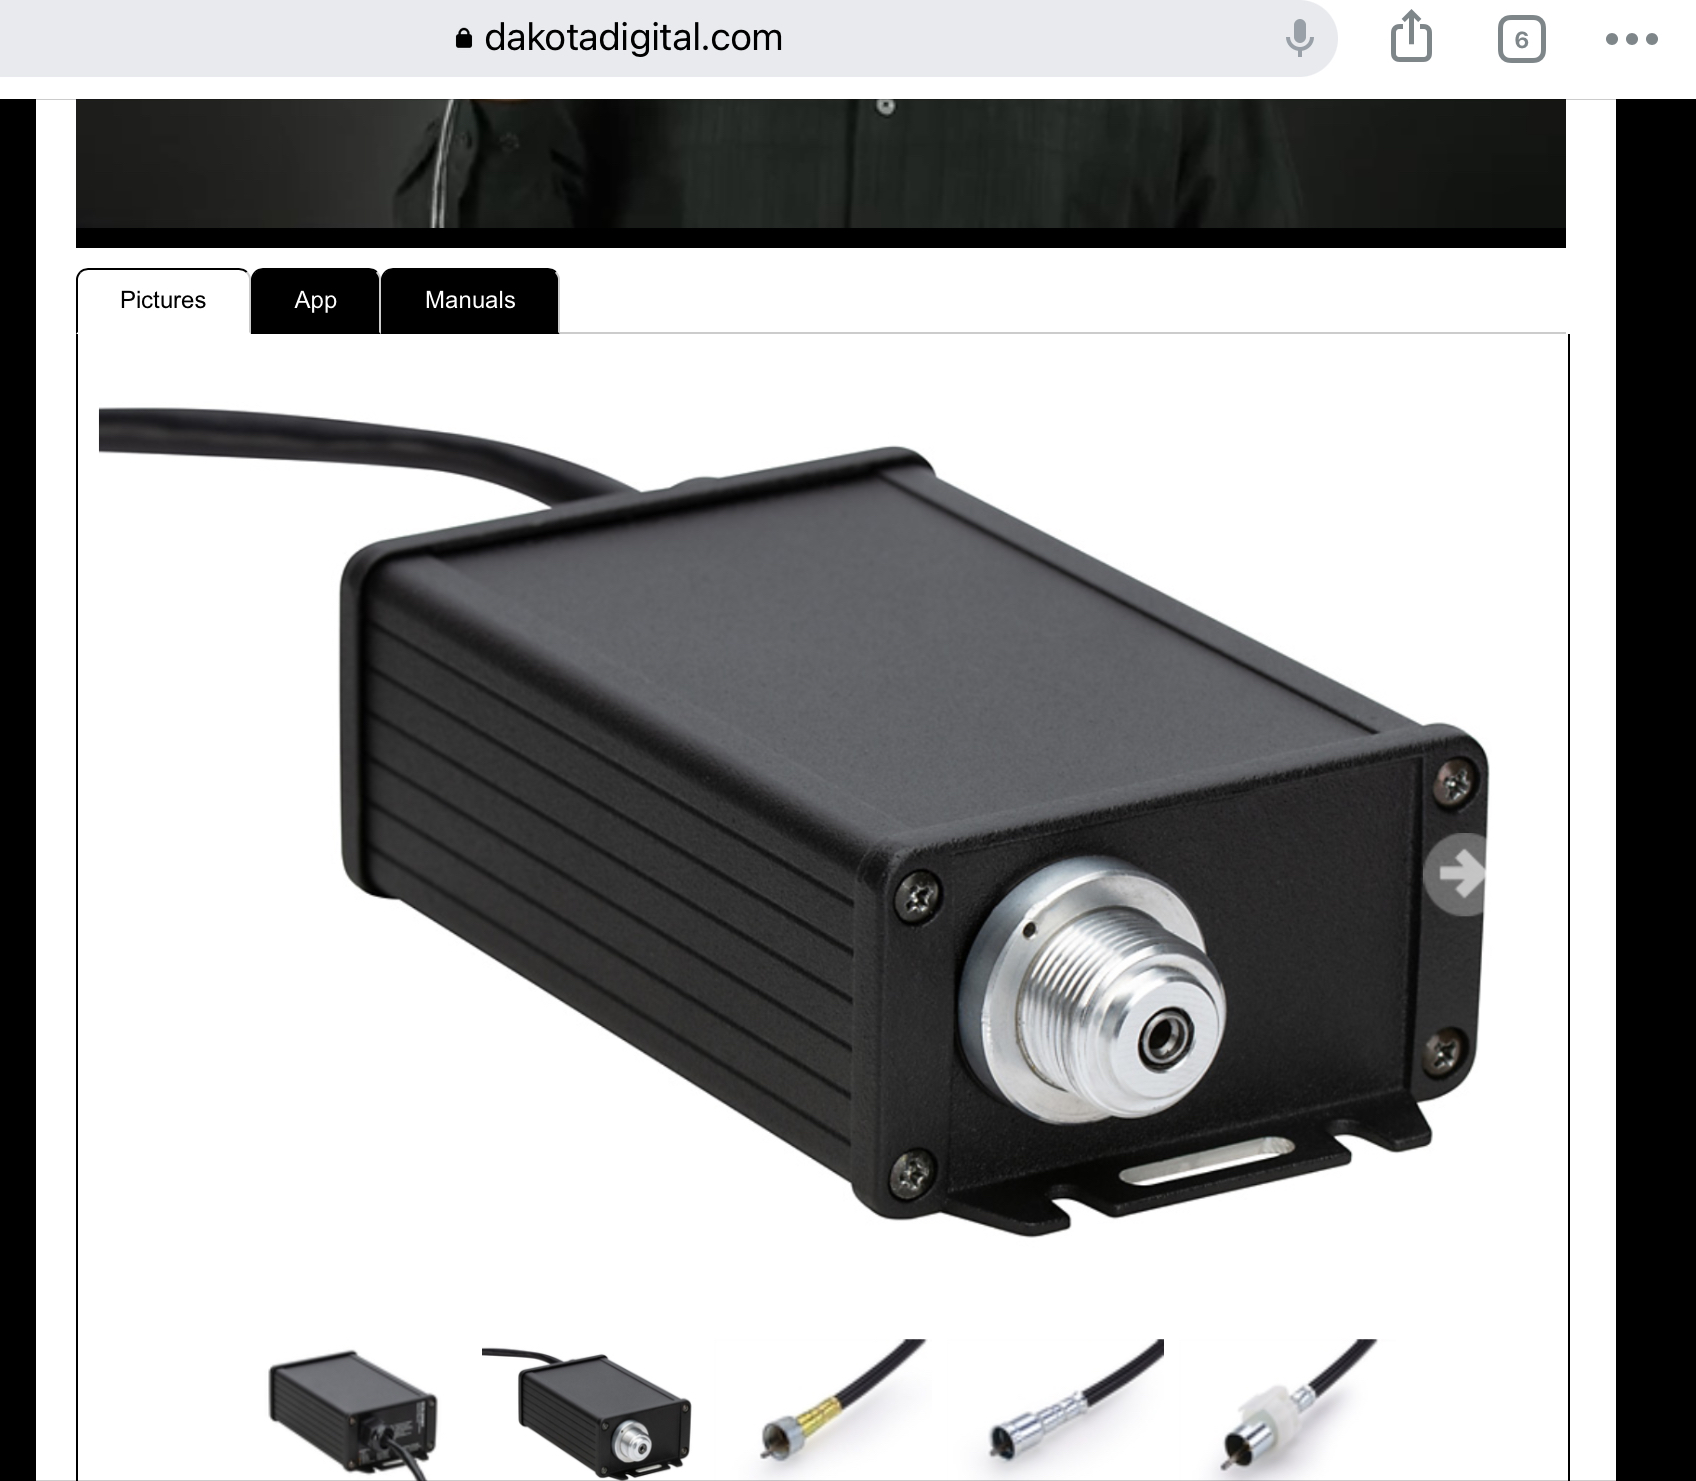
Ok, we have a VSS that gives me a driveshaft rotation frequency, we have a “Way” to use that drive my fancy little ARDUINO board to make a little GM stepper motor point a needle at whatever speedo position I want. Just have to tear up my speedo and mount a stepper motor where that old ancient mechanical speedo and odo gear pile was and I’m flying! Wait just a doggone second….. Odometer….. Sheite….. what do I do about this? Well Mr inventor here thinks I could certainly get my Arduino thingy to add up covered distance and display a ODO number but then I need to include a small LED display thingy in my speedo. Well….. So back to searching for alternatives. Guess what both Speed hut and Dakota digital have invented? A box that converts a speed signal into a motor driven speedo cable. Takes my VSS singal and directly drives my existing and un-modified classic 69 510 speedometer via a 3 foot speedo cable. The ECD-200BT is the Dakota digital version https://www.dakotadigital.com/index.cfm/page/ptype=product/product_id=886/mode=prod/prd886.htm But do they make a Datsun compatible cable? No of course not! But so what. They make a GM cable (duh) that turns out to be 90% identical to a Datsun cable (left one in the picture). The dang threaded cap there is 5/8-16 thread (M16x1.5 Datsun), which JUST ABOUT threads right on, and the cable core is a perfect fit into the datsun speedo (510 and Z same same, don’t worry). So I just removed to GM metal crimped-on housing part and slipped on the nearly identical Datsun end bits. Bit of heat on the metal barrel, out slipped the sheath, same when putting the datsun end back on. Little piece of heat shrink over it if you’re worried about it coming off. So after a quick calibration i need to do when i get the car moving again, which itself is a bit of a modern miracle as the silly box Bluetooths wirelessly to an app on my phone!!! Love this stuff! Just as an aside, the Speedhut box is the same, with one important additional feature. It has a GPS optional input to get speed information from, you don’t need to use the transmission mounted VSS. Even easier. But quite a bit more $$. $320 for the DD box i have and over $500 for the Speedhut one.
Been busy continuing the conversion, shoveling snow and taking care of family matters. All is going well, will continue this discussion shortly. thanks for the kind words everyone.
My fingers are tired. I’m going back to wiring up MegaSquirt to my fancy EFI sensors and injectors. More later.
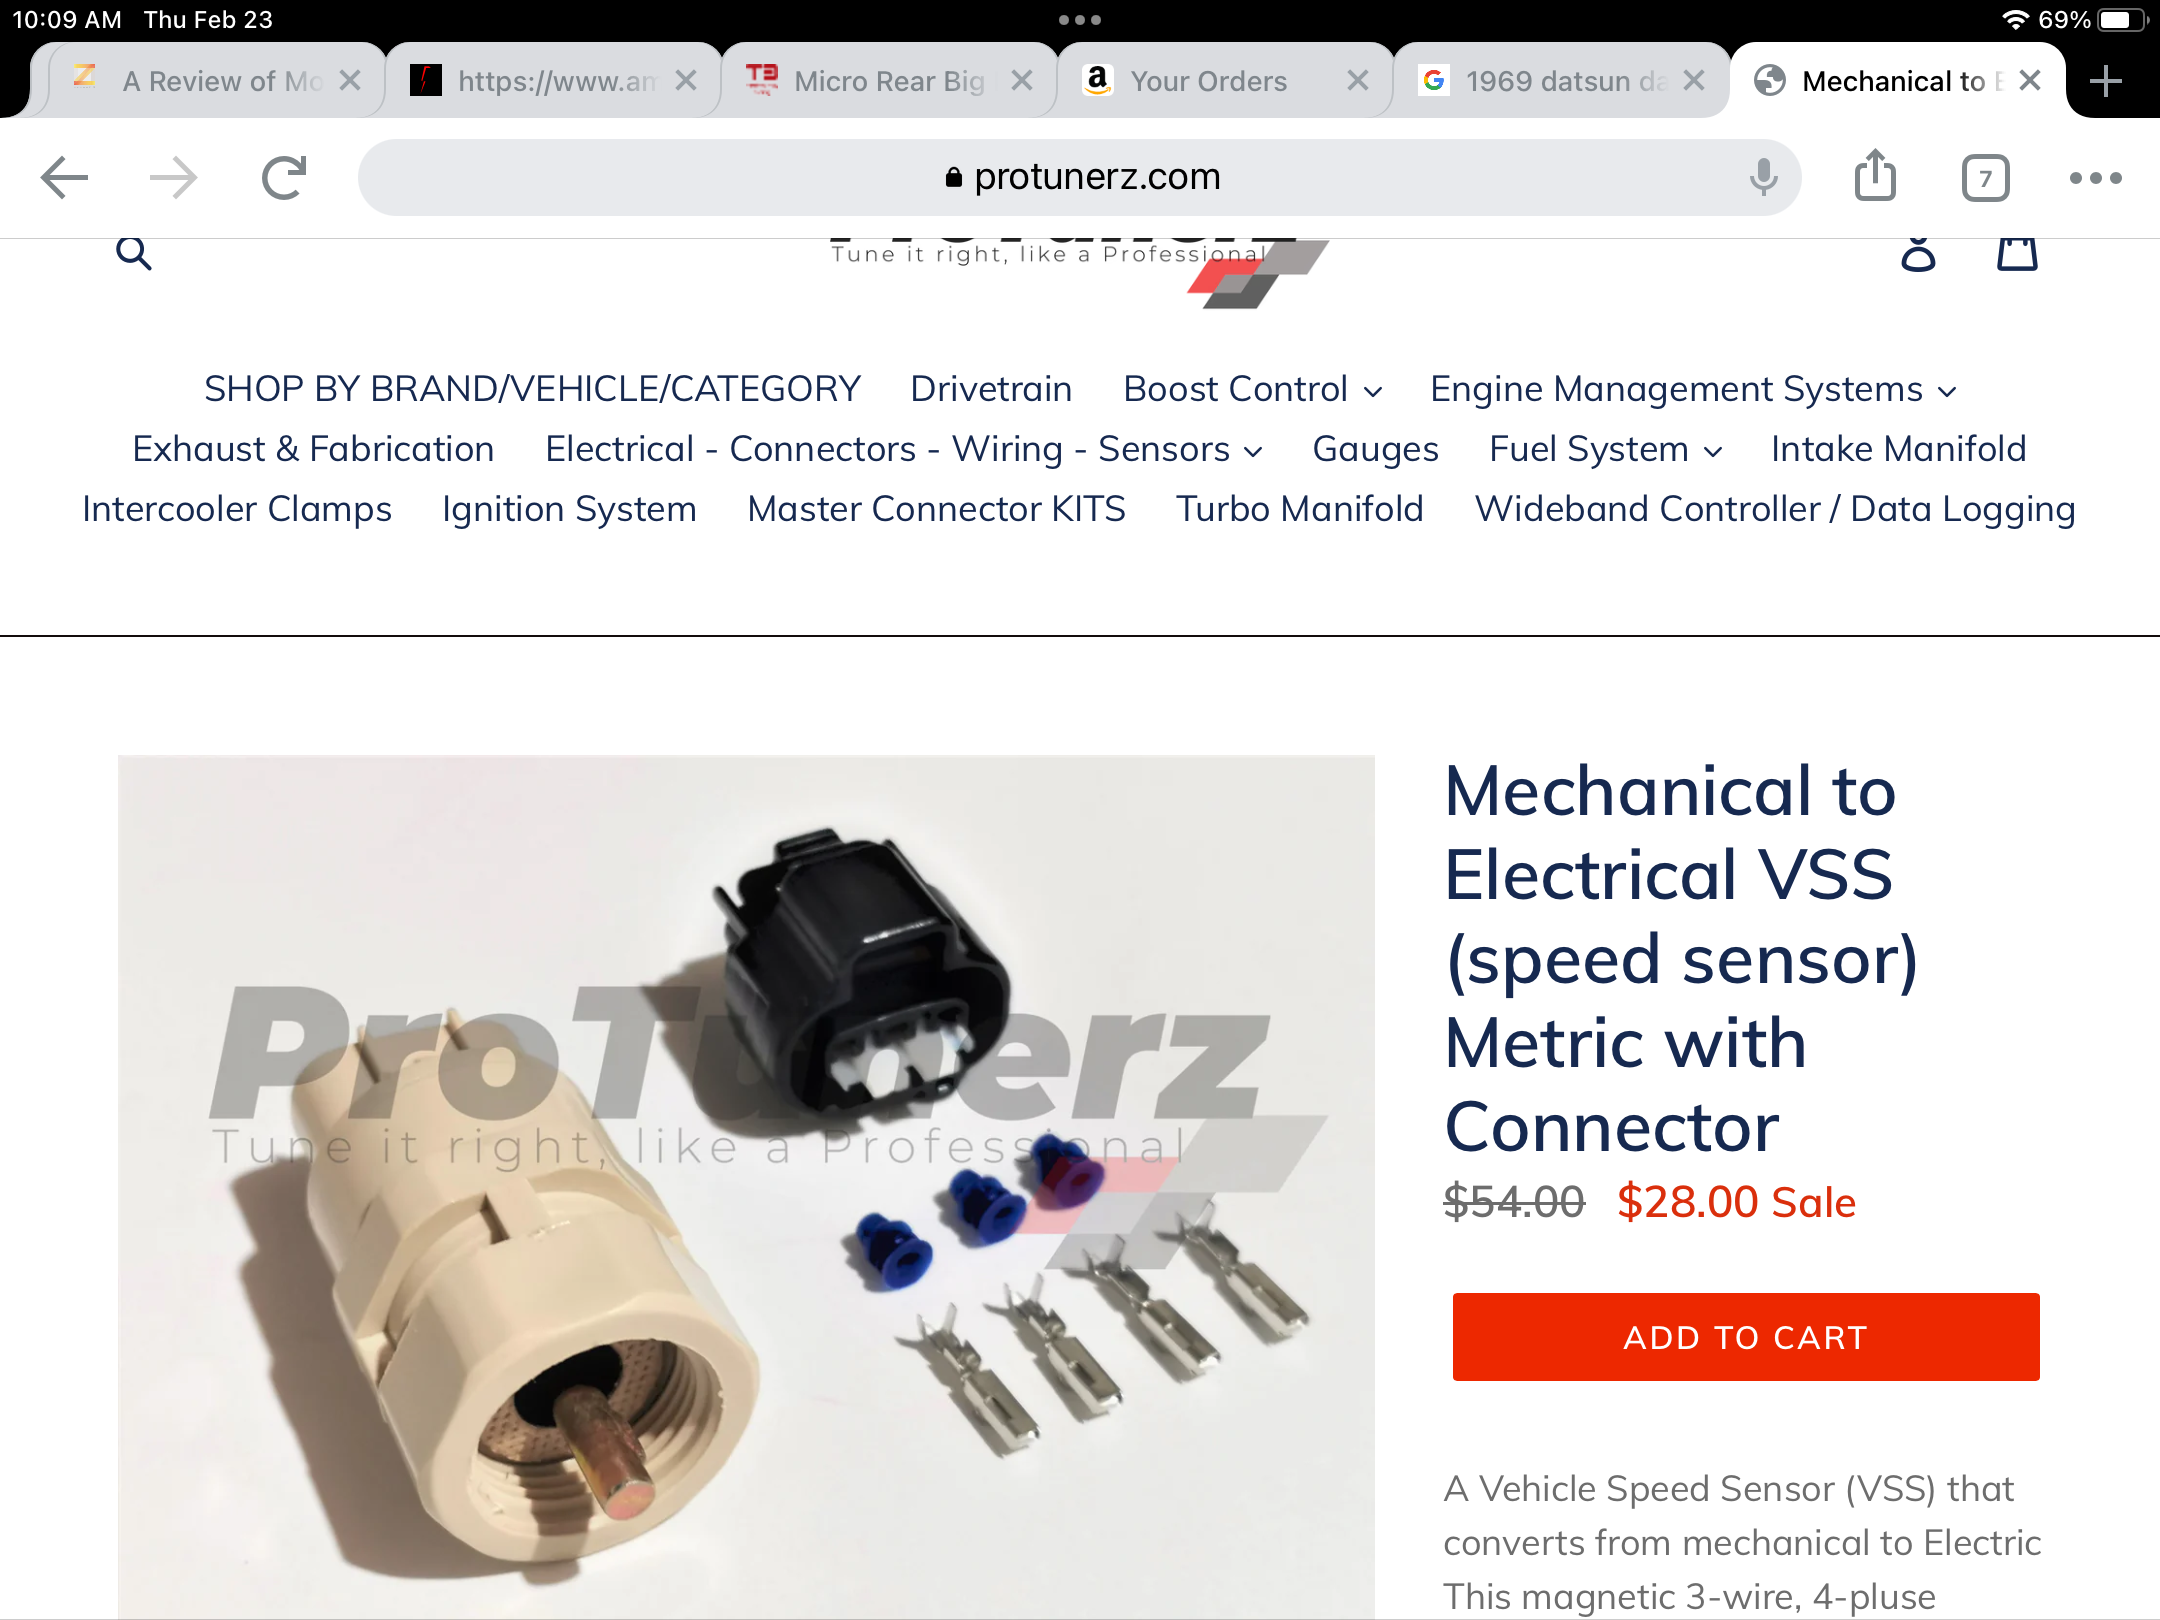
Ok, we have a VSS that gives me a driveshaft rotation frequency, we have a “Way” to use that drive my fancy little ARDUINO board to make a little GM stepper motor point a needle at whatever speedo position I want. Just have to tear up my speedo and mount a stepper motor where that old ancient mechanical speedo and odo gear pile was and I’m flying! Wait just a doggone second….. Odometer….. Sheite….. what do I do about this? Well Mr inventor here thinks I could certainly get my Arduino thingy to add up covered distance and display a ODO number but then I need to include a small LED display thingy in my speedo. Well….. So back to searching for alternatives. Guess what both Speed hut and Dakota digital have invented? A box that converts a speed signal into a motor driven speedo cable. Takes my VSS singal and directly drives my existing and un-modified classic 69 510 speedometer via a 3 foot speedo cable. The ECD-200BT is the Dakota digital version https://www.dakotadigital.com/index.cfm/page/ptype=product/product_id=886/mode=prod/prd886.htm But do they make a Datsun compatible cable? No of course not! But so what. They make a GM cable (duh) that turns out to be 90% identical to a Datsun cable (left one in the picture). The dang threaded cap there is 5/8-16 thread (M16x1.5 Datsun), which JUST ABOUT threads right on, and the cable core is a perfect fit into the datsun speedo (510 and Z same same, don’t worry). So I just removed to GM metal crimped-on housing part and slipped on the nearly identical Datsun end bits. Bit of heat on the metal barrel, out slipped the sheath, same when putting the datsun end back on. Little piece of heat shrink over it if you’re worried about it coming off. So after a quick calibration i need to do when i get the car moving again, which itself is a bit of a modern miracle as the silly box Bluetooths wirelessly to an app on my phone!!! Love this stuff! Just as an aside, the Speedhut box is the same, with one important additional feature. It has a GPS optional input to get speed information from, you don’t need to use the transmission mounted VSS. Even easier. But quite a bit more $$. $320 for the DD box i have and over $500 for the Speedhut one. 2. Speedo Upgrades The issue here is the ever changing differential gears and tire selections we just can’t help making. The limited choices of transmission pinions gear tooth counts means you might get close, but you will never be very close….. Well, there is a cure. Actually many cures GPS Speedometers. These have been around for a while a. Cheap dash mounted little box that displays speed. Amazon is loaded with options. b. Your cell phone. There are 150 free speedo apps out there. Did I say free? Hardly easy to use in continuous and easy fashion though c. Dedicated aftermarket gauge manufactures. Speedhut, Dakota Digital and others. Seen and owned the Speedhut GPS speedo for my Z, it was great. There are now shops making 3D printed mounting rings for Z’s for all 5 holes. Fabulous. D. Here is where it gets interesting. In my 69 510 (same issue for 68), I do NOT have a round speedometer. It is an old school rectangular sweep speedo. See pic below (not my car, 68 actually but ~same as 69). I love it, I want to keep it, but there are no aftermarket options for this style of electronic speedo. So I start searching for solutions. Step one was DIY stepper motors. Pun intended. Cool stuff. You tell a motor EXACTLY how fast to move, or even better, where to EXACTLY STOP at whatever rotation position you like. How do you think all the OEM’s have been building their instrument clusters for 1000 years? How do you think Speedhut and others build THEIR gauges today? But you say “how can a simple backyard mechanic figure out how to get this electronic gizmo’s to work?” Well it turns out that while we have been toiling in the garage and watching Bachelor in the evenings, the engineering world has been invented a huge range of DIY electronic packages designed at the “young” to get them into robotics and STEM learning. Search ARDUINO or RASPBERRY PIE on youtube. You will spend countless hours saying “OMG” to yourself…… Let me sum this up. After spending $50 bucks in boards and bits, and investing 15 minutes watching a YouTube video, I had a working tiny stepper motor (actually a 2$/100 generic GM instrument stepper motor) driven by a square wave frequency input (more on that in a minute) moving a toothpick speedo needle to anywhere I decreed. FM! Now I have to admit to being a actual engineer (EE) and this stuff ain’t completely new to me so it was “easy” for me to make this leap, but I just didn’t understand the breadth and scope of what is truly EASILY possible now. This leads to the following revelations. Got a fuel gauge that doesn’t match your new fuel sender in your new tank? No problem. Don’t want to spend the current insane $500 USD and up to find a used and rare stock tach for your 510? Make you’re own…… Now I’ll show the next link in this chain, The VSS. Vehicle speed sensor. To drive all this fancy stuff, you need to have a digital signal that tells you have fast your driveshaft is spinning (needed for cruise control too!) Well there is this cool little device, available from ProTunerZ. I first tound it years ago through a Toyota 4x4 supplier. https://www.marlincrawler.com/transfer-case/parts-upgrade/misc-hardware/vehicle-speed-sensor-mci Turns out the threads on the toyota tranny’s speedo cable pinion is the same as Datsun. Screw this little gem on YOUR speedo pinion add 12v and a 1K resistor, and you get this lovely perfect 12v 50% duty cycle square wave output at a frequency 4 times the pinion rotation rate. For $28 buck.s Yeah. BTW, the gear ratio of YOUR speedo pinion is computed by dividing 6 by the # of teeth on whatever pinion you have. 6/16 (yellow 16 tooth I think) is .375. So at 3000 RPM driveshaft speed your pinion is going 0.375 times slower. Use your tire circumference and diff gear ratio to compute Rotations per mile.
 1. EFI Conversion I am not going to tell you every detail about how to do this, just to make the point that while it can be daunting, it is SO WORTH IT. I did an EFI conversion on my “other” 69 510 back in 2018 and have never looked back. The increase in reliability, drivability, and maybe mostly the ability to be informed about the state of the engine, and the ease of monitoring any input or output has made it a pleasure to drive. I have done literally NOTHING other than routine maintenance in 5 years…. Hop in, drive it. Park it for the winter. Hop in April drive it till it snows. Repeat. It’s cool vintage looking. I used the Jenvey Heritage Throttle bodies that look like dual webber carbs. I get the classic look and appeal but it runs like a modern car. On this one I’m doing more or less what Datsun did with the 280z EFI, just the 4 cylinder version of that. Bit of rare kit, but that makes it fun. “L18E” is the thing to look up if you want to find out more. I’m only using the intake manifold. The high tech part of this that I will identify and name is summed up in one acronym, CANBUS. If you do an EFI conversion, get a system that has CANBUS at it’s heart. It will be give you control and monitoring in a hundred ways. I used HALTECH on the first 510, I’m using MegaSquirt 3 Pro/Evo on this one. There are “easier” options, like using a 4 barrel manifold and bolting on Holley’s EFI system with a 4 barrel EFI carb looking thing. But make no mistake, this is not for the faint of heart no matter what you do. Perhaps the hardest part is the need for an “outside”, ie a tuner to make it all run right after you build the hardware.
A lot has happened since November’s first kiss of white wonder that drove me into the garage, but what I want to share here is what I think are important “opportunities” for classic restorers who just need to have some modern features in their cars. A ton of stuff is out there, the more I find the more I am amazed. I will not be discussing stereo’s or A/C, enough has already been said on this topic. No I will discussing really modern and high tech stuff. First a quick summary of the these groups of technology that I’m tinkering with and want to share. 1. EFI convesion. 2. Speedometer upgrades or perhaps “Instrumentation” upgrades is a better way of 3. Cruise control 4. Power locks 5. Seats. Let me be clear. I am deliberately and consciously doing my best to retain classic look and feel in this restoration, everything I have found and will discuss here be related to how i used these modern toys to retain that.
Greeting from freezing western Canada in February. When things get cold and you can’t drive, I spend the winters working on garage projects and this year is no different. Last winter I did a restoration on the latest 69 510 sedan I found, trying my dang-dest to do a as close to stock restoration as I could stand for a change. This one was kinda special, one owner, low miles, low rust and great backstory. I won’t share any of that story in this thread. Just suffice to say I had a hankering to drive a stock 510. Got it done and started driving it last fall, spent all of 2 months putting some miles on it and loving most of it. Gentle ride, decently quiet exhaust. Snappy little L!8 SSS motor. Ok, THAT’s not stock but it’s OEM un-modified SSS L18. So it was stock in SOMETHING, okay? Fine….. Then the first blast-O-winter hit Alberta in November and in the garage it went cause it had two problems. Noisy transmission in 5th and REALLY BAD seats. You think stock Z seats aren’t “perfectly comfortable and supportive”? Well 510 seats are AWFUL for long trips and or any sort of performance driving. Yes I had a very low mileage set that I restored to lovely appearance and function, but…… And so it began. Will I be able to restrain myself and limit the “upgrades” to just the barely acceptable minimums or will it get out of hand? Do I really have to tell you what happened?
Haven’t done this for a while (done 10+ before hand), but sourcing ATV700 part number u-joints never resulted in any issues during reassembly. If you have to do a little “clearancing” with whatever parts are now available, well it never hurts. Sounds like what I always have to do with GM alternator replacements. Some part of the case or mounting bracket has to be “relieved” to make it swing in close enough to get the belt on. Just what you have to do. What I do remember is the last time I ordered more from the u-joint store I think, they were having supply chain issues and couldn’t supply any. Will have to check again.
It is a voltage regulator. The plug style was used 75-78 and possibly late 260. Early 260 had a one time only round solid black plug, all 240’s had a 6 pin rectangular flat pinned plug. The parts fiche gives you an idea of how many unique ones were made and start and stop dates. All do exactly the same thing. You could switch plugs and use a reg from any year technically. At some point in the late 280’s the alternators went to the internally regulated style (designations starting with LR rather than the earlier LT) and the external regulator nonsense was put to rest. Many replacement regulators you buy today have transistor based relays rather than mechanical ones for enhanced reliability if you are stuck with an LT alternator. Common practice now is to use later GM or later Nissan alternators with higher output anyway. Tons of threads here and else suggest what you might use.
1. EFI Conversion I am not going to tell you every detail about how to do this, just to make the point that while it can be daunting, it is SO WORTH IT. I did an EFI conversion on my “other” 69 510 back in 2018 and have never looked back. The increase in reliability, drivability, and maybe mostly the ability to be informed about the state of the engine, and the ease of monitoring any input or output has made it a pleasure to drive. I have done literally NOTHING other than routine maintenance in 5 years…. Hop in, drive it. Park it for the winter. Hop in April drive it till it snows. Repeat. It’s cool vintage looking. I used the Jenvey Heritage Throttle bodies that look like dual webber carbs. I get the classic look and appeal but it runs like a modern car. On this one I’m doing more or less what Datsun did with the 280z EFI, just the 4 cylinder version of that. Bit of rare kit, but that makes it fun. “L18E” is the thing to look up if you want to find out more. I’m only using the intake manifold. The high tech part of this that I will identify and name is summed up in one acronym, CANBUS. If you do an EFI conversion, get a system that has CANBUS at it’s heart. It will be give you control and monitoring in a hundred ways. I used HALTECH on the first 510, I’m using MegaSquirt 3 Pro/Evo on this one. There are “easier” options, like using a 4 barrel manifold and bolting on Holley’s EFI system with a 4 barrel EFI carb looking thing. But make no mistake, this is not for the faint of heart no matter what you do. Perhaps the hardest part is the need for an “outside”, ie a tuner to make it all run right after you build the hardware.
A lot has happened since November’s first kiss of white wonder that drove me into the garage, but what I want to share here is what I think are important “opportunities” for classic restorers who just need to have some modern features in their cars. A ton of stuff is out there, the more I find the more I am amazed. I will not be discussing stereo’s or A/C, enough has already been said on this topic. No I will discussing really modern and high tech stuff. First a quick summary of the these groups of technology that I’m tinkering with and want to share. 1. EFI convesion. 2. Speedometer upgrades or perhaps “Instrumentation” upgrades is a better way of 3. Cruise control 4. Power locks 5. Seats. Let me be clear. I am deliberately and consciously doing my best to retain classic look and feel in this restoration, everything I have found and will discuss here be related to how i used these modern toys to retain that.
Greeting from freezing western Canada in February. When things get cold and you can’t drive, I spend the winters working on garage projects and this year is no different. Last winter I did a restoration on the latest 69 510 sedan I found, trying my dang-dest to do a as close to stock restoration as I could stand for a change. This one was kinda special, one owner, low miles, low rust and great backstory. I won’t share any of that story in this thread. Just suffice to say I had a hankering to drive a stock 510. Got it done and started driving it last fall, spent all of 2 months putting some miles on it and loving most of it. Gentle ride, decently quiet exhaust. Snappy little L!8 SSS motor. Ok, THAT’s not stock but it’s OEM un-modified SSS L18. So it was stock in SOMETHING, okay? Fine….. Then the first blast-O-winter hit Alberta in November and in the garage it went cause it had two problems. Noisy transmission in 5th and REALLY BAD seats. You think stock Z seats aren’t “perfectly comfortable and supportive”? Well 510 seats are AWFUL for long trips and or any sort of performance driving. Yes I had a very low mileage set that I restored to lovely appearance and function, but…… And so it began. Will I be able to restrain myself and limit the “upgrades” to just the barely acceptable minimums or will it get out of hand? Do I really have to tell you what happened?
Haven’t done this for a while (done 10+ before hand), but sourcing ATV700 part number u-joints never resulted in any issues during reassembly. If you have to do a little “clearancing” with whatever parts are now available, well it never hurts. Sounds like what I always have to do with GM alternator replacements. Some part of the case or mounting bracket has to be “relieved” to make it swing in close enough to get the belt on. Just what you have to do. What I do remember is the last time I ordered more from the u-joint store I think, they were having supply chain issues and couldn’t supply any. Will have to check again.
It is a voltage regulator. The plug style was used 75-78 and possibly late 260. Early 260 had a one time only round solid black plug, all 240’s had a 6 pin rectangular flat pinned plug. The parts fiche gives you an idea of how many unique ones were made and start and stop dates. All do exactly the same thing. You could switch plugs and use a reg from any year technically. At some point in the late 280’s the alternators went to the internally regulated style (designations starting with LR rather than the earlier LT) and the external regulator nonsense was put to rest. Many replacement regulators you buy today have transistor based relays rather than mechanical ones for enhanced reliability if you are stuck with an LT alternator. Common practice now is to use later GM or later Nissan alternators with higher output anyway. Tons of threads here and else suggest what you might use. I did the modern thing and googled “Engine Shipping Crate”. Quite enlightening what’s out there. Plastic two piece clam shell boxes are very popular. Shippers also love pallets. Few pieces of wood under strategic places to support it upright, basic tie down ratchet straps to lock down to the pallet slats. No need to “enclose it in a box”
There are aftermarket replacements for the 240z eyeballs vents, but not the 280z ones. Going to have to find a better set of used ones or someplace that does plastic chroming.
Just to put it out there plainly, the block threads are 1/8 BSPT. The adapter needed is the one SteveJ linked to, BSPT male into the block, 1/8 NPT female to thread in common gauge fittings.
Seven years. OMG. Yes I still have some.
I’ll do the same. Thanks for the reminder.
You lowered the car too much. Does it rub when you turn? Or turn and going over bumps? Stop, turn the wheels full left and get out and look what’s close to what.
So: If I may be so bold as to offer a final summation: Made of wood? No. Made with wood? Yes Looks like wood? Yes to most, no for some, but it is one of the basic design design objectives of this damn thing, so Yes is reasonably correct. Which wood? Who cares. As long as it makes most drivers think “wood”. Feels like wood? Doesn’t matter. Original question is “wood yes or no”. See above. Made of plastic? No Made with plastic? Yes Feels like plastic? See above.
On to that really nasty race that on the inside of the pinion shaft. Getting it out is easy, but getting it lined up and beaten back into place from the nose is a real test of wills. It’s down there about 10 inches…..
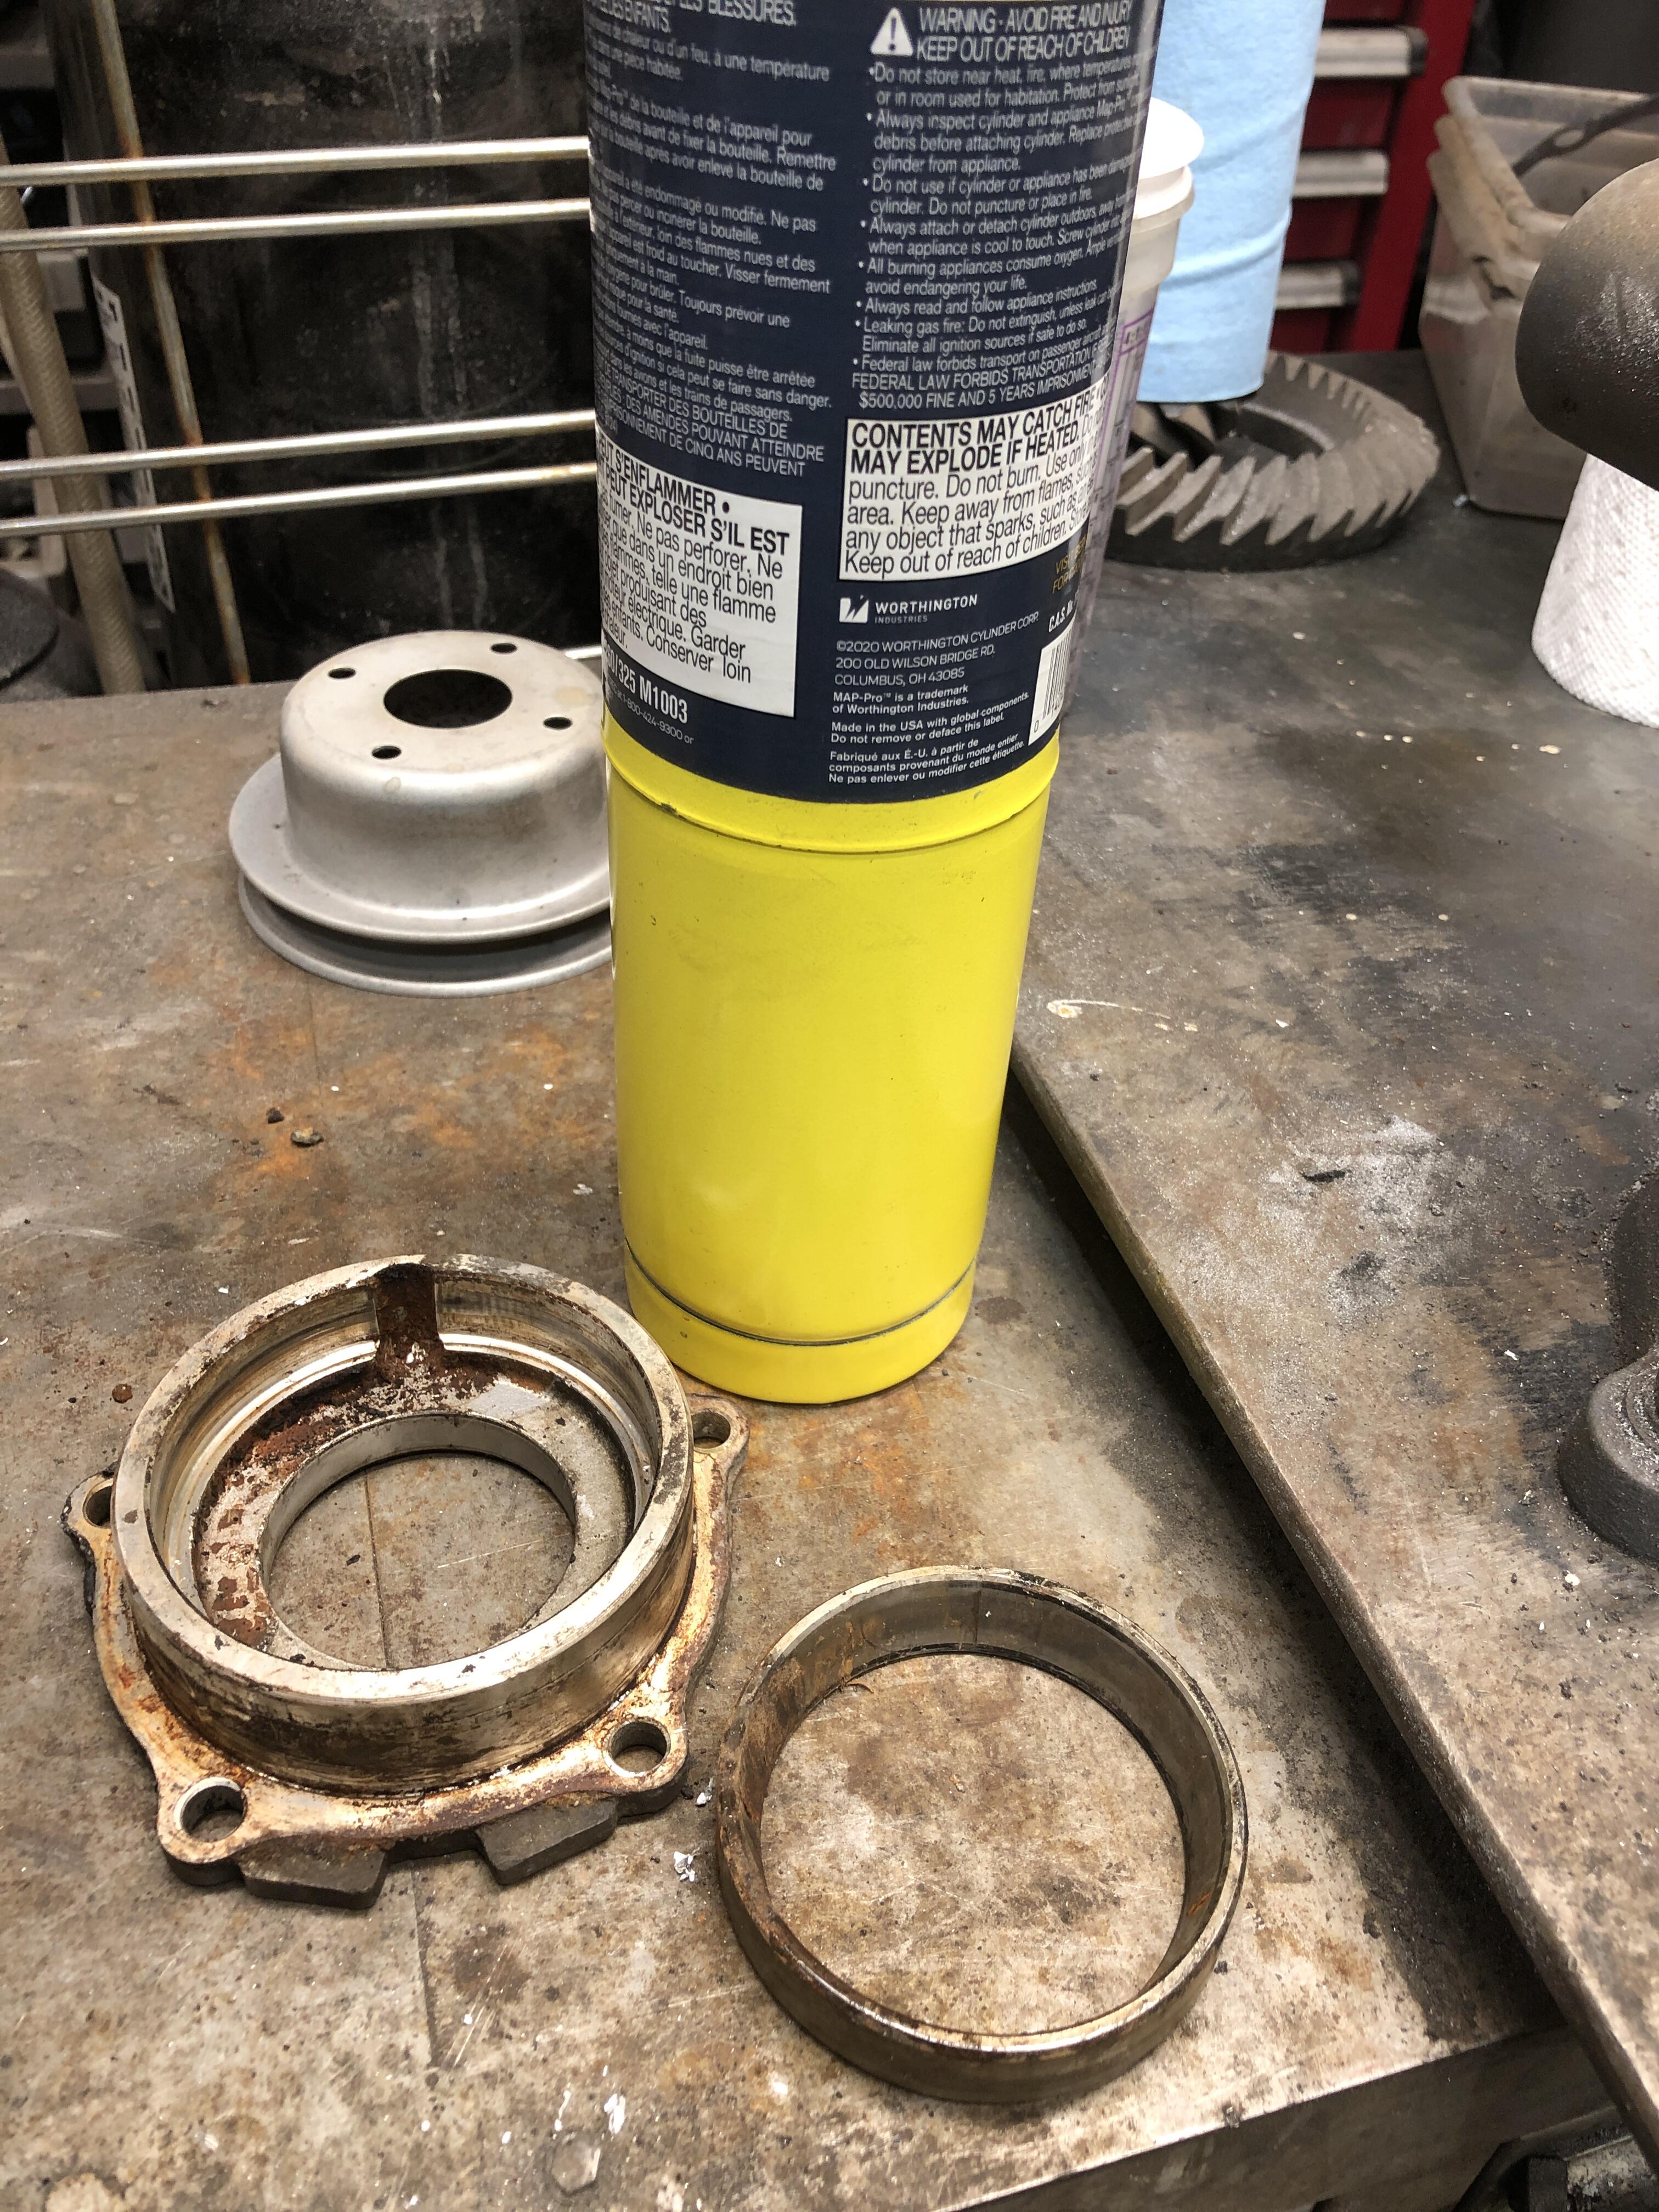
Clamped it in the vice upright, got the MAP gas torch out (propane would be just fine) and warmed up the outer circumference for about 90 seconds. The race just popped out with minimal prying with a flat blade behind it. 5 minutes, both sides done. Bamn!
I did the modern thing and googled “Engine Shipping Crate”. Quite enlightening what’s out there. Plastic two piece clam shell boxes are very popular. Shippers also love pallets. Few pieces of wood under strategic places to support it upright, basic tie down ratchet straps to lock down to the pallet slats. No need to “enclose it in a box”
There are aftermarket replacements for the 240z eyeballs vents, but not the 280z ones. Going to have to find a better set of used ones or someplace that does plastic chroming.
Just to put it out there plainly, the block threads are 1/8 BSPT. The adapter needed is the one SteveJ linked to, BSPT male into the block, 1/8 NPT female to thread in common gauge fittings.
Seven years. OMG. Yes I still have some.
I’ll do the same. Thanks for the reminder.
You lowered the car too much. Does it rub when you turn? Or turn and going over bumps? Stop, turn the wheels full left and get out and look what’s close to what.
So: If I may be so bold as to offer a final summation: Made of wood? No. Made with wood? Yes Looks like wood? Yes to most, no for some, but it is one of the basic design design objectives of this damn thing, so Yes is reasonably correct. Which wood? Who cares. As long as it makes most drivers think “wood”. Feels like wood? Doesn’t matter. Original question is “wood yes or no”. See above. Made of plastic? No Made with plastic? Yes Feels like plastic? See above.
On to that really nasty race that on the inside of the pinion shaft. Getting it out is easy, but getting it lined up and beaten back into place from the nose is a real test of wills. It’s down there about 10 inches…..
Clamped it in the vice upright, got the MAP gas torch out (propane would be just fine) and warmed up the outer circumference for about 90 seconds. The race just popped out with minimal prying with a flat blade behind it. 5 minutes, both sides done. Bamn!


Important Information
By using this site, you agree to our Privacy Policy and Guidelines. We have placed cookies on your device to help make this website better. You can adjust your cookie settings, otherwise we'll assume you're okay to continue.