zKars
 Subscriber
-
Posts
3,742 -
Joined
-
Last visited
-
Days Won
107
Content Type
Profiles
Knowledge Base
Zcar Wiki
Forums
Gallery
Events
Downloads
Store
Blogs
Collections
Classifieds
Everything posted by zKars
-
Thanks gang! Heard what I wanted to hear, something along the lines of "there's trouble brewing...." The silly $6000 price tag just lost at least one zero.....
-
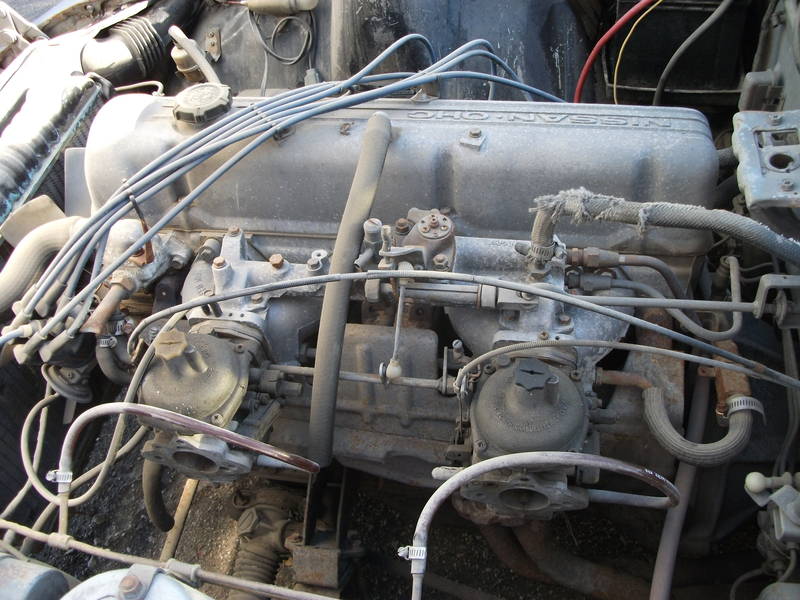
Whilst perusing the local kijiji ads in my neck of the woods this morning, I came across this "lovely" (cough cough) specimen of a 73. http://regina.kijiji.ca/c-cars-vehicles-classic-cars-1973-Datsun-Z-Series-Hatchback-W0QQAdIdZ243202306 What is interesting is the carb substitution seen in attached picture. Anyone know what those came from? They have the visual cues of SU/Hitachi ' ishness, but clearly aren't the usual culprits. Mostly I'm trying to decide if they are a suitable for our application. The car appears to be not running from the text of the ad, and of course makes you wonder if there more of a reason than the need for a battery and fuel lines.... Any ideas?
-
I'm up for that! Let me know a complete list of what you want to swap and we'll get this worked out. Send me a PM or a note to z240@shaw.ca Thanks!
-

Door window frame weatherstrip (outer)
zKars replied to dankfrye@charter.net's topic in Open Discussions
Picture #1 goes on top of the door frame in the groove, #2 goes on the bottom of the door, held on with 4 (5?) push in plastic pins. Both are the correct after market part for the application from what I've seen. Both are side to side interchangable. Just turn them around. Two carpenters are talking. One brings up a hand full of nails. "Half of these have the heads on the wrong ends!", complains one. The other looks at him, as if he's an idiot, and says, "you idiot, those are for the other side of the house!!" -
Front same, back different. The 280 insulator is much taller in the rear, The "bearings" (front has an actual bearing, the rear has a some size rubber donut) are the same 240-280. So as long as you're doing the front, go get the 77 parts.
-
Raltz: There a few Canadian parts not too far away. I'm in Calgary, drop me a line to z240@shaw.ca and we'll get you what you need. Assuming you need it for a Z. I can't think of a way of repairing it in a way that would last. Jim
-
In need of a Hazard light switch (1972 Z) anyone? Please!!
zKars replied to 72zeta's topic in Help Me !!
The pull switch is from a 73. Electrically I believe its the same. You can take it out, dis-assemble it, clean the contacts, and re-assemble it. Do the same with the head light switch on the steering column assembly. If you don't want to tackle that, send it to Z'sondabrain for work. If you just want a new switch, put an ad on the want to buy section of the site. I was tempted to suggest you learn about the period when composing sentences, but I finally spotted one in your text, so I won't bring that up. Jim -
Did a little searching and came up with http://www.classiczcars.com/forums/showthread.php?t=3129
-
You may have the wrong bushings. There is a different spacing between the ears on the 280 rack (on one side only), requiring a wider bushing to fill the space. The ES kit for 280 and 240 are different only in this one bushing if I recall correctly. If you use the 240 rack bushing on a 280 rack, you get room for movement. Ask me how I know. I did the bushing replacement several years ago as I also changed the rack. I then went for a drive. Made a left turn, and when my wheel returned to "center" it stayed about 10 deg left of center. Car is going striaght! Make a right turn, now the wheel sits 10deg right of center. Car still going straight. Rack was shifting with each turn. Had to go through the grief again with the right bushing. Turns out the rack I swapped was for a 280.
-
Okay, so I found an advantage that the Canadians have...
zKars replied to SteveJ's topic in Electrical
Steve: Nice to hear someone saying something nice about our little spot on the planet. Thanks! Well, of immediate interest that you have to visit is a little place called Princess Auto (have no clue how that came up with THAT...) (princessauto.com) The place reminds me of Harbour Freight, but better in my opinion (based on one store I visited in Vegas recently). Lots of automotive related tools and equipment, and stuff you just don't find other places. There seem to be several stores in Ontario. Hopefully you will find one close to where you are going. I just know I NEVER leave there without buying 3-5 things I had NO intention of buying when I went in.... Take care with the amount of money you take with you, maybe leave your credit card at home.... -
I had the usual and expected hub cap problem with mine, but on one side, there was also an interference problem with the hub. I had to grind a small amount of metal from the hub casting around the wheel opening area to get clearance to allow the tabs on the cap to both pass through the hole and expand enough to catch on the other side. The amount you have to deform the grease cover to gain the depth you need is miniscule, the real problem for me was the clearance with the hub to get it to seat. Putting the cap on first then mounting the wheel will result in broken tabs. Ask me how I know.....
-
Chris. I have 240 regulators in great shape. Don't go to the junk yard yet. Drop me a line at z240@shaw.ca and we'll get them on the way.
-
Please please oh please, let it only be the head was assembled without the valve seals..... or just one forgotten. Other than that? head gasket? You did use a new one, didn't you? block face cleaned properly? The oil pump is highly unlikely to be the direct cause.
-
Is it just the time of day or is age getting to me? All L-6 series blocks I've seen in Z's have the drain on the intake/exhaust side (left side) on the block down under the #5-6 exhaust area. I've seen a couple of different sized heads, but its always in the same place. Someone tell me I'm not crazy! Jim
-
The green hard stuff around the broken off wires our temp switch can be chipped or scrapped away to expose more wire. Scrap the individual wire strands to expose clean bright copper and solder your wires back on. mix and dab some epoxy on the bare soldered connection to strengthen and insulate the connections. Then get back to enjoying your Z.
-
Charlie Osbourne (Zedd Findings) make replacements so at least you don't need to re-create them. They do not come with the TC rod pockets though. I've used them, they are wonderful. With what you've done already, I think you can handle it. I do like the idea of an over-lay of fresh material, sounds easier and definitely stronger, but I worry about rust coming back underneath eventually if you're not VERY careful about rust removal and sealing.
-
A fact I missed until recently is also important. Study the picture on the inline stroker page that shows two gear carriers side by side. There are two different gear carriers with 180 deg offsets to the through hole depending on which trans has the retaining bolt up or down. You have to use the one with the correct offset or no-gear-touchy!
-
Amazing story! It is easy to think too deeply about the "why" of naming things, especially when you are in that situation. It would have been even cooler if it had taken them 26 attempts to get it right! (think about it.....)
-
Pretty sure it only traps the metal flange. Can't see it overlapping the plastic trim
-
If you have shaft play that would cause the motion to get out of hand or to get to a degree that you get reluctor gap issues, that might explain your problem. Or clearances get loose enough at temp to cause problems only when hot. Maybe. Don't buy the weak spark causes sooty plugs argument though. The only thing in the dizzy that is likely to temperature sensitive is the coil in the pickup winding. That shouldn't be RPM dependant. If its the ignition module, anything stopping you from doing a GM HEI conversion as far as the race rules goes? Tach will work fine with either 75-78 system. It comes right off the + side of the coil on both cars.
-
Sounds like fuel for sure but don't discount plugs loading with use. If you're running a bit rich, those dang BP6..11 wide gap (1.1mm) plugs don't like it. Try good old BP6RES instead. Also the new mech fuel pump may be not so great. Got the right thickness of spacer between it and the head? Got the spacer at all? A pressure gauge will tell the story. Good luck on the race!
-
That is a totally home grown floor you have there. The previous owner made a very interesting custom floor and yes (good catch S.) added zx cargo area bars to gain access to the hidden compartments in the front. It is true that 77-78 have a unique and raised hardboard floor compared to the early s30's, but it looks nothing like what you have. Maybe soom of the original hardboard or supports are still underthere, but likely not much. To recarpet this, you'll be getting it custom made, as the step in the middle there, makes this carpet longer than either of the stock carpet sets, and the unique shape will guarantee that any stock carpet will not fit correctly. Is there no end to what PO's will come up? Apparently not....
-
There is a popular method to replace these links with modern fuses. http://atlanticz.ca/zclub/techtips/fusiblelinks/index.html I'm not personnally a fan of this, as it is just about as weatherproof as the original (not), but it is likely MUCH better than your current setup. Replacing the stock one with another stock one requires you cut and splice the wires. The base has molded in contacts. The high currents carried by these wires require that you do proper solder connections and properly insulate the exposed wires or you'll be doing this all over again real soon.
-
Ok, now that is one pretty car. Now why can't that be the next Z shape?
-
That is the front diff mount. Any year will work (70-78). The late 260 to 280 are slightly different in the strength of the unit (more steel reinforcing) and a larger radius to the exhaust pipe clearance curve on the drivers side of it. Great time to get Zs-ondabrain's R/T diff mount too if you're not already on the list.