zKars
 Subscriber
-
Joined
-
Last visited
Everything posted by zKars
-
 Never seen a split bushing. The factory bushings I seen are one piece that are press-flared outward and don't start with a split shell. Must be some kind of aftermarket stock bushing replacement. In any event, just do what Terrapin did, grind out the inner flare and make it all smooth... You do need the shell or the ID is too big for the POLY bushing. Its all good.
 -
The parts are not missing. The later 280's (77 78?) use a slightly different system to connect the cable to the read brakes. The cable comes without the ends you find on the 240 cables, and I pretty sure there is no part you could buy separately. You will have to use the ends from your old cable. Make a slit with a dremel cutoff wheel or hacksaw, then spread the bracket to allow the old cable end to be removed, then use these on the 280 cable. You may wish to get the slit welded again to prevent an un-intentional escape.... Jim
-
Language is important, yes? S30 70-78 Z S130 79-83 280ZX (sorry mgood) z31 84-89 300 ZX z32 90-96 300 ZX z33 350Z z34 370Z Others will chime in with other items. alloy wheels types and hubcaps come to mind. Jim
-
Mine arrived yesterday. I'm in the process of getting m Z painted now, and that lovely decal will be on a fresh windshield in about 4 weeks. Perfect final touch. Thanks for doing this. I know the time and effort it took was substantial. Jim
-
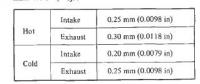
Torker: You're getting your millimeters and your inches mixed up! Read those specs again! For a guy from Kansas, 0.080 (Intake) and 0.010 (Exhaust) in INCHES cold! 0.010 (I) and 0.012 (E) in INCHES hot! FSM grab attached. Jim
-
You are just dealing with a bad case. Nothing that unusual. I had to weld a 4 foot bar to the gland nuts on one set of struts of mine to finally get the leverage required to crack them free. Then the shocks were stuck in the tubes. I poured penetrating fluid down them for days until they freed up. I have read/heard that others had to drill a hole in the bottom of the strut and drive the shock out with a punch. Last resort, but worth considering. Use a big punch otherwise you might puncture the shock. Heat, my usual favorite, is not the right solution to brake the shock free from the tube due to the danger of shock explosion. Welcome to world of z suspension overhaul. Tried the spindle pins yet? Jim
-
There is a thin spacer plate on the end of the crank that has to come off! Just stare at the end, you'll see it. Its just sitting there. And you need to put a pilot bushing in the end of the crank for the manual trans input shaft to fit in. There is a thread on here with detailed step by step instructions on everything you need to collect and do. Search and yee will find, something like that. Let us know if you run into any problems. Jim
-
So we are done with the head liner install on the 74. Too easy. We are using the MSA replacement, which is good in two ways. It is quite stiff, and has a fabric/netting stuff over the foam, so it takes glue really well. We (two of us) held it up and tucked it in all around the outside with no glue first to test fit, center it and to mark center. It pretty much holds itself up without glue its so stiff. One of use then sat in the passenger seat and held up half and kept it in position, while the other guy pulled down the headliner on the other half and sprayed it with glue, waited the 5 minutes as suggested, then stuck it back up. Repeat on the other side, tuck it back in around the edges, all with fingers, no sticks. Done in 30 minutes. Left about 6 inches all around the edge with no glue to make tucking easy. I guess the true test will be tomorrow if its still up there! Thanks for the tips, took all the stress out of by having a plan in mind. Jim
-
This is spooky. Talk about good timing. We are doing this today on a 74! Excellent advice all around. Thanks! Jim and Andy
-
Tom: I worried like a parent after you left, figuring it wasn't going to be all "smooth" from that point onward. I assumed everything went "ok", and you got everything you were going on time, one way or the other. Congrats on the wedding, the career and your conquering of the Canadian road system. Handle everything in life like that and you'll never have a problem you can't handle. All the best. Jim
-
Michael. Wow, you've discovered an excellent resource for brake line parts and tools. This will help me and hopefully several others. Thanks! Jim
-
There is a few threads on people's Vintage Air installs here. Search for "Vintage Air" and you'll find it. This are great photos and documentation posted. If all else fails, go to vintageair.com. They have all of there documentation on line so you can read and understand how AC systems are wired and plumbed. This may help you to figure out what goes where. It is a bit difficult to understand why MSA would supply such poor documentation. I'de be asking for help from them and expressing some concerns about it. Reminds me of the graining, barely ledgable xerox's of xerox's of xerox's instruction pages I found in a Tokico spring/shock kit recently... Unacceptable! Don't stand for it! Demand better! (getting down from soap box now....) Jim
-
Search for "EFI BIBLE", do a little light reading, and learn the function of the "AAR" valve and how it may relate to your running problem. Also discover while reading the 61 or so posts on the topic that the majority of any used ones you may be offered no longer function very well due to advanced age; ie take care when buying one, if and when you decide you need it. In Alabama, with the exception of the weather this December and early January in most of North America, you may decide its not needed... Jim
-
Most of us are just using 5/8 ID heater hose. Nothing special. Basic car parts store stuff.
-
I confirm that it is a 2.2K ohm resistor, 2200 ohms. Get a 1/2 watt resistor. Jim
-
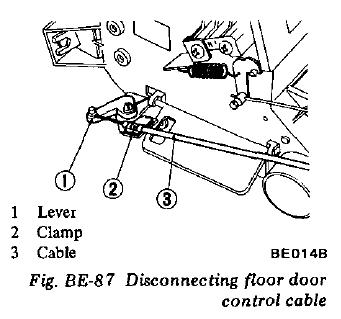
Excellent. A picture can really be worth a thousand posts.... Your description of what cable is connected to what seems accurate. I have some control sets and HVAC units and cables that I can take pictures of so you can see the real and complete setup if need be, but I bet you have the information you need now to fix the problems. If you find a missing or broken cable or clamp or screw etc, let us know. Jim
-
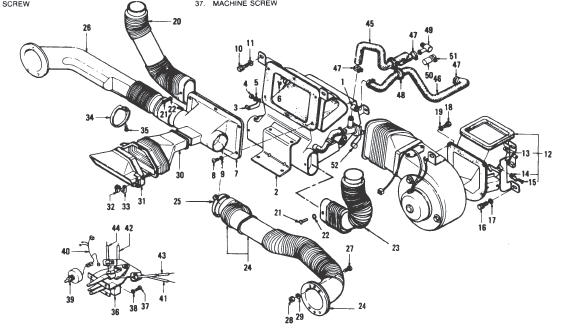
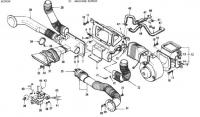
Zedy: Listen to Arne and Darrel. You cannot get heat from the dash vents regardless of control settings. They only work when "Air" is in "Vent" and this connects you the outside. check page 13 of the supplemental chassis Manual of the FSM. I have a picture of it attached. You're inability to move the slider to "ROOM" is a problem with the cable, the slider mechanism, or the connection of the cable to the flapper doors on the left side foot well heat outlets, which is what that control moves. It just closes the two external flap doors at the base of the unit which pushes all heat to the defrost vents when in the DEF position. I also attached a picture of the control cables on the left side from the 76 manual (very similar) for clarification. You haven't somehow connected the defrost air ducts to the vent ducts have you? Or perhaps the central flapper valve in the heater box (under the #6) in the picture) is/was partly open allowing heated air to get into dash vent system. I willing to bet you believe you once got hot air from these vents and are now convinced you can again. It should not work like that. Hope this helps. Jim

-
The hazard switch on a 73 is the green faced pull knob below the lighter. Earlier Z's have a paddle switch in the same spot 260-280 have the hazard toggle switch on the console below the radio. Switch contacts in the hazard switch are often the source of these problems, especially on the 72 and prior switches. Spend time tracing that diagram. Be systematic with your checking.
-
I see no reason to run the fusible link wire all the way to the trunk to get to the battery. Under the hood, just pretend the starter terminal where the battery line connects, is the +side of the 'battery' and connect the fusible link there. Other than that, be sure to get an EXCELLENT secure, clean (paint and dirt free) ground point in the trunk to frame steel and use the same gauge wire as the +cable going up front. Protect it against corrosion so it keeps working well for you. Others have fit an optima in the stock position and been pleased with the result, there are posts about how they did it here somewhere, do a little searching. Jim
-
If it smells like a duck and quacks like a duck, its a VR for sure....
-
I am pleased in this case to be taught something new! Who knew 3 wire tachs were available in 73! And that plug is an in-line 3 pin! Unlike the square 4 pin earlier ones, certainly nothing like the 8 pin 280 style! Nothing like that in the FSM, eh? And you wonder why you have to carefull when getting a replacement dash harness! Now, how are they wired? Is that one terminal routed to the coil negative side with an inline 2.2k resistor like all 280 (maybe I should watch my usage of 'all' !!!) The presence or lack of the need for that resistor will make a difference when using a later tach for Dave if we can't find him an official correct 3 wire 240 tach. Good stuff gang!
-
Those wing nuts are a beech to crack by hand. Take 3/8 drive, 7/16 6pt socket, and cut a slot down into to it with a dremel wheel, wide enough that would fit over the wings. Then use that over the wing nuts with a 1/4 drive handle and adapter to break the wing nuts free. Last resort, but it works. One of those tools we should have as a mail out loner like the spinder pin puller.... Good luck. With strong fingers you can do it without. Jim
-
I have been through this a few times. Heat is answer to soften the tubing, but it can still be very tough to do. Lubrication is good idea as well. Some nice lithium based grease would do fine. Rotating the tank and filler neck as you push them together is the other trick as mentioned above. What you need to end up with, is this. You see two small ridges that encircle the filler neck near the end, about 3/8"" apart about 1/4 from the end of the tube? This is where the clamp goes, between the ridges. So you job is to get that area over the tank neck completely, so that tightening the clamp secures it around the neck of the tank inlet. It will eventually work its way off if the clamp ends up overalapping the end of the tank inlet tube. Capish? Patience, a good hair dryer, and strength will see you through. Jim
-
Oh yes, did this a long time ago with a Painless wiring fan switch. Just plain don't like the rod in the rad fins type. Its just asking for trouble. Just have to be careful with how far in the sender sits inside the thermostat housing so as not to interfere withe thermostat, and when drilling out and tapping it for 3/8 NPT or whatever size sender you use. Go slow and tap a little at a time, aluminum likes to crack. Another option is to use a 280z/zx housing which has more spots in the front for sensors if you need to run the wiring out the front instead of the side (depends on what fancy carbs/EFI etc stuff might be in the way. Jim
-
Z-luke: Welcome to the world of the Z. You will find all that you need here. Read as much as you can and search for specific topics that relate to your needs. Let us know if you have any questions about your new friend. Us Z club guys way out west of you here in Calgary and Edmonton are close at hand for advice and guidance as well. Let us know what you need. calgaryzclub.ca and edmontonzcarclub.com Oh, let me close with : "Go Riders!!" Jim