zKars
 Subscriber
-
Joined
-
Last visited
Everything posted by zKars
-
 $850 USD? And only lousy "Z" hub caps! "D' 's maybe, but "Z"'s ??? http://www.ebay.ca/itm/NOS-72-73-74-75-Datsun-Z-240z-260z-280z-Hubcaps-Wheel-Covers-1972-1975-Hub-Caps-/182011340125?hash=item2a60b8a55d:g:mcgAAOSwoydWsRH9&vxp=mtr The asking price does not determine value, the final sale price does, but it just surprises me. The last couple of sets of these were ~$400 ish in this condition. He's had 3 offers. Would be nice to see what the offers were. Time will tell.
 -
-
Me too. Never seen one go up by itself. Given the extreme flat angle the strut has to the hatch body when it's closed, I can't imagine a strut strong enough to lift it from that position. Even the 280's with two struts can't do it. There does appear to be cheap easy to get aftermarket struts . RockAuto https://www.rockauto.com/catalog/moreinfo.php?pk=1806840&cc=1209170&jnid=406&jpid=0
-
Interesting idea Cappy, you are correct. The headlight bulb connection is universal to all. Could just buy the Black Dragon or ebay generic headlight relay harness. But.. I think the issue of dealing with the difficulties of accessing, removing ($*&%$# rounded headed philips bolts...) and modifying/resealing the headlight can in the wheel well to get this wiring in place makes this a less than desirable solution though. I think our friend Steve with www.240zrubberparts.com is making that grommet now, so for the industrious, it might be workable. Nothing quites beats using the harness connection point. If only there was a way...
-
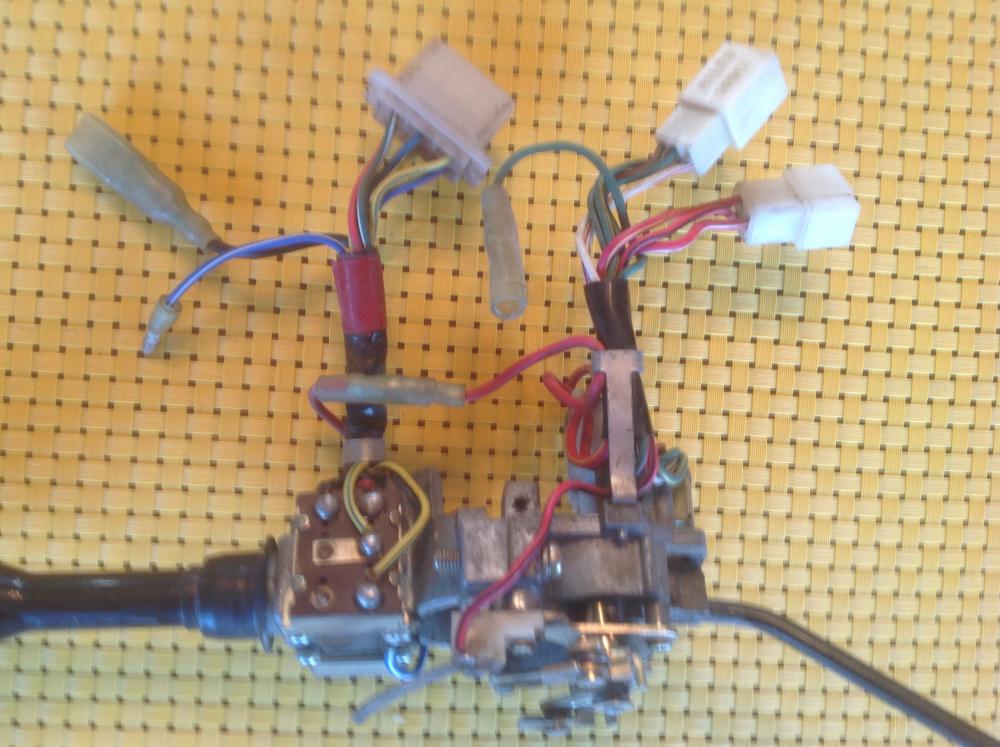
Dave's (and MSA's) harness does not deal with the under dash combo switch harness at all. It "splices in" to the harness up front at the two head light connectors in front of the rad. This makes it possible to work with all the various 240 switch types, It "could" work just fine with the 280's as well, but the problem is with the new round, 4 pin (only three are used) weather proof connectors on the 280's. No one (including Dave) has found the plugs to build the head light harness to connect in at that spot. This is why I have seen discussion about putting the relays into the harness at the combo switch. But as you mention, there are differences in the plugs across the years at the switches. Anyway, I'm working on a solution that everyone will like. Simple, cheap(ish), high quality and retains ALL of the advantages of the original harness design.
-
Ok, so I just bought some stuff on ebay from a seller in Maryland. He used the Global shipping program as I'm in Western Canada. Here are the details. The total for the item was $100.18 Canadian, and the shipping cost was $10 flat (seller determined). The "import fee" from the global shipping side was $9.53. The order was put in on Jan 20. I just received the parcel today. 12 days later. Facts. It arrived using the post office. There were no additional charges on arrival. Not even GST, which I'm confused about. Normally I pay the 5% GST on the declared value using postal shipping when it arrives here. Maybe that was part of the $9.53. Anyway, I am happy on almost all counts. Costs, and timing. stuff usually takes 6-10 days when I get something postal from the US. It did go to some central global shipping place in Kentucky first (2-day priority), who then forwarded it to me. The CanadaPost sticker layed over the USPS sticker from MD-KY claims it came from Pitney Bowes in Toronto to me. Nothing on the packaging about how it got from KY to Toronto. Magic! The only thing I didn't like was the tracking. I had no idea which specific shippng method was being used (postal, fedex, ups etc), and I never had a tracking number from that company. ebay/paypal was keeping me informed of the progress in a fairly informal way. They told me when it hit the global shipping place in Kentucky, then told me it cleared customs and was out for delivery, and to expect it from Jan 29-Feb6. Thanks....
-
The wiring is definitely upgraded in the 280, all the way to the weather proof connections up front, but not the headlight OR high beam switch contacts. The switch bodies and contacts inside appear identical across all the years. When clean and new they can carry all the current for H4's no problem. But we all know what happens with age.... (my contacts aren't very clean either hahahahahah)
-
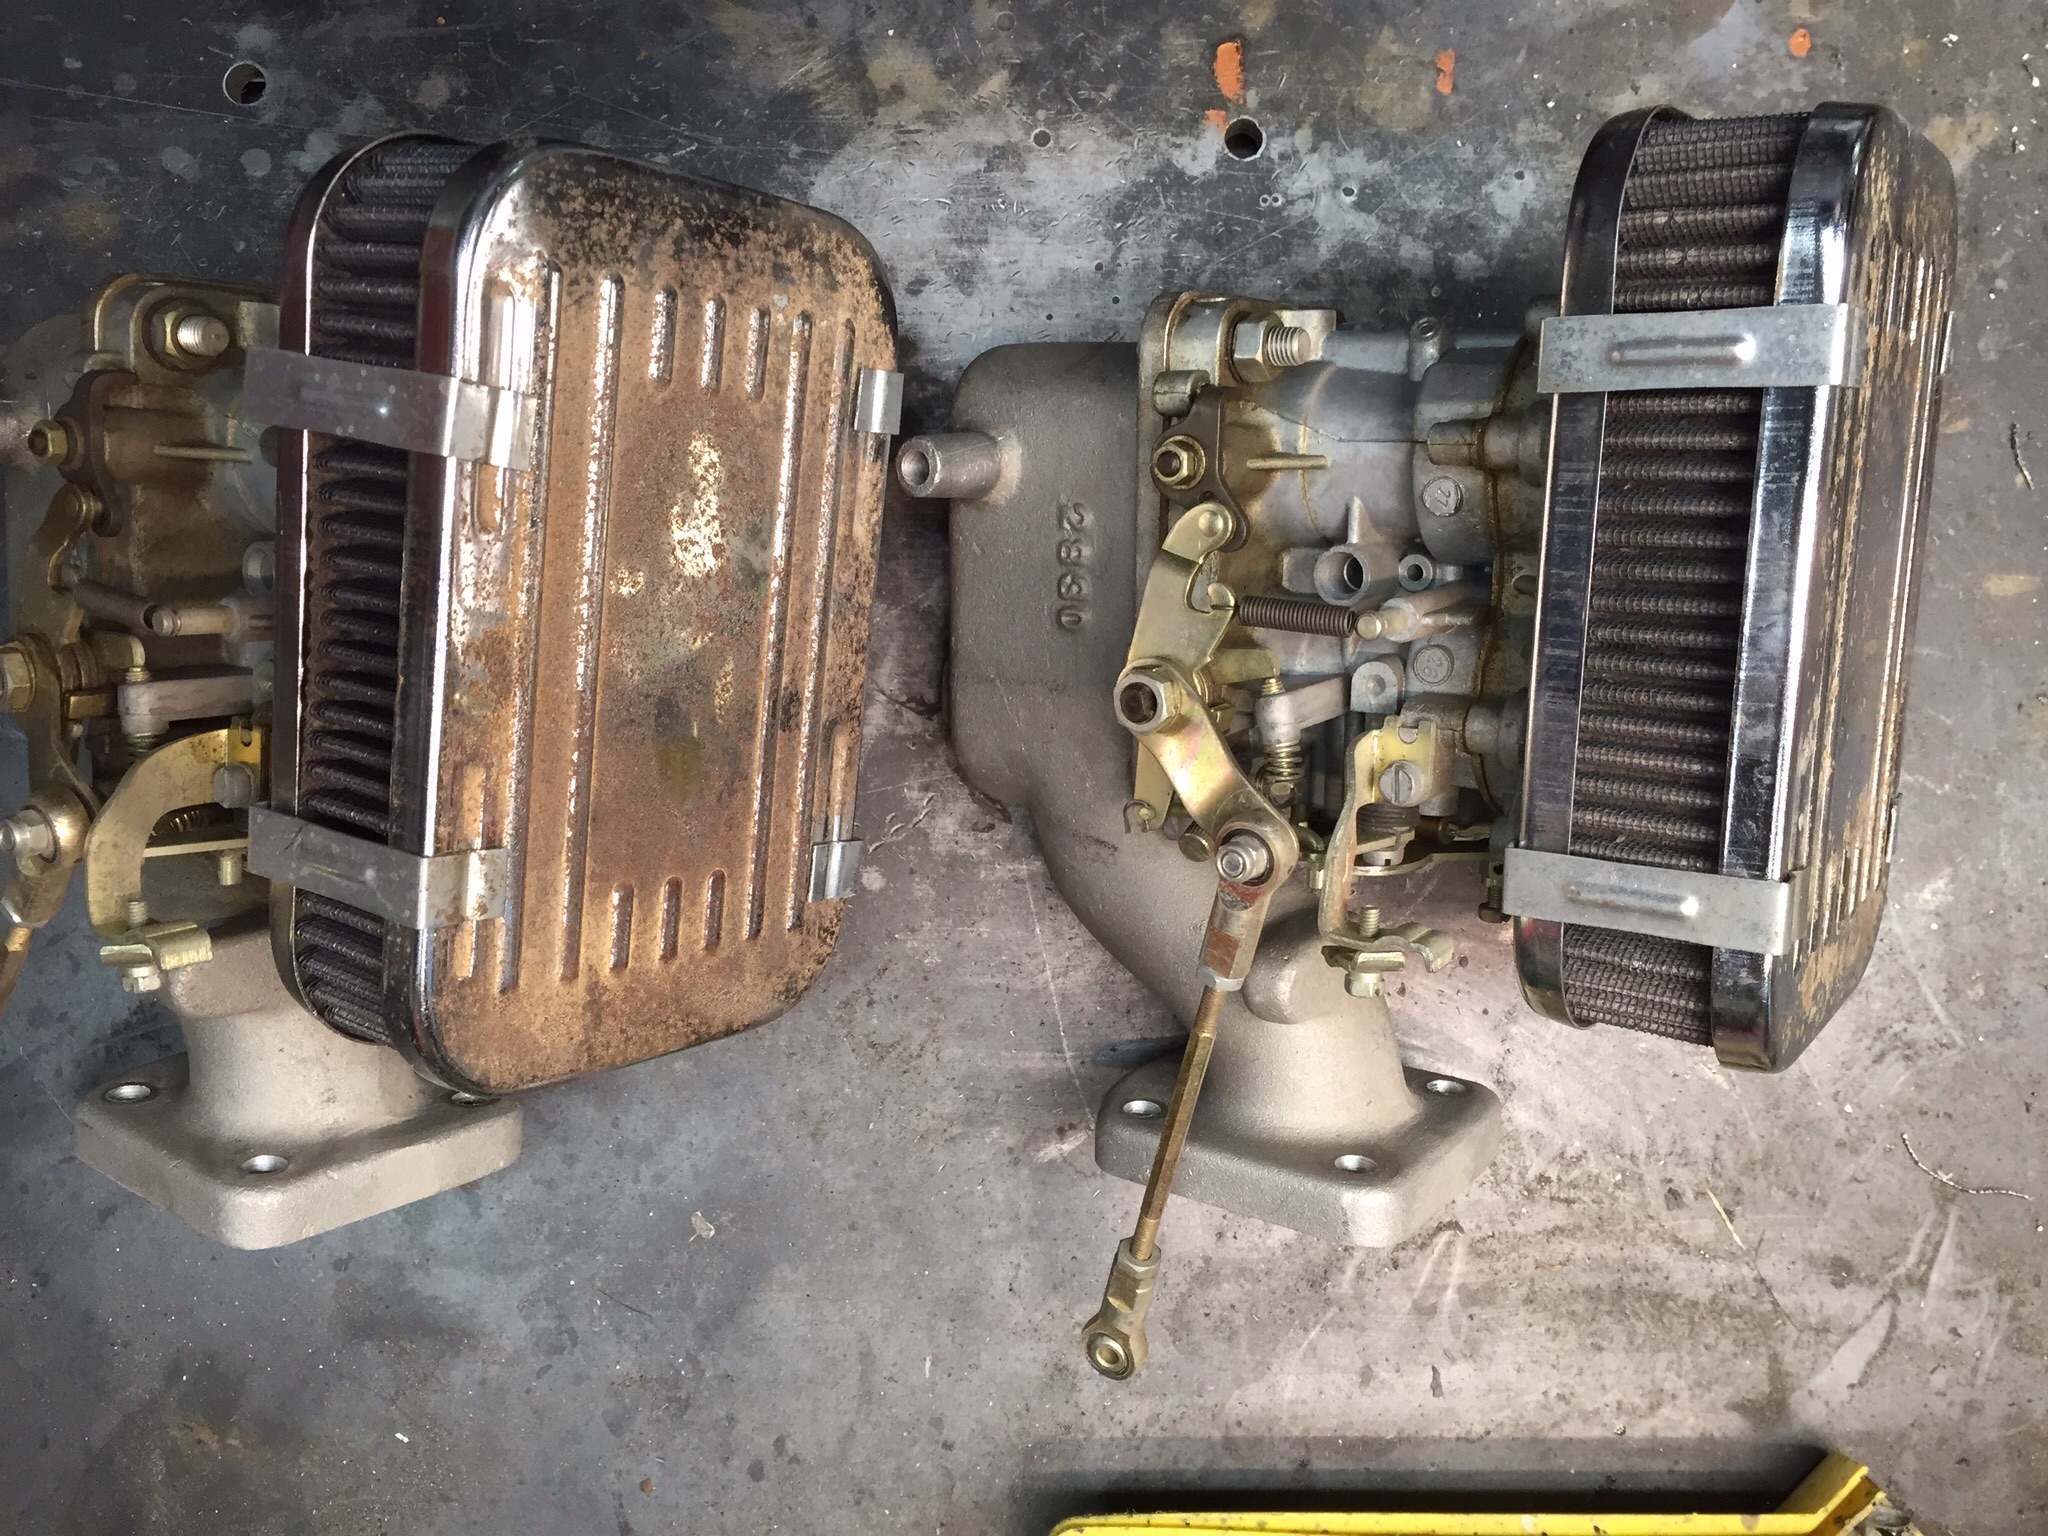
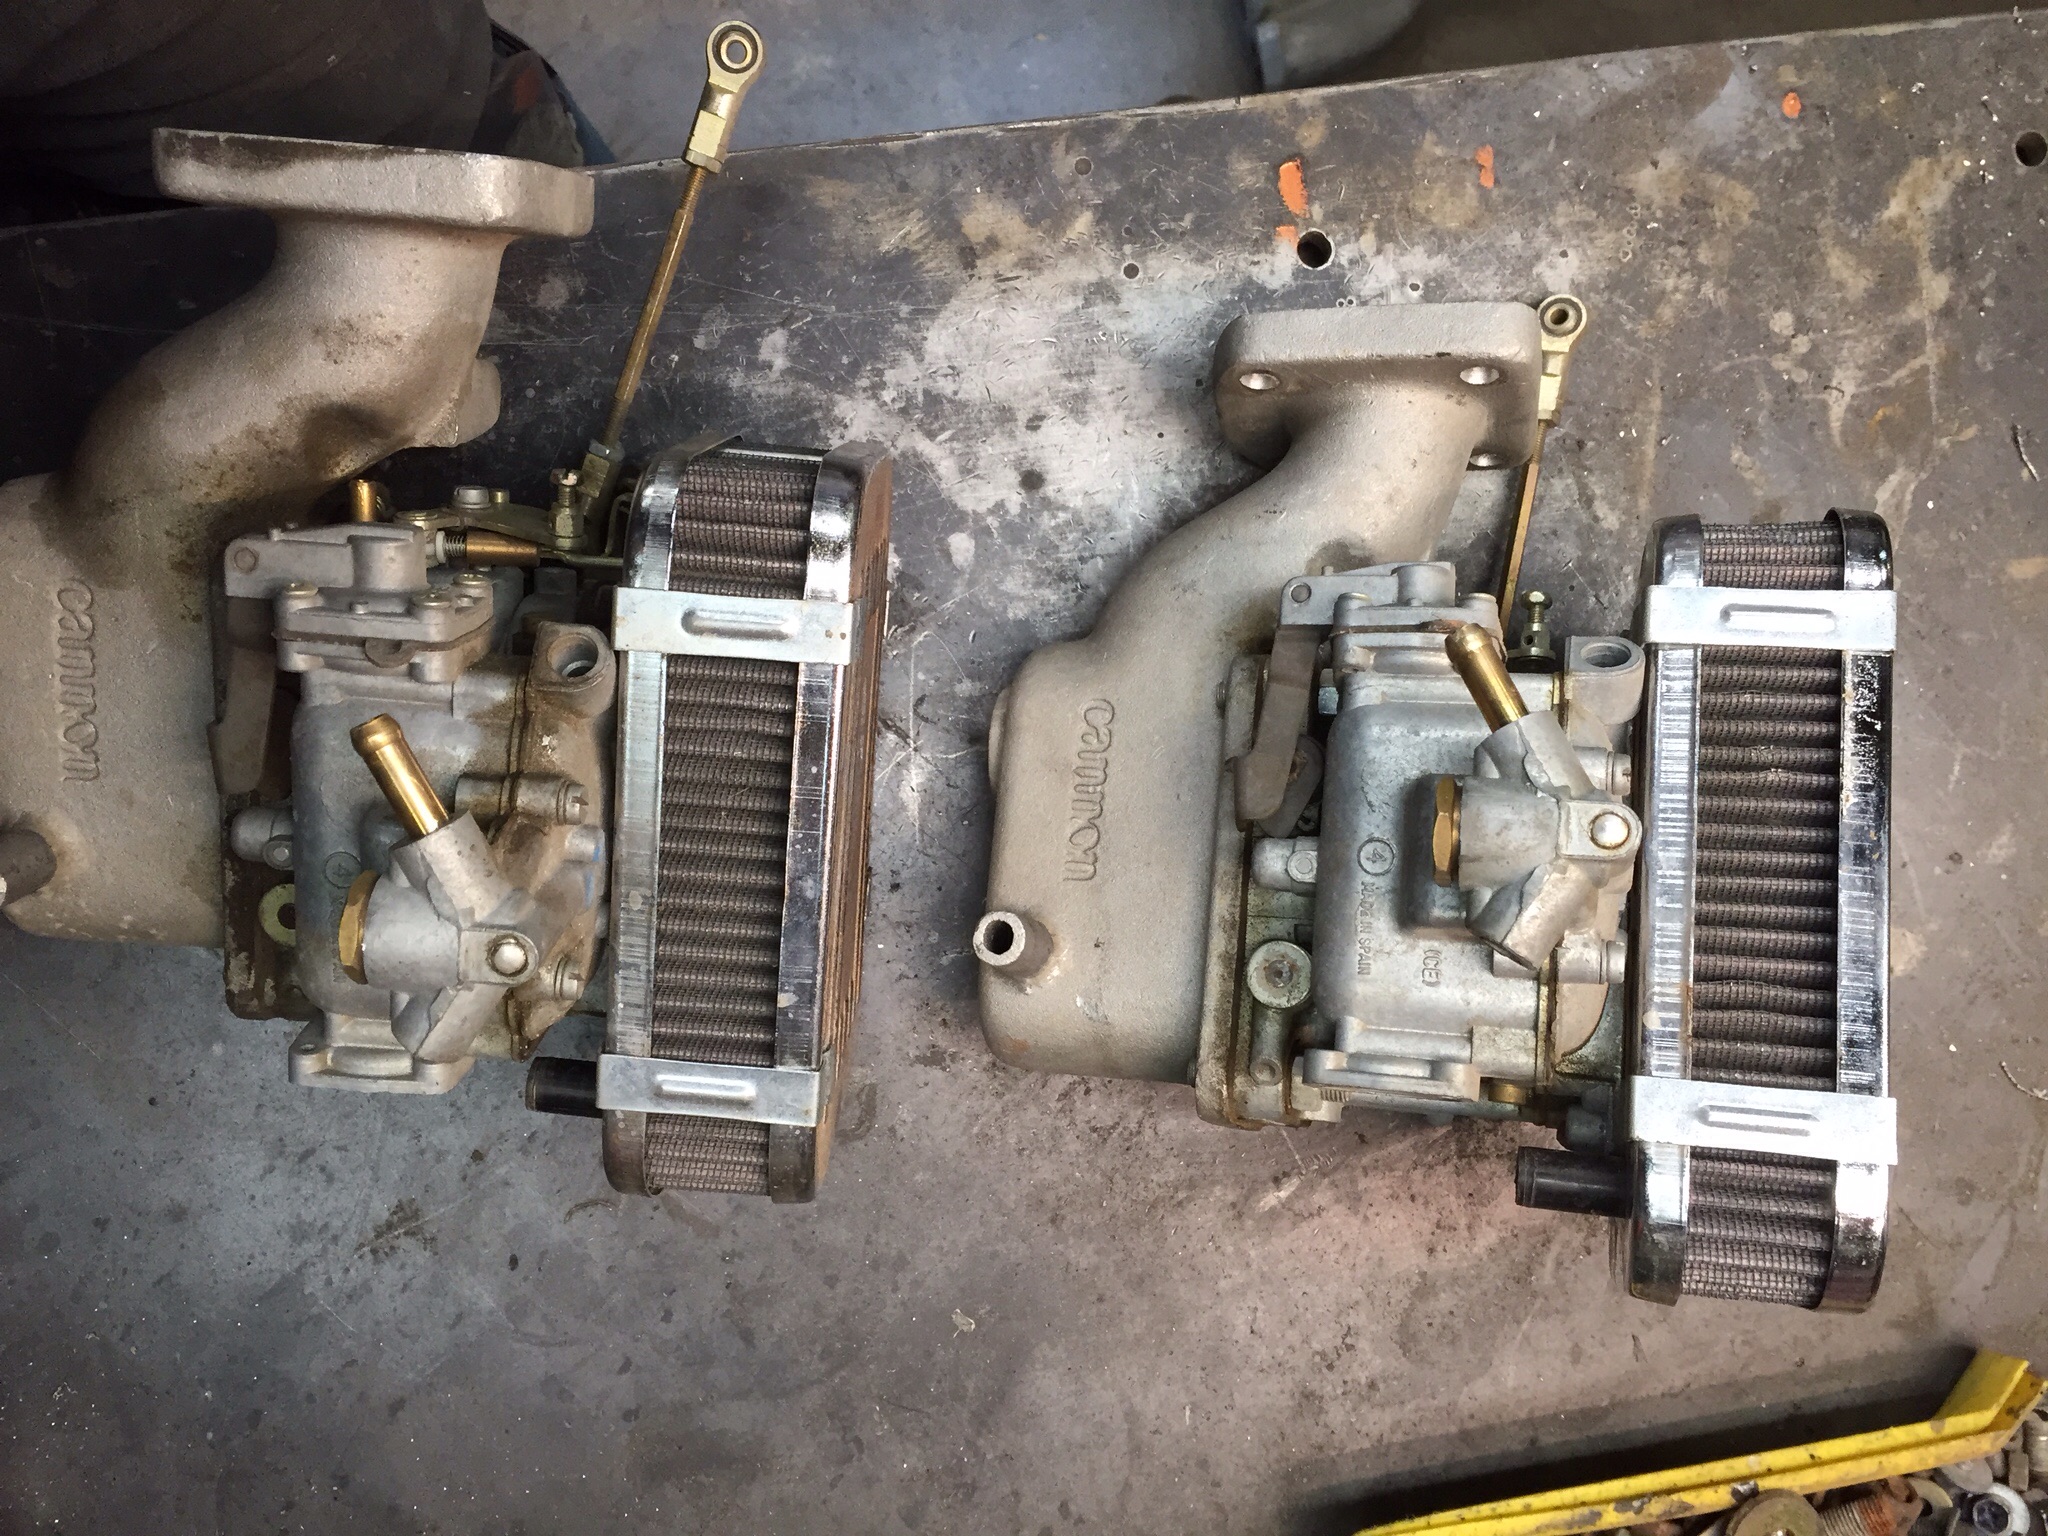
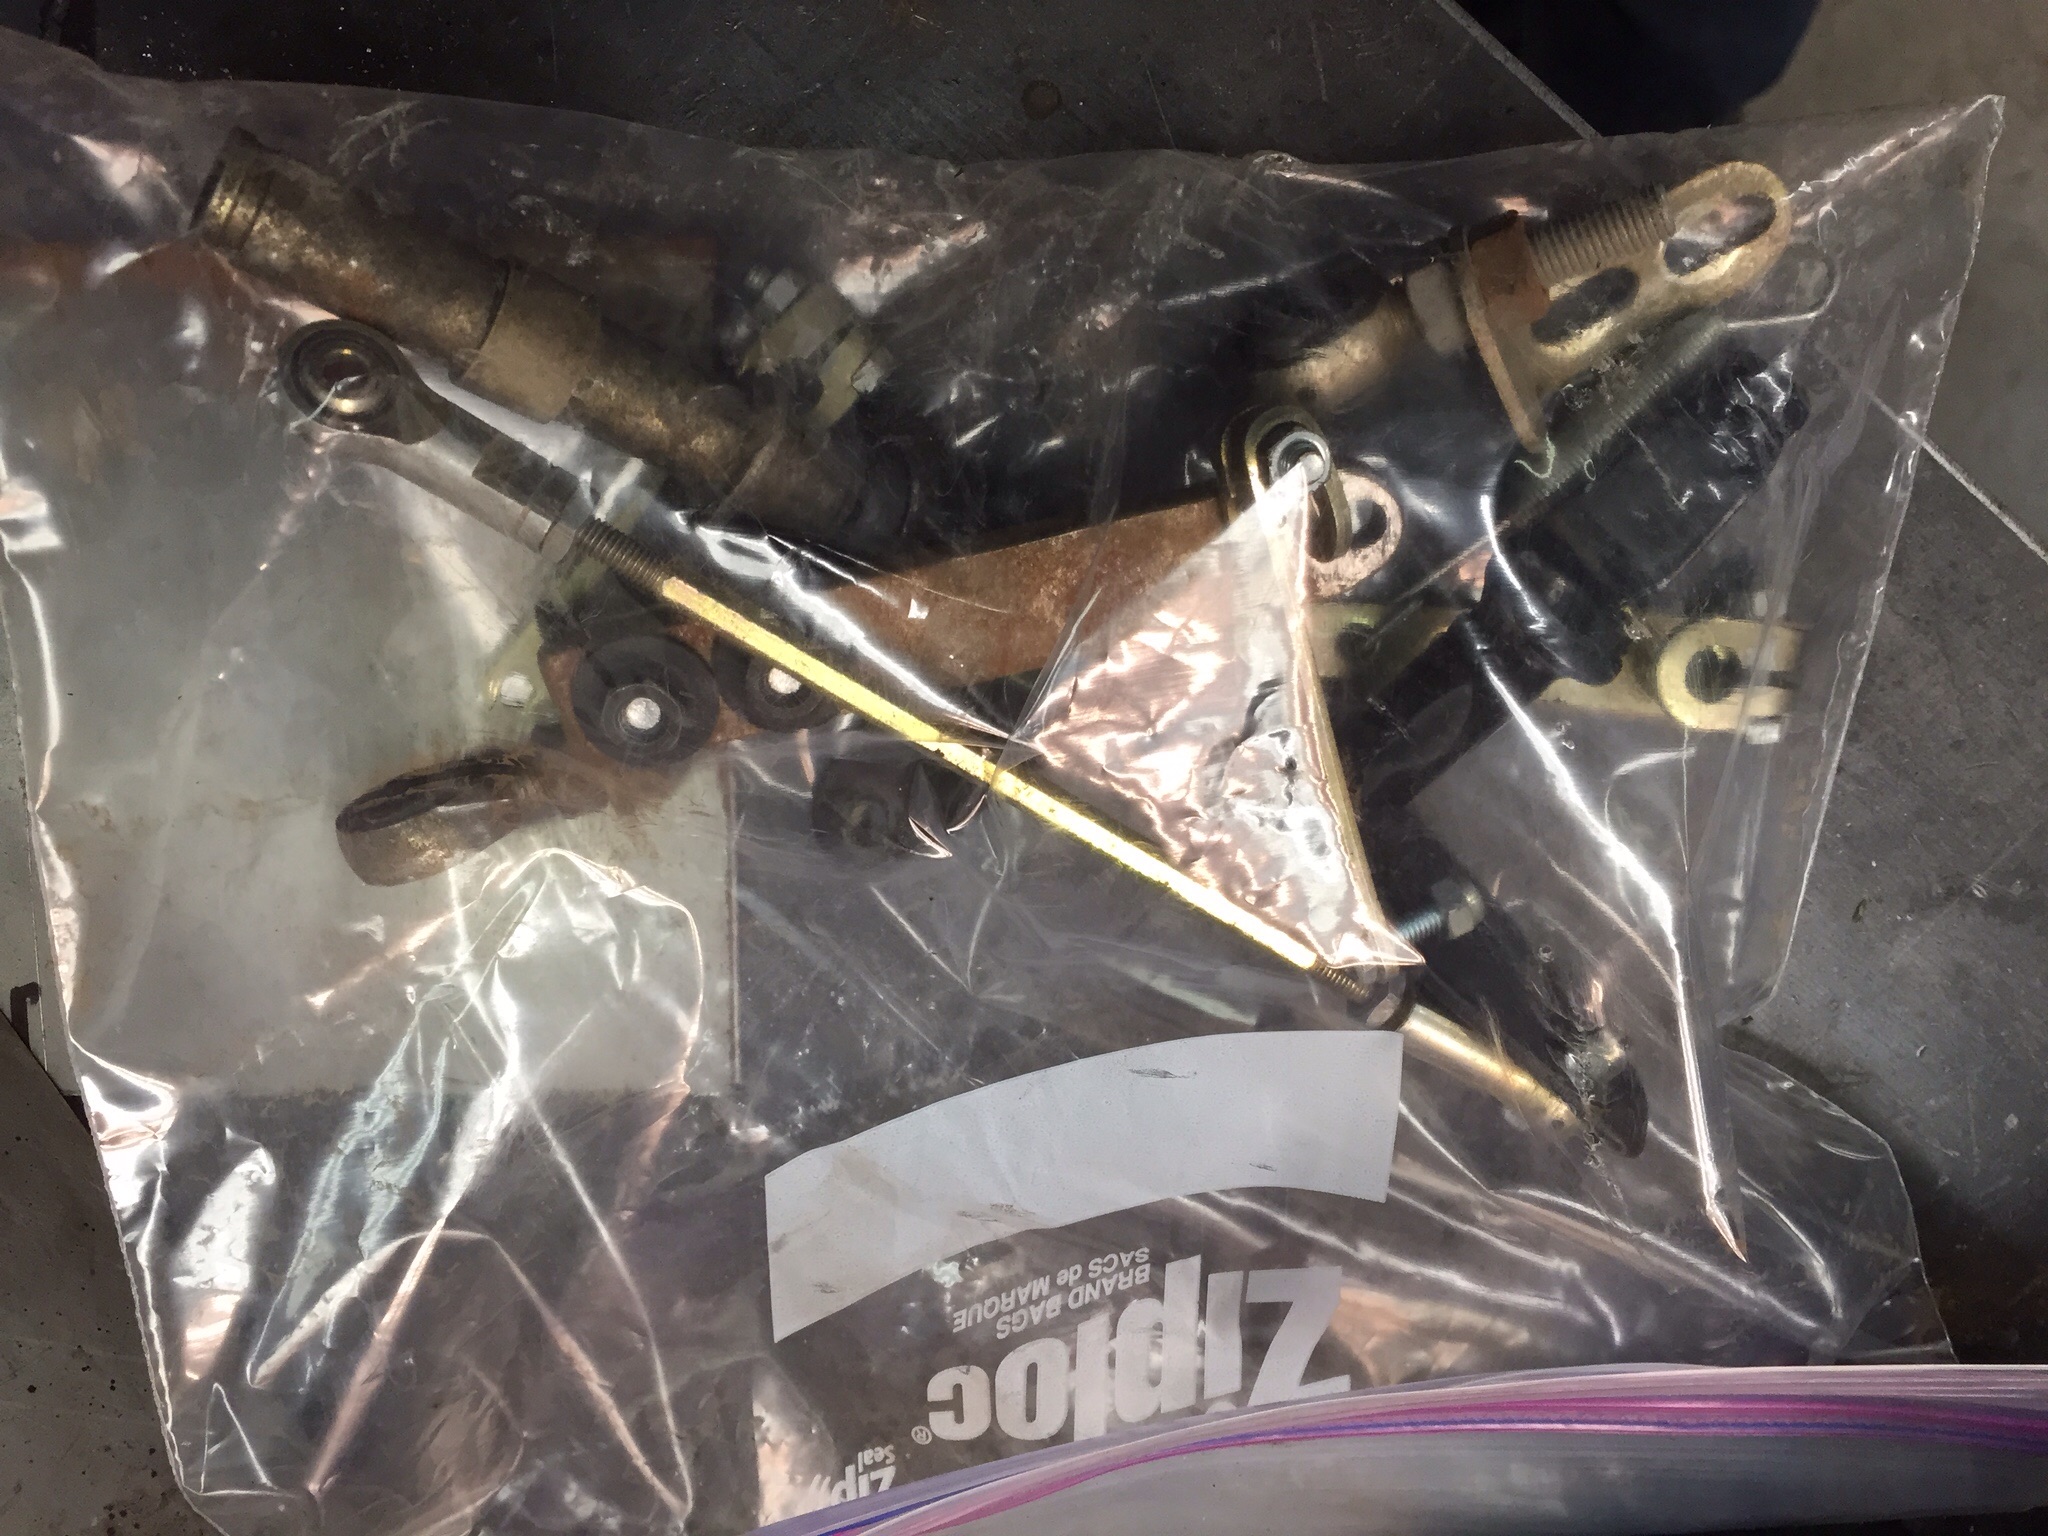
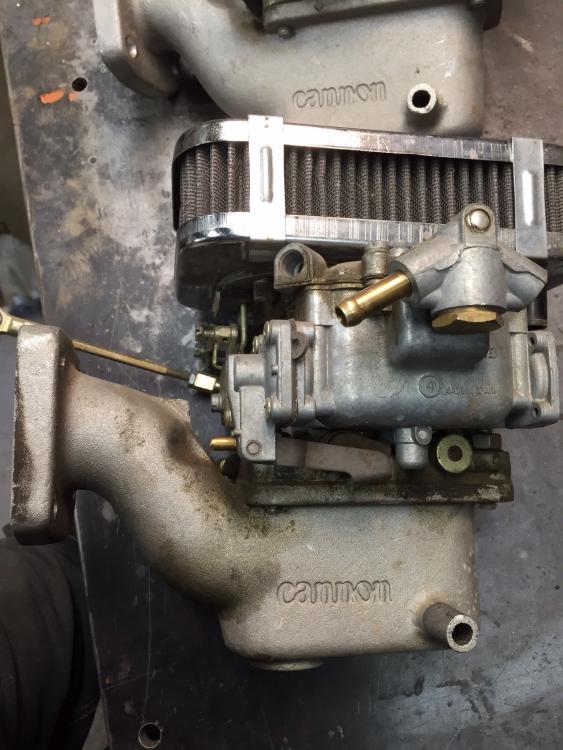
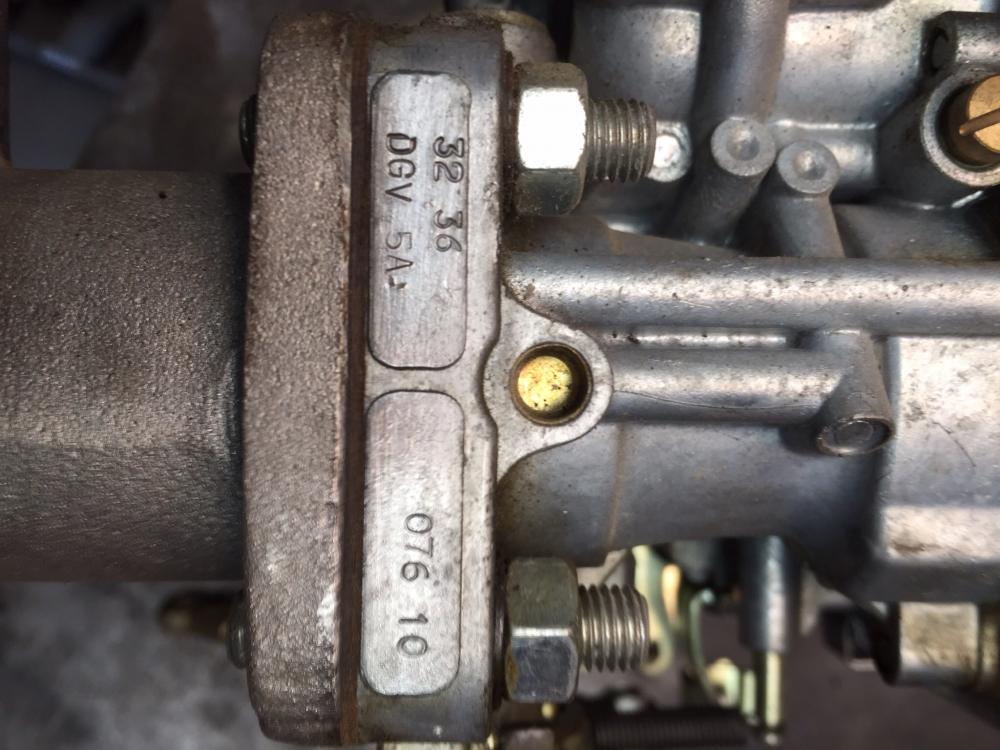
I have for sale a well tested and running (ok, was) pair of Weber 32/36 DGV and Cannon intake manifold adapters for the SU manifolds. Come complete with air cleaners and all linkage components. Came to me running on the 71 I'm now restoring. Mixtures were fine, and chokes were working as well. The engine was an N42 L28 with early E88 head totally stock for reference. Everything is pretty clean so the mileage is reasonable. Best offer situation. Asking $300 USD.


-
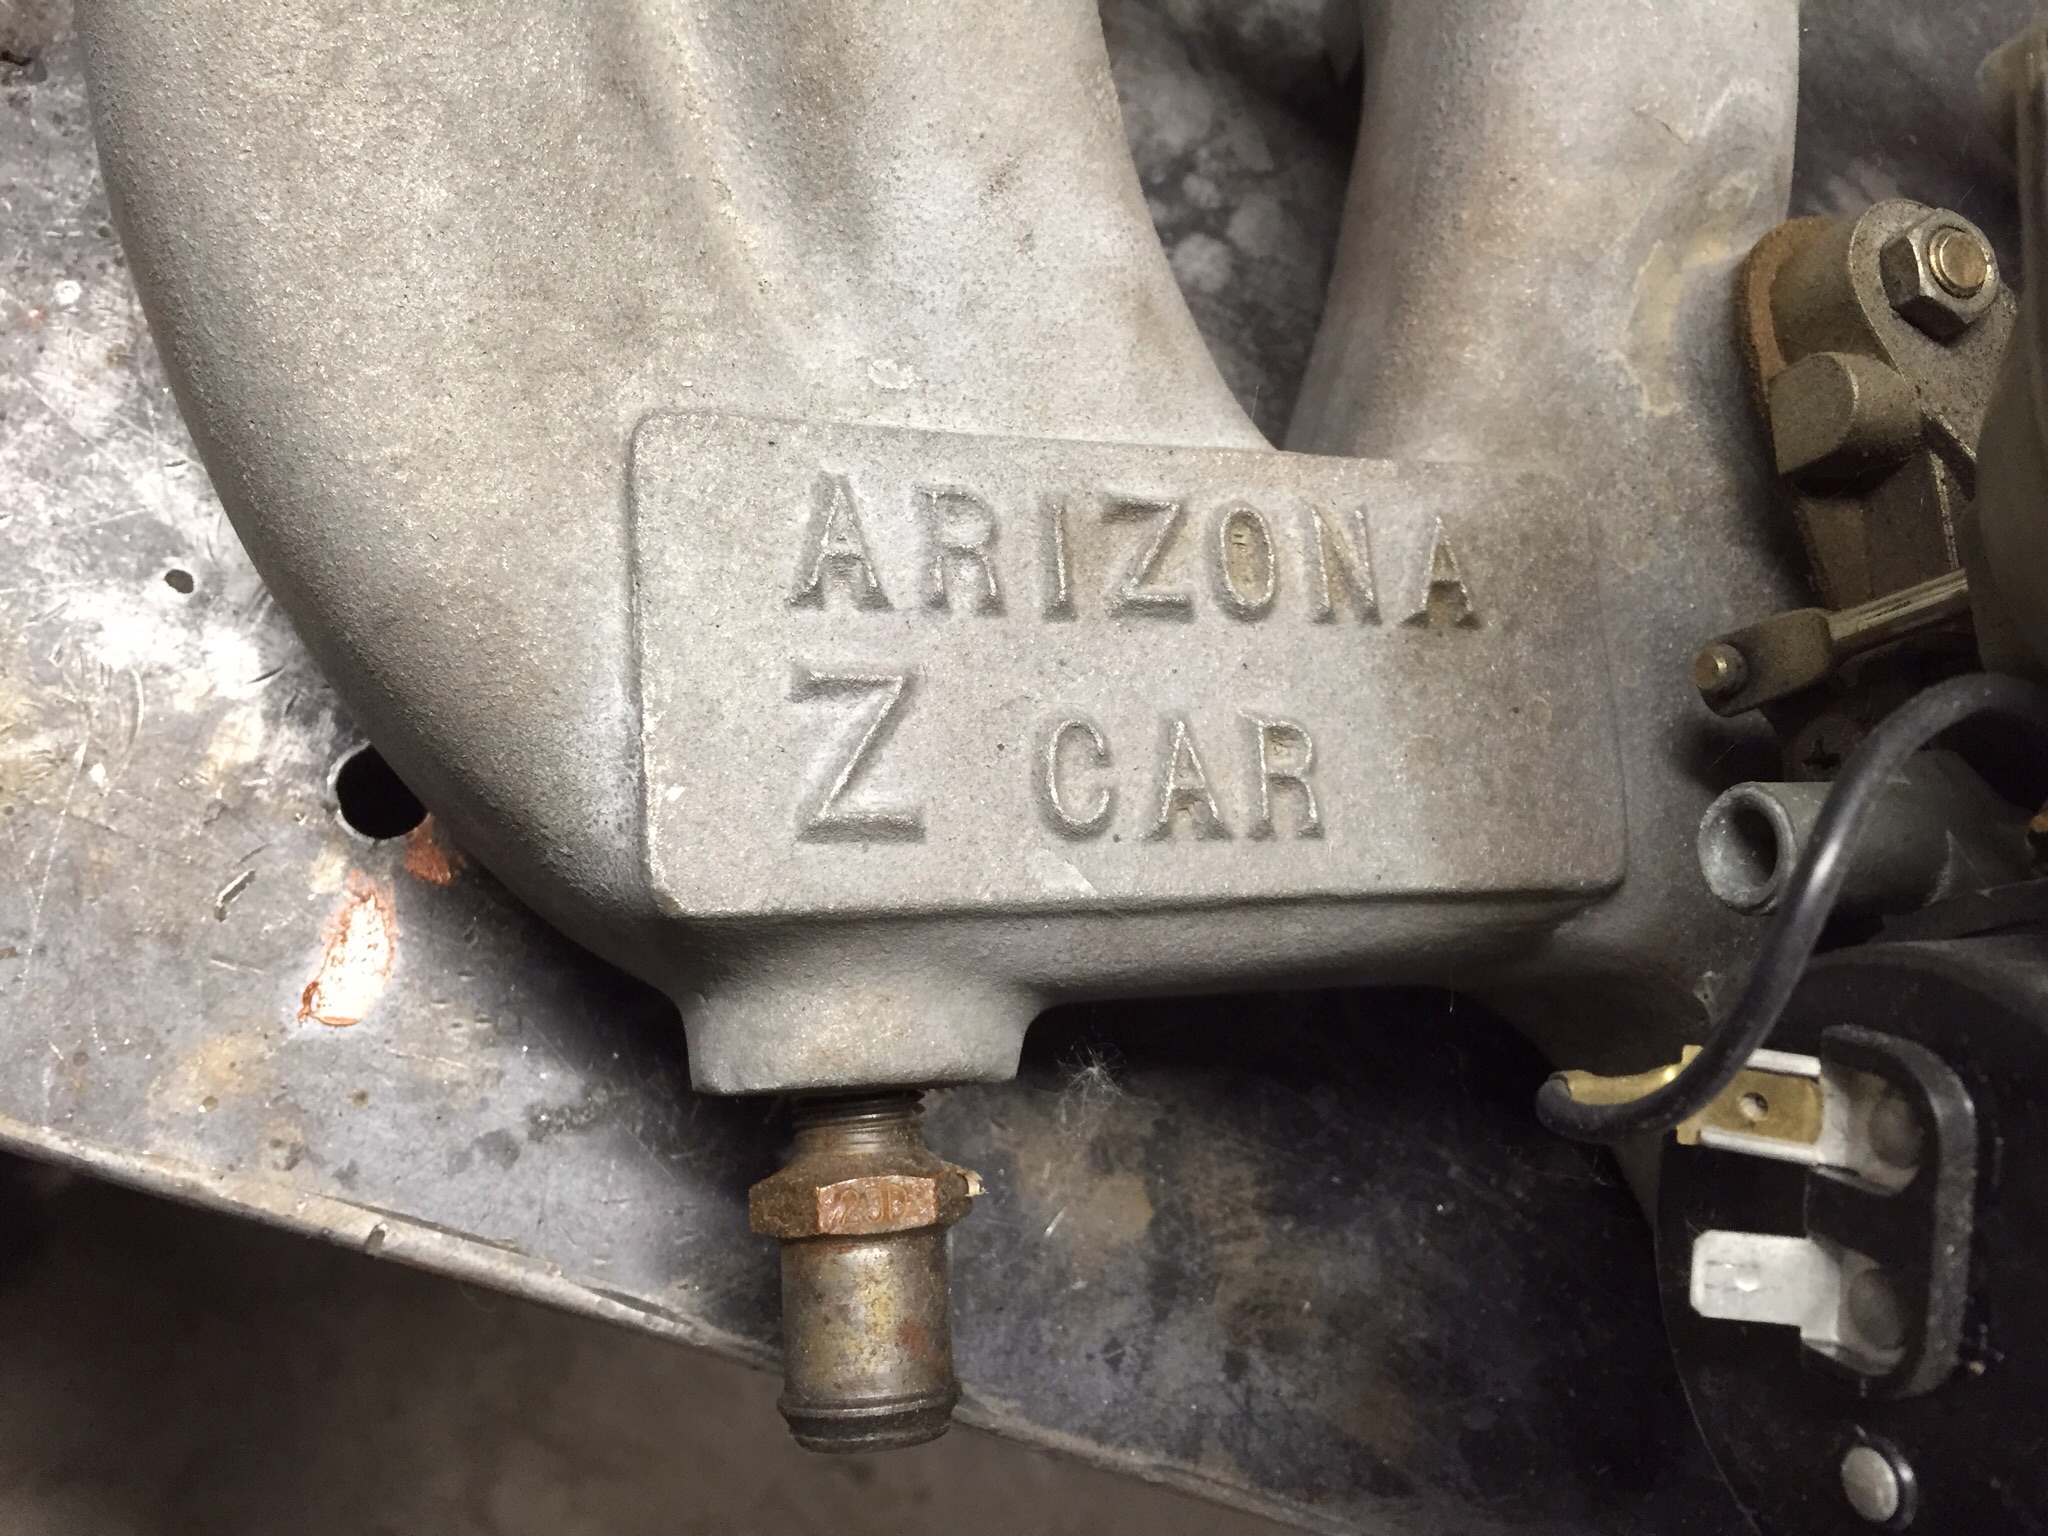
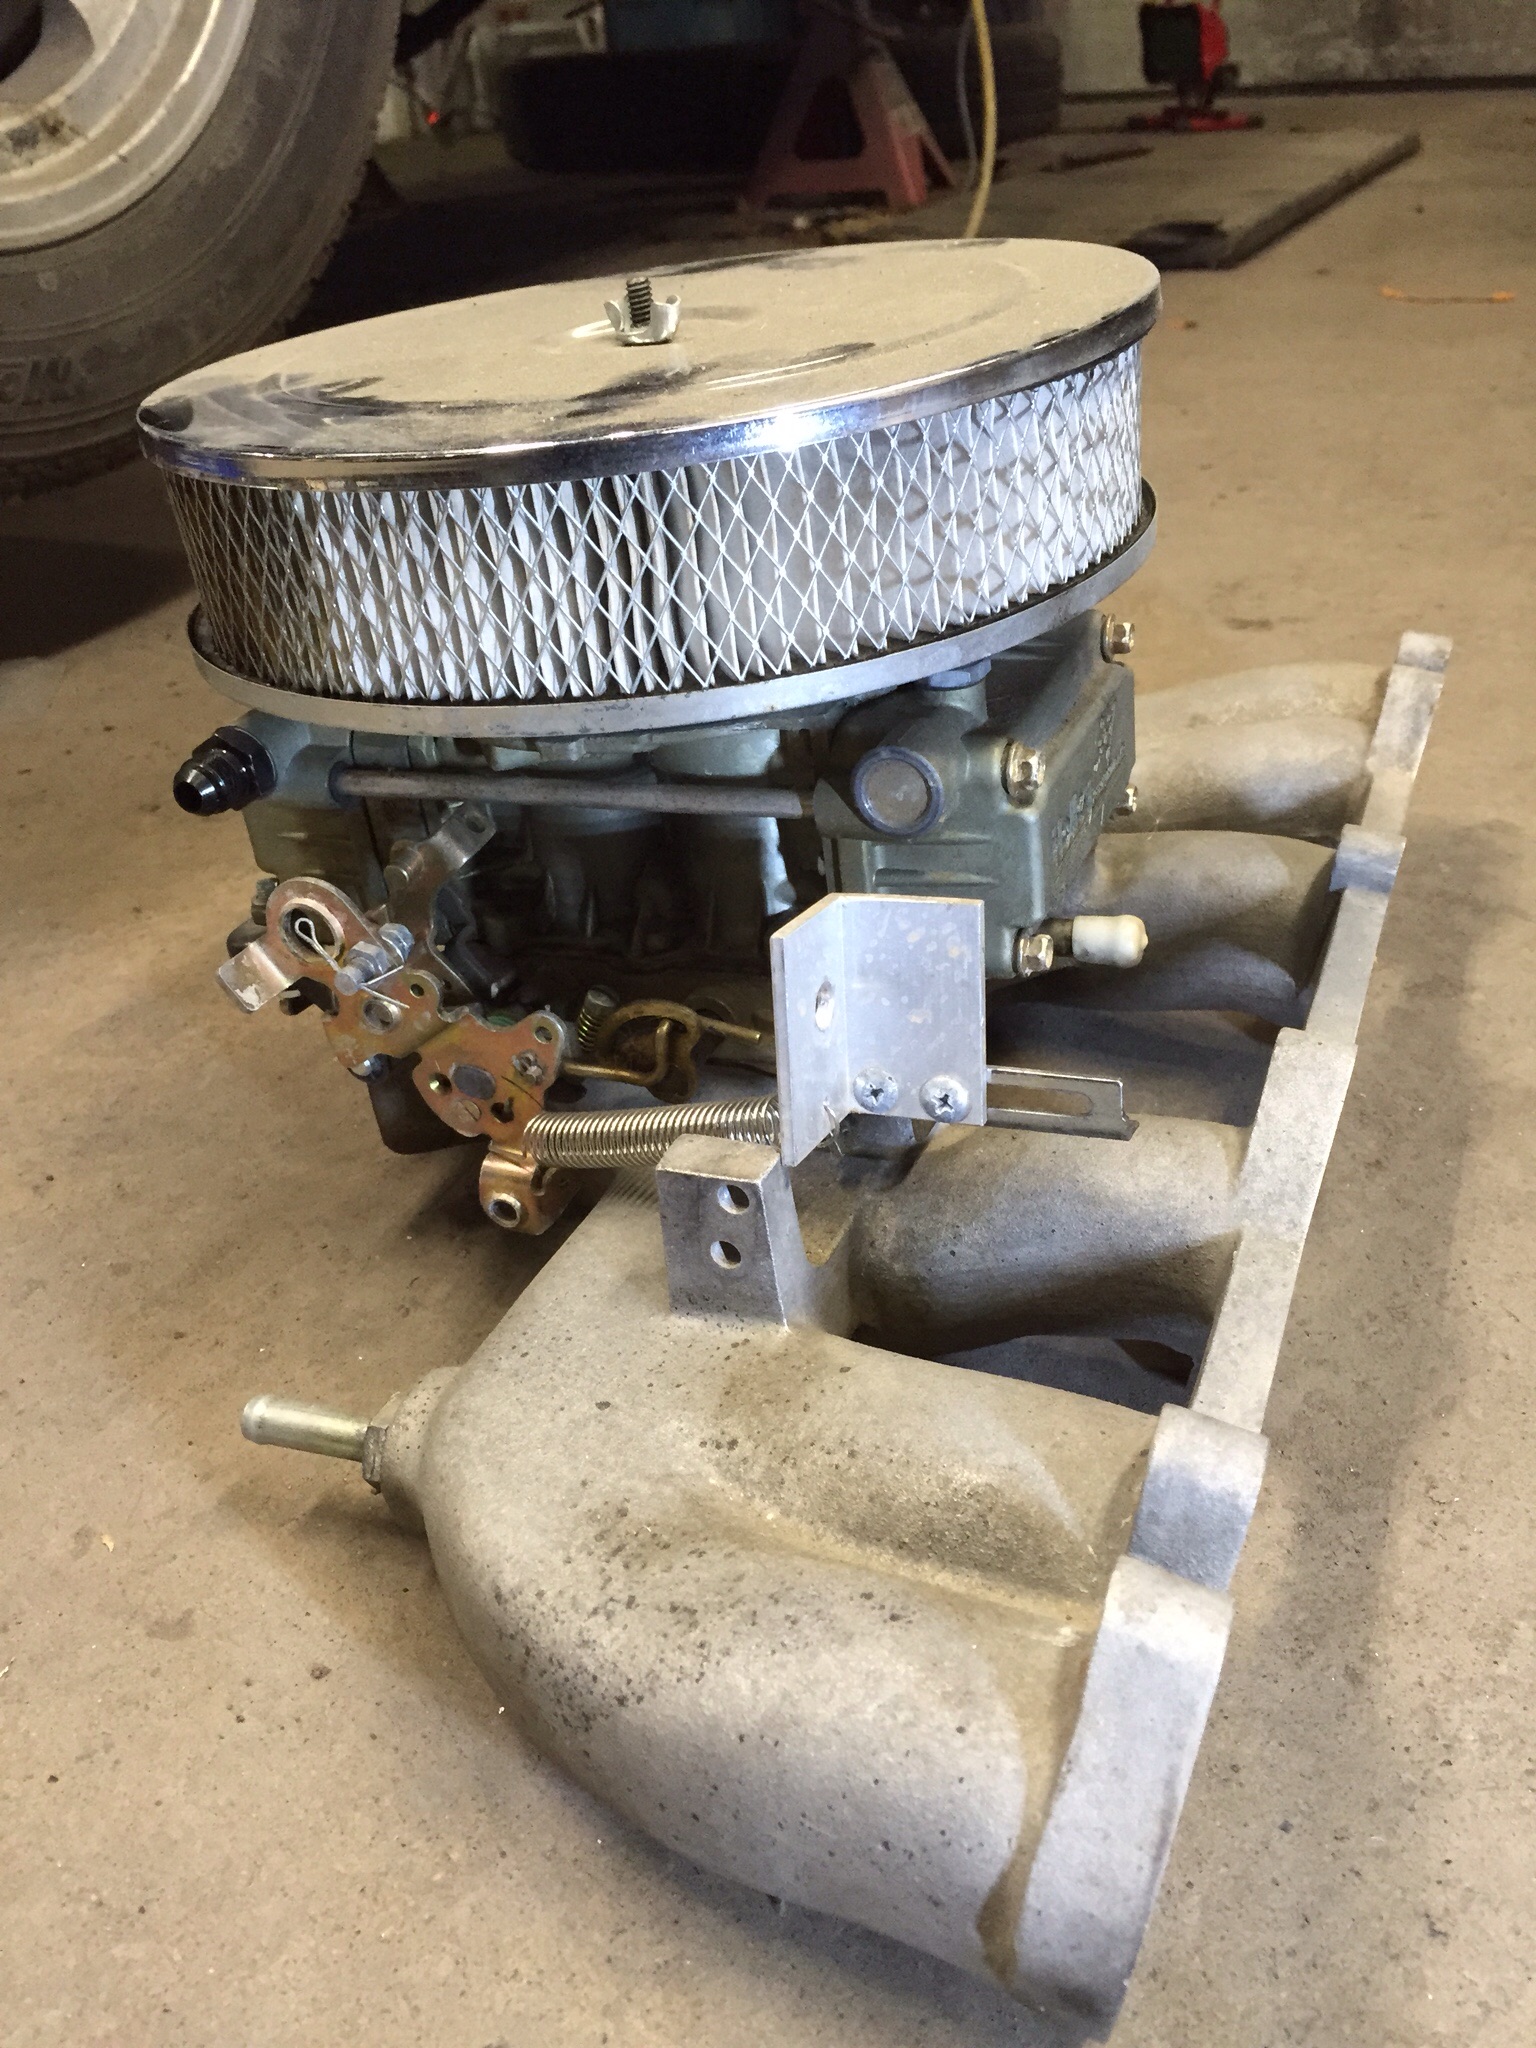
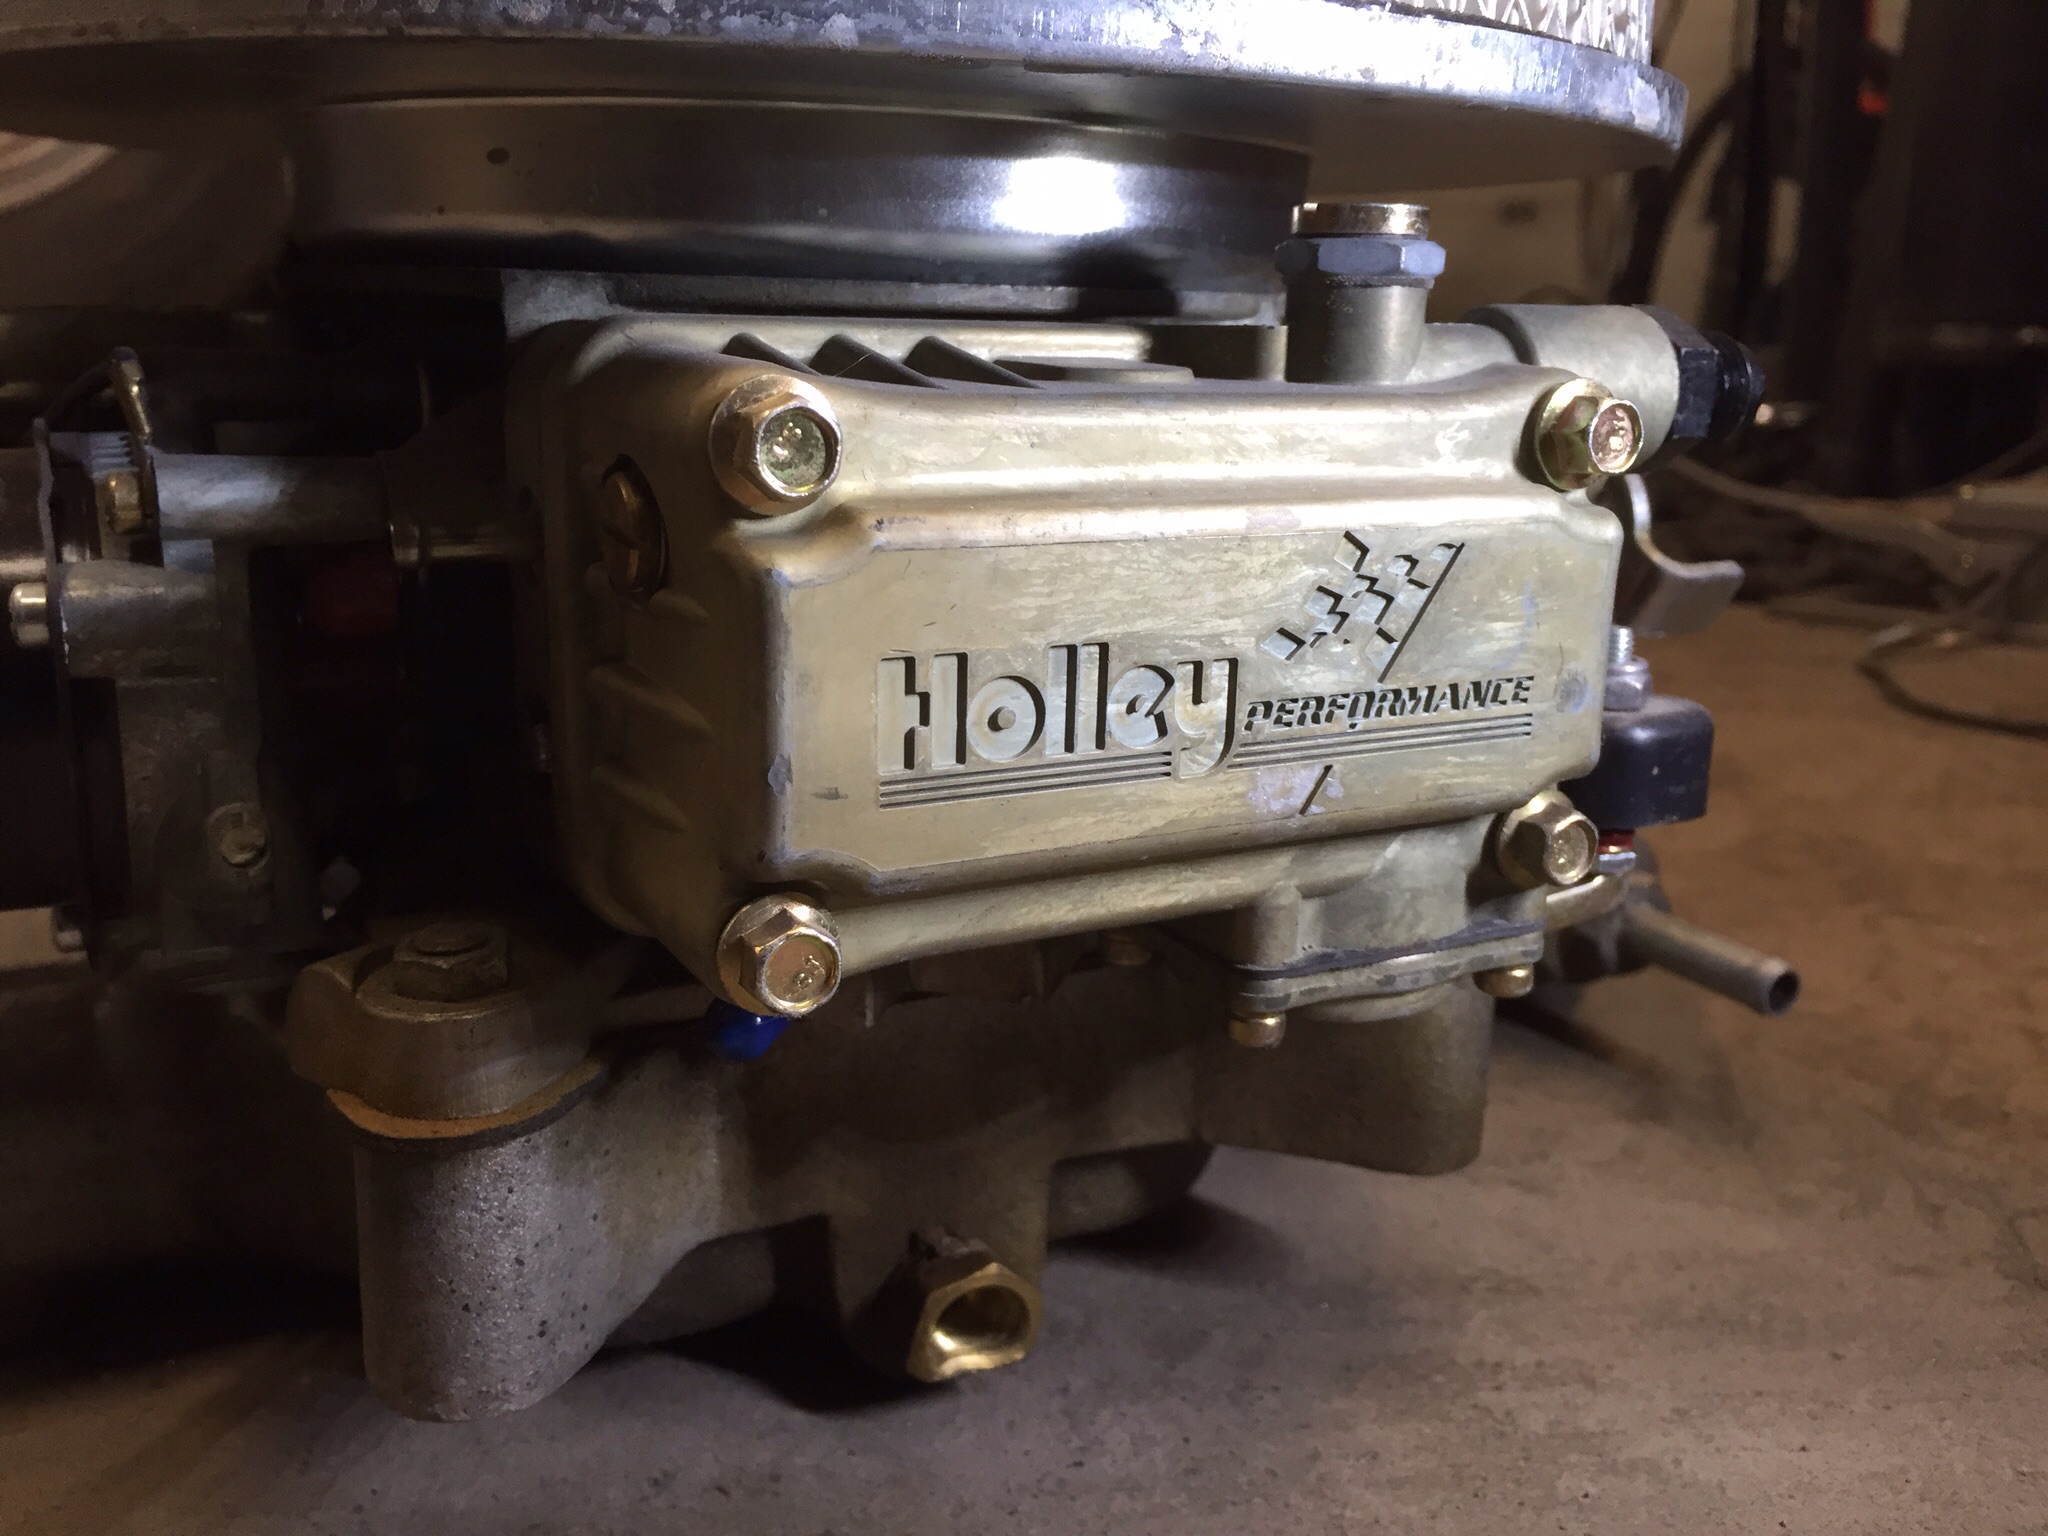
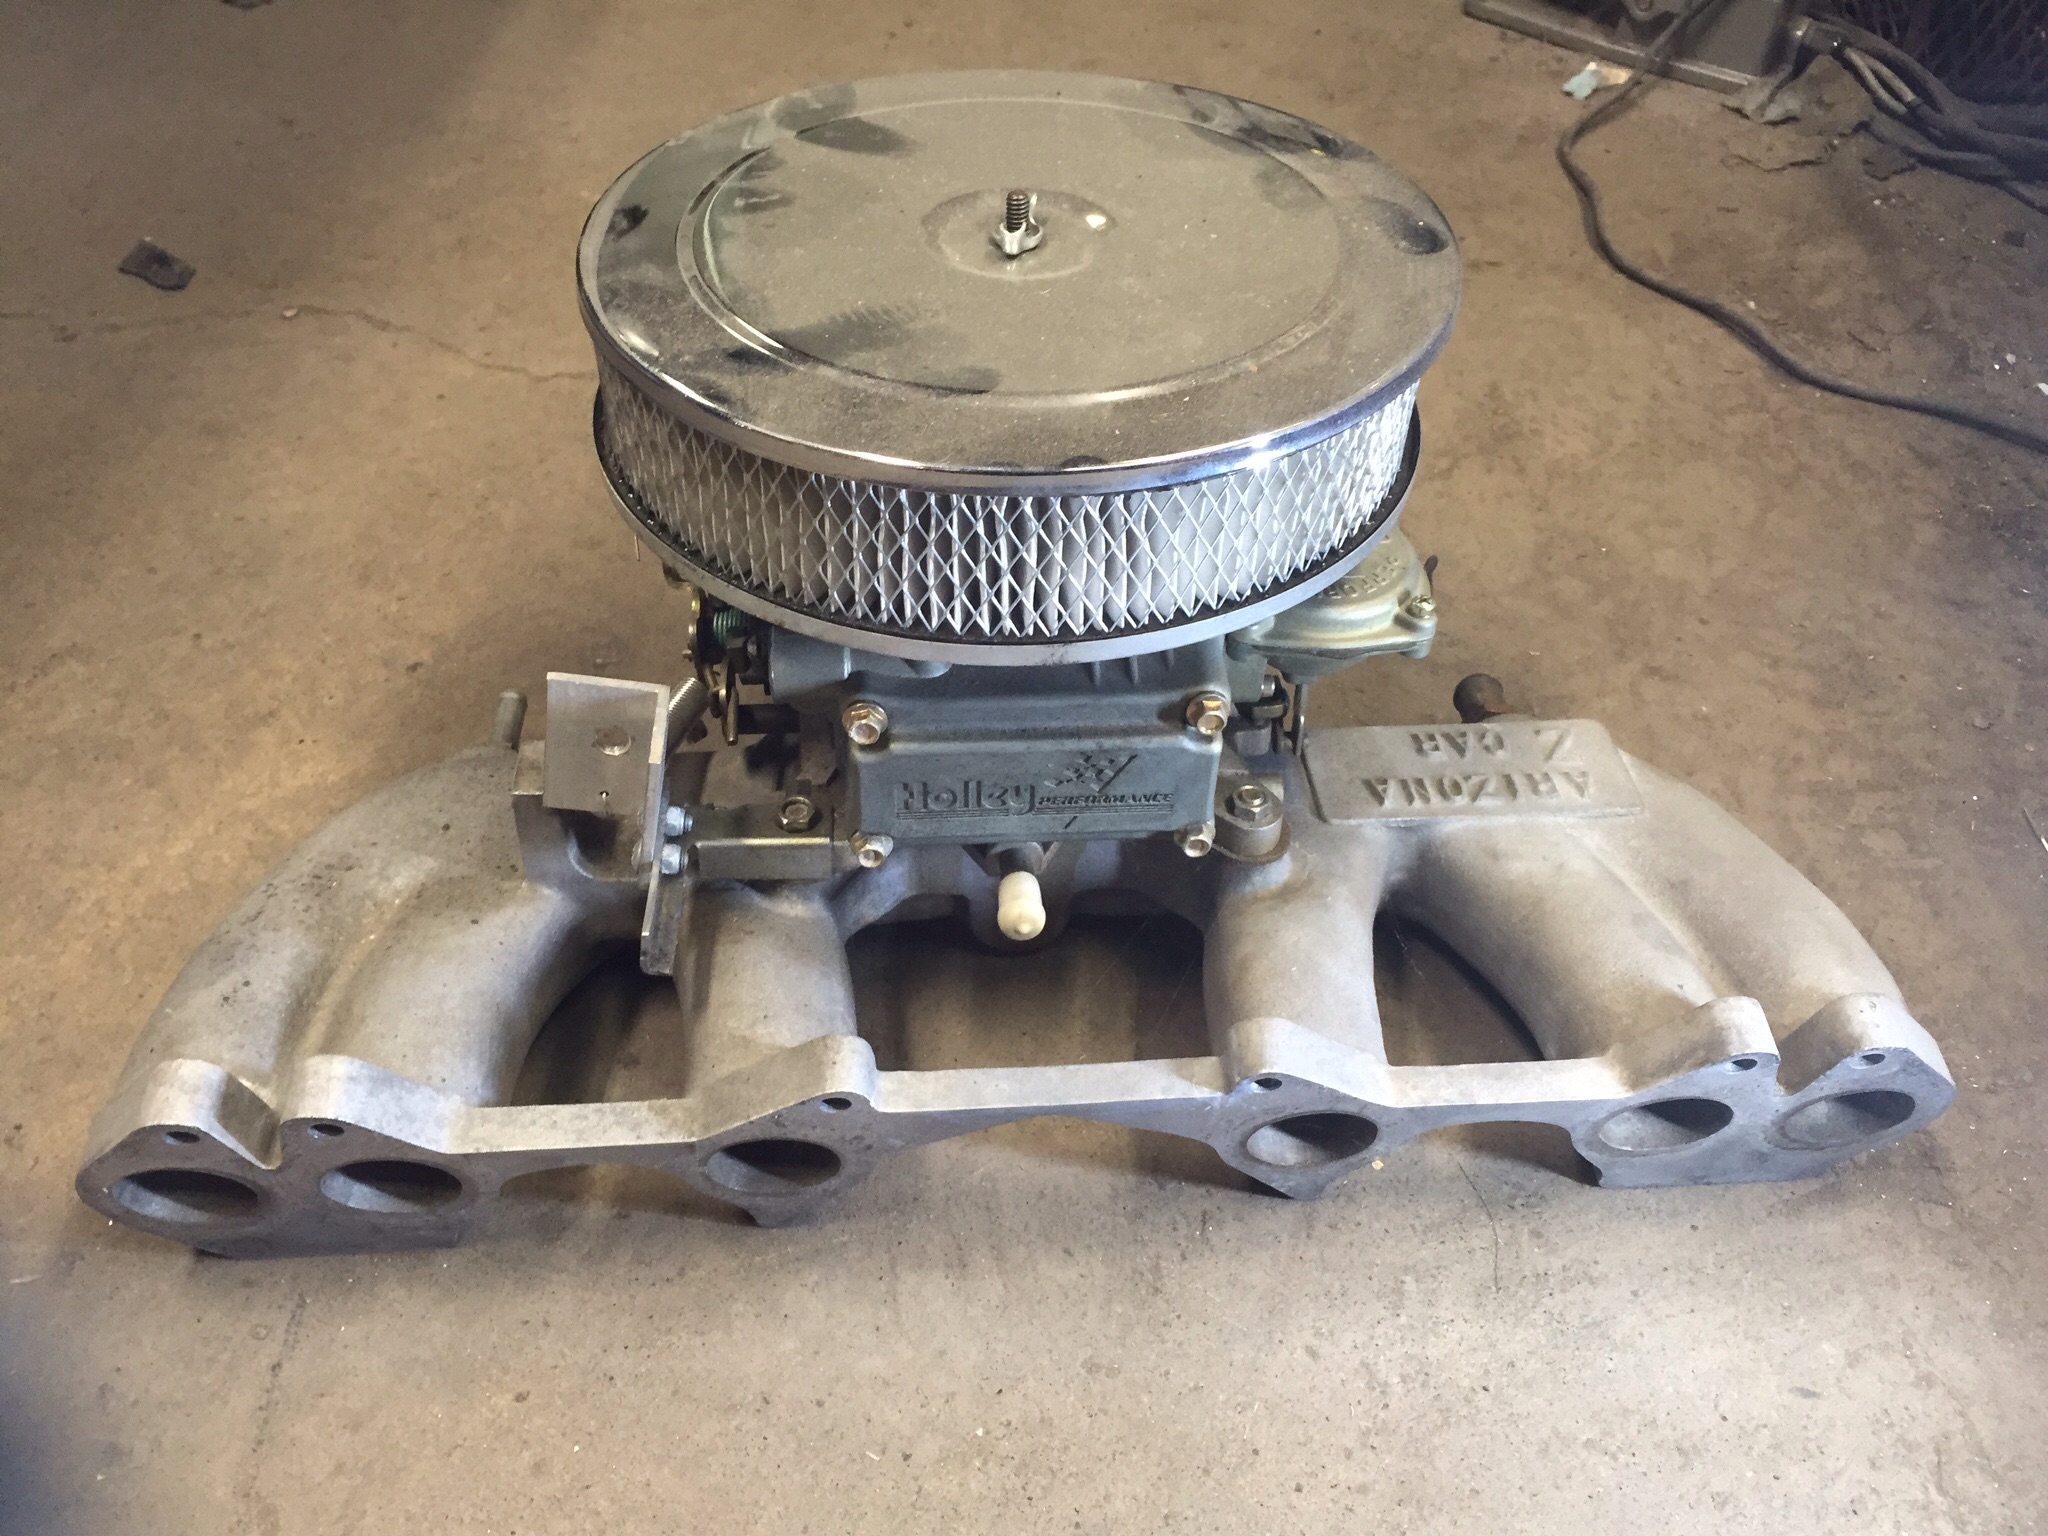
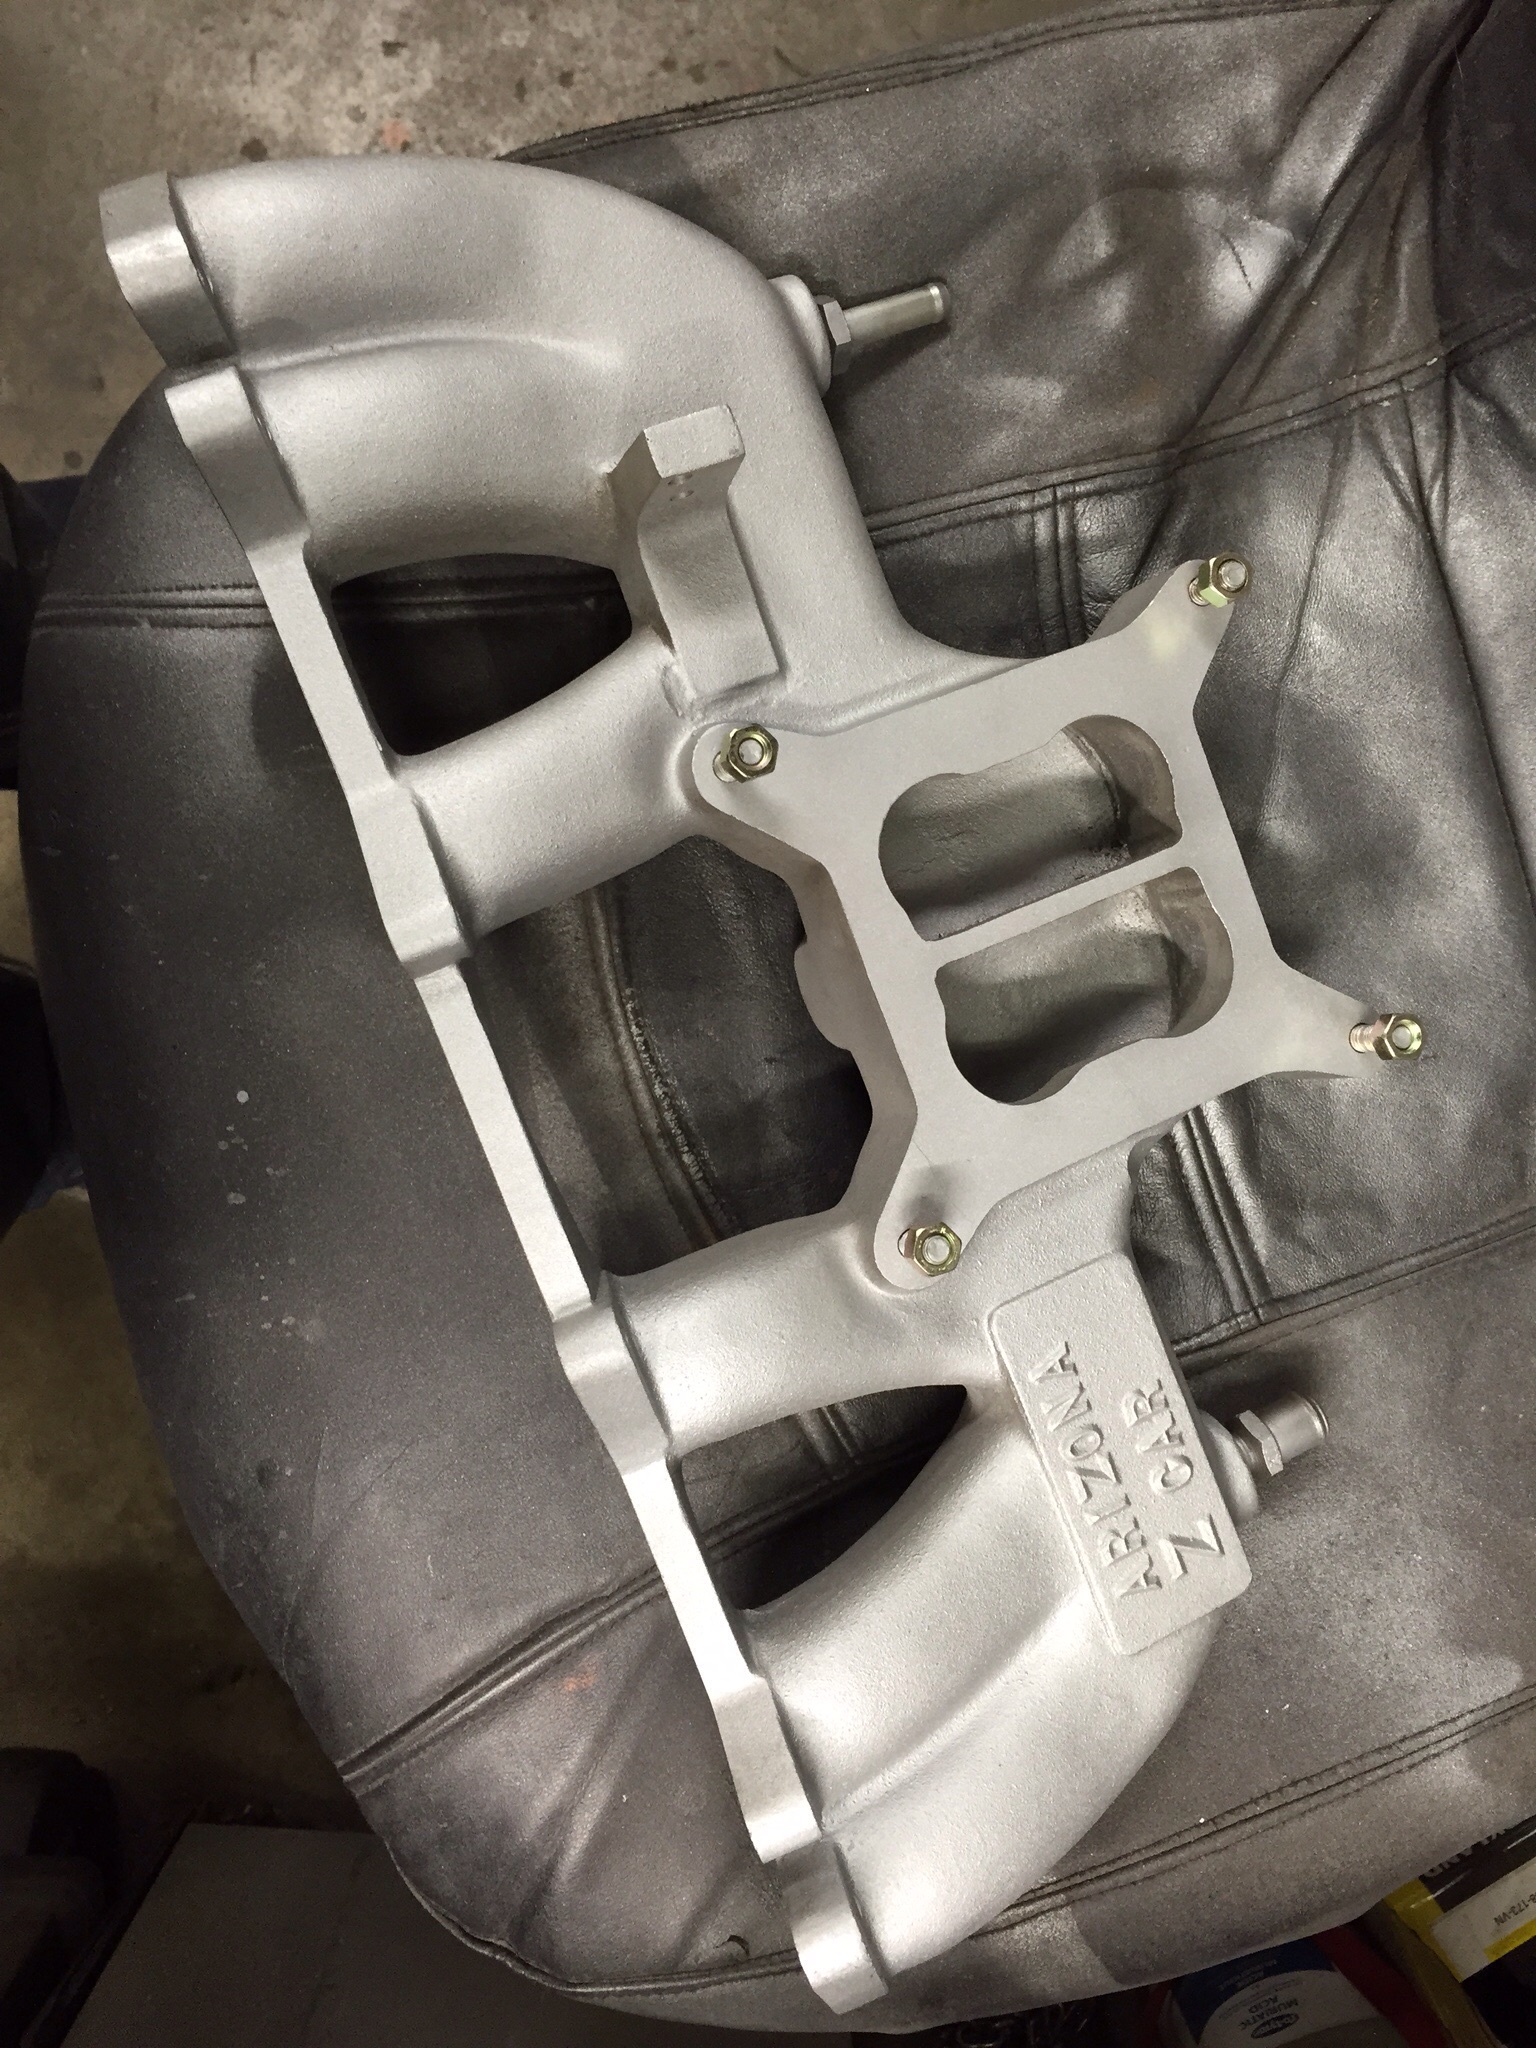
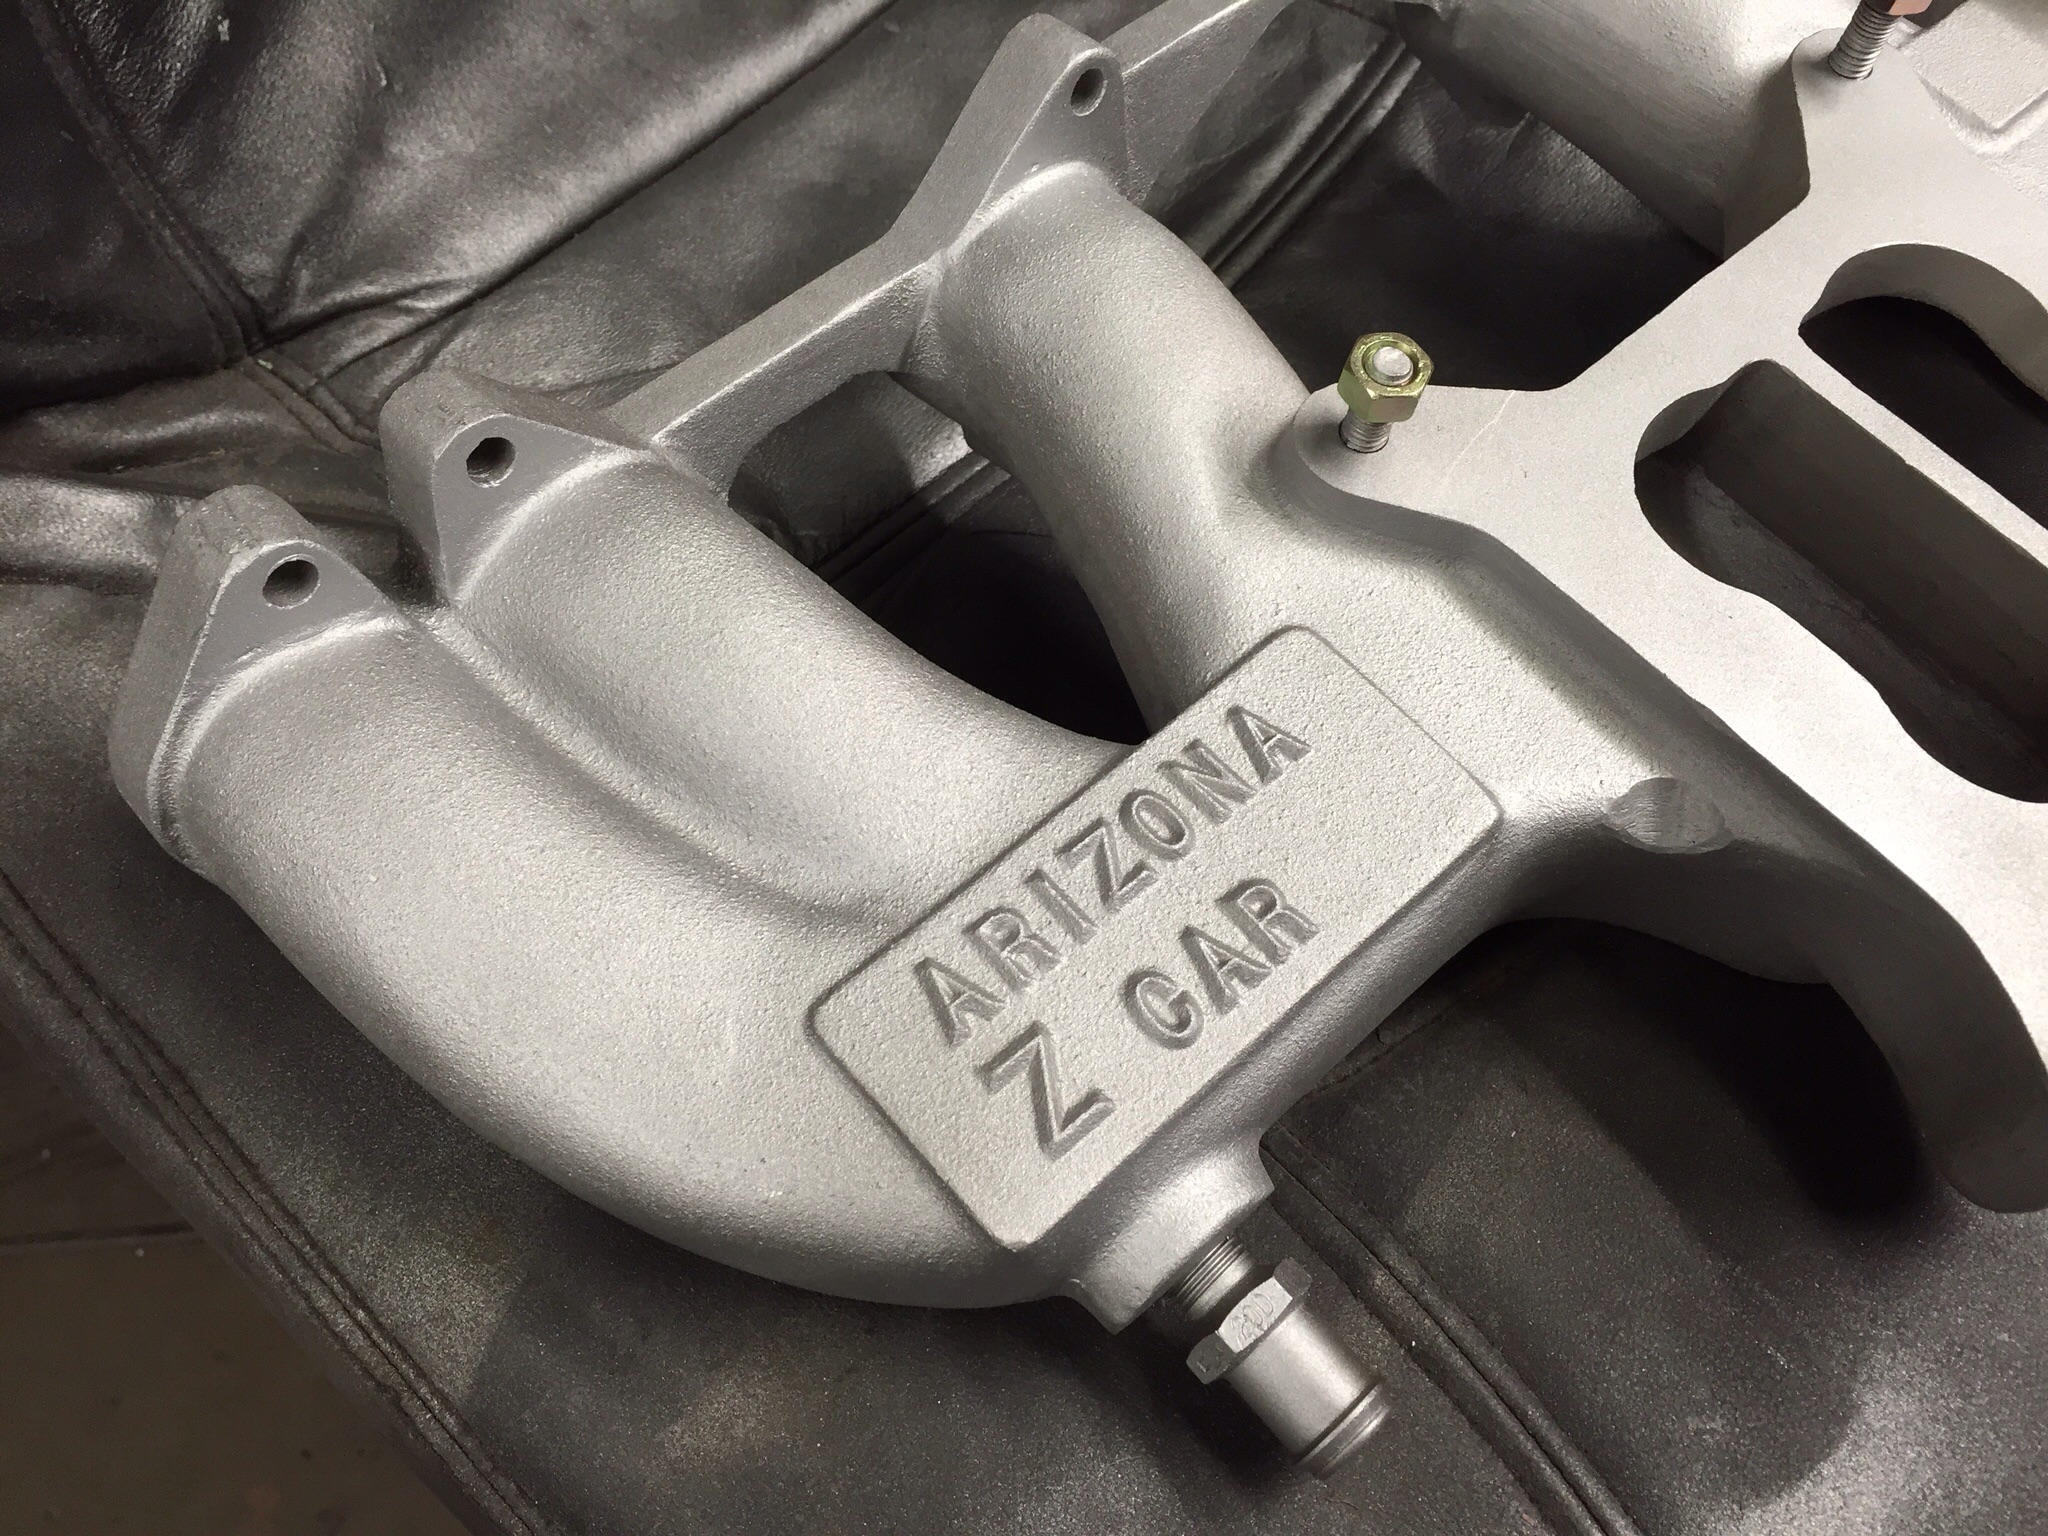
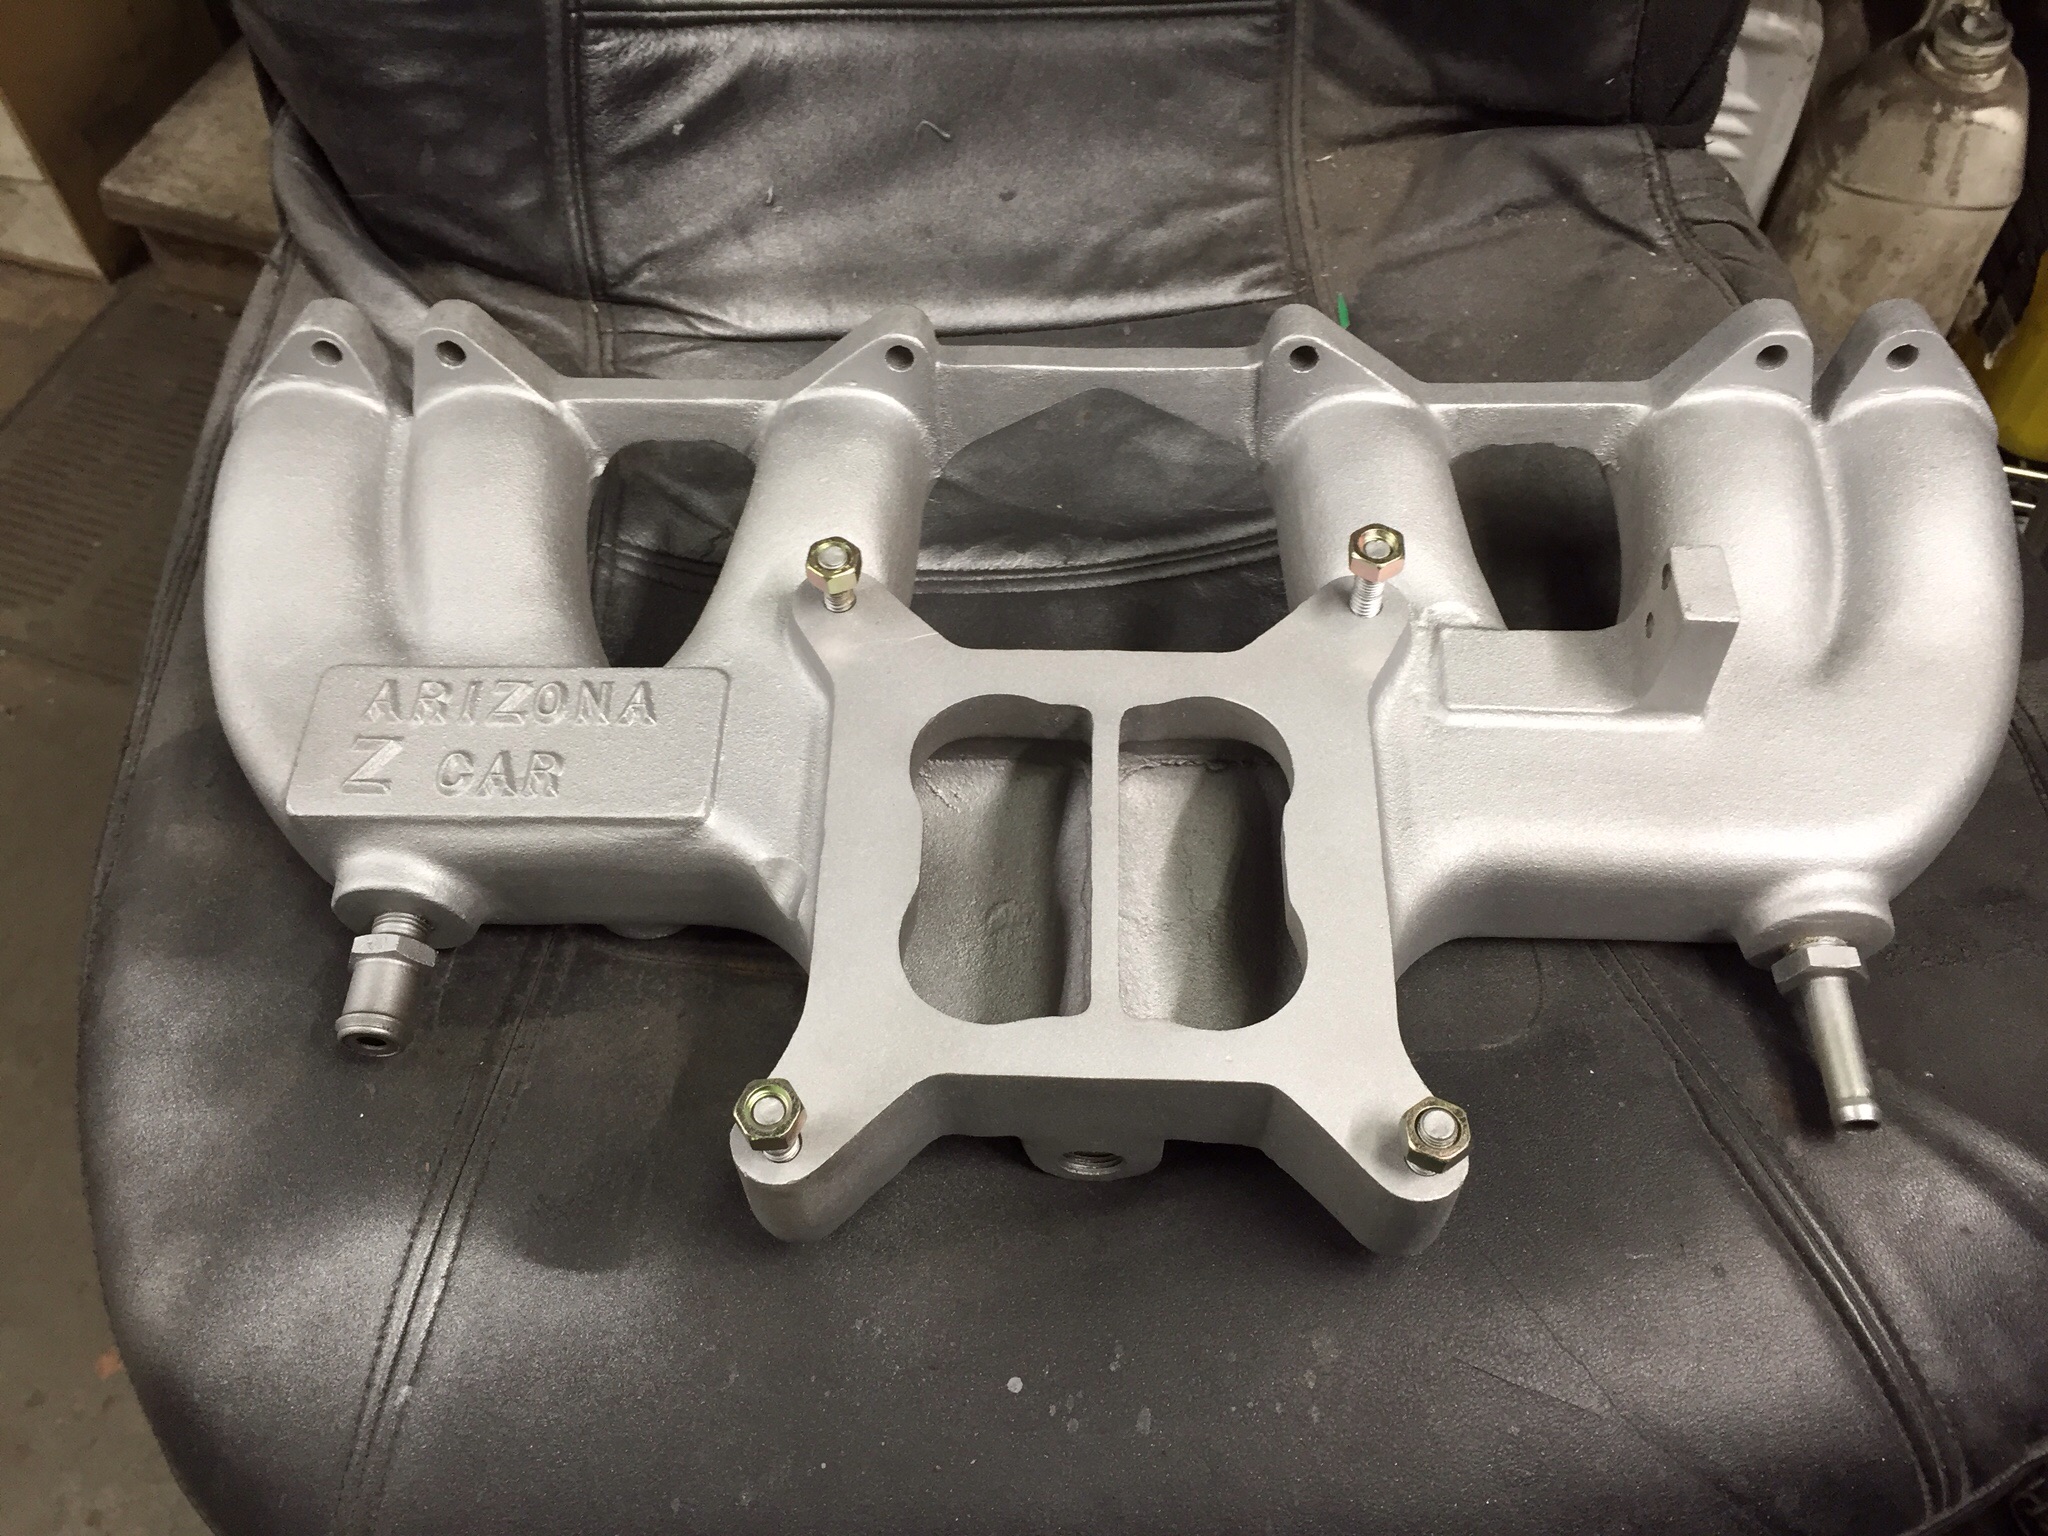
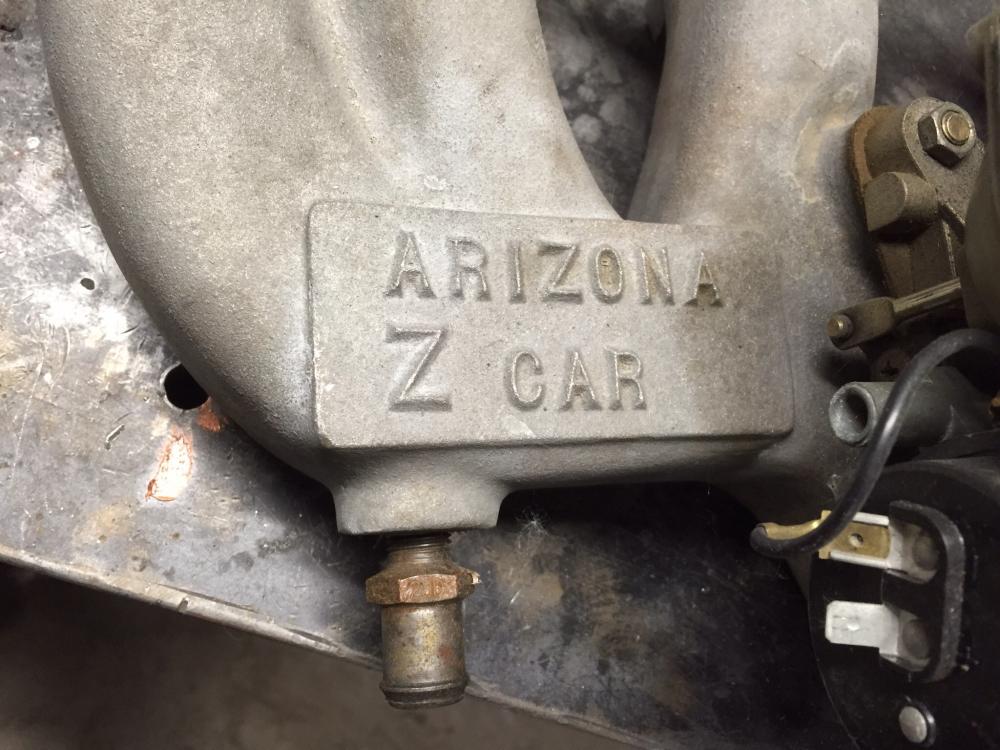
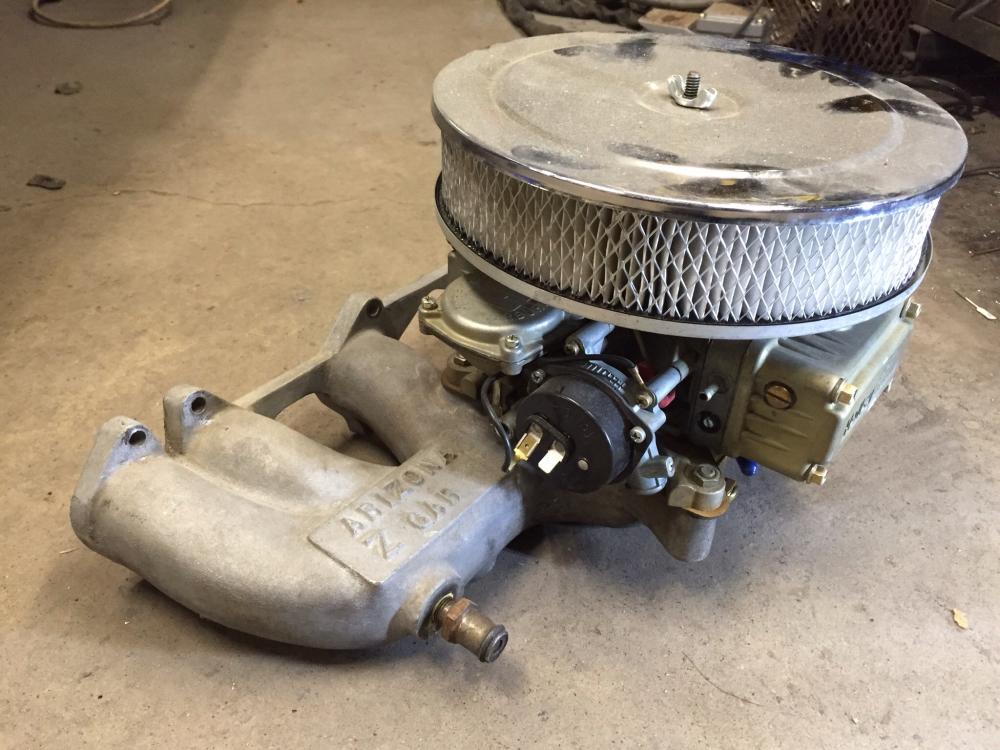
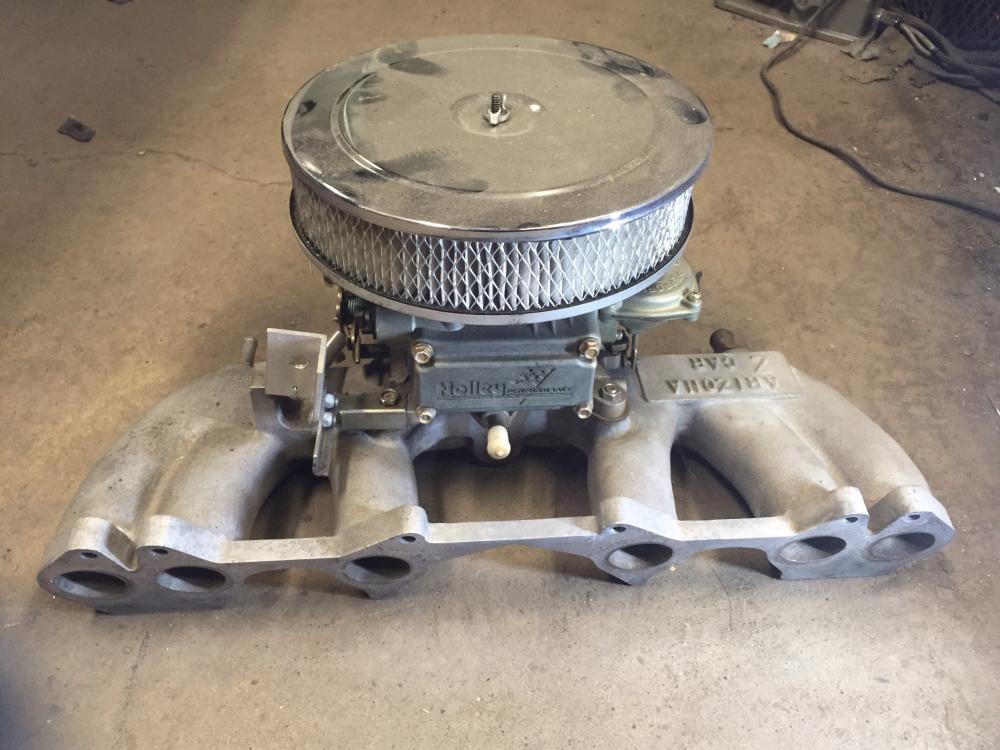
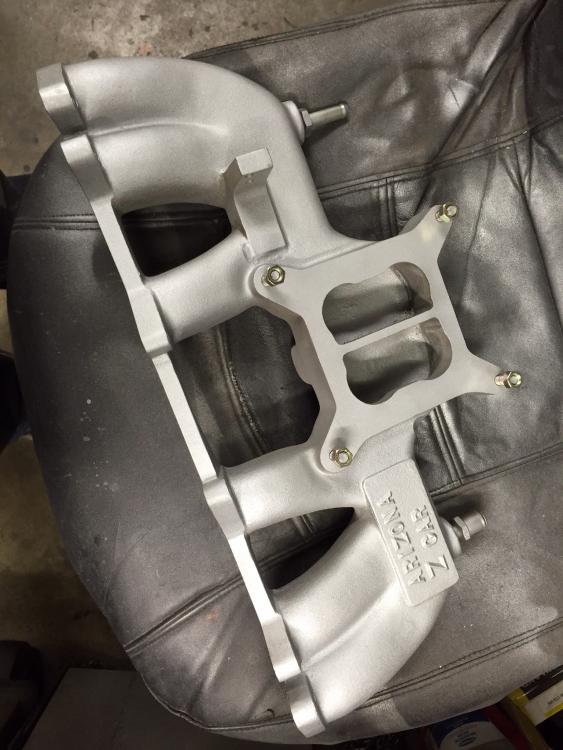
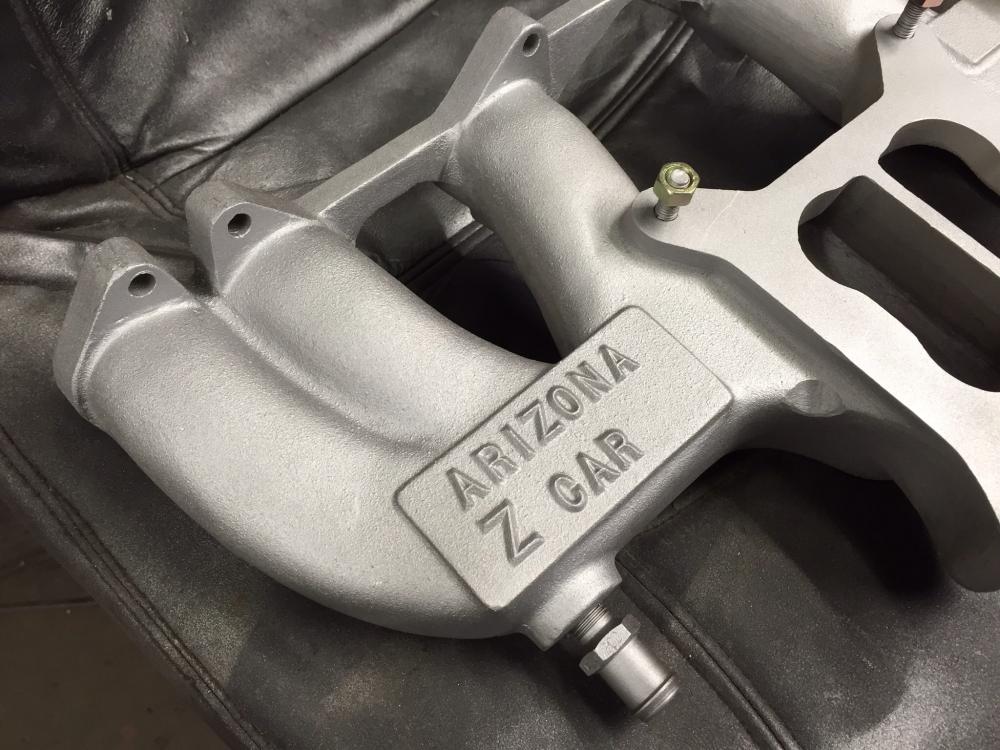
I have complete Arizona Z Car intake/Holley 390 setup for sale. This was removed in favor of a "better" (don't start...) Z therapy SU setup. Each to his own. Very low mileage on these components, in the order of 8-10K. Was setup for a cable throttle conversion. I can sandblast and paint the intake to make it look new if requested gratis. $350 USD or best offer. Feb 26. Carb and Air cleaner now sold. me at z240@shaw.ca for best response. Pics of intake sand blasted and painted included Feb 28 2016


-
The 280 M-bar is thicker and wider than the 240 bars. Definitely heavier duty. The holes for the R200 mount studs are larger as well. I'd have to compare directly, but the amount of curvature (distance from rear of R200 diff to centerline of m-bar chassis mount pins) may be slightly greater as well. I know can use the 72-73 Mbar with an R200. The holes in the bar need to enlarged (12-14mm or something?). It is a bit of a stretch, but it fits.
-
-
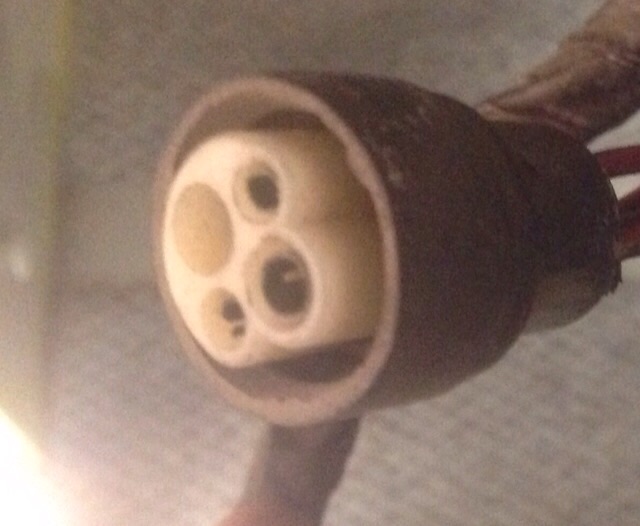
I sold it right here in the classifieds! This is the For Sale section isn't it? I quite sure mine is the early switch. The picture you showed is of a later switch. The key to telling them apart is the head light switch wires. On the late 71 and later, the main HL on-off switch has a White/Red power wire from the battery, and a red one exiting the switch. This goes to the fuse box to energize the headlights. On 280's these WR and R wires get quite thick, I think 10 gauge and the bullet connectors get bigger too. Trying to make things better. Yet they keep the same switch... Sheesh... On the early switch, they switched the ground side of the circuit leading to the dimmer to turn the Headlights on, and the wire colors and routing of the HL switch wires are different. They use black wires bringing "ground" from the chassis, through the switch, to a red wire, that jumpers over to the center of the dimmer switch. The head lights common terminals are hard wired directly to the HL fuses to energize them. This was an early design, after this they all use the "switch on the hot side to the fuses" approach with the WR in and R out until 78. At least in North America. Also 280 switches are easy to tell apart from 240's. The HL/Wiper stalk angles up 15 deg or so, while all the 240 stalks are horizontal ( and hidden very well by the steering wheel spokes, hence the change in 74)
-
The switch set has been sold for $300. Thanks to all interested parties.
-
I'm not letting this go forever. I'll wait for further offers until Wednesday, then call it. I have had very good offers. Last chance if you're interested.
-
Repairing a defroster grid, while very possible, is a bit of a test of wills. Me, I'm just replacing the whole thing with a modern equivalent. scrape 'er off and start fresh. http://www.frostfighter.com/clear-view-defrosters-list-12V-1.htm These guys sell quality repair kits and total new systems.
-
I don't see any difference in how the 240 or 280 circuits work. The HL switch on the combo turns on power to the pair of fuses in the fuse box (L and R), which then power the common terminal of each head light through the R and RY wires. Then the dimmer switch grounds either the High or Low beam side to decide which is on at any time. The only true difference is the dedicated HL fusible link on the 280z. The only slight year related difference is in the early 70-71 switch where the HL combo switch acts on the GROUND side of the circuit, at the center common line to the dimmer switch, while the battery + side power is hardwired to the two fuses in the fuse box. The dimmer still grounds either the HB or LB side of the head lights. Even the harness wire color codes out to the head lights stay the same across all years. I'm pretty sure the early issues were totally about the lack of connector availability. While there other ways to approach this problem, including the one you mention to just put a relay at the HL combo switch contacts, Dave's harness that puts the relays way out at the headlight connectors, and moves the power supply directly to the battery, is the best overall solution for one very important reason. It removes high current requirement (and the resulting voltage drops and heat buildups and failures) from ALL switch AND harness connections AND fuse box fuses areas in one fell swoop. All components (switches, fuses, connectors) are reduced to relay trigger level power levels, which even the worst condition stuff is capable of handling. The only areas the user has to improve, clean or replace might be the pin contacts at the head light connectors where the new harness splices in.
-
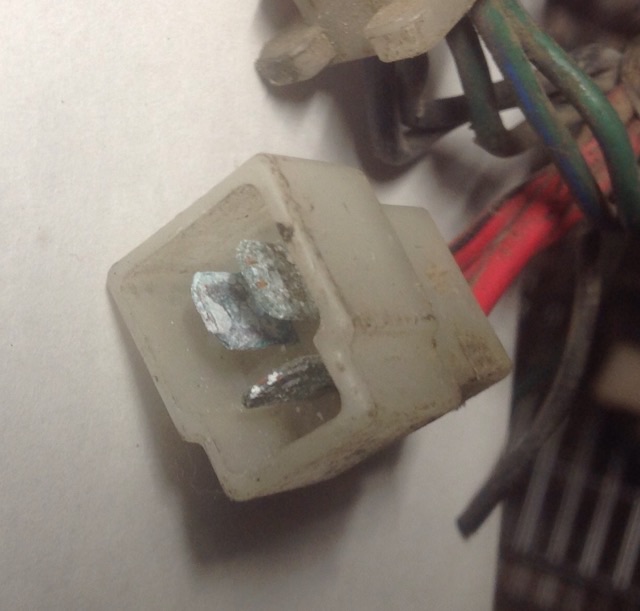
So I find myself building a headlight relay upgrade harness for the 71 project car I'm working on. I've been making my own for a long time, can't justify the $158 USD cost of buying one from MSA. Especially with the exchange rate the way it is. While building this one, it reminded me that a friend had asked me to build him one for his '76 280 last fall, so I thought I should do two at once and save a bit of time. Then I remembered the "detail" that makes the 280Z harnesses a royal pain. There are no sources for the round 4 pin weatherproof connectors that the 280's use to make the harness plug and play. You are forced to hack into the harness or replace the plugs with 240 style plugs (not simple, and removes important weatherproofing). Yuch! Can't just hand him the harness and say "go plug it in". Has to come in and get it "wired in". So naturally I started doing a bit of research trying to find a solution. It's not simple. Those round weatherproof plugs and pins are just not out there to just go and buy at any price. But my question, my "raison-de-etre" for this thread, revolves around a central question. This has been such a long standing issue, and so many people have used the Dave Irwin (Zs-ondabrain) inspired harness on their 240's (did you know he started that back in 2005? 10+ years!), have the 280 crowd just given up hope and moved on, or is there a huge buildup of "if only there was a solution!" seekers out there that would jump on such a thing if it were available? I haven't seen more than a couple of theads from 280 owners wrestling with this over the years. So what's the feeling out there? If there was a plug and play solution for 280 owners, would there be 5 intested parties or 500? Are 280 owners more likely to just be happy with a "hack the harness" solution than us prissy fussy 240 owners who insist on totally reversible "no-hack" upgrade solutions?
-
-
First post a picture of your switch from a few other angles. I need that to id which year it comes from. Also post your build date. drivers door jamb. Make sure the pictures show the connectors. The 73 switches after 1/73 I think have intermittent wipers. You will see three white dots on the wiper switch rather then two on earlier ones.
-
-
Thanks for the mention Zup, but I don't have one at the moment. I have modified later ones to look like the clean early ones. I love to TIG and grind and polish. About the only downside is the finish isn't a perfect match to the stock cast aluminum look. For example, here's one of my early attempts where I got slightly carried away. You might notice a small problem with it...
-
All contacts on the switch check out with a VOM for continuity and insulation. It's in very good shape. I've felt/used many of these switches and this one is "tight" so the "mileage" is realitively low. I've done nothing to clean it up. I really hate pricing stuff. There are just so few prior sales made known of these switches to use for comparison. That's why I made all the noise about letting the market speak. I'm tempted not to put an asking price in at all, just take offers, but I think a number has to be mentioned, and clearly it has to be "high" as very few people will offer more than asking. I will be taking the high offer, whether it's $50 or $5000. I've promised to post the finally selling price to let the market know this data point for future reference. Anyone please feel free to post what you think it's worth. Remember the asking price does not determine the value. The finally selling price does that. How many sellers have been raked over the coals for crazy high asking prices for stuff, when in fact that number has nothing to do the value. Please be kind.
-
They don't look too bad. The only real test is connect them and apply hydraulic pressure. Remember this is a metal to metal seal on that 45deg inner bevel you just made, so look for symetry and even shape on that inner bevel and ignore the outside. I can help with the tubing prep. Three things are crutial. 1. Straight cut with perfect tubing roundness. ie must use a pipe cutter, never a saw. 2. Inside must be deburred. You must remove the natural inward ID reduction that happens with pipe cutters. I use a tapered round file 3. File a 45deg camfer on the outer edge all around. Doesn't have to be much, just try to make a nice consistent pass with a fine file. 4. Blow the tubing out to remove debris before assembling. Ok four things....
-
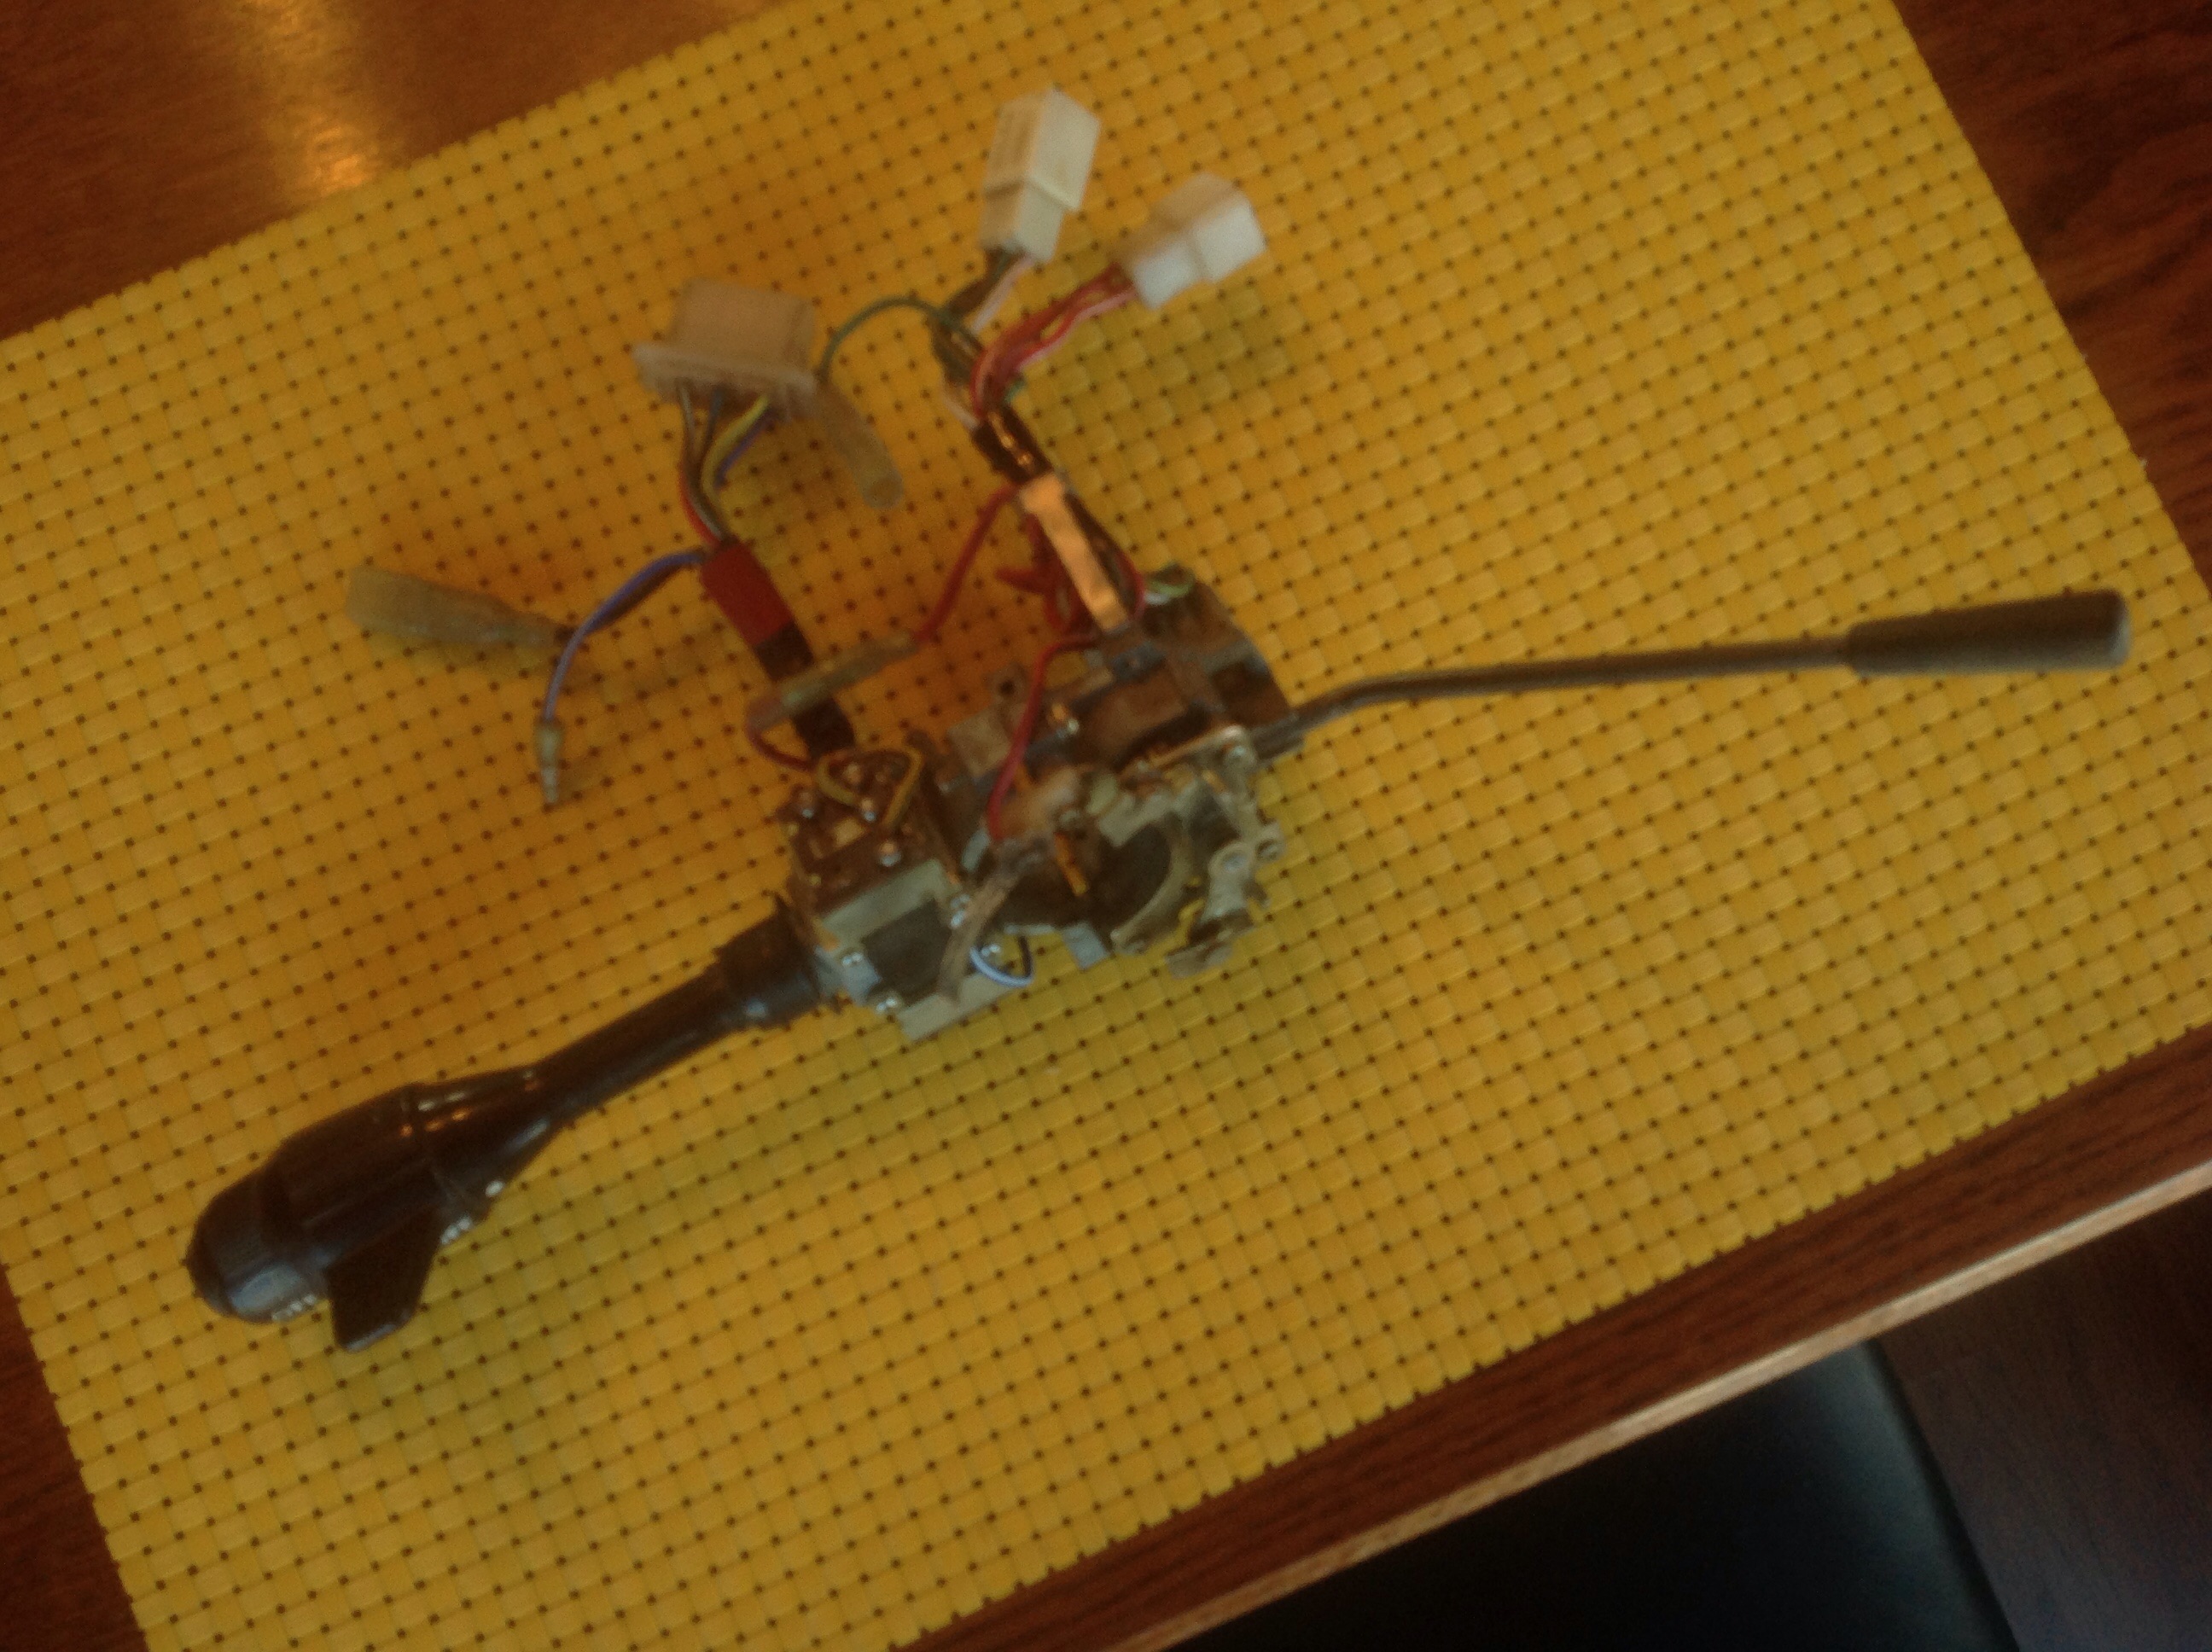
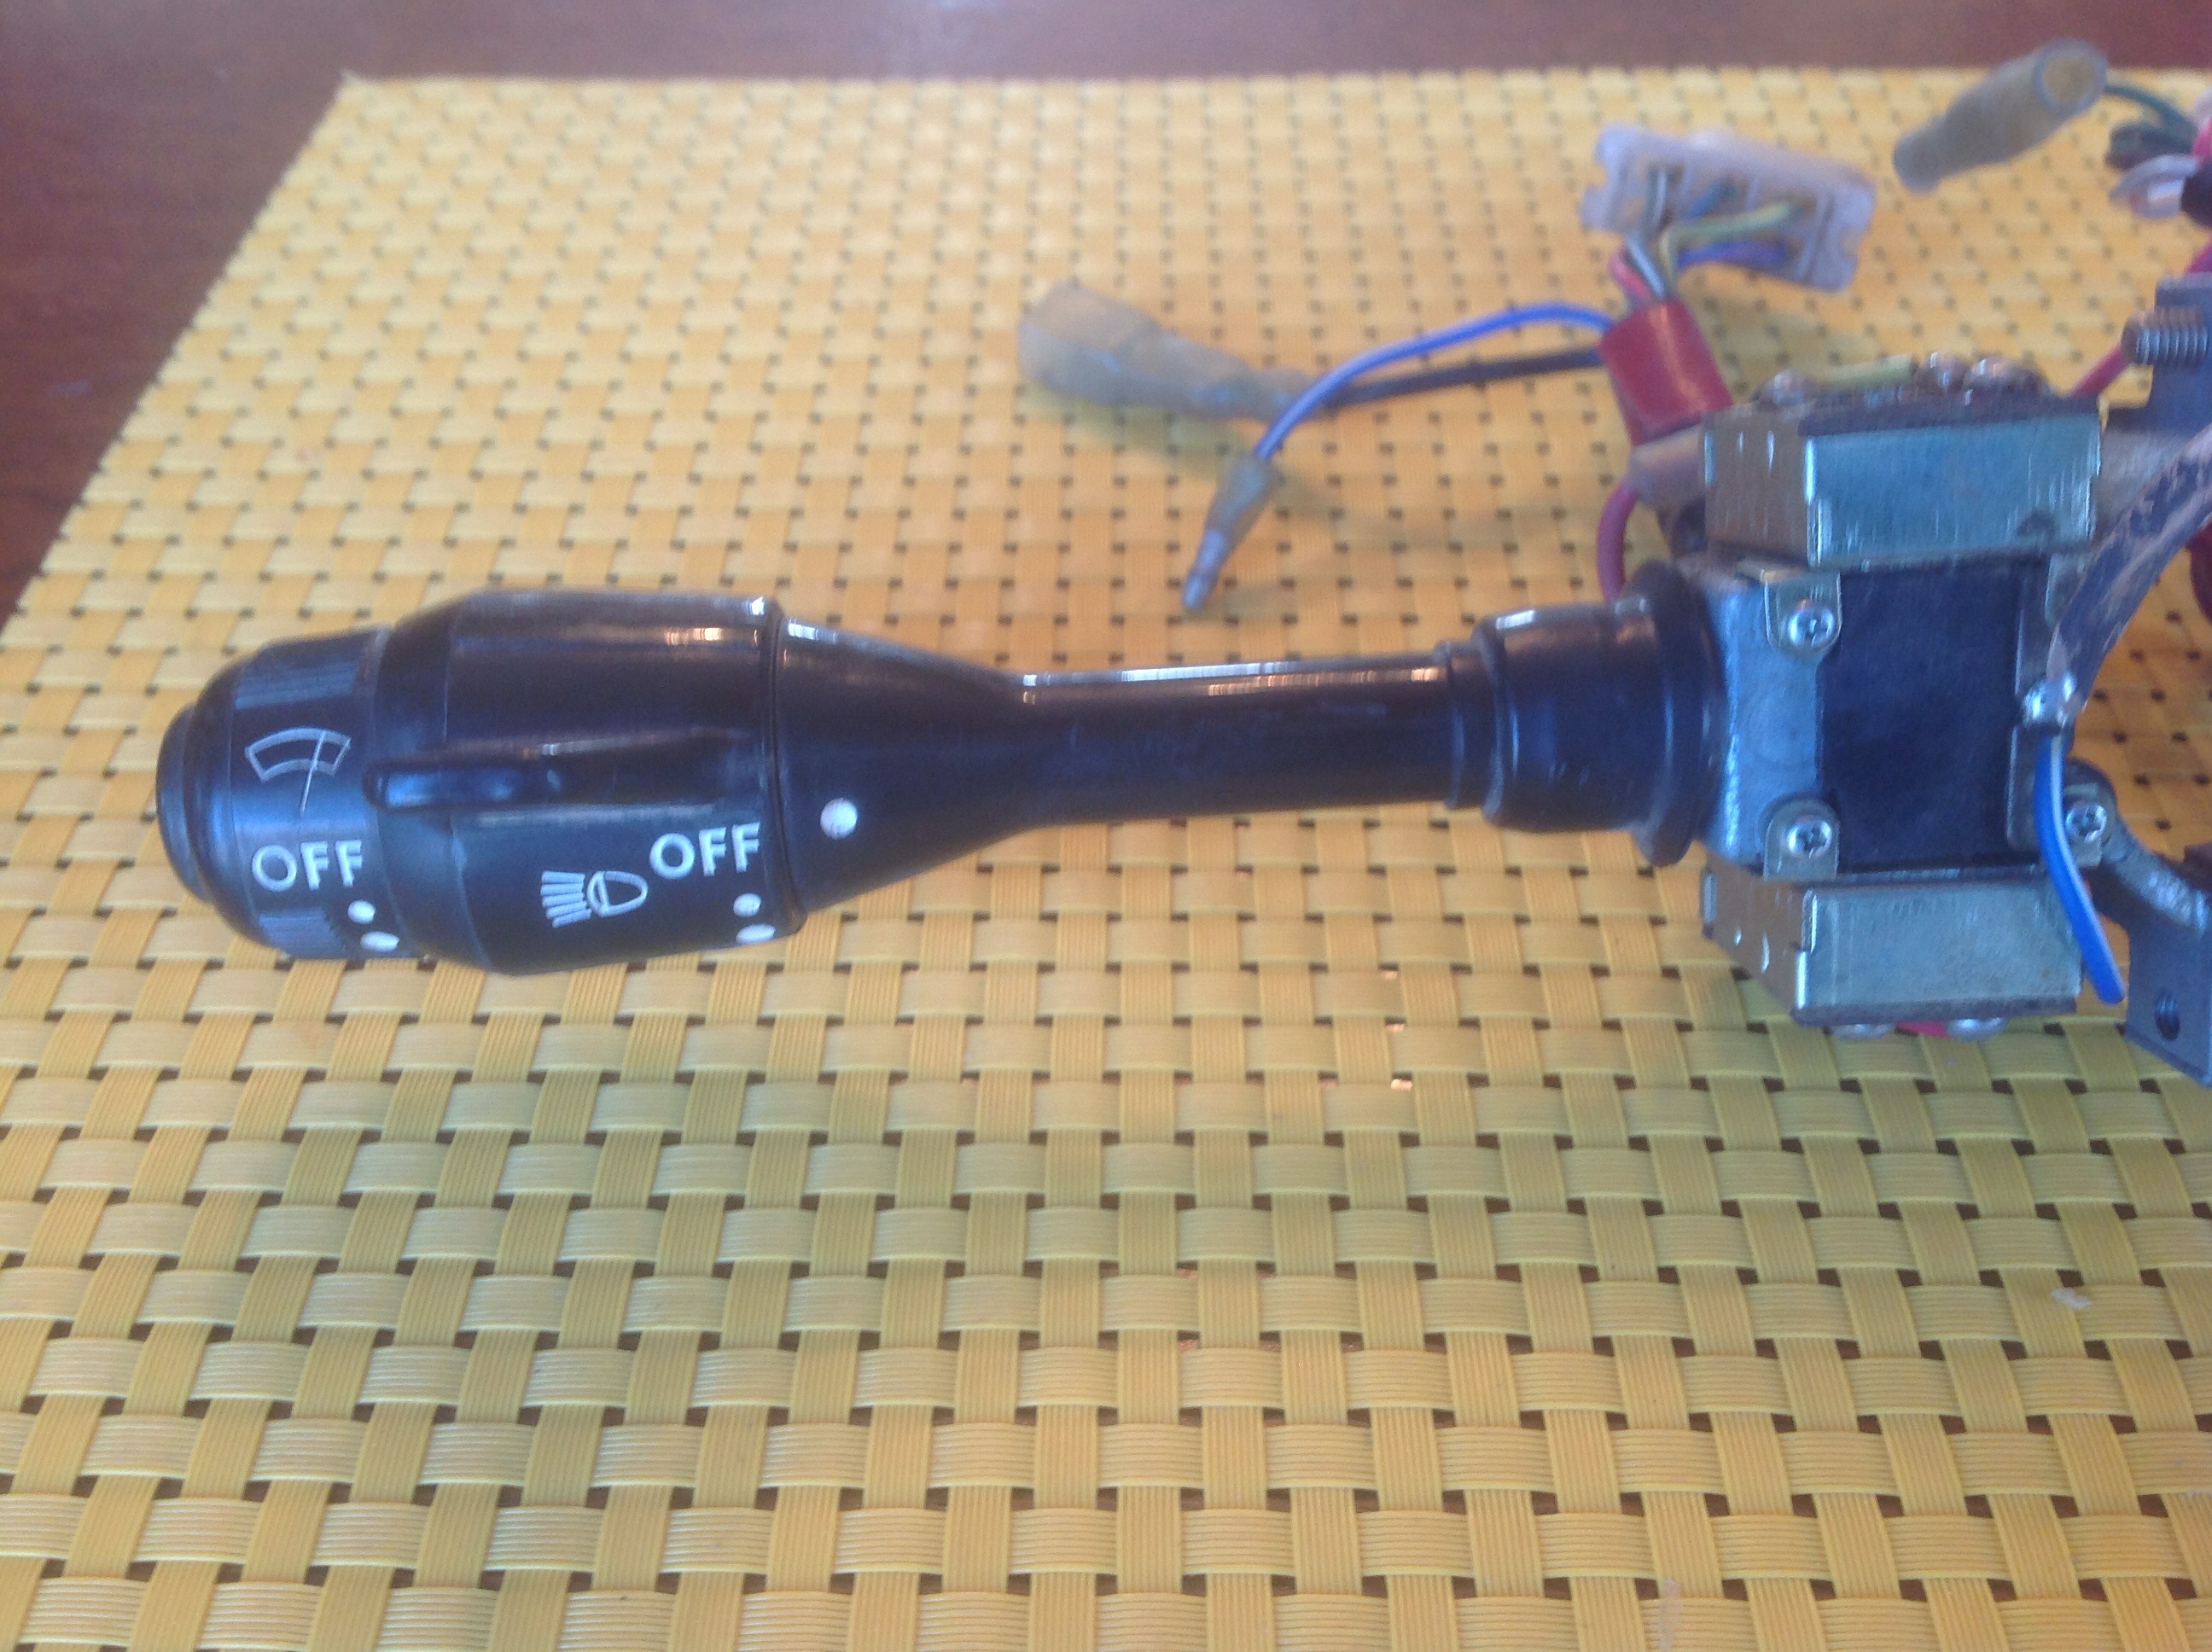
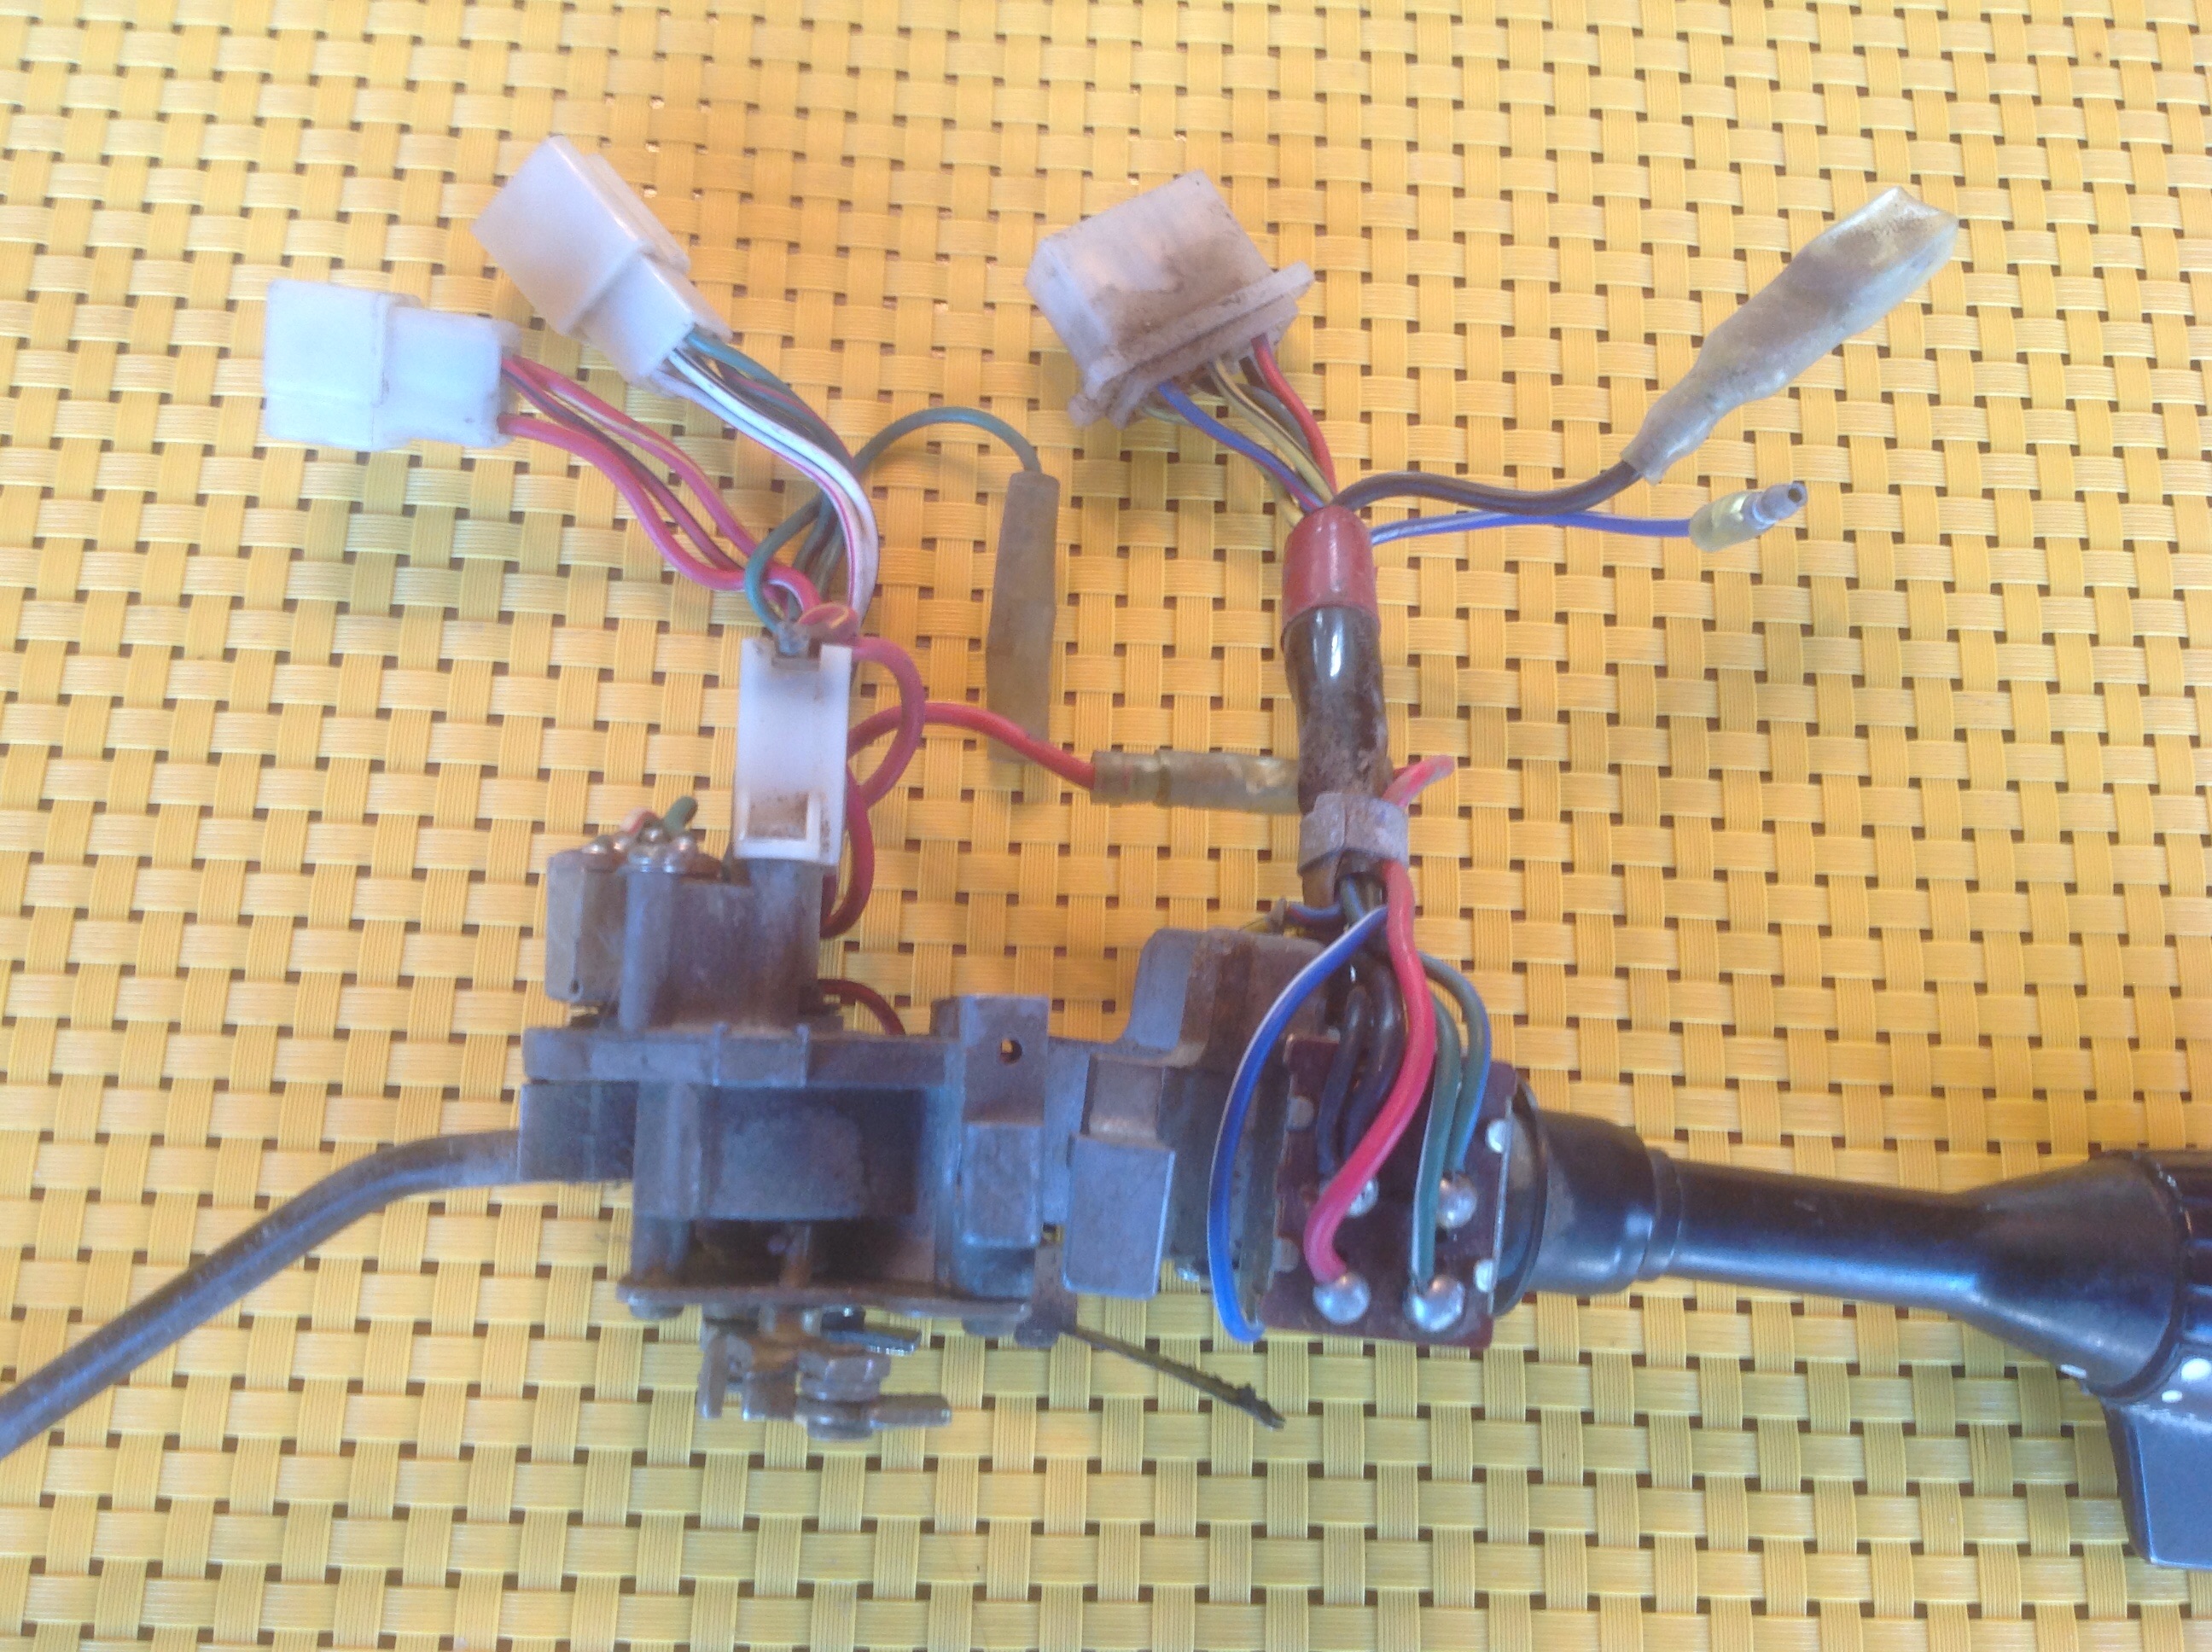
I was rooting through my collection of Z combo switches looking for a 70-71 set for my '71 project and I grabbed this one and was mightly confused for a minute (not all that unusual actually....). Everything seemed to be a mirror image, then it dawned on me. RHD! Now where the heck did I get this???? No clue actually. But I can't imagine needing or using it. So it's up for grabs. This is definitely a series 1 switch, it has the ground side head light switch wiring. Nice condition. All switches work smoothly, even the high beam. Turn signal lever is tight, none of the usual slop. I have not opened the switches to clean contacts. Connector plugs are all in really good shape. It all needs a good cleaning, but nothing other than age related dirt. No clue what this puppy might be worth, but I'll start with a $400 USD asking price, and take offers and see what the value is by polling the masses and let the offers define the value. Let me know what you think. Get me at z240@shaw.ca for fastest response. Remember the proceeds are going toward the resto of a nice early '71, not to party supplies. Well, maybe a little, man can't sand and weld and re-wire all day for heaven's sake!


-
I'm having trouble imagining where it is "hitting the strut towers". Can you describe where this contact occurs? Given what I know about the front sway bar, being 1" or so wider than stock would do nothing more than slightly increase the angle of the links at the end of the bar that connect it to the control arm. The thing fits under the car, how can it interfere with the strut towers?