ea6driver
Free Member
-
Joined
-
Last visited
Everything posted by ea6driver
-
 So I'm thinking ahead now that the weather is starting to change and my Z will likely be spending much of the next seveal months in the garage. It's a 78Z, 4 speed manual (original stock set up). This summer I bought a 5 speed (and the 3.90 diffy) from an 83ZX and plan on installing it in the next few months. And I thought that this would be an excellent time to go ahead and replace the clutch. I've read alot of stories on this and other forums about the importance of matching up the t/o bearing, fork, pressure plate and disc from either the original set up or from the donor car. Here's my questions: 1. When buying the new clutch, should I buy one for an 83ZX (since that's the tranny I'll have in the car) or one for a 78Z? Also, with the new clutch should I use the fork and t/o bearing from the 83ZX or the 78Z? 2. What would be your recommendations on a clutch purchase? Brand? Cost really isn't an issue. The car is usually driven by a 50 year old man for scenic drives through the Cascade mountains, ie, highway driving and light driving around town. No real hard driving. Thanks in advance!
 -
Did the window sticker that you were gonna post photos of go with her, or are you still planning on posting it?
-
Hi WingZro, Any chance I could get you to post a printable photo of your original window sticker? I'd be really interested in seeing the window sticker from a Z that was only a few VIN numbers different than my own Z. I'd like to print it off and stick it in my folder of interesting Z stuff. Thanks in advance! Bob
-
WingZro, I'd be especially interested in seeing a scan of your window sticker since I also have a 78Z. My VIN is a little newer than yours but I'm sure the costs would have been similar.
-
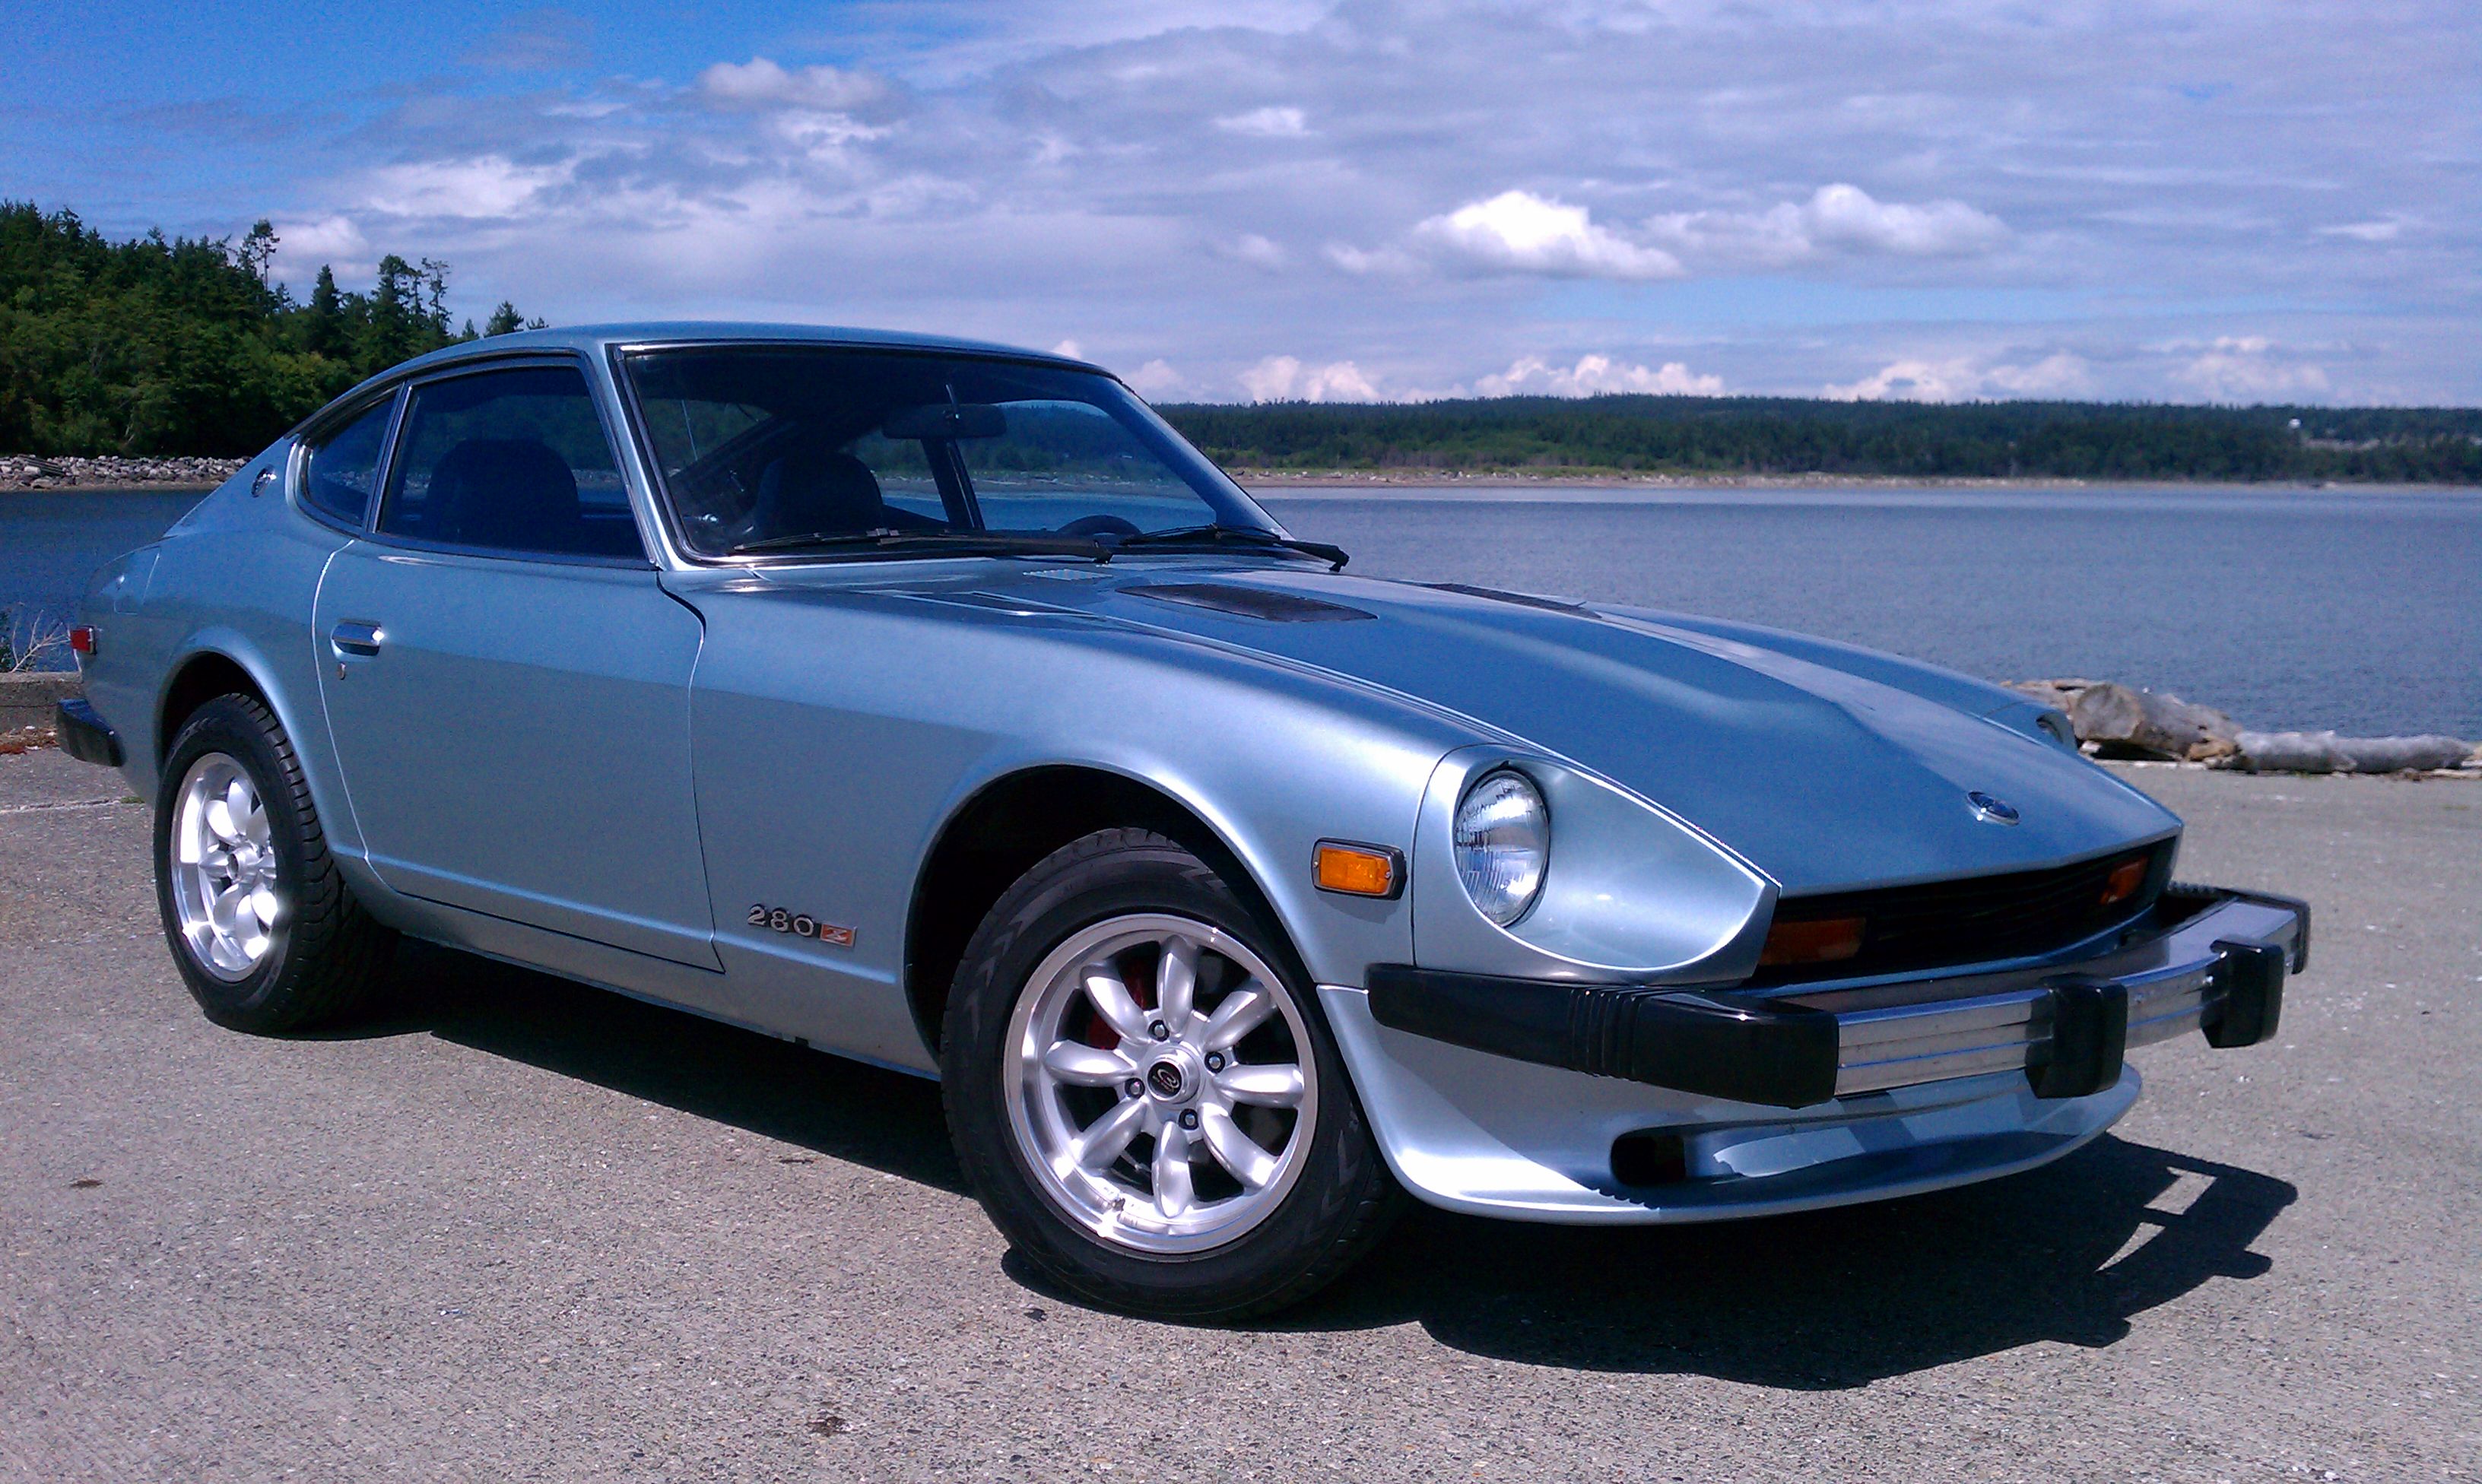
Please add one more for the Great Northwest! Bob in Oak Harbor, WA. About midway down Whidbey Island. Thanks!
-
Thanks. I found it. Buried under the aft part of the intake manifold and close by the exhuast downpipe. Sure would have been easier to get to if it were on the other side. 22mm on my 78. Now to try and unscrew it tomorrow after going out to buy a 22mm socket.
-
Reading straight from my 78 FSM: "To drain the cooling system remove radiator cap, release drain **** at the bottom of radiator and drain plug on side of cylinder block." Could someone please tell me exactly where this drain plug on the side of the cylinder block is? Left side/right side? Forward/rear end of the block? What does the drain plug look like? etc. Thanks for your help.
-
My last post got pushed down in the pack before anyone chimed in with specific ideas/techniques for polishing the intake manifold, so I thought I'd repost the request. I've polished a valve cover with good success using the multi-grade sandpaper technique, but an intake manifold is obviously a much more complex part (multiple curves, rounded surfaces, etc.) and I'm hoping there are some "secrets" that can make the process less painful. Again, thanks in advance
-
I recently bought a set of four brand new braided steel brake hoses/lines from someone who sold them to me because he'd sold his Z and no longer needed them. When they arrived today I was quite excited to install them, but when I opened the packaging I noticed a label attached to each hose that read "For off road use only. Do not use on public highways." Well, I emailed him to ask why he had failed to mention this to me when he was describing the hoses and he said: "I didn't mention it because its an industry wide standard warning. All performance parts for any car have that warning on them so the manufacturer isn't liable. They are perfectly fine for street use, there are no restrictions on their use, ask anyone." OK. So I'm asking - are these brake lines OK to use on an otherwise stock street Z? The brand name of the hoses is Earl's Performance Plumbing. Thanks in advance.
-
280~master, In post #4 of this thread you posted some photographs of various types of Z intake manifolds. The first photo shows a polished manifold. Would you mind sharing with us specifically HOW you got that manifold looking so good? Please be as specific as possible. I'd like to copy whatever you did to a T! Sanding by hand? Buffing wheels? I'd appreciate your willingness to share the secret! Additionally, if others have achieved similar results with their polished manifolds, please chime in with your secrets as well. I'm familiar with the hand sanding process of polishing valve covers, but it just seems that intake manifolds don't lend themselves as easily to the same process because of all their curves/irregular surfaces. Thanks in advance.
-
Update. I pulled the stock intake manifold off a non-California 77 Z today. It did not have the "webbing" referred to earlier in this thread. Can I safely assume then that the 78 was likely the first year model Z to incorporate this webbing into the intake manifold? Just an interesting "factoid" I guess. Now to begin the polishing!
-
Thanks Stephen, My Z is a non-California late model 78 (5/78) and it has the webbing. From your discussion, it sounds like the 77 year models probably do not have webbing, but all the connections should be the same as long as it has the EGR. When I go look at this car Saturday I'll probalbly go ahead and buy his intake manifold and polish it up (even if it does not have webbing). Without webbing, it won't be an exact replacement, but sounds like it will do the job all the same. Worst case, I'll end up with 2 polished manifolds and just put the original one back on! By the way, what are the advantages/disadvantages of the webbing? Thanks again for your insight.
-
My head is an N47. While I haven't had a chance to inspect/compare his intake manifold to mine (that will happen this Saturday), I've noticed that other intakes sold on this website (and on ebay) had separate or individual "tubes" extending from the main manifold body into the head intake ports. On my 78 manifold, these tubes appear to be "connected" to each other with an aluminum fillament. You can't see in between each of the intake tubes like others I've seen for sale. I know this setup is kinda hard to explain. It's like a duck's webbed feet - picture it's individual "toes" as the intake tubes and the "webbed" portion as this fillament I'm talking about. Not sure if this setup was changed from earlier models for added strength or for "thermal" reasons. Additionally I've heard others refer to EGR and non-EGR intake manifolds. I reckon I'll have a better idea on their compatibility when I see it in person this weekend. Thanks sblake01. If any others have any thoughts on this I'm "all ears."
-
So after polishing up my valve cover with (seems like) about ten different grades of sandpaper and installing it, I'm hooked. It looks great. Now I'm thinking that doing the same thing to the intake manifold is the next logical step in beautifying my engine compartment. A guy who lives nearby is parting out his 77 Z. Mine is a 78, totally stock. What I want to know is, can I buy his intake manifold, take a month or so to polish it up - just doing a little at a time in my time off - and bolt it right on. In other words, are the intake manifolds on these two year models totally interchangeable, or were there differences between them? The obvious advantage to this idea is that my Z would still be driveable while I took my time polishing up the replacement manifold. Thanks in advance for any advice.
-
Whoa. Lots of options on that website. Would you mind posting exactly which check valve you went with. Thanks.
-
OK. Thanks for the responses. So the fuel pump shouldn't begin operating until I begin cranking the engine (key in "start" position). Sounds like that's what mine is doing. Now it seems to me that this would imply that the fuel system should maintain pressure even after the engine is turned off. However, in my car that is not the case (I have a fuel pressure guage installed downstream of the fuel filter). Additionally, when I try to start the engine it doesn't start up immediately. I usually need to crank the engine 3 or 4 seconds (or maybe 2 or 3 seconds, haven't actually timed it) before it fires up. To me it seems like this delay is due to the fuel system repressurizing once I begin cranking. What might be the most likely causes of the fuel system losing pressure when the engine is turned off? I was thinking fuel could be leaking past the cold start valve. The only real "problem" I'm having here is the additional cranking required to start the engine. But, hey, if it ain't right I'd like to try and fix it. Thanks again for your ideas.
-
78 280Z. Fuel and electrical systems are totally stock. Car runs fine. Should I be able to hear the fuel pump working when the key is turned to "on" or just when it's turned to "start"? Currently the fuel pump does not operate until I turn the key all the way to "start" (starter motor engaged). Search function revealed conflicting answers - perhaps the answer is different depending on year model. It seems to me that I used to could hear the pump come on when placing the key to "on" (years ago) and so I'm wondering if something has happened that only allows it to operate when engaging the starter ("start" position of key). Any help is most appreciated.
-
Thanks for the info gentlemen. Looks like I'll give it a try. Is this a DIY job, or would you recommend simply taking it by my local muffler shop and asking them to install it? I've got lots of tools - just never really worked with exhaust systems. How does the forward end of the "turbo tip" couple with the existing pipe? Is any welding required/recommended? Thanks again.
-
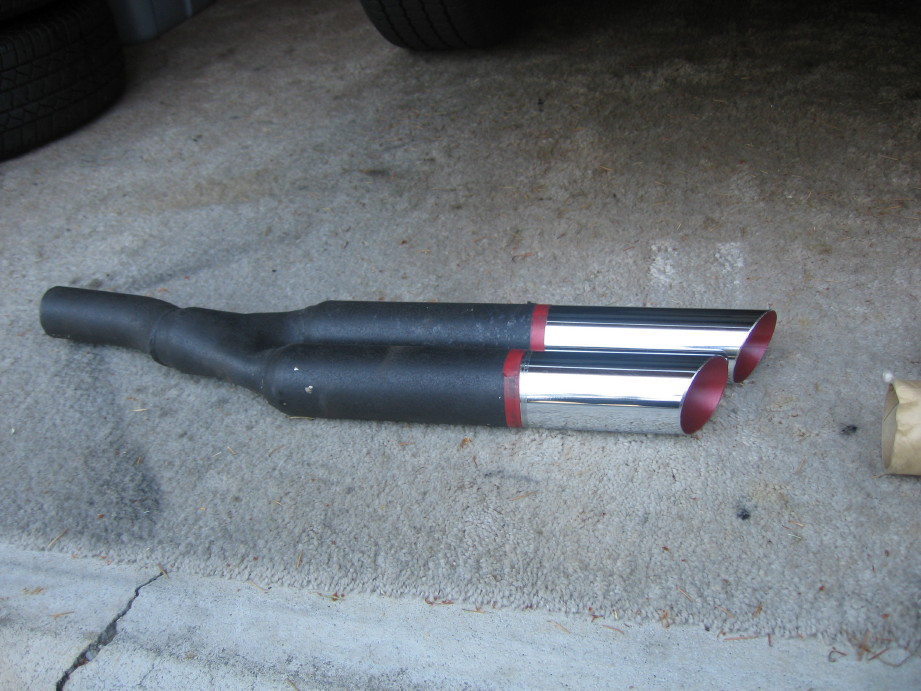
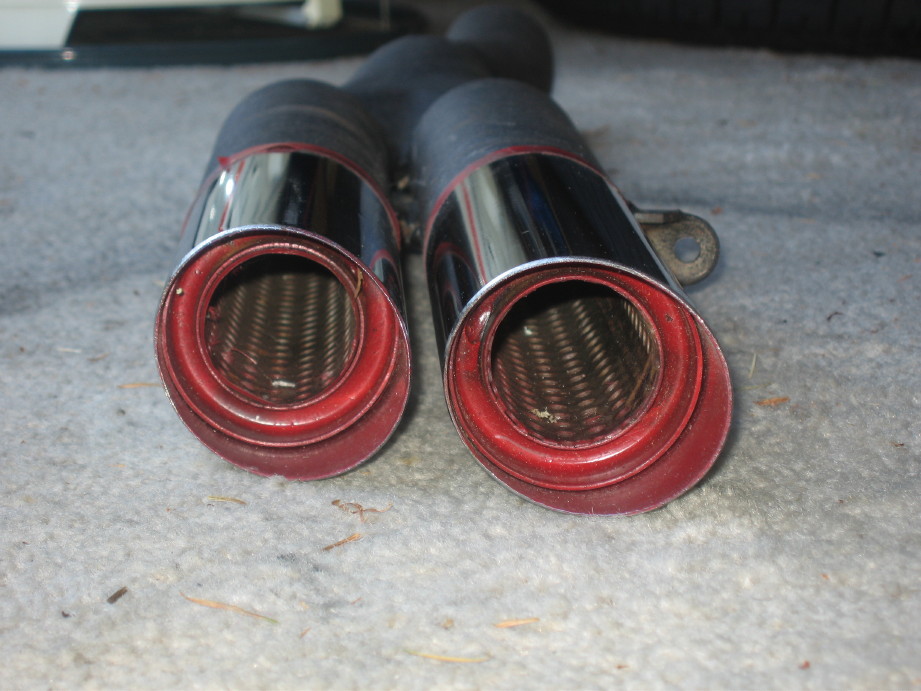
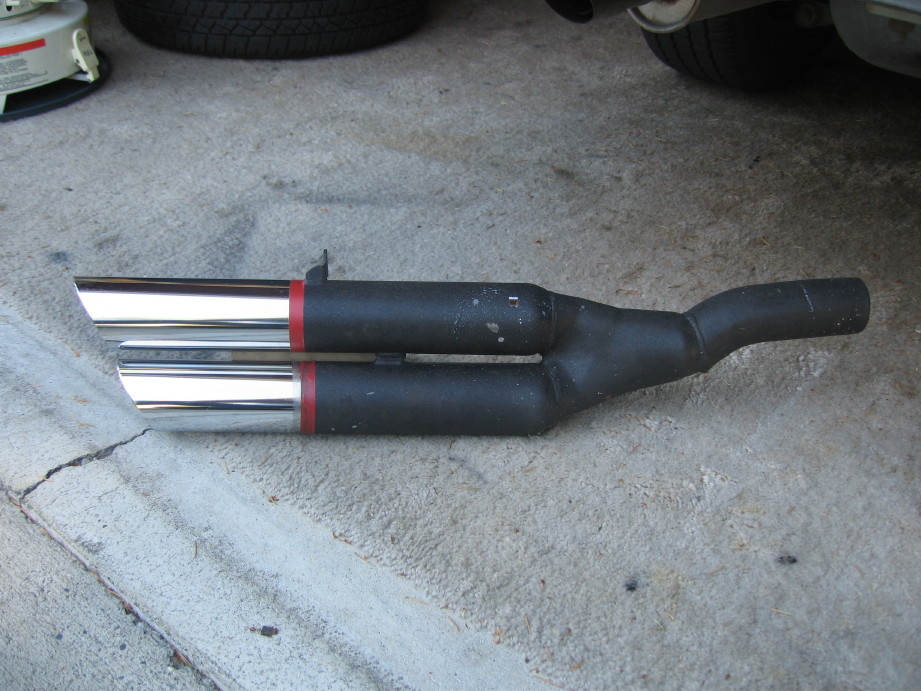
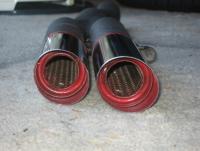
So I'm going through all the miscellaneous Z stuff in my garage yesterday and I come across this (see attached photos). I reckon I knew it was there all along, but had simply forgotten about it. I've had it at least 20 years. Not really sure who the manufacturer was/is, but I seem to recall I bought it from Motorsport Auto. My questions are: 1) What do I need to consider before simply replacing my existing muffler with this (78Z with stock exhaust system). Any performance issues? 2) What will be the difference in the sound of the exhaust with this mod? Will my wife ever want to drive the car again (she's not impressed with excessively loud exhausts)? Will law enforcement take interest in me when I drive by? 3) I've seen similar tips displayed here on other threads. One of these tips in particular seemed to have more of a "crook" or bend in the pipe where it attaches to the exhaust pipe. So are these tips year model specific? I think the chrome tips look alot cooler than the one tip coming out of the current muffler, so I'd like to make the change - I'd just like to be armed with as much knowledge as possible in advance. Thanks in advance for your insight.


-
That was a good idea. I wasn't comfortable trying to cram a 3/8" barb into a 5/16" fuel line. And changing out the whole fuel line to 3/8" just to accomodate the 3/8" tee fitting was problematic as well. So I went to Ace. Got a brass tee fitting with 1/8" NPT holes (since this was what the threads on the gauge had). Screwed a couple 5/16" barb fittings into both ends and problem solved!
-
I'm trying to install an inline fuel pressure gauge. This afternoon I cut the fuel line to insert the gauge fitting but could not get it to fit. My fuel line is 5/16" ID. The fitting is 3/8" OD. I've read that this should work, ie, that I should be able to force the 3/8" fitting into the slightly smaller fuel hose. However, if this is so, I've yet to figure out how. I've looked around online for a 5/16" fitting but couldn't find one anywhere (the fitting needs to have a 1/8 NPT port for the gauge). So my questions are: Should this work? Do I just need to apply more "elbow grease"? If the answer to the above is "no", is the best alternate solution to simply replace the 5/16" fuel hose with 3/8" hose? The concern I have with this solution is that the fuel filter outlet nipple and the nipple to the fuel line running over to the fuel rail are not made for 3/8" hose. Here's a couple links with photos of the fitting and the gauge I'm using: http://www.jegs.com/webapp/wcs/stores/servlet/ProductDisplayPopup?storeId=10001&catalogId=10002&productId=763500&itemId=90480&langId=-1&showValue=1 http://www.jegs.com/webapp/wcs/stores/servlet/ProductDisplayPopup?storeId=10001&catalogId=10002&productId=763500&itemId=360725&langId=-1&showValue=1 I've read here that many have successfully made this mod, so I know the answer is close at hand. Any help/advise is most appreciated.
-
If I were a bettin' man, I'd say that installing a carpet similar to the link you posted would be described as anything except "hassle-free". I paid well over $200 for my replacement "molded carpet kit" and it was pretty basic. The rear deck carpet was pretty nice. It fit well and already had the jute (under) padding attatched. All the edges were bound. It was by far the best piece of the kit although it did not have the finished "slits" for the luggage straps. The piece that installs vertically behind the seats was simply designed to be jammed under the metal trim bar. On my old OEM carpet one single piece was used for both the rear deck and forward "wall" As for the floor area, the kit basically came with 4 large rectangles of carpet (2 per side). Not the same layout as the OEM carpet. Both the front sections included a sewn seam on the inboard side so the carpet would conform to the contours of the floor where it meets the tranny tunnel at the extreme forward end. No finished cutouts for seatbelts, no snaps for the leather emergency brake cover, no "heel pad" along tranny tunnel (to right side of accelerator pedal) as in the OEM carpet. No "jute" padding included for these floor sections. I had to take my carpet to an upholsterer to get all these mods done. In short, lots of extra work.
-
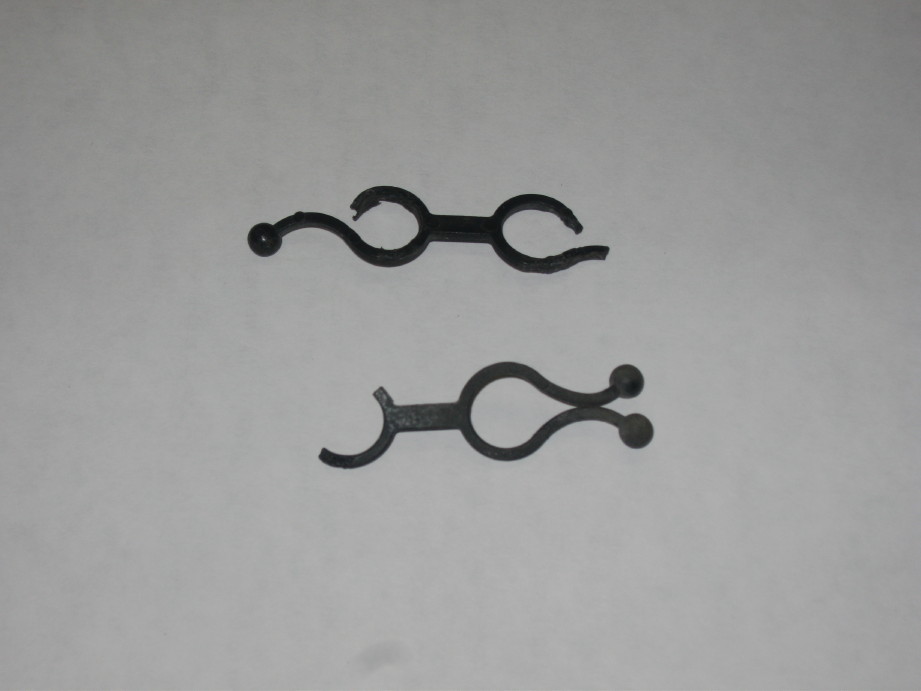
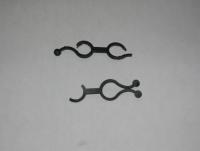
I know it's an engine bay fastener, but specifically what is it used to fasten? One of the fasteners in the photo was attached to the battery-starter cable. The other one was laying on the right frame rail. I'm thinkin' they are vacuum hose fasteners, but that's just a guess. Also, since these are broken, where can I buy some replacements? Thanks in advance.
-
I'm replacing all the vacuum hoses in my '78Z. The FSM is very helpful for showing what components attach to the ends of all the the hoses, but I'm having a litttle trouble trying to figure out how to route the hoses in the engine compartment. Two of the vacuum hoses attach to the intake manifold and run aft then along the top of the firewall (with 3 plastic clips) over to the passenger side where they (and a third hose coming out of the firewall) then run forward to the magnetic valve assembly and vacuum tank. This last part of the run is where I'm not too sure of the routing. In the FSM there is a diagram that shows these 3 hoses running forward and attaching to the engine bay with 3 more clips. I can't find these clips in my car, and I don't want to just leave the hoses dangling in the air. If you've got a 280Z with the stock vacuum hose configuration could you please post a few photos showing exactly how these vacuum hoses attach in the engine bay for this last part of their run forward? Two other short questions: What is the size of the vacum hoses? I'm thinking about ordering some silicone vacuum hoses online and just want to be sure to order the correct size. Where can I get a replacement OEM one-way vacuum check valve (the black circular one that installs into the lower hole of the magnet valve assembly)? Thanks in advance.
-
Went out this afternoon and bought two squeeze tubes of silicone sealer. By squeezing my arm through the holes in the panel I was able to run a thick bead of sealer all along the top of the reinforcement beam. The only part I couldn't reach was about 6 inches at the extreme forward end of the door. Even got my son out to the garage and he couldn't reach that part either. Thanks for all the advice!