


ea6driver
Free Member
-
Joined
-
Last visited
Everything posted by ea6driver
-
 So I hooked up the clock to my 12V car battery as described above...and sure enough, the clock seemed to operate normally, at least for a while. Every time the minute hand would rotate around to approximately the six o'clock position it would "stick" in position. I could adjust the minute hand using the center "set" knob, and it would begin operation normally again...at least until it rotated around to that same position again. It felt as if there was something slightly obstructing the minute hand at that position of its travel. Anyway, the point being that there appeared to be no problem powering the clock up by connecting it directly to the car battery.
 -
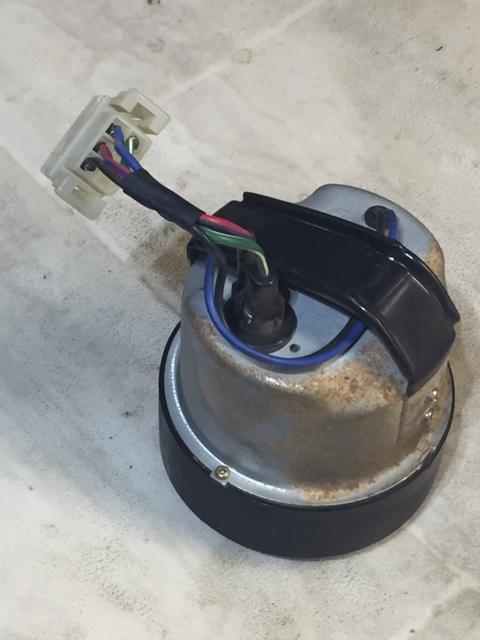
I'm interested in selling this clock that has been stored in a box in my garage for several years. The buyer is asking me if it works. I'd like to test it. Can I simply attach leads to a 12V battery and apply the positive lead to the blue pin on the connector and apply the negative lead to the black pin to see if it operates? The face of the clock is labeled "quartz", so I think it's from a later model classic Z. Thanks!
-
I appreciate all those ideas. I'll have to check tomorrow, but I was thinking that the original reflective material was too damaged/rusted to simply clean it up and polish. The chrome rustoleum paint may be the easiest/simplest solution...or perhaps look for some of the reflective material from the hobby shops like ajmcforester suggested. I'll update when I get er done.
-
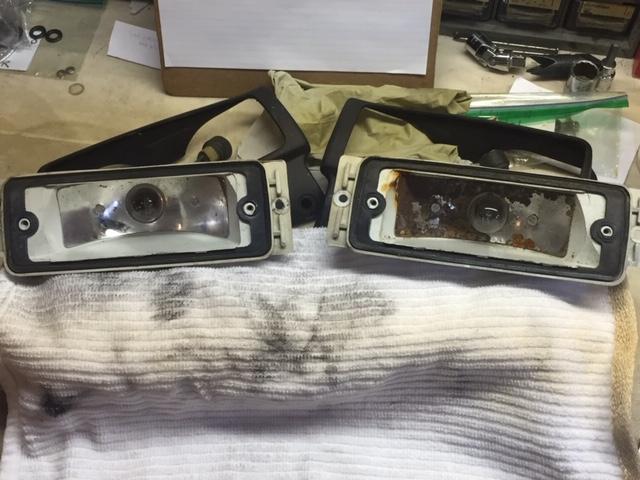
Photo attached for clarification. The reflective coating inside one of my turn signal lenses has rusted to the point that it is not functional. What would be an effective way to restore this?
-
View Advert AC High Pressure Switch (78 280Z) Wanted to Buy: the high pressure AC switch that screws into the a/c receiver drier for a 78 280z. See attached photo of the part I'm looking for. In the photo, the protective black rubber boot has been pulled back to show where the two wires attach to the main body of the switch. As you can see, one of these wires has broken away from the switch due to corrosion and reattaching it is quite difficult. Advertiser ea6driver Date 06/16/2020 Price $1.00 Category Parts Wanted Year 1978 Model 280Z
-
yeah...i suppose I should qualify what "a lot" is....several years ago a guy who lived near me was advertising cans of R-12 for sale on Craigslist. Now he had A Lot. like cases of the stuff...I prolly bought about 10 cans from him...maybe have 5 or 6 left at this point. I would recommend keeping an eye out on CL, ebay, and word of mouth...even things like yard sales. If you stay diligent about it I would bet you'll eventually score some.
-
Couple things. First the good. The little filter at the firewall connection is pristine. Glad to see that. And I have a lot of R-12 to work with. The condenser and drier problems are not yet solved. Do you recall the source for the new expensive condenser you spoke of? I have searched online, but you know how that goes. hit and miss. surf for hours. frustration. I'm leaning toward buying a used condenser from the "Z man of washington". His name is Oliver and his business is within a reasonable driving distance from my home. I know it's a gamble, but his prices are reasonable and i will get it tested before installing it. After all...i might even get lucky and get a perfectly serviceable one for my exact year model (78). As for the drier...i'm convinced that finding an OE one is not gonna happen. That means finding an aftermarket one, preferably with the connection for the high pressure switch, which seems unlikely as well. So that means that the most likely solution will involve refabricating the copper lines to/from the drier to make an aftermarket one work. So that's where I'm at. Fortunately, AC is more of a luxury where I live and I'm willing to "chew" on this problem for a while and drive the car without AC in the meantime. Thanks again for all your insight.
-
Thanks Dave I don't actually need a gallon...it was just that after my earlier internet search, it seemed like a lot of the industrial websites were only selling it in quantities even larger that that. I'm sure a quart would be fine. Im the second owner of the car and bought it when it was 2 years old (1980) so the system has never been converted to R-134. If you recall, I'm the same guy who posted a pic of my leaking condenser on this forum back in January (you responded to that post). I'm just now starting to put everything back together after working on my engine bay over the last 6 months. As I gather everything necessary to try and get the AC system working again, I just wanted to make sure I had the correct oil to service the AC...and I wasn't sure just how important it was to use the FSM recommended brand. From your response I gather it's not that important, and I'll just go with something similar to what you recommended. Thanks!
-
I'm looking for the appropriate AC system mineral oil for the factory AC in my 78Z. The FSM call for SUNISO 5GS. I've spent about the last 2 hours scouring the internet for this product, but, other than obscure listings from questionable (or expensive) overseas websites I've not had any luck finding it. I'm wondering if there is a suitable substitute product that i might purchase that isn't too expensive, will lubricate the system appropriately, and is available in, say, a 1 quart to 1 gallon size. Thank you for any ideas you might pass along.
-
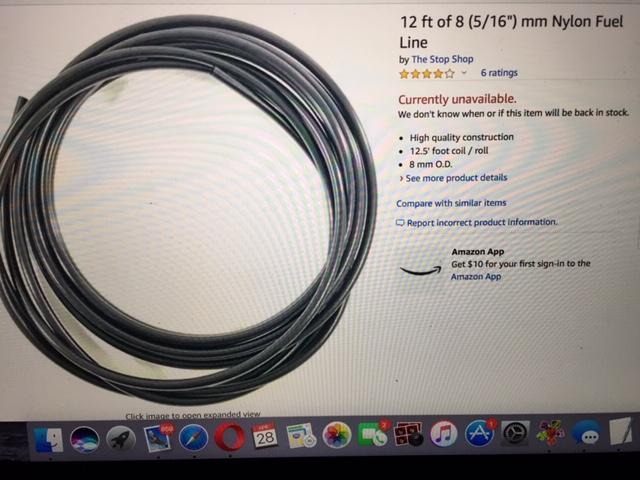
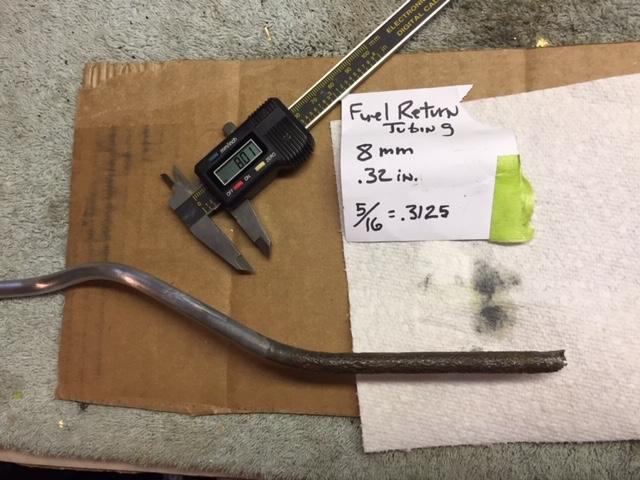
I bought it off Amazon from a supplier named The Stop Shop. 12' roll of 8mm OD nylon line for $17. Compression fittings were Dorman part number 800-222 Fuel Line Compression Union 5/16" (pack of 5) for $16.50.
-
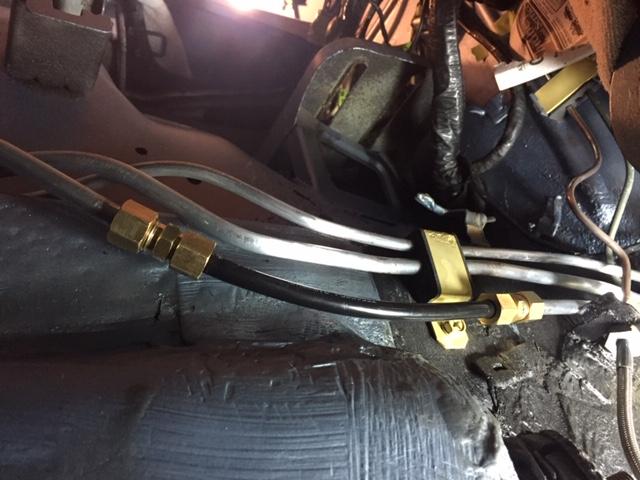
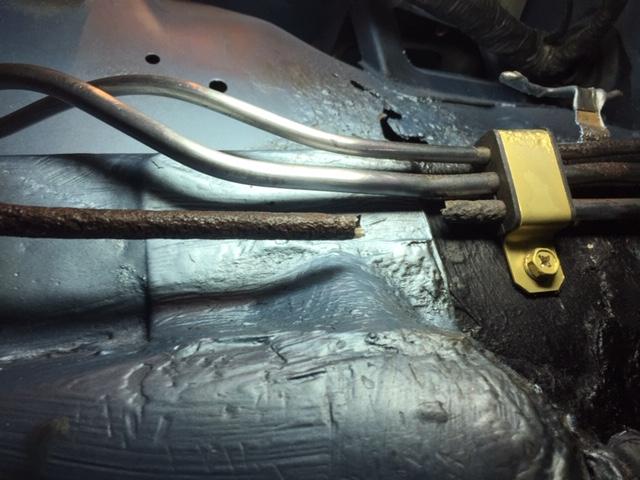
I thought I'd post an update to the "fix" I came up with for this problem. I ordered some nylon fuel line and "steel to nylon" compression fittings, cut out the corroded original piping, and installed the flex line with a compression fitting at each end. For perspective, the photo is taken from under the car looking up toward the underside of the battery tray (which you can see in the top of the photo). I was a little disappointed that I wasn't able to come up with a fix that allowed me to route the new line through the old bracket, but there just wasn't much room to work with under there. Hoping this will be safe and functional for the type of driving I do (once/month, sunny days, within the speed limit).
-
Found this. Was thinking that, along with "steel to nylon" compression fittings on each end, this repair would allow for an effective and tidy repair that would still allow me to use the original fuel line brackets.
-
I like the idea of cutting the existing tubing back to unrotted metal at both sides. Figured that would be the first step. However, I was hoping for an option that allowed me to continue using the original fuel tubing brackets. The problem I see there is that there is very little clearance separating the 3 pipes in the brackets...so any fitting connecting the original pipe to the replacement one would have to be a very slim profile. I'm not too worried about the time factor as this is just one more problem of many I'm encountering with the engine bay restoration (maybe I posted this in the wrong forum....sorry for that...). Just wondering...is fuel pressure an issue here? I'm thinking that the fuel returning to the tank from the fuel pressure regulator can't be under too much pressure...thereby allowing for a repair that didn't need to hold up under fuel pressure.
-
Cleaning/refurbing the engine bay. As expected, the area under the battery has the most corrosion, including the fuel and brake lines/brackets that run in that area. Well, while disassembling everything one of the fuel lines was corroded so bad that it snapped in half. The corroded area of the snapped line/pipe runs for several inches. I'm looking for some good ideas on the best way repair this. The line in question is the fuel return line that runs from the fuel pressure regulator on the fuel rail back to the fuel tank. Any and all ideas are welcome...I'm really hoping there is an effective repair option short of replacing the entire pipe all the way to the back of the car.
-
Well...I have no idea if I'll ever get it back in again...but it's out! And like gwri8 said...it was just "magical". I was just twisting, tugging cussing, gripping with pliers and swearing that there was simply no way this was gonna work....when, all of a sudden, it just slipped free. So, I can independently verify that the heat shield is removable with the EGR tube in place. Even with the EGR tube heat shield still in place. Thanks to all...moving along to the next puzzle...
-
sorry...should have mentioned that not just the hose, but also the pcv valve itself is removed. Turns out that on the 78 year model, the egr pipe itself has its own heat shield...of course, the screws that secure the egr pipe heat shield to the egr pipe are severely corroded. Imagine that. So i'm working on removing that heat shield now. It looks as though, once removed, that there will be some more wiggle room.
-
All the bolts securing the heat shield are definitely removed...I can easily slide the heat shield fore/aft & side/side enough to tell that all the bolts are out. It's just that, because the shield is somewhat "preformed" (i.e., three dimensional, not completely flat), it is easily wedged by the intake runners and the EGR tube. Still working on it.
-
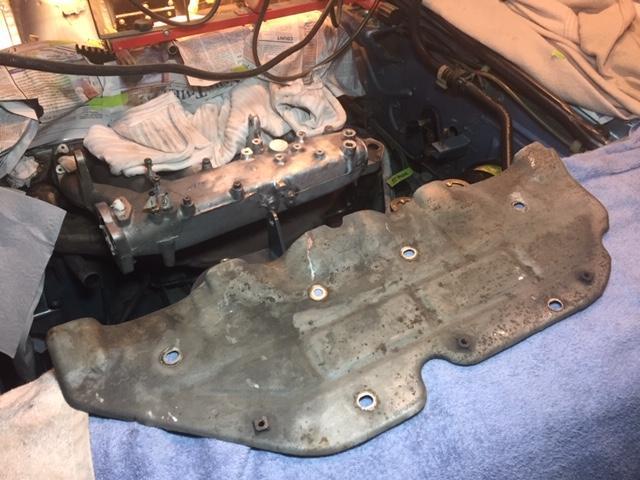
Thanks for all those comments/pieces of advice. I've completely remove the "vertical" heat shield that's bolted to the bottom of the larger "horizontal" heat shield...that one was no problem. Took some doing, but finally got all the bolts off that secure the "horizontal" heat shield to the bottom of the intake manifold. The PCV valve hose has been removed. In the photo above that siteunseen posted, his EGR tube has been removed...didn't know if he meant to imply that he was able to slide the heat shield out before or after that tube had been removed. Gwri8 seems to recall that it will come out with the EGR tube still installed, but that it only comes out one way...so with that in mind I'll head back out to the garage and wrestle with it some more. Will report back.
-
I've successfully removed all the bolts securing this heat shield to the underside of the intake manifold, but it seems as though the EGR pipe (the pipe that is connected between the intake and exhaust manifolds) is blocking the heat shield from being able to be removed from the engine. I tried for several minutes trying to wiggle the heat shield out, but with no luck. The next logical step would be to remove the EGR pipe to get it out of the way, but everything I've read on this forum indicates that loosening the bolts that secure the EGR pipe is damn near impossible. Am I missing any trick to getting the heat shield out with the EGR pipe still installed?
-
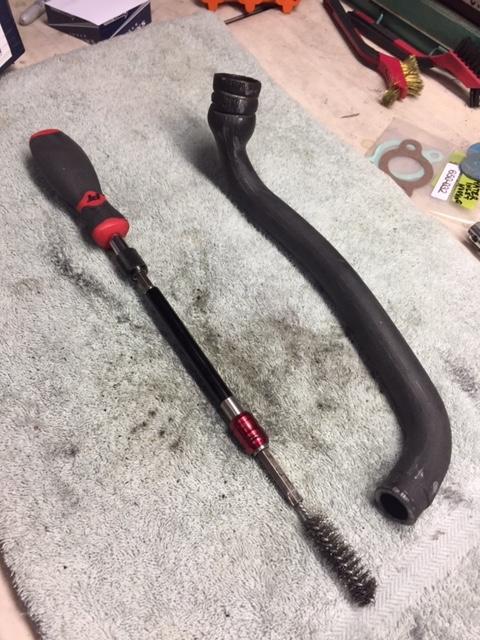
So...half the job is done. I was able to completely ream out the hose with a wire brush on an extension. Got most everything out from inside I think. I'm sure it's 100% functional again. Now to repaint it Hi Temp Silver, as it originally was. The more I inspect this hose, the more I believe it is factory original...primarily because of the preformed bends and the unique way one end of it is formed where it attaches to the crankcase pipe. You can clearly see where it was manufactured with a pronounced expansion at that end to accommodate the larger opening of that fitting. Thanks for all the advice....once again!
-
Thanks for all the suggestions. I'll definitely have to soak the inside of the hose good with some sort of degreaser/solvent before trying to ream it out with some sort of bottle brush. A lot of the crud in there is hard and caked on...I'd be surprised if anything with plastic bristles is going to hack it...but, we'll see...I'll report back once the job is completed!
-
Thanks Zed...so...I guess I'll repaint it silver...Hi Temp Silver probably...as for reaming it out with a screwdriver, I'll give it a try, but due to the 90 degree bends at both ends, and the relative brittleness of the 40+ year old hose (and the fact that replacement hoses from nissan are NLA) I'm not 100 percent confident that that will be effective...Hoping I can think of a way to ream it out with something more flexible than a screwdriver.
-
Thanks for that....then it seems that the earlier Z's may be different than mine (78). My PCV valve screws in on the bottom of the intake manifold and is connected directly to the crankcase via the hose I'm referencing...hopefully this link will show what I'm talking about... https://whiteheadperformance.com/gallery/datsun-l-series-engines/#
-
I know that there is supposed to be a flame arrestor inside the hose that's connected to the valve cover...but hadn't heard that there was one in the PCV valve hose....is it possible that you're confusing the two (or that I'm not describing the hose I'm talking about clearly enough)?
-
Was this hose originally painted from the factory? I removed this hose recently as part of an overall engine "clean up" project and noticed that it appeared to have been painted a silver color. Well, thinking that it must have been painted that way by a prior owner, I dutifully removed all the paint with a solvent. Then, while perusing numerous L28 engine photos posted online, I found several that displayed this hose seemingly painted a "silvery" color... Just wondering if it was originally painted from the factory (and why). Thoughts? Also...it appears to be somewhat "clogged up" with "gunk"....how would you recommend a thorough cleaning of it?
