JimmyZ
Free Member
-
Joined
-
Last visited
Everything posted by JimmyZ
-

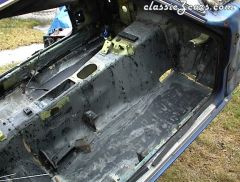 Floor pans are in. There are a few areas which need patch metal and the crossmembers need to be re-installed. The black caste is from Ospho.
 -
-
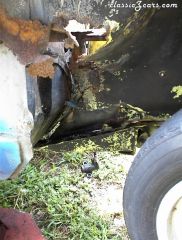 Battery acid ate through firewall, inner fenderwell and frame rail.
 -
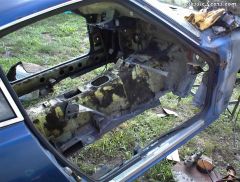 Initial removal of affected areas. Battery explosion spewed acid all over pass frame rail. It needed to be replaced.
 -
The price of R-12 (at least in Florida) has gone down quite a bit in the last few years. It is now very affordable! Stick with the R-12 if you like really cold AC. Conversion to R-134 isn't as straightforward as you'd think if it's to be done right. The cheapest/best route is to fix and fill your R-12 system. I visited my local A/C shop and was talking with the manager about the whole R-12 fiasco a few years back. I was mainly interested in prices and future availability of the stuff. Both questions were met with positive responses but he let me know about some low tricks certain A/C shops were doing. I can't remember if it was R-12 systems we were discussing but some places were mixing different refrigerants and selling them as R-12. This is not cool so make sure you are getting bonafide R-12. We discussed many types of systems so it's possible we were talking about refrigerants in restaurant applications. If so ignore the R-12 mixing sentences above. Jim
-
It's probably a case of them not hooking up the ground or the hot wire. I use a jumper wire to the fuse box for any testing that I do. Use a voltmeter and determine if the ground you made is really grounded too. The leads coming off the motor are about 9" long. The beginnings of these leads should be in plain sight. Simply unplug and apply some current. If the fan works there is a spring shaped section of wire that functions as a resistor. Check for voltage at this resistor element if the LO/MED/HI switch checks out OK. The leads from the fan switch attatch to different parts of this helical wire which allows for more or less current to pass. On later models it is mounted in the fan housing but I think it's in the dash on earlier Z's. I've got my dash out right now so let me know how things progress. I'll shoot you a picture of it if you need one. It is probably just an unplugged wire and not a part failure. My2C Jim
-
My Z used to owned by a race car driver who told of being run off the road, spinning out and passing the drunk idiot backwards doing 80! He had the skill to whip it around and catch the guy. I've heard that the Z's weight distribution (approx 50/50) favors slight acceleration during a turn. This helps the rear end squat during a turn and works fine on a track. In real life on public roads I found out how much trouble this can get one into. Driving home extremely tired I came to a sharp ninety degree turn and applied this technique. I failed to notice the oil slick in the middle of the intersection due to it being nightime. To make a long story short I overcorrected twice while trying to straighten things up. In a blink all the hard work I had done on my 240Z was moot becuase I ended up in a ditch. "Fortunately" the car was only submerged to the air cleaner. My shoes floated out the door as I opened it. Another time, I was "cruising" along the local Interstate at a clip much faster than the flow of traffic. I started to relax as I cleared the congestion and was moving through a pocket between congested areas. The Interstate had a large hill which hid what was coming next. As I crested the hill doing about 100 I found an ocean of brake lights greeting me with traffic moving ten miles an hour. Jamming on the brakes at the top of a hill is futile at this speed and the emergency lane was blocked. There was no choice but to "thread the needle" and go down the middle of the line. (Between two rows of traffic down the dashed line) I'm soooo glad nobody was waving their arms out the window because I had the car down to 70 before inserting my car where it shoudn't have gone. By the time I was down to 45 traffic had sped up and I was able to swerve into the left lane. Yes, my knuckles were white and NO I didn't crap my drawers. This second incident was a long time ago but it managed to influence my decision making. I could have died or caused someone else to die and for what?? It seems everyone in major cities has to drive a little over the edge to get by but there is an awesome responsiblity that comes with driving. It's called avoiding getting charged with manslaughter or having to be cursed with the guilt of changing someones life for the worse. It used to be that getting caught for drinking or speeding was no big deal. Nowdays the law doesn't play around. Trying to get ahead in life without a license is an almost futile effort. If you really must drive like a nut then make sure that you do so alone in the car on an empty stretch of road.
-
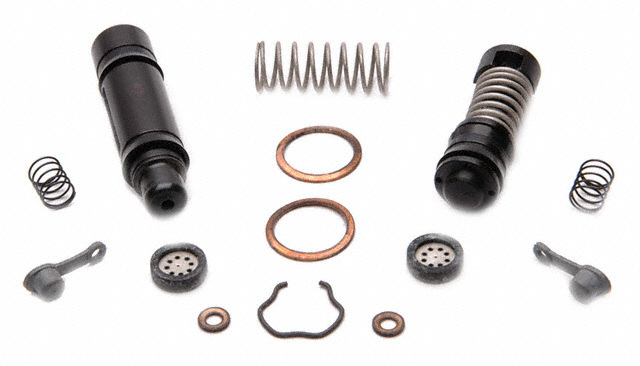
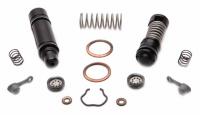
Just thought I'd share what I've found regarding rebuild kits. I got the LAST master cylinder kit in the USA today!!! It was $85.00 and purchased through Nissan. I tried Beck Arnley and Raybestos (aftermarket suppliers to parts stores) The early (69-8/71) master cylinder kits are no longer in production. New MC's for first gen Z's go for $180-$270 depending on who's supplying. Interestingly NAPA offered to rebuild mine for me at a decent price. The 7/8" seals should be standard items. Special tooling might be required to unscrew the piston without marring the exterior. (This is probably a collet chucked in a lathe.) I'll post dimesions of the rubber seals once I get things apart in case anyone has access to a lathe or means of unscrewing the piston. Jim
-
Not to worry Arne. The MC you currently have is the cheapest and easiest to replace part. I'm only going to great lengths to keep some authenticity otherwise I'd use a '72 MC. Now that I think of it the swept volume of each piston/circuit in the master cylinder is the same. Just change the reservoir. The reason for the larger reservoir is that as the pads wear a larger amount of fluid is required to fill the pistons in each caliper. The idea of having the front brakes on the front circuit may allow for some minimal redundancy. If there is seepage past the forward seals the rears are there to provide backup even though they are on another (sep) circuit. As long as the fluid is topped off it shouldn't matter which reservoir goes to front or back. Of course this is all my opinion but it seems reasonable. Jim
-
Liquid glass is awesome! It has an extremely fine polish which should nix anything that is too fine for prior polishes to get. In the final years of my paint job's life I used to use Meg #2,7,9 then liquid glass. By the time I was done you could only count 4 radial cobweb scratches/ three foot area using the sun. (You would need a clean room to get a better polish job) This is my measure of just how well a car is polished. I'm sure others use it too. Just stand in dif places and use the sun's reflection in the paint to spot any scratches from wash mit, towel, etc... Make absolutely sure hat there are no oxides on the paint or it will haze. (properly prep before app) Apply it evenly with an extra soft cloth and stroke in a straight line one panel at a time. If you apply it in sunlight it will stain the paint. Same goes for a hot surface so make sure everything is cool. This is really noticable on dark colors. Lighter colors aren't as big a deal. Try and keep it away from cracks/joints as the stuff dries hard and stains those areas. Post a picture of your finished product. It's possible that a garaged/tended car might have servicable paint. I would just like to see the old enamel shine. It's a challenge. Cya, Jim
-
Might be piston slap. If it is it should be gone or much quieter when engine gets to normal temps. If the engine rebuild was a ring job then it is probably piston slap. I drove mine like this for years. Keeps the rpm's down until the pistons have expanded (warmed up). Forged pistons can do this also due to expansion differences vs cast. My2C Jim
-
As a follow up on my earlier post... The latest news is that master cylinder rebuild kits for early 240Z MC's are not available from any of the major chains. Sure, they all list it but it might as well be on the NLA list. Hopefully this is temporary. I am waiting 'til Monday when Raybestos and Beck Arnley are in the office to answer whether or not the parts are made any longer. My local Nissan dealer is also waiting until Monday for word on availability. Nissan wants $85 for the kit but if they have it... Just thought I'd share this with my fellow first gen 240 owners. Hopefully Monday will see me with a kit on order. Is anyone aware of Master cylinder kits available in other countries?? (For '69-8/71 240Z's)
-
Have you verified movement of the slave cylinder? Does the clutch fork move 1-2"? (Have someone look at slave while U pump clutch pedal.) When you press the clutch pedal do you feel resistance in the pedal at the beginning of travel? By asking this I mean to ask if the clutch master adjusting rod is set right. There may not be enough travel in the MC's piston if this is the case. If you have verified the above and seen proper movement of the clutch fork then it is a question of just how stuck the clutch is. Sometimes you can unstick it by simply running the engine and pressing the pedal several times (20 -50) occasionally trying to put it in gear to see if it works. If this fails and the situation permits start the car in first gear and drive it. Rev up the engine (Increase speed of car) and cram on the brakes just short of stalling the engine. Punch/release the gas and generally try to get a real jerky ride also. High RPMs will increse torsional vibration which can help liberate the plate fromt he flywheel. Please be careful not to wreck and don't try this unless it is safe to do so. An abondoned parking lot with no traffic would be best. The last resort is to take tranny out and remove the clutch. Naturally nobody would ever try to use WD-40 or parts blaster etc etc to try and free the asbestos disc as this would create the need to replace the disc. You can't do this with a car but we used to take tractors with stuck clutches and drive them into a tree as the very last resort prior ro teardown. The jolt usually worked! My2c Jim
-
OMG that's a GREAT post!! I should have just typed that instead of the short novel! I thought he said a three year old paint job. Your'e right a thirty four year old is beyond saving. Jim
-
If you want true perfection then finesse sanding and a multi step process are required. What follows is a description of a process which has many opinions but the same principles. Older or abused paint jobs may be too far gone to salvage with finesse. My single stage enamel job was pretty much beyond after 17 years. Seventeen years ungaraged in Florida is quite a long lifespan for a daily driver! Don't apply wax/polymer over oxidized paint. To this end you'll need to polish the paint and remove the oxidized layer. Finesse sanding then polishing will give the best results. The goal is to remove as little paint as possible when polishing etc so this extreme approach should only be done two or three times in a paint jobs life. (Pref once) Simply polish and wax otherwise. Some quick but important rules... A shaded dust-free area is a must when doing any work on paint. The paint should also be completely clean, cool and dry before applying polishes. One speck of debris caught in a polishing head/bonnet can wreak havoc on the paint. Any sanding should be done wet with a clean flow of water used to keep the paper flushed. When sanding avoid edges or going up to the edge. Don't sand corners unless you want to break through and see primer or basecoat. If you sand too close to an emblem you can use hand polishing to remove the scratches. To Finesse sand... Start w/ 1500 grit sandpaper and a semi-hard tri fold pad to knock the peaks off and flatten orange peel. Go easy on the 1500 and just do enough of it to remove 70% of the peel. Follow with 2000 grit (soft pad) to make the sanding scratches from the 1500 less deep. By now you should have only 10% orange peel left. If the body work isn't so hot then leave a little more peel in the paint because it diffracts light and hides errors. Next comes the polishing step. Most production shops shun orbital buffers but I like them because of how slow they work. If you are impatient then get a rotary buffer with a set of foam pads. Being "old school" I use a commercial orbital buffer which is very heavy. Cloth bonnets or foam pads are used for each succesive polish/compound. I've used 3m and Meguiars but like the Meguiars better. Your local paint jobber can get the stuff. Ask for pints of each product because you'll never use a gallon soon enough. For removal of heavy oxidation/ finesse sanding scratches etc.. start with. Meguiars#1 (Med cut cleaner) Follow with #2, #7 , #9 and carnauba wax. For normal maintenance I like to use.. (In order of app) #2 Fine cut cleaner #7 #9 Carnauba wax My feeling about Carnauba is that it's oils slow oxidation more than polymers. Polymers are more durable and offer more chemical resistance in harsh climates. Regardless of claims all protectants should be applied once a month or when water stops beading IMHO. Repeat "normal maintenance" once a month and use the proper soap when washing the car at least once a week. (Not dish soap) Avoid having dust or foreign materials set on the car. Mineral deposits, bugs and tree sap are the worst! I like to use Liquid glass if I know that it will be a while before I get around to polishing again. It's a very nice product but needs good prep before application. Follow the directions though! Don't apply it in sunlight or slop it on the paint and spread it around unless you want it to make streaks/stains in your paint. I could and will write a lot more about this on my personal page. There are books about the specifics of detailing/ using equipment. Hope this helps, Jim
-
Hi kcoke, I just put up a similar post regarding rebuild parts. I'm going to NAPA tomorrow to get the parts. Wish to God that someone on the board would share their experiences with us. It would save some possible aggravation. A '72+ master cylinder can be made to work. The brake lines may need to be rebent or new ones fabbed to hook up to it. It has been many years since I saw another 240 so I can't remember the differences were. I once bought a MC from AutoZone and after opening it realized that all remans are for the later Z's. If it's 7/8" bore it should really be no prob tho. If you want to kep the car original then White Post Restorations can install a liner in your master cylinder. After that it is only a matter of getting a rebuild kit. I'll post again with the results of mypurchasing rebuild parts at NAPA. Comparing part #'s online seems to indicate that their parts for earlier Z's are correct. Automotive One in Orlando FL used to have all the kits for hydraulics on the early Z. I think they are going out of business tho. Bummer:( http://www.whitepost.com I was very pleased with the reline job they did. It took a couple weeks for turnaround but now my MC has eternal life as long as the rubber is replaced every ten years. Jim HLS30 23654 2/71 240Z
-
Just wanted to know if any of us have had luck finding 1st generation rebuild kits for brake/clutch master cylinders. I'm trying to avoid mail ordering parts as I would like to install the parts this weekend. BMC is Tokico 7/8 CMC is Nabco 5/8 My Z was made in 2/71 and has the earlier style Master cylinder and Clutch master. Years ago I was able to get rebuild kits for these parts but the shop I bought them from closed. NAPA online carries them but I suspect it's second gen parts. If I recall the second gen rebuild kits don't jive with the earlier parts but I could be wrong. I'm refurbishing the old parts because it seems that reman/exchange parts I've seen are second generation (72Z) parts. Although the second gen parts would work I like having original stuff under the hood. Years ago I sent the brake master off to get a bronze liner so it's lifespan is eternal as long as the rubber gets swapped every ten years or so. Just one more reason to try and save it. Any help/direction would be appreciated. Jim HLS30 23654
-
Just looked up Sydney Moon on google Image. If you get her to make an private appearance for me I'll do your car and her at no charge! She's smokin!!! The question is how much money are you able to spend? I lucked out and befriended a body shop owner down the street who gives me free use of his booth. I've learned from him that specialty work comes at a price. He's a reasonable guy but would charge a hefty price to be bothered by anything more than stuff that can be bolted on. There was a time when bodyworkers saved panels. Nowdays it is cheaper to replace panels, etc than to massage or patch things up. What I'm trying to say is that most shops don't have the time to play with time consuming projects unless you are ready to pay a premium price. (It's actually a fair price for them considering toady's labor costs/shop space utilization) It would be cheaper for you to buy a compressor and MIG welder and do it yourself. Sell the equipment on Ebay or something when you're done and recoup your money. What do you need done on the car? If you want to spend a weekend in sunny Florida replacing floor pans/rotted areas I'm game. I've got a plasma cutter, MIG, TIG, every air tool made by man, machine shop, etc, etc. Just make sure that you show up with new materials ready to install. This offer really goes out to anyone in a pinch with their Z. I remember what it was like working on the Z 17 years ago with minimal tools. Fortunately someone was nice enough to loan me the more expensive stuff such as a compressor. I'll never forget that and feel that it is only right to extend the favor to others. What goes around comes around. Jim
-
I thought all 240-280Z's came from the factory with clear. I'm sure someone on the board knows the answer. Where did you find the NOS windshield? Dealer??
-
Here is a nice "cheap" in car progamable batch fire system... http://www.sdsefi.com/ A few plane building friends have used it and loved it. It's a batch fire system but the flexibility of the system is very appealing.
-
Along Resurected's line of thought... Justice would have been served if patrol cars were dispatched to arrest the woman and she and her offspring were killed in the resultant high speed chase. (She could slide under a gas truck and taste her own blood before getting torched... Yes that would be nice!) Naturally, the cause of her accident during the chase would be yet another 911 call to "vent" to an overworked operator. Nobody this stupid should be allowed to have kids. They should have been sterilized if found to be as off kilter as this broad. Jim
-
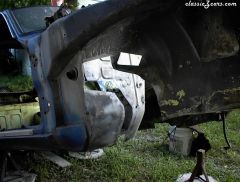
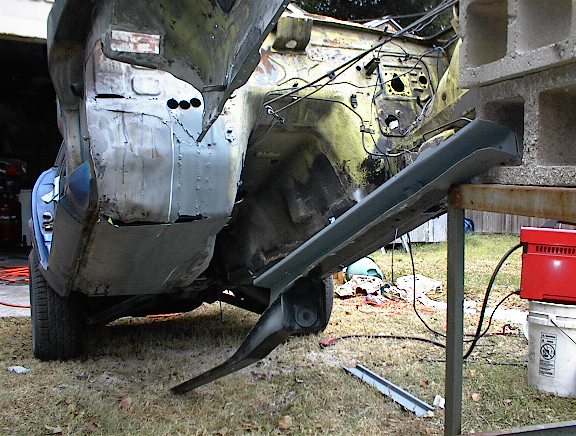
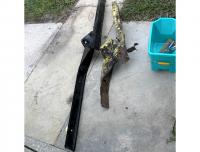
I saw a temporary fix for this once. A guy welded a 1/4"x2" wide piece of strap to the center crossmember. (From crossmember to Compression rod housing) Just about died laughing when I saw the fix but it got him through a little longer. Mine did this too. Like Zak I had to replace floor pans and one frame rail. (Battery acid runover caused it) Make sure that you use the crossmember as an alignment aid when replacing the frame rail. Frame rail replacement is pretty easy to do once you get the engine, tranny etc off the car. I could easily pick up the front end of my 240 once the front suspension assy was removed. This is a great excuse to sandblast and paint the engine compartment too! The attached pictures show passenger frame rail replacement. I had to cut out the battery tray and firewall material immediately around it because it was too thin to save/weld. You can see that my frame rail had the same tear as yours. It is a grave safety issue so fix it before it totals the car and possibly yourself with it. Jim

-
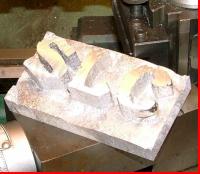
Yeah I must have received some improperly baked/applied stuff. The coating was exposed to chemicals on occasion. The tubular steel also flexed a little. I think they didn't take the flexing into account when deciding which material to use. Rims are mostly die cast but other methods can be used. It's possible that my old five hole mags were sand cast then machined. (Petrobond cast not greensand) This type of casting wouldn't mind heat. The problem with die cast is the voids. Heat the metal and you can cause stresses which become cracks. I'm not saying that you can't powdercoat mags. It's just a possibility that a crack might develop and cause a part failure later. As an example of hidden voids here's a pic of a hastily done plaster cast aluminum part. (Desk deco for a friend) You can really see the voids where gas was trapped. Machining exposed the voids. Nice site Cruez. I'd have you do my powdercoating before the local guys anytime.
-
I should have clarified that my aversion to powder coating rims was due to them being die cast. (more later) On flexible itmes such as pipe I've had it chip off in big chunks before. (Nope, it wasn't me that applied it) Imron's shine/luster would be better unless someone wanted a less reflective appearance. I'm just going on what I've seen at my local powder coating shop. I realize there are several powder formulas, each with unique properties. Maybe I've just not been impressed with what my local shop is doing. What I'm getting at is that I have to wonder how well it would adhere to aluminum rims over time. (Heat cool cycles when brakes are used etc...) I imagine something a little more flexible like Imron would adhere better on an application such as rims. (Just use tape weights) The comment wasn't made to slight powder coating but rather it's use for aluminum die cast rims. I machine and cast my own aluminum parts for various hobby projects. Some of the more critical stuff I send off to be heat treated. It is my understanding that Die Cast ally can be damaged from heat treating due to air pockets entrapped in the metal. I know it's only 400 degrees but it's better to be safe. Yes die cast can be heat treated if porosity and other factors are controlled. I've known a few friends that used powder coating for their steel rims (Jeep rims) with no probs. This is all MHO of course and my2c Jim
-
If the scratches aren't too deep you can sand then polish them out. This is made easier with scotch-brite/velco discs that fit 4-1/2" angle grinders down to drill size implements. The smaller version for use with a drill is what you'll end up needing for curves, detail work, etc. Here's a link. Check out the Surface Conditioning Discs (Scotch Brite not aluminum oxide) http://www.use-enco.com/CGI/INPDFF?PMPAGE=149&PARTPG=INLMK3&PMITEM=990-1302 If you can sand the scratches out then progess to 220 -320 grit paper. Switch to Scotch-Brite to get overall and any stray areas. Hit one last time with 400 grit then whip out a buffing wheel and progress through the various grades. Finish with a good metal polish to final polish and protect. You can easily get a mirror finish this way. IF you decide that you need to paint them then you'll need to acid etch the rims before priming OR you can use an etching primer. Ideally you'd want a really tough paint like Imron. Spraying this requires a fresh air mask as repirators won't protect you from it. Sending the rims off for powder coating is another possibility. I'm not that crazy about powder coating though. My 2c Jim