JimmyZ
Free Member
-
Joined
-
Last visited
Everything posted by JimmyZ
-
 I think it's wrong that they are taxing cigarettes to the point of near extortion. I also think it's wrong to deprive someone of their property in certain cases. (Cars, imminent domain/condemnation, inheritance tax, etc) The issue here is social reponsibility and people's need to be aware of it. How to do teach an irresponsible kid such a thing when tickets/accidents are paid for by mom and dad? The only justifiable way I can see them crushing a car is if it is a repeat offender. We've all driven like we stole it at one time or another. Many of us are lucky to still be alive. As the world's population gets crowded social responsibility becomes imperative. Look at NYC and what it took to make it what it is today. I don't like zero tolerance laws but look at what the effect was. The way things are going, crushing cars and overpriced cigs might be here to stay. 2c Jim
 -
It looks nice using the same color but I'd prefer to have original color on back. Contrast is good.
-
Here's a link to some pictures inside my tank... http://warbuddies.homestead.com/gastank.html
-
There is a baffle between the pickup and filler. The baffle is directly underneath the termination of the tank's "hump". FWIW. I used a hair dyer to heat my filler neck so that it became pliable. You have to keep the plastic warm/hot as it becomes rigid quickly when the heat is removed. Use a fan to blow the fumes away from the hair dryer as you can imagine a remote possibility of the gas fumes igniting.
-
NICE!!!! Beautiful shots, car and scenery. AZ is a beautiful state. Jim
-
I've no problem with the 350Z except that most 350Z drivers I've run into aren't in touch with with the Z legacy. When you drive a motorcycle suddenly you realize that you are part of a larger brotherhood. Depending on where you ride, other cycle riders usually display a nod, wave, fist or some other method of greeting. When driving an S30 this brotherhood mentality comes to an abrupt decline when one encounters the newer 350Z crowd. This is what pisses me off. We're part of the Nissan Z "brotherhood" and the newer crowd often chooses not to see it. I've had exceptions. Winding down a country road, I looked up and saw a 350 in the mirror. Stuck my hand out and waved and both people in the 350 leaned forward and waved. Things like this make motoring a great experience... Sharing the road with your kind. Jim
-
There is at least one engine builder on the site who could easily answer your question. Haven't seen him post in a while. I'll give your post a bump. I've only rebuilt a few engines and have always built them for street use. Never got to try anything wild. My first guess is that you had plug interference on more than #3 cyl. Dome cracked and in time failed. You might find that more than one piston got "stamped". Try using some clay and reassemble head/block to verify this. Stressed parts don't do well when notched. How much clearance did you have with the deck? I imagine the head was milled to increase CR?? Forged pistons or cast? Forged might tilt just enough when running cold to take one side up a few thous and if the clearances were too close... Just pulling at straws. Bump Jim
-
Thanks Will, My glass is fine so I don't need any now. Years ago I accidentally broke my driver side glass but knew of several 240's in the local JYards. It was easy to get spares then but now... Just forming a shopping list for the next 240 that I find in a junkyard. Used to have tons of spares but several moves and swaps have whittled things down a bit. Thanks again for the offer. Might have to take you up on it someday. Jim
-
Noticed in the Black Dragon catalog that the door glass isn't listed for the 240Z. It says "260-280Z" Is this a typo/ommision or is the 240 glass unique to the model? Curious, Jim
-
The hose I mentioned earlier is boat vent hose. (Fuel vent) According to the supplier it is OK for exposure such as the side vent hose. It was slightly thicker than the original Z hoses. Here's a link to their catalog... http://www.amazonhose.com/Boat-Fuel-Hose.asp
-
Amazon hose here in Orlando has the exact diameters needed. (fractional inch stock not metric but it's close enough) Total for all hoses thru them was $60.00. If U like I could get some for you. Jim
-
It will be cheaper to get a Junkyard tranny for $100-175 than to replace the bearings. If you buy bearings at a local bearing house rather than Nissan You might get away with spending 100-125. You are really better off getting nother unit though. Should you decide to take this challenge... I've replaced bearings and synchros in my Z tranny(s) over the years. It's a fun thing to do because of the sense of accomplishment once it's back together. The bearings sitting in the lower part of the tranny seem to go earlier because of what runs through them. Making a plate out of wood to hold the bearing carrier and getting the detent balls/springs back in proper order is as difficult as it gets. You will need to take the input shaft to someone to press off/on it's bearing otherwise the rest is "in house". Get a really GOOD set of snap ring pliers otherwise you'll cuss your way through the whole thing. I used an unfolded pizza box to arrange parts as they came off. The Haynes manual was my best freind for helping get the detent balls back in right. 2c Jim
-
Just a thought... I don't think I saw that you tried another cable. I hit half a truck tire while driving at night and cracked my speedo cable. Didn't know 'til 500 miles later and 1000miles from home. Ended up doing a field tranny swap. Lots of fun. 2c Jim
-
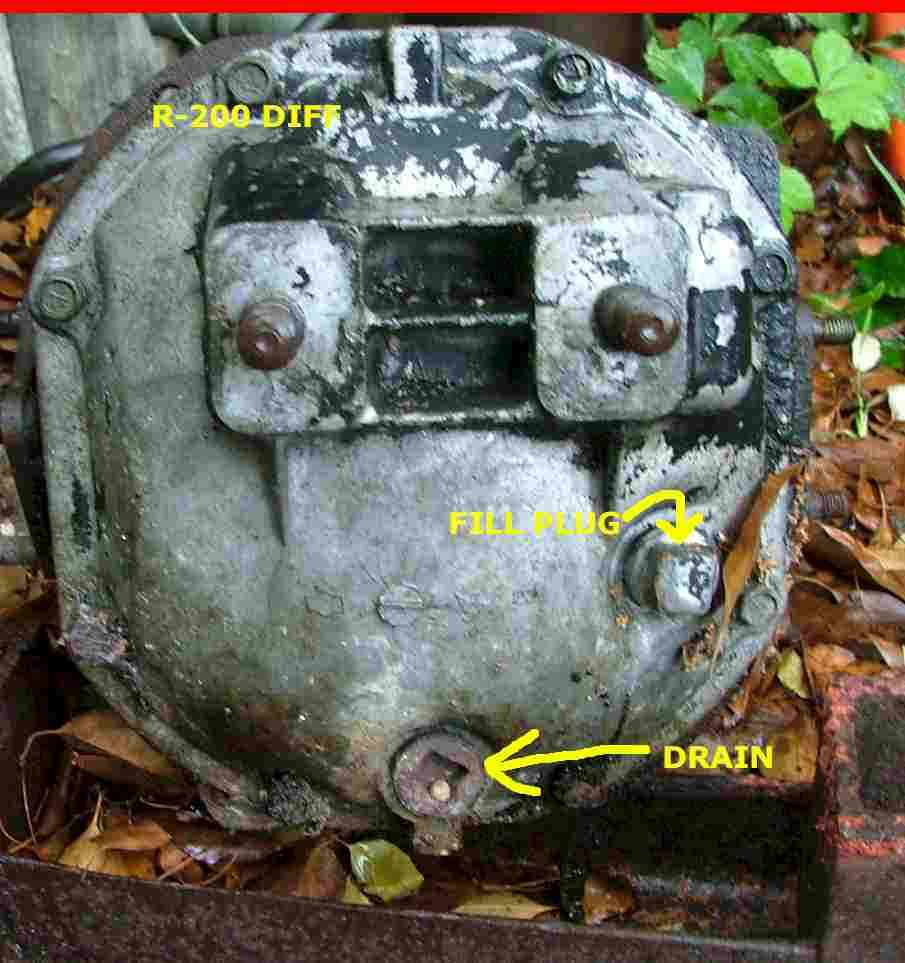
here's a pic:classic: This is an R-200 differential. R-180 plug is more centered.
-
Although the pump is nicer to use you can also get away with jacking the rear end higher and using the pointy spout that comes with the liter of gear lube. (Snip tip of spout of course) Messy, but it works. Fill plug is a male square protusion which threads in. 2c Jim
-
A few links which may/may not be needed. Here's a link to Hirsch's tank etch. I got 2 pints. http://www.hirschauto.com/acb/showdetl.cfm?&DID=27&Product_ID=7&CATID=3 Got my RedKote from Bailey Motor Equipment out past Taft. They are nice people and will sell you a quart. Think it was $35.00 (If you want to DIY otherwise let the radiator shop get it) http://www.baileymotorequip.com/ Ben's Paint supply for Ospho... http://www.benspaintsupply.com/locations.html A quick synopsis of basic restoration/refreshing. Check out the rust section. http://warbuddies.homestead.com/RestoHelp.html 3c now I'll stop posting
-
The aforementioned radiator shop does the usual boiling and acid treatment. When the metal is rust free they apply RedKote (From here on "RK") by sloshing. The directions permit the use of a thinner to allow better distribution. You still have to work fast because the stuff sets fast when exposed to air.. even thinned. If you were to use the radiator shop you could request they use Hirsh's tank etch (follow directions) prior to applying RK. This would be MUCH better. You would have to provide the Hirsch etch as I'm sure they would not order it. It works REALLY good. (The etch not the tank sealer) I don't care much for acid treating tanks as a primary means of rust removal. There is still a chance for rust to come back as 280~ said. Here's what I did for my tank... 1.Removed majority of varnish by allowing laquer thinner to set in tank for several hours. LT gets just about everything. (Varnish has to go as it can harbor explosive fumes) 2.Built a water tank for submersing gas tank and did electrolysis for three days. (Washing soda and 12V battery charger. This process strips any paint, etc from the tank. It also did away with some but not all of the rust. Electrodes were used inside and out. (Electrodes can't touch tank of course) 3. Now that I was absolutely certain there were no fumes left in tank I cut an access hole for sandblasting. 3.5 Sent tank off to have some offending vent tubes resoldered. (One had leaked and one was loose) 4. After inside of tank was sandblasted I sloshed OSPHO (phosphoric acid) in the tank to kill off any remaining rust. 5. Sandblasted inside tank to remove OSPHO and anything that remained. 6. Welded patch over hole cut for sandblasting. 7. Dumped in Hirsh's tank etch. This is akin to using Zinc chromate primer on bare metal. It preps the metal for paint/covering. 8. Waited a day then sloshed thinned RedKote. I just taped over the openings such as fuel sending unit. Used hand sandblaster to suck RK thru lines to prevent clogging. Sealing surfaces such as sending unti area were cleaned up using Acetone. 9. Painted tank with Basecoat/clearcoat. 10. Allowed one week for RK to cure. This is much longer than they specify but I was in no hurry. Thinned RK can cure in a 12-48hrs. Better safe than sorry. I lookd into plating the inside of the tank, Hirsh, POR etc. Plating is not feasible according to a knowlegeable plater. (Unless you have factory grade equipment) Hirsh and POR camps have thrown so much indirect flak at each other I just said to hell with 'em. I got to see what happens to Hirsh's white sealer when it goes bad. I've also heard a few reports of POR going bad and dislodging like a garbage bag inside a tank. The Hirsh thing was due to chemical shortcomings. POR's problem was probably due to user error. POR's film is tough and adhesion is good. Try stripping it and you'll see that it comes off in big sheets though. I perceive that RK is not superior to POR except for the fact that if you screw up it is easy to undo. Screw up with POR and it is not easily undone. By "screwing up" I mean bad prepwork. This is my long-winded 2c and of course my opinion. Jim
-
BTW There is a radiator shop in orlando that did all of my sweating. (Lead soldering of vent tubes) They boil tanks and use RedKote. They are near Robinson and OBT. Not the best area of town but they are good. RedKote does a nice job of sealing pinholes too. C & M Radiator & Air ConditioningAddress: Unverified listing - - more info »Placement on map is approximate 1228 W Robinson St Orlando, FL 32805 (407) 422-6007 - Here's a quick video I made of some leftover RedKote. Its neat stuff. http://warbuddies.homestead.com/RedkoteTank_Liner.wmv
-
You can do a search through past posts regarding gas tanks. Safety is the first concern when "playing" with your tank. I used RedKote to line my tank. The advantage of using RedKote is that you can remove it with MEK. Other tank sealers are more difficult to remove later. The Renu people are definitely the way to go if U have the money.
-
The personal development/accomplishment that sprung from my love of the car... All disciplines mechanical, etc... The car and I have shaped each other. For some of this and else everything there's Mastercard:) Made some damn good freinds along the way too. You guys are icing on the cake. Jim
-
Thanks for the replies all. All I have left of my old system is the interior components. The York Compressor took a dump a long time ago so I junked everything except the evaporator box. Although it could be married to new parts I'd rather get a fresh start with all new parts. I liked the York and the R-12 kicked butt. Power loss was very minimal. The ONLY thing leaning me towards 134 is the fact that it is easy to get which would allow me to service it myself. (With proper equip) I've heard stories about techs saying they were using R-12 and using some other crap instead. Don't know that much about A/C but I do know that mixing things can be detrimental. Took note of Inf's post regarding mold. Could that be a drainage problem or did a lizard/etc start decaying in there?
-
Yeah, I agree. The 2/71 doesn't have the compartment for the mechanism. Something tells me it may be a while. I just tried to edit my post but passed the time limit. Ugh!
-
Thanks! I'll check it out:)
-
I'm VERY interested in obtaining a set of "Z" pushbutton seatbelts for my 2/71. Does anyone know where I can find a set?
-
not to make any trouble but I clicked on the picture and got a starware pop up. Is it just me?