JimmyZ
Free Member
-
Joined
-
Last visited
Everything posted by JimmyZ
-
 possibly have them powdercoated?? There is a powdercoater in the group.
 -
Hi All, I'd like to find out how well the 134 system offered by MSA cools. It is my understanding that a 134 system has to be larger to provide the same cooling that an R-12 system provides. I imagine that the MSA 134 kit uses the same sized components as the R-12. Has anyone used both? I used to have a "factory" R-12 system in my '71 240Z and it was great. It used to blow air so cold that fog came out of the vents. Have any of you found that the newer systems run as cold/comfortable? I'm looking at getting a new system because the old one needs to be replaced. Thanks, Jim
-
You can reference past threads and find that there is a better fitting WXstrip sold thru JC Whitney. The strips made by Precision are for 280Z door jambs which are a little different. 2c Jim
-
Re media and compressor size... I like glass beads as the really fine grades root out rust better and don't remove as much good metal as sand. My 5hp compressor can't keep up with the gun and gives 1 minute of good blasting before it needs to catch up. My 7hp compressor keeps up with the cabinet's siphon gun though. Got the 7hp at Harbor F. on sale for $350!!! I had a larger cabinet but used it so infrequently that I chucked it. (Needed space) Shop space is valuable so get the big one only if you know that you'll need the capacity. You can always remove the mesh floor on the tabletop unit for more capacity.
-
I have a Harbor Freight table top unit. It's OK but it leaks glass beads in a few places. (Before filling yours seal the seams.)The ceramic nozzles require a decent sized compressor if any sustained blasting is to be done. To me, such a cabinet is a real help. The main pain is the need to ventilate and evacuate the suspended media. If you don't use a shop vac or some means of sucking the air to an outside place your shop will develop a cloud of blast media. This is not good for your health. My 2c
-
Here's a page I made which might help. http://warbuddies.homestead.com/RestoHelp.html Jim
-
Very cool! I'm glad to hear that your dealer wasn't trying to do what mine was. If I had ben armed with the right part# perhaps things would have been different. Jim
-
While we are on the topic is it possible to buy our connectors new? (Plastic parts) Are they a standard item that anyone is aware of. I just junked a mid-80's Maxima and poked around a bit. It seems there are a few connector types which they share in common but not all. Restating the question... For those of us that desire to reconstruct an origninal appearing harness from scratch is there a place where can we get the plastic connectors new?? Buying the wiring/connectors could actually be shared between a few members so as to even out and make the cost worthwhile. (Noone left with 50 feet of unusable color coded wire) I'd love to do this if anyone else is game. Jim
-
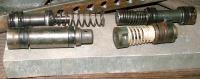
Nice that White Post is doing rebuilds now! When I used them I don't think they were. (15 years ago) I'm still perplexed at how they would get the right rubbers. Nobody supplies them anymore. Matching OD is easy but getting the ID and thickness/profile which matches the shoulders of the pistons would prove interesting. (Unless they make the pistons to suit) I spent about a week searching online and calling parts stores but had no luck locating rubbers. Many of the sources said "I can order that.. No prob". When time came to order it I got the usual "It's in the system but has been discontinued". I was able to buy the last rebuild kit from Nissan though. Before sending off to White Post (If you choose that route) I'd make sure they can get rubbers. Are you sure that Nissan is not trying to give you a later series MC? Reed Nissan was all ready to take my money and order one but I had them look into what they were actually going to get me... This would have been the 8/71-> MC. The dealer was more eager to sell a part that worked but not the "right" part. I had to insist on seeing the paper parts manual and then note that the MC# was different than what they were going to get me. Someday I'll get the parts CD offered by this site. Here's a pic for comparison. The bottom is the pre-8/71 MC internals. On top is a Maxima MC internals. Both have the same bore but the thickness of the rubbers is different. It's funny that the thinner/lighter rubbers are for a Maxima station wagon.
-
Hiya & FYI:) White Post doesn't offer rubber kits. All they do is bore and insert a bronze or stainless sleeve. This sleeve is then reamed and/or honed to spec. WP doesn't rebuild cylinders they just get the MC bore back to tolerances. It is really a thing for rare and exotic cars but they humored me just the same. Really nice people. As mentioned NAPA didn't sell a rebuild kit but a local NAPA store did offer a service where I'd send it to them and they would stick in some new rubbers. (My thoughts on rubbers at end of post) If you can swing it I'd just buy the master cylinder from Nissan. (If they still sell the early one) When I went there I wasn't armed with a part number but they said that the part had been superceeded by the 8/71-> model MC. Still, I was able to find that some parts stores showed that you could buy the "correct" MC for $275-$300. BRE... Did you say that there are only four left??!! Seems your parts counter is better than mine. Four though:( After taking several other master cylinders apart I've come to the conclusion that the style of rubber used in the early MC design isn't common. Perhaps my NAPA had the inside track perhaps they just THOUGHT they did. Since I do machining as a hobby I like to study such things. The early internals for the MC are more complex than other designs. This doesn't mean that it would be that hard to make some altered internals that utilize readily obtainable rubbers though. I've got about 7-15 years to figure this one out before the MC needs rubbers again. Pic of rebuild kit... Too bad nobody has/offers one anymore. http://www.classiczcars.com/forums/attachment.php?attachmentid=14492&d=1160278383
-
Does Kragens offer a kit?? I had my master cyl bored and a bronze liner added. White Post Restorations did this 15 years ago. I bought the last rebuild kit from Nissan a couple months ago. It's a shame that nobody offers a kit. I replaced the rubbers as prevntative maint and found the bronze bore to be shiny and smooth. My local NAPA offered a rebuild service for the early MC maybe they have a parts list for the individual rubber parts. You can still buy a brand new MC for around $275. 2c Jim
-
I've been fortunate enough to befriend people with Z's over the years. In time they sell or junk the car so I end up getting their spare parts stash. My Z is just getting back on the road after 5 years. What I find most shocking is that there are no junkyard 240's around. You bet I'm going to start stockpiling parts. It's not a disease. It's Z preservation.
-
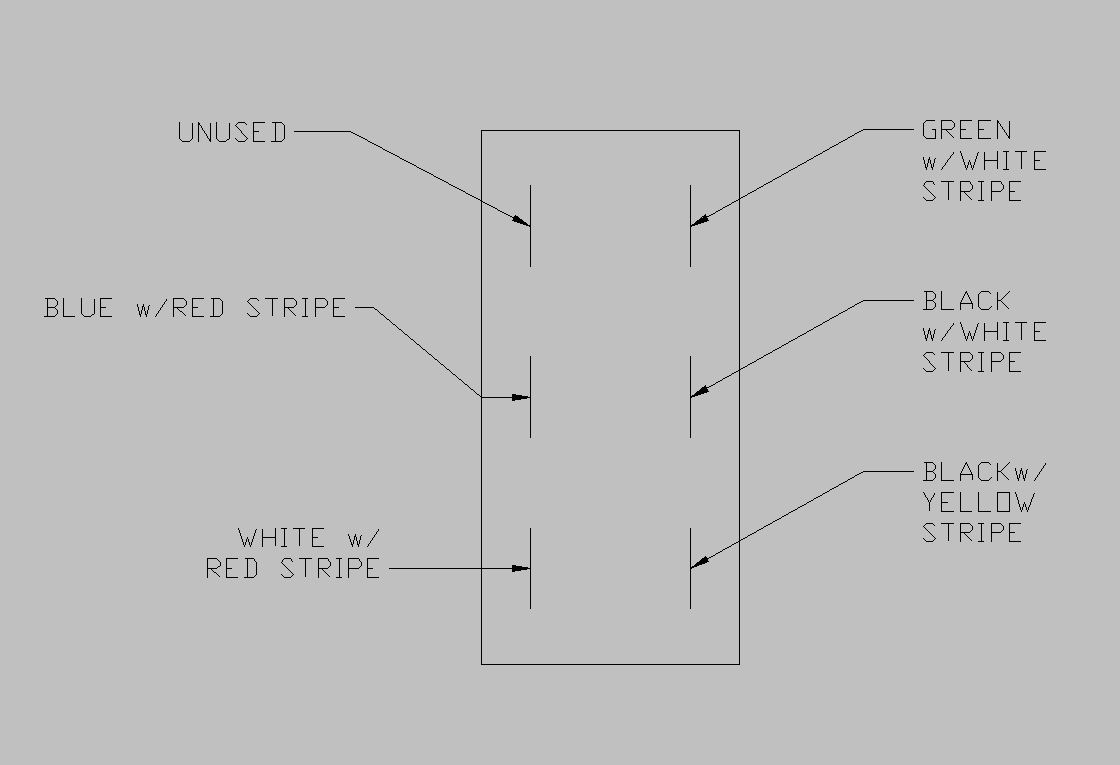
The following post is a copy from another but seems valid for the topic... I had a great realization/lesson about my White wire with red stripe. Driving down the road I noticed the smell of burning wire so I shut down the car immediately. Turned out it was the WR wire to the fuse box. I had no lights or accesories on and the AMP guge read full charge. hmmmm.. After some consultation of the wiring diagram I decided to unplug the field wire from the alternator. The wire now stayed cool even with the lights, etc, on. Hooked up the alternator and a voltmeter and found that I had a bad regulator (16+ volts) Replaced the regulator and no probs. Just need to fix the melted plastic connector now. A fusible link would be nice to have on the WR wire where it comes of the alternator. This might save the day in the event of something like this happening. Hard to say what rating though... 30-50 AMP might do OK. I'm leaning toward the 50 though. 2c I would very much like to buy a brand new harness. Considering making my own as the hot wire problem above really put me in a panic. Jim Jim
-
What a coincidence! I had a great realization/lesson about my White wire with red stripe. Driving down the road I noticed the smell of burning wire so I shut down the car immediately. Turned out it was the WR wire to the fuse box. I had no lights or accesories on and the AMP guge read full charge. hmmmm.. After some consultation of the wiring diagram I decided to unplug the field wire from the alternator. The wire now stayed cool even with the lights, etc, on. Hooked up the alternator and a voltmeter and found that I had a bad regulator (16+ volts) Replaced the regulator and no probs. Just need to fix the melted plastic connector now. This might help here. Jim
-
The large white w/ red stripe runs through the AMP guage. (Under dash) I believe this is the same wire that is hooked to the alternator hot lead. You've got some real problems it seems. (As in replace both harnesses) If you are trying to jury rig an electrical system for temp use then it may be easier to bypass the regulator with a manually switched field wire to the alternator. This is just the beginning because you would really need to make an entirely separate system if you wanted any lights, etc. There is a good chance that other wires will follow suit due to their proximity in the bundle. Best to take pictures and unsheath the entire bundle and fix what has melted. (Engine cpt and under dash harnesses) While my dash was out I had to fix a few of my wires as the insulation had begun to melt away. The funny thing was that I couldn't figure out why the wires had begun to melt. They weren't part of any of the usual suspects like the headlights or other high amperage carrying lines. Hope this helps. Jim
-
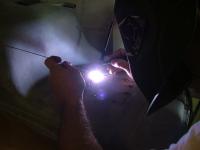
Yes push. This keeps the heat moving ahead. Set the wire feed rate to a speed which sounds like bacon frying. Not a pop.pop ..pop but rather buwhaaaa. If you can feel the gun being pushed back by the wire contacting the material then you are going way too fast. I know this doesnt help a bit. Remember that fitup should be no further than the filler wire is wide ideally. You can get away with larger gaps but this is not ideal. The gap your plasma cutter is leaving is too wide. A good weldor could manipulate things to fill such a gap well but this takes finesse. Try lap welds on thin sheet for starters. If you burn through on a lap weld then something is really wrong. Another thing to try is the tack technique as mentioned on my webpage. Just try laying a series of tacks at opposite sides of the panel until all of the tacks close things in. Once again precise fitup is the key to making things easy here. Remember that the slag the plasma cutter leaves behind is not ideal for joining. The metal's edge needs to be cleaned up. Use an air cutoof tool to straighten your cut and clean the edge at the same time. I'd like to make some video of actual welding but finding a shade and shutter setting that lets all the detail through is tough. I'll see about posting a vid tomorrow. Jim
-
Thanks Ron:) While I was out I thought about onuthin's welding experience. Onu... Have you welded on thin stuff before or did your training revolve around thicker material? The reason I'm asking is because you may be used to weaving or some other pattern while laying a bead. On thin stuff MIG is done with a leading angle with no weave. Just move in a straight line. 2c Jim
-
Here's a page I made for our type problems... http://warbuddies.homestead.com/RestoHelp.html If you have your machine on the "1" (lowest heat) setting and are using .023 wire and STILL blow holes then perhaps your wire feed rate is too slow. Maybe your travel rate is too slow. Try using a gold shade 9 lens on the "1" setting as this will let you see what is going on better. Are the two pieces being joined as thick as the filler wire?? (.023) If they are thinner you will need to pulse the gun so that you can build some thickness. (At least on the thin areas) Just tap the trigger long enough to lay down a small glob of metal. See the link above for details. Make sure that your wire feed is consistent. (Equip set up right, Rollers set right etc) Here's a page I made which includes some welding tips. Autobody welding is not as critical therefore you can cheat a little and do things which would not pass otherwise. Use proper welding technique/practices for anything structural of course. Patching a fender or other cosmetic repairs is what I'm talking about. Hope this helps. Jim PS Post a pic of the front of your machine. Maybe one of us has used one of these and can eye the settings for you.
-
While taking machine shop I got some welding instruction at the Vo-Tech. I'm not certified but have had many cert weldors say I would pass easily. I own a 200A/MIG, 300A/ TIG, Oxyfuel set and plasma cutter. All of these came to bear on the Z at one point or another. TIG is too slow and filling holes with MIG is easier. Just use some .023 wire and Argon/Co2 with a decent MIG. Once knew a guy that TIG'ed all of his patches on a VW. Beautiful work, but the concours judges spotted some areas which had weld beads near the engine. (Points off for that) This was a shame because his patchwork was meticulous otherwise. For autobody MIG seems to be best to me. Distortion is less with MIG unless you go to great pains to keep the heat down with TIG. (Using a .020 tungsten for instance) Fitup and cleanliness is more critical with TIG than MIG. To me, using a foot pedal beats the crap out of a silly torch mounted switch. Such a switch is almost a must when TIG'n parts on the car. It is possible to TIG and end up with a weld that is perfectly flat on the front and back sides. There was need to cut an access hole for sandblasting in the top of my tank. (Picture below) Something critical like this could be MIG'ed but since it is a life threatening thing to have a gas leak I chose TIG.
-
At least you didn't paint it then realize that your perfect paint job was not the color you wanted. (Color mixing error) I had this happen to me. Paint looked "right" under flourescent light but outside it glowed a loud... no screaming version of the red I was shooting for. Bottom line is that when you are new to this stuff you will probably end up redoing things a few times like it or not. It is a great experience though... Doing it yourself. Feel'n your pain. Jim
-
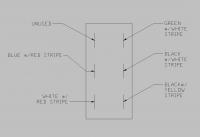
HERE YOU GO... This is off of a 2/71 The attachment is best viewed at full size Hope this helps. Jim
-
Wow! This is a very enlightening thread. I also looked up the link to the previous key discussion. Pretty cool. Zbane, You say that the "N" key you have belongs to a ZX?? I thought the round N key was for the early models only. Jim
-
Just logged in... Thanks for the pics of the round key. This will help me show people what I'm looking for when asking around. I have a working (but different) key for the ignition. My original "N" key was getting too smooth to unlock the doors so I retired it. Several years/moves later I can't find it. It just felt like more of a classic car when I used the N key. Thanks Jim
-
Do any of you still have your original round key with an embossed "N" in it? (Has holes too) If so, could you post a picture. Better yet does anyone know where to get a blank N key? (w/o purchasing a set) My 2/71 Z had such a key but the ignition barrel took a dump. Now all I can find is the ugly no-class keys you get at the locksmith. Jim
-
Great! Glad to know he's still doing it. I just need some simple but 240-only parts. Thanks Jim