JimmyZ
Free Member
-
Joined
-
Last visited
Everything posted by JimmyZ
-
 No prob. If water flows in one hose and out the other(engine cmpt side) then I don't know what to say. You flushed the core by disconnecting both hoses right? Might try reversing the direction of the flush in case there is a chunk of something blocking the valve. Just grasping at straws here. Jim
 -
This thread is taking me back to past trips in junkyards! I miss my 2/71 Z key. It had a "N" with holes. Anyone have any original key pictures?? Can you still get the "N" key??
-
If the pump weren't doing a good job then the engine would seize. (Ask me how I know this!) Verify that the coolig system is full and that it is purged of air by checking level after engine has cooled. If you are sure that the hoses are hooked up to the core and that the valve is functioning when you turn it to hot then you have a real puzzle. The valve is on the passenger side by a vent. (A foot from your knee when sitting) Check that the valve is moving when you shift the control lever. It is possible that someone bypassed the heater lines. Check that the lines exit/re-enter at the rear side of the engine. To eliminate the valve/heater core as suspects you could always disconnect both hoses and flush with water to check for flow. (Valve on/open of course) One other possibility is that the thermostat you have is rated at a cooler temperature. Don't know if they offer diff temp T'stats for Datsun but they do for other cars I've worked on. Make sure that you installed the theremostat right side up by comparing it to a manual's picture otherwise it may not flow.
-
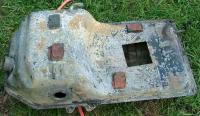
Determine if it is a replacement pan and not a failing old pan. The stock floor pans have a 1/16" thick asphalt-like melt sheet applied to the metal. They also have several removable rubber drain plugs. Even the fine aftermarket ones I've seen don't have the holes for the plugs. Is your frame rail extension installed underneath? If the frame rail extension isn't there than there is no reinforcement therefore things will flex. It might also be a cracked weld from improper prep. (Unlikely) If the FR extension/channel is there and all of the welds are holding then here are some options... You could either use the torch and cool method or cut out some excess in the middle and reweld the seam. (Not over the FR extension/need access to repaint) It is probably beyond using a shrinking hammer or shrinking dolly. With these methods you will need to repaint the affected area of course. The torch and rag cool method would prob be best cosmetically IMO. I live in Orlando (Winter Park) but it would probably be cheaper to take it by a body shop and flip the guy a $20 to shrink it with a torch. (If that's what's called for) Jim
-
26-27mpg@90 is average for mine. The Z is a nice thing to ride in for a long trip. Never had trouble getting sore on extended trips. Orlando,FL - St Louis MO - Oklahoma City and back is the longest I've gone in one trip. Done a few trips made in 24hr speed runs too. Can't wait 'til the Z is back together for some more. Bummer is that spares are becoming more scarce. (Had to swap tranny at relative's garage in Oklahoma. Lucky to have found one at JY) I think it's funny when you go to a backwoods area and the kids come running and screaming in wonder at the Z. They really think it's an exotic car since you don't see many anymore. It's always fun to not burst their bubble and let them think they saw a true exotic. To me the Z is just that even though I know better.
-
I have a friend down the street who has been in the business for 26 years. $4100 is not bad but it really depends on the level of work they do. My buddy has charged up to $10,000 for a proper strip and repaint. (More in a few cases) To me, painting the car completely disassembled is the only way to go if you truly love it. (Needs to be painted all at once for best color match) This is a pain and requires care during refitting and also happens to cost $$$. The question you have to ask is how meticulous do you want them to be as far as eliminating rust and it's chances of reoccurence? This is what really makes the diff. You will almost always find rust underneath the winshield/rear glass areas. The degree of treatment determines how long it will take rust to resurface if at all. Here's a link I made for such issues. It is far from being authoritative as I have only done a few cars. What I have seen is how long lasting the repairs I made were as compared to other, more common treatments. http://warbuddies.homestead.com/RestoHelp.html My emphasis/belief is that the metal underneath, not the paint on top is most important. (Yes paint is important too) Most bodymen know what it takes to treat metal right but they often cut corners in the name of saving time/labor. My wife's Volvo is an example of this mentality. It has sheet rust beginning to bubble through in certain areas indicating careless work. My 2c Jim
-
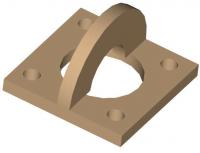
It is possible that a good impact wrench will whizz it off. (400 ft-lb+ rated) The tire would have to be on the ground or held by someone during this. In the manual the axle nut will come off when you make a tool to lock it. The tool has holes which the lugs attach to and also has a provision for inserting a bar to lock the axle in place. (Mentioned in first reply) Does someone have a picture of the special tool? It is in every manual I've seen made for the Z. It is used when replacing the rear bearings. Trouble is, I can't find any of my manuals to get a picture! If memory serves me this nut is torqued to 180 ft-lbs. Not having a manual I would refer to one or one of us with a manual before reassembly. As for the second problem try some penetrating fluid first. (Parts blaster etc...) Allow it to soak for a day or so. If this fails you then a torch should help liberate it. (Think I had to torch mine) Heat the OD of the assembly and try to keep the shaft cool. The temp differential will cause the parts to separate if they are rusted or if there is any interference fit. When I say "torch" I mean Oxyfuel/Acetylene rig as in a "real" torch. A propane torch would not heat it enough or fast enough. If using the torch get new bushings. You were probably going to replace them anyway right? The parts are removed when hot so that the expanded(heated) parts allow to others to slip by freely. Take measures to ensure that you don't mushroom the bolt or damage the threads. Hope this helps Jim As for the axle locking/pulling tool here is a pic I drew from memory. It's a simple tool made from plate steel. You attach a slide hammer to the tool when pulling the axle or insert a bar in it to lock the axle when using a breaker bar.
-
I'll see if I can dig it up. (Haven't put the car back together completely yet) Memory says that it is 23654 on dash and plates. Engine says 30xxx. The previous owner said it was the original engine but he did send the engine out for a rebuild. To be 6000 digits off is a lot but seeing 26thZ's engine #2338 gives some hope. Jim
-
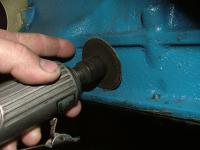
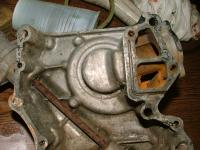
If you screw up while doing method above you can always drill and tap a slightly oversize hole/ next thread size up. As HLS30 mentioned a left handed drill bit might eliminate the need for an easy out. 90% of the time the LH drill bit will get it on small stuff like this. There are lots of posts with diff methods for broken bolt removal too. You may be able to notch the head of the bolt and turn it with a small screwdriver. (If it is one of the bolts shown in the pic below) When there is enough to grip with vise grips you'll be set. Take it out through the bottom in case the shank provides interference. 2c Jim
-
It's the seal that wraps around crank snout. When you get the crank pulley off you'll see it. Make sure that you install the new one using something flat so that it goes in straight. (Block of wood etc) It is easier to install the new seal with the front cover off the car. Make sure that the front cover and corresponding area on the block has all old gasket material removed. They make a spray gasket remover which helps. It's important that the sealing faces be clean or water and oil passages may leak. My2c Jim
-
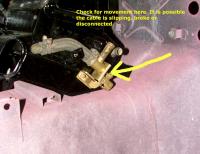
I'm assuming you can't get the drums off despite tha name of the thread. Maybe you are looking to pull the axle to get the plate off/ new plate on??? If the drums can't be removed you can turn the star wheel with a screwdriver. This will manually adjust the spread of the shoes together or apart. There is an access plug under the axle for this. Pop of the access plug and rotate the star wheel. Sometimes it takes quite a few turns to get things loose enough. If you have the drum and hardware removed and need to get the axle off look for a description of a special tool in a manual. Most manuals I've seen have a good dimensioned drawing of this tool. Hope this helps Jim
-
Thanks! I have an engine# that is about 6000 past my VIN. Always thought that it wasn't the original. Now it seems that it might be after all. Thanks, Jim
-
Just curious Chris (26th) about the engine number. Why does it say "2338"? I thought the engine# matched the VIN. Just curious. Nice thread BTW. I'm looking for the curved/rounded choke handle. Seems that nobody sells that type. Anyone know where I can get one? Jim
-
You're welcome! I know what it's like to sweat. You should have seen my face when I snapped a head bolt. Are we talking about the same bolt? I'm thinking it's the one closest to the alternator adjust bracket. (Viewed from front, it is the upper left bolt) If so then this one had threads that go into the block. This one snapped for me also. I tapped the aluminum front cover for an oversize bolt and got a good seal on the pump. This worked for quite a while with no internal leakage. (Leak inside front cover) Internal leakage could be an issue but it wasnt for my case. Here is a link for purchasing left handed drill bits. I've never bought from them though. http://www.mytoolstore.com/hanson/hanson.html If drilling then you'll need to find a way to keep the drill bit centered perfectly or else you'll be doing a helicoil or tapping oversize into the block. Watch the depth when drilling so that you don't pierce the block and get into the water jacket. (Of course) Hope this helps Jim
-
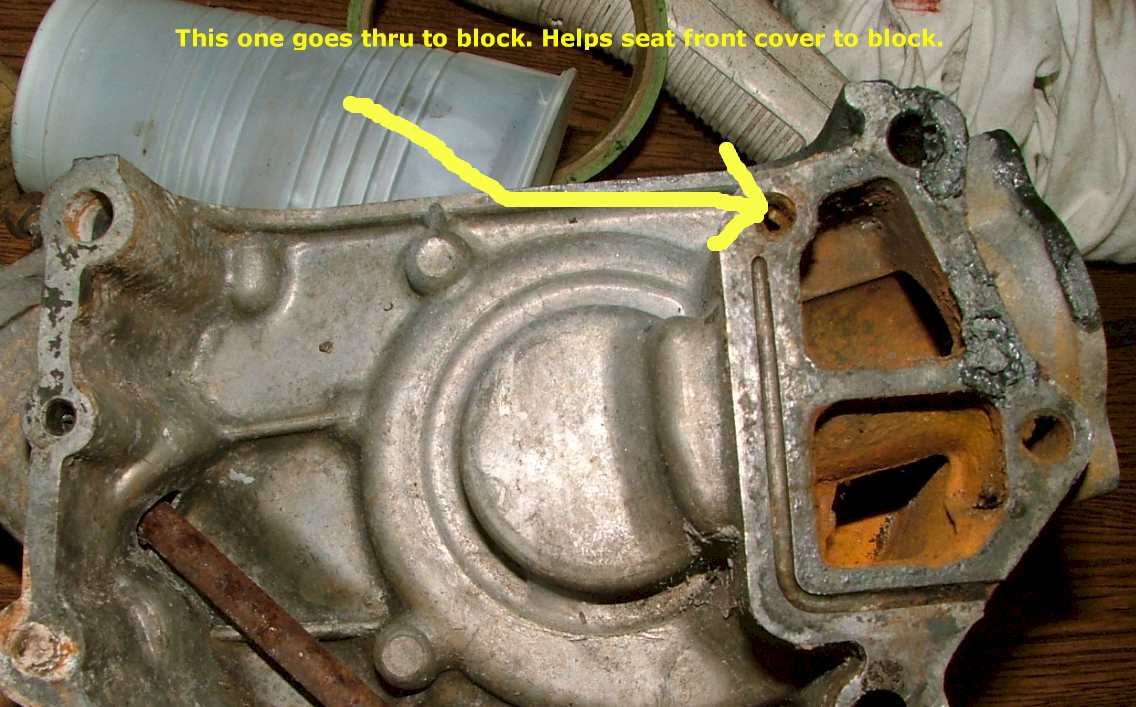
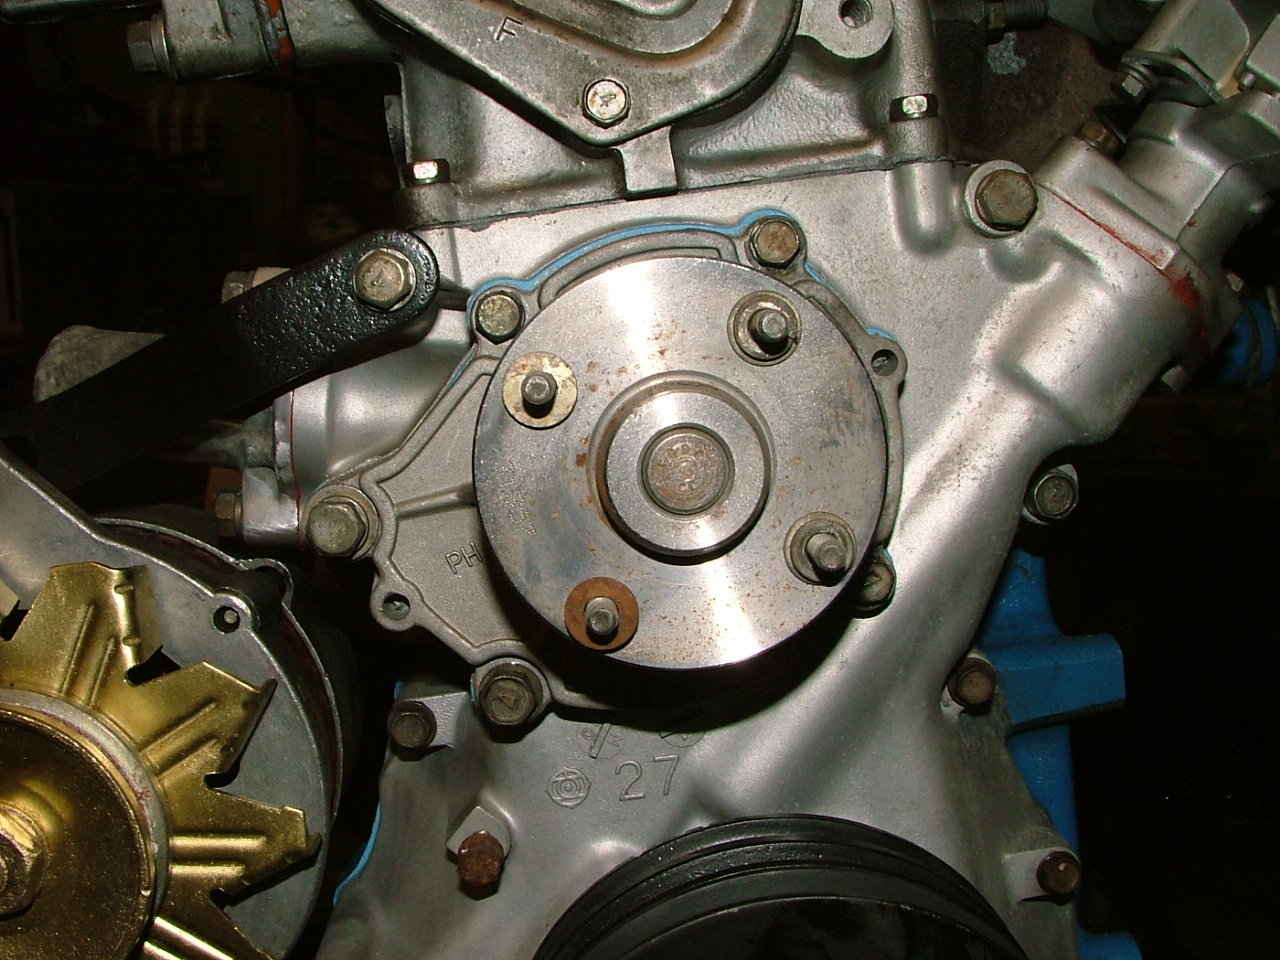
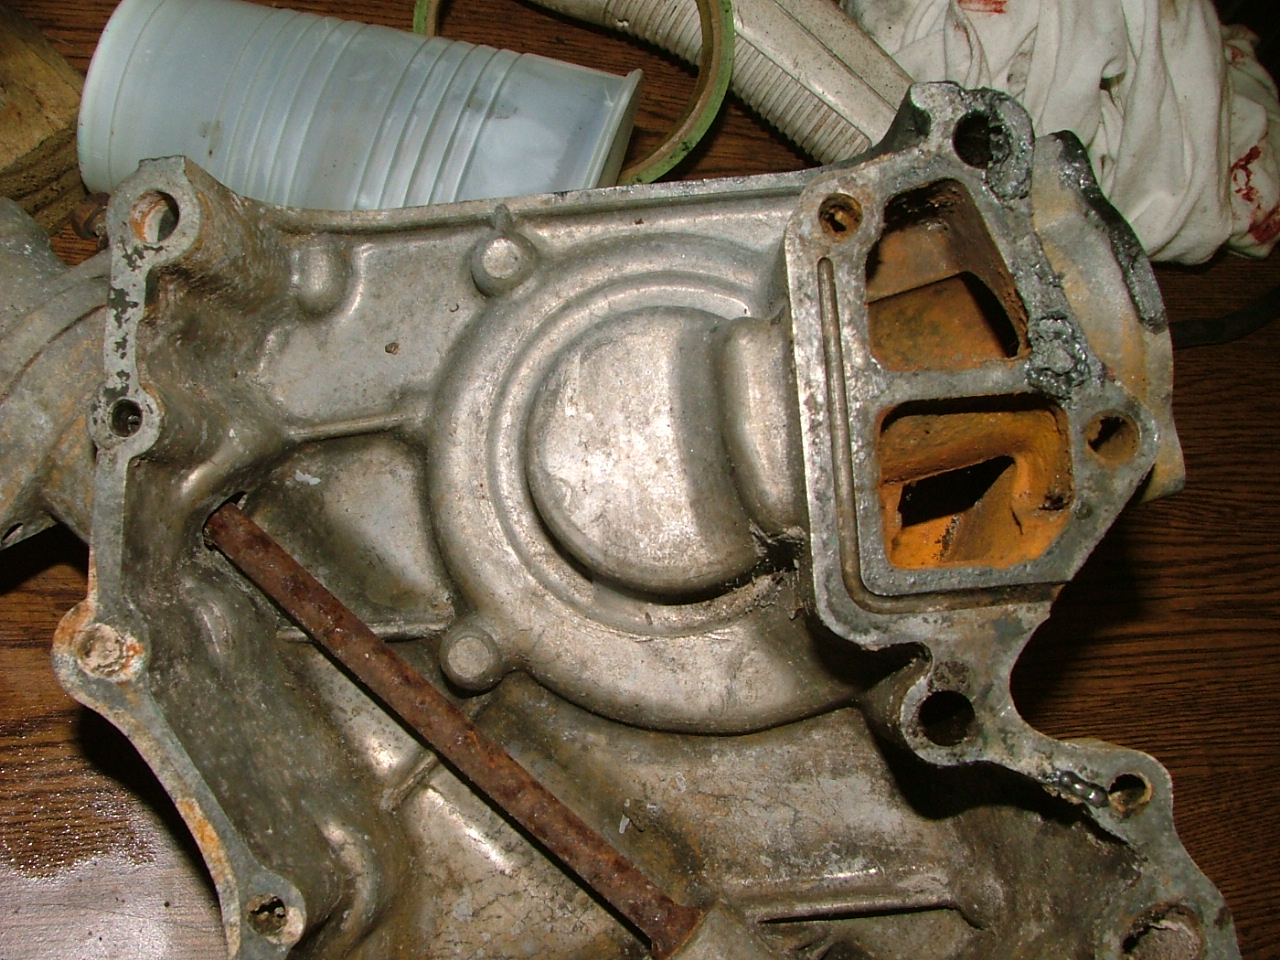
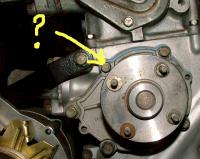
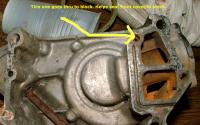
Like Ed said it may or may not seal. Years ago I overheated my Z while racing someone. Apparently I had put too much sealer on the WP gasket and not torqued things down tight enough. The high revs helped blow a good portion of my water out. The three bolts on the left side of the pump go through to the block. The other small/short bolts terminate in the front case. From what you've described it is one of the bolts on the left side of the case. There is a slim chance that you could leak water internally. (See case backside photo) You might be able to limp on it long enough to take time to collect parts, gaskets and whatever else might be needed to fix the problem. (Assuming you're taking the front case off) Hopefully it broke off just proud of the block's face and all you'll need is vise grips. Perhaps you can avoid takign the front cover off and just use a left handed drill bit. Get a tap and chase the holes clean so that things go easier. If the bolt has broken beneath the block's surface then a left handed drill bit would be better. Ideally you could use the front case hole as a guide while using a fabbed bushing to center the drill bit perfectly. You will be able to drill more precisely with the radiator out. The depth from the front of the water pump to the back side of the case is 2.92". (Assuming it is the upper left bolt closest to the alt bracket. This measurement may help you figure out where the bolt snapped at. Good luck Jim PS If WP sealing is an issue you might try drilling and tapping the current hole in the alum front case. This doesn't help the back side of the case seal but it nixes one problem for a while. I had to do this when my Z was a daily driver. The fix lasted for years before the new motor was in.

-
The Z gods are smiling on you dude. Very nice! I'm amazed that you were able to get such an early model so quickly. Nice to have friends with early Z's lying around! Congrats!! Jim A Z-less life is a life wasted.
-
I agree completely Bruce. The main thing is that the seller be given a chance to correct any misinformation. If they don't correct things then they get shamed. Nobody has a problem with someone who's not being a tattle tale but rather exposing a seedy seller. Pictures would be the best way to subdue any backlash. I think Onuthin's real dillema is the possibility of having his reputation tarnished because of his report on some dirtbag seller. He wants to be a welcome member of the community and doesn't want us to think any less of him. Anyone that can't appreciate such a service if done with diplomacy doesn't deserve a second thought.
-
I remember in the '80's someone had another version of a flying car. The problem is getting FAA approval and devising a system with enough backups/redundancy for safety. The line from the flying car people has always been "We expect to be using these/have them approved in _ years. (Usually two or three years) It is still a nice idea. Noise abatement is a real issue as I doubt they will be able to make these things quiet. The best we could hope for would be to use the flying car to cut the rental of a loaner car out of the airport scene. At many small airports you can usually borrow or rent the field car for some local jaunt. With the flying car you'd simply drive your car to the airport or designated liftoff area depending on the hour and weather. Training for SEL VFR private pilot cert is not too hard but would escape the masses. They simply don't posess the concept of social responsibility that comes with being a pilot. (Some pilots do too) You would have people who are too rushed to do a proper preflight taking off with water in the fuel, inoperative equipment etc all just to make it somewhere. (Their crash site) I can see a select few operating flying cars in the future. Community planning is better as is mass transit. As the world gets more crowded Autozone, McDonalds, malls and Home Depots become more numerous so soon won't need to drive anywhere. Fed Ex will pick up the loose ends. My2c Jim
-
I think it all depends on the circumstance. If it is a grandmother or some unknowlegable person selling the Z and they say "no rust" then maybe it's just ignorance. If someone makes very specific claims on areas of the car which could cost a lot of money then they should be held accountable if they are misleading. (Floor pans perfect, frame rails, zero rust, etc) Regardless I think the seller if confronted should change his ad or accept being exposed. This is fair if done in a clinical non-slanderous fashion and would be doing a service to others. It would be even better if you were to back up such claims with pictures. The only grey area is one's subjectivity and perceived value. They aren't making 240 -***Z's anymore. Who's to say what price should be asked. The real issue is honesty in the sale. Jim
-
Could also be a frame rail slowly breaking away from the body. Like Beandip said get under and check it all. The Z suspension is so light you can jack both tires up, grasp the wheel and twist/pull to see areas of extreme slop. It could also be that your rotors are warped. Tire could also have a separated belt... the list goes on. There are alignment shops which are much better than the garden variety alginment shops which can easily spot what's wrong. We used to have two such shops in my town. Sometimes you may have slop (bushings) in your rear suspension which feels like it's something up front. My2c Jim
-
Twenty years ago sleeping in a car was reasonably safe. Today though... Every time I ever slept in the Z I was woke up by a concerned state trooper. (Like to catch power naps on anything over 24hrs straight driving) They probably thought that I got whacked. Maybe one should include an "I'm just resting" note as part of the standard Z sleeping kit. (Should have said Zzzzzing kit) :-) Before leaving home take out your passenger seat and use your luggage to form a plateau level with the rear. Bummer that the strut towers don't allow you to toss too much. The cab is so small that fresh air becomes scarce quick. The camper a few posts up is way cool! I've seen a modern version of the same camper... Sweet
-
Me too! What year is the parts car?
-
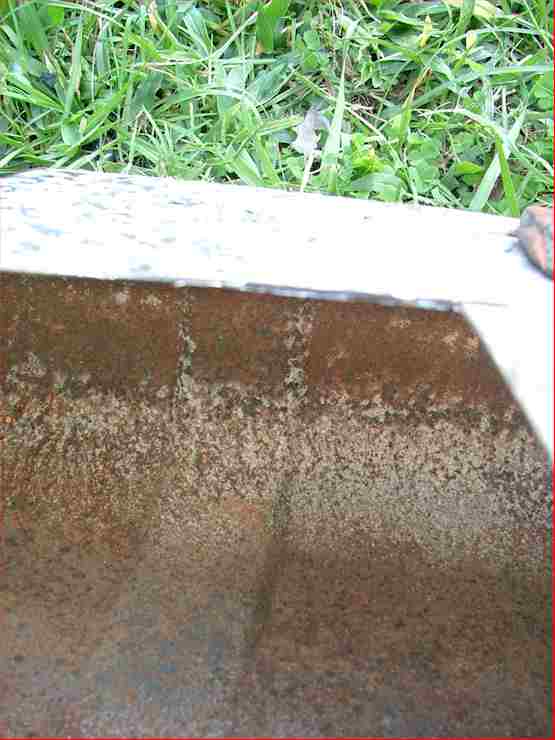
Glad to hear it was "just a hose". Although talking about gas safety has created a lot of "heat" here discussion like this may save someone from making a bad mistake. Below is a copy of an earlier post I made regarding fuel tank handling safety. A member reminded me of the important need for safety notes/disclaimers. I admit to not being an expert but I have talked to a few people who have done repairs on tanks. Their stories of accidents/injuries/deaths were enlightening. Here is the copy of an earlier post.. Ah yes... A good point. This is a very important part because of the severe explosion hazard. Should have put up a disclaimer like this... Gas tanks pose EXTREME explosion hazards which have been known to kill or at least break a few bones while sending someone across a shop. This is something which should not be taken lightly. Before beginning any work on a tank one should remove all traces of gas or anything combustible such as varnish which may produce vapors. Gasoline itself is highly flammable but one should remember it is the vapors which ignite and not the gas itself. Stay at least 100 away from open flames, water heaters, electric motors and anything else which could ignite the vapors. If something should ignite the vapors in a tank, the openings are unable to release the pressure resulting in a serious explosion. I've met a survivor of such an explosion. His description wasn't pretty and he confessed he was very lucky to have survived. Handling raw gasoline is equally as dangerous and requires extreme caution. Place drained gasoline in a sealed, approved container as soon as possible. End of disclaimer Here is what my research has found regarding creating conditions for safely work on a gas tank. (Welding, cutting, anything involving sparks or heat etc...) Since a mistake with a gas tank is a one time thing I'll list methods which have worked for some but should NOT be relied upon. Ususally the work being done on the tank was welding or sweating. The following methods though somewhat sound have FAILED at one time or another and should NOT be used... Filling tank with water Assuming tank that has set dry for a year is safe(Can't smell fumes) Purging tank with exhaust pipe. CO supposedly negates combustion. Purging tank with inert gas such as argon. (Similar to above) This method though sound can backfire unless all fuel remains under cover of inert atmosphere. Washing tank with water Methods that work and what should be used... Take tank to radiator shop for boiling and any welding/sweating req. It is interesting to note that one Renu franchise defumes tanks in an oven. Don't try this at home as I'm sure they have proper controls/safety precautions/equipment. If you are doing it yourself... Drain all fuel and place in approved container. Use strong degreaser to thoroughly clean the tank interior. Clean tank until no residue is showing in waste water. Make sure that once dried there are no fumes present in the tank. A good follow up for the degreaser treatment is electrolysis as this will liberate a lot of crud that the degreaser might have missed. (Varnish,etc) Electrolysis has dangers of it's own so I will make a page for the electrolysis and place in a later post. It's cool and it really works well. One shouldn't rely on it to remove all rust inside a tank despite using internal electrodes. Cut access hole in top of tank and sandblast. Stop occasionally and use a light and mirror to see what you've missed. When you have removed 90% of rust then drain sand and apply ospho to inside of tank. Let ospho set up for 24 hours and sandblast to remove all traces of it. Conduct any sweating or welding on the tank now that it is taken down to bare metal inside and out. Create and weld in patch for access hole. Apply metal prep such as Hirsh's tank etch to inside of tank. Follow product instructions. Apply tank sealer per instructions. See my original post for opinions/reasons for using RedKote tank sealer. Some people use muriatic acid to nix their tank rust but this is very destructive as it eats metal. If the chemical reaction isn't neutralized it could continue to eat things or rust out the tank. The way to be absolutely sure that the rust is gone is outlined above. Make sure that you focus on the seams and any areas which harbor rust when sandblasting. Ospho gets the rest but needs for there to be as little rust as possible for maximum effectiveness. Schew!!! That was a longgg post. Sorry. Beandip, you're absolutley right about the need for extreme caution/safety. Thanks Jim Attachments are post tank cleaning/electrolysis. Single "L" shaped electrode was used inside tank. Tank was completely immersed in water and washing soda (environmentaly friendly). DC welder on 20 Amps was used for two days. Note how more rust was removed in areas closer to the electrode. Hole was cut in tank AFTER electrolysis. Coatings inside and outside of tank were removed by this process. Tank was sandblasted inside and out afterwards. Attached Thumbnails -------------------------------------------------------------------------------- Last edited by JimmyZ : 11-14-2006 at 06:52 PM.

-
Very nice!!! Is that the original vinyl on the seats? If not where did you get the seat kit from. Jim
-
Hopefully it is as simple as a rotted soft line. My tank had one of the vent tube leaded joints crack. Couldn't fill it up beyond half until I cleaned it and applied copious amounts of JB weld. This sealed it for quite a while. Amazing stuff that JB weld. While my Z was in a million pieces during resto I cleaned the tank and cut an access hole for sandblasting. (After completely removing any chance of fuel or vapors being present) Had the local radiator shop resweat all of my vent lines and filler neck. By now the inside of your tank probably has a decent amount of rust anyway. The tenacity of the rust was so great I had to sandblast and Ospho twice to get it all out. Look into getting RedKote liner if you decide to clean/line the tank. It is removable with MEK and fills pinholes well. The guy at my local radiator repair shop showed me a slew of tanks that had been sealed with other products. Renu's process and service is the best with proper prep/RedKote coming in second place according to the rad shop. Please be extra careful with raw fuel or vapors. I sustained second and third degree burns over 50% of my body years ago... All from half a cup of gas. It ignited twelve feet away from me! (Had a lawn service) Cutting and scrubbing off your skin for a month is no fun! My 2c Jim