Everything posted by rzola
-
8mm rod bolts and racing
1973 240 engines had 9mm bolts.
-
Please Help ID This 5 Speed
Thanks Darrel. Based on your photos, I have a 77-78 trans.
-
Please Help ID This 5 Speed
I have a bonus 5 speed that came in a junker 73 240 I bought years ago. Didn't even know it was a 5 speed at first. Attached photos of the tail. Can any one tell me if it is a ZX or a 1977-78 280 model. Any help would be appreciuated! Thanks!
-
Triple Carb Manifold Short or Long??
Longer runners give you peak torque a lower/mid RPMs. Short runners are for high RPM race engines. For a street car the longer set up may be better for drivability.......
-
Hood hinges - Paint or Plate?
Hinges were hung on the body before paint, so to be "correct" paint them that way (body color). Of course plated would look cool too.
-
240Z rear bumper center?
MSA now has new repro rear center bars available for 1970-72. $300 for that thin little piece of steel. I guess the customer has to pay off that tooling bill!
-
Vibration at 60 MPH and above
Your car is a 1970? Move your rear diff back. I have had both 1970 and 1971 cars. Terrible higway vice. I did the service fix update of moving the rear end back and what a major improvement! Check your moustache bar (behind diff). If it is flat, your car was not updated. You will need a 1972 or later moustache bar and a 1972-78 r180 rear diff mounting insulator..............
-
Metal headlight bucket?
1970-72 used glass head light cases. The 1973 and later cars were the steel units from the factory. This is based on my experiance parting out about a dozen Z cars....... Of course collision repair parts were typically later steel versions. Thats why you may find a mixed set on your early 240Z
-
Another SM needle question
The brit SUs use standard threads (non metric) on many of the threaded holes and the Hitacis use metric
-
Undercoat removal technique?
I used the propane torch methos on my race car project. It worked awesome, I stripped the bottom of the car to bare metal with the torch heat and a metal scraper...
-
Head Ticking noise
Check your valve lash adjustment. I have a 240 that sat for 12 years before I bought it. The lash was loose and the motor sounded like a thrashing machine at idle. After setting the lash, the motor was real quiet at idle........
-
Fuel Cell Frame Design
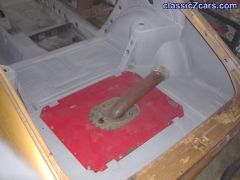
Here's what I did. My understanding of the SCCA GCR not make me belive a "Frame" was needed. I am using a Fuel Safe 15 gal cell. I removed the spare tire tub with a spot weld cutter. I then cut out additional floor pan area wher needed. I then made a 0.090 steel filler panel that fit into the old spare tire hole. This kind of looked like a big "Pac Man" and made the round hole square. I also tried to offset the cell as far to the right side of the car as possible. I fabricted 1" x 1" 0.090 angle iron steel and welded it along the longitudal sides of the fuel cell opening. These pieces are welded to the floor pan of the Z and the classis front and rear crossmember stampings Uunder side of floor pan). The angle pieces also serve as a doubler for the fuel cell can side mounting holes. I also made some 2" wide 0.090 steel bottom support straps that fit onder the fuel cell can. Overall, this mounting method should meet the SCCA GCR, and does not add too much weight to he car. I tested the strength with my 240 lb arse standing on the floor, and was very satisfied with the result!
- Fuel Cell Trial Fit
- Fuel Cell Opening
-
Gas Prices?
The butthole F350 4x4 and Suburban clowns that ride your arse at 90 mph will soon be gone. People are parking the big old SUVs, because they can't afford the $100 a week gas bill! It will make it safer to drive our little Z cars....... My 240 has been getting a lot of miles this summer. 25+ mpg with a 4 speed. I am getting a 5 speed ZX trans ready to further improve my MPG...
-
Need some tech advice on front springs
I re-built my front suspension on my 1970 240Z. I used a set of front springs that were on my 1971 240Z. I blasted and painted them. When I installed them, the front ride height was much higher! Also the camber is way off. Top of tire leaned out (popsitive camber I belive). Before installing the springs, I compared the heights. The old vs. new were within 1/4 of a inch. After scratching my head, I belive these front springs may be too stiff and holding the front of the car too high? I just measured the coil diameter. The old spings are about 0.425" wire diameter. The "too high" springs are about 0.455-0.460" diameter. I am going to install the old springs tomorrow. Heres a question.... My 1971 service manual says the left spring is 373mm or 14.7" tall. The right side spring should be 386mm or 15.2" tall in free state. Should the shorter spring go on the left side of a US left drive car? I relize more weight is on the left side of vewhicle. Wouldn't ou want the taller (and maybe stiffer) spring on the drivers side? Why did Nissan have different height springs on the front of these cars. Any help from you Z suspension gurus would be appreciated. Thanks!
-
Inability to retard timing under 10 degrees
Adjust your lower distributor (not dizzy) plate. This is a slotted plate with one bolt (bolt threads facing up), has the degree marks on it. I could not back my timing below 15 degrees initial on my 1970 240. My total advance was in the way too high range as well! I had to run premium fuel in my stock engine to prevent spark knock. When I tried to back the timing down, it was at it's limit. I pulled the distributor out to see if the shaft was in wrong, or I jumped timing chain. This is when I saw the timing plate adjustment slot on the bottom of this distributor housing. I loosened the bottom bolt and centered the plate. I re-installed the distrubutor and set my timing to 10 deg advanced initial ( 3 degrees more than my service manual called for). The car now runs great on plain old 87 octane regular unleaded. Give it a try.............
-
Throttle grommet too big for '71 Z!!!!!!
There are 2 sizes of throttle rod grometts for the 1st generation Z. The 1970-73 240Z had a smaller gromett (and hole through the fire wall). The 1974 to 1978 use a larger gromett (boot). Perhaps the part you have is for the later year 260-280?
-
Airconditioning
Any of you guys know where to get the "freon" hose for the early 240Z dealer installed A/C? I am trying to re-install my old Yorx system, and need new hose. The hoses are quite thick the larger one is 12mm ID 24mm OD. The other is 8mm ID......
-
Racecar replica
The real Big Sam has been restored and still resides in the UK. Take a look at zhome.com web site. There is a section called z history/racing history
-
cracked doors
My 11/70 Z has the same crack. This causes a terrible rattle when closing the door. I am going to tig weld the crack to correct the problem.....
-
Exhaust Fumes In 1st Generation Z Cars
Thanks to all the posters on this forum! After reading through quite a few post on the interior fume issue, I decided to attack the problem on my car. I have a series 1 car in fairly good shape that I use as a fair weather daily driver. I love the car, but was getting sick of smelling like a tailpipe! Even just cracking the drivers window 1/2" would fill the car with nasty untreated exhaust fumes.. I used to think it was bad aerodynamics of the car. My therory was the rear turbulance from the car would draw he fumes forward along the car and enter the side windows. I was getting ready to buy a BRE rear spoiler and try to modify the aerodynamic wake of the car to resolve the fume issue. Glad I did not do this, my theory was wrong! Another poster mentioned that while the widows are closed, the cabin has positive pressure, from the ventalation system. That is why the Series 1 cars have the rear hatch or later cars the Z logo air extractor vents. This allows a flow through effect for your ventilation. They also serve as a relief valve while slamming the doors. If you did not have these extractors, slamming the door causes pressure that can irratate your ears. The extrators on most all cars have a rubber flap, so they work as exit only valves. Once the windows are opened (even just a wee bit) the cabin changes to a negative pressue at speed. This causes the car to pull air in from any other openings in the body. A list of possible culprits: 1. Firewall openings, boots and grometts may be ripped or missing. 2. Inner shift boot (under console), ripped or cracked. 3. Rust holes in the body structure that go through to the interior. 4. Rear hatch area: a. Rear hatch inner seal b. Rear hatch inner trim panel (was used as a air extractor valve on 1970 cars) gasket leaking. c. Rear hatch edge plugs (were used as vent drains on 1970 cars) missing. Also 2 small holes on outer edge. d. Tail lamp gaskets leaking e. Other pass throughs for antenna, fuel vapor system. 5. Leaking exhaust system compnents. Since I have already adressed items 1 , 2, 3, and 5 when I first purchased the car, I focused on area 4. A. Rear Hatch Seal: Initial observation showed hatch seals appered to be in good condition. I then checked the gap between the hatch and the seal. I used a trick I learned while working as a vehicle development engineer at Ford. You apply some talcum powder to the seal surface, just a light dusting. Close the panel, and then re-open. The powder will deposit on the mating surface. This will show the contact area with the seal bulb quite well. If there is a thin line or no powder, you have a poor seal! I had a very poor seal along the entire rear edge, and around the lower side sections. Resolution: I tried to adjust the hatch striker bracket downward to get the hatch to close in tighter. This did not make significant improvement. To remedy this, I applied a strip of EPDM rubber self adhesive seal to the hatch. Another Home Depot product. This stuff is black self adhesive seal bulb 7/16th" wide. I stuck it on the hatch inner surface, along where the body seal meets it. This gave a very tight seal in this region! B. Rear Hatch Inner Trim/Vent Panel: The rear inner hatch panel's sealing gasket (cork) had disintigrated, and a couple of fasteners were missing. Resolution: I made a new seal from flat foam 3/8" wide stick-on weather stripping. Cheep stuff $2.59 for a small roll at Home Ddepot. Replaced missing fasteners so the new gasket is compressed. The panel is now well sealed! C. Drain and Plug Holes in Hatch: My 1970 car has drain tubes in these holes, so not an issue.... I did fill the small holes located on both outer edges with a couple of small rubber bumpers. Not sure why Nissan made these holes? D. Tail lamp gaskets: These tend to get nasty around the edge flanges on 240Zs, but the mounting surface has many fasteners. This usually holds the seal tight and probably will not leak. I have parted out many terminal 240s and found good seal integrity on the mounting surface. E. Other Pass Throughs: I inspected antenna, and fuel vapor line grometts. All were in good condition. Conclusion: A 30 mile commute to work left me very excited. No significant fumes inside of the car. I tried various speeds, and window opening combinations. I could only get slight scents of fumes on slow downs, and throttle back outs. Most of this is due to the fact that my valve guide seals are shot. I feel the issue is 90% fixed at this point. I think the most significant fix was the main hatch seal. This is a critical fit on the 1st generation Z. While my seal fix would not fly on a show car, it still does not look too cobbled. Fine for a driver Z car. When I do a re-paint, I will try to install a new seal, and hopefully eliminate the extra seal on the hatch bottom. The fix is nice and cheep. About $10.00 and 2 hours of time was spent on the fix. Now my wife will ride in the Z again! I hope this summary, and sharing of experiance will help out other Datsun Z fans. Besides the stench, this could possibly be a deady situation! CO poisoning is quite possible. This post has been promoted to an article
-
Steering wheel vibration
Try tightening your front wheel spindle nuts a little bit. My 71 240 had the same issue. After replacing rack bushings, coupler and rack lash adjustments without sucess, I tried it. Belive it or not that fixed the problem. Wish I would have tried that 1st, rack bushings are a pain to install!
-
Wall Street Journal Says 240Z is a good investment!
Follow this link to the article........... http://online.wsj.com/public/resources/documents/info-invcar04.html?printVersion=true
-
1970 (11/70) 240Z for sale (and Weber carbs)
This Z will be my new driver for the summer. The car runs very strong, but needs a clutch and some brake work. Solid and pretty complete. I am very happy with this purchase! See the photos on: http://cybersanford.net/1970ZRestoration.html


