2377kN
Free Member
-
Joined
Everything posted by 2377kN
-
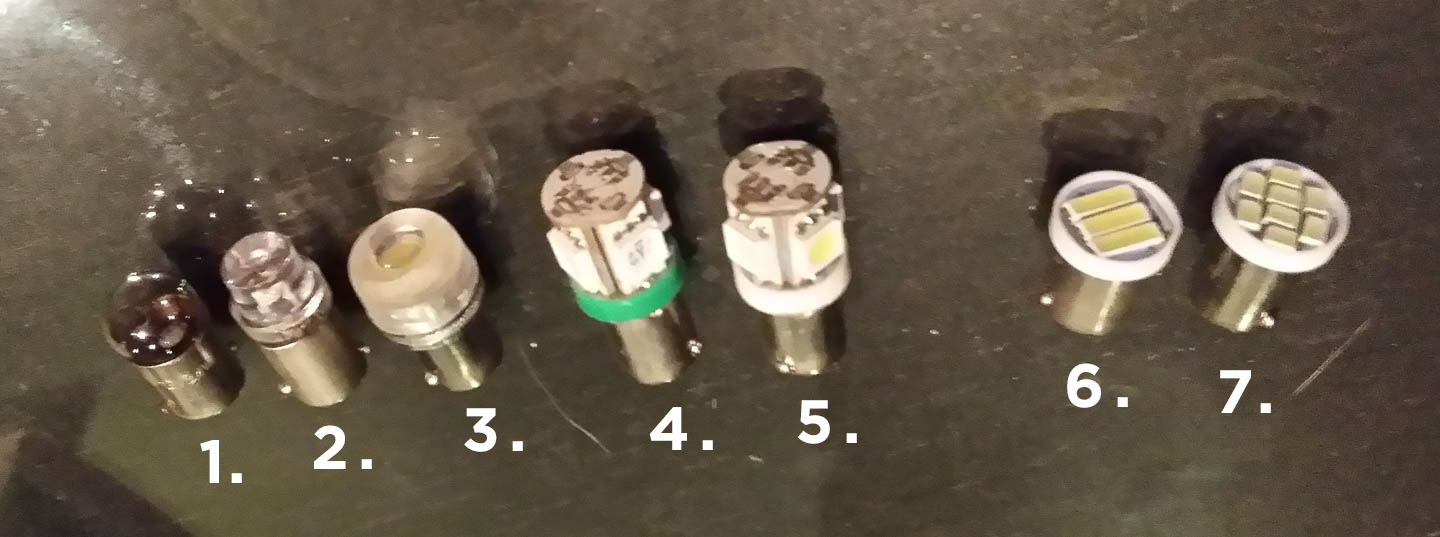
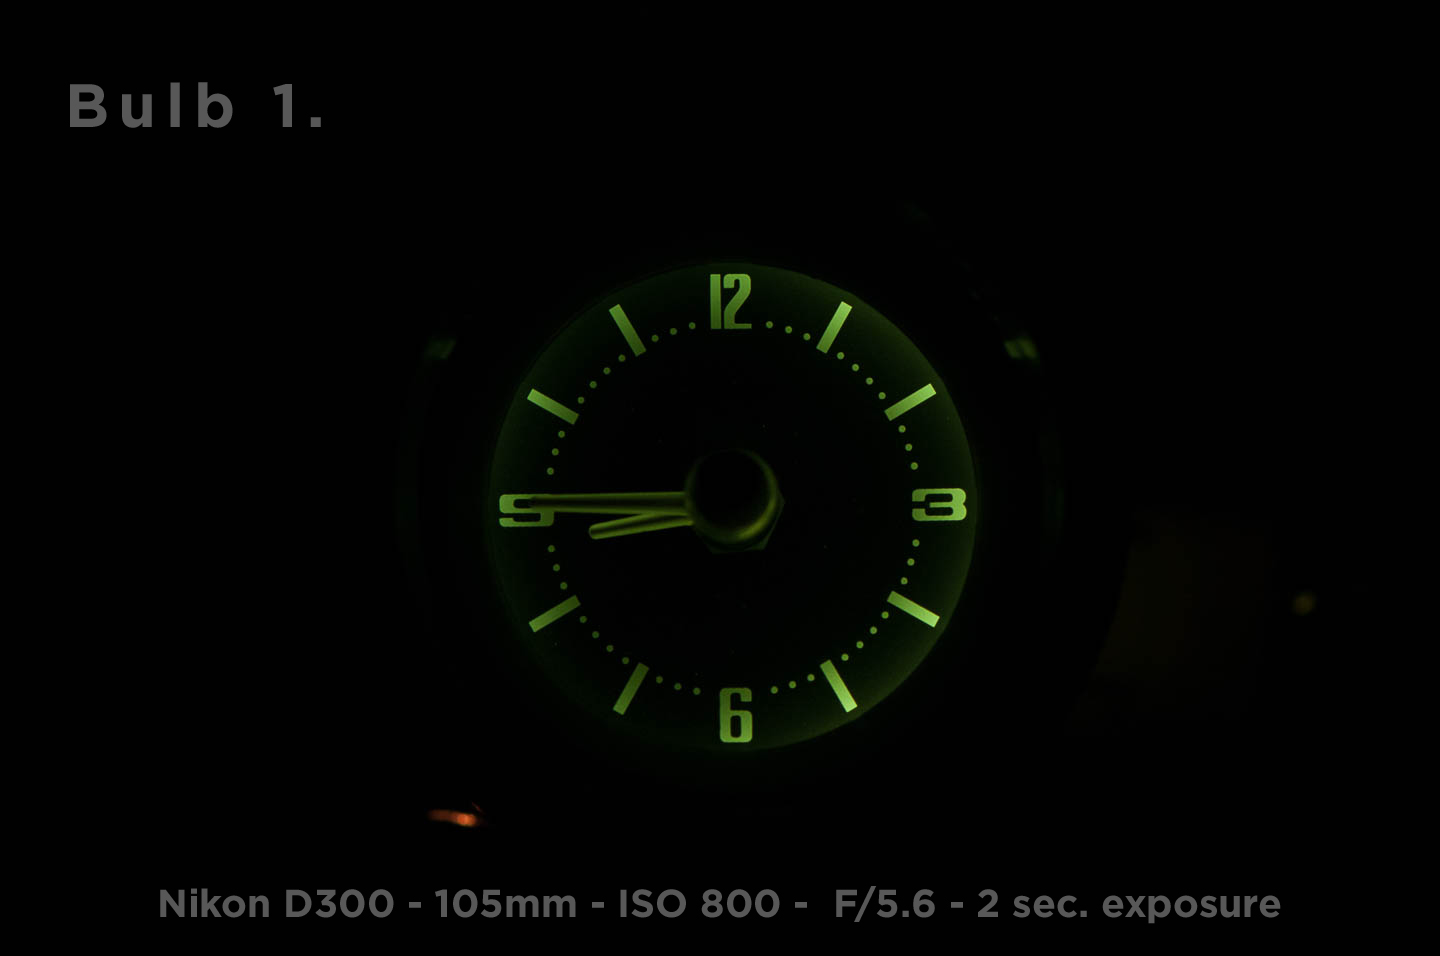
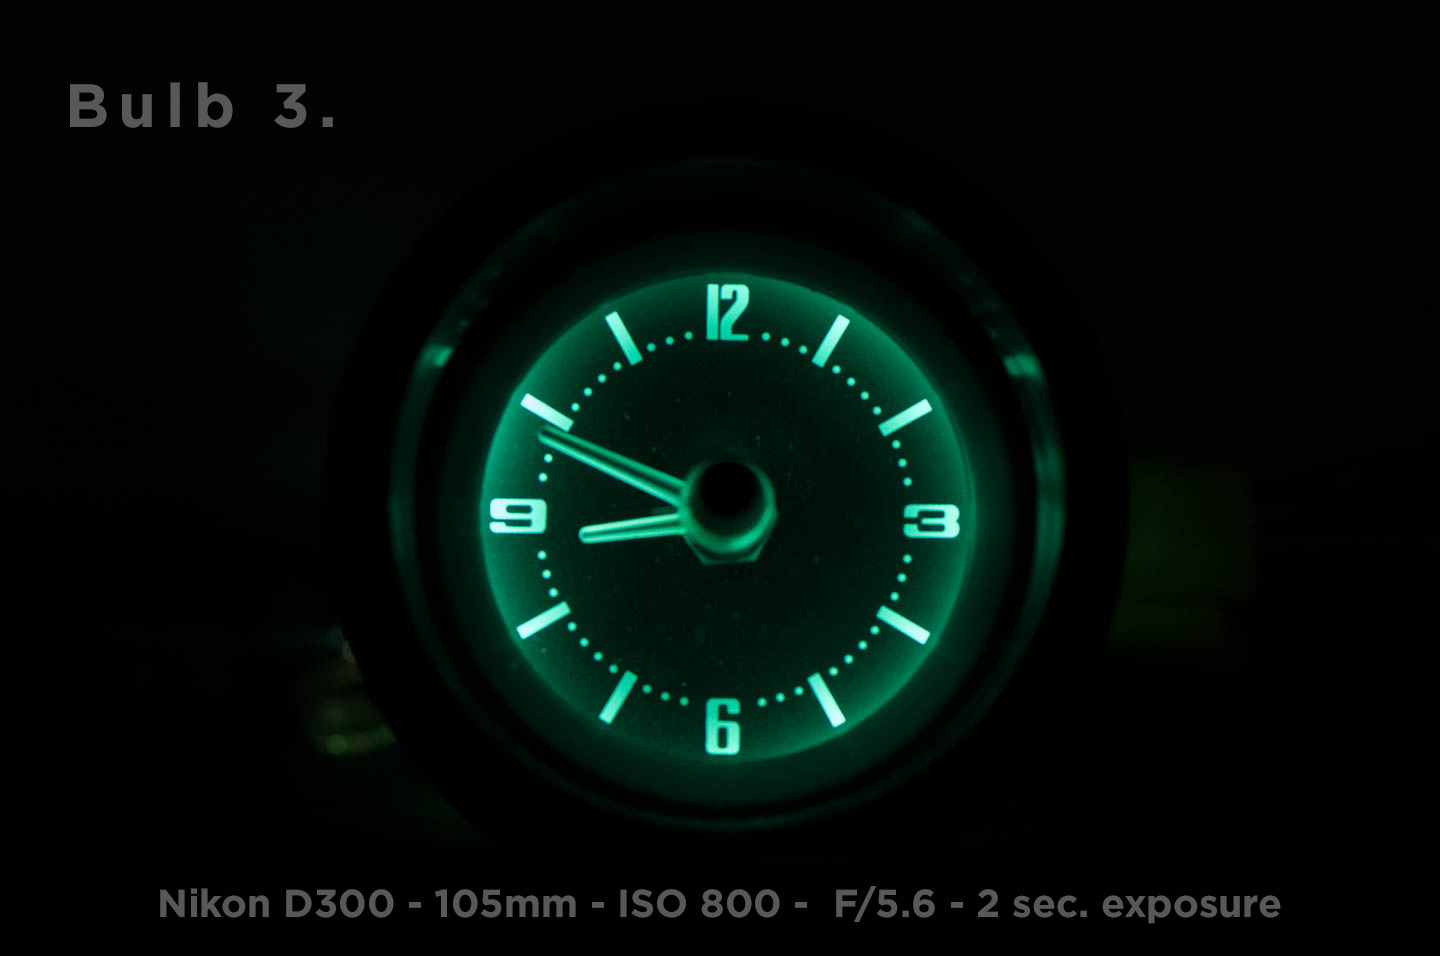
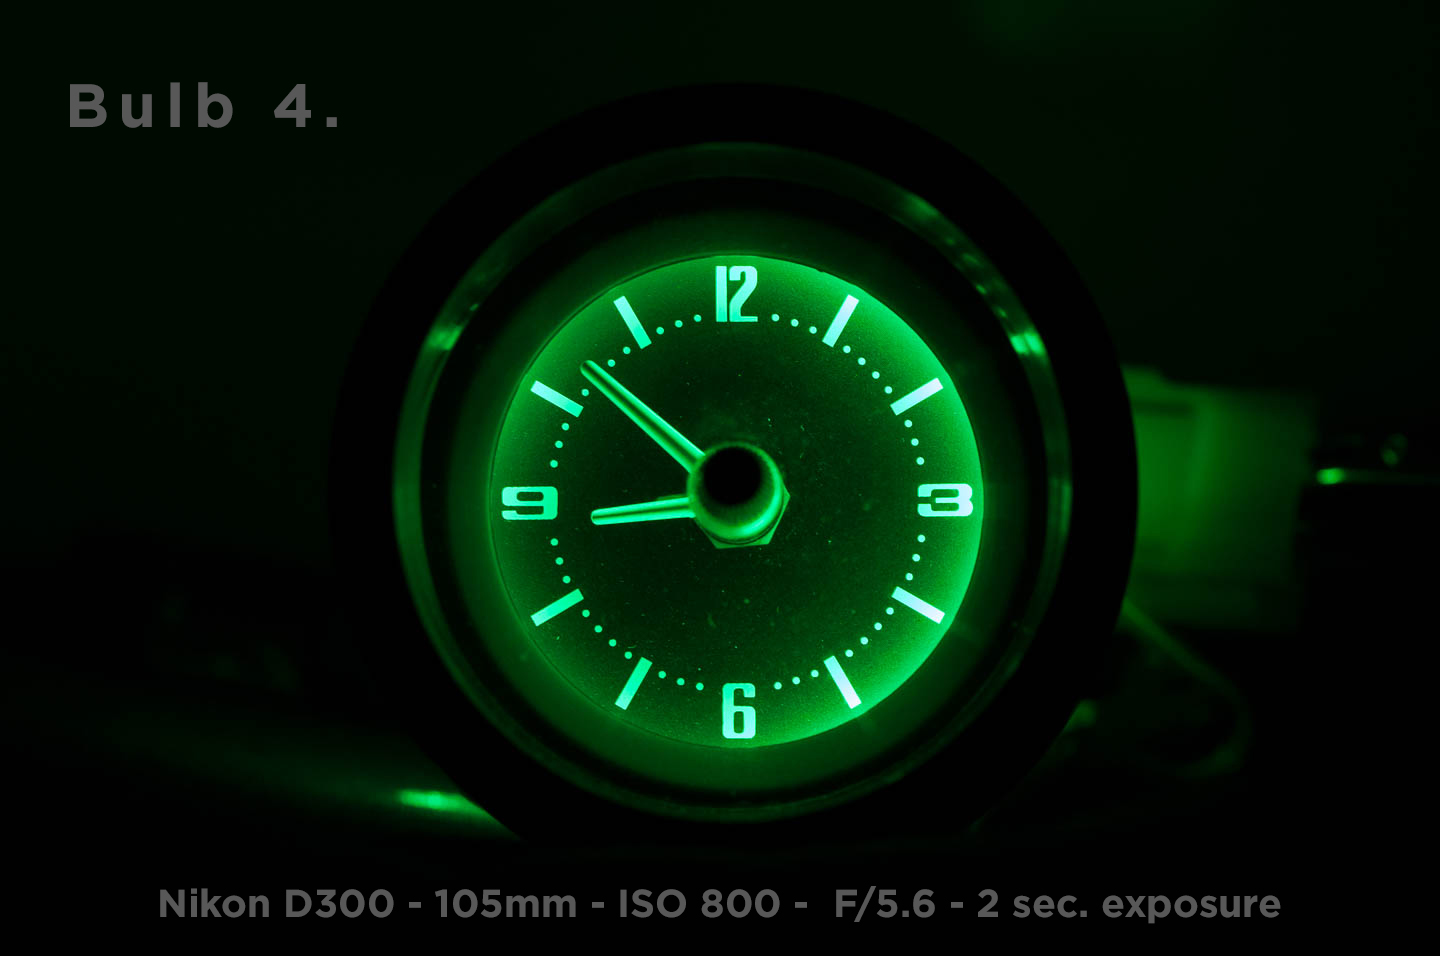
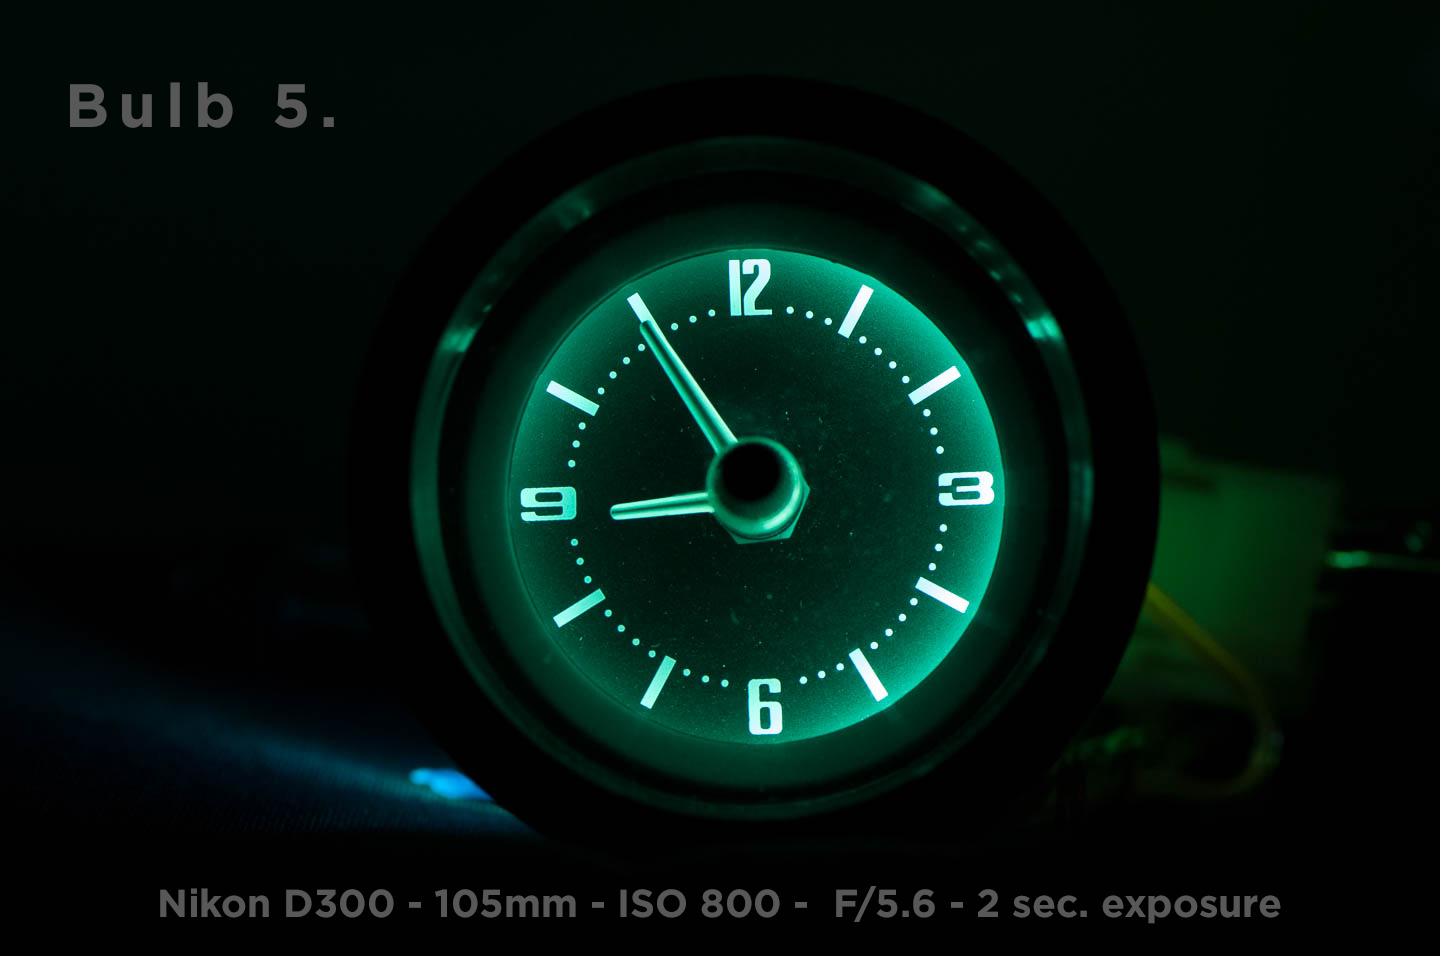
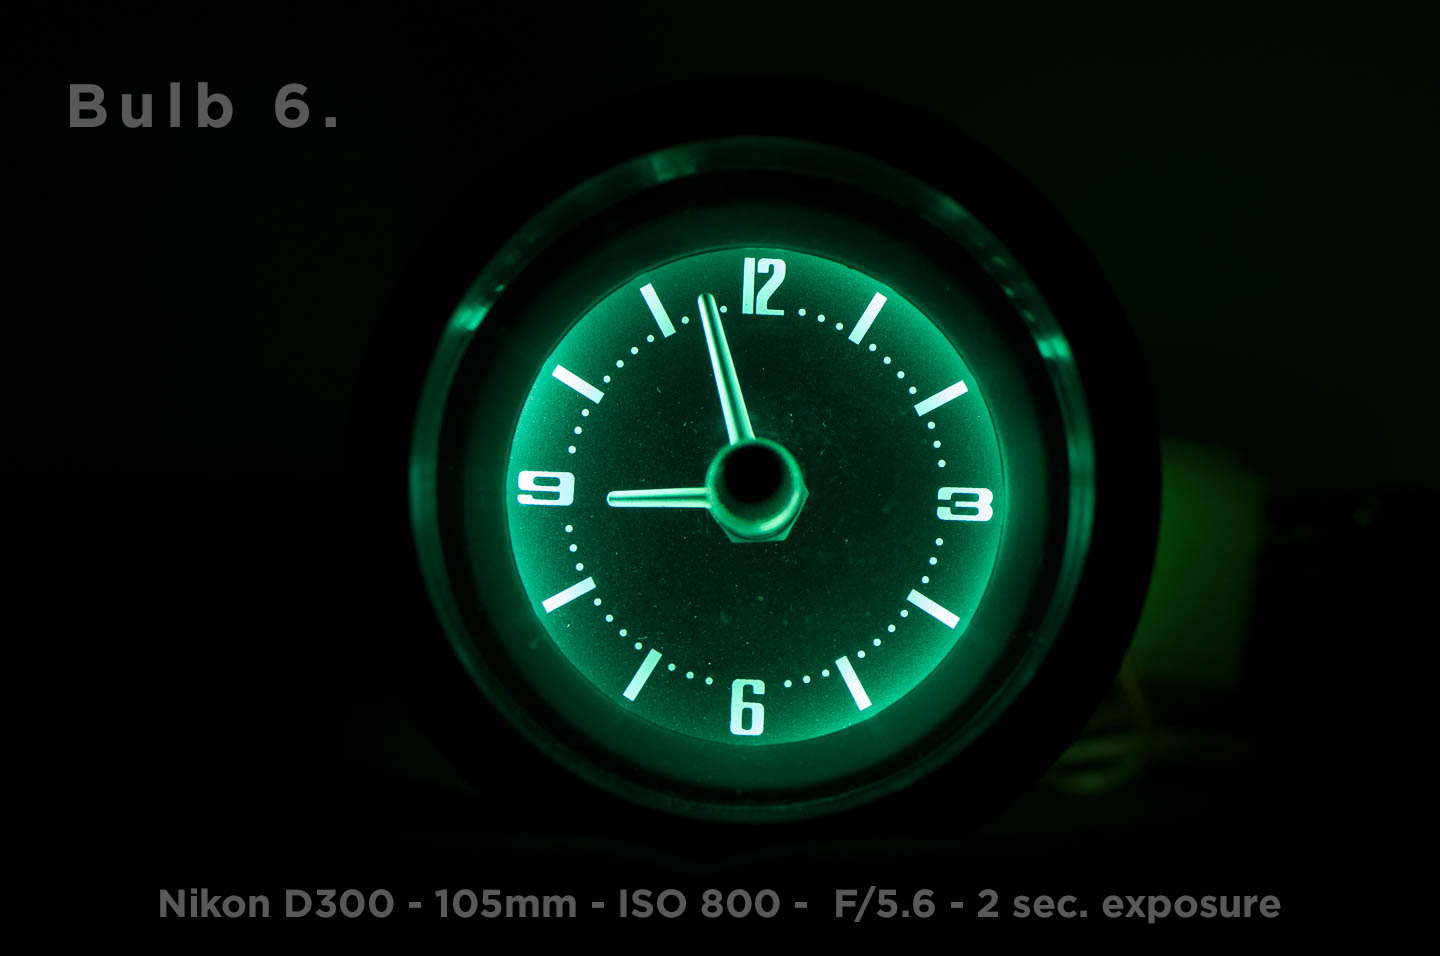
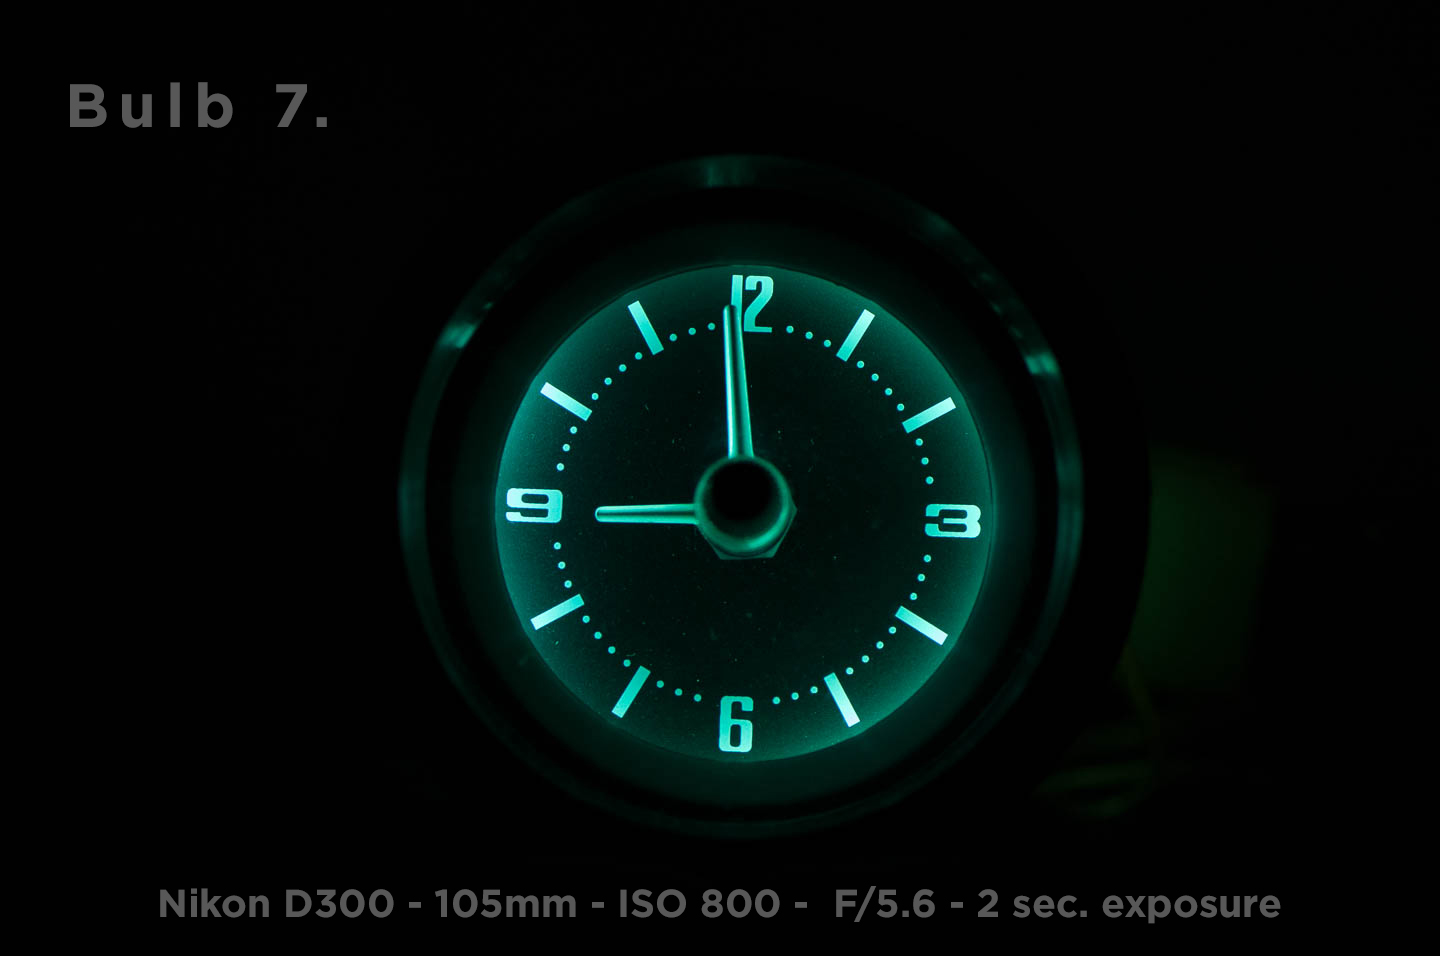
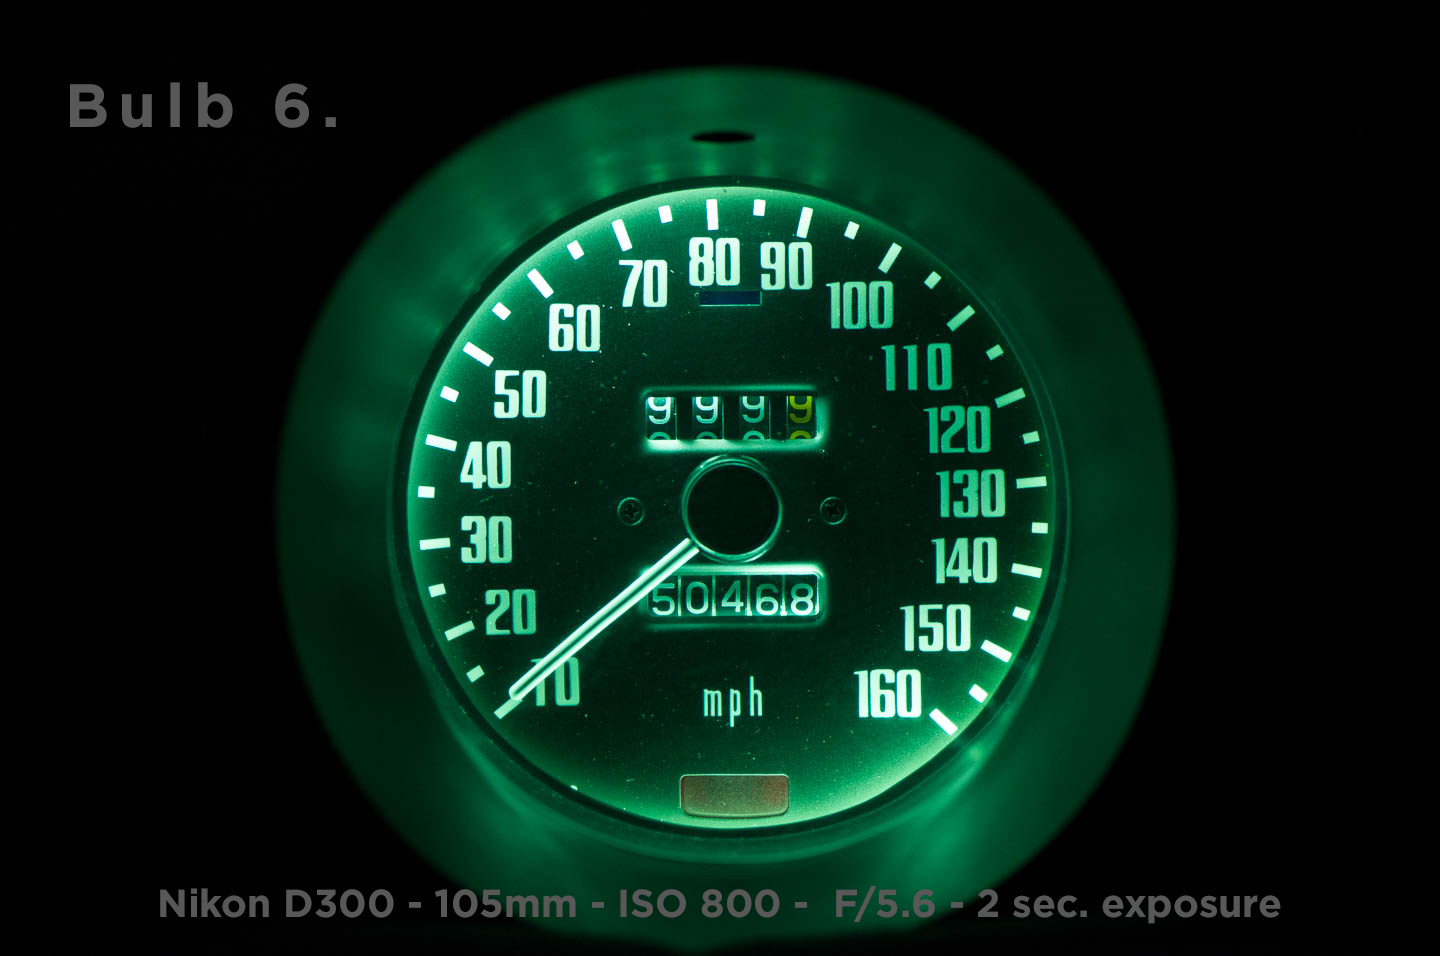
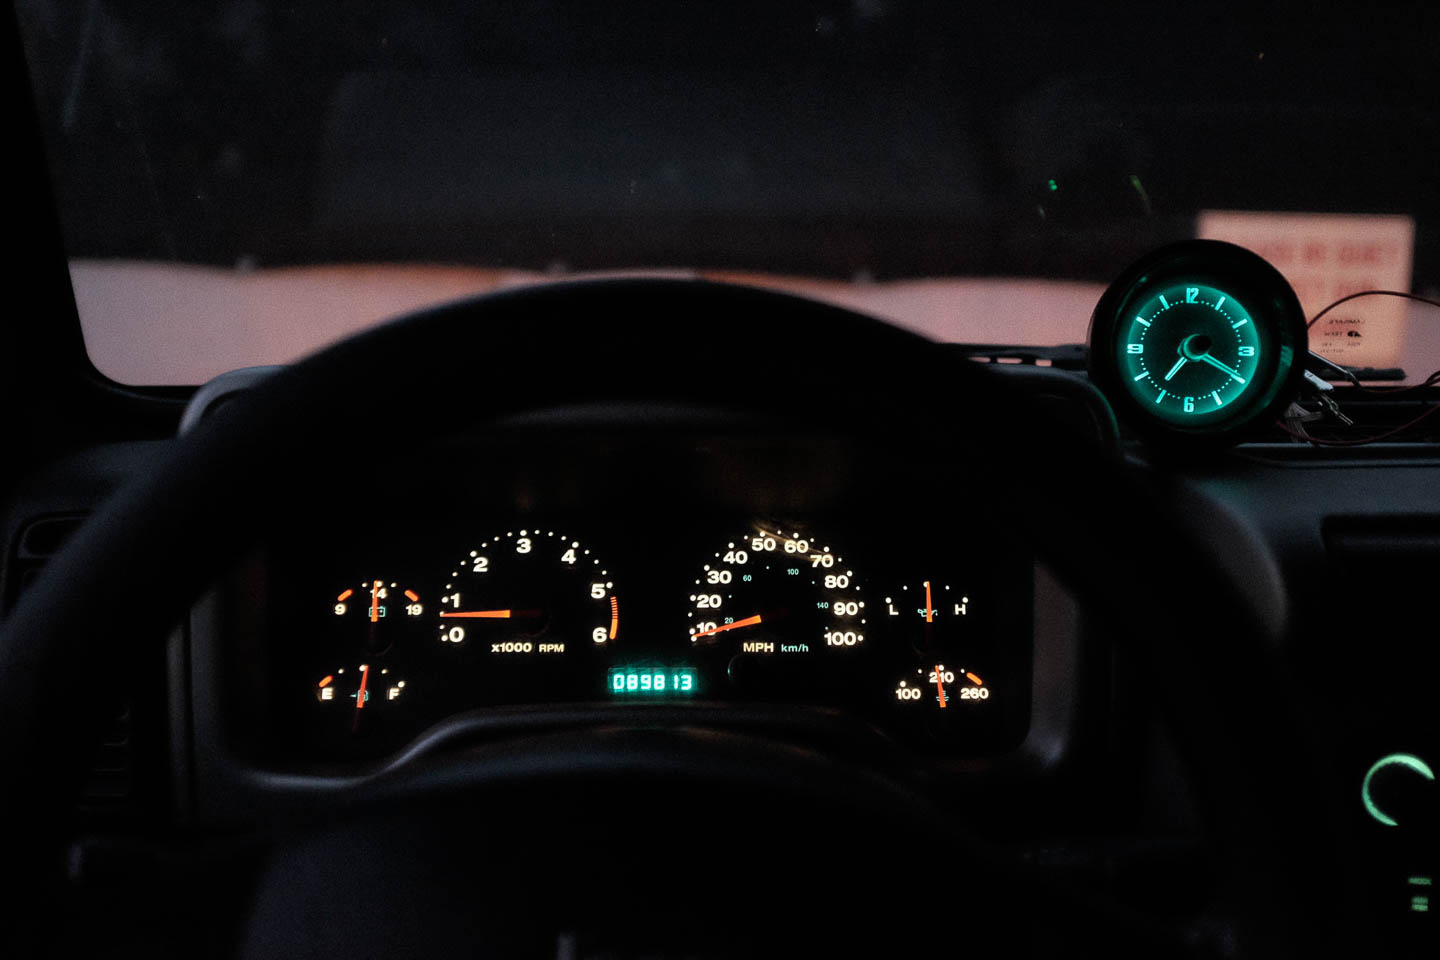
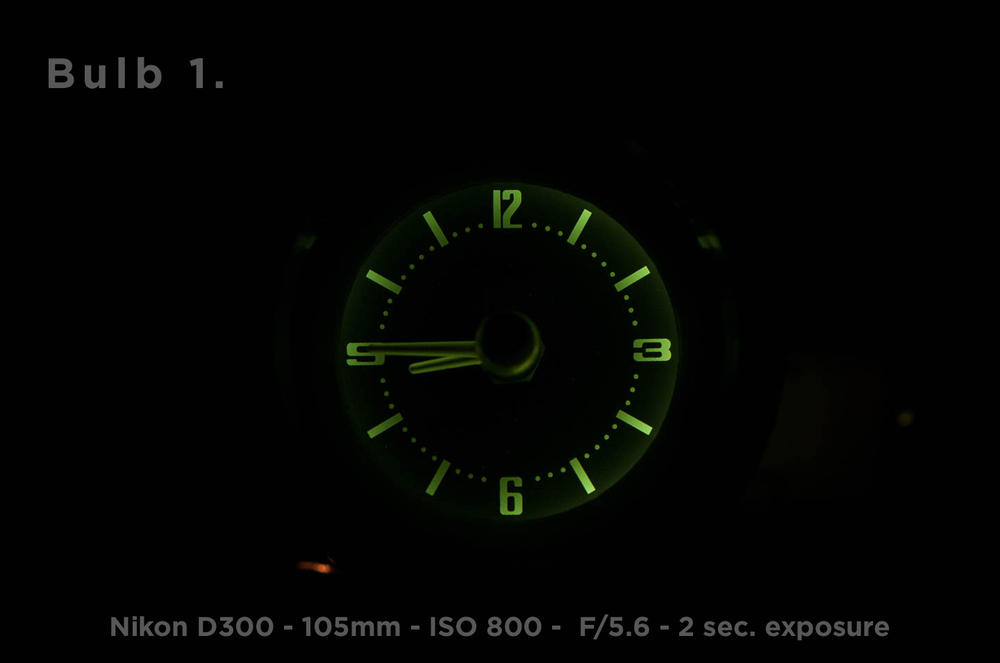
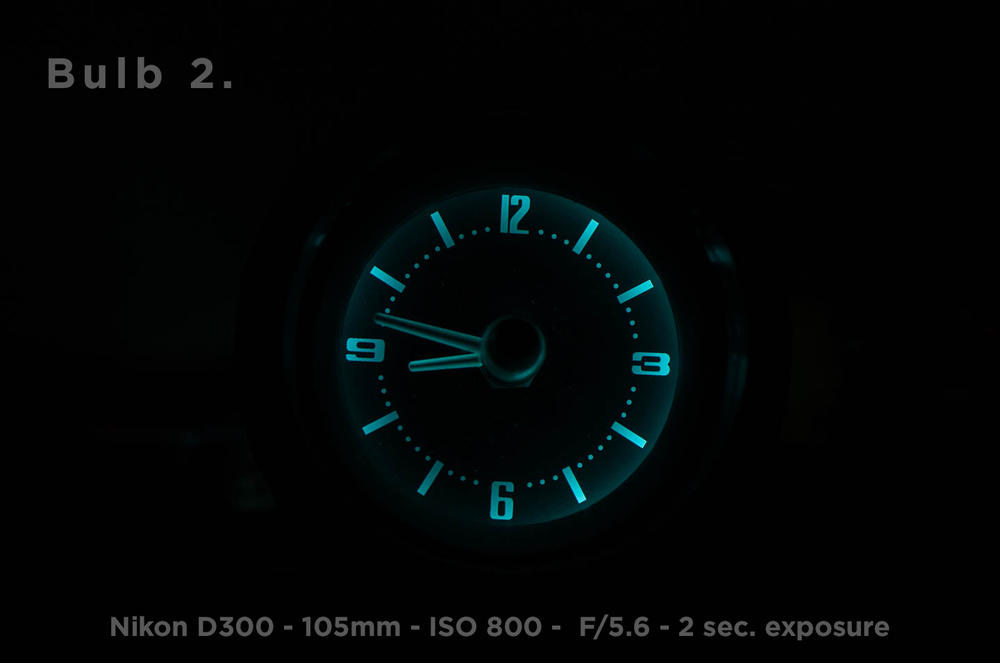
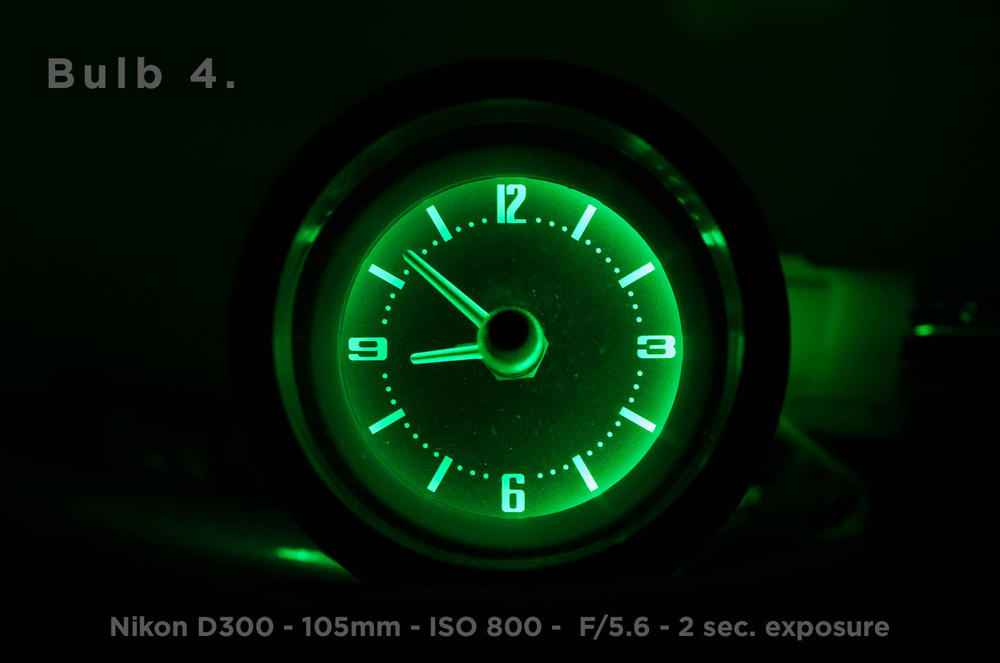
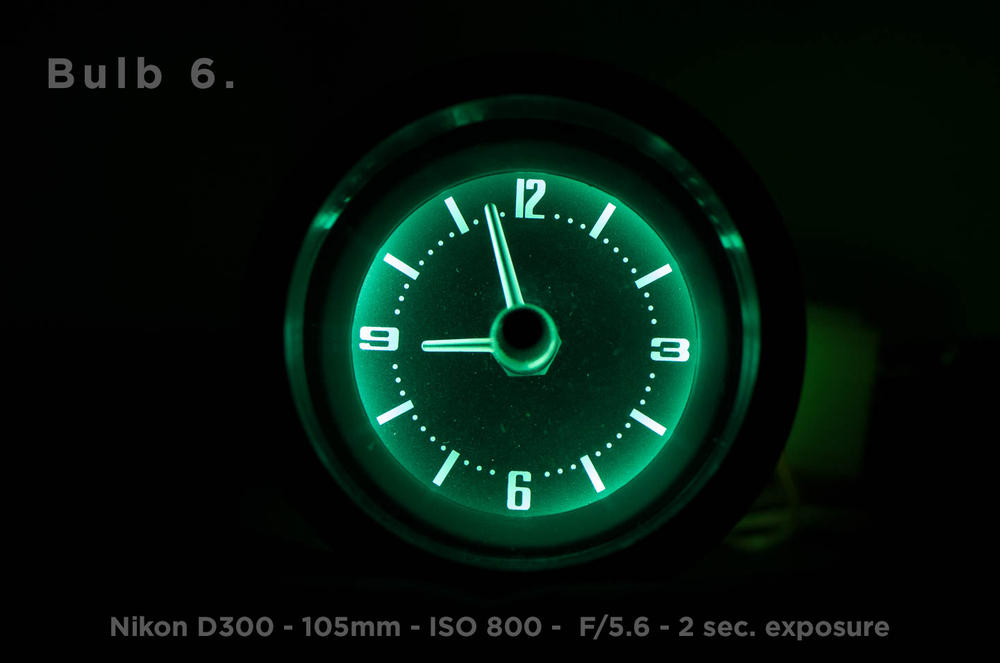
 I’ve read all the threads on LED lights for the interior, and here’s what I ended up doing. I got a bunch of different LEDs and tested them out with the clock. To keep it simple so I did not remove the green domes, or alter the inside of the gauges in any way. I set up the camera on a tripod and used an 8AA battery pack to power the light bulbs. I shot in RAW, the color temp is 5000K. I used the same exposure values for every shot. Here’s a picture of all the bulbs I ended up testing. Bulb 1 This picture is the bulb that was in the clock. Regular stock tungsten filament bulb. It might even be original. It’s pretty dim. The surprising thing is how hot the base of the bulb got when powered up for a short time. Bulb 2 The second picture shows a bulb from superbrightleds.com. Cool 7000K 120° 4 Lumens. BA9s https://www.superbrightleds.com/moreinfo/ba9s-ba7s/ba9s-led-bulb-1-led-ba9s-retrofit-car/3/ It’s noticeably brighter than the stock bulb. Bulb 3 The third picture shows a bulb from superbrightleds.com. Cool 5500K 270° 40 Lumens. BA9s https://www.superbrightleds.com/moreinfo/ba9s-ba7s/ba9s-led-bulb-1-led-ba9s-retrofit-car/958/2359/ I shaved the plastic end down with a Dremel so the bulb would fit inside the green dome. Looks pretty good. Bulb 4 The fourth picture shows a bulb from superbrightleds.com. Green 40 Lumens. BA9s https://www.superbrightleds.com/moreinfo/ba9s-ba7s/ba9s-led-bulb-5-smd-led-tower-ba9s-retrofit-car/2077/ This bulb did not fit inside the green plastic dome. To take the picture I taped it in place with as much of the bulb in the dome as possible. The color was too green for my taste. Bulb 5 The fifth picture shows a bulb from superbrightleds.com. Cool 6100K 96 Lumens. BA9s https://www.superbrightleds.com/moreinfo/ba9s-ba7s/ba9s-led-bulb-5-smd-led-tower-ba9s-retrofit-car/2077/#/attributes/10855 This bulb is the same as the previous bulb, but cool white instead of green. To take the picture I taped it in place with as much of the bulb in the dome as possible. Bulb 6 The sixth picture shows a bulb from amazon.com White. BA9s https://www.amazon.com/64111-3-7020-Lights-Extremely-Bright/dp/B01MEFGAAI/ref=sr_1_3?ie=UTF8&qid=1505518231&sr=8-3&keywords=ba9s+LED This bulb came in a four pack. I decided to try this bulb since it was cheap. It’s nice and bright. Close to the same brightness as the 96 Lumen white bulb from superbrightleds.com. It surprised me how evenly this style of bulb illuminated the clock. I like this one the best so far. Bulb 7 The seventh picture shows a bulb from amazon.com White. BA9s https://www.amazon.com/gp/product/B01MQOXU74/ref=oh_aui_detailpage_o01_s01?ie=UTF8&psc=1 This bulb came in a 10 pack. It is bright but not as bright as the bulb in the sixth picture. Bulb 6 in the speedometer Overall I went with bulb number six. Here’s a picture of my speedometer with that bulb. It lights up nice and bright. Here’s a picture of the clock powered up and resting on the dash of my jeep. Overall it’s about the same brightness feel to the jeep gauges on full brightness setting. The dimmer in my 280z did not dim the LED bulbs at all. It’s either full brightness or off. I also put LED bulbs in the turn signal indicators, high beam indicator, and brake warning light in the gauges. I tried a couple different bulbs but forgot to take pictures. I don’t have everything put back together yet, but when I do I’ll update with a pic of all the gauges lit up in the car.
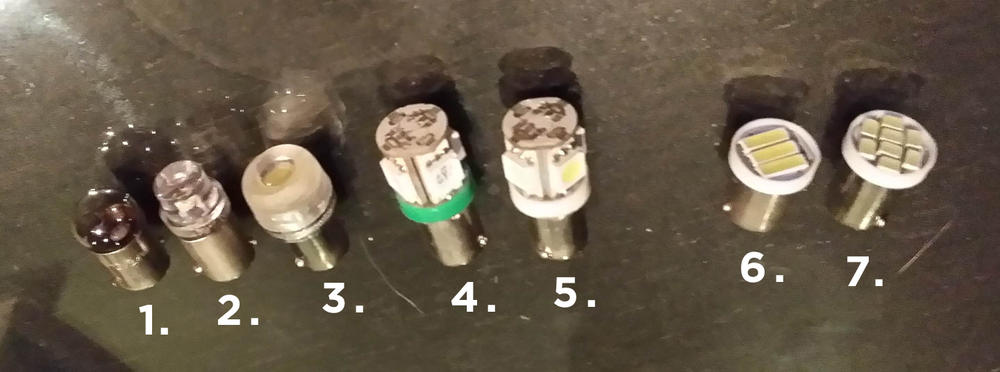


-
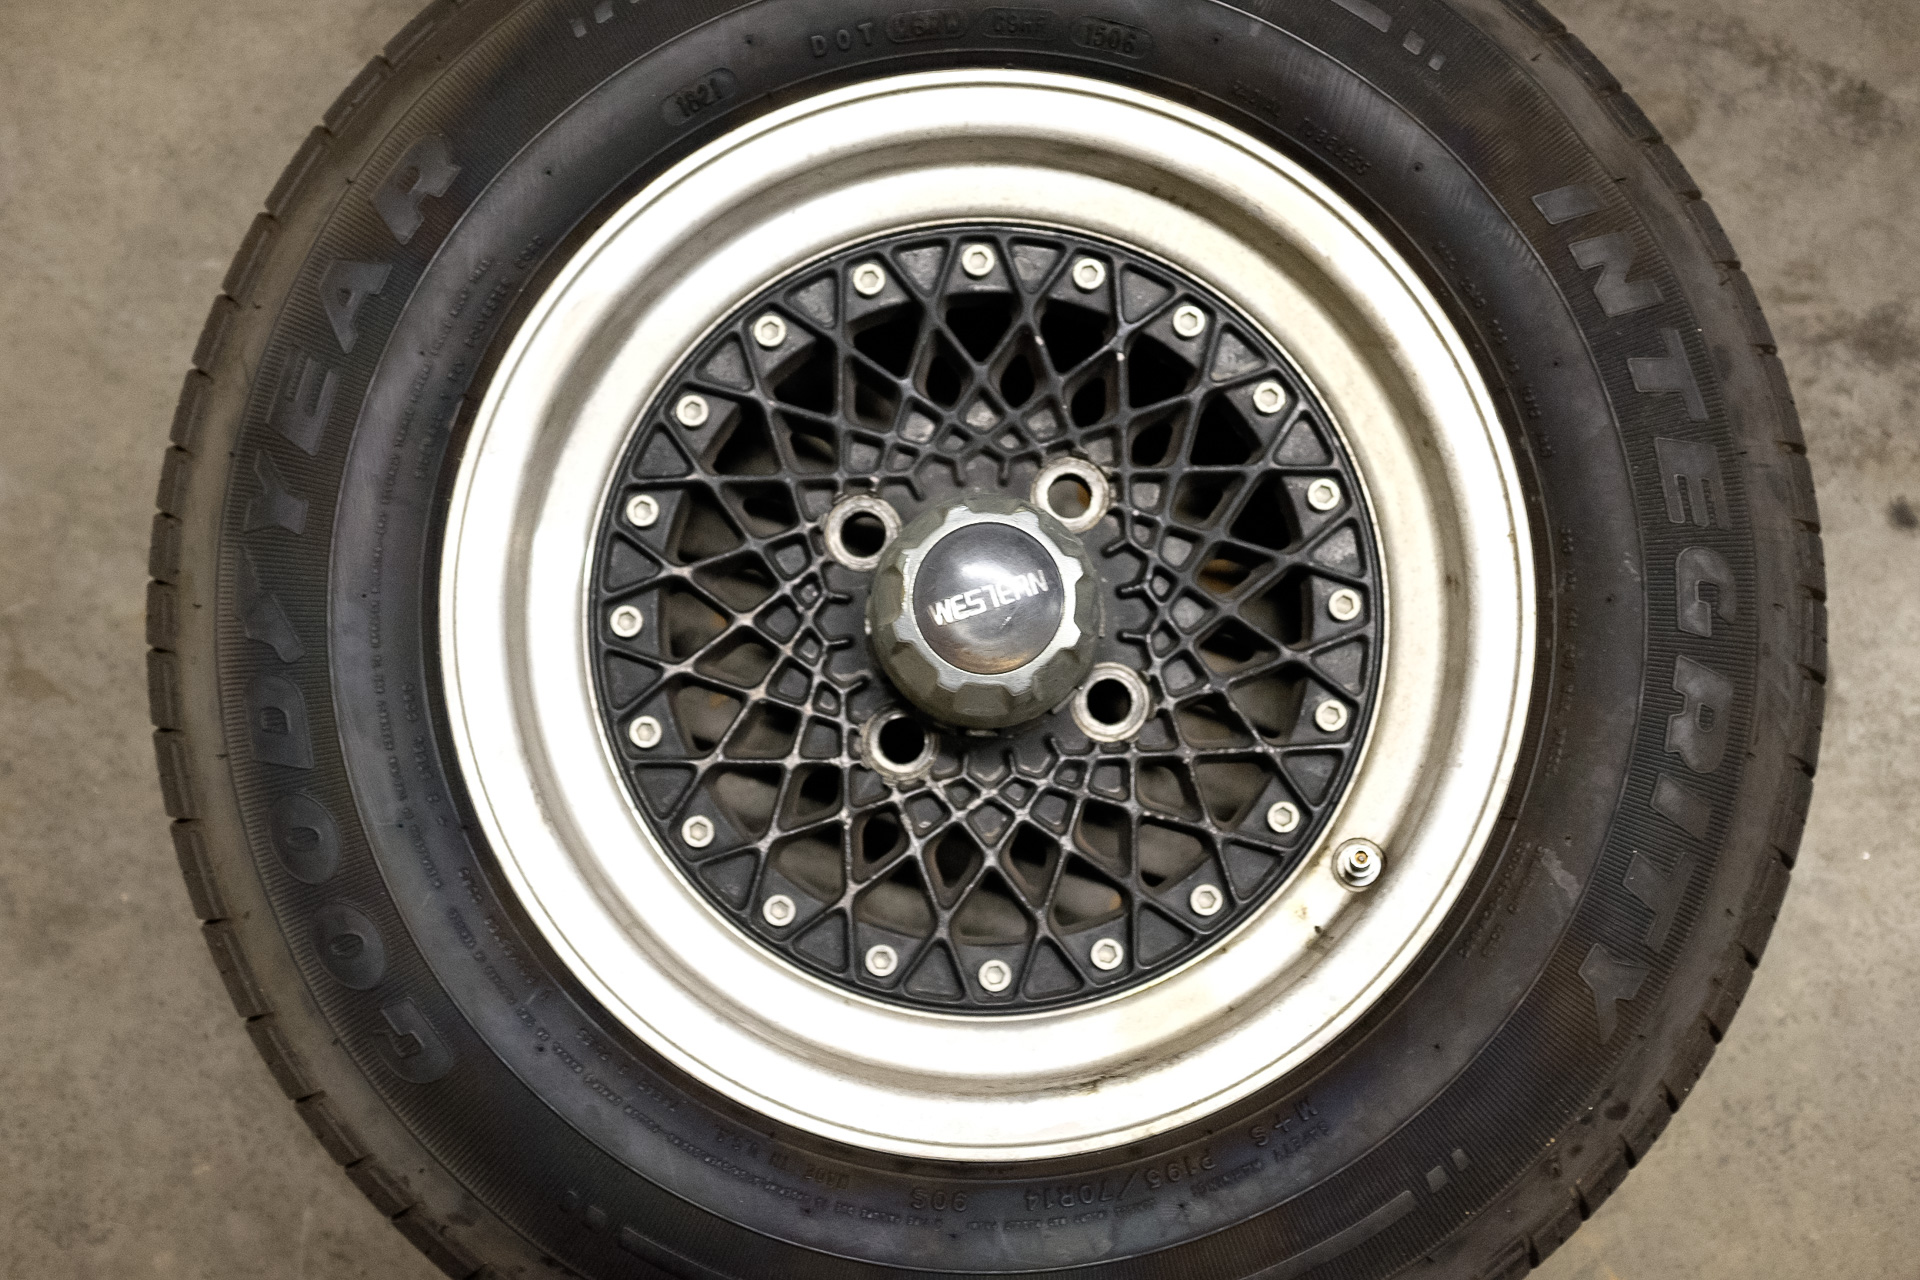
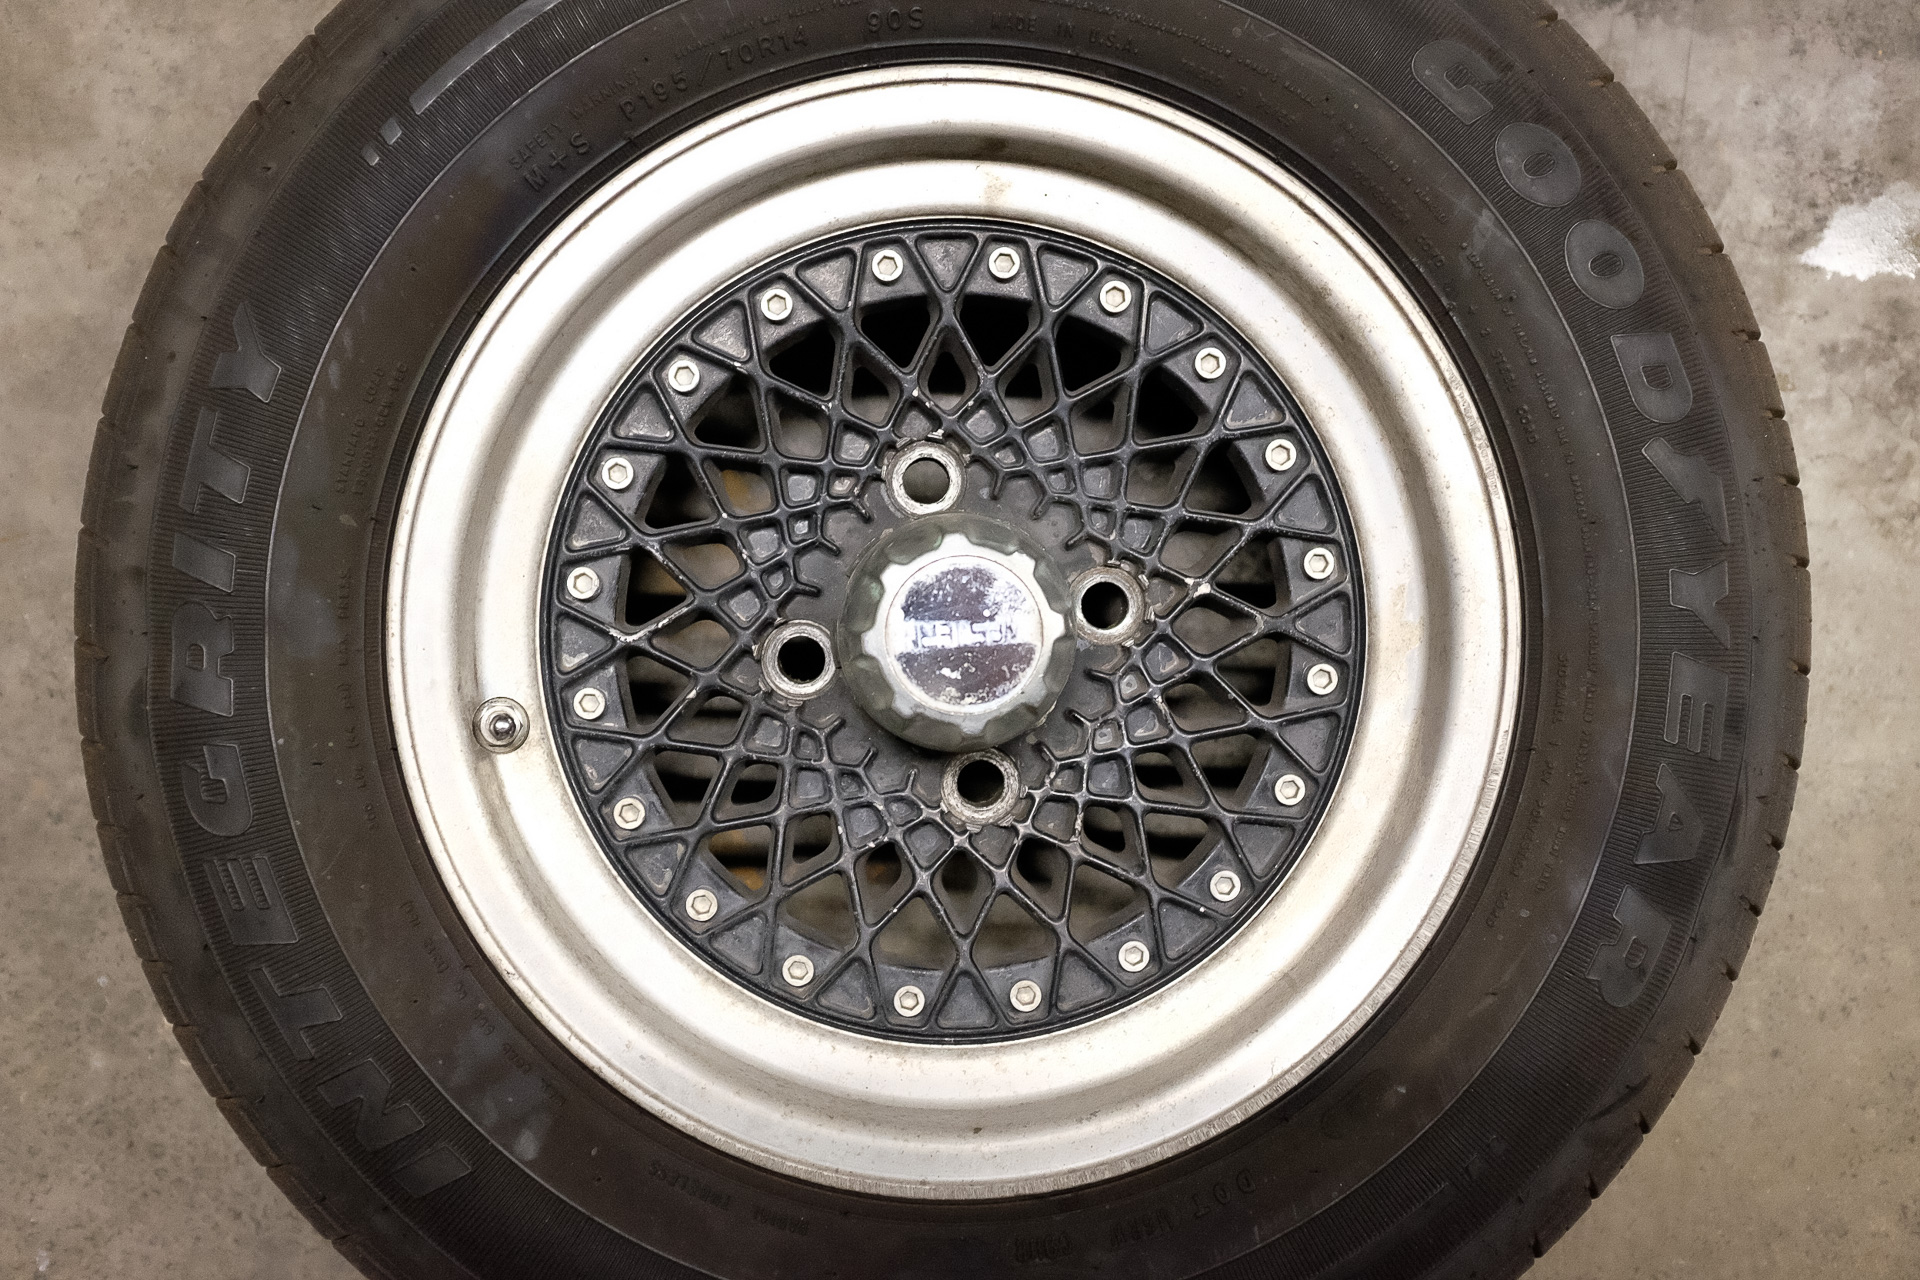
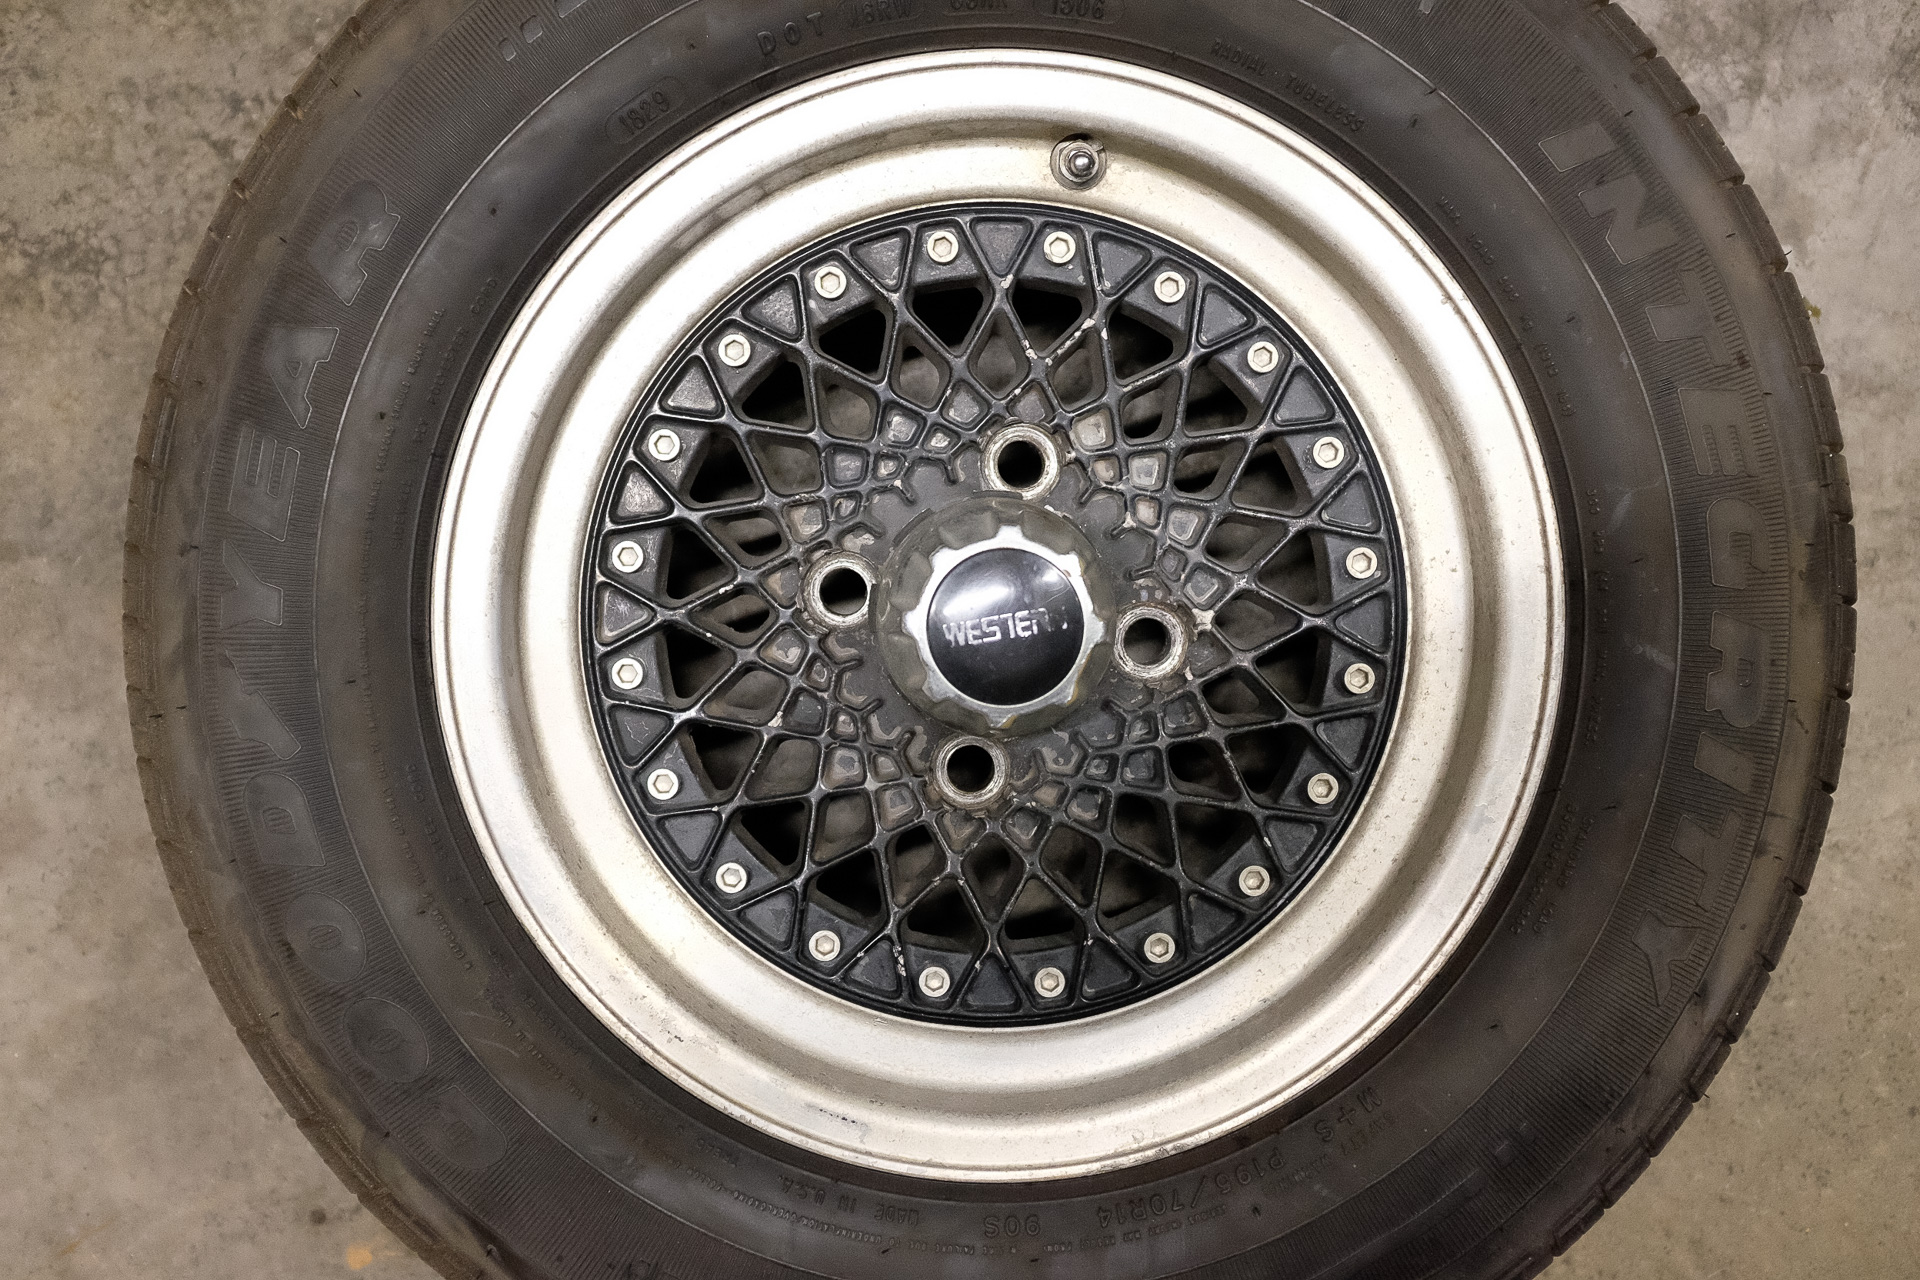
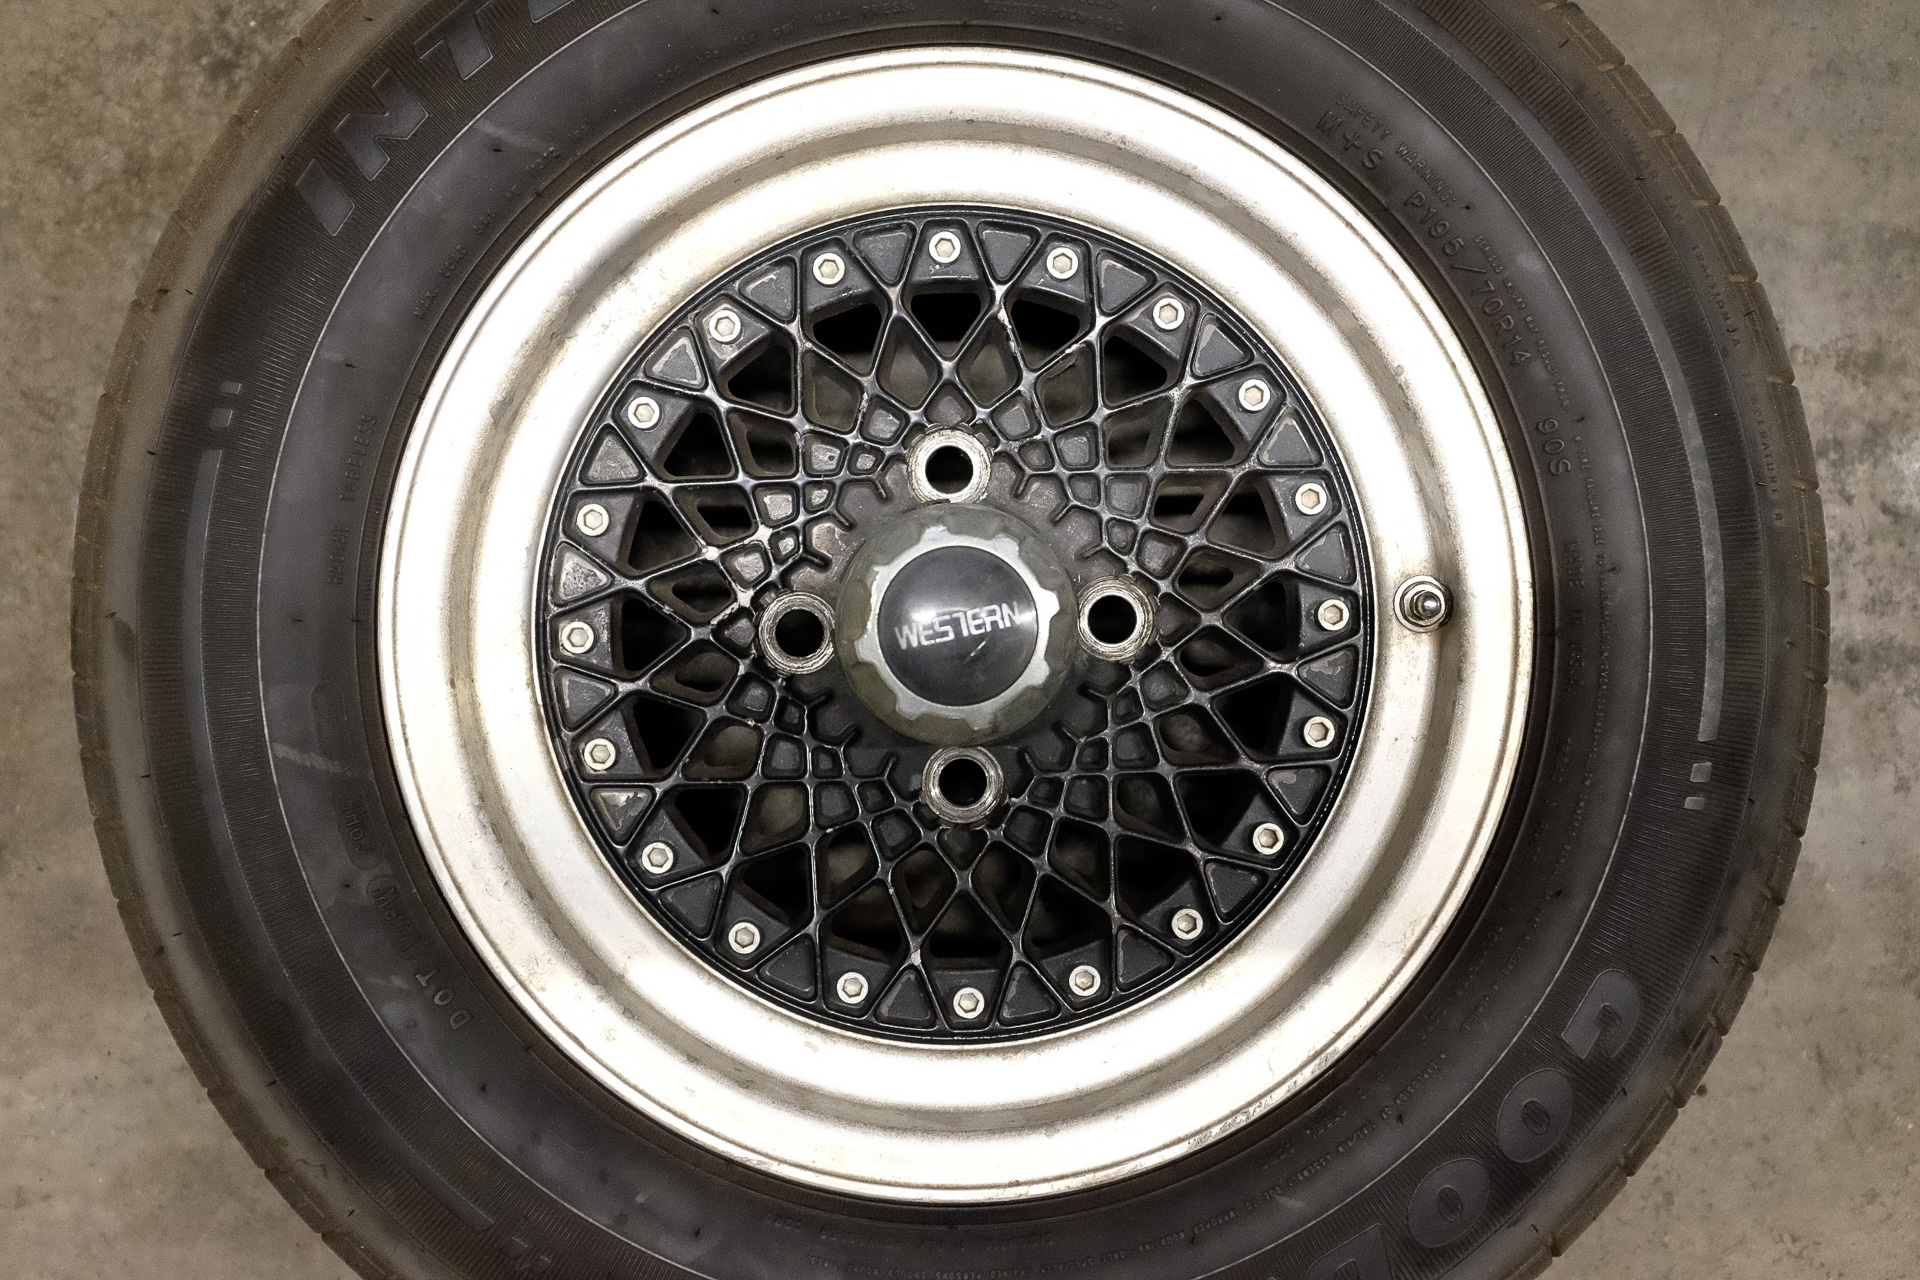
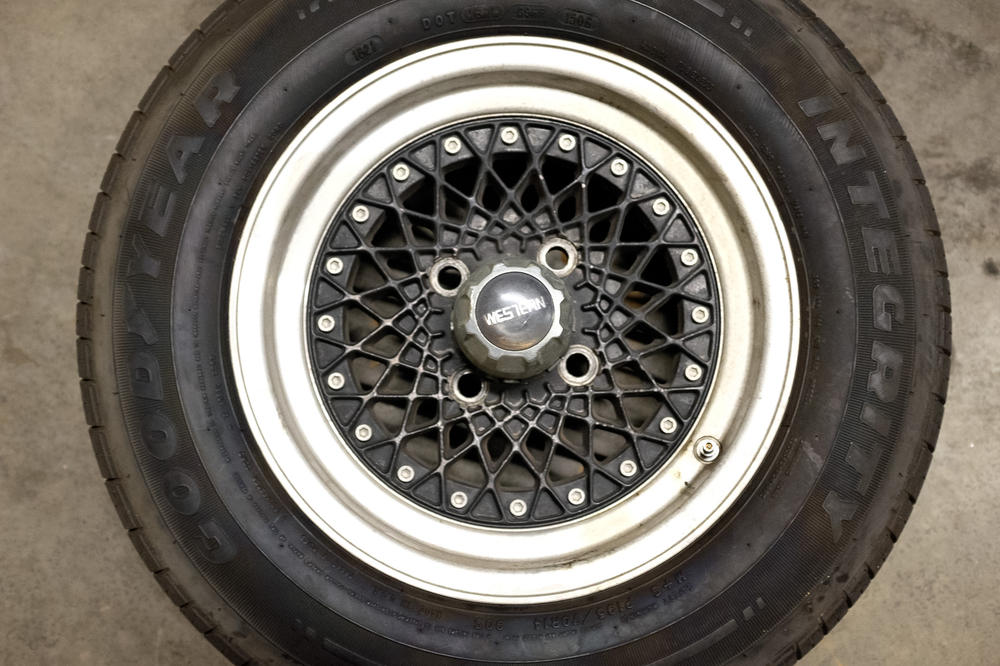
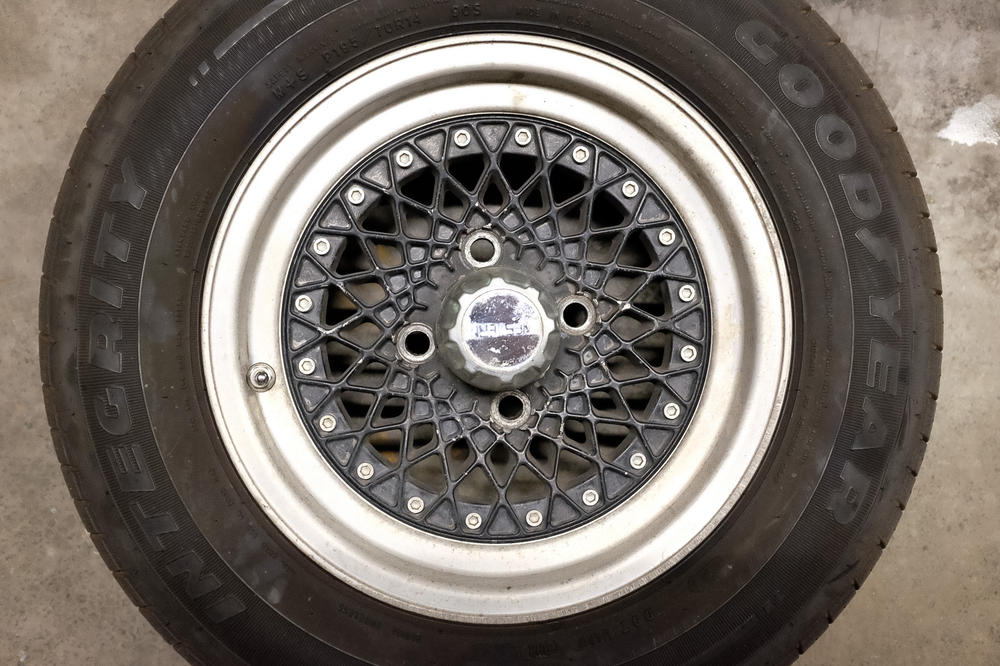
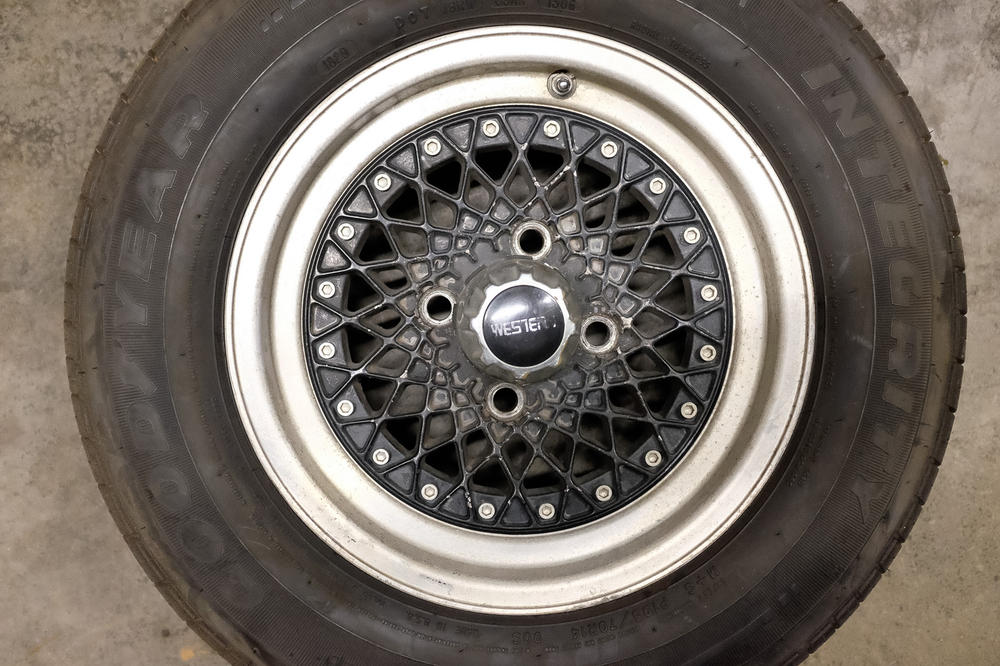
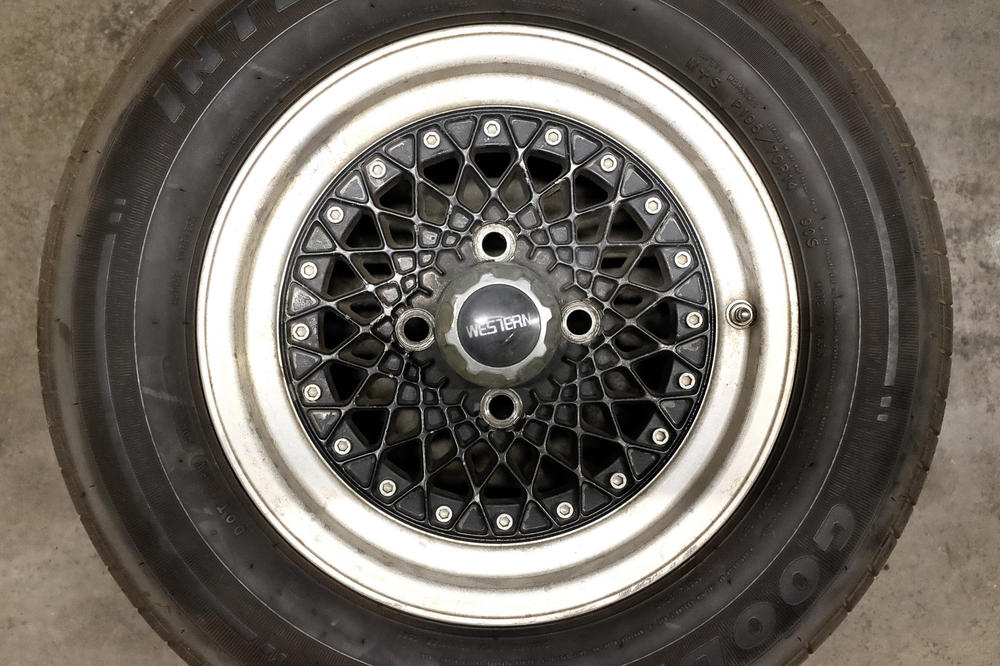
I have a set of 14” Western wheels that I need to get rid of. They are free to pickup. I am in the Burbank, CA area. Update: Wheels are gone.
-
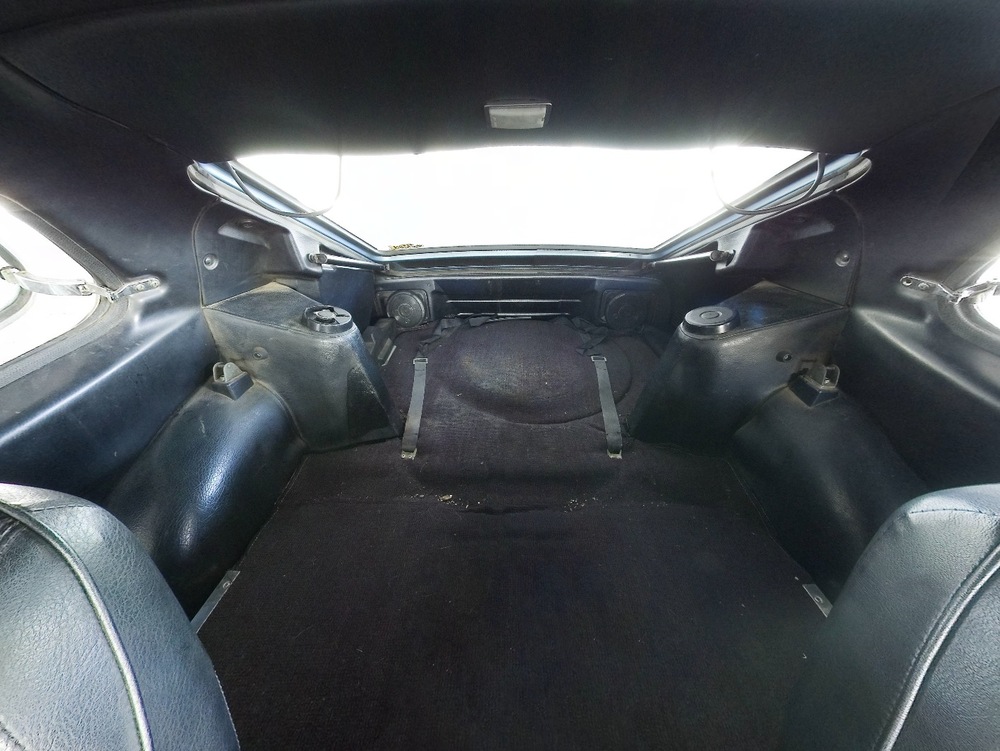
Yes, the seats fold down and quite a lot of stuff will fit back there.
-
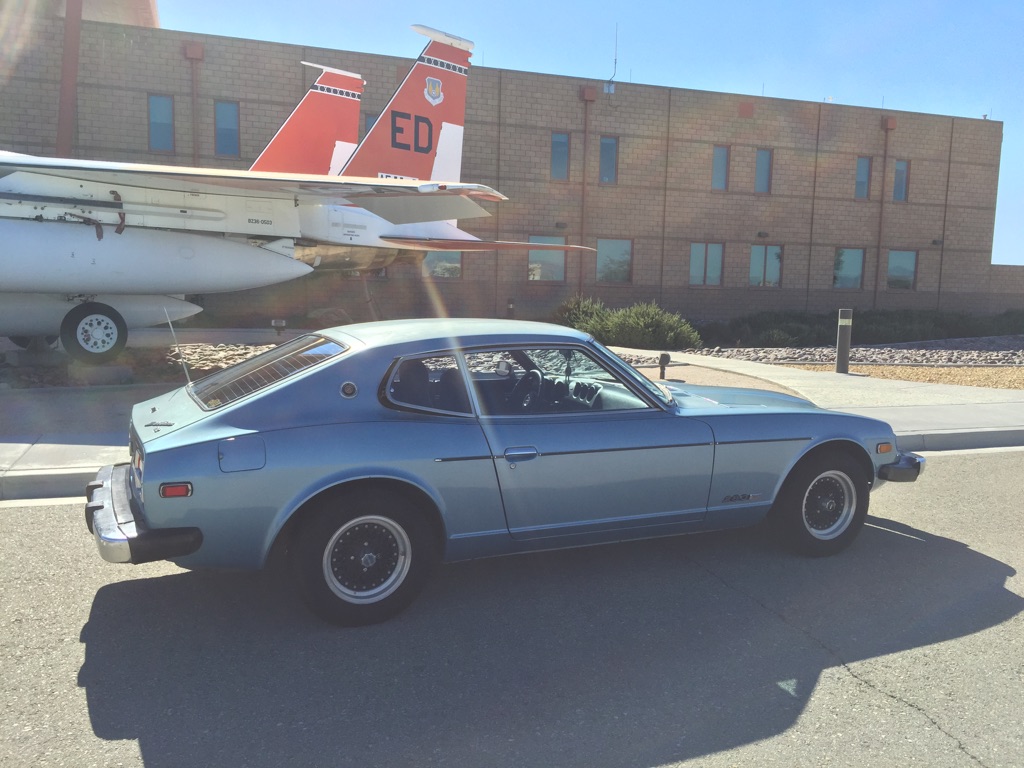
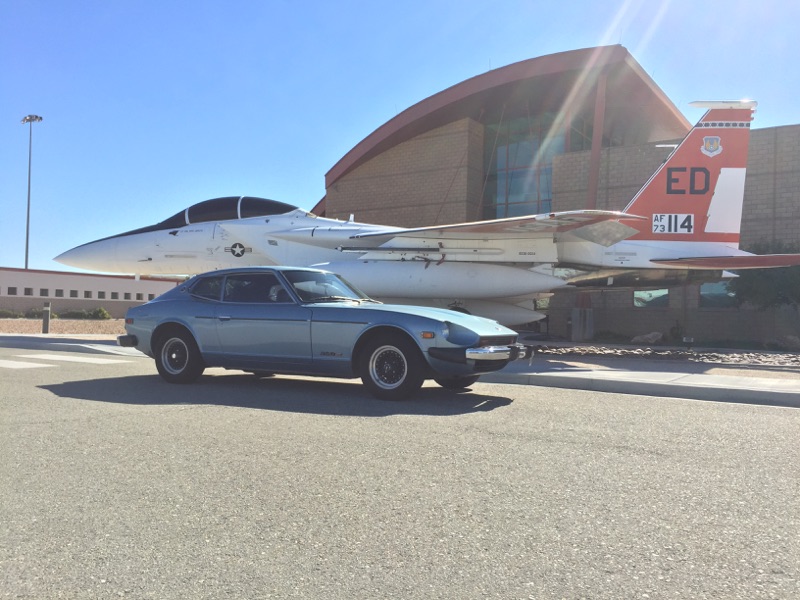
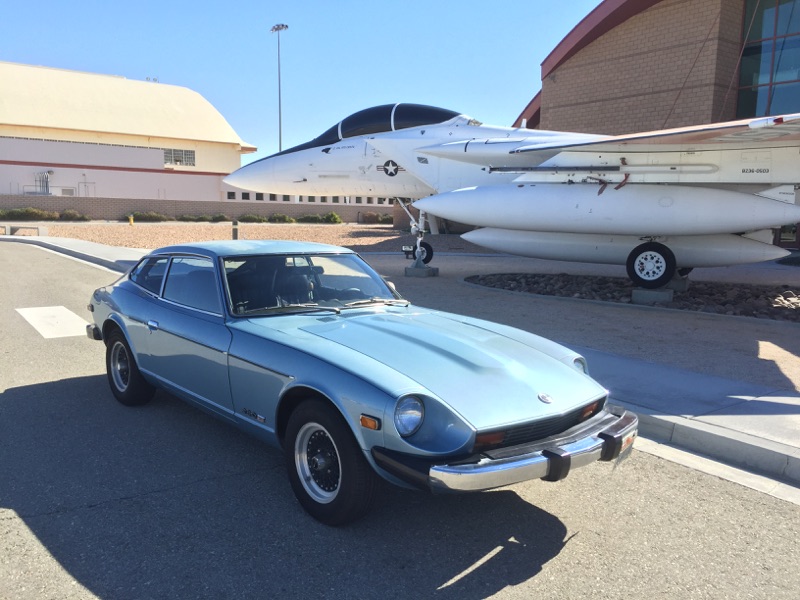
Hello again, Been quite a while since I posted here. How’s this for an update? September 2006 Acquired my uncle’s 1976 2+2. He got it around 1980 or 81. Drove it from Houston, TX to Glendale, CA. It’s not in the best of shape. Has over 300,000 miles on it. October 2006 After getting my 76 2+2 that was originally my uncles checked out at a shop in Glendale, CA, it was evident that the car was a rusty mess. Too many years in east Texas rain. Began looking for a rolling shell. Engine/transmission OK, so are interior parts and other odds and ends. Gonna keep the rims too. 14” Western Mesh from who knows how long ago. June 2007 Not much luck finding a rolling shell, but did find a couple running cars from Bakersfield to near Sacramento. Decided to take a long day trip to check them all out on a Saturday. 1st up was Bakersfield; a 78 that ran strong, needs full interior, suspension work, but more rust than I’d like. 2nd was near Fresno. Another ok runner needs interior/ bumpers, all sorts of odds and ends. Last for the day was Auburn CA. Found original owner 75. This is the car I bought. 140,XXX miles, factory A/C. Needs brakes and paint, but the car is 100% intact. Most everything original. Never in an accident. Almost everything works, except an early 80’s radio (ended up being a fuse) and the washer fluid pump. Least amount of rust on a Z I’ve seen in person. So far as I can tell, just spotted rock chip rust hear and there. Floor boards are good, rails good, spare wheel area good. Put deposit down to pick up the next week. Had brakes worked on by the PO’s mechanic in Auburn during the week, and drove it back the next Saturday. The car hadn’t been on a long trip in a while but made it back no problems. June 2008 At a shop in Glendale, CA, got the 5-Speed swapped into the car and they stripped the rusty 76 of all salvageable parts. Put the 14” western rims on as well. July 2008 to August 2015 Life happens: Got laid off, found new job, got married, bought apt. in Burbank, CA. All the while, kept driving the car and doing fluid changes and what not, but that’s about it. September - October 2015 My brother moved to Lancaster briefly, so finally had a place to do some work on the car for a couple months, as much as time and budget allows. So began a serious tune-up and replaced the following; Rubber fuel hoses, Injectors, injector connectors, plugs and wires, distributor cap, rotor, fuel filter, air filter, fusible links and cap, fram fuel filter before fuel pump, new battery cables, battery hold down, new alternator, belts, oil change, coolant flush. January 2016 Back to Burbank now. I can work on the car in the underground garage, HOA is cool, as long as I don’t do fluid changes or jack up the car (can’t anyway as parking spot is on incline) and have to cleanup when done. No problem there. Installed battery cut off switch, and notice the 1st of the previous owner’s peculiarities after recently studying the electrical system in FSM. The fusible link between battery and EFI was replaced with two 20amp reg inline fuses. Replaced that with a properly crimped and insulated maxi-fuse. February 2016 Noticed a coolant leak. Had a shop replace the water pump and gasket. All good now. Began replacing all the vacuum lines. Started slow/ took my time, but got them all done except the brake booster hoses. Started the car, smoke everywhere. I went through FSM, and found in the process of replacing vacuum lines I knocked the other electrical connectors around. They are corroded and just about crumble when touched. June 2016 Finished replacing all the other electrical connectors, cleaned all the other electrical connections, and replaced bullet & butt connectors. Dyno Label maker with heat resistant labels made this so much easier. Replaced AFM Boots, PCV Valve and PCV Hose. Opened up the AFM to have a look, and it seems to have never been opened. Everything inside was shiny and original. I sealed it back up and re-installed. Read to many stories about jacked up AFM’s. Same with the TPS. Started the car for the first time in three and a half months. No problems. Fired right up and runs smooth, no smoke. July 2016 Installed re-built combo and turn signal switch. Installed famous headlight relays and parking light relays upgrade. They work great. Installed a set of Hella 500 driving lights under the front bumper. Wired it up with a proper relay. Had them laying around for when the “fog” lights go out in my 2005 Jeep Wrangler Unlimited (daily driver). If you’re gonna have ginormous bumpers may as well use them for something. Noticed the hazard lights don’t work. Don’t know when that stopped working, never had to use them. Turn signals worked no problem. Cleaned the switch, still no hazards. Ended up replacing the flasher. All good now. Getting to the flasher is something else though. Mine was original and still screwed down. Was able to get my hand up far enough to get the wired connector loose and place on new flasher unit. Zip-tied and velcroed down, all is good. Also noticed the other electrical connectors under the dash (those I can reach/see) are nice and shiny. August 2016 Replaced the side view mirror with a chrome 240z style aftermarket mirror. Old one would crumble and chip if looked at funny. September 2016 Went over everything done in the past year. Checked and re-checked. Found a couple things to tighten up, clean, etc… November 2016 Suspension needs refresh. Drives like a squishy bumper car. Who knows how many suspension parts are original. It’s next on the list, gonna keep stock. Gonna have to farm this work out. That’s where I’m at now. After the suspension is refreshed, I’m gonna work on the replacing all the cooling system hoses. and HVAC seals.


-
Depending on what you want to record there are many options. If you are looking to record still frames over a period of time find a compact digital camera with whats called an intervalometer function (fancy name for time-lapse) that takes either secure digital or compact flash cards (cost efective for multi-gigabite memory cards). You will also want to make sure you can lock the focus and exposure value. You'll then be able to record images (for example every thirty seconds) until the memory card is full. Be sure to have it plugged into the cigarette lighter for power or use an AC power inverter and use the camera's AC adapter. If you want uninterupted video the best bet is to use a laptop in conjunction with video camera that can record to the laptop (most likely a firewire connection). Max out the hard drive on the laptop and you could record upwards of 12 hours uninterupted. Be aware that the longer you record the greater the chance the audio and video will not be in-sync. Although this is not so much a problem if the camera can't see anyone's lips if they're talking. Again, you'll want to be able to lock the focus, exposure value, and power it from something other than batteries. As for mounting the camera there are many options. From my experience the suction mount devices allow to much vibration. Bogen/Manfrotto makes some very interesting camera mount gadgets that can attach to a window frame, (anti)sway bar, or just about anywhere. But looking at their online catalog is kind of tough to figure out the possibilities, as little parts from across there product line will connect together securely in ways their engineers could not possibly envision. Try your local Pro Photo/Video store to play around with what they got. (just for some ideas try this link www.bogenimaging.us/product/itemlist.php3?manufid=1§ionid=92)
-
Well to sum it up... My uncle purchased the car in 80 or 81, drove it all over Texas for years. It's white and will continue to stay that way. There are over 300,000 miles in the engine give or take. At some point in the late 80's or early 90's it was in an accident where it slid under a vehicle and almost peeled the roof off. Everyone was OK. Then the car was slowly put back together and it ran till about 2002 or 2003. From then till now it just sat collecting dust. It came into my possession as a college graduation present in 2004 (I went to the same school as my uncle, Rochester Institute of Technology). I think it also helped that I used to detail the hell out the car. But being a right out of school meant putting money into the Z was not in the cards... till now. So here's what I want to do to the car... turn it into the ultimate road trip machine. The extra room in a 2+2 means I can fit my cameras, a hefty tripod, and a whole lot more in the back. I'm thinking about stripping it to the frame and doing a ground up restoration/refurb. Lucky for me I now live in sunny SoCal. Any suggestions are welcome. More Later... Mike
-
Hey ya'll, Just gonna get this introduction out of the way. My name is Mike and I am a Z-aholic. No, really, I am the proud new owner of a white 76 280Z 2+2. It's been in the family for over 25 years. For the past five it's been sitting in Houston TX, till I drove it to Glendale CA, my current residence, not more than a week ago. A little about myself... I'm 28, work as a photoshop specialist in Hollyweird, and produce fine art photography in my own time. I'm an avid outdoorsman, over 3.5 years living in a tent if I count all the trips back to back. I look forward to learning alot from everyone here. Mike Ewasko