geezer
Free Member
-
Joined
-
Last visited
Everything posted by geezer
-
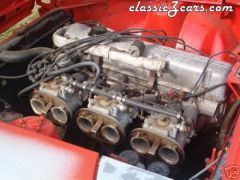
Marty - What coating did you have Jet-Hot put on yours? I'm sending mine out to them tomorrow, along with my intake. I specified the Extreme Sterling which is rated for 1700 degrees. It has a slightly textured finish. They are doing both inside & outside of the header and just the outside on the Cannon intake. They quoted a price of $280.00. They are aluminum oxide blasted first and they will pay the return shipping. I thought that was reasonable since the header is virtualy irreplaceable and I want it to last. Doing the intake will reduce heat transfer somewhat.
-
In the link provided by Mr Camouflage read Post #50, submitted by Jon Mortensen. I am following his lead, which is the best solution in my view. He also posted some great pics a few posts later. I am going with the truck shifter and relocating the pivot point. The amount of metal you need to remove is minimal and will not change the finished appearance other than a stouter shift lever.
-
Will - Can you help me out here? I searched with what I thought would be the key words and still can't find the thread. Sounds like your sold, so I want to learn more. Sorry, found it. Cheaper alternative than Eastwood's http://www.partsexpress.com/pe/pshowdetl.cfm?&PartNumber=341-200&DID=7
-
Hang those double D's over your monitor as a reminder for the next time you get the urge. D-umb D-ecision Seriously, I think everyone is looking to upgrade what they already have. On any given day I see at least a half dozen parts that will make my car a little better. I'm already swimming in parts, so I am limiting myself to just missing pieces now. It's just too easy these days to find, buy and have anything dropped on your doorstep.
-
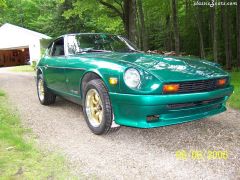 Those wheels really compliment the paint. Nice!
 -
If you were to spend the time and agravation of parting it out, and sold what is worthwhile selling, after the expense and hassle of pickiing it up in the first place, you would still lose even if you got it for $900.00.
-
The red handled one is a Miller specialty tool designed for working the glass into the channel of a gasket that is already in place on the flange, but is also very useful for other applications. Because I primarily work on early A-Body Mopars it gets used a lot. The tool on the far left is used for moulding installation. This one is actually one I fabricated, because my Miller was never returned after loaning it out. It works just as well. It is made from a paint can opener that you can get from many paint outlets. After a 5 minute rework, your ready to go. It might not be obvious to some how it works, so I'll try to explain. In the picture it is upside down. The small flat surface is positioned in the groove of the gasket and the moulding is fed into the opening coming lengthwise from under the handle. Now, as the tool is drawn towards you along the length of the moulding, it goes into place without damaging the rubber. No part of the tool touches the bright surface. It goes around corners easily. You assemble the moulding pieces as you go. The red handled Miller is great for finishing up where you end. Hope this helps.
-
Congrats Jeremy - Does this mean, one day your Z will literaly "fly"? :classic: Good Luck with the new job!
-
You can't go wrong following Carl's advise here. I have installed a lot of glass/gasket assemblies of this type. At the factory a thin skim layer of adhesive was run around the perimeter of the glass. It has the consistancy of contact cement and it is allowed to dry. The gasket which was preheated in a hot box is then given the same treatment in the appropriate places. The gasket is then put in place on the glass. Here is where my method parts way. Route the cotton 1/4" cord around the gasket and leave enough rope at the top after the overlap to get a grip on. Without the moulding in place the rubber has a greater amount of flexability, making the assembly fall into place much easier without putting any undue stress on the glass when the cord is pulled out. (when the cord is slowly pulled out make sure you have someone applying pressure on the outside about a foot behind the cord being removed) This is the time to put a sealer between the glass and gasket (outside only). This does make it harder now to install the mouldings. That is why specialty tools are made. If you do not have the proper tools or confidence to do this yourself, you should let a pro do it. I use a product called IsoPar from the Dodge dealership. It is liberaly brushed on the rubber before installing the mouldings. It lubricates and cleans off easily and will not affect your paint or trim. The moulding tool is then placed over the moulding and pulled ahead. The moulding falls right into place spreading the rubber and tightening the rubber to the glass. Heres a pic of the only gasket type tools I use. The moulding tool is the one of particular interest.
-
-
-
-
-
-
-
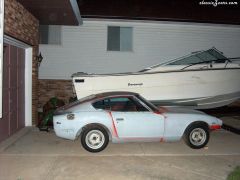
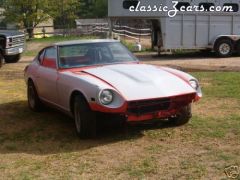
Hey Tom - The body really is in pretty good shape. The frame & floor was previously replaced but the floor pans need to be replaced again just because it sat outside so long and the water got in. The fenders, doors, hood & hatch only need to be prepped & painted. The rear quarters were replaced, but not up to my standards. It was a case of the previous owner doing the best he could with what he had. Easy fix for me. I had pics from when I bought it in my gallery, but they got wiped out after the server change. I'll put them back up soon.
-
Had a volunteer do a great polishing job on the stainless trim on the windshield and hatch glass before removal. Cut the rubber and pitched the glass. I previously lucked out and found a flawless set of OEM replacements. Removed the hood, hatch, doors, fenders and most every thing in the engine compartment. I left the engine sitting in place, just to keep it out of my way for now. I'm working out of the smaller garage because it is easier to heat. Today, the dash and remaining interior pieces come out. Tommorow, I hope to drop the suspension. I dont have a spindle pin removing tool so that might slow me down a bit.
-
Beautiful Mike! Looks like a matter of crossing the t's and dotting the i's now. What have you decided to do with the color match problem on the cones? I think it would be better to just spray them in place.
-
JimmyZ has got it down! That is an excellent article, my hat is off to you. The only thing I could think of adding is pointing out the many years of practice it takes to become proficient in both welding and body/paint. I've been doing it for more than 40 years, both as a hobbiest and a few years professionaly, and made a lot of mistakes along the way. Then I realized there was more money in industrial painting. I have never regreted laying out the cash for good equipment. It's been put to good use. There is no better feeling than knowing you did it all yourself. As a kid I started out with oxy/acetelene using coat hangers as rods. My dad built our first arc welder out of florescent light ballasts. Things have come a long way since then. Butt welding with a MIG is just second nature now. Looking forward to reading the "more to come". Great job Jimmy.
-
Got an early start today, doing some disassembly work in preparation of mounting the Z on the rotissary and sandblasting. Found out a few things about the cars previous life also. I experimented first on paint removal. Using a razor blade I removed two previous coats of paint. This is what surprised me. The bottom coat was a cheap 1 step enamel. The second coat was a base coat/clear coat. Left behind was a good coat of epoxy primer/sealer. I found that the rear quarters had been replaced also. The only problem rust areas are where water got in because of being left outside with missing weatherstripping and the door latches removed. Frame was nicely beefed up years ago, but I will be replacing the floorpans. Also, my curiosity got the better of me, so I removed the intake and Webers and the exhaust header. I then mocked up the triple carb setup with the Trust header that was intended to go on a right hand drive Fairlady Z. I had heard before that there would be a steering shaft problem. There is no problem at all. The rest of the twice pipe system will also be a simple bolt on.
-
Hi Dan - 'The brand name is Denalt. The number on the label is 5001. It works great on everything except Epoxy. I'm going to get another one. It has a long shelf life.
-
 HA! - I had to chuckle when I seen this pic. That shoe matches exactly to the ones I put on when I get to the garage. At least I think that's overspray.
 -
That is one stunning looking car! Groundhogs shadow or not, springs not going to come fast enough for you, for sure. And I sure like that white interior a lot better then the white on the ground right now.
-
Congratulations!...You do nice work there Will!...but you didn't build this one yourself...:classic: Hope all are doing well...aint life grand!?
-
I just checked one that was on my watch list and went off. Only the winning bidder's I.D. was revealed.