geoyam
Free Member
-
Joined
-
Last visited
-
Oil filters being like many other things, there appears to be only 4 companies that manufacture oil filters, Champion, Wix, Purolator and Fram. For the most part, everything else out there is rebranded. Here's link to a Corolla forum site where a member did a study of the various filters out there. Interesting bathroom reading if your so inclined. For what ever it's worth. http://www.corolland.com/oil-filters.html here's a mopar site with what appears to be more up to date info. http://minimopar.knizefamily.net/oilfilters/
-
FastWoman, Have you checked out this Holley prefilter (http://www.holley.com/562-3.asp). Is this the one you're referring to? Holley's website says its to be used between the fuel tank and EFI fuel pump. Summit Racing has it on their website too (http://www.summitracing.com/parts/HLY-562-3/). Summit's site says it's for the throttle body FI systems. I have one installed on my 77 280z. It's works fine. It's a plastic inline prefilter with 3/8" hose ends. Essentially plug and play with the existing hose dimensions. I thought I had the filter specs at one time, but don't recall the micron size. Holley does advertise it as low restriction.
-
Hey Arne, have you seen or checked out the website for this wheel company? http://www.akhwheels.com/pages/showWheel.php?pk=20 They're in your neck of the woods too.
-
I posted this two years ago regarding the oem rubber bushings. The 2006 cost for a full set including spindle pins was about $200 dollars through online dealer (www.buynissanparts.com). I'm shocked if they doubled in price in four years. Here's the link to the original post http://www.classiczcars.com/forums/showthread.php?t=32622
-
Try using this as a fix for the worn cam. It was not necessary for me to swap door lock cylinders. The shim seated the lever arm up against the un-worn portion of the cam. The worn out portion seems to be at the end of the cam due to the excess play in the lever arm.
-
I installed a Painless Performance Headlight Relay Conversion Harness (Part# 30815) (http://www.painlessperformance.com/webcatalog/largeview.php?SearchField=30815&SearchAll=Classic Cars) on my 77 280z. I had also purchased the BD Heavy Duty Headlight Harness and wasn't very impressed with the quality and construction. The wiring was way too short to reach the opposite headlight and the harness did not have any type of fuse protection. Zs-ondabrain is correct when he says that getting the wiring harness through the headlight bucket is a problem. I was able to overcome this by simply removing the connectors out of the plug. You can use a small flat bladed screwdrive to press the metal locking tabs and remove each connector from the plug. Be careful not to break the locking tabs or you're SOL. I was able to fish the wires with the connectors attached through the rubber grommet and into the bucket. I simple made sure that I re-inserted the connectors into the correct position in the plug. You're good to go to plug into your headlamp. No need to butcher up the bucket or OEM headlight harness this way. But this still presented a problem in how to mate the relay control harness to the vehicle wiring harness. I ended up cutting off the old round male connector from one of the headlight harnesses and splicing it onto the end of the relay control harness. I still butchered up the OEM harness. Oh well, at least my lights are 100% better and I'm not likely going back to the original wiring system.
-
Hey mlc240z. Great to hear that the Trico 11-601 is a direct replacment. Wished I found the part before spending $117 dollars at the dealer for a replacement washer reservoir w/pump. For any of those of you who may be thinking, Datsun does not show the pump as a replacement part by itself. They make you buy the whole reservoir and pump. Now you can buy a plug & play replacement for a whole lot less money. As I see it, the only way to solve the problem of a missing rubber mounting sleeve is to hunt the junk yards.
-
Hey Zs-ondabrain. Have you every looked at using a Trico 11-601 instead of a universal model. The 11-601 looks like it's a direct replacement for the OEM washer pump. No need to cut off any mounting stubs. My old pump went out on my 77 a couple of years ago. I ended up buying a new washer reservoir w/pump before I found the Trico replacment on Trico's website. Here's their link: http://www.tricoproducts.com/Trico2/pdf/ACF1701.pdf. The 11-601 is selling for about $22 dollars on various websites. I always wanted to know if the 11-601 is a an exact replacement. It is listed as a replacement for the 1976-1984 Honda Accord. Anyone out there used the 11-601 and can speak from experience?
-
Believe it or not the best thing to use on the interior plastic for our z cars is Oatey's black ABS cement. It the same cement used to weld ABS drain pipes. The interior plastic panels in the z cars is made from ABS. ABS cement will literally weld any cracks or broken pieces together. I've also used ABS cement to fabricate small pieces that have broken off, such as the stubs for screw points. I swear, the stuff works great. The welded seams become stronger than the surrounding plastic. Check the website www.MP3car.com. They have lots of info on the subject, plus lots of mods done to dash panels that look like they were OEM.
-
1) You're correct on the four (4) bushings for the left and right tension rod. 2) You need eight (8) bushings for the left and right side front sway bar end links. 3) You're correct on the two (2) bushings for the left and right front control arms If your going to change the front sway bar end links you should consider changing the sway bar mount bushings also. There are two (2) of them. Yes there are two different sizes per rear control arm. You'll need two (2) rear control arm bushings FRONT and two (2) rear control arm bushings REAR. If memory serves me correctly, the spindle pin bushings do have rubber on them. Either way I would suggest changing the four (4) spindle pin bushing while your at it. Is there a reason why your not changing the rear sway bar end links also? There are eight (8) bushings for the rear, just like the front. And the same thing goes for the rear sway bar mount bushings. There are two (2) of them. I had all of my rubber bushings for my 1977 280z replaced with OEM rubber bushing a couple of years ago. At that time they were still available from Nissan dealers. I've attached a list with the part numbers for a complete OEM bushing/spindle pin replacement. Most of the part numbers are listed for the 70-78 240, 260 and 280z models. Some parts, such as the sway bar mount bushings are year specific due to the size of the sway bar. Total cost for the parts was about $200 dollars. 1977 Datsun 280Z Suspension Bushings List.doc
-
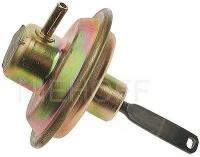
Your post doesn't say if you need a vacuum advance for a manual or automatic transmission. Kragen Auto has them brand new for an automatic on their online store, PartsAmerica.com for about $40 dollars. Doesn't look like they have then in your year for a manual transmission. Checking Nissan dealer parts finder, (parts# 22301-E4603) a vacuum advance for a manual transmission is showing still available for $30 dollars.
-
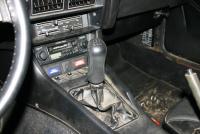
300ZX (Z32) Black Leather Shift Knob mounted on a MSA Short Throw Shifter.
-
Stay clear of the MSA bulbs. The bulb shape is too long for OEM application and they're pricey at that. You can us an Eiko A-72 bulb. It has the correct G3 1/2 bulb shape as the OEM bulb and you can find them as low as $1.32 @ piece on the internet (Http://bulbster.com/lightbulbs/a72-p-3002.html). The Eiko A-72 is a 4 watt bulb. It's interesting that the Sylvania 53 is only a 1.68 watt bulb. It use to be a 4 watt, G3 1/2 bulb some time ago. Sylvania must have change the bulb wattage. That would make the Eiko the only proper OEM bulb shape in 4 watts.
-
Be careful in using any BA9 base shaped bulb if you intend to use the stock green lenses in the gauges. Unless the bulb shape is a G3.5, any other bulb will be too long and rest against the lense eventually causing them to disintegrate from the heat. The specs on the OEM bulbs were 24mm (.94") in length, bulb shape: G3.5, bulb base: BA9, volts: 14.4, watts: 3.4. As mentioned before the Sylvania 53 is a close OEM replacement as is the Eiko A-72. Both bulbs are rated at 4 watts. Seems like no one manufactures 3.4 watt replacements in the proper bulb and base configuration. Using the 4 watt replacements have increased the brightness of the gauges. They've been in my car for over a year without any visible damage to the stock green lenses.
-
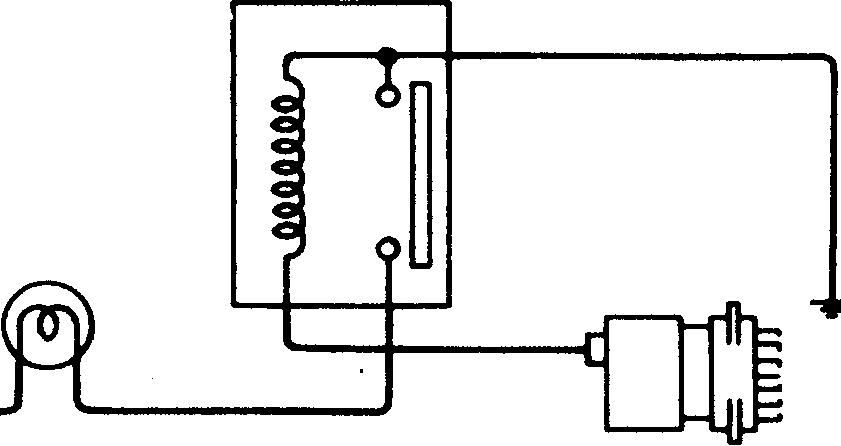
This is the diagram of the relay from page BE-35 of the 1977 FSM. The OEM relay is a SPST normally closed using only a 3 terminal connector. The terminal to ground is share by one leg of the coil and one leg of the lamp circuit. The second terminal is for the yellow wire from the alternator and the third terminal is for the green w/yellow stripe wire from the brake warning lamp. If I remember correctly, you should be able to take a Bosch relay and wire terminal 85 to the yellow and terminal 86 to ground to power the relay coil. Terminal 30 is wired to the green w/yellow stripe. Terminal 87a should be normally closed and terminal 87 is normally open. You want to wire terminal 87a to ground and ternminal 87 is not used. A Bosch relay socket can be used to wire into the factory harness. If you don't want to butcher up the harness you can wire the relay socket into a male 3 terminal connector if you can find one and plug the new relay setup into the factory female connector.