Everything posted by Nissanman
-
vacuum diagram
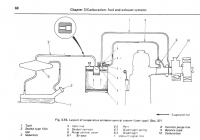
There are several diagrams in the Haynes Manual. This one is for the evaporative emissions control system: - What exactly are you wanting?
-
Medical Procedure In San Francisco
As far as the prostate test is concerned, NEVER, NEVER, EVER ask for a second opinion:finger: I did and the GP proceeded to repeat the test with TWO fingers:tapemouth:tapemouth
-
Alternative PCV Filter material in the block
Probably, but you can fold up a replacement out of metal fly wire and it will last the life of the engine. It is a very efficient oil/vapor separator so don't be tempted to use anything that may clog up and render it useless.
-
Inflating the Spare Tire on an 83
1. Compressed air? 2. I doubt it.
-
Anyone know what the heater coil thing is in the heater unit?
When you say you fried it, does it still read resistance? It might have glowed red hot but may still be OK. You could fit one from a late model car and it will work fine.
-
UGh more vacuum issues
-
Battery won't charge with headlights on
My initial guess is the brushes in the alternator are worn out. When worn down they have very little spring tension on them and, providing the Voltage Regulator is doing the right thing, the exciter current doesn't increase in the rotor therefore the stator doesn't increase in output voltage. So once again, providing the VR is good, I'd suggest pulling the brushes out to check their integrity:bulb:
-
engine block question
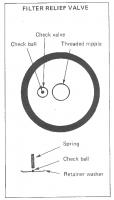
Yes, I've never had any problems getting the soft plugs or the pressure relief valve. The valves I have seen and used are a self contained device with a spring loaded ball captive in it. You just slip the new valve into the hole in the oil filter boss in the block and gently tap it home. Yours is I gather something like this attachment, later versions are, as I say, a self contained device
-
engine block question
Removing the valve is a good idea, it allows the tank solution to circulate thoroughly. However, you should also remove the soft plugs from the front and rear faces of the block for the main oil gallery. Remove one plug by drilling through it, threading the hole and insert the appropriate bolt. Then lever under the bolt head with a flat lever, king size screwdriver etc. Protect the block with a scrap of wood. The plug will come out fairly easily. To remove the remaining plug I use a length of steel rod. Slip it into the open end of the gallery and tap the rod with the percussion device. Be careful not to spear the next door neighbor. The plugs and valve are cheap to replace, Nissan used zillions of them in all kinds of engines.
-
Stuck as hell: tales of a transmission drain plug
There are a couple of options for you, if the trans. is to remain in the car. If the fill plug is stuck, the trans can be re-filled through the gearstick hole. If the drain plug is stuck, I'd be tempted to drill out the centre of the plug as large as possible, say 12mm, and after the oil has dumped out, thread the hole to take the appropriate cap screw fitted with a copper washer. If the bottom surface of the original plug is rough, smooth it out with a grinder so that the new "plug" can seal properly.
-
blower fan under dashboard not working
Check the relevant fuse for the blower motor. Have you tried it on all speeds? There is a dropping resistor inside the housing that provides the various speed settings.
-
rear hatch hinge seals
Yes, I can do some measuring for you. While I am not disputing what you suggest, bear in mind the guy who is producing these has spent a LOT of time perfecting the moulds and material. If you can do it in RTV, good job, but I'm sure it won't be easy to produce a boot with the correct thickness and strength to handle the wear and tear of the hinge movement.
-
rear hatch hinge seals
-
coolant in #3 intake
I tend to think that the coolant got there during your dismantling work:ermm: If you measured 175psi compression in #4 then I'd take that as a good sign. I would put it all back together with the new manifold gasket and see how it goes. When/if you see that it runs OK, do a Leakdown Test on an engine that is at operating temperature. That is really the only thing you can do IMO, apart from ripping the head off now, which I don't think is necessary:beer:
-
speedometer not working!
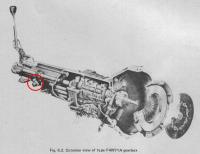
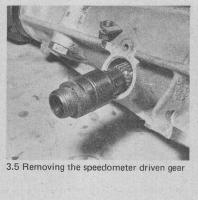
The drive pinion is located on the RHS of the rear extension housing of the transmission. You should see the speedo cable screwed into it. You should be able to get to the rear of the speedo and unscrew the cable nut with everything still mounted in the car. If your hands are too big you might have to enlist a smaller person:ermm: The nut is circular and knurled so it is easy to grip and undo.
-
speedometer not working!
Likely to be a broken drive cable. You will need to disconnect the cable from the speedo and the transmission to verify that the inner cable is intact and in fact turning freely. Broken inner will require a new cable or at least a new inner. If all is well there, you will need to check that the speedo drive pinion in the transmission is not stripped. Stripped gears will need a new drive pinion of the same tooth count as what is fitted. If all is good there, there only remains a faulty speedo.
-
Wiper Motor not working?
Here is a check list I posted on an Oz site some time ago re wipers: - 1) Disconnect the wiper arm linkage from the rear of the motor, switch it on and check it has reasonable slow and fast speeds. YES/NO? 2) Now check the mechanical linkage, you should be able to operate the wipers by rotating the motor arm by hand. (Lift the arms off the screen or remove them to eliminate drag on the glass.) YES/NO? NO to 1) means motor is tired. NO to 2) means that the pivots and linkages need a damn good lubing! Fixing the pivots is relatively easy, just be patient in getting them apart if they are dry and corroded. Lots of CRC-556 and gentle pressure over several days and they should eventually come apart. There is, or should be, a wuzzy little circlip on the end of the shaft, remove and ditch it. Replace it with a decent external circlip from CBC. Wire brush the shafts, thoroughly clean the tubes, lube it all with PH Zinc Oxide grease, check for smooth rotation and finally fit new weather boots to the shafts. Applies to any car really;) As a point of interest, later model Nissans have nylon wiper pivot bushings which will "never" require maintenance. My 1985 B120 ute and my 1993 R33 Skyline have these. Alloy housings + steel shafts + time + corrosion = :tapemouth
-
rear hatch hinge seals
A guy here in Oz has reproduced these. I actually own some but they are at my sons' house and I haven't seen them yet. The Vendor has spent a LOT of time and effort to produce a quality item. Anyone want further information;)
-
Relays
Here's a copy of the wiring info for an S30, LHD too:cool: If you want the originals I can email them to you:bulb:
-
rear brakes dragging
Methinks you need to remove the rear wheels and drums and have good look at the condition of the shoes and drums. The shoes may be worn out or there may be grit inside the drums. We won't know unless you give it the eyeball:ermm:
-
help with moustache bar stoppers
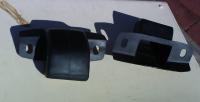
Does this help? The top stopper has small bumps, the bottom one looks to be a flat washer, no vulcanizing.
-
no idle screw?
-
powder coating coasts
I can't help you with the $$ but I can offer some advice. I had all my Z suspension powder coated years ago but I took some precautions first. Tape over all the surfaces that are of critical dimension e.g. the rear arm pivots so that they don't "grow" in dimension and cause issues when re-assembly time comes. I also wired plates to the rear strut hubs to prevent the inner surface from getting sprayed. Masking tape is effective in protecting any surfaces that you don't want coated. It will prevent the powder from sticking and so what if it burns off in the oven :bulb: Have a good look at the parts you want done and decide which areas, if increased in thickness or diameter, will be a problem come assembly time:classic:
-
Using Lead or body filler on quarter panel seam
The use of lead as a filler is in this day and age unnecessary and dangerous. Providing there is a strong metal to metal weld at the seam, the use of Hi Tech Body Filler is the desirable solution. Just make sure the surrounding surfaces are correctly prepared for the 2 part filler and it will do the job admirably. It is what it was designed for:beer:
-
parking light fuse keeps blowing
Leave the fuse out and connect a 12V globe across the fuse terminals to show you if/when the short circuit occurs. Remove all the globes in the circuit in question. Check that they are the correct globe, i.e. single filament. Insert the globes one at a time and check for correct operation before inserting next globe. If the globe at the fuse lights up that last globe you put in, or the socket, is the problem:bulb:


