


Nissanman
Free Member
-
Joined
-
Last visited
Everything posted by Nissanman
-
 You really need to determine the power source for the fan. It can be either direct from the battery, or from an ignition type circuit [via protective fuse and relay]. The former will allow the fan to run at all times, depending on the fan thermostat/sensor operation. The latter will be only when the key is in the "ON" position, plus thermostat/sensor operation. Then, as mentioned above, the thermostat needs to be reliably attached to either the radiator metal work [e.g. top tank]or immersed in the coolant flow. If the thermostat is adjustable, it need not be very complicated in its mounting since the device can be adjusted to switch the fan on at your desired temperature. For it to come on ONLY when the engine is shut off is undesireable. Either the power source is incorrect, or the thermostat is set far too high and only heat soak after shutdown is operating it:ermm:
 -
Yup, a chicken is a chook, generic term, no gender differentiation. That is also why a Mazda rotary is often referred to as a "chook cooker". Rotary, rotisserie, chicken rotisserie = chook cookerLOLLOLLOL We also have a national TV show called "Spics and Specs". For some obscure reason, a visiting American film/TV personality declined to be a guest on the show:surprised:surprised Was it something we said:finger: And, the piece de resistance, we have a very popular brand of matured cheese called, wait for it....COON:tapemouth
-
Mine was advertised at $17K, I offered him $16K and deal was done. This was back in May, 2005. My wife has lost the ability [desire] to drive a manual and the auto was just great so I didn't mind it a bit. Car was very well looked after, absolutely stock as a stone. It had been sitting after compliencing for some 6 months until I saw it on their web site. It is getting old now too but so what:rolleyes: The 1986 Commodore I had was in an advance state of leprosy, it had to go:(
-
Reminds me of a comment made by a technician at our Submarine Factory here in Adelaide: - "there is some $^!# in the hydraulic lines" Received by the American suppliers as: - "they've mixed up the hydraulic lines with the sewerage lines"
-
Here is a check list I posted on an Oz site some time ago re wipers: - 1) Disconnect the wiper arm linkage from the rear of the motor, switch it on and check it has reasonable slow and fast speeds. YES/NO? 2) Now check the mechanical linkage, you should be able to operate the wipers by rotating the motor arm by hand. (Lift the arms off the screen or remove them to eliminate drag on the glass.) YES/NO? NO to 1) means motor is tired. NO to 2) means that the pivots and linkages need a damn good lubing! Fixing the pivots is relatively easy, just be patient in getting them apart if they are dry and corroded. Lots of CRC-556 and gentle pressure over several days and they should eventually come apart. There is, or should be, a wuzzy little circlip on the end of the shaft, remove and ditch it. Replace it with a decent external circlip from CBC. Wire brush the shafts, thoroughly clean the tubes, lube it all with PH Zinc Oxide grease, check for smooth rotation and finally fit new weather boots to the shafts. Applies to any car really:classic: As a point of interest, later model Nissans have nylon wiper pivot bushings which will "never" require maintenance. My 1985 B120 ute and my 1993 R33 Skyline have these. Alloy housings + steel shafts + time + corrosion = :tapemouth
-
If you can't read this properly , email me and I'll send you the original file.
-
Bought a 1993 R33 GTST back in 2005. Had ~60,000K on the clock. Stock as a rock, with 4spd auto. Best car I've ever had or driven:) Being auto, all the boy racers avoided it, to my advantage. I'm sure you could get a decent one if you "ordered" the car from a reputable importer. Mine was for sale in Adelaide but was complied in Brisbane.
 My advice would be the following: - Use the feed to the ignition coil. "T" into this wire, do not break continuity to ignition circuit. Wire it to the coil tag of one [or more] SPST auto relay. Earth the other side of the coil. Connect your new fuse box to the battery with the appropriate gauge wire to handle the new fuse. On the distribution side of your new fuse, wire to one of the contacts of the above relay, using appropriate gauge wire. Wire from the other contact of the relay to your new accessories. This means that you are only using the ignition wire to sense key on/engine running by operating a heavy duty relay. The relay does all the hard work switching power from the battery, via your new fuses, to the new load. Existing wiring is not overloaded, new wiring must be adequate dimension for the new load. Relay rating must not be exceeded, use more than one, they come cheap. A lot cheaper that wiring looms and engine bay fires:tapemouth If you need a drawing just let me know:classic:
BUMP STOPS? What are they? Are they the little churned up, disintegrated, mish mash of stuff that fall down from the top of the strut after driving around the block? Sorry:nervous: Perhaps they are too long for your application? Does the supplier have a choice of lengths available?
Exhaust manifold studs are a real beach to service. The metal tends to crystallize due to the heat and it makes them very brittle. Do what you have to do to remove the manifold. When all clear you will be left with a stub of the stud protruding from the head. If it has any thread on it, you may be able to lock two nuts on it and attempt to unscrew. If no thread, you can try to unscrew it using vise grips, penetrating oil, and lots of patience, but I think I know what is going to happen:disappoin After it has snapped off, your only option is to use a drill bit on it. Drill a small hole down the centre of the stud, right through to the base of the hole in the head. 8mm stud, try a 4mm drill bit. This hole is now ready for a dose of penetrating oil which will treat the threads from the bottom of the hole. Repeat the treatment for a few days, patience here is a definite virtue:devious: Then, if the Nissan Gods are smiling, use an EZY-OUT very carefully, to unscrew the stud. If you don't like using EZY-OUTs, and I don't, the alternative is to drill out with a larger bit, so that when done you can re-tap the head for the correct stud size. If you can get it, use a LH drill bit in a reversible drill so the drilling action will assist in unscrewing the stud. Don't just do the one that is broken, consider re-newing all of the manifold studs while you can get to them. It is only a matter of time before deja vu sets in:tapemouth
If you want to retain a drum brake rear, the later model aluminium finned drums are a better option over the plain old cast iron drums. If you buy 2nd hand, make sure the inside diameter is not worn beyond the safety limit, branded on the drum as: - MAX. DIA. 230.0MM 9.055" As far as restoring the aluminium drums is concerned, I would grit blast them then paint with a high temperature paint such as American Eagle Hi Temp Aluminium. They look really great done that way, the paint gives them an as cast colour but it won't oxidise like bare aluminium
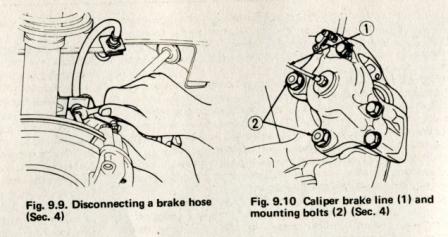
You need to undo the 10mm tube nut which mates to the flexible hose. The hose end should be held captive by a metal clip allowing you the grip the hard tube nut and unscrew it.
My advice would be the following: - Use the feed to the ignition coil. "T" into this wire, do not break continuity to ignition circuit. Wire it to the coil tag of one [or more] SPST auto relay. Earth the other side of the coil. Connect your new fuse box to the battery with the appropriate gauge wire to handle the new fuse. On the distribution side of your new fuse, wire to one of the contacts of the above relay, using appropriate gauge wire. Wire from the other contact of the relay to your new accessories. This means that you are only using the ignition wire to sense key on/engine running by operating a heavy duty relay. The relay does all the hard work switching power from the battery, via your new fuses, to the new load. Existing wiring is not overloaded, new wiring must be adequate dimension for the new load. Relay rating must not be exceeded, use more than one, they come cheap. A lot cheaper that wiring looms and engine bay fires:tapemouth If you need a drawing just let me know:classic:
BUMP STOPS? What are they? Are they the little churned up, disintegrated, mish mash of stuff that fall down from the top of the strut after driving around the block? Sorry:nervous: Perhaps they are too long for your application? Does the supplier have a choice of lengths available?
Exhaust manifold studs are a real beach to service. The metal tends to crystallize due to the heat and it makes them very brittle. Do what you have to do to remove the manifold. When all clear you will be left with a stub of the stud protruding from the head. If it has any thread on it, you may be able to lock two nuts on it and attempt to unscrew. If no thread, you can try to unscrew it using vise grips, penetrating oil, and lots of patience, but I think I know what is going to happen:disappoin After it has snapped off, your only option is to use a drill bit on it. Drill a small hole down the centre of the stud, right through to the base of the hole in the head. 8mm stud, try a 4mm drill bit. This hole is now ready for a dose of penetrating oil which will treat the threads from the bottom of the hole. Repeat the treatment for a few days, patience here is a definite virtue:devious: Then, if the Nissan Gods are smiling, use an EZY-OUT very carefully, to unscrew the stud. If you don't like using EZY-OUTs, and I don't, the alternative is to drill out with a larger bit, so that when done you can re-tap the head for the correct stud size. If you can get it, use a LH drill bit in a reversible drill so the drilling action will assist in unscrewing the stud. Don't just do the one that is broken, consider re-newing all of the manifold studs while you can get to them. It is only a matter of time before deja vu sets in:tapemouth
If you want to retain a drum brake rear, the later model aluminium finned drums are a better option over the plain old cast iron drums. If you buy 2nd hand, make sure the inside diameter is not worn beyond the safety limit, branded on the drum as: - MAX. DIA. 230.0MM 9.055" As far as restoring the aluminium drums is concerned, I would grit blast them then paint with a high temperature paint such as American Eagle Hi Temp Aluminium. They look really great done that way, the paint gives them an as cast colour but it won't oxidise like bare aluminium
You need to undo the 10mm tube nut which mates to the flexible hose. The hose end should be held captive by a metal clip allowing you the grip the hard tube nut and unscrew it.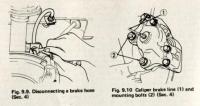 Now we are getting to the bottom of it all:devious: The single point timing mark is usd to check against the pulley marks which are in 5 deg. steps. TDC or 0 deg. is the last notch ,the most ACW notch when viewing the pulley from the front of the engine. Then, in a CW direction, 5, 10, 15 then 20 deg. advance or deg. BTDC. There is another version of Timing which uses a single notch on the crank pulley and a graduated static pointer. Probably easier to read since there is only one notch to find, clean, paint and see with a Timing Light.
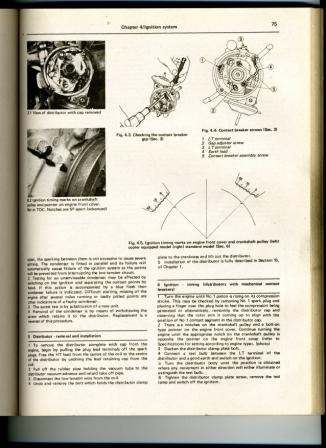
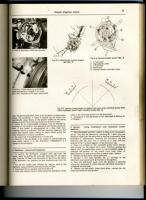 Like he said about the possibility of a separating pulley:ermm: To determine TDC for #1, you just need to set the crank keyway to 12 o'clock. Make sure that both the valve rockers for #1 are loose, i.e. both inlet and exhaust valves are CLOSED. This means TDC on the compression stroke. This is not an exact method. You could try to determine the piston position more accurately with a screwdriver [or thin wire] in the spark plug hole. Just be careful it doesn't jam and damage something:finger: As the crank is turned by hand, the screwdriver/wire will rise up then start going down again as the piston goes through TDC. I really do think there is something amiss with the pulley though:ermm:
Women give us the "Silent treatment" for punishment and we men pretend that we hate it:rolleyes:
Does that mean she went down on youROFL
The timing reference on your crank pulley is only applicable to cylinder#1, at TDC on compression stroke. The crank has a keyway on it to make sure it is oriented correctly to the crank pulley and therefore the timing marks. For cyl#1 [at TDC on compression stroke], that keyway should be at the 12 o'clock position. The standard crank pulley will then have its' timing marks at about 1:30 o'clock suitable for a timing pointer on the RHS of the engine. The crank pulley for a car with A/C has the timing marks 90deg. anti-clockwise at about 10:30 o'clock suitable for a timing pointer as you describe. It sounds like you have a pulley for a non A/C engine and a timing pointer for an A/C engine:surprised:surprised It all gets back to that crank keyway, that IS TDC for #1:) Make sure you are using the spark lead for cyl#1 also.
Been there, done that, didn't get notification of your post above:(
As he said. BUT, if they were stretched in length when you dissembled the rear, they may have jammed at full length. You should be able to free them up by gentle compression either with the strut attached or just by a swift belt with a rubber mallet:nervous:
Those t/s bolts should be removeable, someone put them in there originally:cry: Just a word of advice re tailshaft and seal. Make sure the t/s has a smooth surface on it i.e. no grooves or pits where the seal lip rubs. If it is grooved you can remedy the situation by: - 1. not inserting the new seal in the same place as was the old, so the new seal lip runs on a fresh t/s surface. 2. slipping a Speedi-sleeve over the t/s to provide a fresh surface 3. have the t/s surface repaired by hard chroming - last option:rolleyes:
I have had a similar problem, so I changed the option in my User Control Panel to "send instant Emails" to see if it helps. Methinks there have been some gremlins in the Forum software lately:surprised:surprised
At least the compression readings are close to each other, that in itself is a good sign. Try dosing the cylinders with a squirt of oil, to help seal the rings, and repeat your test. The compression readings should increase. If the lowest reading is 75% of the highest, chances are the rings and valves are OK. Make sure the throttle butterfly are wide open when you do the test.
Yes, an impact wrench would probably be quite OK, providing you can get good access to the fasteners. I don't have one so it didn't occur to me:surprised
If it is your first time in removing these fasteners, it can be tough. I find a socket bar with a length of steel pipe [24" min.]slipped over it, gives you a great advantage when attempting to loosen these. Just make sure the socket is a snug fit and engaged properly, then gently haul on the end of the bar:devious:
Like he said about the possibility of a separating pulley:ermm: To determine TDC for #1, you just need to set the crank keyway to 12 o'clock. Make sure that both the valve rockers for #1 are loose, i.e. both inlet and exhaust valves are CLOSED. This means TDC on the compression stroke. This is not an exact method. You could try to determine the piston position more accurately with a screwdriver [or thin wire] in the spark plug hole. Just be careful it doesn't jam and damage something:finger: As the crank is turned by hand, the screwdriver/wire will rise up then start going down again as the piston goes through TDC. I really do think there is something amiss with the pulley though:ermm:
Women give us the "Silent treatment" for punishment and we men pretend that we hate it:rolleyes:
Does that mean she went down on youROFL
The timing reference on your crank pulley is only applicable to cylinder#1, at TDC on compression stroke. The crank has a keyway on it to make sure it is oriented correctly to the crank pulley and therefore the timing marks. For cyl#1 [at TDC on compression stroke], that keyway should be at the 12 o'clock position. The standard crank pulley will then have its' timing marks at about 1:30 o'clock suitable for a timing pointer on the RHS of the engine. The crank pulley for a car with A/C has the timing marks 90deg. anti-clockwise at about 10:30 o'clock suitable for a timing pointer as you describe. It sounds like you have a pulley for a non A/C engine and a timing pointer for an A/C engine:surprised:surprised It all gets back to that crank keyway, that IS TDC for #1:) Make sure you are using the spark lead for cyl#1 also.
Been there, done that, didn't get notification of your post above:(
As he said. BUT, if they were stretched in length when you dissembled the rear, they may have jammed at full length. You should be able to free them up by gentle compression either with the strut attached or just by a swift belt with a rubber mallet:nervous:
Those t/s bolts should be removeable, someone put them in there originally:cry: Just a word of advice re tailshaft and seal. Make sure the t/s has a smooth surface on it i.e. no grooves or pits where the seal lip rubs. If it is grooved you can remedy the situation by: - 1. not inserting the new seal in the same place as was the old, so the new seal lip runs on a fresh t/s surface. 2. slipping a Speedi-sleeve over the t/s to provide a fresh surface 3. have the t/s surface repaired by hard chroming - last option:rolleyes:
I have had a similar problem, so I changed the option in my User Control Panel to "send instant Emails" to see if it helps. Methinks there have been some gremlins in the Forum software lately:surprised:surprised
At least the compression readings are close to each other, that in itself is a good sign. Try dosing the cylinders with a squirt of oil, to help seal the rings, and repeat your test. The compression readings should increase. If the lowest reading is 75% of the highest, chances are the rings and valves are OK. Make sure the throttle butterfly are wide open when you do the test.
Yes, an impact wrench would probably be quite OK, providing you can get good access to the fasteners. I don't have one so it didn't occur to me:surprised
If it is your first time in removing these fasteners, it can be tough. I find a socket bar with a length of steel pipe [24" min.]slipped over it, gives you a great advantage when attempting to loosen these. Just make sure the socket is a snug fit and engaged properly, then gently haul on the end of the bar:devious:

Important Information
By using this site, you agree to our Privacy Policy and Guidelines. We have placed cookies on your device to help make this website better. You can adjust your cookie settings, otherwise we'll assume you're okay to continue.