Everything posted by Nissanman
-
Car is down again
Could be a million things but I suggest checking the very basics. Check for adequate fuel flow by letting the fuel supply pump into a container of some sort. The EFI pump should deliver a heap of fuel at high pressure when you switch the key to ON. If that is OK check for adequate spark. You can use a timing light on the distributor cap to coil lead connector to check for all 6 events or intercept any spark plug to see just 1. You could also check all the electrical connections to see if anything has been dislodged or broken. Check that there is no unwanted holes in the air intake that the throttle body doesn't know about, e.g. torn duct, dislodhed duct, split hose etc. You had a good reason for doing that work on the fuel supply, perhaps you have dud fuel in the tank or at least a heap of sediment:ermm: Check for splits and holes in the air ducts, the air flow sensor needs it all sealed.
-
How often should the water pump be changed?
Maintenance interval is really dependent on the quality of the coolant that has been used in the engine and the tension of the water pump drive belt. If for example the edges of the alloy thermostat housing neck are still smooth and corrosion free, then it is reasonable to assume that the water pump is in good condition. However the bearing may still get a dose of the growls. If there is no wobble in the water pump and it feels smooth and quiet when rotated by hand, chances are it is still serviceable. I would advise against using any RTV type sealant. Use a non-hardening gasket sealant like Permatex. It is excellent stuff, won't damage your engine and any that squeezes into oil/coolant passages is harmless. NOT SO with RTV Also, I advise the use of Nissan Long Life Coolant. Great stuff, designed for Nissans and relatively cheap:love:
-
Steering column spring with picture
Were you a Roman Centurion in a previous lifeLOLLOL
-
Fuel level indicator
Nissan make[made] this:classic: However it is a diagnostic tool, not intended to be left in situ. The top of the tube needs to be open to the atmosphere or the fuel bowl vent to allow it to fill with fuel.
-
Steel Line or Wheel Cylinder?
If it is still too hard to determine what the problem is, give everything a good wash down with a degreaser to remove all the crud. Then pump your pedal and see where the fresh fluid appears from:classic:
-
no head lights
On the early 240Z, the supply side of the fuse block should be a W/R wire. It starts at the alternator A terminal, goes via a FUSIBLE LINK to the fuse block and feeds 5 fuses, headlamp L and R included, and then to the AMMETER. Check for voltage at the A terminal first, then see where you lose it from there.
-
Removing/Installing Clevis Pin in Brake Pedal
About the only thing that will make it a wee bit easier is to use an "R" clip for the clevis pin instead of a conventional split pin. You can attach a length of wire to the eye end so it can be yanked out of the clevis pin but you still need to get some fingers or a poker up in there to remove/insert the pin from the clevis and pedal. Other than that, what you see is what you get:surprised
-
Steering column spring
This is only a guess comparing your description with another column I have worked on. The upper section of the shaft may have pushed the upper bearings out of the jacket slightly. You may need to compress the upper bearing sleeves back into the jacket by a few mm to gain access to the circlip groove at the top of the upper shaft. You may also need 3 hands to do it. If I'm way off track, please disregard previous advice:cross-eye
-
Which engine is this!?
My guess is it is a CA20. SOHC, 2000cc twin plug slug:rolleyes:
-
Wheel Cylinder Leaking
The first 1 is a bit bare, no E brake lever or ratchet adjuster. The last 2 look similar and come with what is missing from 1. Do your current wheel cylinders have the ratchet adjuster? I would suggest they do. If you get #1 you will have to re-use the ratchet mechanism and E-brake lever from your current cylinder providing they fit:nervous: For $ value I would suggest #2 or #3, you get all the relevant bits.
-
Rear Brake Bleeding
Unless the hydraulic fluid is less than 2 years old I would advise flushing and bleeding the entire brake system. It can be as simple as opening all the bleeder screws and letting the old fluid drain through while topping up the M/C with fresh fluid. When you see the new fluid emerging from the bleeders, close them off. You can then do a conventional bleed at each corner to ensure the absence of air bubbles. Rears first, longest line first, then fronts, longest line first. I would also suggest you adjust the Emergency Brake prior to bleeding the rears.
-
Head Removal questions
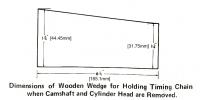
I suspect that you may need to remove the front cover to renew all the cam timing parts. Your call. Anyhoo, here are the dimensions for DA WEDGE:classic:
-
More horn problems
Well, that copper wiper contact is the "hot" wire to the horn is it not? When you earth that wire the horn should operate. The horn pad should have a metal ring on it with a series of contacts on it. These should touch the contact plate that the wiper is touching, only on the steering wheel side where the horn button is. However there should be a small jumper wire from an earth terminal on the column to the contact plate on the horn button to provide the earth required to energise the horn relay. NB. pipped at the post.....again!
-
Engine compression low??
If it is an old/worn engine, to me those readings simply show remarkably even wear in each cylinder. They are low but unless you have any reason to doubt them they may be actual. When you do a compression test, make sure you remove all spark plugs, jam the throttle wide open, lift the slides up and engine should be at operating temperature. Crank it over at least 3 times and record the highest reading. A non-turbo L series in fresh condition should give ~185psi. A turbo, ~140psi. Probably a very tired engine and ripe for a rebuild:ermm:
-
Sealing engine gaskets: Timing Cover and Oil Pan
You are dead right there:finger: DO NOT use RTV on an engine that is not designed for it. It will squeeze out of the joint and create a heap of silicon worms which will migrate inside the engine and end up ANYWHERE:mad: The recommended sealant is a non-hardening type. I can't remember what number it is but Permatex make an excellent non-hardening sealer. For the front cover, I usually paint around the water passage openings and right down the full length of the gasket on the inside/engine side of all the holes. Do the engine surface, apply the gasket and paint the gasket surface before fitting the front cover. The oil inside the cover is not under pressure but it may still weep past an unsealed gasket. Similarly with the sump. A thin smear of sealant on the block apply the gasket then another coat on the sump side of the gasket, again on the inside/engine side of the holes. The beauty of the non-hardening stuff is that is relatively easy to remove the gasket at a later date if necessary. For the fasteners, I just work my way from front to back, alternating sides, doing them up in 2 or 3 stages. Never used a torque wrench, we are only talking "tight" as defined by a 6" ring spanner. Watch the gasket as it will start to compress and if too tight it will squeeze out at the fastener: that is too tight. You can't really overdo a paint on sealant like Permatex as far as where you use it, just don't use too much as to create a mess. You can certainly overdo RTV and that will cause a dose of worms that you don't need:rolleyes:
-
Shimming Out The Rear Seal
Try: - http://nissanman.shutterfly.com/action/
-
Shimming Out The Rear Seal
I personally install the seal before the cap. As long as you position it on a clean part of the crank and it is square to the block and therefore bearing cap, job done:) In your situation, I'd be slipping the seal over the crank to where you want the lip to rub, then fit the rear cap. That way you can see the exact location of the lip and be confidant it will be OK. Make sure you lube the inside of the seal with engine oil before sliding it over the crank. Tom Monroes' book has a section referring to this very issue. Let me know if you need any more pics/info.
-
Shimming Out The Rear Seal
It doesn't have to be shimmed. When you fit the new seal, just position it in the register so that the sealing lip rubs on a fresh, ungrooved surface of the crank. Use a depth gauge to check it is reasonably square with the block and register. Clamp the lower bearing register down carefully so you don't alter the angle of the seal and tighten as per Manual. Once clamped in that position it won't wander and should seal as good as new.
-
Radiator coolant and cooling system filters
....and I would add this "commercial". Always use genuine Nissan Long Life Coolant with your system. I have had some very complimentary remarks made about the condition of my [now departed] Nissan RB30 engine which had regular oil and coolant changes with the LLC added. It is cheap to buy and an excellent product for your engine:love: Heater cores by their very design and intermittent useage are great for trapping any sludge in the system.
-
Window trim
You are correct, stainless it is. With a light rub over with a fine grit paper, suitable preparation and the use of a good quality etch primer, I'm sure you can get paint to stick. There may even be primers suitable for stainless nowadays, check with a paint supplier.
-
Coolant leak
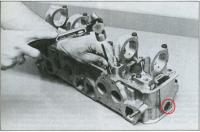
I need something from you... What type of car are you talking about?? On the 240Z for example there is a coolant passage that runs between the two pairs of inlet manifolds. This is a rigid metal pipe sealed by two screw in bosses. The flexible hoses connect to the extreme front [cyl #1]and rear [cyl #6] of the manifold to two screw in pipe nipples. Any of these 4 connections may be leaking. See circled bits in the attached diag. The factory wire clamps are a bit tough on rubber hoses, the rubber tends to flow away from the wire over time resulting in a loose pipe. Re tensioning the clamp often does the trick. If the rubber pipe or metal nipple are old and crusty, it may very well crush them both and create a bigger problem:tapemouth It is possible, depending on your climate, to temporarily disconnect the coolant feed to the inlet manifold and leave it that way. Just make sure you seal the feed pipe that connects to the front nipple and seal off the return pipe from the rear nipple.
-
Hood hinges
Certainly is:) It is called FBH, a Flamin' Big Hammer. Those rivets were probably whacked with a hydraulic press when the hinge was assembled so try it again. Back up the rivet with an anvil or another hammer head. Or you could try squeezing them in a bench vice:cheeky:
-
Trying to get her started
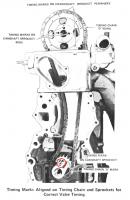
Well, that is sounding like everything is correct:nervous: The keyway I'm referring to is on the snout of the crank shaft. Unfortunately, it can't be seen until/unless the crank retaining bolt and washer are removed. That is a job in itself. Since you have determined that you are at TDC already, it may not be necessary to check the keyway, your call. MAKE SURE the engine rotates freely at this point [with all sparkplugs removed] and piston/valve contact is not happening Just turn it over with a socket and bar on the crank nut very slowly. Once you are SURE that there is no problem, try cranking it with the starter and plugging the #1 cylinder with your pinky of choice. Engine should build up a heap of pressure and blow your pinky well out of the way. No pressure indicates valves still open on the compression stroke. Here is a diagram showing the initial valve gear timing setup. You can see the keyway pointing up at 12 o'clock. The reference marks on the cam chain are a bit misleading because they only coincide with the cam and crank pulley marks once every X revolutions:ermm:
-
she starts just throughs water out the head
-
she starts just throughs water out the head
I assume the coolant is not exiting from inlet or exhaust passages? There is a welch[freeze] plug at the rear of the alloy head that could be the culprit, although they are normally all replaced when a head is reconditioned:disappoin. The plug may have a hole rusted in it and it has started leaking under pressure:nervous:


