Derek
Free Member
-
Joined
-
Last visited
Everything posted by Derek
-
I have not used Peninsula but have had them quote a few things for me. They seemed to know what they are doing. I use Certified Metal Finishing in Pompano. Not sure if they do the process you want but they do a lot of stuff. I trust them to impregnate my head castings so that should tell you something:) Unless you plan on driving your parts there what difference does location make? Derek
-
I'm sure that this kind of data collection is probably industry standard but one of my complaints about this is I'm leaving some solid documentation of how fast, when and where I've been driving. This is one of the drawbacks in my mind. As a plugged in society we are loosing more and more of our anonymity. I would prefer a system that allows me to choose when it transmits speed data. For me it would be if it is outside of the GEO fence and assumed stolen. Now excuse me while I put my tin foil hat back on:)
-
So I can assume that vehicle speed data is constantly being uploaded to your servers? Is this correct? Do you store this data and for how long.
-
I can see where it would be a problem with stock Z cars and their electronics. Fortunately for me that is all gone and replaced with modern stuff. It's much easier to integrate anti theft methods into those electronics. Hence my confidence. I've been looking at trackers for a while. Having input is an absolute must for me and I understand the liability aspects of giving the unit output as well. Output would allow me to activate a dash cam and upload the video of the police chase. The money I make on youtube hits of the chase will fund my next hair brained project. You FAQ is a little ambiguous on the IO. So they are inputs only? If my car is stolen do I call the cops and give them the real time data from the phone? You say in the FAQ that police forces can track without special equipment. When does the unit send speed data to Geosky. Only when it's outside the geo fence or all the time. Sorry for all the questions but I've been really hot for one of these for a while. It got really confusing with all the different ones out there. I kind of gave up and then this thread popped up.
-
Dash cam and video upload would be nice. I'm 99 percent sure that no one will break into my car and drive it away. Car jacking or towing will be how it would happen. Would the ejection seat bother to pop the roof or just splat the driver.
-
HI Ron On the Geosky are there any plans for outputs as well as inputs. Also Is there any provision for the software to report what input is in use? I'm thinking it would be nice to know if it's under it's own power or on a flatbed. A remote output would allow me to pop the tail gate discreetly. Let the bastards choke to death on exhaust fumes:) This is for Mike. It might not be practical but it would be nice if security ideas could be posted anonymously. It's seems counter productive to post my security methods when it is pretty easy for some of us to be doxed. Thanks Derek
-
-
Well on this one I didn't. All of the seams are mostly hidden. Same as before I left it as is. But if I wanted to do a better job I would have added more filler to the seams and feathered them in. Then I would have used the SEM texture spray to try and blend the haircell ABS into the filler. When I did the crack repair originally I sprayed the whole dash with the texture spray and it looked pretty good. In theory you could sand the cap a bit to smooth out the haircell than shoot the entire dash with the texture spray. I wasn't interested in putting in that kind of time. The speedo and tach use the factory bezels with custom adapters I machined After the cap is on there is no way the gauges are going trough the front. I don't know how much room there is to bring a stock set in from the back but that's how they will have to be installed. The three up top are in custom brackets and come in from the back. The 2 3/8" gauges are a nice snug fit in the factory dash.
-
Dash recover . I’ve been thinking about doing this for a couple of years. I put it off until I had my Speedhut gauges. Well I no longer had any excuses. This is not a cheap way to fix your dash but a lot cheaper than sending it out for recovering. It is destructive to the original dash so if you plan on having it recovered in the future this is not an appropriate mod. The basic premise is this. Bond the cap to the existing dash. Fill any gaps between the cap and dash with expanding foam. Fill and blend all the seams and gaps. Paint entire dash. I had done the “fill the cracks and texture paint” kludge to my dash years ago. It worked for a little while, but soon a new crack started and then the old ones opened up again. I decided that I wasn’t going to fix the cracks again and opted for a full cap instead. Most of the installed caps I’ve seen were warping and generally ill fitting because of it. I knew from the start that I was going to get the thickest cover I could find and then float it on the existing dash. What I mean by float is let the cap stay as close to its original shape as possible. I had made a couple of posts looking for thicknesses on different caps but didn’t get much data. I called Palco Industries which makes the Dashtop cover. I was told the base material started out at 1/8”. This is the same thickness I use for my speaker panels so I was pretty optimistic that it would have a decent thickness in even the deeper draw sections like the gauge pods. Unfortunately when it arrived it was pretty obvious that the base material was a lot thinner. Most likely 1/6” I decided to stick with it as the overall look was really nice. The hair cell texture was your standard ABS so it isn’t an exact match to the factory but it wasn’t too bad either. You have to pull the dash for this and it is not hard to do so no matter what, don’t convince yourself you can do it in the car. I pulled the dash and did a test fit of the cap. It was immediately apparent that it wasn’t going to just slip on. You could wrench it into position but in doing so it put huge stress on it. Over time that stress would lead to warpage and de-lamination from the pad. I knew it wouldn’t be perfect but I was surprised at how far off it was. The plastic in the gauge pockets is extremely thin so be really careful you don’t tear it during fitting. In order for the cap to sit in it’s natural position I had to do a fair amount of grinding to the pad. Mostly to the tops of the gauge pods and the outer corners. Even then I had to throw in the towel and accept a small amount of stress. I took a DA sander to the entire dash surface with 80 grit to improve adhesion. In reality something even rougher like a 50 grit sander would be better. Speaking of adhesion I decided to use SEM 2 part plastic repair #39847. It’s made for repairing plastic bumpers and is sand-able like bondo with almost no shrinkage. I already have the dual mix gun but if you don’t have one you will need to get one. By the time it was all said and done I used the entire 7 oz tube and 6 mixing tubes. The next part is how I should have done it not exactly how I did it. Slip the cap over the dash and hold it as best you can in position. Four hands would be helpful. Press the dash cap in different areas looking for low spots. Make a mental note of where they are. I was mostly concerned with the top surface. Take a drill and a 3/8” drill bit and drill through the dash pad all the way out the back through the metal frame. Make sure you don’t hit anything important. These are the holes you will use to inject the foam. I can’t tell you how many you need but for every injection hole I figured one or two vent holes. You don’t want the foam to build up pressure so a 2:1 ratio is probably pretty safe. Now you are going to glue down the cap. I did mine in multiple steps. I wiped the inside of the cap with lacquer thinner. This will clean it but also etch the surface a bit. First area to glue was the top and a small amount down the front. This helped me create a stable base so that as I pulled the rest of the cap into position it wouldn’t effect the top. I concentrated the glue around the edges and the high spots that I knew were contacting the cap. After that I put a few dabs in the shallow in between the foam holes so that it would help keep it from distorting. I slid the cap down over the dash. I only needed a couple of clamps to hold it since I sanded the pad to fit. I pushed the cap down in the low spots so it would make contact with the glue. When it springs back it will hopefully have a ribbon of glue between the dash pad and cap. The glue has a 7 minute work time so you need to have everything well rehearsed. After about an hour to dry I then methodically worked my way around the rest of the cap glueing things in position. I masked off areas of the dash that weren’t covered. Pay careful attention to the glove box area. I didn’t and my glove box door is now a very tight fit. No problem as it’s non functional but if I wanted it to work I would have had issues. You need to pull the cap outward as far as you can to have enough clearance. So now you have the basic adhesion done. Now you are going to glue ALL the edges. This is where you decide how well you want it to look. I was really nervous about the gauge pod areas warping over time and ending up in the sight line of the gauges. I took a heat gun and a pair of heavy gloves. I heated the plastic that fit poorly and then shaped it against the dash pad with my gloved hand. This is really tricky. You go from not hot enough to disaster in the blink of an eye. After I was done shaping I went around and glued most of the edges. More on that later. So now that all your edges and high spots are glued you have a dash cap that is theoretically under little or no internal stress and held in position with the old dash. The problem is that you now have hollow areas that have little or no adhesion, plus there will be a temperature differential between the bonded areas and the hollow areas. Can you say “air gap”. Time for the foam. I used low expansion window foam. It seems to be the right choice. It stays soft like the original pad. It also has a bit of adhesion going for it. Not much shear strength but every little bit helps. Position the dash with the gauges facing up so that extra foam falls away. Gravity is your friend. I would shoot the foam in one hole and watch for it to appear in one of the vent holes. I moved from section to section. Don’t over do it as even the low expansion foam expands quite a bit. If it has no place to go then it may distort the dash. I found that if you kept the fill holes clear of foam then it allowed the still expanding foam a place to go. That may just be a guess though. After the foam dried I noticed a huge improvement in the feel of the dash. It felt solid with almost no discernible hollow spots. This is why you seal every edge. Time to finish. I took the remaining glue and used it as filler to build up the areas I wanted to feather in. I sanded them with 80 grit. Most of the areas I was working get covered so I wasn’t too worried abut it being perfect. If I was trying to do a flawless job I would fill the areas and then use the SEM texture spray. That stuff really works well. I cleaned off the dash and sprayed it with SEM trim black out of a rattle can. Looks great. Do’s, and don’ts. When working with the glue and foam where multiple disposable gloves. This way you can use them like tear-offs. Make sure you mask off areas that you don’t want glue on. It’s much quicker to mask stuff off than it is to try and sand it later. Be careful with the gauge areas of the cap. They are thin and fragile. Remember to drill the foam holes before you mount the dash cap. I didn’t think about foaming the dash until after I had bonded the cap. It limited me to only being able to drill a few holes. You can scrape extra glue off with a thumbnail for about 20 minutes. Also sand the glue as soon as you can. It’s soft and will cut like buttah. Be really careful with the foam. It can get out of control really quickly. Don’t foam it and go to lunch. I thought it was done expanding and I looked over and I had a new area growing. The SEM trim spray is lacquer and really susceptible to moisture. It will blush really badly if it’s too humid. Ounce it blushes it can be a real PIA to get it right. Here is the finished product installed in the car. I’m really happy with the results. It’s the hot season in Florida so I’ll update the thread in the fall. I daily drive the car and it’s parked outside in the sun. I do use a window shade most of the time. Hopefully this will last a lot longer that the crack repair. It was a lot of work but as long as the ABS stays stable it should last a long time. Derek
-
-
-
Panels are now in production. Well they will be on Monday:) These things were a PIA to make work. Although it seemed like a simple concept to me when I started it really wasn't. There is a lot of things to have happen in a very small area. Drivers side mimics the existing ECU cover and uses it's mounting screws. Good space to get to the dead pedal but you may have to adjust your driving style to get to it. Passengers side mounts using the existing upper trim screw and a piece of industrial velcro attached to whatever the black control box is above it. To get to the fuse box you loosen the trim screw, pull the panel away from the velcro and slide it out. The screw hole is slotted so you don't have to remove the screw. If this seems like a lot of work to change a fuse you probably should fix what's blowing your fuses before buying speaker panels! Here is a small sample of the scrap I made getting the fit, the vacuum forming and the CNC routing worked out. Now for the fine print. Price is $115.00 plus shipping for the pair. Right now I'm only saying they fit a 77 for sure as that is what I have here. I've lined up a 78 for testing. I'm looking for people with a 75 and 76 to test fit as well. So if you have a 77 you're good to go if you have a 75 or 76 and want to participate in my testing program PM me. I looked at pictures on line of the different year interiors and they all look the same to me. The clutch pedal is really really close to the grill. There may be cars where you have to dent the grill a little up front at the top so be prepared for that. I was more interested in keeping the dead pedal as clear as possible. There is 2" of clearance from the mounting lip to the ECU for speaker depth. You may be able to do a deeper speaker with a spacer ring and some grill mods but I'm not making any claims to that. The Pyle PLS502 fits as it is. PM me if you are interested in a set. Thanks Derek
-
No But I sat in the seat and made Vroom Vroom noises while I worked the clutch pedal:) There is no motor in the car but I have prior experience with my other pod designs. It's tight but workable with my size 10 1/2 work boots. Really if you are any kind of audiophile you really should be building custom enclosures not buying vacu-formed ABS. The problem is there just isn't a lot of room to work with.
-
-
Funny you guys should ask. I'm starting to develop panels for the 280. I started a post at http://www.classiczcars.com/topic/53157-280z-kick-panel-speaker-pods-in-development/ Check it out. I would love to get input from 280 owners before I finalize things. Thanks Derek
-
Hi everyone. Over the years I’ve gotten quite a few requests for kick panel speaker pods for the 280Z. What was holding me back was uninterrupted access to a 280 for measuring and fitting. I finally found one that was close enough and cheap enough for me to buy. One thing that is very apparent is there isn’t a lot of room to work with. Especially on the drivers side.At this point I’ve completed a working prototype for the drivers side and wanted to get input from interested buyers as to the layout on the passengers side. The bad news is there really isn’t any room for a high end 5 1/4” speaker. I designed it around these Pyle PLS502 slim speakers. http://www.pyleaudio.com/sku/PLSL502/525-160-Watt-Slim-Mount-Two-Way-Coaxial-Speakers I also believe the retro sound R525N will fit as well. There is 1.9” available right now for top mount clearance. Most of the higher end speakers require 2 3/16” and that’s not going to work. I found a few models that had a 1 7/8” top mount clearance. The tricky part is how far the grill sticks out beyond the speaker. None of the manufacturers listed grill height. Here is a few shots of the drivers side. Keep in mind this is a rough prototype and the cuts are crude. I have the speaker as far up and as far back as I can get it. There is reasonable room to get your foot over to the dead pedal. It may take a bit of retraining but it’s doable. Clutch pedal just clears grill. Dead pedal is accessible. Remember the cuts are really rough on the prototype. Before I start the passengers side I wanted some input as to whether to angle the speaker to improve acoustics or keep it flat to match the drivers side. And how to handle fuse box access. The pricing should be around $100.00 - 125.00 for the pair. The CNC router work is much more complicated than my regular panels requiring multiple setups. So if you think you may be in the market for a set and want to have some input either PM me or email me at kick@red240.com. Thanks Derek Edit: You can post here as well. It doesn't have to be a PM.
-
-
-
I do a lot of reverse engineering and for simple parts measuring and drawing 2D is the most accurate and usually the quickest. I then use the 2D drawing to create the model. Ultimately if you are printing you will want to output your final product as a watertight mesh.
-
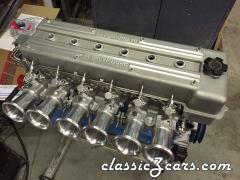
I hope your right:) In september it was a year since I made my big unveiling of the head. I couldn't believe a year went by and I still didn't have a close to finished product. And so it goes.
-
Wow that's impressive. You must have a very big shoe horn:) How far away from running are you? There are quite few people interested in the head. I think the list will grow after I have a running prototype. I have a blog now if you want to keep up with my progress. http://www.datsunworks.com/Blog/
-
Week from Tuesday:)
-
I'm glad someone mentioned it. I posted that closeup for a reason:) My mill is down with a blown board so I had to do it all by hand. I did one set satin and one with a DA finish. I liked the DA better so they are in the front. The belt sand in hidden in the back.
-
I've been wanting to do this for years. I finally got around to it. Finished product They were a little bigger that I would have liked but they were black. I got them at Harbor Freight. Made brackets out of aluminum and painted them black. I guess I could have dusted them off:) I cut the hooks out of the webbing. I cut the hooks themselves as I have an iron worker that will do that kind of thing. I left the loops in the webbing. I then used a soldering iron to burn holes through the strap. If you really wanted to get crazy you could slip a pin through the loop to keep it from pulling out but I really don't think you need it. Perfect for hauling around your twin cam L6 prototype head:)
-
I think you would be hard pressed to make everything connect using the heater hose holes. You may have to bight the bullet and blow a hole through the firewall. Derek