Derek
Free Member
-
Joined
-
Last visited
Everything posted by Derek
-
Electric drifting how cool! You've accomplished one thing for sure though. You have The people from Classic Z Car and HybridZ agreeing on something! Derek
-
very cool James. post more video!! derek
-
WOW great progress James! You know you could always use the loop of cable on the middle batteries in the passenger compartment (blog pic) as a cup holder. Thanks again for sharing this with us. Derek
-
That is so cool. You definitely have inspired me to rethink my long term ZCar Plans. A plug in Z would be perfect for my daily drive. Of course I'd still have to have a gas powered one as well!. Derek
-
I have Konig 15" Rewinds on my 73 with no problems Derek
-
Thanks for the info Carl. I guess I have either the stage I or Stage II springs. I'm almost positive I have a conventional shock not gas. It seems to be getting a little better the more I drive it. Probably just me getting used to the ride is all! I'll probably run it for a month or so and then tear it down and measure the spring rates. Thanks again Derek
-
Go Here and read. It's all there. http://forums.hybridz.org/showthread.php?t=104735 I'm getting ready to swap mine over as well. Derek
-
I'm starting to think I'm going to have to pull it apart and see what I have. I've been without my Z for over 12 years and I hate to bring it off of the road so soon! Derek
-
Well that's the problem. I can't remember for sure. I was going to go with KYB at the time but Frank from Zcar center in fort lauderdale ( I lived in Fort Lauderdale then) recommended a regular shock. I almost want to say they were Bosch?? Did Bosch even make shocks? You know when you park a car under tarps for a number of years you can really loose track of some of the details! Derek
-
Your too generous! I bought the springs when I was working in the parts department of a Datsun dealership. I seem to remember they listed 2 different rates for their springs. I'm hoping someone has an old Nissan comp catalog and it may jog my memory. I really wish the roads were smoother here. The car really handles well with the springs but it's going to kill me and the car at some point. Derek
-
Ok Here's the story. I purchased a set of front and rear coil springs out the Nissan competition catalog in probably 1990 or so. I put them on the car and drove it for a short amount of time then the car was parked since then. I just got the car back on the street and I'm not happy at all with the harshness of the ride. It handles like a dream but I'm making this my daily driver so I need something a little more forgiving. Does anyone have any direct experience with these springs and can maybe help me establish a benchmark as to how stiff they really are. I want to buy a new set of springs but I don't want to end up with the same ride as I have now. Thanks Derek
-
Sorry to hijack this but I have a question for Carl. I'm installing a Vintage Air unit in my Z and want to add larger more functional center vents as well. Can you tell me what you used for vents? Thanks Derek
-
I just purchased the vintage air GenII Mini. The size difference between the factory heater and aftermarket A/C was huge. I have a ton of room now behind the dash. The only drawback is the controls potentiometers driving servo motors so using the stock levers is going to require some mods. I'm planning on doing a new center section so it's not a problem for me. I'll probably have it installed and working in the next three weeks or so. I'll post some pics if you want. Derek
-
You might want to take a look at this post that I made on HybridZ http://forums.hybridz.org/showthread.php?t=128208 I used panel adhesive to make my repairs as opposed to welding. Not sure if it's right for you but It's working for me. Derek
-
Well add my name to the list of successful dash repairs. I followed Bruces instructions to the "T" and couldn't believe how nice it came out. I did my repair with the dash still in the car but with the windshield out. Not the best but it was workable. Here's a couple things I found during my repair. I drilled tiny holes at the ends of the cracks to check the crack from spreading. Make sure you remove enough of the black dash material next to the crack. Mine was warped upward. I didn't cut it far enough back and when I started to feather out the filler I broke through immediately. Make sure you have a thick enough layer of bumper repair over the crack. I sanded it too thin and when I pulled the car out in the sun it cracked again. I would try and leave at least 1/32" thickness over the crack and feather it out 2" or more on either side. I'm still amazed at how good the dash looks and how easy it was to do. I keep looking at the dash and just can't believe how good it looks. Thanks again Bruce! Derek
-
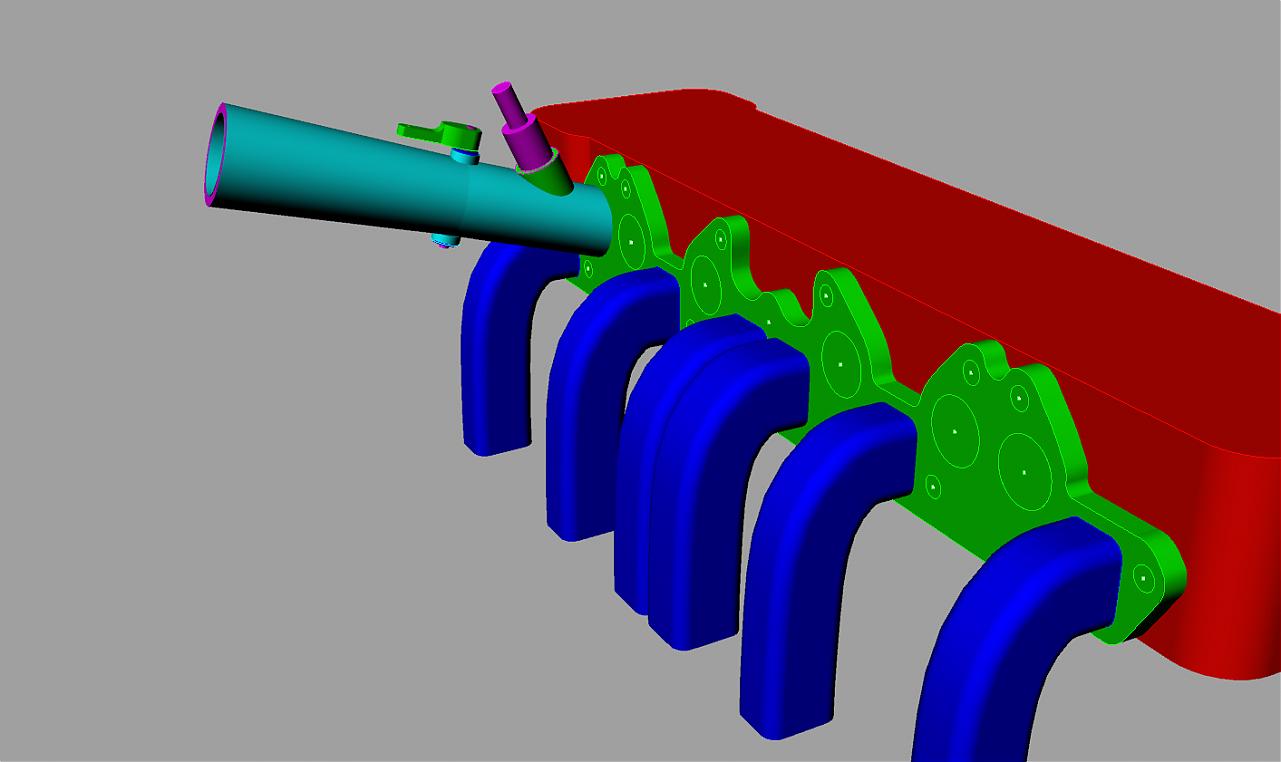
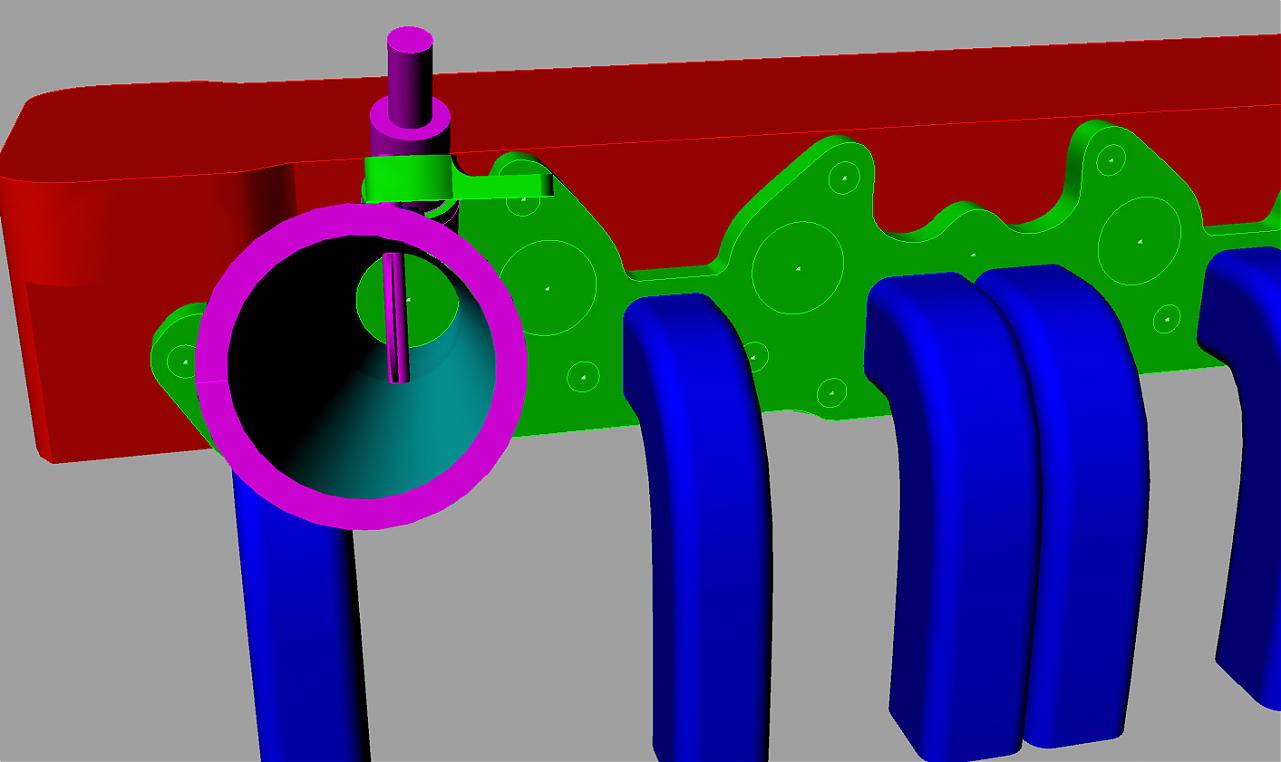
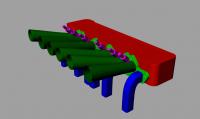
Ok Here's the latest design. Overall legnth is 10†which is the distance from the face of the SUs to the head. The downward angle is 16 degrees which lines up pretty well with the port entrance. The individual throttle bodies will be angled in the horizontal plane so that they're all the same length. The bore comes out straight for 3†and then tapers out 2.5 degrees for 7 inches. Some things I need to finalize. Injectors. I really don't like the look of fuel rails and they ad a level of complexity on the machining end. I'd love to locate a screw or clamp in style with a threaded top that would accept a banjo style fitting. I could hard line it to a central fuel block with more banjo fittings. I think this would have a very old school mechanical injection look and would satisfy my design criteria #2 “Look Really Cool “ Air filtration. I suppose I could put flanges on the ends of the throttle bodies and use an air box. I'm not too crazy about the looks of an air box and would love some sort of alternative. I could cast a step on the inside of each throttle body and use some sort of mesh-foam-mesh arrangement that would fit inside them. I really don't know how practical this would be. Cleaning air filters every other day might not be very fun. Linkage. At this stage I'm thinking separate levers and rods connected to a central bell crank and cable driven. I'm also working out the individual idle screw and return spring design. Here's a cool shot looking down the throat WFO Thanks for all the help. Derek

-
Hi This is my first post here. I have a 73 240 that I've owned for 26 years. It's been in storage for the last 10 and i recently decided to get i on the road again. I'm a CNC pattern maker for the sand casting industry and have my own shop. I decided that I needed to design and cast something cool for the car and thought I'd do something unique like a triple SU set up. Then after digging around a little I see that Z therapy is coming out with one. So much for being unique! After some more digging I came across the Megasquirt site. This seemed to be a lot slicker than three SUs and and being a bit of a geek I love the open source concept of it. So here's my design criteria: #1 Look Cool #2 Look Really Cool #3 Actually Run I'm opting for 6 individual throttle bodies in two banks of three. I'm running a stock L28 block with a E88 head. I plan on keeping the throttle bodies fairly long to improve my bottom end. The throttle shafts will be vertical as opposed to horizontal for ease of machining. Right now I have the the head and exhaust modeled in 3d and I'm starting to do some preliminary design on the throttle bodies. Here's a few questions. Is there any benefit to tapering the throttle body. I drew it up going from 2†tapering down to 1.5†because it met design criteria #1 and #2 Is there any reason I shouldn't mount the injector as close to the intake port as possible. I've attached a jpeg of where I'm at right now. Thanks in advance Derek
-
-
This is the first refurbish I did on my 73 240 in 1995