tstewart
Free Member
-
Joined
-
Last visited
Everything posted by tstewart
-
Just developed an issue with my '73. Drove it yesterday for the 1st time in about a month and when using the left turn signal, the indicator in the dash illuminated solid as if one of the turn signals were blown. Went out to check it out today and when I turned on the left turn signal, it began working but flashing slightly more rapidly than usual. I also noticed that the left side indicator lamps have begun flashing in alternation with the left turn signals (as the flashing signal goes out, the side marker illuminates and vice versa). This only happens on the left side. Additionally, the right turn signal actually blinks almost imperceptibly with the left. There are otherwise no issues with the right signal. I was taking the car for a test drive after replacing all the fuel hoses at the fuel tank. During that process, I had the fuel tank connectors loose. More importantly, the left brake light was blown, so while I was there, I replaced it. The brake lights work fine now but could there be a relationship?
-
One last cry for help before I pursue another option. Thanks everyone for your help so far. -Tony
-
Sorry for the delay, but I was travelling yesterday. From looking at the photo you took, those appear to be the lock nuts that attach strut mount insulator to the strut tower. The nut I need slides over the strut rod and mounts the strut cartridge into the strut tube. I greatly appreciate the offer. -Tony
-
I'll gladly pay the shipping if you have them and are willing to part with them. Let me know. Thanks.
-
No worries. I certainly appreciate the effort. I have two more sets of front and rear suspension. I'll probably disassemble those in the hopes that I'll find the right gland nuts. If not, I'll just take a different route on the struts. Thanks again for looking. Tony
-
The portion that tapers off near the end and fits in the gland nut measures about 1.63" (~41.4mm). Thanks again.
-
Thanks John. Anyone out there have a couple of these they'd part with for a few bucks plus shipping?
-
Just purchased a NOS set of Mulholland rear strut cartridges. Went with these because I was hoping to maintain stock ride height without cutting the coil springs. However, the gland nut used with the stock struts will not work with the Mulhollands as the gland nut is too thick. I am now of the opinion that the gland nut is specific to the cartridge and the NOS Mulhollands did not come with gland nuts. I know it's a long shot, but does anyone out there know where I might find the gland nut I need? The new cartridges are P/N 2351502. Thanks in advance.
-
If you don't have it already, the factory service manual for your car can be downloaded at http://www.xenons30.com/reference.html. This may help with your troubleshooting.
-
Absolutely true. I work at a large refinery in the southeast and trucks pull in all day long, fill up at the marketing terminal, add their additives. The additives then become the only distinction among the brands. -Tony
-
Just located the inline fuse for the blower motor... found the source of the burning smell. Fuse holder melted nearly in half at one end. Probably corroded at the contact. Will replace fuse holder and try again.
-
Just did the Honda blower motor swap in my 73. Trying to get the A/C up to par so it can be driven in the summer down here on the Gulf Coast. I purchased a new blower from O'reilly and did the installation. I hooked up my manifold gauges to the A/C system, started the car and turned on the A/C. The blower was in the HI position and moving LOTS of air compared to the old blower. After a few minutes, I checked the interior and it was cooling nicely. Closed the door and went back to the gauges. The clutch on the compressor disengaged which I thought was odd because it shouldn't have been cool enough in the car to shut it off. I opened the door to the car and the blower was not running. There was a strong burning smell in the car. I shut everything off and began exploring. Checked and double checked all fuses by swapping, then pulled out the multimeter to recheck fuses. No bad fuses. This car has about 90,000 miles on it, has ALWAYS been garaged and has not been tampered with. Absolutely everything on the car works like new. I'm aware of the fact that the electrical system is 35 years old, but most everything in this car is in exceptional shape and has been well cared for. Having said that, I'm afraid the current draw for the Honda blower may have been too much for the stock wiring. I know this is popular swap and I've never read about anyone having any issues with their wiring. Anyone out there experienced problems with the Honda blower and their old wiring? This weekend I intend to pull everything back out and try and locate the problem. I'll keep you posted.
-
As it happens, I have a newly manufactured crate motor sitting around that I was planning on using for another project. I've since decided to go with a turbo L28 on the other project, so I'll probably just drop the crate motor in this one. The numbers do match on this car, but I'm not too worried about it as it is a rust bucket that I drive back and forth to work sometimes. Way too far gone for me to consider restoring.
-
Anyone have any ideas where to locate this vent tube for an L24 on a '72 240? None of the part numbers I have show it as being available. I may be pulling the motor from one of my cars and putting in a remanufactured motor. The new motor doesn't have the vent tube. Are these pressed in or threaded? Can I simply remove the one from the motor that's in the car now?
-
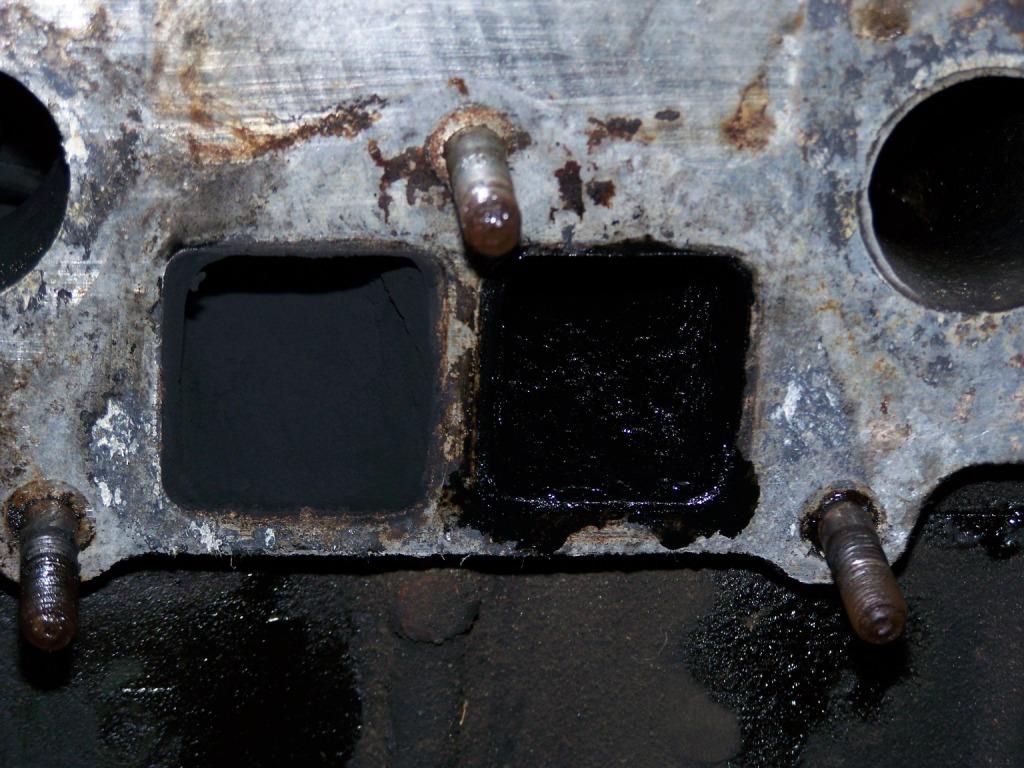
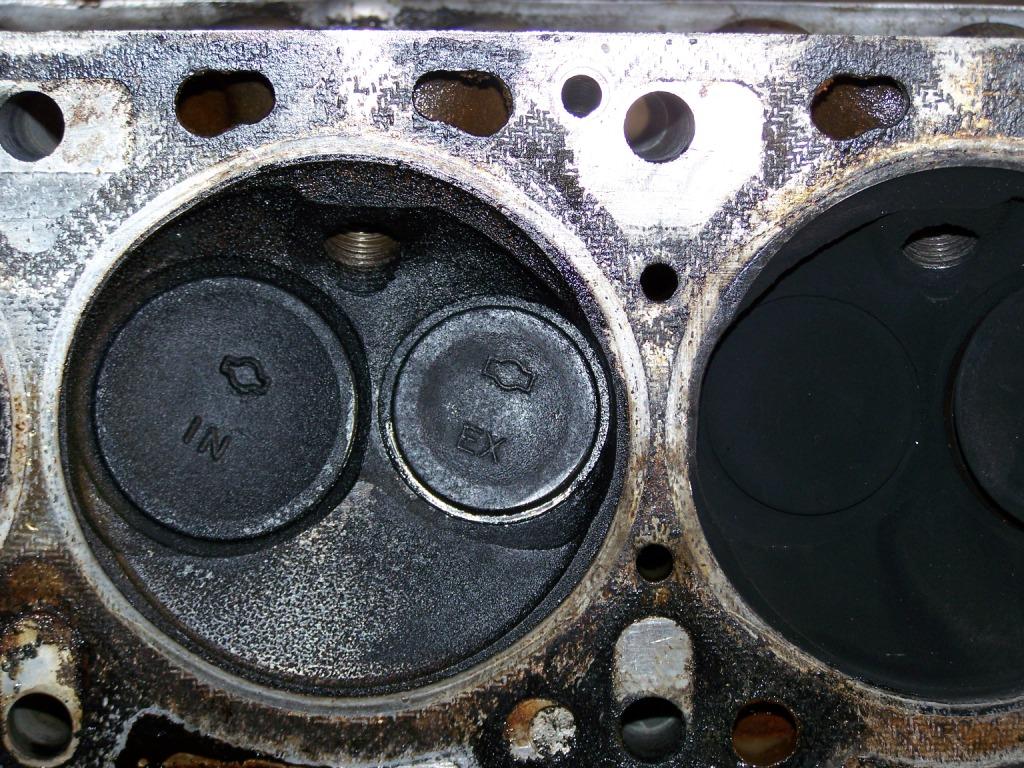
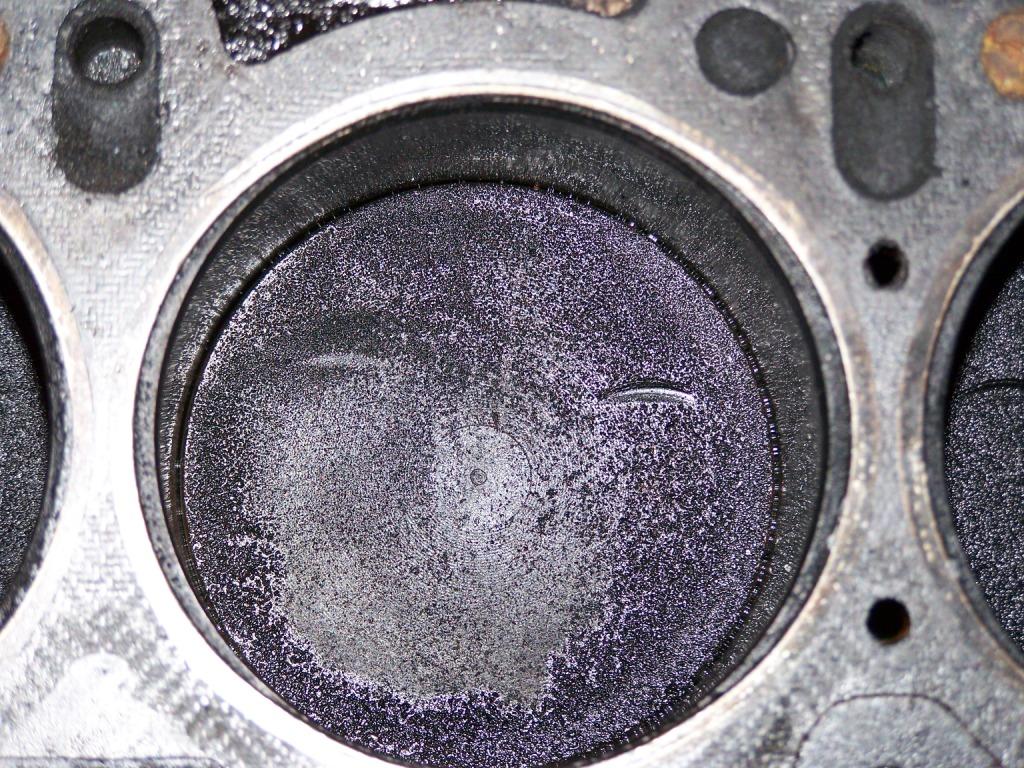
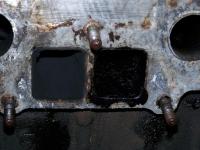
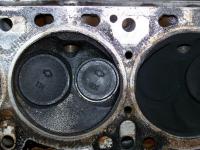
I have a 72 240 with the factory L24 that smokes pretty badly. I did a compression test several weeks ago and found compression to be good in all cylinders and almost no difference in compression between cylinders. I then purchased a leak-down tester and performed a leak-down test. The test revealed a problem with cylinder 4. The cylinder would not hold any pressure and leakage could be heard most distinctly when listening at tailpipe. I removed the head today. As you can see, when I pulled the exhaust manifold, I found the exhaust port for cylinder 4 to be pretty nasty. I also posted pics of the combustion chamber and cylinder/piston for cylinder 4. I don't see any evidence of a burned valve, so I was thinking bad valve guides or seals. Additionally, I've heard that clean edges around the piston are indicative of oil leaking around the rings but the crud is uniform here... which backed up my suspicions about valve guides or seals. But... Inspection of the cylinder bore reveals no obvious scoring. However, near the top of the bore, there is a small pit (for lack of a better word). It is somewhat irregular in shape and is approximately 1/4 tall by less than 1/2 inch wide. It looks like a rust spot caused by condensation in that area. It is very shallow, so much so that if I hadn't seen it, I probably would not have found it by touch alone. I pulled out my telescoping gauges and outside micrometer set today to check out the cylinder bore, but my mic set only goes to 3 inches. I'll probably pick up a larger mic or a dial bore gauge and check it out. Anyone have any opinions based on the pics? Anything else I should look at while I'm here?

-
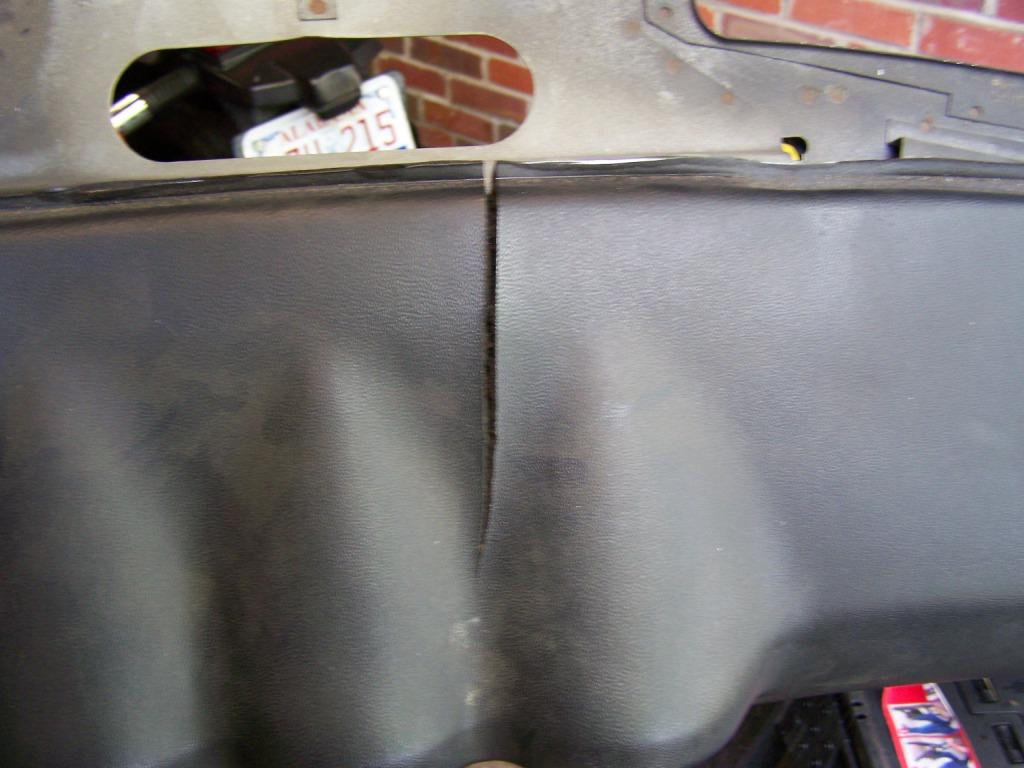
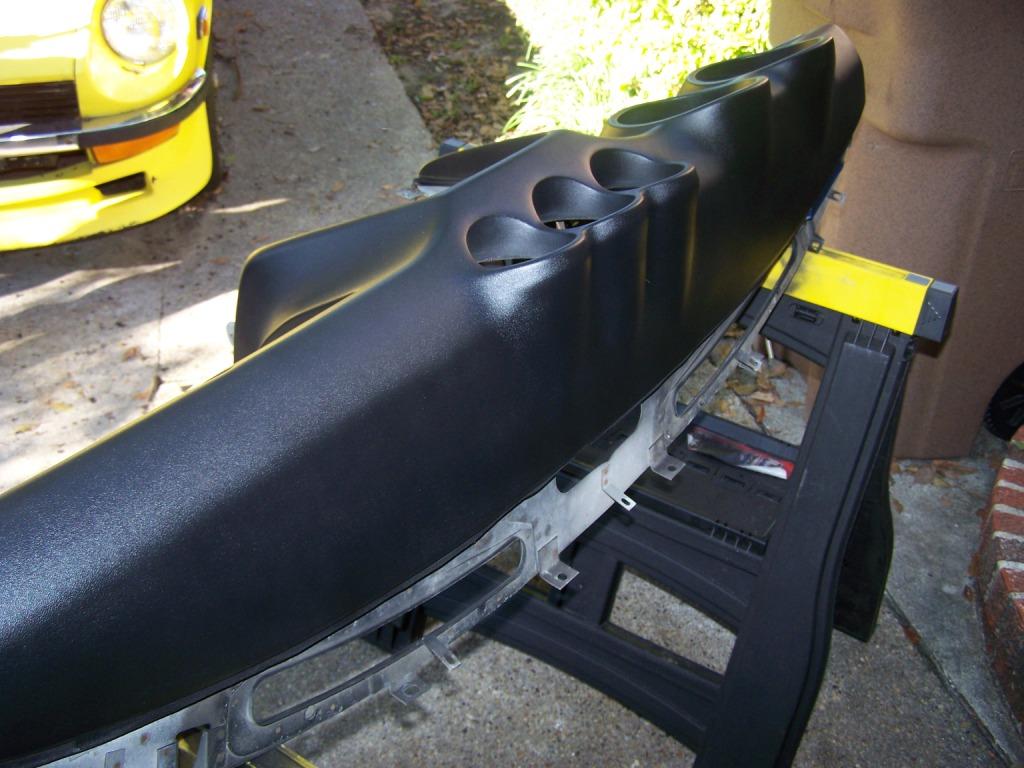
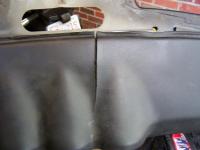
Just wanted to post my results repairing a spare dash I had around using the method described here. I am quite pleased with the results. Hopefully I'll get around to getting it in a car soon and see how it holds up in the Gulf Coast heat. -Tony

-
Thanks Dave... but I found the other bolt in a box of parts that I got with the car. Stephen, I ordered the CD, thanks for the info. One more request. Do you have a part number for the gasket/seal between the airbox cover and the lid? Mine is brittle.
-
Thanks... where did you locate the part numbers? I've been looking for a parts book, or a parts site that has diagrams like all of the better cycle parts sites do.
-
Anyone know if the air cleaner "wing bolts" that attach the air cleaner to the carbs are still available? I'm swapping out my individual air cleaners for the factory setup. The air box I have came with the car but one of the bolts is missing. Thanks.
-
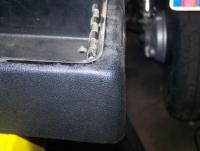
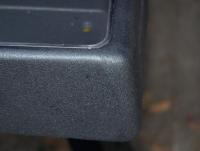
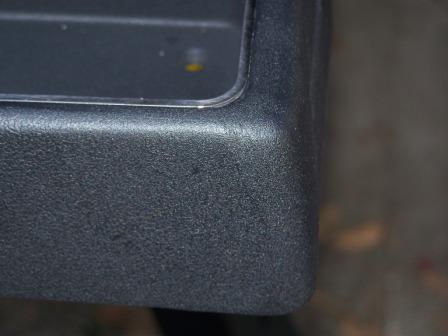
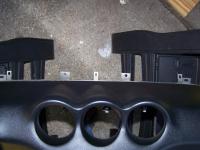
An alternative that I picked up from repairing plastics on motorcycles is to create your own filler using scrap pieces of plastic and MEK (methyl ethyl ketone, purchased at a hardware store). Take the scrap plastic and shave filings into a glass container. Add MEK to the filings and stir. Over time, the MEK will dissolve the plastic shavings making a plastic paste. Adjust plastic/solvent mixture to achieve desired consistency. The resultant paste is then used to fill cracks, etc. This solution acts like others mentioned in this thread in that it will slightly dissolve and bond to the material that is being repaired (similar to using pvc cement when working with pvc). This material can be formed and while it is soft, textured material can be used to imprint textures on the repair. If you use a scrap of the same material as the original as the source of the filings (an piece of old console to repair a better one), color matching is not an issue. I usually use a dremel or similar tool to open up cracks and provide ample surface area for the paste to attach. The resultant repair is extremely strong. In my experience repairing broken plastics on motorcycles, this was the most durable repair. I have included a before and after pic of a quick and dirty repair I made on a cracked console for a daily driver. I ground out the crack, covered it with masking tape and filled from the back side, careful to force the paste into the crack. After the repair hardened, I sanded the rough edges and applied SEM texture coating to achieve a similar finish. I then applied a black finish that bonds to plastic (ColorBond) to freshen up the entire piece as there was some fading. As you can see, the repair is not perfect. This is a daily driver and I was more concerned with a strong repair than a show quality finish. More time and effort can create any level of perfection you desire.